Chili-Garlic Stir Fry | Made by Meaghan Moineau

Chili-Garlic Stir Fry | Made by Meaghan Moineau

Title: Spice Up Your Dinner: A Heartwarming Chili-Garlic Stir Fry
Description: Dive into a world of vibrant flavors and cherished family memories with our Chili-Garlic Stir Fry recipe. This delightful main dish is a harmonious blend of colorful vegetables, succulent chicken, and a savory sauce with a kick of heat. Perfect for a cozy family dinner or a solo indulgence, this stir fry is both a feast for the senses and a touchstone to nostalgic family moments. With a difficulty rating of 4 out of 10, it’s an ideal choice for both novice and seasoned home chefs looking to bring something special to the table.

---


When I think of comfort food, my mind drifts back to my grandmother's kitchen, where the air was always filled with the tantalizing aroma of sizzling ingredients and the warm laughter of family. One dish that stands out in my memory is her Chili-Garlic Stir Fry, an unassuming yet flavorful creation that brought us all together, especially on those cozy Sunday afternoons.


The magic began with the rich scent of sesame oil heating in her well-loved wok, a cue for us kids to gather around the table in anticipation. The sizzle of skinless boneless chicken breast meeting the pan was music to our ears, a promise of the delicious meal to come. As the chicken cooked to perfection, my grandmother would share stories of her own childhood, weaving tales that seemed as vibrant as the vegetables she skillfully chopped: crisp bok choy, sweet snow peas, crunchy carrots, and the vibrant yellows and oranges of bell peppers.


While we waited, the kitchen would fill with a new aroma—the pungent, mouthwatering smell of garlic sautéing in sesame oil. It was then that she would whisk together the sauce, a delicate balance of low sodium chicken broth, cooking sherry, and just the right amount of Sriracha for that extra kick. Watching her stir the sauce into a thick, glossy coating was like watching an artist at work, each movement deliberate and filled with love.


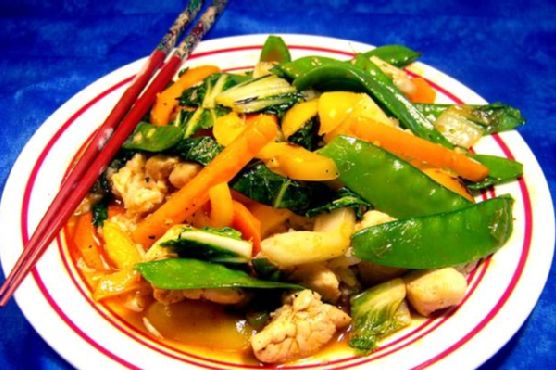
Finally, the moment we all waited for: the melding of flavors. The chicken and vegetables reunited in the wok, green onions adding their fresh, sharp note alongside the leafy tops of the bok choy. The sauce enveloped everything, transforming individual ingredients into a cohesive, delectable masterpiece.


Now, as I recreate this Chili-Garlic Stir Fry in my own kitchen, I am reminded not only of the deliciousness of the dish but of the joy and togetherness it represents. It's a testament to how food can transcend taste, becoming a bridge to memories and a celebration of family.


Ingredients:

- 3 teaspoons sesame oil, divided


- 1 pound skinless boneless chicken breast, sliced


- 1 bunch bok choy, stalks and leaves separated


- 1 cup snow peas


- 1 cup carrots, julienned


- 1 yellow bell pepper, sliced


- 1 orange bell pepper, sliced


- 3 green onions, chopped


- 1 cup low sodium chicken broth


- 2 tablespoons cooking sherry


- 2 teaspoons cornstarch


- 1 tablespoon Sriracha


- 3 cloves garlic, minced


Instructions:

1. In a wok or large skillet, heat 1 teaspoon of sesame oil over medium-high heat. Add the chicken and sauté until cooked through. Set aside and cover to keep warm.


2. Using the same pan, heat another teaspoon of sesame oil over medium-high heat. Add the bok choy stalks, carrots, and snow peas. Sauté until just tender, about 3-4 minutes. Set aside and cover.


3. In a medium bowl, whisk together the chicken broth, cooking sherry, cornstarch, and Sriracha until smooth.


4. Heat the final teaspoon of sesame oil in the pan over medium-high heat. Add the garlic and sauté until fragrant, about 30 seconds to 1 minute.


5. Pour the sauce mixture into the pan, bringing it to a boil. Stir continuously until it thickens, about 2 minutes.


6. Return the chicken and vegetables to the pan, adding in the bok choy leaves and green onions. Stir everything together until well-coated and heated through, about 2-3 minutes.


7. Serve hot, garnished with additional green onions if desired.


This Chili-Garlic Stir Fry is more than just a meal; it's a slice of family heritage, a dish that invites you to create your own memories around the dinner table. Whether serving it as a quick weeknight dinner or as part of a larger family gathering, this dish is sure to become a beloved tradition in your home, too.

Read more about Appetizers

Read more about Main Dishes

Read more about Desserts

Philly Cheesesteak Grilled Wraps | Made by Meaghan Moineau

Philly Cheesesteak Grilled Wraps | Made by Meaghan Moineau

Title: Savoring Memories: Philly Cheesesteak Grilled Wraps for the Perfect Family Gathering


Description:

Dive into the heartwarming world of Philly Cheesesteak Grilled Wraps, where nostalgia meets culinary delight. This easy-to-follow recipe will guide you through creating a mouthwatering masterpiece that's sure to become a family favorite. Rated as a 5 out of 10 in difficulty, this main dish is perfect for any gathering where you want to impress your loved ones with a delicious twist on a classic.

---


Philly Cheesesteak Grilled Wraps Recipe


Ingredients:

- Steaks

- Vegetable oil


- Onions


- Better than Bouillon Beef Base


- Portobello mushrooms


- Bell peppers


- Mayonnaise


- Hot sauce


- Tortillas


Instructions:

1. Caramelize the Onions: In a frying pan over medium-low heat, add onions and cook on low until caramelized. This process, when done properly, takes about 30 minutes, allowing the natural sugars to develop a rich, deep flavor.
2. Create the Gravy: Add the Better than Bouillon Beef Base and a tablespoon of water to the onions to make a faint gravy. This will enhance the savory profile of your wrap.
3. Cook the Veggies: Stir in the portobello mushrooms and bell peppers, cooking until softened, about 5 minutes. These add a delightful, earthy texture to the dish.
4. Prepare the Tortillas: Spread a thin layer of mayonnaise on each tortilla and top with a few squirts of hot sauce. This subtle kick ties all the flavors together.
5. Assemble the Wraps: Pile on the steak and vegetable mixture, then roll up the tortilla, ensuring the ends are sealed to prevent any deliciousness from escaping.
6. Grill to Perfection: On a griddle or in a large frying pan sprayed with cooking spray, place the wraps seam side down. Use a smaller frying pan weighted with something heatproof to press down, grilling until toasted. Flip and repeat for an even, golden finish. Alternatively, use an electric grill like a George Foreman or a panini press for convenience.
7. Serve and Enjoy: Once finished, let the wraps rest for a minute before slicing in half. Enjoy the happy faces around you as everyone digs into this comforting dish.

---


A Nostalgic Family Memory:


Growing up, Sunday afternoons were always a cherished time in our household. It was a day reserved for family, laughter, and, most importantly, food. My father would often take charge of the kitchen, a place where he transformed simple ingredients into unforgettable meals. One of his signature dishes was the Philly Cheesesteak Grilled Wraps.


I remember the aroma of caramelizing onions filling the house, a scent that would draw everyone to the kitchen. My siblings and I would gather around the counter, eagerly watching as my father expertly layered the juicy steak and colorful vegetables onto the tortillas. The sizzle of the wraps hitting the hot griddle was music to our ears.


As we sat around the dining table, biting into the crispy, flavorful wraps, stories were shared, and laughter echoed through the room. Those moments, marked by the taste of savory steak and the warmth of family, are a cherished memory that I carry with me.


---


Recipe Difficulty: 5/10


Classification: Main Dish


---


Whether you're creating new family traditions or simply enjoying a cozy meal at home, these Philly Cheesesteak Grilled Wraps offer a taste of nostalgia and a promise of happy faces around the table. Gather your loved ones and enjoy crafting—and savoring—this delicious dish together.

Read more about Appetizers

Read more about Main Dishes

Read more about Desserts

Classic Mint Julep | Made by Meaghan Moineau

Classic Mint Julep | Made by Meaghan Moineau

Title: Sipping on Nostalgia: The Timeless Charm of a Classic Mint Julep
Description: Dive into the refreshing world of the Classic Mint Julep, a cocktail that perfectly marries the boldness of bourbon with the invigorating essence of fresh mint. This blog post not only walks you through crafting this iconic drink but also weaves in a heartwarming tale from a family summer tradition. Perfect for a relaxing afternoon on the porch, this recipe is rated at a difficulty level of 3/10 and is classified under “Appetizer” as a delightful prelude to any gathering.

The Timeless Charm of a Classic Mint Julep

There’s something undeniably enchanting about sipping on a Mint Julep. The clinking of ice against the julep cup, the aromatic burst of fresh mint, and the smooth warmth of bourbon create an experience that’s more than just a drink—it’s a moment. Today, I want to take you on a journey through my cherished family memories and guide you in crafting this timeless cocktail.

Ingredients:

– Fresh mint

– Simple syrup

– Ice

– Bourbon

Instructions:

1. Minty Fresh Start: Begin by adding fresh mint leaves and simple syrup to a tall glass. With the handle of a spoon, gently crush and mash the mint leaves to release their essential oils and aromas, creating the foundation of this classic cocktail.
2. Creating the Chill: Fill the glass with crushed ice, then pour in the bourbon. Using a teaspoon, jiggle the contents to ensure a thorough mix while chilling the concoction.
3. The Grand Finish: Strain the mixture into a julep cup brimming with crushed ice. Garnish with a sprig of fresh mint for that perfect aromatic touch.

A Nostalgic Family Memory

Growing up, summers were synonymous with family gatherings on my grandparents’ porch. As kids, we were always fascinated by the ritualistic preparation of the Mint Julep, a tradition my grandfather upheld with pride. The adults would gather around, their laughter mingling with the evening breeze, as my grandfather meticulously mashed mint leaves with his cherished wooden spoon—an heirloom passed down through generations.

The clinking of ice and the rich aroma of bourbon signaled the start of stories and conversations that would weave our family closer. My grandmother would tell tales of our ancestors, each story as refreshing and invigorating as the drinks in their hands. The Mint Julep wasn’t just a cocktail; it was a vessel of connection, a way to keep our family history alive with each sip.

Difficulty Level: 3/10

Creating a Classic Mint Julep is simple yet satisfying, making it a perfect choice for both novice and seasoned cocktail enthusiasts. With a few ingredients and steps, you can craft a drink that resonates with tradition and taste.

Classification: Appetizer

This drink sets the stage for any social gathering, offering a refreshing start to an evening of camaraderie and delight.

Indulge in the nostalgia and serenity of a Classic Mint Julep, where every sip is a tribute to the past and a toast to the memories yet to be made. Whether you’re entertaining guests or enjoying a quiet moment alone, this cocktail is an invitation to savor the simple joys of life.

Read more about Appetizers

Read more about Main Dishes

Read more about Desserts

Also try: Banana Smoothie Boost

Roasted Beet and Radicchio Salad | Made by Meaghan Moineau

Roasted Beet and Radicchio Salad | Made by Meaghan Moineau

Title: A Taste of Tradition: Roasted Beet and Radicchio Salad with a Twist of Nostalgia
Description: Discover the vibrant flavors and colors of a Roasted Beet and Radicchio Salad that not only delights your taste buds but also stirs fond memories of family gatherings. This easy-to-follow recipe promises a symphony of textures and tastes, perfect for any occasion. Dive into the blend of earthy beets, crisp radicchio, and creamy queso fresco, all tied together with a zesty vinaigrette. Ideal as an appetizer, this dish is rated 5 out of 10 in difficulty and is sure to impress.

---


As the holiday season rolls in, I find myself reminiscing about the lively family dinners at my grandmother's house. Her culinary magic always brought us together, even if it meant squeezing around a table too small for our growing family. One dish that was always a staple on the table was her Roasted Beet and Radicchio Salad. The vibrant colors mirrored the festive atmosphere and the robust flavors matched the lively conversations echoing around the room.


Ingredients:

- Beets


- Olive oil


- Radicchio


- Red onion


- Radishes


- Fresh mint leaves


- Queso fresco


- Red wine vinegar


- Honey


- Garlic clove


- Salt


- Pepper


Instructions:
1. Preheat and Prep: Preheat your oven to 400°F. Trim the beets and place them in a baking dish. Drizzle 1 tablespoon of olive oil over the beets, cover the dish, and roast for 30-35 minutes, or until they are fork-tender.
2. Radicchio Bath: While the beets are roasting, cut the head of radicchio into quarters and remove the core. Slice the radicchio into thin strips and soak them in a bowl of ice water for 20-30 minutes. This trick, handed down from my grandmother, helps reduce its natural bitterness.
3. Slice and Dice: Thinly slice the red onion and radishes. The precision of these cuts is key to balancing the flavors and textures in the salad.
4. Whisk the Dressing: In a small bowl, whisk together 3 tablespoons of olive oil, red wine vinegar, honey, a minced garlic clove, salt, and pepper. This vinaigrette is the heart of the dish, tying all the ingredients together.
5. Assemble the Salad: Once the beets have cooled slightly, peel off their skins and slice them into wedges. Toss the radicchio, beets, onions, radishes, and mint leaves with the vinaigrette in a large bowl.
6. Finishing Touches: Top the salad with crumbled queso fresco. This creamy cheese adds a delightful contrast to the earthy beets and bitter radicchio.
7. Serve and Enjoy: Serve the salad as a vibrant appetizer for four. It's a dish that promises to spark conversation and create memories, just as it did in my grandmother's dining room.

Every time I recreate this salad, I'm transported back to those cherished moments, surrounded by family and laughter. It’s more than just a dish; it’s a bridge to the past, a reminder of the love and warmth that defined our family gatherings. Whether you’re carrying on a tradition or starting a new one, this Roasted Beet and Radicchio Salad is sure to be a hit at your table.

Read more about Appetizers

Read more about Main Dishes

Read more about Desserts

Strip steak with roasted cherry tomatoes and vegetable mash | Made by Meaghan Moineau

Strip steak with roasted cherry tomatoes and vegetable mash | Made by Meaghan Moineau

Savoring Tradition: Strip Steak with Roasted Cherry Tomatoes and Vegetable Mash


A Culinary Journey Back to Family Gatherings


In the world of culinary delights, there are dishes that not only tantalize the taste buds but also evoke cherished memories. Our recipe for Strip Steak with Roasted Cherry Tomatoes and Vegetable Mash is one such creation—a melding of flavors that brings back the nostalgia of family gatherings around a warmly lit dining table.


A Taste of Home


Growing up, Sunday dinners were a cherished tradition in my family. My grandmother, a brilliant cook, would spend the entire afternoon in the kitchen, creating magic with her recipes. One of her signature dishes was a perfectly seared strip steak, served with a medley of roasted cherry tomatoes and her famous vegetable mash. The aroma of rosemary, garlic, and balsamic vinegar would fill the house, signaling that it was time to gather around the table.


As a child, I would watch her work, fascinated by the precision with which she handled each ingredient. The sizzle of the steak hitting the hot pan, the vibrant colors of the cherry tomatoes, and the creamy texture of the mash are memories etched in my mind. This recipe is a tribute to those Sundays—simple, flavorful, and filled with love.


Ingredients


- 2 beef strip steaks


- 1 cup cherry tomatoes


- 2 tablespoons balsamic vinegar


- 2 tablespoons fresh chives, chopped


- 200g fresh green beans


- 200g fresh peas


- 1 tablespoon fresh rosemary, chopped


- 2 cloves garlic, minced


- 3 tablespoons olive oil


- Salt and pepper to taste


- 100g ricotta cheese


- 2 tablespoons unsalted butter


Instructions


1. Marinade: In a bowl, mix balsamic vinegar, fresh chives, minced garlic, olive oil, and a dash of salt and pepper. Add the fresh rosemary and mix well. Pour the marinade over the strip steaks, ensuring they are well coated. Allow the steaks to marinate for at least an hour, preferably overnight, to absorb the flavors.
2. Roasted Cherry Tomatoes: Heat a grill pan and add cherry tomatoes. Drizzle with a little olive oil and season to taste. Cook until the tomatoes are slightly blistered and caramelized. Set aside.
3. Cook the Steaks: Remove the steaks from the marinade. Heat olive oil in a pan over high heat. Cook the steaks for 2 minutes on each side. Reduce the heat, add unsalted butter, and cook for an additional 2-4 minutes, turning once, depending on your preferred doneness. Transfer the steaks to a plate, and set aside in a warm place to rest.
4. Vegetable Mash: Boil the green beans and peas for 8-10 minutes until tender. Drain and cool under cold water. Transfer to a food processor with ricotta cheese and a tablespoon of olive oil. Season with salt and pepper, and blend into a rough puree. Reheat the mash in the pan where the steaks were cooked, gently heating for 1 minute.
5. Serve: Divide the vegetable mash among warmed plates. Arrange the steaks on top and finish with a pile of roasted tomatoes. Drizzle with olive oil and serve with steamed new potatoes for a complete meal.

Difficulty Rating


This dish is rated at a 6 out of 10 for difficulty due to the marinade preparation and timing required for cooking the steak to perfection. It is classified as a Main Dish, ideal for a special occasion or a comforting family meal.


Conclusion


Our Strip Steak with Roasted Cherry Tomatoes and Vegetable Mash is more than just a meal—it's an experience that brings the warmth of family traditions to your table. Whether you're looking to recreate a piece of nostalgia or simply enjoy a delicious dinner, this recipe is sure to delight and inspire. So gather your loved ones and savor the flavors of home.

Read more about Appetizers

Read more about Main Dishes

Read more about Desserts

Cottage pie with Quorn mince | Made by Meaghan Moineau

Cottage pie with Quorn mince | Made by Meaghan Moineau

Title: Cozy Comfort: Crafting the Perfect Cottage Pie with Quorn Mince
Description: Dive into the heart of culinary nostalgia with our Cottage Pie with Quorn Mince. This vegetarian twist on a beloved classic is not just a feast for the taste buds but a journey down memory lane. Discover the warmth of family gatherings and the simple joy of home-cooked meals with this flavorful main dish, rated 5/10 in difficulty—perfect for both novice and seasoned cooks.

---


Cottage Pie with Quorn Mince: A Slice of Home


There’s something inherently comforting about a well-made cottage pie. The way the mashed potatoes sit like a fluffy cloud atop a savory filling, golden and crisp from the oven, brings back cherished memories of family dinners and laughter-filled evenings. This particular recipe, with its delightful twist using Quorn mince, is a testament to how food can evolve while preserving its heartwarming essence.


Ingredients:


- 4 large potatoes, peeled and diced


- 2 tablespoons butter


- 1/4 cup milk (plus extra if needed)


- 1 teaspoon dried parsley


- 300g Quorn mince


- 1 large onion, finely chopped


- 1 bay leaf


- 2 medium carrots, diced


- 2 garlic cloves, minced


- 2 green chillies, finely chopped


- 1 teaspoon cumin powder


- 1 tablespoon fresh rosemary, chopped


- 1 can (400g) tomatoes, chopped


- 200 ml boiling water


- 1 vegetable stock cube


- 1 egg, beaten


- Salt and pepper, to taste


- 1 tablespoon oil


Instructions:


1. Prepare the Stock: Dissolve the vegetable stock cube in 200 ml of boiling water and set aside.
2. Cook the Potatoes: In a saucepan, bring water to a boil. Add the diced potatoes and cook until tender, about 15 to 20 minutes. Drain and return them to the saucepan. Mash until smooth, then blend in butter, dried parsley, and milk. Add more milk if needed to achieve a creamy consistency. Season with salt and pepper.
3. Preheat the Oven: Set your oven to 200°C (392°F).
4. Prepare the Filling: In a large frying pan, heat oil over medium heat. Sauté the onion, carrots, garlic, green chillies, and bay leaf for 4-5 minutes. Add the Quorn mince and cumin powder, cooking for an additional 5 minutes. Mix in the canned tomatoes, rosemary, and prepared stock. Bring the mixture to a boil, then remove from heat. Discard the bay leaf.
5. Assemble the Pie: Transfer the Quorn mince mixture to an ovenproof dish, spreading it in a single layer. Top with the mashed potatoes, using a fork to fluff the surface. Brush lightly with the beaten egg to encourage browning in the oven.
6. Bake: Place the dish in the preheated oven and cook for 20-25 minutes until the top is golden and crisp. For an extra indulgence, sprinkle grated cheese over the potatoes before baking, omitting the egg if you choose this option.

A Taste of Nostalgia


Cottage pie holds a special place in my heart. Growing up, Sunday afternoons meant gathering around the dinner table with my family, the aroma of a freshly baked pie filling the air. My grandmother, the family’s culinary matriarch, would always let me help with the mashing of the potatoes—a task I took on with great seriousness. As the pie baked, she would tell stories of her own childhood, when her mother would make a similar dish, using whatever ingredients were on hand.


Adapting this family tradition to include Quorn mince has not only made it more inclusive for the vegetarian members of my family but has also added a new layer of flavor that has become a beloved staple. Every bite is a reminder of those cozy afternoons, the warmth of the kitchen, and the love that only a home-cooked meal can convey.


With a difficulty rating of 5/10, this dish is accessible for cooks of all skill levels, ensuring that anyone can bring a piece of this cherished tradition to their own table. Whether it's a simple weeknight dinner or the centerpiece of a family gathering, Cottage Pie with Quorn Mince is sure to delight and comfort, one delicious bite at a time.

Read more about Appetizers

Read more about Main Dishes

Read more about Desserts

Turkey Burgers | Made by Meaghan Moineau

Turkey Burgers | Made by Meaghan Moineau

Title: Savoring Simplicity: The Perfect Turkey Burgers for Family Gatherings
Description: Discover the delightful flavors of homemade turkey burgers, a comforting dish that brings families together. This easy-to-follow recipe combines healthy ingredients and a touch of nostalgia, making it a must-try for any occasion.

---


When I think back to family gatherings during those long summer evenings, one dish stands out as a perennial favorite: turkey burgers. These delightful patties, bursting with flavor and wholesome goodness, were a staple at our backyard barbecues. I vividly remember the aroma wafting through the air, mingling with the laughter and warmth of cherished family moments.


The recipe I'm sharing today is not just about making a delicious meal; it's about creating memories. These turkey burgers are crafted with a blend of lean extra ground turkey, shredded carrots, zucchini, and spinach, bringing a healthy twist to a classic favorite. The addition of garlic, green onions, and smoked paprika infuses each bite with a savory depth that is simply irresistible.


Ingredients:

- 1 lb lean extra ground turkey


- 1/2 cup shredded carrots


- 1 zucchini, grated


- 1 cup spinach, chopped


- 1 egg


- 2 cloves garlic, minced


- 2 green onions, finely chopped


- 1/4 cup panko


- 2 tbsp tomato paste


- 1 tsp smoked paprika


- Salt and pepper to taste


- 1 red bell pepper, seeded and sliced for roasted rings


Instructions:

1. Begin by mixing all the ingredients, except the red bell pepper, in a large bowl. Remember, the key is not to overwork the mixture—just enough to ensure it's well combined.


2. Shape the mixture into 4-6 round patties, depending on your preferred size.


3. Preheat your grill or stovetop to medium-high heat. Cook the patties thoroughly, ensuring they reach an internal temperature of 165°F. This ensures the burgers are perfectly cooked while retaining their juicy goodness.


4. For the roasted red pepper rings, lightly spritz the slices with olive oil and bake them in an oven preheated to 425°F for about 20 minutes. This simple addition adds a delightful sweetness and a hint of charred flavor to your burgers.


As we gathered around the table, the turkey burgers were always the star of the show. I remember my grandmother's kitchen, where she would let me shape the patties, my small hands mimicking her practiced movements. The joy of contributing to our family meal was a memory I cherish deeply. These turkey burgers not only offer a taste of nostalgia but also serve as a reminder that the simplest of dishes can create the most profound connections.


Difficulty: 3/10
Classification: Main Dish

This turkey burger recipe is perfect for those seeking a nutritious yet satisfying meal. Its simplicity ensures that even novice cooks can prepare it with ease, while the robust flavors promise to impress family and friends alike. So fire up the grill, gather your loved ones, and create your own cherished memories with these delicious turkey burgers.

Read more about Appetizers

Read more about Main Dishes

Read more about Desserts

Konami Hopes To Revive ‘Metal Gear’ Game Franchise – Bloomberg.com | Analysis by Brian Moineau

Konami Hopes To Revive ‘Metal Gear’ Game Franchise - Bloomberg.com | Analysis by Brian Moineau

Blog Post: "The Return of Metal Gear: A Nostalgic Revival or the Dawn of a New Era?"

In the ever-evolving landscape of video games, few franchises hold as much nostalgic and innovative clout as Metal Gear. For decades, this series has been a touchstone for stealth gaming aficionados and storytelling enthusiasts alike. Recently, Konami decided to dust off one of its most cherished titles, releasing *Metal Gear Solid Delta: Snake Eater*, a remake of the 2004 classic. As it hits the shelves (both physical and digital), the gaming community is abuzz with excitement and curiosity. But what does this revival mean for the franchise and the industry as a whole?

A Trip Down Memory Lane


For those unfamiliar, the original *Metal Gear Solid 3: Snake Eater* was a groundbreaking title that took players into the heart of the Cold War, weaving a tale of espionage, loyalty, and survival. It was a game that not only pushed the boundaries of graphics and gameplay mechanics at the time but also offered a richly detailed narrative that was rare in the early 2000s. The remake, now dubbed *Metal Gear Solid Delta: Snake Eater*, promises to retain the essence of its predecessor while offering enhanced graphics and refined mechanics to meet modern gaming standards.

The Industry's Love Affair with Remakes


In recent years, the gaming industry has seen a surge in remakes and remasters. From *Final Fantasy VII Remake* to *Resident Evil 2*, developers are tapping into the nostalgic hearts of gamers while introducing classic titles to a new generation. This trend mirrors a broader cultural phenomenon where the past is being repackaged and sold in a shiny new bottle. Whether it's fashion trends inspired by the '90s or the resurgence of vinyl records, nostalgia is a powerful force.

But the question remains: Is this reliance on the past stifling creativity, or does it serve as a bridge to future innovations? In the case of *Metal Gear Solid Delta: Snake Eater*, early reviews suggest that the game not only honors its roots but also elevates the experience, potentially setting a precedent for how remakes can be approached.

The Konami Factor


Konami, the Japanese entertainment juggernaut, has had a tumultuous relationship with its fan base over the years. Once a dominant force in the gaming world, the company's focus shifted, much to the chagrin of die-hard fans. However, this latest release might signal a change in strategy. By revisiting one of its most beloved franchises, is Konami seeking redemption in the eyes of gamers? Or is this merely a tactical move to capitalize on a beloved brand? Only time will tell, but the positive reception of the remake could be a beacon of hope for fans longing for a return to form.

A Broader Cultural Resonance


Beyond the realm of gaming, the revival of *Metal Gear* resonates with broader cultural trends. In a world marked by rapid technological advancements and uncertainty, nostalgia offers comfort. It allows individuals to revisit a time when things seemed simpler, even if only through the lens of a video game. Moreover, as society grapples with issues of privacy, surveillance, and geopolitical tensions, the themes explored in *Metal Gear* remain as relevant today as they were nearly two decades ago.

Final Thoughts


The release of *Metal Gear Solid Delta: Snake Eater* is more than just a gaming event; it’s a cultural moment. It’s a reminder of the enduring power of storytelling and the ability of video games to captivate and inspire. Whether you're a seasoned veteran of the series or a newcomer curious to explore its depths, this remake offers something for everyone. As Konami charts its path forward, one can only hope that this revival is a harbinger of more exciting adventures to come.

In the end, the return of *Metal Gear* isn't just about revisiting the past—it's about reimagining it for the future. And in that, there is a kind of magic that transcends pixels and polygons.

Read more about AI in Business

Read more about Latest Sports Trends

Read more about Technology Innovations

Cilantro Lime Fish Tacos | Made by Meaghan Moineau

Cilantro Lime Fish Tacos | Made by Meaghan Moineau

A Family Feast: Cilantro Lime Fish Tacos That Bring Us Together


Discover the Zesty Delight of Cilantro Lime Fish Tacos


In the heart of our family gatherings, there's one dish that embodies both the zest of life and the warmth of togetherness — Cilantro Lime Fish Tacos. This dish is more than just a meal; it's a nostalgic journey to sunlit kitchens and laughter-filled tables, where the aroma of fresh cilantro and tangy lime dances in the air.


Difficulty: 3/10
Classification: Main Dish

The Ingredients of Joy


- 2 tablespoons olive oil


- 4 fresh tilapia fillets


- 1/4 cup flavor-concentrated seafood broth


- Juice of 2 limes


- 1/2 cup fresh cilantro leaves, chopped


- 8 fresh corn tortillas


- 1 cup shredded lettuce


- 1/2 cup red diced onions


- 1 cup chunky salsa


- 1/2 cup sour cream


Cooking Instructions


1. Heat and Sizzle: Begin by heating the olive oil in a 12-inch skillet over medium-high heat. The sizzle of oil is a prelude to the enticing flavors that are about to unfold.
2. Cook the Fish: Gently lay the fresh tilapia fillets into the skillet. Cook them for about 8 minutes, turning each fillet once halfway through, until they flake easily with a fork. The fish should be tender and infused with the aromatic oil.
3. Infuse with Flavor: Add the concentrated seafood broth, lime juice, and chopped cilantro to the skillet. Break the fish into large, succulent pieces with a spoon, ensuring they are well-coated with the zesty broth mixture.
4. Assemble the Tacos: Divide the flavorful fish mixture evenly among the corn tortillas. Top each taco with shredded lettuce, diced red onions, a dollop of sour cream, and a generous spoonful of chunky salsa.
5. Fold and Savor: Carefully fold the tortillas around the vibrant filling, creating a handheld feast ready to be devoured.

A Nostalgic Tale: The Heart of Our Family


As a child, I remember the weekends when our family kitchen transformed into a vibrant hub of activity. My grandmother, the matriarch of our culinary adventures, would orchestrate these gatherings with a sparkle in her eye and a spring in her step. Her Cilantro Lime Fish Tacos were the star of these occasions, a recipe passed down through generations, each iteration carrying a piece of our family’s heart.


We would gather around the kitchen island, each of us assigned a task — chopping cilantro, squeezing limes, or gently stirring the fish in the skillet. It was a symphony of flavors and laughter, where stories of the past mingled with dreams of the future. As we savored each bite of the tangy, fresh tacos, the world outside seemed to pause, leaving just us and the flavors that bound us together.


These tacos aren't just food; they are a canvas of memories, painted with the vibrant hues of family love and culinary tradition. Every bite takes me back to those cherished moments, reminding me of the joy that comes from sharing a meal with those you love.


Conclusion


Cilantro Lime Fish Tacos are more than just a main dish; they are an experience, a journey, a celebration of flavors that brings families closer. With a sprinkle of nostalgia and a zest of lime, they transform any meal into a cherished memory. Gather your loved ones, recreate this simple yet flavorful recipe, and let the magic of these tacos fill your hearts and homes.

Read more about Appetizers

Read more about Main Dishes

Read more about Desserts

Falafels With Tahini Sauce | Made by Meaghan Moineau

Falafels With Tahini Sauce | Made by Meaghan Moineau

Title: “Crispy Falafels with Creamy Tahini Sauce: A Journey Back to Family Gatherings”
Description: Dive into the heartwarming world of homemade falafels, a cherished Middle Eastern delight, paired with a lusciously smooth tahini sauce. This recipe, brimming with vibrant flavors and texture, will transport you to a lively family gathering where each bite is a nostalgic reminder of shared laughter and stories. Easy to make and delightful to taste, this appetizer is a perfect way to bring loved ones together around the table.

Falafels with Tahini Sauce: A Taste of Home and Nostalgia

Introduction

The aroma of falafels sizzling in the kitchen always takes me back to my grandmother’s house. Her tiny kitchen, filled with the chatter of family members, was the center of our universe. Every family gathering was incomplete without her signature falafels, crispy on the outside and soft on the inside, paired with a creamy, tangy tahini sauce.

Ingredients

For the Falafels:

– 1 cup garbanzo beans, soaked overnight and drained

– 1 medium onion, finely chopped

– 2 cloves garlic, minced

– 1/4 cup fresh cilantro, chopped

– 1/4 cup fresh parsley, chopped

– 1 teaspoon ground cumin

– 1 teaspoon sea salt

– 1/2 teaspoon red dried pepper flakes

– 1 teaspoon baking powder

– Flour, as needed

For the Tahini Sauce:

– 1/2 cup tahini paste

– 1/4 cup water

– Juice of 2 lemons

– 1 clove garlic, minced

– 1/2 teaspoon sea salt

Instructions

Falafels:

1. Begin by soaking the garbanzo beans overnight. Drain and set aside.

2. In a food processor, combine the garbanzo beans, onion, garlic, cilantro, parsley, cumin, sea salt, and red pepper flakes. Process until the mixture is crumbly.

3. Transfer the mixture to a large bowl. Gradually add the flour, one tablespoon at a time, mixing well until the mixture can easily be formed into balls or patties.

4. Shape the mixture into balls or patties. Place them in the refrigerator to chill while preparing the tahini sauce.

Tahini Sauce:

1. In the food processor, combine the tahini paste, water, lemon juice, garlic, and sea salt.

2. Process until smooth. Adjust the consistency by adding more water if the sauce is too thick, or more lemon juice for extra tang.

A Nostalgic Family Memory

One summer evening, as the sun dipped below the horizon, casting a golden glow over our backyard, my grandmother and I were in the kitchen, preparing her famous falafels. Despite the heat of the day, the kitchen was cool, and the scent of fresh herbs filled the air. As we formed the falafel mixture into balls, she shared stories of her childhood, how her mother would make falafels as a treat for special occasions.

I watched in awe as she effortlessly flipped the falafels in the pan, each one perfectly golden brown. We gathered around the table, the adults with their stories and laughter, the children eager to devour the delicious spread. The falafels were always the highlight, their crispy exterior giving way to a burst of flavors inside. The tahini sauce, with its creamy texture and hint of garlic, was the perfect accompaniment.

That evening, with the sound of cicadas in the background and the warmth of family around, I realized that food is more than just sustenance—it’s a vessel for memories and love.

Difficulty Rating

Difficulty: 5/10

Classification

This dish is a versatile appetizer, perfect for starting a meal with its rich flavors and delightful textures.

Falafels with tahini sauce are more than just a dish; they are a celebration of family, tradition, and the stories that bind us. As you savor each bite, may it bring warmth to your heart and a smile to your face, reminiscent of cherished family gatherings.

Read more about Appetizers

Read more about Main Dishes

Read more about Desserts

Related update: Lemon and Strawberry Loaf

Powerhouse Almond Matcha Superfood Smoothie | Made by Meaghan Moineau

Powerhouse Almond Matcha Superfood Smoothie | Made by Meaghan Moineau

Title: Unleash Your Energy with the Powerhouse Almond Matcha Superfood Smoothie
Description: Dive into the world of wellness with our Powerhouse Almond Matcha Superfood Smoothie. This vibrant, nutrient-packed blend is a delicious way to kickstart your day. Perfect for breakfast or a midday boost, this smoothie combines the creamy richness of almond butter with the refreshing zing of matcha and tropical fruits. Join us as we explore this delightful recipe and the cherished family memory that inspired it.

In the hustle and bustle of modern life, finding the perfect balance of health and taste can often feel like an elusive quest. But what if I told you that the secret lies in a simple, yet extraordinary, blend of ingredients? Enter the Powerhouse Almond Matcha Superfood Smoothie—a concoction that not only fuels your body but also brings a sense of nostalgia with every sip.

Growing up, Sunday mornings were a special time in our house. My grandmother, a spirited woman with a penchant for healthy living, would whip up what she called her “magic potions.” These weren’t your ordinary breakfast smoothies; they were vibrant elixirs, brimming with color and flavor, designed to invigorate our bodies and minds for the week ahead.

One particular Sunday, I remember vividly. The kitchen was filled with the comforting aroma of vanilla, mingling with the earthy scent of matcha. My grandmother stood by the blender, her eyes twinkling with mischief as she added a spoonful of almond butter—her secret ingredient. “This,” she said with a wink, “is what gives it the power.”

As a child, I didn’t quite understand the concept of superfoods. But I did understand that this smoothie was something special. It was creamy yet refreshing, with a perfect balance of sweetness and a subtle hint of green tea. It felt like a treat, yet it was packed with wholesome goodness.

Now, as an adult, I’ve recreated this memory in my own kitchen. The Powerhouse Almond Matcha Superfood Smoothie has become a staple in my household, not just for its health benefits but for the warm reminder of those cherished Sunday mornings.

Ingredients:

– 2 tablespoons unsalted natural almond butter

– 1 cup unsweetened almond milk

– 1 frozen banana

– 1 tablespoon chia seeds

– 1 cup baby kale

– 1/2 cup frozen mango pieces

– 1 teaspoon green matcha tea powder

– 1/2 cup frozen pineapple

– 1/2 teaspoon vanilla extract

Instructions:

1. Combine all of the ingredients in a blender.

2. Blend on high until smooth.

3. Serve immediately and enjoy the burst of flavor and energy!

Difficulty Rating: 3/10
Classification: Appetizer

This smoothie is not just a drink; it’s a celebration of vibrant, wholesome ingredients that work harmoniously to energize your day. Whether you’re a seasoned health enthusiast or just starting your journey, the Powerhouse Almond Matcha Superfood Smoothie is a perfect way to embrace wellness with a touch of nostalgia. So go ahead, take a sip, and let the memories flow.

Read more about Appetizers

Read more about Main Dishes

Read more about Desserts

Also try: Banana Smoothie Boost

Spicy Lemongrass Soup | Made by Meaghan Moineau

Spicy Lemongrass Soup | Made by Meaghan Moineau

Title: A Taste of Home: Crafting Spicy Lemongrass Soup
Description: Dive into the heartwarming world of Spicy Lemongrass Soup, a delightful blend of vibrant flavors and family memories. This recipe, bursting with fresh lemongrass, coconut milk, and aromatic spices, promises to transport you to a cozy kitchen filled with laughter and love. Perfect as a main dish, this soup is a testament to the simple joys of home-cooked meals.

---


There’s something uniquely comforting about a bowl of soup simmering on the stove, filling the kitchen with its fragrant aroma. For me, Spicy Lemongrass Soup is more than just a dish—it's a cherished family ritual, steeped in nostalgia and warmth.


Ingredients You'll Need:

- Fresh lemongrass


- Red dried peppers


- Ginger


- Garlic


- Vegetable broth


- Canned fresh coconut milk (if you can find it)


- Tofu cubes


- Snow peas


- Mushrooms


- Rice noodles


- Lime (juice)


Instructions:
1. Prepare the Broth: Start by chopping the lemongrass into 2-inch pieces and slicing them down the center. Add these to your soup pot along with vegetable broth, coconut milk, garlic, and ginger. Bring the mixture to a boil, then reduce the heat to a gentle simmer for about 30 minutes.
2. Strain the Broth: Once your broth has simmered to perfection, strain it through some cheesecloth to remove the lemongrass stalks—trust me, they’re not edible. This step is crucial for achieving a smooth, flavorful base.
3. Simmer the Ingredients: Return the broth to a simmer and introduce tofu cubes, mushrooms, snow peas, and rice noodles. The lime juice can be added at any point; I like to add some at the beginning and a little more just before serving for an extra zing.
4. Finishing Touches: Simmer until the rice noodles are soft and ready to eat. For garnish, consider adding some grated ginger or fresh scallions to enhance the flavor profile.
A Family Memory:

Every time I prepare Spicy Lemongrass Soup, I'm transported back to my grandmother's cozy kitchen. As a child, I would sit perched on a stool, watching her deftly chop lemongrass and ginger, her hands moving with the practiced ease of years spent cooking for loved ones. The kitchen was always filled with laughter, stories, and the comforting smell of this very soup simmering on the stove.


My grandmother's secret ingredient was always love, wrapped warmly in each spoonful. She would serve the soup with a knowing smile, watching as our family gathered around the table, sharing stories and savoring each bite. Those evenings were filled with warmth, not just from the soup, but from the bond we shared as a family.


Difficulty Rating: 6/10
Classification: Main Dish

Spicy Lemongrass Soup is more than just a meal; it’s a journey back to simpler times, a reminder of the love and laughter that make life truly delicious. Whether you're making it for the first time or the hundredth, I hope this recipe brings as much joy to your table as it has to mine. Enjoy!

Read more about Appetizers

Read more about Main Dishes

Read more about Desserts

Smoked Salmon Eggs Benedict With Lemon Dill Hollandaise | Made by Meaghan Moineau

Smoked Salmon Eggs Benedict With Lemon Dill Hollandaise | Made by Meaghan Moineau

Title: Savoring Sundays: Smoked Salmon Eggs Benedict with Lemon Dill Hollandaise
Description: Discover the luxurious flavors of our Smoked Salmon Eggs Benedict with Lemon Dill Hollandaise – a dish that combines the zest of lemon, the richness of smoked salmon, and the delicate touch of fresh herbs. Perfect for a Sunday brunch or a special family gathering, this recipe is a delightful way to enjoy a gourmet meal at home.

---


A Sunday Tradition: Smoked Salmon Eggs Benedict with Lemon Dill Hollandaise


There’s something inherently comforting about Sunday brunches. Growing up, Sundays were reserved for family gatherings at my grandparents’ house. The aroma of freshly brewed coffee mingled with the scent of a hearty breakfast spread, creating an atmosphere of warmth and love. Among the dishes that graced the table, one stood out for its elegance and rich flavors: Smoked Salmon Eggs Benedict with Lemon Dill Hollandaise.


This dish was my grandmother’s specialty, and she treated it with the reverence it deserved. Every element was carefully crafted, from the perfectly poached eggs to the luscious, velvety hollandaise sauce infused with lemon and dill. As a child, I watched in awe as she skillfully whisked the egg yolks over simmering water, her movements precise and practiced. The kitchen was her domain, and I was her eager apprentice, absorbing her culinary wisdom with every dish.


Ingredients:


- Baby arugula


- Baby spinach


- Butter


- Egg yolks


- Eggs


- Fresh or dried dill


- Lemon


- Multigrain bread


- Salt and pepper


- Smoked salmon


- Water


- Worcestershire sauce


Instructions:


1. Make the Lemon Dill Hollandaise:

- Fill a medium saucepan halfway with water, bringing it to a gentle simmer over medium heat.


- In a heatproof bowl, combine egg yolks and water. Season with a pinch of dill (if using dried), salt, and pepper.


- Whisk the ingredients together and place the bowl on top of the saucepan, ensuring it doesn’t touch the water directly.


- Stir the egg mixture continuously for about 5 minutes, until it begins to thicken. Be cautious not to scramble the eggs.


- Once thickened, remove the bowl from the heat and set aside.


2. Poach the Eggs:

- Fill another medium saucepan with water, adding a splash of white vinegar (optional) to help keep the egg whites intact.


- Bring the water to a gentle simmer, with tiny bubbles but not boiling.


- Carefully add eggs to the water and poach until they reach your desired doneness.


3. Assemble the Dish:

- Toast slices of multigrain bread and place them on serving plates.


- Top each slice with a layer of baby arugula, spinach, and slices of smoked salmon.


- Place the poached eggs on top of the salmon.


- Generously spoon the lemon dill hollandaise over the eggs.


- Garnish with fresh dill, a sprinkle of salt, and freshly cracked black pepper.


---


A Taste of Nostalgia


Every bite of this dish transports me back to my grandmother’s kitchen, where love was the secret ingredient in every meal. The tangy hollandaise, the smoky salmon, and the tender poached eggs all meld together, creating a symphony of flavors that capture the essence of those cherished Sundays.


Rating and Classification


Difficulty Rating: 6/10
Classification: Main Dish

This Smoked Salmon Eggs Benedict with Lemon Dill Hollandaise is not just a meal; it’s a celebration of family, tradition, and the joy of cooking. Whether you're carrying forward a family tradition or starting your own, this dish is sure to become a beloved favorite. Enjoy it with those you love, and create new memories with every delicious bite.

Read more about Appetizers

Read more about Main Dishes

Read more about Desserts

Refreshing Strawberry Limeade | Made by Meaghan Moineau

Refreshing Strawberry Limeade | Made by Meaghan Moineau

Title: Revive Summer Memories with Refreshing Strawberry Limeade
Description: Dive into nostalgia with our Refreshing Strawberry Limeade recipe, a delightful blend of sweet strawberries and tangy lime that is sure to awaken your senses. Perfect for summer gatherings or a quiet afternoon on the porch, this beverage is a trip down memory lane with every sip. Learn how to craft this easy yet elegant drink that’s sure to become a family favorite.

---


A Sip of Summer: Refreshing Strawberry Limeade Recipe

There's something magic about the simple joy of sipping a chilled, fruity drink on a hot summer day. For me, this Refreshing Strawberry Limeade is more than just a thirst-quencher; it's a cherished family tradition.


A Walk Down Memory Lane

Growing up, summer vacations meant long afternoons spent at my grandmother's house. Her backyard was a haven of vibrant flowers, towering oak trees, and laughter that echoed through the warm air. My cousins and I would run around until we were breathless before collapsing under the shade with cups of her famous strawberry limeade in hand. The sweet, tangy taste was the perfect antidote to the summer heat, and each sip seemed to cool the sun’s fiery rays.


My grandmother would prepare the drink early in the morning, allowing the flavors to meld together. Watching her work in the kitchen, I learned the art of balancing sweetness with tartness—a skill I've come to master over the years.


Ingredients:

- Fresh strawberries


- Sugar


- Lemon lime soda


- Seltzer


- Turbinado sugar


- Lime (juice)


- Thinly sliced limes


- Ice


Instructions:
1. Macerate the Berries: Begin by adding fresh strawberries and sugar to a bowl. Allow them to macerate for about 30 minutes. This process enhances the natural sweetness of the berries, creating a luscious base for your limeade.
2. Blend to Perfection: Once the strawberries have released their juices, transfer them to a food processor or blender. Pulse until smooth, creating a vibrant strawberry puree.
3. Mix the Magic: In a large pitcher, add ice until it's about one-third full. Pour in 2 parts seltzer to 1 part lemon lime soda. This combination provides the perfect fizzy foundation for your drink.
4. Combine Flavors: Stir in a few scoops of the strawberry puree and add the juice from 1 lime. Mix well, then taste. Adjust by adding more strawberry puree or lime juice as desired to suit your taste.
5. Garnish and Serve: For a touch of elegance, add thinly sliced limes to the pitcher. Rim each glass with turbinado sugar for added sweetness and garnish with a lime wedge.
Difficulty Rating: 3/10
Classification: Appetizer

This Refreshing Strawberry Limeade is more than just a drink; it's a celebration of family bonds and summer afternoons. Whether you're looking to relive old memories or create new ones, this delightful beverage is sure to enchant your taste buds and warm your heart. So, gather your loved ones, find a cozy spot in the shade, and enjoy a glass of nostalgia. Cheers to summer's sweetest flavors!

Read more about Appetizers

Read more about Main Dishes

Read more about Desserts

Chinese Style Chicken and Noodle Stir Fry | Made by Meaghan Moineau

Chinese Style Chicken and Noodle Stir Fry | Made by Meaghan Moineau

Title: Savory Memories: A Journey to the Heart of Chinese Style Chicken and Noodle Stir Fry


Description:

Dive into the flavors of a cherished family tradition with our Chinese Style Chicken and Noodle Stir Fry. Discover the perfect balance of savory and sweet with this mouthwatering main dish, and relive the nostalgia of family gatherings filled with laughter and delightful aromas. Rated 6/10 in difficulty, this recipe is both a culinary adventure and a heartwarming memory waiting to be recreated in your kitchen.

---


A Taste of Nostalgia: Chinese Style Chicken and Noodle Stir Fry


In every family, there are dishes that transcend the act of eating and enter the realm of cherished memories. For me, Chinese Style Chicken and Noodle Stir Fry is one such dish. Its vibrant colors, enticing aromas, and harmonious flavors remind me of the many Sunday afternoons spent in my grandmother's bustling kitchen. This recipe was a staple at our family gatherings, a dish that brought everyone together around the table, sharing stories and laughter.


Ingredients:

- Chow mein noodles


- Chicken broth


- Sugar


- Oyster sauce


- Soy sauce


- Water


- Vegetable oil


- Garlic, minced


- Ginger, minced


- Skinless boneless chicken thighs, sliced


- Onion, sliced


- Red bell pepper, julienned


- Carrots, julienned


- Sugar snap peas


Instructions:
1. Prepare the Noodles: Begin by soaking the chow mein noodles in hot water until softened, about 5 minutes. Drain and set them aside. This simple step is the foundation of our flavorful stir fry.
2. Create the Sauce: In a small bowl, combine chicken broth, sugar, oyster sauce, soy sauce, and water. Set this aside as it will tie all the flavors together beautifully.
3. Sauté Aromatics: Heat vegetable oil in a wok over medium-high heat. When the oil is hot, add minced garlic and ginger, cooking until they release their fragrance, about 30 seconds. This is where the magic begins, as these aromatics form the base of our dish.
4. Cook the Chicken: Add sliced chicken thighs to the wok, cooking until they are done. The chicken absorbs the flavors of garlic and ginger, creating a savory depth that will resonate through the dish.
5. Add Vegetables: Introduce the onion, red bell pepper, carrots, and sugar snap peas to the wok. Cook until the vegetables are tender-crisp, about 4-5 minutes. Their vibrant colors and fresh crunch are what make this stir fry so visually appealing and delicious.
6. Combine and Serve: Pour in the chicken broth mixture and stir in the drained noodles. Cook until everything is heated through, about 2 minutes. Toss everything together to ensure the noodles are well coated with the sauce. Serve hot and enjoy the blend of textures and flavors that dance in every bite.
A Family Tradition:

Every time I cook this dish, I'm transported back to my childhood, watching my grandmother expertly wield her wok with a grace that seemed almost magical. She would often share stories about her own childhood, cooking alongside her mother, and it felt like a culinary baton was being passed down through generations. This dish was more than just a meal; it was a way of preserving family history, a delicious tapestry woven with love, culture, and tradition.


Difficulty Rating: 6/10
Classification: Main Dish

Crafting this Chinese Style Chicken and Noodle Stir Fry is more than just following a recipe; it’s about embracing a tradition and creating memories. Whether you're sharing it with family or introducing it to friends, this dish promises a delightful experience that bridges past and present, one flavorful bite at a time.

Read more about Appetizers

Read more about Main Dishes

Read more about Desserts

15 Minute Healthy Dark Chocolate Truffles | Made by Meaghan Moineau

15 Minute Healthy Dark Chocolate Truffles | Made by Meaghan Moineau

Title: Indulge in Guilt-Free Pleasure: 15-Minute Healthy Dark Chocolate Truffles
Description: Discover the deliciously simple art of creating these 15-minute healthy dark chocolate truffles. Packed with natural sweetness and rich flavors, these truffles are the perfect guilt-free dessert that brings a touch of nostalgia to your table. Dive into our step-by-step guide and enjoy a delightful treat that’s sure to impress!

---


There’s something magical about the aroma of dark chocolate wafting through the kitchen. It reminds me of family gatherings during the holidays, where my grandmother would bring out a tray adorned with homemade treats. Among them, the little nuggets of joy she called “chocolate gems” were my absolute favorite. As a child, I was fascinated by the idea that something so decadent could be made with simple ingredients found in our pantry. Inspired by her, I’ve crafted a healthier version that retains all the indulgence without the guilt.


Ingredients:


- 1 cup dried dates


- 1/2 cup slivered almonds


- 1/2 cup pecans


- 1/4 cup cocoa powder


- 1 teaspoon vanilla extract


- 1 tablespoon agave nectar


- 1/4 teaspoon sea salt


- Water (for soaking dates)


- Optional: coconut flakes for rolling


Instructions:


1. Prep the Dates: Start by soaking the dates in hot water for about 5 minutes. The water should be comfortably hot but not scalding. This softens the dates, making them perfect for blending.
2. Create Nut Meal: In a food processor, pulse the slivered almonds until a coarse almond meal forms. Add the pecans and continue processing until they are ground into a coarse meal as well.
3. Blend Ingredients: Drain the dates and gently squeeze out excess water. Add these to the food processor along with cocoa powder, vanilla extract, agave nectar, and sea salt. Blend until a smooth, cohesive paste forms.
4. Form the Truffles: Use a tablespoon measure to scoop out a heaping portion of the mixture. Pack it tightly and gently slide the half-rounded ball out. Carefully shape it into a sphere with your hands, being mindful not to let it crumble.
5. Add Toppings: If desired, roll the truffles in your choice of toppings. Unsweetened coconut flakes add a lovely texture, while extra cocoa powder intensifies the chocolate flavor—though beware of its added bitterness.

This recipe is a delightful reminder of those warm family moments, echoing the simplicity and love found in every bite. Rated a 3 out of 10 in difficulty, these truffles are classified as a Dessert, perfect for satisfying your sweet tooth without veering off the path of health.


Whether you’re sharing them with loved ones or savoring them solo, these truffles invite you to indulge in a sweet nostalgia that’s both heartwarming and deliciously guilt-free. Enjoy every bite of this easy, delightful treat that can be whipped up anytime you need a little piece of happiness!

Read more about Appetizers

Read more about Main Dishes

Read more about Desserts

WoW: Midnight’s gameplay has been shown off at Gamescom 2025 – Windows Central | Analysis by Brian Moineau

WoW: Midnight's gameplay has been shown off at Gamescom 2025 - Windows Central | Analysis by Brian Moineau

Title: A New Dawn for Azeroth: WoW: Midnight Unveiled at Gamescom 2025

Ah, Gamescom! That annual crescendo of excitement where gaming enthusiasts from around the globe converge to celebrate the art of interactive entertainment. This year, amid the vibrant chaos and the clamor of enthusiastic attendees, Blizzard Entertainment dropped a bombshell that left fans of the cherished MMORPG series World of Warcraft (WoW) buzzing with anticipation. The unveiling of "World of Warcraft: Midnight" was a moment many had been eagerly awaiting, and it did not disappoint.

The next chapter in the Worldsoul Saga, WoW: Midnight, promises to take players on a thrilling quest to save Azeroth from the ominous invasion of Void Walkers. Scheduled for release in 2026, the expansion is already sparking conversations and theories among the community. The gameplay footage revealed at Gamescom offered a tantalizing glimpse of what's to come, showcasing stunning landscapes and intense battles that are sure to challenge both new and veteran players alike.

The Return of the Void Walkers

For those unfamiliar with the lore, the Void Walkers are not new to the WoW universe. These enigmatic entities, capable of shifting between dimensions, last posed a significant threat in the "Burning Crusade" expansion. Their return in Midnight signals a deepening of the cosmic narrative that WoW has been weaving for years.

Thematically, this expansion echoes broader narratives found in today's world—tales of resilience and unity in the face of adversity. Much like Azeroth's heroes rallying against an otherworldly threat, societies worldwide are increasingly banding together to tackle issues like climate change and global health crises. The parallels between game and reality add a layer of depth to the gaming experience, reminding us of the power of collective action.

A Nod to Nostalgia

WoW: Midnight also appears to be a love letter to long-time fans. The gameplay footage unveiled at Gamescom teemed with familiar elements that hark back to WoW's earlier days. This nostalgia is cleverly interwoven with fresh content, ensuring that the expansion will appeal to both seasoned players and newcomers. This balance between old and new is a trend seen across the entertainment industry, from the resurgence of vinyl records to the revival of iconic TV shows like "The X-Files."

The Broader Gaming Landscape

WoW: Midnight's announcement is part of a larger trend in the gaming industry, where developers are increasingly focusing on expansive, narrative-driven experiences. This trend is evident in other popular titles such as "The Witcher 3" and "Horizon Zero Dawn," which have captivated audiences with their rich storytelling and immersive worlds. As gaming technology continues to evolve, the lines between gaming and storytelling blur, creating experiences that are both engaging and emotionally resonant.

Final Thoughts

As the countdown to 2026 begins, the WoW community is already abuzz with speculation about Midnight’s plot twists and potential new gameplay mechanics. While we await the expansion's release, it's worth reflecting on how games like WoW serve as a microcosm of the world, mirroring our challenges and triumphs while offering an escape into the fantastical.

In a world where reality can sometimes seem as daunting as a Void Walker invasion, WoW: Midnight reminds us of the joy of adventure and the thrill of coming together to overcome the impossible. Whether you're a die-hard WoW veteran or a curious newcomer, this expansion promises a journey worth embarking on. So gear up, adventurers—the fate of Azeroth awaits!

For more insights and gameplay footage, check out [Windows Central's coverage](https://www.windowscentral.com) on the big reveal. Happy questing!

Read more about AI in Business

Read more about Latest Sports Trends

Read more about Technology Innovations

Dutch Baby | Made by Meaghan Moineau

Dutch Baby | Made by Meaghan Moineau

Title: The Magic of Dutch Baby: A Delightful Morning Ritual
Description: Discover the enchanting world of the Dutch Baby—a heavenly, puffed pancake that transforms breakfast into a cherished family tradition. Unveil the simplicity of its creation and indulge in a nostalgic journey that celebrates togetherness. Perfect for beginners, this dish is a delightful dessert that brings warmth to the table.

---


There's something magical about a Dutch Baby. Not only does it puff up like a glorious, golden crown, but it also carries with it a sense of nostalgia that warms the heart. For our family, the Dutch Baby is more than just a dish; it's a morning ritual that whispers of comfort and connection.


Ingredients:

- 3 large eggs


- ½ cup flour


- ½ cup milk


- 2 tablespoons unsalted butter


- 1-2 lemons


- Confectioner's sugar for dusting


Instructions:

1. Preheat your oven to a toasty 475 degrees F. This high heat is crucial for achieving that signature puff.


2. Cut the lemons in half crosswise—these will be your final flourish.


3. Place the unsalted butter in a heavy 10" oven-proof skillet and let it melt in the oven. The aroma of melting butter is just the beginning of this delightful journey.


4. While the butter melts, whisk together the eggs, flour, and milk in a bowl. Mix just until combined; overmixing isn't necessary.


5. Carefully remove the skillet from the oven once the butter has melted. Swirl the butter around to coat the sides of the skillet.


6. Pour the batter into the hot skillet and quickly return it to the oven.


7. Bake for 12 minutes or until your Dutch Baby has puffed up like a dream.


8. Once puffed and golden, remove it from the oven and transfer to a platter.


9. Squeeze the lemon halves over the Dutch Baby, letting the juice soak in. Dust generously with confectioner's sugar for that perfect finish.


10. Cut into serving-sized pieces and serve immediately.


Difficulty Rating: 3/10
Classification: Dessert

---


Growing up, Sundays were synonymous with family and food. My grandmother, with her apron tied loosely around her waist, would gather us in the kitchen to help with our favorite breakfast treat—the Dutch Baby. The anticipation was half the fun; we’d watch through the oven window as the batter rose, transforming into a golden, airy masterpiece.


As she pulled it from the oven, she’d tell us stories of her own childhood, of Sundays spent in her mother’s kitchen. The Dutch Baby was her mother's favorite too, and it became a thread that tied generations together. As the lemon juice mingled with the confectioner's sugar, we’d gather around the table, sharing stories, laughter, and the simple joy of being together.


The beauty of the Dutch Baby lies in its simplicity. It's a dish that invites you to slow down and savor the moment, to appreciate the warmth of family and the joy of shared meals. Whether you're a seasoned cook or a kitchen novice, this delightful dessert is an invitation to create your own family memories—one delicious puff at a time.

Read more about Appetizers

Read more about Main Dishes

Read more about Desserts

Gluten Free Profiteroles | Made by Meaghan Moineau

Gluten Free Profiteroles | Made by Meaghan Moineau

Title: Delightful Gluten-Free Profiteroles: A Taste of Nostalgia and Elegance
Description: Explore the world of gluten-free baking with our exquisite Gluten-Free Profiteroles recipe. Perfect for any occasion, these light and airy delights promise both flavor and nostalgia. Join us as we share a cherished family memory, step-by-step instructions, and tips for perfecting this elegant dessert.

---


When it comes to desserts, few things are as elegant and indulgent as profiteroles. These dainty puffs, filled with cream or custard and drizzled with chocolate or caramel, are a showstopper at any gathering. But for those with gluten sensitivities, enjoying this classic treat has often required compromise—until now. Our Gluten-Free Profiteroles are not only delicious but also evoke a sense of nostalgia and family warmth.


A Sweet Memory:

Growing up, my grandmother would make profiteroles every holiday season. Her kitchen would transform into a wonderland of sweet aromas and bustling activity. I remember standing on tiptoes to watch her skillfully work the dough, a process that seemed nothing short of magical. The anticipation was palpable as we waited for those golden puffs to emerge from the oven, perfectly crisp and hollow, ready to be filled with her signature vanilla custard.


One year, after discovering my gluten sensitivity, I thought those days of indulging in profiteroles were behind me. But my grandmother, ever the culinary wizard, adapted the recipe to be gluten-free. The result was just as delicious as the original, if not more so, because it was a testament to her love and creativity. Every bite was a reminder of those cherished holiday moments, a connection to family and tradition.


Recipe: Gluten-Free Profiteroles
Ingredients:

- 1/2 cup butter


- 1 cup water


- 1/2 cup milk


- 1 cup gluten-free flour


- 1/4 teaspoon xantham gum


- 1/2 teaspoon salt


- 1 tablespoon sugar


- 4 large eggs


Instructions:
1. Preheat the Oven: Set your oven to 375°F (190°C) and prepare your baking sheets by running them under cold water, shaking off excess water but leaving them slightly damp.
2. Prepare Dry Ingredients: Sift together the gluten-free flour, xanthan gum, salt, and sugar 3-4 times. Place the mixture in a convenient spot near the stove.
3. Mix Wet Ingredients: In a deep, heavy-bottomed pan, combine the water and milk. Cut the butter into small chunks and add to the pan. Heat gently until the butter is fully melted.
4. Bring to Boil: Increase the heat until the mixture reaches a rolling boil. Remove from heat immediately and pour the dry mixture into the pan all at once. Stir vigorously with a wooden spoon.
5. Form the Paste: Return the pan to low heat, continuing to stir until the mixture forms a smooth, shiny paste and pulls away from the sides of the pan.
6. Incorporate Eggs: Remove from heat. Gradually add the beaten eggs, using a hand mixer to blend thoroughly. The paste should be shiny, stiff, and able to hold its shape.
7. Prepare for Baking: Drop tablespoons of the dough onto the baking sheet, spaced about 10 cm apart. The puffs will expand significantly as they bake.
8. Bake: Place in the oven and bake for 20-25 minutes until the profiteroles are golden brown on all sides. Resist the urge to open the oven during the first 15 minutes to prevent collapse.
9. Cool and Serve: Transfer to a baking rack, piercing each puff with a toothpick to allow steam to escape. Once cooled, fill with your choice of cream or custard and enjoy!
Difficulty Rating: 6/10
Dish Classification: Dessert
Conclusion:

Creating gluten-free profiteroles might seem daunting, but the reward is well worth the effort. These airy puffs are a delightful dessert that brings elegance to any table while carrying the warmth of family memories. Whether you're serving them at a festive gathering or enjoying a quiet moment with a cup of tea, these profiteroles are a testament to the power of adaptability and love in the kitchen.

Read more about Appetizers

Read more about Main Dishes

Read more about Desserts

Gluten-Free Tres Leches Cake | Made by Meaghan Moineau

Gluten-Free Tres Leches Cake | Made by Meaghan Moineau

A Slice of Sweet Nostalgia: Gluten-Free Tres Leches Cake Recipe


Description: Dive into the rich, velvety world of our Gluten-Free Tres Leches Cake. This classic Latin American dessert, infused with a modern twist of gluten-free ingredients, promises to tantalize your taste buds with its creamy texture and fragrant flavors. Perfect for any occasion, this cake is as much a feast for the senses as it is a trip down memory lane.

---


Introduction: A Culinary Journey Back in Time


As the golden rays of the afternoon sun filtered through the lace curtains of my grandmother’s kitchen, the air was filled with the irresistible aroma of baking. It was a special day — Tres Leches Cake day. This cake is more than just a treat; it's a cherished family tradition, a recipe passed down through generations, each bite imbued with stories and laughter from the past. Today, I share with you a gluten-free version of this beloved dessert, ensuring that everyone can partake in this sweet piece of nostalgia.


Ingredients


- 1 cup sugar, divided


- 5 large eggs, separated


- 1/2 cup unsalted butter, softened


- 1 teaspoon vanilla extract


- Zest of one orange


- 1 teaspoon ground cinnamon


- 1 cup sorghum flour


- 1/2 cup masa harina


- 2 teaspoons baking powder


- 1/2 teaspoon xanthan gum


- 1/2 cup milk


- 1/4 teaspoon cream of tartar


- 1 can (12 ounces) evaporated milk


- 1 cup half-and-half


- 1 can (14 ounces) sweetened condensed milk


- 1 cup heavy whipping cream


- 2 tablespoons sugar


- 1 teaspoon vanilla extract


- Strawberries and mint leaves, for garnish


Instructions


1. Preparation:

Preheat your oven to 350 degrees Fahrenheit. Generously butter a 13x9-inch baking dish.


2. Make the Cake Batter:

In a large bowl, beat 1/2 cup of sugar, egg yolks, and butter until light and fluffy, about 5 minutes. Fold in the vanilla extract, orange zest, cinnamon, sorghum flour, masa harina, baking powder, xanthan gum, and milk.


3. Whip the Egg Whites:

In another large bowl, beat the egg whites to soft peaks, adding the cream of tartar after about 20 seconds. Gradually add the remaining 1/2 cup of sugar and continue beating until the egg whites are glossy and firm, but not dry.


4. Combine the Mixtures:

Gently fold the egg whites into the cake mixture. Pour this batter into the prepared baking dish, spreading it out evenly.


5. Bake:

Bake until the cake is golden and a toothpick inserted in the center comes out clean, about 25 minutes.


6. Add the Tres Leches:

Pierce the cake all over with a toothpick. Whisk together the evaporated milk, half-and-half, and sweetened condensed milk, then pour evenly over the cake. Allow it to cool slightly, then cover and refrigerate for at least 4 hours, preferably overnight.


7. Make the Topping:

Before serving, place the whipping cream, 2 tablespoons of sugar, and 1 teaspoon of vanilla in a mixer bowl. Whisk to stiff peaks until nice and thick. Spread over the cake.


8. Garnish and Serve:

Top with fresh strawberries and mint leaves. Allow the cake to chill in the refrigerator until ready to serve.


A Family Memory


Every Sunday, after a hearty family lunch, my grandmother would unveil her Tres Leches Cake. We, the grandchildren, would gather around the table, eyes wide with anticipation. The cake was always topped with fresh strawberries from her garden and sprigs of mint, their vibrant colors a prelude to the burst of flavors that awaited. These afternoons were filled with stories of her childhood, each tale as sweet as the dessert itself. This gluten-free rendition not only honors her legacy but also ensures that the tradition continues, inclusive and cherished by all.


Difficulty: 5/10


Classification: Dessert


---


Whether you're revisiting fond memories or creating new ones, this Gluten-Free Tres Leches Cake is a delightful, inclusive treat that everyone can enjoy. With its delicate balance of flavors and textures, each slice is a testament to the timelessness of family traditions. Happy baking!

Read more about Appetizers

Read more about Main Dishes

Read more about Desserts