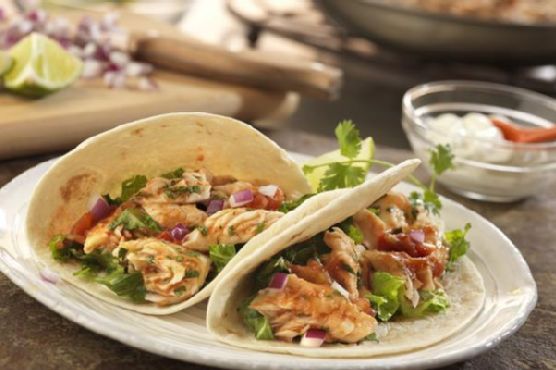
Crab Salad Stuffed Pita Pockets | Made by Meaghan Moineau

Crab Salad Stuffed Pita Pockets | Made by Meaghan Moineau

Title: A Taste of Summer: Crab Salad Stuffed Pita Pockets
Description: Dive into a delicious blend of fresh flavors with our Crab Salad Stuffed Pita Pockets. This light and refreshing dish combines the sweetness of apple, the tang of yellow bell pepper, and the savory taste of white crabmeat, all wrapped in a warm, toasted wholewheat pita. Perfect for a summer afternoon, this recipe is quick and easy to prepare, bringing back cherished family memories with every bite.

---


Summer at our family beach house was always a magical time. The sun-drenched days were filled with the laughter of children playing by the shore, the comforting sound of waves crashing, and the enticing aroma of delicious meals being prepared in the kitchen. One dish that always marked the highlight of these summer gatherings was my grandmother's Crab Salad Stuffed Pita Pockets.


I vividly remember the hustle and bustle in the kitchen, where the air was filled with the crisp scent of freshly chopped apples and the vibrant smell of coriander leaves. My grandmother would stand at the counter, her hands deftly mixing the canned white crabmeat with diced apple and yellow bell pepper. She had a way of creating magic with the simplest of ingredients.


As she worked, my siblings and I would eagerly gather around, occasionally sneaking a taste of the sweet, juicy apple or the tangy bell pepper. The anticipation would build as we watched her toast the wholewheat pita breads until they were perfectly puffed and golden brown.


Once the crab salad was seasoned to perfection with just the right amount of salt and pepper, and lovingly folded with light mayonnaise, the real fun began. We would help stuff the warm pita pockets with fresh, peppery watercress and the delicious crab mixture. Each bite was a symphony of flavors—sweet, savory, and herbaceous—all reminding us of those carefree, sunlit days.


Every time I prepare this dish, I am transported back to those cherished family summers, filled with love, laughter, and great food. It's a simple recipe, yet it holds a treasure trove of memories.


Crab Salad Stuffed Pita Pockets Recipe
Ingredients:

- 1 apple, diced


- 1 can white crabmeat, drained


- A handful of fresh coriander leaves, chopped


- 2 tablespoons light mayonnaise


- 4 wholewheat pita breads


- Salt and pepper to taste


- A bunch of fresh watercress


- 1 yellow bell pepper, diced


Instructions:

1. In a large bowl, combine the crabmeat, diced apple, and yellow bell pepper.


2. Season the mixture with salt and pepper to taste, then add the chopped coriander leaves.


3. Gently fold in the light mayonnaise until everything is well combined.


4. Toast the wholewheat pita breads until they are puffed up and golden brown.


5. Carefully cut open the pitas on one side and stuff them with a generous handful of fresh watercress, followed by the crab mixture.


6. Serve immediately and enjoy a taste of summer nostalgia.


Difficulty Rating: 3/10
Classification: Appetizer

This delightful appetizer is not only a breeze to make but also a wonderful way to bring a bit of summer into your home, no matter the season. Enjoy this family favorite and create your own cherished memories with each delicious bite.

Read more about Appetizers

Read more about Main Dishes

Read more about Desserts

{No Bake} Cinnamon Butterscotch Energy Bites | Made by Meaghan Moineau

{No Bake} Cinnamon Butterscotch Energy Bites | Made by Meaghan Moineau

No Bake Cinnamon Butterscotch Energy Bites: A Sweet Trip Down Memory Lane


A Delightful No-Bake Treat with a Touch of Nostalgia


There's something magical about recipes that require no baking—especially when they're packed with flavors that evoke cherished memories. Today, I'm thrilled to share a recipe that not only satisfies your sweet cravings but also transports you back to simpler times: No Bake Cinnamon Butterscotch Energy Bites.


The Magic Mix of Ingredients


These energy bites combine the perfect blend of brown sugar, butterscotch chips, rice cereal, ground flax seed, honey, oats, peanut butter, and protein powder to create a delectable treat that's both nutritious and delicious. The gentle spice of cinnamon weaves through every bite, adding a comforting warmth that pairs beautifully with the sweet butterscotch.


A Nostalgic Family Memory


Growing up, I spent countless summer afternoons at my grandmother's house, where the kitchen was always filled with the aroma of something sweet. My grandmother had a knack for creating delicious treats without ever turning on the oven, a skill I admired deeply. One of my fondest memories is of her teaching me how to make these very energy bites.


We would gather all the ingredients on her antique wooden countertop. As I carefully measured out the oats and rice cereal, she'd share stories of her childhood, weaving tales as rich as the flavors we were about to create. Once the mixture was prepared, she'd let me press the butterscotch chips into each ball—a task I took very seriously, ensuring each one was perfectly adorned.


When we finished, we'd sit on her porch, enjoying our creations while sipping iced tea, the summer breeze carrying the sound of birds chirping. Those afternoons taught me the joy of cooking with love and intention, a lesson I carry with me to this day.


Recipe Instructions


1. Grind the Oats: Start by grinding 1 cup of oats in a blender until you achieve a fine texture.
2. Mix the Dry Ingredients: In a large bowl, combine the rice cereal, whole oats, ground oats, protein powder, and ground flax seed.
3. Create the Liquid Mixture: In a microwavable safe bowl, mix together brown sugar, peanut butter, and honey. Heat in the microwave in 15-second intervals, stirring intermittently, until melted and well-combined.
4. Combine and Chill: Pour the liquid mixture into the bowl of dry ingredients and stir until thoroughly combined. Refrigerate the mixture for about 30 minutes.
5. Form and Finish: Once chilled, remove the mixture from the fridge and roll it into bite-sized balls. Press butterscotch chips into each ball for that sweet, nostalgic touch.

Difficulty and Classification


Difficulty: 3/10
Classification: Dessert

These No Bake Cinnamon Butterscotch Energy Bites are incredibly easy to make, requiring minimal effort for maximum flavor payoff. Whether you're a seasoned baker or a kitchen novice, this recipe is a delightful way to create something special without the hassle of baking.


Conclusion


These energy bites are more than just a tasty treat—they're a journey back to cherished moments and the warmth of family. I hope this recipe brings you as much joy and nostalgia as it does for me. Enjoy every bite and perhaps, create some sweet memories of your own along the way.

Read more about Appetizers

Read more about Main Dishes

Read more about Desserts

Bacon & Egg Toast Cups | Made by Meaghan Moineau

Bacon & Egg Toast Cups | Made by Meaghan Moineau

Title: Perfect Breakfast Delight: Bacon & Egg Toast Cups
Description: Discover the delightful simplicity of Bacon & Egg Toast Cups, a nostalgic breakfast treat that brings back cherished family memories. Easy to prepare yet impressively delicious, this dish is sure to become a staple in your morning routine.

---


In the tapestry of family traditions, breakfast holds a special place, weaving together the scents and sounds of cherished mornings. One such cherished memory of mine involves the delightful creation of Bacon & Egg Toast Cups, a dish that perfectly combines simplicity with a touch of elegance. As I share this nostalgic recipe, I hope it brings warmth and joy to your breakfast table just as it did to mine.


Ingredients:


- Unsalted butter


- 6 slices of sandwich bread


- 6 slices of bacon


- 6 eggs


- Salt & pepper to taste


Instructions:


1. Preheat and Prepare: Begin by preheating your oven to 375°F (190°C). Lightly butter six standard muffin cups to prevent sticking.
2. Create the Toast Cups: Using a rolling pin, gently flatten the bread slices. With a 4.5-inch cookie cutter, cut each slice into four rounds. Cut each round in half, then press the two halves into each muffin cup, overlapping slightly and ensuring the bread extends to the edges. Use any extra bread and crusts to patch holes if necessary. Brush with the remaining butter for added flavor.
3. Cook the Bacon: In a large skillet, cook the bacon until almost crisp, about four minutes, flipping once. The bacon will continue to cook in the oven, so avoid overcooking it at this stage.
4. Assemble and Bake: Lay one bacon slice in each bread cup. Crack an egg over each, taking care not to break the yolk. Season with salt and pepper. Bake in the preheated oven until the egg whites are just set, approximately 25 minutes.
5. Serve and Enjoy: Once baked, run a small knife around the cups to loosen them. Serve hot and enjoy the delightful combination of flavors.

Nostalgic Family Memory:


I vividly remember Sunday mornings at my grandmother's house, where the aroma of bacon sizzling in the kitchen would gently coax us out of bed. My siblings and I would gather around the breakfast table, eagerly awaiting the moment when my grandmother would present her famous Bacon & Egg Toast Cups. Each bite was a comforting blend of crispy bacon, perfectly cooked eggs, and warm, buttery toast—a symphony of flavors that felt like a loving hug.


These mornings were filled with laughter and the joy of being together, creating memories that have lasted a lifetime. Now, as I prepare this dish for my own family, I am reminded of those cherished moments and the bond we shared over this simple yet delicious meal.


Recipe Rating:


- Difficulty: 3/10
- Classification: Main Dish

Whether you're looking for a quick weekday breakfast or a special treat for a leisurely weekend brunch, Bacon & Egg Toast Cups are a delightful choice. With their ease of preparation and rich, satisfying flavors, this dish is a testament to the beauty of simple ingredients coming together to create something truly special. Enjoy this recipe, and may it bring the same warmth and joy to your family as it has to mine.

Read more about Appetizers

Read more about Main Dishes

Read more about Desserts

Tuna Stuffed Hard-Boiled Eggs | Made by Meaghan Moineau

Tuna Stuffed Hard-Boiled Eggs | Made by Meaghan Moineau

Title: Delightful Nostalgia: Tuna Stuffed Hard-Boiled Eggs for Every Family Gathering
Description: Dive into a deliciously nostalgic journey with our Tuna Stuffed Hard-Boiled Eggs recipe. This simple, yet flavorful appetizer is perfect for every family gathering, evoking cherished memories with every bite. Discover how to create this dish that marries ease with elegance, leaving a lasting impression on your guests.

---


Every family has that one recipe that holds a special place in their hearts. For me, it's the Tuna Stuffed Hard-Boiled Eggs. This delightful appetizer was a staple at every family reunion, birthday party, and holiday gathering. The aroma of tuna mixed with fresh parsley and a hint of lemon would fill the kitchen, pulling us all together around the table, eager to dig in.


Ingredients:

- Hardboiled eggs


- 1 can of tuna


- 1 small onion, finely chopped


- 1 carrot, shredded


- Fresh parsley, chopped


- Lemon juice


- Corn kernels for garnish


Instructions:

1. Begin by cutting each hardboiled egg in half and carefully removing the yolks. Set the egg whites aside on a serving platter.


2. In a small bowl, combine the canned tuna with the finely chopped onion, shredded carrot, chopped parsley, and a generous squeeze of lemon juice. Mix well until the ingredients are thoroughly combined.


3. Spoon the tuna mixture into each egg white half, creating a small mound. Ensure each egg is generously filled for optimum flavor.


4. Garnish each stuffed egg with a few corn kernels, adding a touch of sweetness and color to the dish.


5. Serve immediately or refrigerate until ready to enjoy.


Difficulty Level: 3/10
Classification: Appetizer

---


A Walk Down Memory Lane

Growing up, my grandmother's kitchen was the heart of our home. It was a place filled with laughter, stories, and the comforting scent of home-cooked meals. Among the many dishes she prepared, her Tuna Stuffed Hard-Boiled Eggs stood out as a family favorite.


I remember one sunny Easter Sunday when I was about eight years old. We were gathered at my grandparents' house, eagerly participating in the annual egg hunt. Afterward, as everyone settled around the table, my grandmother brought out a platter of her signature stuffed eggs. The room fell silent, except for the clinking of forks and the occasional hum of delight as we savored each bite.


Those eggs were more than just an appetizer; they were a symbol of togetherness. Every time we tasted that familiar combination of creamy tuna and citrusy lemon, we were transported back to those joyful gatherings, surrounded by the warmth of family.


Recreating this dish today is like opening a time capsule. It's a simple recipe, yet it carries with it decades of love and tradition. Whether you're looking to create new memories with your loved ones or revisit old ones, Tuna Stuffed Hard-Boiled Eggs are a delightful way to bring everyone together. Enjoy this easy-to-make appetizer and let it become a cherished part of your family's culinary story.

Read more about Appetizers

Read more about Main Dishes

Read more about Desserts

Herb Roasted Chicken | Made by Meaghan Moineau

Herb Roasted Chicken | Made by Meaghan Moineau

Title: Savoring Tradition: Herb Roasted Chicken for Every Family Gathering


Description: Discover the comforting flavors of Herb Roasted Chicken, a dish that brings family together with its aromatic herbs and juicy tenderness. Perfect for any occasion, this recipe is steeped in tradition and love, making every bite memorable.


---


There's something truly special about the aroma of a perfectly roasted chicken wafting through the house. It’s an aroma that evokes memories of family gatherings, laughter, and shared stories. In our family, Herb Roasted Chicken isn't just a meal—it's a tradition.


Ingredients:

- 2 bay leaves

- 1/4 cup brown sugar


- 4 tablespoons butter, softened


- 2 teaspoons dried basil


- 2 teaspoons dried rosemary


- 2 teaspoons dried thyme


- 1 teaspoon fennel seeds


- 1 quart ice water


- 1 cup kosher salt


- 1 teaspoon black coarse pepper


- 4 quarts water


- 1 whole chicken (about 4-5 pounds)


Instructions:


1. Prepare the Brine: In a large saucepan, combine water, salt, sugar, half of the dried herbs, and bay leaves. Bring to a boil, stirring to dissolve the salt and sugar. Reduce heat to low and simmer for 10 minutes to draw out the flavors of the herbs. Pour the brine into a large bowl and cool it down with ice water. Set aside.
2. Prepare the Chicken: Rinse the chicken cavity and skin thoroughly. Place the chicken in the brine, ensuring it is completely submerged. Cover and marinate for at least 1 hour and up to 6 hours.
3. Preheat and Prep: Preheat the oven to 375°F. Remove the chicken from the brine and pat dry with a paper towel. Carefully separate the skin from the flesh by inserting your fingers underneath the skin.
4. Season and Roast: Rub butter underneath the skin to ensure moist, tender meat. Coat the skin with the remaining herbs. Place the chicken in a roasting pan. Bake for about 1 hour and 10 minutes, basting halfway through and again during the last 10 minutes. The chicken is done when a meat thermometer reads 165°F in the thickest part of the breast.
5. Rest and Carve: Transfer the chicken to a carving board and let it rest for 10-20 minutes. This allows the juices to settle. Carve by starting at the joints, removing wings, legs, and thighs, and finally, slicing the breasts.

A Nostalgic Family Memory:


Every Thanksgiving, our home was filled with the scent of Herb Roasted Chicken. My grandmother, with her apron dusted with flour and a warm smile on her face, would gather us around the kitchen counter. The kitchen was the heart of our home, bustling with activity and chatter. As a child, I remember standing on a stool, peering over the counter as she showed me how to gently rub butter beneath the chicken's skin, a secret she said made all the difference.


After the chicken was roasted to perfection, we would sit around the table, sharing stories of past gatherings and making new memories. The Herb Roasted Chicken was always the centerpiece, a symbol of togetherness and love. Even now, as I prepare this dish for my own family, I can feel her presence, guiding my hands and warming my heart.


Difficulty Rating: 6/10


Classification: Main Dish


This Herb Roasted Chicken is more than just a meal; it's a cherished family tradition that brings warmth and connection to any gathering. Whether you're a seasoned chef or a kitchen novice, this recipe is sure to become a beloved staple in your culinary repertoire. Enjoy the flavors and the memories it brings.

Read more about Appetizers

Read more about Main Dishes

Read more about Desserts

Goat Cheese, Fig And Proscuitto Crostini | Made by Meaghan Moineau

Goat Cheese, Fig And Proscuitto Crostini | Made by Meaghan Moineau

Title: Delightful Nostalgia on a Platter: Goat Cheese, Fig, and Prosciutto Crostini
Description: Dive into a world of flavors with our Goat Cheese, Fig, and Prosciutto Crostini recipe. This easy yet elegant appetizer will transport you back to cherished family gatherings, blending sweet, savory, and creamy notes in every bite. Perfect for any occasion, this dish is sure to impress your guests with its gourmet appeal.

---


A Taste of Memory: The Perfect Appetizer for Family Gatherings


There's something magical about the combination of flavors in a well-crafted appetizer, and our Goat Cheese, Fig, and Prosciutto Crostini is no exception. This dish is a nostalgic nod to the cherished family gatherings of my childhood, where food was the centerpiece of our joyful celebrations.


Ingredients:

- Biscuit-type crackers

- Fig jam


- Prosciutto


- Goat cheese


- White peppercorns, cracked


Instructions:

1. Preheat the Oven: Start by preheating your oven to 350 degrees Fahrenheit. The anticipation of the warm, melting cheese is worth every minute of preparation.
2. Assemble the Crostini: Spread 1 teaspoon of fig jam on each cracker. The sweet, sticky jam forms the perfect base for our savory topping.
3. Layer with Prosciutto: Place a small piece of prosciutto on each cracker. The saltiness of the prosciutto beautifully complements the sweetness of the fig jam.
4. Add the Cheese: Slice the goat cheese and place one slice on each prepared cracker. The creamy texture of the cheese adds a luxurious touch to this simple yet sophisticated dish.
5. Bake to Perfection: Arrange the crostini on sheet trays and bake in the preheated oven for 10-12 minutes until the edges of the cheese start to brown.
6. Finish with Flavor: Remove from the oven and top with cracked white pepper for an added layer of aroma and subtle heat.

A Nostalgic Family Memory


I vividly remember the first time my grandmother introduced this delightful recipe at our annual family reunion. The kitchen was filled with laughter and the irresistible aroma of freshly baked crostini. As we gathered around the table, the crostini became more than just an appetizer; it was a symbol of togetherness and love.


Each bite was a journey back to those precious moments, where the sweet fig jam and savory prosciutto mirrored the harmonious blend of personalities in our family. It was a dish that brought everyone together, regardless of age or preference. The creamy goat cheese was the perfect centerpiece, much like my grandmother, who held our family together with her warmth and kindness.


Difficulty Rating: 3/10


This recipe is wonderfully simple to make, earning a difficulty rating of 3 out of 10. It's perfect for both novice cooks and experienced chefs looking to add a touch of elegance to their appetizer spread.


Classification: Appetizer


Ideal as a starter, this Goat Cheese, Fig, and Prosciutto Crostini sets the stage for any meal. Its blend of flavors and textures makes it an unforgettable appetizer that will delight your guests and create lasting memories.


Incorporate this appetizer into your next gathering, and let the flavors transport you to a place of warmth, love, and cherished family memories. Whether you're hosting a dinner party or enjoying a quiet evening at home, this crostini recipe is sure to become a favorite in your culinary repertoire.

Read more about Appetizers

Read more about Main Dishes

Read more about Desserts

Spinach Cheese Tortellini | Made by Meaghan Moineau

Spinach Cheese Tortellini | Made by Meaghan Moineau

Title: Spinach Cheese Tortellini: A Comfort Dish with a Dash of Nostalgia
Description: Dive into the heartwarming world of Spinach Cheese Tortellini, a creamy and flavorful delight that's perfect for any family gathering. Learn how to create this comforting main dish with a touch of nostalgia and simple yet effective ingredients.

---


Spinach Cheese Tortellini: A Comfort Dish with a Dash of Nostalgia

When it comes to comfort food, nothing beats the feeling of sitting around the table with loved ones, sharing a meal that brings warmth and joy. One dish that has always held a special place in my heart is Spinach Cheese Tortellini. This creamy and flavorful delight not only satisfies the taste buds but also brings back cherished memories of family gatherings. Let's dive into the recipe and a story that makes this dish so dear to me.


A Taste of Home

Growing up, family dinners were a sacred tradition in our household. Every Sunday, my grandmother would don her favorite apron, and the kitchen would transform into a fragrant haven of delicious aromas. The star of many of these gatherings was her Spinach Cheese Tortellini. As a child, I remember eagerly watching her skillfully prepare the dish, her hands moving with grace and precision. The kitchen was filled with laughter and stories, making every meal a cherished memory.


The combination of cheese-filled tortellini bathed in a creamy tomato sauce was irresistible. The addition of fresh spinach not only added a vibrant color but also made us feel like we were indulging in something healthy. The gentle spice from the red pepper flakes and the aromatic blend of thyme, oregano, and basil created a symphony of flavors that danced on our palates.


Ingredients:

- Butter


- Canned tomato


- Fresh dried cheese tortellini (prepared as per package instructions)


- Cumin


- Dried basil


- Flour


- Garlic


- Garlic powder


- Heavy cream


- Milk


- Olive oil


- Diced onion


- Onion powder


- Oregano


- Fresh parmesan cheese


- Raw sugar


- Red pepper flakes


- Pepper and salt


- Fresh spinach


- Thyme


Instructions:

1. Prepare the tortellini according to the package instructions. This will ensure they are perfectly cooked and ready to be enveloped in the creamy sauce.


2. In a large stainless steel pan, heat the diced onions in olive oil and butter over medium heat until they are soft and translucent, about 3-4 minutes.


3. Add the garlic and let it cook for an additional minute, releasing its rich aroma.


4. Stir in the canned tomatoes (juice and all), along with salt, pepper, garlic powder, onion powder, red pepper flakes, thyme, oregano, cumin, dried basil, and raw sugar. Allow the mixture to simmer for about 5 minutes.


5. Add the spinach leaves all at once, cover the pan, and let them wilt. Stir occasionally. If the tomato mixture becomes too dry, add water a cup at a time as needed.


6. In a small bowl, mix flour, milk, and cream together. Whisk until well blended, then add to the tomato/spinach mixture. Stir in the Parmesan cheese.


7. Using a slotted spoon, gently remove the tortellini from its cooking water and add them to the tomato mixture. Carefully mix with a wooden spoon to avoid breaking the tortellini.


8. Heat on the stovetop until everything is warmed through. Serve immediately, garnished with Parmesan cheese and fresh basil.


Nostalgia at Every Bite

As I prepare this dish today, I can't help but reminisce about those cherished Sunday dinners. The sense of nostalgia is as rich as the creamy sauce itself. Sharing this recipe with my family now, I hope to create the same warm memories for my children that my grandmother gifted to me.


Difficulty Rating: 5/10
Classification: Main Dish

Spinach Cheese Tortellini is more than just a meal; it's a journey back to simpler times, where love and laughter were the secret ingredients. Try this recipe today and create your own treasured memories around the dinner table.

Read more about Appetizers

Read more about Main Dishes

Read more about Desserts

Zesty Lime Marinated Chicken with Homemade Watermelon Salsa | Made by Meaghan Moineau

Zesty Lime Marinated Chicken with Homemade Watermelon Salsa | Made by Meaghan Moineau

Title: Savor Summer: Zesty Lime Marinated Chicken with Homemade Watermelon Salsa
Description: Dive into the vibrant flavors of summer with our Zesty Lime Marinated Chicken topped with a refreshing Homemade Watermelon Salsa. This dish combines the tangy essence of lime with the sweet crunch of watermelon, creating a symphony of tastes that will transport you to sun-drenched days and warm family gatherings. Serve it with our Simple Garlic Toast for a meal that’s both delightful and memorable.

---


A Taste of Summer: Nostalgia on a Plate


Growing up, summers at my grandmother's house were the highlight of the year. Her backyard was a lush paradise of blooming flowers and the sweet scent of freshly cut grass. But what truly made those days unforgettable were the family barbecues. My uncle, the self-proclaimed grill master, would always bring his signature dish—Zesty Lime Marinated Chicken with Homemade Watermelon Salsa.


The preparation was a family affair. My grandmother would hand me a small paring knife, and together, we’d dice watermelon, cucumber, and sweet peppers, laughing at the mess we made in the process. My uncle would whisk together lime juice, honey, and a hint of Tabasco for the glaze, sneaking spoonfuls to taste, claiming he needed to "make sure it was just right."


As the chicken sizzled on the grill, the air filled with the zesty aroma of lime and garlic, mingling with the scent of watermelon salsa. Finally, when everything was ready, we'd gather around the table, diving into the vibrant, flavorful feast. Those meals were more than just food; they were a celebration of family, love, and the simple joys of summer.


Ingredients


- For the Salsa:

- Diced watermelon


- Diced cucumber


- Sweet fresh ear corn


- Fresh cilantro


- Yellow sweet diced orange pepper


- Red diced onion


- 1 cup fresh lime juice


- Honey


- Crushed red pepper flakes


- Salt


- For the Chicken:

- Skinless boneless chicken breasts


- 3 tablespoons fresh lime juice


- Garlic powder


- Fresh ground pepper


- Salt


- Extra virgin olive oil


- For the Honey Lime Glaze:

- 1 cup fresh lime juice


- 2 tablespoons honey


- Tabasco sauce


Instructions


1. To Make Salsa:

In a medium bowl, combine watermelon, cucumber, sweet pepper, corn, cilantro, and onion. In a small bowl, mix together lime juice, honey, red pepper flakes, and salt. Refrigerate for at least 1 hour before serving, to allow flavors to blend.


2. To Make Chicken:

In a shallow bowl, add the chicken, 3 tablespoons lime juice, and sprinkle with garlic powder, salt, and pepper. Marinate in the refrigerator for 30 minutes. Coat a large nonstick pan or a grill pan with olive oil spray, add olive oil, and heat. Add chicken, cover, and sauté over medium heat until browned on both sides and cooked through, about 10-12 minutes total. Remove the chicken from the pan.


3. To Make Honey Lime Glaze:

In a small bowl, mix together lime juice, honey, and Tabasco. Add the honey lime glaze to the same pan. Cook for about 30 seconds until melted. Return cooked chicken to the pan, flipping the chicken once to coat with the glaze. Remove from pan and plate each piece. Spoon watermelon salsa on top of each piece of chicken and serve with more salsa on the side.


4. Serve with Simple Garlic Toast:

Start with 4 slices of sourdough wheat bread. Cut each slice in half and toast all of them. Spread each half with 1 teaspoon reduced-fat butter or Smart Balance Light. Sprinkle each with a little garlic powder. Place all 8 halves on a plate and reheat in the microwave for about 15 seconds.


Difficulty: 5/10

Classification: Main Dish

---


This dish is not just a meal; it's an invitation to create your own memories. Whether you're hosting a backyard barbecue or enjoying a quiet evening with family, let the flavors of Zesty Lime Marinated Chicken with Homemade Watermelon Salsa bring a touch of nostalgia and warmth to your table.

Read more about Appetizers

Read more about Main Dishes

Read more about Desserts

Crème Fraiche Coconut Bavarians | Made by Meaghan Moineau

Crème Fraiche Coconut Bavarians | Made by Meaghan Moineau

Title: "Indulge in Nostalgia: Crème Fraiche Coconut Bavarians"
Description: Dive into the creamy, dreamy world of Crème Fraiche Coconut Bavarians, a dessert that perfectly blends the tropical allure of coconut with the luxurious touch of crème fraiche. This delightful treat is not just a feast for the senses but also stirs the soul with cherished family memories. Discover the step-by-step guide to crafting this elegant dessert and uncover the story behind its special place in our hearts.

---


A Taste of Yesteryears: Crème Fraiche Coconut Bavarians

Food has a magical way of transporting us back in time, evoking memories that are as vivid as the flavors on our palate. For me, Crème Fraiche Coconut Bavarians is more than just a dessert; it's a sweet journey back to my grandmother's cozy kitchen, where laughter mixed with the aroma of coconut and crème fraiche.


Ingredients:

- Gelatin


- Coconut milk


- Canned sweetened condensed milk


- Sugar


- Egg yolks


- Alouette Cuisine Crème Fraiche


- Shredded coconut


Instructions:
1. Bloom the Gelatin: Start by combining your gelatin with 4 tablespoons of coconut milk. Allow it to bloom, setting the foundation for our creamy dessert.
2. Heat the Milk Mixture: In a saucepan over medium-high heat, bring together the canned sweetened condensed milk and the remaining coconut milk until it simmers gently.
3. Prepare the Egg Mixture: Whisk the sugar and egg yolks until well combined. Carefully temper this mixture by gradually adding a small amount of the heated milk mixture, continuing to whisk briskly.
4. Combine and Thicken: Slowly pour the tempered egg yolk mixture back into the saucepan with the milk mixture. Heat while stirring constantly for 5-7 minutes, until the mixture is thick enough to coat the back of a spoon.
5. Incorporate Gelatin: Remove from heat and stir in the bloomed gelatin until fully dissolved.
6. Chill and Prepare: Pour the entire mixture into a bowl and refrigerate until it begins to gel.
7. Whip the Crème Fraiche: In a separate bowl, whip the Alouette Cuisine Crème Fraiche to a soft peak.
8. Fold and Mold: Once the refrigerated mixture starts to gel, fold it together with the whipped crème fraiche. Pour into your desired molds and refrigerate overnight.
9. Serve with a Coconut Coating: To serve, carefully remove the Bavarians from their molds and generously cover with shredded coconut.
A Family Memory:

The first time I tasted Crème Fraiche Coconut Bavarians, I was a child, eagerly watching my grandmother craft this masterpiece with the patience and grace only she possessed. Her kitchen was a wonderland of flavors, each dish a testament to her love for cooking and for us. I remember how she would let me sprinkle the shredded coconut, a task I took seriously as if the success of the dessert depended on it. The simplicity and richness of flavors in each bite always felt like a warm hug, a reminder of those afternoons spent in her kitchen, filled with stories and laughter. Even now, every spoonful of this dessert is a nostalgic embrace, a cherished memory of love and family.


Difficulty Rating: 6/10
Classification: Dessert

Crafting Crème Fraiche Coconut Bavarians may take a bit of patience and finesse, but the end result is a luxurious dessert that is sure to impress. Whether you're serving it at a family gathering or indulging in a solo treat, this dish is a beautiful blend of flavors and memories. So, go ahead, indulge your senses and your soul with this nostalgic delight.

Read more about Appetizers

Read more about Main Dishes

Read more about Desserts

Easy and Addictive Eggplant “Chips | Made by Meaghan Moineau

Easy and Addictive Eggplant "Chips | Made by Meaghan Moineau

Crispy Delights: Easy and Addictive Eggplant "Chips"


Description

Discover the perfect snack with our Easy and Addictive Eggplant "Chips" – a delightful combination of savory flavors and crispy texture. This simple recipe takes the humble eggplant and transforms it into a delicious treat that’s perfect as an appetizer or a light snack. With the rich umami taste of soy sauce, the aromatic hint of dried garlic, and a touch of sweetness, these eggplant chips are sure to become a household favorite. Follow along as we guide you through this easy-to-make dish and share a heartwarming family memory that makes it even more special.

Ingredients

- 1 large eggplant, sliced into thin rounds

- 1 cup “chicken” broth (vegetarian or regular)


- 1 tablespoon dried garlic granules


- 3 tablespoons soy sauce


- 1 tablespoon sugar


Instructions


1. Preheat the Oven: Begin by preheating your oven to 400°F (200°C). This ensures your eggplant chips will cook evenly and achieve that perfect crisp.
2. Prepare the Eggplant: Arrange the eggplant rounds in a single layer on a large cookie sheet. This will allow each slice to absorb the marinade evenly.
3. Make the Marinade: In a bowl, whisk together the “chicken” broth, dried garlic granules, soy sauce, and sugar until well combined.
4. Marinate the Eggplant: Pour the marinade over the eggplant slices, ensuring each piece is coated. Turn the slices over so the marinade can soak into both sides. Allow the eggplant to marinate briefly while the oven is preheating.
5. Bake the Eggplant: Place the marinated eggplant in the oven and bake for 10-15 minutes, or until the underside is nicely browned. Flip the slices over with a spatula and continue baking for another 5-10 minutes, until both sides are caramelized and tender.
6. Serve and Enjoy: Remove the eggplant chips from the oven and serve immediately. Enjoy the crispy, gooey, and well-browned delights as a tasty appetizer or snack.

*Note: Any remaining sauce that doesn’t absorb into the eggplant will bake onto the pan. Simply soak the pan for at least 10 minutes to clean easily.*


Nostalgic Family Memory


Growing up, my grandmother’s kitchen was a treasure trove of delicious aromas and comforting flavors. One of the fondest memories I have is the smell of eggplant chips wafting through the house, signaling a weekend gathering of family and friends. Grandma would always prepare a huge batch of these addictive snacks, knowing that they would disappear in no time. As children, we eagerly awaited the moment when the oven timer would ding, and the tray of crispy eggplant slices would emerge, glistening and caramelized. Those eggplant chips became synonymous with laughter, storytelling, and the warmth of family togetherness. Even now, every time I make this recipe, it feels like a comforting embrace from the past, a reminder of those cherished moments shared around the kitchen table.


Difficulty Rating: 3/10


Classification: Appetizer


Indulge in this easy yet addictive recipe and create new memories with your loved ones. Whether you’re hosting a get-together or simply craving a savory snack, these eggplant chips are sure to impress with their rich flavors and satisfying crunch.

Read more about Appetizers

Read more about Main Dishes

Read more about Desserts

Moroccan Chicken Pitas | Made by Meaghan Moineau

Moroccan Chicken Pitas | Made by Meaghan Moineau

Title: Savoring Tradition: Moroccan Chicken Pitas and Family Memories

Description: Dive into the vibrant flavors of Moroccan cuisine with our recipe for Moroccan Chicken Pitas. This delightful dish combines aromatic spices and fresh ingredients to create a meal rich in tradition and taste. Join us as we explore the preparation of these flavorful pitas and share a nostalgic family story that makes this dish all the more special. Rated at a moderate difficulty of 6/10, this recipe serves as a delectable main dish for any occasion.


---


Moroccan Chicken Pitas: A Journey Through Flavor and Time


There's something truly special about preparing a meal that not only tantalizes the taste buds but also evokes cherished memories. Moroccan Chicken Pitas are one such dish, combining the vibrant spices of Morocco with the warmth of family tradition. This recipe, with its medley of flavors and textures, transports me back to joyful gatherings and lively conversations around the dinner table.


Ingredients:


- Pita bread


- Skinless boneless chicken breasts


- Paprika


- Coriander


- Cinnamon


- Cumin


- Cayenne pepper


- Garlic


- Ginger


- Salt


- Olive oil


- Fresh Italian parsley


- Cooked quinoa


- Canned diced petite tomatoes


- Yellow diced onion


- Lemon (juice)


- Diced Medjool dates


- Olive oil


- Sea salt


- Greek yogurt


- Diced cucumber


- Mint


- Lemon (juice)


Instructions:


1. Prepare the Spice Rub:

- In a small dish, combine paprika, coriander, cinnamon, cumin, cayenne pepper, garlic, ginger, and salt. Stir thoroughly.


2. Marinate the Chicken:

- Using a meat mallet, pound the chicken breasts until they're about 1/2 inch thick.


- Generously rub the spice mixture on all sides of the chicken breasts. Cover and refrigerate for about an hour.


3. Prepare the Tabbouleh:

- Combine cooked quinoa, canned diced petite tomatoes, yellow diced onion, lemon juice, diced Medjool dates, olive oil, and sea salt.


- Adjust salt and oil to taste. Cover and chill while the chicken is marinating. (Tip: Enjoy a handful of pita chips with a scoop of this refreshing mix!)


4. Grill the Chicken:

- Prepare the grill to medium heat.


- Grill the marinated chicken until thoroughly cooked, about 16 minutes. I prefer mine with a slight char for added flavor.


5. Assemble the Pitas:

- Half and split open the pita bread.


- Fill each half with slices of grilled chicken, tabbouleh, and a generous dollop of the yogurt sauce made from Greek yogurt, diced cucumber, mint, and lemon juice.


A Nostalgic Family Memory:


The aroma of Moroccan spices takes me back to my grandmother's kitchen, where the air was always filled with mouth-watering scents and laughter. Every Sunday, our family would gather for a feast, and my grandmother's Moroccan Chicken Pitas were always the star of the show. I remember her meticulously preparing the spices, her hands working with the ease and grace that only years of practice can bring.


As children, we would hover around the kitchen, eager for a taste. She would shoo us away with a playful smile, always making sure there was extra tabbouleh for us to nibble on with pita chips. These pitas were more than a meal; they were a celebration of our heritage and the love that bound us together. Each bite was a reminder of the warmth and joy that filled our family gatherings.


Difficulty Rating: 6/10


Classification: Main Dish


---


Whether you're looking to relive a cherished memory or create new ones, Moroccan Chicken Pitas offer a delicious journey through flavors and time. With its blend of spices and fresh ingredients, this dish is sure to impress at any gathering and bring a touch of Moroccan magic to your table.

Read more about Appetizers

Read more about Main Dishes

Read more about Desserts

Lemon Fish with Sweet Potatoes | Made by Meaghan Moineau

Lemon Fish with Sweet Potatoes | Made by Meaghan Moineau

Title: Zesty Lemon Fish with Sweet Potatoes: A Flavorful Journey Down Memory Lane
Description: Dive into the delightful flavors of Lemon Fish with Sweet Potatoes, a dish that brings together the zesty tang of lemon and the creamy richness of coconut sauce. This easy-to-follow recipe is not only a treat for the taste buds but also a heartwarming trip down memory lane. Rated at a difficulty of 5 out of 10, this main dish is perfect for both family gatherings and cozy dinners.

---


There’s something about the aroma of fresh lemon and sizzling butter that instantly transports me back to my childhood kitchen. The scent wafts through the air, mingling with the sweet notes of coconut milk and the earthy tones of sweet potato. Every time I prepare Lemon Fish with Sweet Potatoes, I'm reminded of the Sunday afternoons spent in my grandmother's warm kitchen, where the family would gather and share stories over a hearty meal.


Ingredients:

- Butter


- Chili pepper


- Coconut sauce


- Coconut milk


- Croaker fish


- Garlic clove


- Seasoning cube


- Half of a seasoning cube


- Lemon


- Red bulb of onion


- Sprinkle of parsley


- Pepper soup spice


- Sweet potato


- Vegetable oil


Instructions:
1. Prepare the Sweet Potatoes: Begin by washing and placing your sweet potatoes in a pot. Bring them to a boil until they are soft. Once cooked, peel, slice, and set them aside. The sweet potatoes add a creamy texture that perfectly complements the zesty fish.
2. Season the Fish: Take your croaker fish and season it generously with pepper soup spice. Set it aside to allow the flavors to meld together.
3. Sauté the Aromatics: In a pan, preheat butter and vegetable oil over medium heat. Add the chopped onions and chili pepper, frying them for a minute until they release their fragrant aroma. This step always reminds me of the laughter and chatter that filled my grandmother’s kitchen as we eagerly awaited our meal.
4. Cook the Fish: Gently place the seasoned fish into the pan. Squeeze a fresh lemon over the fish, adding a vibrant zest to the dish. Sprinkle half of a seasoning cube over the fish. Allow it to cook on low heat until it turns a beautiful golden brown. Flip the fish to brown the other side, ensuring it’s cooked through.
5. Create the Coconut Sauce: In a separate saucepan, heat coconut milk with minced garlic, the remaining seasoning cube, and a sprinkle of parsley. Allow the sauce to thicken slightly, creating a luscious, rich complement to the fish.
6. Serve: Arrange the fish and sweet potatoes on a plate. Generously drizzle the coconut sauce over the top and garnish with extra chili for a kick of heat. The harmony of flavors in this dish is reminiscent of the comforting meals that brought my family together.
A Nostalgic Memory:

Preparing this dish often brings back vivid memories of my grandmother, a master of creating magic in the kitchen with seemingly simple ingredients. I remember her teaching me how to balance flavors, her hands deftly crafting meals infused with love and tradition. Each bite of Lemon Fish with Sweet Potatoes is more than just a culinary experience; it’s a cherished connection to my past and the moments spent in the warmth of family love.


Difficulty Rating: 5/10
Classification: Main Dish

This Lemon Fish with Sweet Potatoes recipe is a testament to the power of food to evoke memories and create new ones. Whether you're cooking for family or friends, this dish promises to be a delightful centerpiece, rich in flavor and history. Enjoy not just a meal, but a story that continues to unfold with every preparation.

Read more about Appetizers

Read more about Main Dishes

Read more about Desserts

Cod with tomatoes, olives and polenta | Made by Meaghan Moineau

Cod with tomatoes, olives and polenta | Made by Meaghan Moineau

Title: Savoring Tradition: Cod with Tomatoes, Olives, and Polenta - A Heartfelt Italian Feast
Description: Dive into the flavors of the Mediterranean with our Cod with Tomatoes, Olives, and Polenta recipe. This main dish, rated at a moderate difficulty of 5/10, combines the fresh taste of cod with the tangy depth of olives and tomatoes, all served alongside creamy polenta. It's a nostalgic culinary journey that warms the soul and brings back cherished family memories.

---


A Culinary Journey Through Time: Cod with Tomatoes, Olives, and Polenta

In the heart of our family kitchen, the aroma of cod simmering with ripe tomatoes and briny olives was synonymous with Sunday gatherings. This dish, steeped in tradition and rich in flavor, was a staple at our family table. It was a recipe passed down from my Nonna, a cherished family heirloom that we lovingly recreated, preserving its authenticity with each preparation.


Ingredients:

- Fresh cod fillets


- Black olives


- Tomatoes


- Dry white wine


- Fresh parsley


- Olive oil


- Fresh and dry oregano


- Corn flour


- Instant corn polenta


- Salt


- White pepper


- Water


Instructions:
1. Prepare the Cod: If your fillets are frozen, be sure to thaw them beforehand. In a shallow dish, mix corn flour with a pinch of salt and white pepper. Dredge each fillet through the seasoned flour, coating evenly.
2. Sauté the Fillets: Heat olive oil in a large skillet over medium heat. Sauté the fillets, allowing them to cook for about 3 minutes on each side until they develop a golden crust. Once done, sprinkle the fillets with a splash of dry white wine, letting it sizzle and infuse the fish with its delicate aroma.
3. Create the Sauce: Add chopped tomatoes and black olives to the skillet, letting them mingle with the fish. Cook this vibrant mixture for about 5 minutes, until the tomatoes soften and release their juices.
4. Finish with Herbs: Before serving, garnish the fillets with freshly chopped parsley and a sprinkle of oregano, both dry and fresh, to elevate the dish with their fragrant essence.
5. Craft the Polenta: In a separate pot, bring water to a boil. Add a dash of white wine, a sprinkle of salt, and a hint of dry oregano. Gradually stir in the instant polenta, whisking continuously for about 5 minutes until it thickens to your desired consistency. If the mixture becomes too thick, add a bit more boiling water.
6. Serve: Allow the polenta to cool slightly before serving it alongside the cod, ensuring each bite is a comforting blend of flavors.
A Taste of Nostalgia:

This dish is more than just a meal; it's a portal to cherished memories. I remember standing on a stool beside my mother, my small hands eager to help as she expertly coated the cod in flour, her eyes twinkling with the joy of passing down our family tradition. The kitchen was filled with laughter and stories of my grandparents' adventures in the Italian countryside, where this recipe was born.


As the sun dipped below the horizon, our family gathered around the table, the comforting warmth of this dish uniting us. Each bite was a celebration of our heritage, a reminder of the love and labor that went into creating this masterpiece.


Difficulty: 5/10
Classification: Main Dish

---


Whether you're recreating this dish for a special occasion or a cozy family dinner, our Cod with Tomatoes, Olives, and Polenta is a delightful reminder of the simple pleasures of life. It's a taste of nostalgia, a journey through tradition, and a testament to the power of food to bring families together. Enjoy this recipe, and may it become a beloved part of your own culinary story.

Read more about Appetizers

Read more about Main Dishes

Read more about Desserts

Rack of Lamb With Parsley | Made by Meaghan Moineau

Rack of Lamb With Parsley | Made by Meaghan Moineau

Title: A Nostalgic Feast: Rack of Lamb with Parsley and Family Memories
Description: Dive into the rich flavors of our Rack of Lamb with Parsley recipe—a main dish destined to become a family favorite. Discover the warmth of shared memories and how this dish brings culinary delight to the table. Rated 6/10 in difficulty, it's a perfectly elegant addition to any dinner menu, ideal for both seasoned cooks and adventurous beginners.

---


When I think of home-cooked meals that bring the family together, my mind inevitably drifts to the aroma of a perfectly roasted Rack of Lamb with Parsley. This dish has been a staple in our family’s culinary repertoire for generations, and each time I prepare it, I am reminded of my grandmother's kitchen, where the warmth of the oven was only surpassed by her welcoming smile.


Ingredients:

- 1 rack of lamb


- 2 tablespoons peanut oil


- Salt and freshly ground pepper to taste


- 2 tablespoons Dijon mustard


- 2 slices white bread, crumbled


- 1 bunch fresh parsley, chopped


- 1 green garlic clove, minced


- 1 shallot, finely chopped


- 1 teaspoon herbes de Provence


- 2 tablespoons unsalted butter, melted


Instructions:

1. Preheat your oven to 400°F (200°C). Brush the rack with peanut oil, and sprinkle it generously with salt and freshly ground pepper.


2. Place the rack in a roasting pan and roast it in the preheated oven for 12 minutes. This initial roasting sets the stage for a beautifully tender lamb.


3. Remove the meat from the oven, and coat it evenly with Dijon mustard. Lower the oven temperature to 350°F (175°C) to ensure a delicate finish.


4. In a medium bowl, combine the bread crumbs, parsley, shallot, garlic, herbes de Provence, and melted butter. This mixture will form a flavorful crust that elevates the lamb to new heights.


5. Spread the bread crumb mixture over the top of the rack, pressing gently to adhere.


6. Return the rack to the 350°F oven, and roast for an additional 15 minutes. The result is a medium-rare lamb rack, with a crust that is both crispy and fragrant.


7. Remove the rack from the oven and let it rest for 10 minutes before carving it into chops.


This dish was the centerpiece of many family gatherings at my grandmother’s house. I remember the anticipation as the aroma filled the room, signaling that dinner was almost ready. My grandmother would regale us with stories from her youth, her voice as comforting as the meal she was preparing. There was something magical about how this simple yet elegant dish could transform an ordinary evening into a cherished memory.


Difficulty Rating: 6/10
Classification: Main Dish

There’s a certain art to preparing a rack of lamb, and while it may seem daunting at first, with a little patience and practice, it becomes a rewarding experience. Whether you’re hosting a dinner party or simply want to treat your family to something special, this Rack of Lamb with Parsley is sure to impress. As you carve into the tender meat and savor the herbaceous crust, you’re not just serving a meal—you’re creating memories that will be cherished for years to come.

Read more about Appetizers

Read more about Main Dishes

Read more about Desserts

Pear and Pesto Crostini | Made by Meaghan Moineau

Pear and Pesto Crostini | Made by Meaghan Moineau

Title: A Taste of Nostalgia: Savory Pear and Pesto Crostini
Description: Dive into the mouthwatering world of Pear and Pesto Crostini, a delectable appetizer that brings together the rich flavors of fresh basil pesto and the sweet juiciness of Bosc pears. Perfect for nostalgic family gatherings or a sophisticated soirée, this recipe is sure to become a cherished favorite.

---


There's something timeless about the smell of fresh basil and garlic wafting through the kitchen. It takes me back to Sunday afternoons spent in my grandmother's sunlit kitchen, where the family gathered around the rustic wooden table, eagerly awaiting a spread of delightful appetizers. Among her many culinary treasures, the Pear and Pesto Crostini held a special place in our hearts.


The magic begins with a simple loaf of French bread. Preheat your oven to 400 degrees and slice the loaf into elegant 1/2-inch-thick rounds. A gentle brush of your best olive oil transforms these humble slices into golden vessels of flavor. As they toast to a deep golden brown in the oven, the anticipation builds.


Meanwhile, the heart of this dish—the vibrant pesto—is crafted. In a dance of flavors, fresh basil leaves, a clove of garlic, pine nuts, and tangy Pecorino Romano cheese come together in a food processor. The transformation is magical, as the ingredients are pulsed into a coarse texture, reminiscent of coarse sand. A drizzle of olive oil brings it all together, creating a pesto that is as fragrant as it is flavorful. Taste, and season with salt and pepper until it sings in harmony.


As the bread cools, I remember the laughter and stories shared in my grandmother's kitchen. We would gather around, eager to top each crostini with a dollop of the green gold pesto, and a slice of sweet Bosc pear. The combination of savory and sweet, crunchy and creamy, was a revelation that delighted our taste buds and hearts alike.


This appetizer, with a difficulty rating of 3 out of 10, is not only simple to prepare but also a stunning addition to any gathering. Whether you're hosting a casual brunch or an elegant dinner party, Pear and Pesto Crostini is sure to impress. It's a dish that invites conversation, evokes memories, and creates new ones with each bite.


So, gather your loved ones, and let the aroma of fresh pesto fill your home. Create a new tradition with this exquisite appetizer, and savor the flavors of nostalgia with each delightful bite.

Read more about Appetizers

Read more about Main Dishes

Read more about Desserts

Bacon Wrapped Green Bean Bundles | Made by Meaghan Moineau

Bacon Wrapped Green Bean Bundles | Made by Meaghan Moineau

Title: Savoring Nostalgia: Bacon Wrapped Green Bean Bundles for the Soul


Description:

Discover the delightful blend of savory and sweet with our Bacon Wrapped Green Bean Bundles. This easy-to-make appetizer not only tantalizes your taste buds but also transports you back to cherished family gatherings. Read on for a heartwarming story and a step-by-step guide to creating this delectable dish.

---


A Taste of Tradition: Bacon Wrapped Green Bean Bundles


When the leaves began to fall and the air turned crisp, our family gathered in the cozy warmth of Grandma’s kitchen. It was a scene of bustling activity, laughter, and the irresistible aroma of something delicious baking in the oven. Among the many dishes that graced our holiday table, one stood out for its simplicity and flavor: Bacon Wrapped Green Bean Bundles.


These delightful bundles were a staple at our family feasts, embodying the perfect harmony of savory and sweet. Grandma would always say, “A dish made with love is a dish worth remembering,” and indeed, her green bean bundles were unforgettable. Each bite was a symphony of crispy bacon, tender green beans, and a luscious glaze of butter, brown sugar, garlic, and soy sauce.


Ingredients:

- Fresh green beans

- Bacon


- Butter


- Brown sugar


- Fresh garlic


- Soy sauce


Instructions:


1. Preheat the Oven: Set your oven to 425°F (220°C) and let it warm up while you prepare the dish.
2. Prepare the Baking Dish: Grease a 10x15 inch baking dish and set it aside for later use.
3. Wrap the Green Beans: Take 8 or 9 fresh green beans and wrap them with a strip of bacon. Place each bundle in the prepared baking dish. Repeat this process until all your green beans are used.
4. Create the Glaze: In a small saucepan, combine butter, brown sugar, fresh garlic, and soy sauce. Heat the mixture gently until the butter is melted and the ingredients are well combined.
5. Dress the Bundles: Pour the warm glaze over the green bean bundles, ensuring that each one is coated evenly.
6. Bake to Perfection: Place the baking dish in the preheated oven and bake for 25 to 30 minutes. The bundles are ready when the bacon is browned and crispy, and the green beans are tender.

A Walk Down Memory Lane


As the bundles baked, the kitchen would fill with a mouthwatering scent that drew everyone in. My cousins and I would sneak peeks through the oven door, eagerly waiting for the timer to ring. Once they were finally ready, we would gather around the table, the room buzzing with conversation and the clinking of silverware. It was in these moments that I learned the true essence of family: sharing, laughter, and the simple joy of being together.


Difficulty: 3/10


This recipe is delightfully easy to make, yet it offers an impressive presentation that will wow your guests. It’s the perfect appetizer for any gathering, from casual dinners to festive celebrations.


Classification: Appetizer


Whether you’re hosting a holiday feast or a simple dinner party, these Bacon Wrapped Green Bean Bundles are sure to be a hit. They’re a testament to the idea that sometimes, the simplest dishes hold the most cherished memories.


So, gather your ingredients, preheat your oven, and prepare to create a dish that will not only satisfy your culinary cravings but also warm your heart with nostalgia.

Read more about Appetizers

Read more about Main Dishes

Read more about Desserts

Jean’s Seafood Gumbo | Made by Meaghan Moineau

Jean's Seafood Gumbo | Made by Meaghan Moineau

Title: "Stirring Up Tradition: Jean's Seafood Gumbo - A Heartfelt Creole Classic"


Description:

Dive into the rich flavors and history of Jean's Seafood Gumbo, a classic Creole dish that brings together family traditions and the bold taste of Louisiana. This main dish, with a difficulty rating of 8/10, promises a culinary journey through the bayous, capturing the essence of Southern hospitality in every savory bite.

---


A Whiff of the Past: The Allure of Jean's Seafood Gumbo


There’s something magical about certain dishes, those that have the power to transport us back in time, evoking memories of family gatherings, laughter, and the comforting hum of a bustling kitchen. One such dish in my family is Jean’s Seafood Gumbo, a recipe that has been passed down through generations, each iteration infused with love and a dash of Creole spirit.


Growing up, Sundays at Grandma Jean’s house were nothing short of an event. The aroma of her gumbo would greet us at the door, a warm invitation that promised a day filled with hearty laughter and full bellies. We’d gather in her cozy kitchen, the heart of our family home, watching as she expertly peeled shrimp and chopped vegetables, her hands a blur of practiced precision. Grandma Jean would often tell stories of her own childhood in Louisiana, where she learned the art of gumbo from her mother, who learned it from her own.


Each ingredient was carefully selected and prepared, with fresh shrimp and blue crabs forming the soul of the dish. The process was a family affair, with each of us taking turns stirring the pot and adding a pinch of this or a dash of that, under Grandma Jean’s watchful eye. It was here, enveloped in the fragrant steam of the gumbo pot, that we learned the importance of patience, of letting the roux develop its deep, nutty hue, and allowing the flavors to meld into a harmonious symphony.


A Step-by-Step Guide to Jean's Seafood Gumbo


Ingredients:

- Fresh shrimp, blue fresh crabs


- Celery, parsley, green peppers, onion, green onions, garlic


- Bay leaves, tomato paste, vegetable oil, flour


- Salt, black ground pepper, dried thyme, Worcestershire sauce


- Whole canned tomatoes, Tabasco sauce, Creole seasoning


- Smoked andouille, filé powder, fresh okra


- White Louisiana rice


Instructions:
1. Create the Stock: In a large 14-16 quart pot, bring two quarts of water to a boil. Peel and devein shrimp, saving the heads and hulls. Boil these in the pot for 30 minutes to an hour for a rich Creole stock. Strain and discard the heads and hulls.
2. Prepare the Crabs: Clean the fresh crabs, discarding the hard shell and yellow insides. Set aside.
3. Chop the Vegetables: Dice celery, parsley, peppers, onions, and garlic, keeping the celery and parsley separate.
4. Start the Gumbo: Return the shrimp stock to the stove, adding crabs and bay leaves. Stir in celery, parsley, and tomato paste, bringing the pot to a gentle boil before reducing to a simmer.
5. Make the Roux: In a heavy skillet, heat vegetable oil over medium-low heat and slowly add flour, stirring continuously until the roux reaches a dark mahogany color.
6. Combine Ingredients: Add onions, garlic, and green peppers to the roux. Pour the mixture into the gumbo pot, adding water if necessary, and bring to a boil. Reduce the heat, cover, and let the gumbo simmer.
7. Season and Simmer: Add salt, pepper, thyme, Worcestershire sauce, Tabasco sauce, and Creole seasoning to taste. Fry the sausages and okra separately before adding to the gumbo. Stir in chopped tomatoes, bringing everything to a boil, then simmer for 2½ to 3 hours.
8. Finish the Dish: Add shrimp and stir in filé powder, cooking for an additional 20-30 minutes. Adjust seasonings as needed.
9. Serve: Serve over white Louisiana rice and enjoy the taste of tradition.

Rating and Classification


Difficulty: 8/10
Classification: Main Dish

As the years have passed, Jean’s Seafood Gumbo has remained a cherished symbol of family unity and culinary heritage. It’s more than just a meal; it’s a celebration of our roots, a testament to the power of food to bring people together. Whether you’re a seasoned chef or a gumbo novice, this dish is sure to fill your home with warmth, laughter, and the irresistible essence of Creole cuisine.

Read more about Appetizers

Read more about Main Dishes

Read more about Desserts

Gluten Free Yellow Cake And Cupcakes | Made by Meaghan Moineau

Gluten Free Yellow Cake And Cupcakes | Made by Meaghan Moineau

Title: Celebrating Family Traditions with a Scrumptious Gluten-Free Yellow Cake and Cupcakes
Description: Dive into a heartwarming recipe for a Gluten-Free Yellow Cake and Cupcakes that promises to excite your taste buds while keeping dietary restrictions in mind. Perfect for family gatherings or a simple treat, this dessert boasts a delightful blend of coconut and tapioca flour with a rich vanilla essence. Indulge in a nostalgic journey as we share a cherished family memory tied to this delectable dessert. Rate difficulty: 5/10. Classified as Dessert.

---


There's something magical about the aroma of a cake baking in the oven. It evokes cherished memories and brings people together, serving as a centerpiece for celebrations and simple family moments alike. This Gluten-Free Yellow Cake and Cupcakes recipe is no exception—it's a testament to the power of food in creating lasting memories.


Growing up, Sunday afternoons at my grandmother's house were always a special occasion. The entire family would gather around her cozy kitchen, eagerly awaiting the treats she had lovingly prepared. Her signature yellow cake was always a highlight, and it became a family tradition to bake it together.


When my younger sister was diagnosed with gluten intolerance, my grandmother was determined to adapt her beloved recipe so everyone could enjoy it. After some trial and error, she created this delightful Gluten-Free Yellow Cake and Cupcakes recipe, using coconut flour and tapioca flour to achieve the perfect texture.


Ingredients:

- 1 cup coconut flour


- 1 cup tapioca flour


- 1/2 teaspoon salt


- 1 teaspoon baking soda


- 1 teaspoon baking powder


- 1 teaspoon xanthan gum


- 6 whole eggs


- 1 1/2 cups sugar


- 1 cup veganaise


- 3/4 cup milk alternative (just under)


- 1 tablespoon vanilla extract


- 1/2 cup Earth Balance butter, melted


- 1 cup dairy-free chocolate chips


- Pinch of salt


- 2 cups powdered sugar


Instructions:

1. Preheat your oven to 350 degrees Fahrenheit. If making a layer cake, grease two 8 or 9-inch round cake pans and dust with tapioca flour. Alternatively, line a muffin tin with baking cups for cupcakes.


2. In a bowl, combine the coconut flour, tapioca flour, salt, xanthan gum, baking soda, and baking powder. Set aside.


3. In a separate large bowl, beat the eggs, sugar, and veganaise until the mixture is light and fluffy.


4. Gradually add the vanilla extract, flour mixture, and milk alternative to the egg mixture, alternating between the dry ingredients and milk. This helps achieve a fluffy cake texture.


5. Pour the batter into the prepared cake pans or fill the baking cups 3/4 full. This recipe yields approximately 24 cupcakes.


6. Bake for 20-25 minutes for the cakes or 12-15 minutes for the cupcakes. The cakes are ready when they are nicely browned, spring back when lightly touched, or when a toothpick inserted in the center comes out clean.


7. Let the cakes or cupcakes cool completely before icing.


This recipe holds a special place in my heart, not just for its delightful taste but also for the memories it brings back. Every bite reminds me of those joyful Sunday afternoons, filled with laughter and the warmth of family. Baking this cake has become a way for us to honor my grandmother's legacy and continue creating new memories around the table.


Whether you're celebrating a birthday, a holiday, or simply the joy of being together, this Gluten-Free Yellow Cake and Cupcakes recipe is sure to become a cherished part of your family traditions. Enjoy the process, savor the taste, and create your own nostalgic moments with loved ones.

Read more about Appetizers

Read more about Main Dishes

Read more about Desserts

Cinnamon Nut Squares | Made by Meaghan Moineau

Cinnamon Nut Squares | Made by Meaghan Moineau

Title: Warm Memories and Sweet Treats: The Irresistible Allure of Cinnamon Nut Squares
Description: Discover the warmth of nostalgia with our Cinnamon Nut Squares—a delightful dessert that combines the rich flavors of cinnamon and pecans with a heartwarming family story. This easy-to-make recipe will become a cherished staple in your kitchen, perfect for creating new memories.

---


There’s something undeniably special about the aroma of cinnamon wafting through the house. It’s a scent that seems to wrap you in a warm hug, transporting you back to cherished moments of laughter and love. For me, the enchanting smell of cinnamon always takes me back to my grandmother’s cozy kitchen, where I first discovered the magic of baking.


Cinnamon Nut Squares: A Taste of Nostalgia
Ingredients:

- 1 cup butter, softened


- 1 teaspoon butter vanilla bakery emulsion


- 1 tablespoon ground cinnamon


- 1 large egg, separated


- 2 cups all-purpose flour


- 1 cup chopped pecans


- 1/2 teaspoon salt


- 3/4 cup sugar


Instructions:

1. Preheat your oven to 300 degrees Fahrenheit and generously spray a 14x8x2 inch oblong baking pan with baking spray.


2. In a mixing bowl, cream the butter, gradually adding the sugar. Continue beating until the mixture is light and fluffy, reminiscent of the joy a simple kitchen can bring.


3. Add the egg yolk, flour, cinnamon, salt, and vanilla emulsion. Mix well until the dough is thick, just like the bond of family.


4. Press the dough evenly into the prepared pan, creating a crust that may be thin but is full of flavor and love.


5. Lightly beat the egg white and brush it over the top of the dough. Sprinkle the chopped pecans evenly, pressing them gently into the dough.


6. Bake for about 50 minutes or until the edges turn golden brown, echoing the golden memories of yesteryears.


7. Remove from the oven and cut into squares while still hot. Let them cool and use a spatula to remove them from the pan.


8. Store in a tightly covered container; these sweet squares will keep for up to a week, inviting you to indulge in nostalgia one bite at a time.


A Walk Down Memory Lane

The first time I tasted these delightful squares was during a crisp autumn afternoon at my grandmother’s house. I was a curious child, always eager to help in the kitchen, and the task of pressing the dough into the pan was mine. I remember the way my small hands moved over the dough, feeling the coolness of the butter and the warmth of the cinnamon. It was a simple task, but the pride it brought was immense.


As the squares baked, my grandmother would regale me with stories of her own childhood, tales of family gatherings and the comforting presence of home-baked goods. The kitchen became a place where the past and the present intertwined, where each ingredient was a thread in the tapestry of our family history.


A Sweet Conclusion

Cinnamon Nut Squares are more than just a dessert—they are a vessel for memories, a tribute to the bonds that tie us together. With a difficulty rating of 3 out of 10, they are accessible to bakers of all levels, inviting everyone to create their own cherished moments.


Classified as a dessert, these squares are perfect for sharing at family gatherings, holiday parties, or simply as a treat to enjoy with a cup of tea. As you bake and savor these little squares of joy, may they remind you of the warmth of family and the sweetness of tradition.


So, gather your loved ones, preheat your oven, and let the delightful aroma of Cinnamon Nut Squares fill your home with memories old and new.

Read more about Appetizers

Read more about Main Dishes

Read more about Desserts

Buttered Plantain Fries and Seasoned Avocado | Made by Meaghan Moineau

Buttered Plantain Fries and Seasoned Avocado | Made by Meaghan Moineau

Title: Reliving Family Moments with Buttered Plantain Fries and Seasoned Avocado
Description: Dive into the heartwarming world of culinary nostalgia with our Buttered Plantain Fries and Seasoned Avocado recipe. This easy-to-make appetizer is not only a delightful treat for your taste buds but also a gateway to cherished family memories. Discover the blend of crispy plantains and creamy avocado that promises to be both a crowd-pleaser and a conversation starter at any gathering.

---


Buttered Plantain Fries and Seasoned Avocado: A Taste of Home

There's something magical about the aroma of buttered plantains sizzling in the kitchen. It takes me back to lazy Sunday afternoons, where the warmth of family laughter filled the air, mingling seamlessly with the comforting smell of plantains frying on the stove. My grandmother, with a knowing smile, would always say that the secret to the best plantain fries was patience—letting them brown to perfection.


Ingredients:


- 1 ripe plantain


- 2 tablespoons butter


- 1 tablespoon vegetable oil


- 1 ripe avocado


- 1 chili pepper, finely chopped


- 1 clove of garlic, minced


- Salt, to taste


- Onions, chopped for garnish


Instructions:


1. Prepare the Plantains:

- Begin by peeling the plantain and slicing it into thin stripes. This step is crucial; the thinner the slices, the crispier the fries.


2. Fry the Plantains:

- In a medium-sized pan, pour in the butter and vegetable oil. Heat slowly until the butter melts and the mixture is hot.


- Gently toss in the plantain slices, ensuring they are evenly coated with the butter and oil.


- Allow them to cook, turning occasionally, until they are golden brown on all sides. The aroma at this stage is simply irresistible.


3. Prepare the Avocado:

- While the plantains are frying, mash the avocado in a bowl until smooth and creamy.


- Season with a pinch of salt, and stir in the chopped chili pepper, minced garlic, and some of the chopped onions. This seasoned avocado mix is the perfect complement to the crispy plantains.


4. Serve:

- Arrange the buttered plantain fries on a serving platter and accompany them with a generous dollop of the seasoned avocado. Garnish with additional chopped onions for a touch of freshness.


Nostalgic Story:


Every time I make this dish, I'm transported back to my grandmother's kitchen. I remember sitting on the counter, swinging my legs as I watched her expertly slice the plantains. She would tell stories of her childhood, of how plantains were a staple in her family's home. Her tales of family gatherings and the joy of sharing meals created a legacy that I now pass on to my own children. The combination of crispy plantains and creamy avocado has always been more than just food; it’s a reminder of love, family, and tradition.


Difficulty Rating:


- Difficulty: 3/10

This dish is simple to prepare, making it perfect for both novice cooks and seasoned chefs looking for a quick yet satisfying appetizer.


Classification:


- Appetizer

Whether you're hosting a family gathering or simply want a nostalgic snack, Buttered Plantain Fries and Seasoned Avocado is a dish that bridges the past with the present, bringing a slice of home to your table. Enjoy the journey of flavors and memories with every bite.

Read more about Appetizers

Read more about Main Dishes

Read more about Desserts