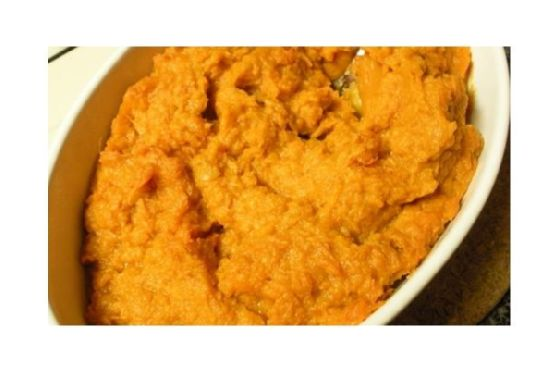
Mashed Sweet Potatoes
Intro
There’s something uniquely comforting about a warm dish of mashed sweet potatoes. This recipe takes me back to my grandmother’s kitchen, where the sweet aroma of spices filled the air during the holiday season. As a child, I would watch her expertly blend the ingredients with her wooden spoon, creating a side dish that was both simple and divine. Today, I’m excited to share this family favorite with you, adding a modern twist that enhances the classic flavors without losing its nostalgic essence.
Why You’ll Love It
This mashed sweet potato recipe is a delightful blend of sweet and spicy, creamy and smooth. It’s packed with flavor thanks to a unique blend of spices, including cinnamon, cardamom, and a hint of cayenne pepper that gives it just the right amount of kick. The addition of maple syrup and orange zest elevates the natural sweetness of the potatoes, making it a perfect side dish for any occasion. Whether you’re serving it at a festive gathering or a simple weeknight dinner, these mashed sweet potatoes are sure to become a staple in your recipe collection.
Ingredients
- 4 large sweet potatoes, peeled and cubed
- 2 tablespoons brown sugar
- 3 tablespoons butter
- 1/2 teaspoon ground cardamom
- 1/4 teaspoon cayenne pepper
- 1 teaspoon ground cinnamon
- 1/4 cup cream
- 1 teaspoon kosher salt
- 2 tablespoons maple syrup
- 1 tablespoon orange zest
- 1 teaspoon vanilla extract
Instructions
- Place the peeled and cubed sweet potatoes in a large pot of boiling water. Cook until they are tender, about 20 minutes. Drain and return them to the pot.
- Mash the sweet potatoes until they are well broken up. If you prefer a smoother consistency, you can use an electric mixer.
- In a small bowl, mix together the cinnamon, cayenne pepper, cardamom, orange zest, and brown sugar. Set aside.
- Add the butter, cream, vanilla extract, and maple syrup to the mashed sweet potatoes. Mix well until fully combined.
- Incorporate the cinnamon sugar mixture into the sweet potatoes, stirring until smooth and well blended.
- Season with kosher salt to taste. Serve warm and enjoy!
Tips
For the best texture, make sure your sweet potatoes are cooked until they are very tender. This will make mashing much easier and result in a creamier consistency. When mashing, avoid overworking the potatoes as this can make them gummy. If you’re using an electric mixer, use it on a low setting.
Variations & Substitutions
If you’re looking to make this dish vegan, simply swap out the butter and cream for your favorite plant-based alternatives. Coconut cream and vegan butter work particularly well. For a different flavor profile, try adding a splash of bourbon or a handful of toasted pecans for extra crunch.
Storage
Store any leftover mashed sweet potatoes in an airtight container in the refrigerator for up to four days. Reheat them gently on the stovetop or in the microwave, adding a splash of cream or milk to restore their creamy consistency. These mashed sweet potatoes also freeze well for up to two months; just make sure to thaw them overnight in the refrigerator before reheating.
FAQ
Can I make mashed sweet potatoes ahead of time?
Yes, this dish can be prepared a day in advance. Simply follow the instructions and store the mashed sweet potatoes in the refrigerator. Reheat them on the stove or in the oven before serving, adding a little extra cream or milk to maintain their texture.
What can I serve with mashed sweet potatoes?
Mashed sweet potatoes are a versatile side dish that pairs well with a variety of main courses. They’re perfect alongside roasted turkey, glazed ham, or grilled chicken. For a vegetarian option, consider serving them with a hearty lentil stew or a fresh salad.
Nutrition
This recipe is not only delicious but also provides a good dose of vitamins and minerals. Sweet potatoes are rich in vitamin A, vitamin C, and potassium, making them a nutritious addition to your meal. Each serving of this dish contains approximately 200 calories, 8 grams of fat, and 30 grams of carbohydrates.
Conclusion
These mashed sweet potatoes are not just a side dish; they’re a tradition, a comfort food, and a crowd-pleaser. With their rich flavor and creamy texture, they are sure to become a beloved part of your culinary repertoire. Whether you’re preparing them for a special holiday meal or a cozy family dinner, they promise warmth and satisfaction in every bite. I hope you enjoy this recipe as much as my family has over the years!
Related update: Mashed Sweet Potatoes