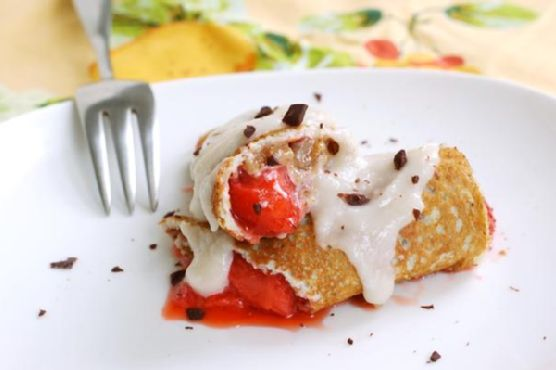
Gluten Free Quinoa and Corn Flour Crepes
Intro
Crepes have always held a special place in my heart. Growing up, Sundays were reserved for family brunches where my grandmother would whip up her famous crepes. We would gather around the kitchen, eagerly waiting for our turn to enjoy those golden, delicate pancakes. As I grew older and my dietary needs changed, I sought to recreate those cherished moments with a gluten-free twist. Enter the Gluten Free Quinoa and Corn Flour Crepes, a modern take on a timeless classic. These crepes are not only a nod to my past but also a delicious new memory in the making.
Why You’ll Love It
Our Gluten Free Quinoa and Corn Flour Crepes are a delightful blend of tradition and innovation. Here’s why you’ll fall head over heels for them:
- Gluten-Free Goodness: Made with quinoa and corn flour, these crepes cater to those with gluten sensitivities without compromising on taste or texture.
- Nutrient-Rich: Packed with proteins and fiber, they make for a wholesome breakfast or snack.
- Versatile: Fill them with sweet or savory fillings, and they become the perfect canvas for any meal.
- Easy to Make: With simple ingredients and straightforward steps, they’re perfect for beginner cooks and seasoned chefs alike.
Ingredients
- 2 tablespoons virgin coconut oil, melted
- 1 cup corn flour
- 2 tablespoons ground flax seeds
- 1 tablespoon maple syrup
- 1 cup quinoa flour
- 2 1/2 cups hemp milk, plus more if needed
- 1/2 teaspoon sea salt
- 1/4 cup tapioca flour
- 1/4 teaspoon xanthan gum
Instructions
- Whisk the corn flour, quinoa flour, tapioca flour, sea salt, and xanthan gum together in a large bowl.
- In a separate bowl, mix the hemp milk, ground flax seeds, maple syrup, and melted coconut oil.
- Combine the wet ingredients with the dry ingredients, mixing gently. If the batter is too thick, add more hemp milk, a few tablespoons at a time, until you achieve a pourable consistency.
- Allow the batter to rest in the refrigerator for at least 30 minutes. This step is crucial for the dry ingredients to fully absorb the liquids, ensuring smooth and pliable crepes.
- Heat a nonstick skillet over medium heat and add a small amount of coconut oil.
- Pour about 1/2 cup of batter into the skillet, swirling the pan to spread the batter into a thin layer. Quickly fill any holes with additional batter.
- Cook until the top of the crepe looks dry, about 1 minute. Gently loosen the edges with a spatula and flip the crepe, cooking the other side for 30 to 60 seconds.
- Transfer the cooked crepe to a plate and keep warm. You can fill the crepe while it’s still in the pan with your choice of fillings.
- Repeat the process, adding more coconut oil as needed, until all the batter is used.
Tips
- Rest the Batter: Allowing the batter to rest is key. This helps to achieve the right texture and prevents the crepes from breaking.
- Adjust Consistency: The batter should be thin enough to spread easily. Don’t hesitate to add more hemp milk if needed.
- Perfect Flip: Practice makes perfect! Use your fingers or a spatula to flip the crepes gently.
Variations & Substitutions
- Flour Alternatives: If you don’t have quinoa flour, you can substitute it with almond flour or buckwheat flour for a different flavor profile.
- Filling Ideas: Enjoy them with nut butter and bananas for a sweet treat, or try smoked salmon and cream cheese for a savory option.
- Milk Options: Substitute hemp milk with almond milk or coconut milk for a different taste.
Storage
To store leftover crepes, place them in an airtight container, separating each crepe with parchment paper to prevent sticking. They can be refrigerated for up to three days. To reheat, simply warm them in a skillet over low heat until heated through.
FAQ
Can I make the batter ahead of time?
Yes, you can prepare the batter up to a day in advance. Store it in the refrigerator and give it a good stir before using. You may need to adjust the consistency with a little more hemp milk if it’s thickened overnight.
What if my crepes keep sticking to the pan?
Ensure your skillet is well-heated and use a good nonstick pan. Adding a small amount of coconut oil before each crepe can also help prevent sticking.
Nutrition
Each serving of these gluten-free crepes is not only delicious but also packed with nutrients. You’ll find a good source of protein, fiber, and healthy fats, making them a balanced choice for any meal.
Conclusion
Whether you’re reminiscing about cherished family gatherings or creating new traditions, these Gluten Free Quinoa and Corn Flour Crepes are a delightful addition to any meal. With their delicate texture and versatile nature, they’ll quickly become a staple in your kitchen. So go ahead, give them a try and watch as they bring joy to your table, one crepe at a time.
Related update: Gluten Free Quinoa and Corn Flour Crepes
Related update: Spicy Coconut French Toast