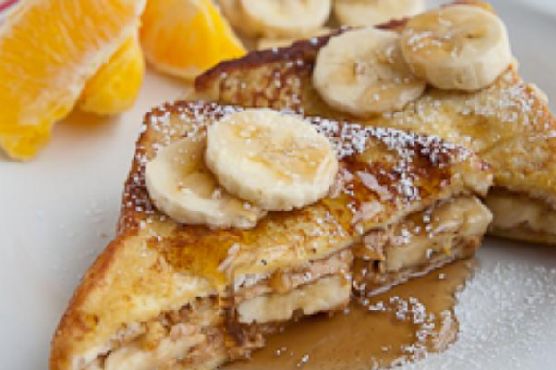
Peanut Butter Banana French Toast | Made by Meaghan Moineau
Title: A Nostalgic Twist on Breakfast: Peanut Butter Banana French ToastDescription: Dive into the warm, comforting embrace of Peanut Butter Banana French Toast, a delightful fusion of flavors that promises to elevate your breakfast game. This scrumptious dish combines the rich creaminess of peanut butter, the natural sweetness of bananas, and the aromatic spices of cinnamon and nutmeg, all wrapped in a golden, crispy French toast. Join me as we explore this recipe that not only tantalizes the taste buds but also stirs cherished family memories. Rated 5/10 in difficulty, this dish shines as a delightful breakfast or a sweet main course indulgence.
---
The Recipe: Peanut Butter Banana French Toast
*Ingredients:*
- Bread (preferably thick slices)
- Peanut butter
- 1/2 banana, thinly sliced
- 1 whole egg
- 1/4 cup orange juice
- 1/4 teaspoon ground nutmeg
- 1/4 teaspoon ground cinnamon
- A pinch of cayenne pepper
- Optional toppings: syrup, confectioners' sugar, additional banana slices
*Instructions:*
1. Prepare the Sandwich: Spread a generous layer of peanut butter on one slice of bread. Top with thin slices of banana and cover with another slice of bread to form a sandwich.
2. Whisk the Egg Mixture: In a shallow bowl, whisk together the egg, orange juice, nutmeg, cinnamon, and a pinch of cayenne pepper until well combined.
3. Heat the Skillet: Place a skillet over medium heat and add a tablespoon of butter or oil.
4. Dip and Cook: Dip the sandwich into the egg mixture, ensuring both sides are thoroughly coated. Immediately place it in the hot skillet.
5. Golden Perfection: Cook for about one minute on each side, or until the bread is golden brown and crispy.
6. Serve with Flair: Transfer the French toast to a plate, ladle with warm syrup, sprinkle with confectioners' sugar, and garnish with additional banana slices if desired.
---
A Nostalgic Family Memory
Growing up, Sunday mornings in my family were a treasured tradition filled with laughter, stories, and, of course, delicious food. My grandmother, the matriarch of our culinary adventures, would often whip up a batch of her famous Peanut Butter Banana French Toast. The aroma of cinnamon and nutmeg wafting through the house was our gentle wake-up call, promising a delightful start to the day.
As children, my siblings and I would gather around the kitchen table, eyes wide with anticipation. Grandma would tell us stories of her own childhood, sharing how she and her siblings would scavenge the pantry for ingredients to make this very dish. It was a creative endeavor born out of necessity, yet it became a beloved family staple.
Even now, every bite of Peanut Butter Banana French Toast takes me back to those cherished mornings. The flavors are not just a treat; they are a link to my past, a reminder of the love and warmth that filled our home. The simplicity of the dish belies its profound ability to connect generations, making it not just a meal, but a heartfelt tradition.
---
Difficulty Rating: 5/10
Classification: Main Dish
Whether you're seeking a nostalgic journey or a new family favorite, Peanut Butter Banana French Toast is sure to delight with its rich flavors and heartwarming associations. Enjoy this dish as a testament to the joy of shared meals and cherished memories.