Overnight Oatmeal | Made by Meaghan Moineau

Overnight Oatmeal

Intro

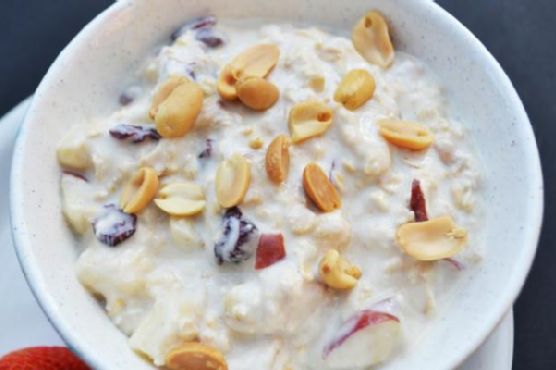
There’s something magical about waking up to the irresistible aroma of a warm breakfast already prepared and waiting for you. Overnight oatmeal has been a beloved tradition in my family, one that carries the comforting memory of my grandmother’s cozy kitchen. As a child, I would spend weekends at her place, and there was no greater joy than waking up to the smell of her special oatmeal. It was always piping hot, creamy, and filled with delightful surprises like dried figs and cranberries. This recipe is a heartfelt homage to those cherished mornings, and I hope it brings the same warmth and comfort to your kitchen.

Why You’ll Love It

Overnight oats are not just convenient; they are a delightful way to begin your day with minimal effort. Here are a few reasons why this recipe will become a staple in your morning routine:

  • Convenience: Set it up the night before, and breakfast is ready by morning. It’s perfect for busy lifestyles.
  • Hearty and Nutritious: Packed with fiber from steel-cut oats and the natural sweetness of dried fruits, this meal is both satisfying and nourishing.
  • Customizable: Easily adjust the ingredients to suit your taste preferences or dietary needs.
  • Comforting: There’s an undeniable comfort in starting your day with a warm, homemade meal.

Ingredients

  • 1 cup dried cranberries
  • 1 cup dried figs, chopped
  • 2 cups half-and-half
  • 1 cup steel-cut oats
  • 4 cups water

Instructions

  1. In a crock-pot, combine all ingredients.
  2. Set the crock-pot to low heat.
  3. Cover and let cook for 8 to 9 hours.
  4. Stir the oatmeal and remove to serving bowls.
  5. This method works best if started before you go to bed. This way your oatmeal will be finished by morning.

Tips

To ensure your overnight oatmeal turns out perfectly, consider these helpful tips:

  • Use steel-cut oats for the best texture. Rolled or quick oats may turn mushy in a slow cooker.
  • If you prefer a creamier texture, you can substitute the water with more half-and-half or milk.
  • Add a pinch of salt to enhance the flavors of the oatmeal.
  • For added sweetness, drizzle honey or maple syrup before serving.

Variations & Substitutions

Feel free to make this recipe your own by experimenting with different ingredients:

  • Fruits: Swap out dried cranberries and figs for raisins, apricots, or cherries.
  • Milk: Use almond milk, coconut milk, or soy milk in place of half-and-half for a dairy-free version.
  • Add-ins: Stir in some almond butter, vanilla extract, or a sprinkle of cinnamon for extra flavor.
  • Nuts and Seeds: Top with chopped nuts or seeds like almonds, walnuts, or chia seeds for added crunch and nutrition.

Storage

Leftover oatmeal can be stored in an airtight container in the refrigerator for up to 4 days. Reheat in the microwave or on the stovetop with a splash of milk or water to maintain the desired consistency.

FAQ

Can I make this recipe without a crock-pot?

Yes, you can! Simply combine all the ingredients in a large pot and bring to a boil. Reduce the heat to low and simmer, stirring occasionally, for about 30-40 minutes until the oats are cooked through.

Can I freeze the oatmeal?

Yes, you can freeze individual portions of the cooked oatmeal in airtight containers for up to 3 months. To reheat, simply thaw overnight in the refrigerator and warm on the stovetop or microwave, adding a bit of liquid if necessary.

Nutrition

While specific nutritional values can vary based on the exact ingredients used, here is an approximate breakdown per serving:

  • Calories: 300
  • Protein: 7g
  • Fat: 7g
  • Carbohydrates: 52g
  • Fiber: 8g
  • Sugar: 20g

Conclusion

Overnight oatmeal is more than just a breakfast; it’s a warm embrace to start your day. With its rich flavors and heartwarming aroma, it’s a simple pleasure that invites you to slow down and savor the morning. Whether you’re reliving fond childhood memories or creating new ones, this recipe is sure to become a beloved favorite in your home. Here’s hoping it fills your mornings with warmth and joy!

Related update: Overnight Oatmeal

Fluffy frittata with spinach | Made by Meaghan Moineau

Fluffy Frittata with Spinach

Intro

There’s something magical about the aroma of a freshly made frittata wafting through the kitchen. It takes me back to Sunday mornings at my grandmother’s house, where the sizzle of garlic and the sight of her expertly whisked eggs made breakfast feel like an event. Among her many beloved recipes, her fluffy spinach frittata was always my favorite. Today, I’m excited to share a version of her classic dish that’s not only nostalgic but also incredibly easy to prepare. Whether you’re hosting a brunch or simply treating yourself to a hearty breakfast, this frittata is bound to become your new go-to recipe.

Why You’ll Love It

This fluffy spinach frittata is everything you want in a breakfast dish: quick to make, absolutely delicious, and packed with nutritious ingredients. The combination of fresh spinach and creamy ricotta cheese makes it light yet satisfying, while the hint of garlic and nutmeg adds depth to its flavor. Perfect for both novice and seasoned cooks, this frittata is a testament to the fact that simplicity often leads to the most delightful outcomes.

Ingredients

  • 4 large eggs, separated
  • 1 clove garlic, minced
  • 1/4 teaspoon ground pepper
  • 1/8 teaspoon nutmeg
  • 2 tablespoons olive oil
  • 1/4 cup grated parmesan cheese
  • 1/2 cup ricotta cheese
  • 1/2 teaspoon salt
  • 1 cup fresh spinach (or 1/2 cup dry frozen spinach, thawed and drained)

Instructions

  1. Preheat your oven to 200°C (392°F).
  2. In a medium oven-proof skillet, heat the olive oil over medium heat. Add the minced garlic and cook until softened and fragrant, about 1 minute.
  3. In a large glass or metal bowl, beat the egg whites until stiff peaks form. This will ensure your frittata turns out perfectly fluffy.
  4. In another bowl, beat the egg yolks and stir in the spinach and ricotta cheese. Season the mixture with salt, ground pepper, and nutmeg.
  5. Gently fold the beaten egg whites into the yolk mixture, taking care not to deflate the whites.
  6. Pour the egg mixture into the hot skillet with the garlic. Cook over medium heat until the edges are just set, approximately 2 minutes.
  7. Transfer the skillet to the preheated oven and bake until the frittata is golden and fluffy, about 15 minutes.
  8. Sprinkle the grated parmesan cheese over the top of the frittata and bake for an additional 2 minutes, or until the cheese is melted and bubbly.
  9. Remove from the oven and let it cool slightly before cutting into wedges. Serve immediately for best results.

Tips

For the fluffiest frittata, ensure that the egg whites are beaten to stiff peaks before folding them into the yolk mixture. When folding, use a gentle hand to maintain the airy texture. Preheating the oven and using an oven-proof skillet will help the frittata cook evenly and achieve a beautiful golden color.

Variations & Substitutions

If you’re looking to customize this frittata, consider adding sautéed mushrooms, sun-dried tomatoes, or bell peppers for added flavor and texture. For a bit of heat, a pinch of red pepper flakes can do wonders. If you’re out of fresh spinach, frozen spinach works well, just be sure to thaw and drain it thoroughly. Additionally, feta or goat cheese can be used in place of ricotta for a different cheese profile.

Storage

Leftover frittata can be stored in an airtight container in the refrigerator for up to 3 days. To reheat, place a slice in a skillet over low heat until warmed through, or use a microwave for a quicker option. While it can be frozen, note that the texture may change slightly upon thawing.

FAQ

Can I make this frittata ahead of time?

Yes, this frittata can be made a day in advance. Simply store it in the refrigerator and reheat it in the oven at a low temperature before serving to maintain its texture.

Is it possible to make this frittata dairy-free?

Definitely! You can substitute the ricotta cheese with a dairy-free cheese alternative and use nutritional yeast instead of parmesan for a similar cheesy flavor without the dairy.

Nutrition

This frittata is a great source of protein and packed with vitamins from the spinach. Each serving contains approximately 250 calories, 18 grams of protein, and 5 grams of carbohydrates. It’s a nutritious way to start your day!

Conclusion

This fluffy spinach frittata is a delightful dish that’s sure to become a staple in your breakfast or brunch repertoire. Its simplicity and versatility make it an ideal choice for any occasion. Whether you’re reminiscing about family breakfasts or creating new traditions, this frittata brings warmth and comfort to your table. I hope you enjoy making and sharing this recipe as much as I have over the years. Bon appétit!

Related update: Fluffy frittata with spinach

Related update: Overnight Oatmeal

Related update: BBQ Mac and Cheese

Moosewood Lentil Soup | Made by Meaghan Moineau

Moosewood Lentil Soup

Intro

There’s something deeply comforting about a warm bowl of lentil soup on a chilly evening. The way the aroma fills the kitchen, the steam that rises from the pot, and the savory flavors that come together so perfectly—it’s like a culinary hug. This Moosewood Lentil Soup has been a staple in my family for generations. I remember the first time I tasted it; I was a child, visiting my grandmother’s home in upstate New York. It was one of those snowy afternoons, and the world outside was transformed into a winter wonderland. As I sat at her table, spoon in hand, I felt a warmth that extended beyond the soup. It was the warmth of love, family, and tradition. Today, I am thrilled to share this cherished recipe with you, hoping it brings the same joy and comfort to your home.

Why You’ll Love It

This Moosewood Lentil Soup is not only delicious but also incredibly nutritious and easy to make. The lentils provide a hearty base, packed with protein and fiber, while the vegetables bring a delightful crunch and color. It’s a versatile dish that suits both vegetarians and meat-lovers alike. Plus, it’s budget-friendly and made with simple ingredients that you probably already have in your pantry. Whether you’re looking for a wholesome weeknight dinner or a satisfying lunch, this soup is sure to please.

Ingredients

  • 1 cup lentils
  • 6 cups water
  • 2 tablespoons grapeseed oil (or butter)
  • 1 large onion, chopped
  • 2 stalks celery, diced
  • 3 carrots, sliced
  • 3 cloves garlic, minced
  • 1 teaspoon salt
  • 1/2 teaspoon black pepper
  • 1 teaspoon dried herbs (such as thyme or oregano)
  • 1 tablespoon brown sugar
  • 2 tablespoons fresh lemon juice
  • 1 tablespoon red wine vinegar
  • 1 can (14.5 ounces) tomatoes, crushed

Instructions

  1. Place lentils and water in a large soup pot or Dutch oven. Bring to a boil, then lower the heat to a simmer. Let cook until lentils are mushy, about 45 minutes. Add more water as needed to reach your desired consistency.
  2. While the lentils are cooking, heat oil or melt butter in a medium-sized skillet over medium heat. Add onion, celery, and carrots, and sauté for about 10 minutes until they begin to soften.
  3. Add garlic, salt, black pepper, and dried herbs of your choice. Continue to sauté for another 5 minutes until the garlic is fragrant.
  4. Transfer the vegetable mixture to the pot with the lentils. Stir in the crushed tomatoes, brown sugar, fresh lemon juice, and red wine vinegar.
  5. Taste the soup and adjust seasonings if necessary. Simmer for at least 15 minutes longer to allow the flavors to meld together.
  6. Serve hot, with a drizzle of red wine vinegar over each serving, and a sprinkling of minced scallions or parsley on top if desired.

Tips

To enhance the flavor, consider adding a bay leaf while the lentils cook. Remember to remove it before serving. If you prefer a smoother texture, you can blend a portion of the soup with an immersion blender. For a touch of spice, add a pinch of red pepper flakes or a dash of hot sauce.

Variations & Substitutions

This soup is highly adaptable. You can use any type of lentils: green, brown, or red. Each variety offers a slightly different texture. Feel free to swap grapeseed oil with olive oil or butter, and add other vegetables like bell peppers or zucchini for extra nutrition. If you’re not a fan of tomatoes, simply leave them out or replace them with roasted red peppers for a sweeter taste.

Storage

Store any leftover soup in an airtight container in the refrigerator for up to 5 days. It also freezes beautifully. Just pour the cooled soup into freezer-safe containers or bags and freeze for up to 3 months. To reheat, thaw in the refrigerator overnight and warm on the stove over low heat.

FAQ

Can I make this soup in a slow cooker?

Yes, absolutely! To make in a slow cooker, simply add all ingredients except for the fresh lemon juice and red wine vinegar to the cooker. Cook on low for 7-8 hours or high for 4-5 hours. Stir in lemon juice and vinegar before serving.

Can I add meat to this recipe?

Certainly! If you wish to add meat, cooked and crumbled sausage or shredded chicken make excellent additions. Simply cook the meat separately and add it to the soup during the final simmering stage.

Nutrition

A serving of this Moosewood Lentil Soup provides a rich source of protein, dietary fiber, and essential vitamins and minerals. It’s low in fat and calories, making it a heart-healthy option for any meal.

Conclusion

Whether you’re a seasoned cook or a beginner in the kitchen, this Moosewood Lentil Soup is a recipe that promises warmth, comfort, and satisfaction. Its rich flavors and wholesome ingredients make it a beloved dish that you’ll want to return to time and again. From my family’s table to yours, may this soup bring joy and nourishment to all who gather around your table.

Related update: Moosewood Lentil Soup

Related update: How to Make the Cheesiest Bowtie Mac and Cheese

Warm Goat Cheese Salad | Made by Meaghan Moineau

Warm Goat Cheese Salad

Intro

There’s something inherently comforting about a warm goat cheese salad. The combination of creamy cheese, crunchy walnuts, and fresh greens creates a delightful medley of textures and flavors. This recipe, which I first encountered during a summer trip to the French countryside, brings back fond memories of leisurely lunches in sunlit gardens. One particular afternoon, after a long bike ride through picturesque villages, we stumbled upon a charming little bistro. There, I savored my first taste of a warm goat cheese salad, and it was love at first bite. Now, I’m thrilled to share this cherished recipe with you, so you can create your own unforgettable culinary moments.

Why You’ll Love It

This warm goat cheese salad is a perfect blend of flavors and textures, making it a standout dish for any occasion. Here’s why you’ll adore it:

  • Quick and Easy: Ready in just 20 minutes, it’s perfect for a speedy lunch or an elegant starter.
  • Healthy and Nutritious: Packed with wholesome ingredients like fresh greens, walnuts, and goat cheese, it’s a nutritious choice.
  • Versatile: Ideal for a light lunch, dinner starter, or even a sophisticated side dish.
  • Impressive Presentation: With its vibrant colors and artful arrangement, this salad is as beautiful as it is delicious.

Ingredients

  • Some bread crumbs
  • Fresh rounds of goat cheese
  • Grapes
  • Lemon juice
  • Olive oil
  • Pepper
  • Salad greens
  • Salt and pepper
  • Shallot
  • Walnut oil
  • Walnuts

Instructions

  1. Whisk together 3 tablespoons of walnut oil with lemon juice, minced shallot, salt, and pepper to make a vinaigrette.
  2. Coat each goat cheese round with walnut oil and then the bread crumbs, patting the crumbs to adhere.
  3. Combine the greens and the walnuts in a large bowl. Add in enough of the vinaigrette and toss well. Adjust the seasoning and divide among two serving plates.
  4. Heat a nonstick skillet over medium heat. Add in olive oil. When the oil is hot, add the goat cheese rounds.
  5. Cook until nicely browned, about 30 seconds. Turn and cook the other side. Do not allow it to burn or melt.
  6. Transfer the goat cheese to the plates, placing 2 or 3 atop each salad.
  7. Sprinkle the cheese with freshly ground pepper and garnish with grape wedges.

Tips

To ensure your salad turns out perfectly every time, consider these helpful tips:

  • Chill the Cheese: Keep the goat cheese rounds in the fridge until just before coating and cooking to help them hold their shape.
  • Use Fresh Ingredients: Fresh salad greens and grapes will enhance the taste and texture of the salad.
  • Adjust the Vinaigrette: Taste the vinaigrette and adjust the seasoning to suit your preference.

Variations & Substitutions

Feel free to customize the salad to your liking with these variations and substitutions:

  • Nuts: Swap walnuts for pecans or almonds for a different nutty flavor.
  • Cheese: Substitute the goat cheese with feta or blue cheese for a different taste profile.
  • Fruits: Add sliced apples or pears for additional sweetness and crunch.
  • Greens: Use arugula or spinach in place of mixed salad greens for a peppery or earthy flavor.

Storage

This salad is best enjoyed fresh, but if you have leftovers, store the components separately in airtight containers:

  • Greens and Walnuts: Store in the refrigerator for up to 2 days.
  • Goat Cheese: Can be stored in an airtight container in the fridge for up to 5 days.
  • Vinaigrette: Keep refrigerated and use within a week.

FAQ

Can I make this salad vegan?

Absolutely! You can replace the goat cheese with a vegan cheese alternative and use a vegan-friendly bread crumb option.

How can I make the salad more filling?

Consider adding grilled chicken or chickpeas to increase the protein content and make it more satiating.

Nutrition

This warm goat cheese salad is not only delicious but also nutritious, offering a good balance of healthy fats, protein, and vitamins. While exact nutritional values can vary, a typical serving provides:

  • Calories: Approximately 400 per serving
  • Protein: 12g
  • Fat: 30g (with healthy fats from olive and walnut oil)
  • Carbohydrates: 20g

Conclusion

Whether you’re seeking a quick lunch option or an elegant starter for a dinner party, this warm goat cheese salad is sure to impress. Its delightful combination of flavors and textures will surely become a favorite in your recipe repertoire. So, gather your ingredients and enjoy the comforting taste of a warm goat cheese salad, perhaps while dreaming of sunny afternoons in the French countryside.

Related update: Warm Goat Cheese Salad

Related update: Simple Squash Salad

Related update: Crab Cake Stuffed Shrimp

Monastery soup | Made by Meaghan Moineau

Monastery Soup: A Simple, Soul-Warming Delight

Intro

There’s something incredibly comforting about a bowl of hot soup, especially when it has a rich history and a story to tell. Monastery Soup is one such dish, with roots deeply embedded in the traditions of monastic cooking. I remember visiting a serene monastery nestled in the hills during my travels in Europe. The air was crisp, and the architecture, simplistic yet awe-inspiring. After a long day of exploration, I was offered a bowl of this humble soup by one of the monks. It was a moment of pure bliss, where the warmth of the soup matched the warmth in my heart. That moment has stayed with me, and today, I want to share this memory and recipe with you.

Why You’ll Love It

Monastery Soup is not just food; it’s an experience. Here’s why you’ll fall in love with this delightful dish:

  • Simplicity: With just a few wholesome ingredients, this soup is easy to prepare yet incredibly nourishing.
  • Heartiness: Packed with vegetables and beans, it’s a meal in itself, perfect for a satisfying lunch or dinner.
  • Customizable: You can easily adjust the ingredients to suit your taste or dietary needs.
  • Comforting: The aroma alone is enough to lift your spirits on a cold day.

Ingredients

  • 2 tablespoons sunflower oil
  • 2 medium potatoes, diced
  • 1 large onion, chopped
  • 3 cloves garlic, minced
  • 2 carrots, sliced
  • 1 leek, sliced
  • 2 stalks celery, chopped
  • 1 cup broad beans
  • 4 cups vegetable stock
  • Fresh parsley, chopped
  • Salt and pepper to taste

Instructions

  1. Heat the sunflower oil in a large pan over medium heat.
  2. Add the diced potatoes, chopped onion, and minced garlic. Sauté, covered, for about 10 minutes until the onions are translucent and the potatoes start to soften.
  3. Stir in the sliced carrots, leek, and chopped celery. Continue to sauté for another 5 minutes, allowing the vegetables to become tender.
  4. Add the broad beans and pour in the vegetable stock. Stir well, cover the pan, and let it simmer gently for another 10 minutes, or until the potatoes and broad beans are soft.
  5. Season with freshly chopped parsley, salt, and pepper according to your taste.
  6. Serve hot with crusty bread for a complete meal.

Tips

  • For a creamier texture, blend a portion of the soup and mix it back in.
  • Use fresh, seasonal vegetables for the best flavor.
  • Adjust the amount of garlic according to your preference for a more robust flavor.

Variations & Substitutions

Monastery Soup is wonderfully adaptable. Here are some variations you might want to try:

  • Vegetables: Swap out the potatoes for sweet potatoes or add some zucchini for a different taste.
  • Beans: If you don’t have broad beans, try using chickpeas or lentils instead.
  • Herbs: Experiment with adding thyme or rosemary for an aromatic twist.

Storage

Monastery Soup stores well, making it perfect for meal prep:

  • Refrigerate: Store in an airtight container for up to 4 days.
  • Freeze: You can freeze the soup for up to 3 months. Thaw in the refrigerator overnight before reheating.

FAQ

Can I make this soup in advance?

Absolutely! This soup tastes even better the next day as the flavors have more time to meld together. Simply reheat on the stove over low heat until warmed through.

Is Monastery Soup vegan?

Yes, as long as you use vegetable stock and avoid any animal-based additives, this soup remains vegan-friendly.

What can I serve with Monastery Soup?

A slice of crusty bread or a fresh green salad makes a perfect accompaniment to this hearty soup.

Nutrition

This soup is not only delicious but also nutritious. It’s packed with fiber from the vegetables and beans, and provides a good source of vitamins and minerals. It’s a guilt-free comfort food that’s perfect for any diet.

Conclusion

Monastery Soup is more than just a meal; it’s a bowl of comfort that carries with it a sense of history and tranquility. Whether you’re enjoying it on a cool evening or sharing it with loved ones, it’s a dish that warms both the body and soul. I hope this recipe brings as much joy to your kitchen as it does to mine. May it become a cherished part of your culinary repertoire, as it has become a staple in my own home.

Related update: Monastery soup

Related update: Corn Chowder with Potatoes, Poblanos, and Smoked Gouda

Soy Ginger Glazed Sea Scallops With Stir Fry Vegetables | Made by Meaghan Moineau

Soy Ginger Glazed Sea Scallops With Stir Fry Vegetables

Intro

There’s something about the combination of soy sauce and ginger that takes me back to my childhood. I remember my grandmother cooking up her signature dishes in her cozy kitchen, the aroma of soy and ginger wafting through the air, mingling with the laughter and chatter of family gathered around the dining table. This recipe for Soy Ginger Glazed Sea Scallops With Stir Fry Vegetables is a tribute to those warm, fulfilling days, offering a balance of flavors and textures that delight the senses.

Incorporating the succulent taste of sea scallops with the vibrant colors and crunch of fresh vegetables, this dish is a symphony of taste and nostalgia. It’s perfect for a family dinner or a special occasion, bringing the warmth of home-cooked meals to your table.

Why You’ll Love It

This recipe is not only delicious but also incredibly easy to prepare. Here’s why you’ll fall in love with it:

  • Quick and Easy: Ready in under 30 minutes, it’s perfect for busy weeknights.
  • Flavorful: The combination of soy, ginger, and sesame creates a rich and savory glaze that complements the sweetness of the scallops.
  • Healthy: Packed with protein and fresh vegetables, it’s a nutritious choice that doesn’t skimp on flavor.
  • Versatile: Easily adaptable to suit your taste preferences and dietary needs.

Ingredients

  • 1 pound sea scallops
  • 2 tablespoons soy sauce
  • 1 tablespoon teriyaki sauce
  • 1 tablespoon brown sugar
  • 1 tablespoon sesame oil
  • 2 cloves garlic, minced
  • 1 teaspoon fresh ginger, grated
  • 1 tablespoon cornstarch
  • 1 red bell pepper, sliced
  • 1 yellow bell pepper, sliced
  • 1 bunch asparagus, trimmed and cut into 2-inch pieces
  • 2 scallions, sliced
  • 1 tablespoon sesame seeds

Instructions

  1. Whisk all teriyaki sauce ingredients together in a small bowl and refrigerate for at least 30 minutes.
  2. Heat sesame oil in a large frying pan over medium-high heat.
  3. Add vegetables (red and yellow bell peppers, asparagus, scallions) and sauté for 5 minutes, until beginning to soften.
  4. Stir in the teriyaki sauce and allow the mixture to come to a simmer.
  5. Add the scallops. Stir and cook the mixture for 5 minutes, stirring occasionally, until the sauce thickens and the scallops have turned an opaque white.
  6. In a small cup, mix cornstarch with two teaspoons of cold water until dissolved. Stir this mixture into the pan and let the mixture come to a simmer for one minute to thicken fully and coat the scallops and vegetables.
  7. Serve immediately, garnished with sesame seeds.

Tips

  • Make sure to pat the scallops dry before cooking to ensure they sear properly.
  • For a richer flavor, marinate the scallops in the teriyaki sauce for an hour before cooking.
  • Be careful not to overcook the scallops; they should be tender and just opaque.

Variations & Substitutions

This recipe is wonderfully flexible. Here are some ideas to make it your own:

  • Protein Swap: Try shrimp or chicken if scallops aren’t your thing.
  • Vegetable Options: Use broccoli, snow peas, or snap peas instead of bell peppers and asparagus.
  • Spicy Kick: Add a pinch of red pepper flakes or a dash of sriracha for some heat.
  • Gluten-Free: Use tamari instead of soy sauce for a gluten-free version.

Storage

Store any leftovers in an airtight container in the refrigerator for up to two days. Reheat gently in a frying pan over low heat until warmed through. While reheating, you might need to add a splash of water or additional soy sauce to maintain the glaze’s consistency.

FAQ

Can I use frozen scallops?

Yes, you can use frozen scallops for this recipe. Make sure to thaw them completely in the refrigerator and pat them dry with paper towels before cooking to ensure even searing.

What can I serve with these scallops?

This dish pairs well with steamed jasmine or brown rice, or you can serve it over a bed of quinoa for a protein-packed meal. A side of fresh salad also complements the flavors beautifully.

How can I tell when the scallops are done?

The scallops are done when they’re opaque all the way through and have a slightly firm texture. Be careful not to overcook them, as they can become rubbery.

Nutrition

This dish is a great source of protein and vitamins. The scallops provide lean protein and are rich in omega-3 fatty acids, while the vegetables offer dietary fiber, vitamins A and C, and antioxidants. With minimal sugar and sodium, it’s a wholesome meal that fits into a balanced diet.

Conclusion

Soy Ginger Glazed Sea Scallops With Stir Fry Vegetables is more than just a dish; it’s an experience that brings together the comforting flavors of home with the elegance of restaurant dining. Perfect for both everyday dinners and special occasions, this recipe is sure to become a favorite in your household. Enjoy the harmony of flavors and the nostalgia of home-cooked meals with every bite.

We hope this recipe brings as much joy to your table as it has to ours. Whether you’re reminiscing about family gatherings or creating new memories, this dish is a delightful addition to any meal. Bon appétit!

Related update: Soy Ginger Glazed Sea Scallops With Stir Fry Vegetables

Related update: The Secret to Easy Skillet Filet Mignon Steak Tacos

Quinoa Tabouli with Lemon Garlic Grilled Shrimp | Made by Meaghan Moineau

Quinoa Tabouli with Lemon Garlic Grilled Shrimp

Intro

There’s something truly magical about a dish that not only tastes delicious but also evokes cherished memories. For me, Quinoa Tabouli with Lemon Garlic Grilled Shrimp is a dish that brings back the warm, sun-soaked afternoons spent at my grandmother’s garden. As kids, my cousins and I would run around, our hands sticky from picking ripe tomatoes and fresh herbs. The aroma of lemon and garlic wafting from the outdoor grill would signal that it was time to gather around the table. Today, I am thrilled to share this delightful recipe with you, hoping it brings as much joy to your table as it has to mine.

Why You’ll Love It

This Quinoa Tabouli with Lemon Garlic Grilled Shrimp is a vibrant, fresh, and nourishing dish that works perfectly as a light lunch or a satisfying dinner. It’s packed with colorful vegetables, fragrant herbs, and succulent shrimp, making every bite an explosion of flavor. Not only is it delicious, but it’s also a healthy option that’s gluten-free and full of protein. Whether you’re preparing it for a family meal or a gathering with friends, this dish is sure to impress with its visual appeal and mouth-watering taste.

Ingredients

  • 1 cup quinoa
  • 2 cups water
  • 1/2 teaspoon sea salt
  • 2 celery stalks, diced
  • 1 each of yellow, red, and orange peppers, diced
  • 4 green onions, sliced
  • 1/2 cup sun-dried olives, chopped
  • 1 vine-ripened tomato, diced
  • 1 cup frozen corn, thawed
  • 1 bunch fresh parsley, finely chopped
  • 1/4 cup mint leaves, finely chopped
  • 3 cloves garlic, minced
  • 1/4 cup lemon juice
  • 1/2 teaspoon sea salt (for dressing)
  • Grilled shrimp, seasoned to taste

Instructions

  1. Add 1/2 teaspoon of sea salt to the water and bring it to a boil.
  2. Toast the quinoa in a dry pan for a couple of minutes, moving it around so it doesn’t burn. Once you hear it pop, count to 5 and remove it immediately.
  3. Add the quinoa to the boiling water and cook for 12 minutes on a soft boil, or until all the water is absorbed.
  4. While the quinoa is cooking, combine the minced garlic with the lemon juice and allow it to sit.
  5. Remove the quinoa from the heat and add the lemon juice and garlic mixture. Mix well and let it absorb and cool.
  6. Chop all the vegetables into similar-sized pieces, about 1/4 inch dice.
  7. Finely chop the parsley and mint.
  8. Once the quinoa has cooled, combine it with the chopped vegetables, herbs, and sun-dried olives. Mix everything together well.
  9. Serve the quinoa tabouli topped with the grilled shrimp.

Tips

Toasting the quinoa before boiling enhances its nutty flavor, so don’t skip this step! Make sure to chop the vegetables into similar-sized pieces for a uniform texture. Allowing the garlic to marinate in lemon juice softens its raw edge, blending seamlessly into the dish.

Variations & Substitutions

If you prefer a vegetarian version, simply omit the shrimp or replace it with grilled halloumi or tofu for a similar protein boost. For an extra burst of flavor, try adding a sprinkle of toasted pine nuts or a handful of pomegranate seeds. If you don’t have sun-dried olives, regular black olives will also work well in this recipe.

Storage

Store any leftovers in an airtight container in the refrigerator for up to three days. The flavors will continue to meld, making the dish even more delicious the next day. If you’re planning to store it longer than a day, consider keeping the shrimp separate to maintain its optimal texture when reheated.

FAQ

Can I make this dish ahead of time?

Absolutely! In fact, making it a few hours ahead allows the flavors to develop even more. Just keep the shrimp separate until you’re ready to serve.

What can I serve with Quinoa Tabouli?

This dish is quite versatile and pairs well with a variety of sides. Try serving it alongside a fresh green salad, some warm pita bread, or a dollop of hummus for a complete meal.

Is this recipe gluten-free?

Yes, quinoa is naturally gluten-free, making this dish a great option for those with gluten sensitivities or allergies.

Nutrition

This recipe is not only delicious but also nutritious. It’s high in protein from both the quinoa and shrimp, packed with fiber from the vegetables, and rich in vitamins and minerals. It’s a healthy choice for anyone looking to enjoy a balanced, satisfying meal.

Conclusion

Quinoa Tabouli with Lemon Garlic Grilled Shrimp is a dish that brings together vibrant flavors and wholesome ingredients to create a meal that’s both nourishing and delightful. Whether you’re enjoying it on a cozy weeknight or sharing it at a festive gathering, it’s sure to be a hit. I hope this recipe becomes a cherished part of your culinary repertoire, bringing a bit of sunshine and warmth to your dining table.

Related update: Quinoa Tabouli with Lemon Garlic Grilled Shrimp

Related update: Mushroom Crepes with Vegetarian Sauce

Venison Stew | Made by Meaghan Moineau

Venison Stew: A Hearty and Flavorful Delight

Intro

There’s nothing quite like a bowl of steaming hot venison stew on a chilly evening. As the aroma fills the kitchen, I’m transported back to my childhood days, watching my grandmother expertly prepare this family favorite. She’d hum softly as she worked, her hands moving deftly through well-rehearsed motions. The stew would simmer on the stove, filling our home with warmth and a promise of comfort. Today, I’m excited to share this beloved recipe with you, hoping it brings the same warmth and joy to your table as it has to mine over the years.

Why You’ll Love It

This venison stew is not only a comforting classic but also a versatile dish that offers deep, rich flavors. Here’s why you’ll absolutely love it:

  • Flavorful and Hearty: Venison offers a unique and robust flavor that pairs beautifully with the medley of vegetables and spices.
  • Nutrient-Rich: Packed with protein, vitamins, and minerals, this stew is as nutritious as it is delicious.
  • Perfect for Cold Days: Nothing warms you up better than a bowl of this thick, savory stew.
  • Family Tradition: This recipe has been passed down through generations, ensuring a tried-and-true meal every time.

Ingredients

  • 1 pound venison stew meat, cut into 1-inch pieces
  • 1 cup flour, plus 3 tablespoons for thickening
  • 2 tablespoons vegetable oil
  • 2 tablespoons beef bouillon
  • 4 cups water
  • 4 medium potatoes, peeled and cubed
  • 1 large onion, chopped
  • 1 can baby carrots, drained
  • 4 stalks celery, chopped
  • 1 can mushrooms, drained
  • 1 green bell pepper, chopped
  • Salt and pepper to taste

Instructions

  1. Prepare all ingredients by cutting the venison, potatoes, onion, celery, and green bell pepper into 1-inch pieces.
  2. In a shallow dish, combine 1 cup of flour with salt and pepper. Dredge the venison pieces in the flour mixture, ensuring they are fully coated.
  3. Heat the vegetable oil in a large pot over medium-high heat. Add the venison, browning it on all sides.
  4. Once browned, add the beef bouillon and 4 cups of water to the pot. Bring to a boil, then reduce the heat and let it simmer for 2 hours, allowing the meat to become tender.
  5. Add the potatoes, onion, baby carrots, celery, mushrooms, and green bell pepper to the pot. Continue to simmer for an additional 30 minutes, until the vegetables are tender.
  6. In a small bowl, mix 3 tablespoons of flour with 1 cup of cold water. Stir this mixture into the stew to thicken it. Cook for another 5-10 minutes, stirring frequently.
  7. Season the stew with additional salt and pepper to taste before serving.

Tips

For the best results, follow these tips:

  • Use fresh venison for the most tender and flavorful results.
  • Be patient while simmering. The longer cooking time helps develop deep flavors and tenderize the meat.
  • If you prefer a thicker stew, add more flour and water mixture to your desired consistency.

Variations & Substitutions

Make this stew your own by trying some of these variations and substitutions:

  • Meat: If venison is not available, you can substitute with beef or lamb for a similar texture and flavor.
  • Vegetables: Feel free to add other vegetables such as parsnips, turnips, or sweet potatoes.
  • Spices: Enhance the flavor by adding herbs like thyme, rosemary, or bay leaves.

Storage

This venison stew stores beautifully, making it perfect for meal prep or leftovers:

  • Refrigerate: Allow the stew to cool, then store in an airtight container in the refrigerator for up to 4 days.
  • Freeze: For longer storage, freeze the stew in a freezer-safe container for up to 3 months. Thaw in the refrigerator overnight before reheating.

FAQ

Can I make this stew in a slow cooker?

Yes, absolutely! To make venison stew in a slow cooker, brown the venison as directed, then transfer to a slow cooker along with the remaining ingredients. Cook on low for 6-8 hours or on high for 3-4 hours until the meat is tender.

What should I serve with venison stew?

Venison stew is hearty enough to be enjoyed on its own, but it pairs wonderfully with crusty bread, mashed potatoes, or a simple side salad.

Nutrition

This stew is a nutritious option, packed with protein from the venison and fiber from the vegetables. While exact calories and macros depend on specific brands and quantities, this stew offers a balanced meal rich in essential nutrients.

Conclusion

This venison stew is more than just a dish; it’s a heartwarming experience that brings family and friends together. Whether you’re reliving cherished family memories or starting new traditions of your own, this stew is sure to become a staple in your culinary repertoire. Enjoy the rich flavors, the tender meat, and the joy of sharing a meal steeped in tradition. Happy cooking!

Related update: Venison Stew

Related update: Quinoa Tabouli with Lemon Garlic Grilled Shrimp

Related update: Creamy Cauliflower Chowder

Sweet-N-Smoky Salmon With Ginger Mahogany Rice | Made by Meaghan Moineau

Sweet-N-Smoky Salmon With Ginger Mahogany Rice

Intro

There’s something magical about a dish that combines the sweetness of brown sugar with the deep, rich notes of liquid smoke. This Sweet-N-Smoky Salmon With Ginger Mahogany Rice is one such creation that never fails to transport me back to my childhood summers. I remember my grandfather, an avid fisherman, teaching me how to grill the perfect piece of salmon. We’d stand side by side, the smoky aroma wafting through the air, as he shared tales of the sea and the importance of patience. This recipe is a tribute to those cherished memories, a delicious reminder of simpler times.

Why You’ll Love It

This dish is a delightful blend of flavors and textures that is sure to captivate your taste buds. The salmon is infused with a sweet and smoky marinade that enhances its natural richness, while the ginger mahogany rice provides a nutty, aromatic base. Whether you’re hosting a dinner party or simply looking for a comforting meal, this recipe is a wonderful choice. It’s nutritious, satisfying, and brings a touch of gourmet to your table without requiring hours in the kitchen.

Ingredients

  • 2 tablespoons brown sugar
  • 1 cup chicken stock
  • 1 tablespoon fresh ginger, peeled and julienned
  • 1 teaspoon liquid smoke
  • 2 tablespoons peanut oil, divided
  • 1 cup mahogany rice
  • 4 salmon fillets
  • Salt and pepper to taste
  • 1/4 cup soy sauce

Instructions

  1. Place the salmon in a bowl or a large zip-top bag with the soy sauce, liquid smoke, and brown sugar. Let it marinate for at least 1 hour, or overnight for deeper flavor.
  2. When ready to cook, preheat the grill or an iron skillet to high heat.
  3. In a medium saucepan over high heat, toast the mahogany rice in 1 tablespoon of peanut oil for 2 minutes. Add the chicken stock and a large pinch of salt and pepper. Bring to a boil.
  4. Lower the heat to a simmer, cover, and cook the rice for about 40 minutes, or as directed on the package.
  5. Meanwhile, heat a small skillet over medium-high heat. Add the remaining tablespoon of peanut oil. Once hot, add the ginger and pan-fry for 1-2 minutes, stirring with a spatula until light brown. Remove from the pan and drain on a paper towel. Sprinkle with salt.
  6. While the rice is cooking, carefully brush the grill with vegetable oil or use grill spray. Season the salmon fillets with pepper and place them on the grill, top-side down. Cook for 3 minutes.
  7. Flip the salmon, carefully sprinkle the tops with a little extra brown sugar, and grill for another 3-5 minutes until just cooked through.
  8. Remove the salmon from the grill, cover with foil, and let them rest for 5-10 minutes before serving.

Tips

To ensure the salmon doesn’t stick to the grill, make sure it’s well-oiled and preheated to high heat. If using a grill pan, let it heat thoroughly before adding the salmon. Marinating the salmon overnight will give you the richest flavor, but even an hour can work wonders.

Variations & Substitutions

If mahogany rice is hard to find, you can substitute it with wild rice or brown rice, which will also complement the flavors nicely. For a spicier kick, add a pinch of red pepper flakes to the marinade. Alternatively, swap the peanut oil with olive oil if you have allergy concerns or prefer its flavor.

Storage

Leftover salmon can be stored in an airtight container in the refrigerator for up to 2 days. The rice can also be stored separately in the fridge for up to 3 days. To reheat, gently warm the salmon in a skillet over low heat or in a microwave. The rice can be reheated in a saucepan with a splash of water to prevent drying out.

FAQ

Can I use frozen salmon for this recipe?

Yes, you can use frozen salmon, but make sure to thaw it completely in the refrigerator before marinating to ensure the flavors are absorbed effectively.

What can I serve with this dish?

This dish pairs beautifully with a simple green salad or steamed vegetables like asparagus or broccoli. A squeeze of lemon over the salmon just before serving can also enhance its flavors.

Nutrition

This dish is rich in omega-3 fatty acids from the salmon, which are great for heart health. It’s also a good source of protein and offers a balanced meal with the rice providing complex carbohydrates and the ginger adding anti-inflammatory benefits.

Conclusion

Sweet-N-Smoky Salmon With Ginger Mahogany Rice is more than just a meal; it’s an experience that brings warmth and joy to any table. Whether you’re recreating fond memories or making new ones, this recipe is sure to become a beloved favorite in your culinary repertoire. Enjoy the delightful harmony of flavors and the satisfaction of serving up something truly special.

Related update: Sweet-N-Smoky Salmon With Ginger Mahogany Rice

Related update: Fettuccine With Bacon Mushroom and Peas

Salmon Quinoa Risotto | Made by Meaghan Moineau

Salmon Quinoa Risotto

Intro

Ah, the comforting embrace of a hearty risotto! Growing up, my grandmother’s kitchen was the heart of our family gatherings, where the aroma of her simmering risottos would fill the room and our hearts. I’ve always cherished those moments, and today, I’m thrilled to share a modern twist on a classic dish: Salmon Quinoa Risotto. This dish combines the rich, nutty flavors of quinoa with the fresh, vibrant notes of poached salmon and kale. It’s a symphony of textures and tastes, perfect for any occasion.

Why You’ll Love It

This Salmon Quinoa Risotto is a delightful blend of healthy and delicious. Here’s why you’ll fall in love with it:

  • Nutritious: Packed with protein from both quinoa and salmon, and loaded with vitamins from kale, this dish is as healthy as it is tasty.
  • Simple Ingredients: All the ingredients are easy to find and likely already in your pantry or fridge.
  • Versatile: It works as a comforting weeknight dinner or a sophisticated dish for entertaining guests.
  • Quick to Prepare: With a little prep, this dish comes together in less than an hour.

Ingredients

  • 1 cup quinoa
  • 1 diced onion
  • 2 cups chopped kale
  • 2 garlic cloves, chopped
  • 3 tablespoons olive oil, divided
  • 1 cup poached salmon, flaked
  • 3 cups vegetable stock
  • Salt, to taste
  • 1 bell pepper, diced

Instructions

  1. In a 4-quart saucepan, heat 2 tablespoons of olive oil over medium-high heat. When the oil is shimmering, add the diced onion.
  2. Sauté the onion until it’s transparent.
  3. Add quinoa to the onion mixture and stir, toasting the quinoa for 2 minutes.
  4. Add 1 cup of vegetable stock to the quinoa and onions. Stir until the stock is absorbed.
  5. Once the stock is absorbed, add another cup of stock. Continue stirring until the stock is absorbed.
  6. Add the remaining stock in 1/2 cup intervals, stirring until all the stock is absorbed. Remove from heat.
  7. While preparing the onion quinoa mixture, heat 1 tablespoon of oil in a sauté pan with the chopped garlic over medium-high heat.
  8. Once the garlic is sizzling, add the chopped kale to the pan. Turn the kale to coat with oil and garlic. Cook until fragrant, approximately 2 minutes. Remove from heat.
  9. Once the quinoa is complete, add the kale and flaked salmon. Stir to combine.
  10. Add salt and pepper to taste, serve warm, and enjoy!

Tips

  • Pre-rinse Quinoa: Rinse quinoa under cold water before cooking to remove its natural coating, saponin, which can taste bitter.
  • Consistent Stirring: Stir the quinoa constantly to ensure even cooking and the creamy texture typical of risotto.
  • Fresh Ingredients: Use fresh salmon and kale for the best flavor and nutritional benefits.

Variations & Substitutions

This dish is highly adaptable, and you can easily tweak it to suit your preferences or dietary restrictions:

  • Vegetarian Option: Substitute the salmon with roasted mushrooms or tofu for a vegetarian version.
  • Add Cheese: Stir in grated Parmesan for an extra layer of richness.
  • Spice It Up: Add a pinch of chili flakes for a touch of heat.

Storage

Store leftovers in an airtight container in the refrigerator for up to 3 days. Reheat gently on the stove or in the microwave, adding a splash of water or stock to restore the creamy texture.

FAQ

Can I use frozen salmon?

Absolutely! Just make sure to thaw the salmon completely before poaching it. This will ensure even cooking and optimal flavor.

What can I use instead of vegetable stock?

You can use chicken stock or water with a bit of bouillon for added flavor. Just be mindful of the salt content if using bouillon.

Nutrition

This Salmon Quinoa Risotto is a powerhouse of nutrition, offering a balanced meal rich in protein, healthy fats, and fiber. It’s a great choice for those looking to maintain a healthy diet without sacrificing flavor.

Conclusion

There you have it, a deliciously modern take on a classic comfort dish. Whether you’re reminiscing about family gatherings or simply looking for a nutritious meal to share with loved ones, this Salmon Quinoa Risotto is sure to become a staple in your culinary repertoire. Enjoy your cooking journey and savor every bite!

Related update: Salmon Quinoa Risotto

Related update: Lasagne Roll Ups

Blast Of Color Mexican Stuffed Bell Peppers | Made by Meaghan Moineau

Blast Of Color Mexican Stuffed Bell Peppers

Intro

There’s something magical about the vibrant colors of fresh vegetables, especially when they’re stuffed with a delicious mix of spices and wholesome ingredients. Our Blast Of Color Mexican Stuffed Bell Peppers bring a rainbow of flavors to your table, reminiscent of the lively street markets of Mexico. As a child, I remember accompanying my grandmother to those bustling markets. The air was filled with the aroma of spices and roasted vegetables, and my eyes were captivated by the vivid displays of fresh produce. These stuffed peppers are a tribute to those cherished days, a perfect blend of tradition and modern convenience.

Why You’ll Love It

This recipe is not only visually stunning but also incredibly satisfying. Here’s why you’ll fall head over heels for these Mexican Stuffed Bell Peppers:

  • Nutritious and Balanced: Packed with protein from chicken and black beans, fiber from brown rice, and vitamins from fresh vegetables.
  • Easy to Prepare: With a few simple steps, you can create a dish that feels gourmet yet is perfect for a weeknight dinner.
  • Customizable: Easily adapt the recipe to fit your dietary needs or personal preferences.
  • Great for Meal Prep: These peppers can be made ahead and stored for quick lunches or dinners throughout the week.

Ingredients

  • 6 large bell peppers (any color)
  • 1 cup black beans, drained and rinsed
  • 1 cup shredded rotisserie chicken breast
  • 1 can (4 oz) fire roasted green diced chiles
  • 1 tablespoon chili seasoning
  • 1 cup cooked brown rice
  • 1 cup frozen corn kernels, thawed
  • 2 cloves garlic, minced
  • 1 cup low-fat shredded cheddar cheese, divided
  • 1/2 cup red onion, diced
  • 1 roma tomato, diced
  • 1/3 cup sour light cream

Instructions

  1. Preheat your oven to 400 degrees Fahrenheit (200 degrees Celsius).
  2. In a large bowl, combine the cooked brown rice, shredded chicken, thawed corn, diced tomato, diced onion, black beans, 1/2 cup of the shredded cheddar cheese, minced garlic, fire roasted green chiles, and chili seasoning. Mix well.
  3. Prepare a baking dish by lining it with foil and spraying it with cooking spray.
  4. Slice the tops off the bell peppers and remove the seeds and membranes. Stuff each bell pepper with the chicken mixture, pressing firmly to fill the cavity and mounding the mixture on top.
  5. Place the stuffed peppers in the prepared baking dish. Top each pepper with an additional 1/2 tablespoon of cheese.
  6. Bake in the preheated oven for 30 to 40 minutes, or until the peppers are just tender.
  7. Remove from the oven and top each pepper with 1/2 tablespoon of sour cream before serving.

Tips

  • If the tops of the peppers brown too quickly in the oven, cover them loosely with foil.
  • For an extra kick, consider adding a dash of hot sauce or a sprinkle of cayenne pepper to the filling mixture.
  • Ensure your rice is cool before mixing it with other ingredients to prevent the cheese from melting prematurely.

Variations & Substitutions

  • Vegetarian Option: Omit the chicken and add extra black beans or some cooked quinoa for added protein.
  • Cheese Substitute: Use a dairy-free cheese to make this recipe lactose-intolerant friendly.
  • Different Grains: Swap out brown rice for quinoa or farro for a different texture and flavor.

Storage

These stuffed peppers can be stored in an airtight container in the refrigerator for up to 3 days. To reheat, simply place them in a microwave-safe dish and heat for 2-3 minutes, or until warmed through. You can also freeze them for up to 2 months; thaw in the refrigerator overnight before reheating.

FAQ

Can I use fresh chiles instead of canned?

Absolutely! If you prefer using fresh chiles, simply roast them until charred, peel off the skin, and dice them before adding to the mixture.

Can I make these peppers spicier?

Yes, you can adjust the spice level to your liking by adding more chili seasoning or incorporating chopped jalapeños into the stuffing mix.

Is there a way to reduce the sodium content?

To reduce sodium, use low-sodium black beans and chicken, and opt for a no-salt-added chili seasoning. You can also rinse the canned beans to remove some of the sodium.

Nutrition

Each serving of these Mexican Stuffed Bell Peppers is approximately 250 calories, with 30g of protein, 10g of fat, and 20g of carbohydrates. They are a rich source of fiber, vitamins A and C, and calcium, making them a nutritious option for any meal.

Conclusion

Our Blast Of Color Mexican Stuffed Bell Peppers are a delightful way to bring vibrant flavors and colors to your dinner table. Whether you’re reminiscing about family traditions or simply looking for a delicious meal to share with loved ones, these peppers will not disappoint. We hope you enjoy making and savoring this recipe as much as we do. Happy cooking!

Related Recipes

Also try: Blast Of Color Mexican Stuffed Bell Peppers

Also try: Beans With Smoked Pork Hock

Chilled Swiss Oatmeal | Made by Meaghan Moineau

Chilled Swiss Oatmeal | Made by Meaghan Moineau

Title: A Nostalgic Dive into Chilled Swiss Oatmeal: A Perfect Start to Your Day
Description: Discover the delightful simplicity of Chilled Swiss Oatmeal, a nutritious breakfast option that's rich in flavor and memories. This easy-to-make dish combines the wholesome goodness of oatmeal with the refreshing taste of fresh fruits and the crunch of walnuts. Perfect for busy mornings or leisurely brunches, it's a dish that will have you reminiscing about cherished family moments with every bite.

---


A Wholesome Morning with Chilled Swiss Oatmeal

There's something truly special about waking up to the comforting taste of Chilled Swiss Oatmeal. This delightful breakfast dish, rich in flavors and textures, has been a beloved staple in my family for generations. Easy to prepare and perfect for those who adore a nutritious start to their day, it's a recipe that brings both health and happiness to the table.


The Ingredients of Joy

To create this masterpiece, you'll need old-fashioned oatmeal, low-fat plain vanilla yogurt, and milk. These form the creamy base of our dish. Fresh slices of apple and banana, along with dried cranberries, infuse the oatmeal with a burst of natural sweetness and tang. Finally, a generous sprinkle of walnuts adds the perfect finishing touch, providing a satisfying crunch and a dose of heart-healthy fats.


Instructions for a Perfect Swiss Oatmeal

1. In a small bowl, combine the oatmeal, yogurt, and milk. Stir until well mixed. For best results, let this mixture sit for a few minutes or, ideally, several hours in the refrigerator.


2. Once chilled, add the freshly chopped apple and banana to the mix, along with the dried cranberries. Stir until all ingredients are well combined.


3. Just before serving, top with a handful of walnuts for added crunch and flavor.


*Note:* For the ultimate taste experience, allow the oatmeal to sit overnight. Add the fresh fruits right before serving to ensure they remain crisp and vibrant.


A Sprinkle of Nostalgia

This dish always takes me back to cozy Sunday mornings at my grandmother's house. I remember waking up to the aroma of freshly brewed coffee and the sight of my grandmother bustling around the kitchen, preparing breakfast for the family. Her Chilled Swiss Oatmeal was the highlight of those mornings, served with love and a side of warm smiles.


The anticipation of digging into a bowl of this chilled delight was almost as enjoyable as the taste itself. As children, my siblings and I would gather around the table, eagerly awaiting our turn to add our favorite toppings. For me, it was always a little extra walnut crunch. These breakfasts were more than just meals; they were family bonding sessions filled with laughter, stories, and the occasional playful banter.


Difficulty Rating and Classification
Difficulty: 3/10
Classification: Appetizer

Chilled Swiss Oatmeal is not just a dish; it's a journey back to simpler times, a reminder of the love and warmth shared around the breakfast table. Whether you're making it for yourself or sharing it with loved ones, this recipe is sure to become a cherished part of your morning routine. So, go ahead and indulge in the nostalgic flavors of Chilled Swiss Oatmeal, and create new memories with every delicious spoonful.

Read more about Appetizers

Read more about Main Dishes

Read more about Desserts

Healthy Mint Brownies | Made by Meaghan Moineau

Healthy Mint Brownies | Made by Meaghan Moineau

Indulge in Healthy Mint Brownies: A Nostalgic Treat with a Wholesome Twist


Description


Dive into a world of rich, decadent flavors with our Healthy Mint Brownies—an irresistible dessert that combines the classic delight of mint and chocolate with a nutritious twist. Made with wholesome ingredients like black beans, avocado, and almond milk, these brownies promise a guilt-free indulgence. Whether you’re a seasoned baker or a curious newbie, this recipe will guide you through creating a dessert that is not only delicious but also packed with healthier ingredients. Perfect for every occasion, these brownies will transport you back to fond memories while making new ones.


---


A Family Tradition Reimagined: The Story Behind the Brownies


Growing up, family gatherings were always a cherished time, filled with laughter, stories, and, of course, food. One of the most anticipated treats during these events was my grandmother's mint brownies—a recipe she had perfected over decades. The moment we walked into her kitchen, the air would be filled with the comforting aroma of chocolate and mint, making it impossible to resist sneaking a taste before dinner.


As I grew older and more health-conscious, I wanted to preserve this beloved family tradition while adapting it to align with a more balanced lifestyle. Thus, the Healthy Mint Brownies were born. By incorporating nutrient-rich ingredients like black beans and avocado, and swapping traditional sugar for coconut sugar and powdered xylitol, I was able to recreate the nostalgic flavors of my grandmother’s recipe with a modern, healthful twist.


Every time I prepare this dessert, I’m reminded of those joyful gatherings and the warmth of family. It’s a testament to how food can connect us to our past, while also allowing us to innovate for the future.


---


Ingredients


- 1/4 cup almond milk


- 1/4 cup unsweetened applesauce


- 1 tablespoon ground flax


- 1/2 cup frozen blueberries


- 1 canned whole unsweetened jar pear


- 1 can black beans, drained and rinsed


- 1/4 cup grape seed oil


- 1 tablespoon natural butter extract


- 1 teaspoon vanilla extract


- 1 teaspoon peppermint extract


- 1/2 cup coconut sugar


- 1/2 cup cocoa powder


- 1 teaspoon baking powder


- 1/2 teaspoon baking soda


- 1/4 teaspoon pink salt


- 1/2 cup white rice flour


- 1/2 cup white spelt flour


- 1/2 cup dark chocolate chunks


- 1 ripe avocado


- 1/2 cup full-fat coconut milk or heavy cream


- 1/2 cup powdered xylitol


- Green drop natural food coloring (optional)


- 1/2 cup dark chocolate, melted


- 2 tablespoons oil


---


Instructions


1. Prepare the Flax Mixture: Combine the ground flax, applesauce, and almond milk in a small bowl. Set aside to thicken.
2. Blend the Base: In a food processor, combine the frozen blueberries, canned pear, black beans, and grape seed oil. Pulse until smooth. Add the butter, vanilla, and peppermint extracts, and blend until fully combined.
3. Mix the Dry Ingredients: Transfer the blended mixture to a medium-sized mixing bowl. Add the coconut sugar, cocoa powder, baking powder, baking soda, and pink salt. Mix well.
4. Form the Batter: Add the white rice flour, white spelt flour, and dark chocolate chunks to the mixture and stir until just combined.
5. Bake: Pour the batter into a prepared baking dish and bake at 350°F (175°C) for 44-45 minutes. Allow the brownies to cool for at least 50 minutes, or speed up the cooling process by refrigerating for 20-30 minutes.
6. Create the Mint Filling: In a small bowl, beat the avocado and coconut milk (or heavy cream) on high for about 5 minutes, until fluffy and smooth. Add the powdered xylitol, peppermint extract, and optional food coloring, beating until well incorporated. Spread the filling evenly over the cooled brownies and refrigerate for 10 minutes to firm.
7. Finish with Chocolate: Melt the dark chocolate and mix with oil. Pour over the brownies, spreading quickly and evenly. Return to the fridge for another 5 minutes until the chocolate is set.
8. Serve: Cut the brownies with a sharp knife and serve chilled or at room temperature. Store leftovers in an airtight container in the refrigerator.

---


Difficulty Rating: 4/10


Classification: Dessert


These Healthy Mint Brownies are a delightful and nutritious take on a classic dessert, perfect for any family gathering or personal indulgence. Enjoy the combination of rich chocolate and refreshing mint while reminiscing about cherished family memories.

Read more about Appetizers

Read more about Main Dishes

Read more about Desserts

Farro & Leek Soup | Made by Meaghan Moineau

Farro & Leek Soup | Made by Meaghan Moineau

Title:

Hearty Comfort in a Bowl: The Timeless Allure of Farro & Leek Soup


Description:

Dive into the nourishing warmth of Farro & Leek Soup, a dish that marries the rustic charm of ancient grains with the delicate flavors of leeks and herbs. This blog post takes you on a culinary journey, complete with a heartwarming family memory, and offers a simple yet flavorful recipe that’s perfect for any season. Discover why this soup is not just a meal, but a cherished tradition.


---


A Nostalgic Journey with Farro & Leek Soup

There's something deeply comforting about a bowl of soup. It’s warmth, aroma, and the memories it evokes. For me, Farro & Leek Soup is a gateway to cherished family moments. Growing up, our kitchen was the heart of the home, especially during the chilly months when my grandmother would lovingly prepare this hearty soup. The scent of leeks and herbs wafting through the house was the signal that warmth and love were soon to embrace us.


The Secret to a Simple Yet Flavorful Soup
What makes Farro & Leek Soup so special is its simplicity. With just a few humble ingredients, you can create a dish that is not only satisfying but also deeply nourishing. Here's how you can recreate this classic family favorite:
Ingredients:

- 2 tablespoons olive oil


- 3 white leeks, thinly sliced


- 200 grams farro


- 2 stalks of celery, diced


- 2 carrots, diced


- 1 onion, diced


- 4 cups meat stock (homemade is best, no bouillon cubes)


- 1 sprig of thyme


- 1 bay leaf


- Parmesan cheese, for garnish


- Salt & pepper, to taste


Instructions:
1. Prepare the Base: In a heavy-bottomed pot, heat the olive oil over medium-low heat. Add the leeks, celery, carrots, and onion. Sweat the vegetables until they become translucent and soft, ensuring they do not brown. If they start to stick, reduce the heat and add a spoonful of water.
2. Incorporate the Farro: Add the farro to the pot, toasting it with the vegetables for 1-2 minutes to enhance its nutty flavor.
3. Simmer with Stock and Herbs: Introduce the thyme, bay leaf, and meat stock to the mix. Season with salt and pepper to your preference. Bring the soup to a low simmer and let it cook for 30-40 minutes until the farro is tender, stirring occasionally.
4. Adjust the Consistency: Depending on your preference, you can adjust the consistency of the soup. For a stew-like texture, hold back some of the stock. For a more soupy consistency, feel free to add more stock.
5. Finish and Serve: Drizzle with extra virgin olive oil, sprinkle with freshly grated Parmesan cheese, and serve hot with a side of toasty bread.
A Dish Beyond the Kitchen

Every spoonful of this soup takes me back to my grandmother's kitchen, where laughter mingled with the aroma of cooking. It was a place where stories were shared, and bonds were strengthened. Today, as I prepare Farro & Leek Soup for my own family, I am reminded of the timeless nature of food and its power to connect generations.


Difficulty Level: 4/10
Classification: Main Dish

With its rich flavors and wholesome ingredients, Farro & Leek Soup is more than just a meal; it is a tradition, a memory, a hug in a bowl. Whether you're seeking comfort on a cold day or a light yet satisfying main dish, this soup is sure to become a cherished favorite in your home, just as it has in mine.

Read more about Appetizers

Read more about Main Dishes

Read more about Desserts

Homemade Apple Almond Granola Bars | Made by Meaghan Moineau

Homemade Apple Almond Granola Bars | Made by Meaghan Moineau

Title: Crunchy Comfort: Homemade Apple Almond Granola Bars for Every Heartfelt Moment
Description: Dive into the delightful world of homemade apple almond granola bars. This easy-to-make recipe not only offers a delicious, nutritious snack but also brings back cherished family memories. Perfect for breakfast on the go or a healthy dessert, these granola bars are sure to become a staple in your kitchen.

---


There's something inherently comforting about the aroma of baking apples and cinnamon wafting through the house. It stirs a sense of nostalgia, transporting me back to chilly autumn afternoons spent in my grandmother's warm kitchen. She would be bustling around, preparing various delights for the family. One of my fondest memories is of her apple almond granola bars—a treat that was both simple and satisfying.


A Family Tradition Rekindled

As a child, I eagerly watched my grandmother as she mixed together rolled oats, ground flax seed, and oat bran with a sprinkle of cinnamon, the spices dancing in the air. The sweet touch of honey would follow, bringing everything together into a harmonious blend. My favorite part was helping her chop up the apples and almonds, little tasks that made me feel like an essential part of the culinary process.


Those granola bars were more than just a snack; they were a symbol of love and togetherness. Each bite was infused with the warmth of family gatherings and laughter that echoed through the kitchen—a tradition that I've carried into my own home, recreating that same cozy atmosphere for my children.


Recipe for Homemade Apple Almond Granola Bars
Ingredients:

- 2 cups rolled oats


- 1/4 cup ground flax seed


- 1/4 cup oat bran


- 1/4 cup wheat bran


- 1/4 teaspoon salt


- 1 teaspoon baking powder


- 1 teaspoon cinnamon


- 1/4 cup sugar substitute


- 1/4 cup unsweetened coconut


- 1/2 cup non-fat milk


- 1/4 cup sweet honey


- 1 large egg


- 1 teaspoon vanilla extract


- 1 apple, peeled and chopped


- 1/2 cup almonds, chopped


Instructions:

1. Preheat your oven to 350°F (175°C). Lightly spray a 9x13 inch pan with non-stick cooking spray.


2. In a large mixing bowl, combine the rolled oats, ground flax seed, oat bran, wheat bran, salt, baking powder, cinnamon, sugar substitute, and unsweetened coconut. Stir until all the ingredients are well mixed.


3. Add in the non-fat milk, sweet honey, egg, and vanilla extract. Stir until the mixture is fully combined.


4. Gently fold in the chopped apple and almonds, ensuring they are evenly distributed throughout the mixture.


5. Press the mixture firmly into the prepared pan, creating an even layer.


6. Bake for 15-20 minutes, or until the edges start to brown and the kitchen is filled with a tantalizing aroma.


7. Allow the granola to cool for about 10 minutes. Cut into bars while still warm, then let them cool completely before serving.


Difficulty Rating: 4/10
Classification: Dessert

These homemade apple almond granola bars are a testament to the timeless bond between family and food. Easy to make yet packed with flavor and nutrition, they're perfect for a quick breakfast, a healthy dessert, or a nostalgic snack that takes you back to simpler times. Share this recipe with loved ones, and continue creating cherished memories in your kitchen.

Read more about Appetizers

Read more about Main Dishes

Read more about Desserts

Roasted Beet Hummus | Made by Meaghan Moineau

Roasted Beet Hummus | Made by Meaghan Moineau

Title: A Vibrant Twist on a Classic: Roasted Beet Hummus
Description: Dive into the colorful world of roasted beet hummus, a delightful fusion of flavors that will elevate your appetizer game. This easy-to-make dish combines earthy beets with the creamy texture of traditional hummus, creating a visually stunning and deliciously nutritious treat. Join us as we explore how this vibrant dish became a beloved family favorite, and learn how you can bring this healthy appetizer to your own table.

---


Hummus has been a staple in my family's kitchen for as long as I can remember. Every family gathering, big or small, featured a bowl of this creamy, luscious dip. The traditional hummus, while delicious, took a vibrant turn one summer when my grandmother decided to add roasted beets to the mix. Little did we know, this experiment would become a cherished family tradition.


The summer of the beet hummus was one I’ll never forget. It was a particularly hot July, and my grandparents had invited the whole family over for a weekend barbecue. As we sat around the old wooden table in their backyard, my grandmother emerged from the kitchen with a bowl of hummus that was a vivid shade of magenta. Our eyes widened at the sight, curiosity piqued by this colorful concoction.


As we dipped warm pita bread into the hummus, the combination of flavors was unlike anything we had experienced before. The earthiness of the beets melded perfectly with the creamy chickpeas and tahini, while a hint of garlic and cumin added depth. A squeeze of fresh lemon juice provided a touch of brightness, making each bite refreshing yet satisfying.


From that day forward, roasted beet hummus became a staple at our family gatherings. Its vibrant color and unique flavor always sparked conversations and brought smiles to our faces. It was a dish that not only tasted wonderful but also held the power to bring us together, reminding us of that long, laughter-filled summer afternoon.


Recipe for Roasted Beet Hummus:
Ingredients:

- 2 medium-sized red roasted beets


- 1 can (15 oz) cooked chickpeas, drained and rinsed


- 2 cloves garlic, minced


- 1 teaspoon ground cumin


- Juice of 1 lemon


- 3 tablespoons olive oil (plus more as needed)


- 1 teaspoon salt (or to taste)


- 3 tablespoons tahini sesame seed paste


Instructions:

1. Begin by roasting your beets until they are tender. Once cooled, peel and chop them into smaller pieces.


2. Place the roasted beets, garlic, cumin, lemon juice, salt, and tahini in a food processor or blender. Pulse until well blended and smooth.


3. Add the cooked chickpeas and olive oil to the processor. Pulse until the mixture is just incorporated. If needed, add more olive oil to reach your desired consistency.


4. Taste and adjust seasoning as needed. If you prefer a thinner hummus, gradually add more olive oil while blending.


5. Serve your roasted beet hummus with warm pita or flatbread and enjoy the burst of flavors.


Difficulty Rating: 3/10
Classification: Appetizer

Roasted beet hummus is not only a feast for the eyes but also a nutritious and flavorful appetizer that’s easy to prepare. It's perfect for any gathering and is sure to become a favorite in your home, just as it did in ours. Whether you’re a seasoned cook or a kitchen novice, this dish is a delightful way to bring people together and create lasting memories.

Read more about Appetizers

Read more about Main Dishes

Read more about Desserts

Spinach Salad with Strawberry Vinaigrette | Made by Meaghan Moineau

Spinach Salad with Strawberry Vinaigrette | Made by Meaghan Moineau

**Title: A Taste of Spring: Spinach Salad with Strawberry Vinaigrette**


**Description: Discover a refreshing and vibrant salad that's as easy to make as it is delicious. Our Spinach Salad with Strawberry Vinaigrette is a delightful blend of fresh ingredients that promises to bring a burst of flavor to your table. Dive into a nostalgic story that makes this dish a cherished family favorite.**


---


**A Taste of Spring: Spinach Salad with Strawberry Vinaigrette**


When the first warm breeze of spring swept through our small town, it was always a signal for my family to gather in my grandmother's garden. Her backyard was a sanctuary of bursting colors, with rows of strawberries glistening like jewels under the sun and spinach leaves swaying gently in the breeze. Among the many dishes that graced our family table, none heralded the arrival of spring quite like our Spinach Salad with Strawberry Vinaigrette.


**Ingredients:**


- Fresh spinach leaves


- Strawberries, sliced


- Almonds, toasted


- Feta cheese, crumbled


- Cooked chicken, sliced


- Shallot, finely chopped


- Fresh thyme, finely chopped


- Ground pepper, to taste


**For the Strawberry Vinaigrette:**


- Strawberries, puréed


- Balsamic vinegar


- Dijon mustard


- Water


**Instructions:**


1. **Prepare the Vinaigrette:** In a small bowl, mix the puréed strawberries with balsamic vinegar, dijon mustard, and a splash of water. Whisk until smooth and set aside.


2. **Assemble the Salad:** On a large plate, layer the fresh spinach leaves. Top with sliced strawberries, toasted almonds, crumbled feta cheese, and cooked chicken.


3. **Add Flavor:** Sprinkle finely chopped shallot and fresh thyme over the salad. Season with ground pepper to taste.


4. **Drizzle and Serve:** Generously drizzle the strawberry vinaigrette over the salad. Serve immediately and enjoy a taste of spring.


**A Nostalgic Family Memory**


As children, my siblings and I would race barefoot through the garden, eager to pick the ripest strawberries. My grandmother would laugh at our stained fingers and delighted giggles as we tried to sneak a few berries into our mouths. Once the basket was full, she'd lead us to the kitchen, where we'd help her prepare this simple yet extraordinary salad.


Around the dinner table, stories of past springs would unfold, each tale more vibrant with the flavors of our meal. The combination of sweet strawberries, tangy vinaigrette, and savory chicken created a symphony on our plates, one that still resonates with me today.


**Difficulty: 2/10**


This recipe is delightfully easy, perfect for beginner cooks or anyone looking for a quick, nutritious meal.


**Classification: Main Dish**


Whether served as a light lunch or a refreshing dinner, this Spinach Salad with Strawberry Vinaigrette is a versatile main dish that embodies the essence of spring. Enjoy this dish with loved ones, and perhaps, create your own cherished memories around the table.

Read more about Appetizers

Read more about Main Dishes

Read more about Desserts

Spicy Salad with Kidney Beans, Cheddar, and Nuts | Made by Meaghan Moineau

Spicy Salad with Kidney Beans, Cheddar, and Nuts | Made by Meaghan Moineau

**Title: Zesty Delight: Spicy Salad with Kidney Beans, Cheddar, and Nuts**


**Description:** Dive into a symphony of flavors with our Spicy Salad featuring kidney beans, cheddar, and a medley of nuts. This vibrant dish is not just a treat for your taste buds but also a wholesome meal that can be whipped up in record time. Perfect for a quick lunch or a light dinner, this salad is both nutritious and satisfying, boasting a tantalizing mix of creamy, crunchy, and spicy elements. Join me as I share a cherished family memory that this delightful salad brings to mind.


---


**The Art of Quick and Healthy: Spicy Salad with Kidney Beans, Cheddar, and Nuts**


When it comes to preparing a meal that's both quick and nourishing, salads often take the spotlight. This Spicy Salad with Kidney Beans, Cheddar, and Nuts is a testament to how simple ingredients can come together to create a dish that's delicious and deeply satisfying. As a bonus, it's a meal that carries with it a personal story from my childhood that makes it even more special.


**Ingredients:**


- 1 cup cooked kidney beans, rinsed and drained


- 1/4 cup almonds


- 1 ripe avocado, sliced


- 2 tablespoons balsamic vinegar


- 1/2 cup cheddar cheese, torn into small pieces


- 4 cups mixed greens


- 2 tablespoons olive oil


- 1/4 cup salted roasted cashews


- 1/4 cup sundried tomatoes, cut into strips


- A dash of Tabasco


**Instructions:**


1. Begin by preparing your ingredients: Rinse and drain the kidney beans, cut the sundried tomatoes into strips, and tear the cheddar cheese into small, bite-sized pieces.


2. In a large salad bowl, lay down a bed of mixed greens. Top the greens with kidney beans, sundried tomatoes, cheddar cheese, almonds, and cashews.


3. In a small mixing bowl, combine olive oil, balsamic vinegar, and a dash of Tabasco sauce. Stir well to create a zesty dressing.


4. Drizzle the dressing over the salad, ensuring every ingredient gets a touch of that spicy, tangy goodness.


5. Give it a gentle toss, ensuring all the flavors meld together beautifully.


This salad is not just a wonderful mix of textures and flavors but also a slice of my family's culinary history. Growing up, Sundays were reserved for family picnics in our local park. My mother would pack a wicker basket with freshly prepared dishes, and this spicy salad was always a staple. I remember the vivid flavors of the kidney beans and cheddar mixing with the crunch of the nuts and the tangy kick from the Tabasco-laced dressing. It was the perfect meal to enjoy on a sunny afternoon, surrounded by laughter and the rustling of leaves.


**Difficulty:** 3/10


**Classification:** Main Dish


With its simple preparation and vibrant flavors, this salad is an excellent choice for anyone looking to enjoy a quick, healthy meal that's rich in protein and fiber. Whether you're reminiscing about family picnics or simply seeking a nutritious lunch option, this Spicy Salad with Kidney Beans, Cheddar, and Nuts is sure to become a favorite. Enjoy the journey of flavors and memories with every bite!

Read more about Appetizers

Read more about Main Dishes

Read more about Desserts

Broccolini Quinoa Pilaf | Made by Meaghan Moineau

Broccolini Quinoa Pilaf | Made by Meaghan Moineau

**Title: "Savor the Simplicity: Nostalgic Broccolini Quinoa Pilaf"**


**Description: Discover the delightful harmony of broccolini and quinoa in a wholesome pilaf that evokes cherished family memories. This nutritious dish is a perfect blend of flavors and textures, ideal as a main dish for any meal.**


---


There's something uniquely satisfying about a dish that not only fills your belly but also warms your heart with memories. Our Broccolini Quinoa Pilaf is one such creation, a delightful main dish that effortlessly combines the earthy notes of quinoa with the bright, slightly bitter touch of broccolini. This recipe not only tantalizes your taste buds but also nurtures your soul with its comfort and simplicity.


### Ingredients:


- 1 bunch of broccolini, trimmed


- 1 garlic clove, minced


- 2 tablespoons olive oil


- 1 medium onion, finely chopped


- 1 cup quinoa


- 2 cups vegetable broth


- ½ cup walnuts, toasted and roughly chopped


- Salt and pepper to taste


### Instructions:


1. In a large pan with a lid, heat olive oil over medium-high heat. Add onions and cook for 1 minute.


2. Add garlic and cook until onions are translucent and garlic is fragrant.


3. Stir in quinoa, ensuring it’s well mixed with the onions and garlic.


4. Gradually pour in the vegetable broth, bringing the mixture to a boil.


5. Cover the pan and reduce the heat to low. Let it simmer for 15 minutes.


6. In the last 2-3 minutes of cooking, place the broccolini on top of the quinoa without stirring, then cover again.


7. After cooking, uncover and gently toss the broccolini with the quinoa.


8. Season with salt and pepper to taste, sprinkle with toasted walnuts, and serve hot.


### A Nostalgic Family Memory:


Growing up, Sunday lunches were a time-honored tradition in our family. My grandmother, the matriarch of our culinary experiences, would often prepare her signature Broccolini Quinoa Pilaf. The aroma of sautéed onions and garlic would waft through the house, signaling the beginning of a meal that brought us all together.


This dish was more than just a meal; it was a vessel of stories and laughter shared around the dining table. As a child, I remember being tasked with the important job of trimming the broccolini, standing on tiptoes to reach the counter. My grandmother would watch over me with a gentle smile, recounting tales of her childhood and how she learned to cook from her own mother.


The simplicity of the pilaf, adorned with the crunch of walnuts, was a testament to the beauty of uncomplicated cooking. Each bite was a reminder of those precious family moments, where food was love and laughter was abundant.


### Difficulty Rating: 3/10


This Broccolini Quinoa Pilaf is not only a testament to uncomplicated cooking but also a delightful main dish that anyone can master with ease. Perfect for a nutritious meal, it brings a touch of nostalgia to your table, making it a cherished addition to any family gathering.

Read more about Appetizers

Read more about Main Dishes

Read more about Desserts