Salmon In Banana Leaf | Made by Meaghan Moineau

Salmon In Banana Leaf

Intro

One of my fondest childhood memories involves the warm, fragrant aroma of banana leaves wafting through our kitchen. My grandmother would prepare delectable dishes wrapped in these leaves, each one a little parcel of love and flavor. Her kitchen was a symphony of sounds and scents, with the sizzle of searing meat and the soothing, earthy smell of banana leaves blending together in perfect harmony. Today, I want to share a recipe that echoes those nostalgic memories while adding a modern twist: Salmon in Banana Leaf. This dish combines the rich, buttery texture of salmon with a medley of fragrant spices, all wrapped up in the comforting embrace of a banana leaf. Whether you’re new to this culinary technique or revisiting an old favorite, this recipe is sure to become a cherished part of your repertoire.

Why You’ll Love It

This recipe is a celebration of flavors and textures, bringing together a unique blend of ingredients that will tantalize your taste buds. The use of banana leaves not only infuses the salmon with a subtle, earthy aroma but also keeps it incredibly moist and tender. The marinade is a harmonious mix of sweet, spicy, and savory elements, creating a complex flavor profile that complements the natural richness of the salmon. Plus, the presentation is stunning, making it perfect for a dinner party or a special occasion. This dish is not only a feast for the palate but also a feast for the eyes.

Ingredients

  • Banana leaves
  • Cinnamon
  • Fennel seed
  • Fish sauce
  • Garlic
  • Ginger
  • Peach preserves
  • Red chiles
  • Rice
  • Rice wine vinegar
  • Salmon steaks
  • Scallions
  • Sesame oil
  • Soy sauce
  • Star anise
  • Tahini
  • Vegetable oil

Instructions

  1. Begin by mixing all of your marinade ingredients together and pouring it over the salmon in a big baggy or container. Marinate under refrigeration for at least half an hour or up to 2 hours.
  2. While the salmon is marinating, put all of your scented rice powder ingredients into a spice grinder and pulse until everything is coarsely ground. Remember, you want a few larger crumbles of rice for mouth-feel!
  3. Remove the salmon from the marinade (discarding any leftover marinade) and coat it with some of the scented rice powder on each side. You won’t use it all with just the 2 pieces of salmon. Save some for another time.
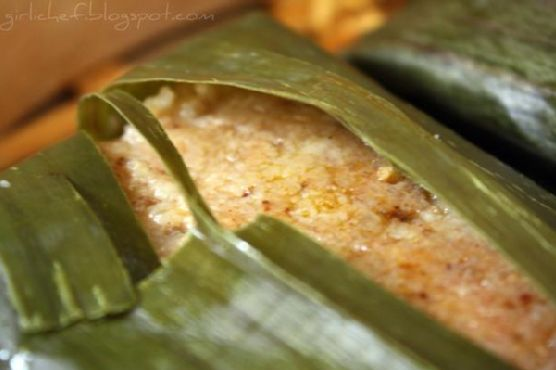
  4. Lay your banana leaves out flat. Place one salmon fillet in the center of each leaf. Fold one side over the salmon. Fold the opposite side over that, then both ends to make a little package.
  5. Place salmon packets in a steamer basket over boiling water.
  6. Put all of the marinade ingredients into a small sauce pot or alternately, a microwave-safe dish and bring to a heat. Whisk everything together, and it’s ready to serve.
  7. After 10-13 minutes, salmon will be finished. Flip the smooth side of the banana leaves up and make a slit through them to serve.
  8. Serve with Chinese noodles, corn, and the dipping sauce.

Tips

When working with banana leaves, it’s important to soften them slightly before use. You can do this by briefly passing them over an open flame or soaking them in hot water for a few minutes. This makes them more pliable and easier to wrap around the salmon.

Variations & Substitutions

If you can’t find banana leaves, parchment paper or aluminum foil can be used as an alternative wrapping. For a different flavor profile, try using orange marmalade instead of peach preserves, or swap out the fennel seed for coriander seeds. If you’d like a spicier kick, increase the amount of red chiles or add a splash of hot sauce to the marinade.

Storage

Leftover salmon can be stored in an airtight container in the refrigerator for up to 2 days. To reheat, steam the salmon in its banana leaf wrapping until warmed through, or gently heat in the oven at a low temperature. Avoid microwaving, as it can cause the salmon to become dry and rubbery.

FAQ

Can I use frozen salmon for this recipe?

Yes, you can use frozen salmon, but make sure to fully thaw it before marinating. This ensures that the marinade penetrates the fish effectively and that it cooks evenly.

What can I serve with Salmon in Banana Leaf?

This dish pairs beautifully with a variety of sides. Consider serving it with steamed jasmine rice, a fresh cucumber salad, or stir-fried vegetables. The dipping sauce also complements a range of accompaniments.

Is banana leaf edible?

While banana leaves are not typically consumed, they impart a lovely aroma and flavor to the food they encase. They are removed before eating, similar to the husks around tamales.

Nutrition

This dish is rich in omega-3 fatty acids and protein, thanks to the salmon. The use of spices and banana leaves adds flavor without additional calories, making it a heart-healthy and satisfying meal. For those watching their sodium intake, consider using a low-sodium soy sauce in the marinade.

Conclusion

Salmon in Banana Leaf is a dish that brings together the best of both tradition and innovation. It’s an opportunity to experiment with new flavors while paying homage to techniques that have been cherished for generations. Whether you’re sharing it with family or serving it at an elegant dinner party, this recipe is sure to impress and delight. So, gather your ingredients, embrace the process, and savor the delicious results. Happy cooking!

Related update: Salmon In Banana Leaf

Related update: Beef Braised In Red Wine

San Francisco Cioppino | Made by Meaghan Moineau

San Francisco Cioppino

Intro

There’s something magical about a bowl of seafood stew that can transport you straight to the bustling shores of San Francisco. Cioppino, a classic Italian-American dish, is a hearty seafood stew known for its rich tomato base and an array of fresh seafood. My first encounter with this delightful dish was during a family trip to the Bay Area when I was a child. I vividly remember savoring each bite while the cool ocean breeze brushed against my skin. Today, I’m excited to share this cherished recipe with you, so you can bring a taste of the San Francisco coast into your home.

Why You’ll Love It

Cioppino is more than just a meal; it’s an experience. Here’s why you’ll love it:

  • Flavorful and Rich: The combination of fresh seafood and a tomato-based broth creates a symphony of flavors that dance on your palate.
  • Easy to Make: Despite its gourmet appearance, cioppino is surprisingly simple to prepare, making it perfect for both weeknight meals and special occasions.
  • Hearty and Nutritious: Packed with protein from a variety of seafood, this stew is both satisfying and nutritious.
  • Customizable: You can easily adjust the ingredients to suit your taste or whatever seafood you have on hand.

Ingredients

  • Fresh canned tomatoes
  • Clams
  • Dry white wine
  • Cooked freshly Dungeness crabs
  • White fresh fish
  • Fresh basil
  • Fresh parsley
  • Garlic
  • Black fresh ground pepper
  • Olive oil
  • Fresh oregano
  • Raw shrimp
  • Scallops
  • Tomato paste
  • Yellow onion

Instructions

  1. Remove the legs and claws from the crabs and break the body in half, reserving as much of the “crab butter” as possible (the yellow-colored center). Set crab pieces aside and force the crab butter through a sieve into a small bowl. Set aside.
  2. Place the clams in a pan, add 1 cup of wine, and steam, covered, over medium heat for 5 minutes or until clams open. Remove clams and discard any that do not open. Strain the stock through a cheesecloth and reserve.
  3. In an 8-quart saucepan, heat the oil. Add the onion and garlic and sauté over medium heat until soft, but not browned.
  4. Add tomatoes, tomato paste, and remaining 2 cups of wine, pepper, herbs, and clam stock. Partially cover and simmer for 20 minutes.
  5. Add the fish, scallops, shrimp, crab, and crab butter. Simmer for approximately 5 minutes or until all seafood is cooked; do not stir or the fish will break apart.
  6. Add the clams and heat for a scant 1 minute. Sprinkle with parsley and serve immediately from the pot.

Tips

Here are some tips to ensure your cioppino turns out perfectly:

  • Use Fresh Seafood: The freshness of the seafood significantly impacts the flavor of the dish. If possible, buy your seafood on the day you plan to make the cioppino.
  • Don’t Overcook the Seafood: Seafood cooks quickly, so be careful not to overcook it to prevent it from becoming tough.
  • Wine Selection: Choose a dry white wine that you enjoy drinking, as it will impart flavor to the stew.

Variations & Substitutions

Cioppino is a versatile dish that can be adapted to your preferences:

  • Seafood: Feel free to add mussels, squid, or lobster to the stew for a different seafood combination.
  • Wine: If you prefer, you can use a light red wine instead of white wine for a deeper flavor.
  • Herbs: Experiment with different herbs such as thyme or rosemary for a unique twist.

Storage

Leftover cioppino can be stored in an airtight container in the refrigerator for up to 2 days. Reheat gently on the stove over low heat, adding a splash of water or broth if needed to thin the stew. Freezing is not recommended as it can affect the texture of the seafood.

FAQ

Can I make cioppino ahead of time?

Yes, you can prepare the tomato base of the stew ahead of time and store it in the refrigerator for up to two days. Add the seafood just before serving to ensure it remains tender and fresh.

What should I serve with cioppino?

Cioppino is traditionally served with crusty bread, which is perfect for soaking up the flavorful broth. A simple green salad or steamed vegetables also complement the dish well.

Nutrition

Cioppino is a nutritious meal, high in protein and low in carbohydrates. The exact nutritional content will vary based on the specific seafood used, but this stew is an excellent source of omega-3 fatty acids, vitamins, and minerals.

Conclusion

Whether you’re reminiscing about a past visit to the San Francisco coast or simply looking to try something new, this cioppino recipe is sure to delight your senses. With its robust flavors and comforting warmth, it’s the perfect dish to share with family and friends. So gather your ingredients, don your apron, and embark on a culinary journey to the heart of San Francisco. Enjoy your homemade cioppino and the cherished memories it may inspire!

Related update: San Francisco Cioppino

Related update: Salmon In Banana Leaf

Cilantro Lime Halibut | Made by Meaghan Moineau

Cilantro Lime Halibut

Intro

There’s something magical about the aroma of lime and cilantro filling the kitchen. It takes me back to summer evenings spent by the sea with my family, sharing stories and laughter over a delicious meal. One of my fondest memories is a fishing trip with my grandfather where we caught fresh halibut, and he taught me how to cook it with his signature lime and cilantro twist. Today, I’m excited to share this Cilantro Lime Halibut recipe with you, a dish that combines fresh, zesty flavors with the rich taste of wild Pacific halibut. Whether you’re a seafood aficionado or just starting to explore fish dishes, this recipe is sure to become a favorite in your home.

Why You’ll Love It

This Cilantro Lime Halibut is not only delicious but also quick and easy to prepare, making it perfect for weeknight dinners or special occasions. The dish features a beautiful balance of flavors—a hint of citrus from the lime, aromatic freshness from the cilantro, and a subtle sweetness from the blood orange olive oil. Plus, it’s a healthy option packed with protein and essential nutrients. Whether you’re cooking for yourself or hosting a dinner party, this dish will impress with its simple yet sophisticated taste.

Ingredients

  • Chicken stock
  • Fresh cilantro
  • Green onions
  • Wild Pacific halibut filets
  • Lime (juice)
  • Another slug of blood orange olive oil
  • Mollie Stone’s blood orange olive oil
  • Dusting of garlic-pepper
  • Salt and pepper
  • White wine

Instructions

  1. Heat the oil in a large frying pan over medium heat.
  2. Coat the filets with garlic pepper on the flesh side.
  3. When the pan is heated, add the filet flesh side down to sear that side. Allow to cook for about 30 seconds.
  4. Flip the filets over with tongs.
  5. Add white wine to the pan and cover to steam. After about 2 minutes, much of the wine will have evaporated.
  6. Add the chicken stock gradually and allow the filets to steam for another couple of minutes.
  7. Add the lime juice. When bubbling and both filets are opaque all the way through, add the green onions to the pan and swirl in the sauce for a moment.
  8. Remove filets to beds of lettuce.
  9. Add a tsp of the Blood Orange Olive Oil, swirl the green onions in the sauce one more time, and then pour equal parts over the fish.
  10. Garnish with fresh cilantro and lime wedges. Sprinkle with salt and pepper to taste.
  11. Serve immediately.

Tips

For the best results, ensure your halibut filets are fresh. If possible, purchase them from a reputable fishmonger. When searing the fish, make sure the pan is hot enough before adding the filets, as this will give them a nice crust. If you don’t have blood orange olive oil, regular olive oil with a splash of orange juice can be a suitable substitute.

Variations & Substitutions

If you’re not a fan of halibut, this recipe works well with other white fish such as cod or haddock. You could also experiment with adding different herbs like parsley or dill for a different flavor profile. For a spicier kick, consider adding a pinch of red pepper flakes to the sauce.

Storage

Leftover Cilantro Lime Halibut can be stored in an airtight container in the refrigerator for up to two days. To reheat, place the fish in a pan over low heat until warmed through. Be careful not to overcook, as the fish can become dry.

FAQ

Can I use frozen halibut filets?

Yes, you can use frozen halibut filets. Just make sure to thaw them completely before cooking. Pat them dry with a paper towel to remove any excess moisture, which helps in achieving a good sear.

What can I serve with Cilantro Lime Halibut?

This dish pairs beautifully with a simple salad, steamed vegetables, or a light quinoa pilaf. The fresh flavors of the halibut complement a variety of sides, so feel free to get creative with your pairings.

Nutrition

Halibut is an excellent source of protein and is rich in omega-3 fatty acids, which are beneficial for heart health. This dish is also low in carbohydrates, making it suitable for those following a low-carb diet. The use of fresh lime and cilantro adds vitamins and antioxidants, contributing to a nutritious, balanced meal.

Conclusion

Our Cilantro Lime Halibut is a delightful dish that brings together the best of fresh seafood and vibrant flavors. It’s easy to prepare, healthy, and sure to please even the pickiest eaters. Whether you’re evoking seaside memories or creating new ones, this recipe is a wonderful way to bring a touch of elegance and flavor to your dining table. We hope you enjoy this recipe as much as we do and that it becomes a cherished part of your culinary repertoire.

Related update: Cilantro Lime Halibut

Bacalhau Macau | Made by Meaghan Moineau

Bacalhau Macau: A Taste of Tradition and Comfort

Intro

There’s something magical about recipes that have stood the test of time, passed down through generations, and cherished by families. Bacalhau Macau is one such dish that brings back fond memories of my grandmother’s kitchen, where the air was always filled with the rich aroma of spices and the comforting warmth of family gatherings. I remember sitting at the wooden table, eagerly waiting for the first bite of those golden, crispy fish cakes that she lovingly prepared. This recipe is a tribute to those cherished moments, a blend of tradition and flavor that I am delighted to share with you.

Why You’ll Love It

Bacalhau Macau is not just a dish; it’s an experience. You’ll love it for its delightful combination of textures and flavors. The crispy outer layer contrasts beautifully with the creamy, savory filling. The fusion of salt cod with aromatic herbs and spices creates a burst of flavor in every bite. Whether you’re serving it as an appetizer or a main course, Bacalhau Macau is sure to impress your family and friends.

Ingredients

  • 1 cup Japanese breadcrumbs
  • 2 tablespoons butter
  • 2 tablespoons chopped cilantro
  • 1 large egg
  • 1 egg white
  • 2 cloves garlic, minced
  • 1 tablespoon minced ginger
  • 2 green onions, sliced
  • 2 russet (Idaho) potatoes, peeled and diced
  • 1/4 cup oil-cured olives, chopped
  • 1/2 teaspoon salt
  • 1 pound salt cod fillets, soaked and shredded
  • 1 tablespoon sesame oil
  • 1/2 cup whipping cream
  • 1/4 teaspoon white pepper
  • Vegetable oil for frying

Instructions

  1. Place cod in a bowl and cover with cold water. Soak for 6 to 8 hours, changing the water once or twice. Drain, rinse very well and pat dry. Shred fish with your fingers.
  2. Pour 3 inches of water into a medium saucepan and bring to a boil. Add the diced potatoes, and cook until tender, 10 to 12 minutes. Drain the potatoes, return them to the pan briefly. Mash the potatoes until smooth, then whisk in the butter.
  3. Stir the cod into the mashed potatoes. Stir in the green onion, cilantro, olives, egg white, sesame oil, salt, garlic, ginger, and pepper.
  4. In a chilled bowl, whip the cream until it holds soft peaks. Gently fold the whipped cream into the cod mixture with a rubber spatula.
  5. Using two large soupspoons, form about 3 tablespoons of the cod-potato mixture into an oval fish cake. Set the cod cake on a baking sheet and repeat with the remaining potato mixture.
  6. Spread the breadcrumbs on a plate. Beat the egg in a wide, shallow bowl. Dip each cod cake into the egg, turning it gently to coat all sides. Allow any excess egg to drip back into the bowl, then roll the cake in breadcrumbs to coat all sides. Set the coated fish cakes on a baking sheet.
  7. Place a large skillet over medium heat and pour in 1/4 inch of vegetable oil. When the oil is hot – a corner of a cod cake will give off a lively sizzle when dipped in the oil – add as many of the fish cakes to the skillet as will fit without touching each other. Cook, turning once, until golden brown, about 5 to 7 minutes.
  8. Remove the fish cakes with a slotted spoon and drain them on paper towels. If necessary, repeat with the remaining cod cakes. Serve warm.

Tips

For the best results, make sure the whipping cream is well chilled before whipping to achieve the perfect soft peaks. Additionally, ensure that the oil is hot enough before frying the fish cakes; otherwise, they may absorb too much oil and become greasy. If you find salt cod difficult to find, many specialty stores or online retailers carry it year-round.

Variations & Substitutions

Feel free to experiment with this recipe by adding your favorite herbs or spices. A dash of smoked paprika or a pinch of chili flakes can add an exciting twist. If you’re seeking a gluten-free option, substitute the Japanese breadcrumbs with gluten-free breadcrumbs available at most grocery stores.

Storage

Any leftover fish cakes can be stored in an airtight container in the refrigerator for up to three days. To reheat, place them in a preheated oven at 350°F (175°C) for about 10 minutes or until warmed through. Avoid microwaving, as it can make the fish cakes soggy and less appetizing.

FAQ

Can I use fresh cod instead of salt cod?

While fresh cod can be used, it won’t provide the same depth of flavor as salt cod. However, if you choose to use fresh cod, make sure to adjust the seasoning as needed since the salt content will differ.

Is it necessary to soak the salt cod for so long?

Yes, soaking the salt cod is crucial to remove excess salt and rehydrate the fish. If not soaked properly, the dish may end up too salty. Make sure to change the water at least once during the soaking process.

Nutrition

This recipe yields 4 servings. Each serving contains approximately 400 calories, 20g of protein, 35g of carbohydrates, and 20g of fat. It’s a deliciously balanced meal that’s rich in flavor and nutrients.

Conclusion

Bacalhau Macau is more than just a recipe; it’s a celebration of rich culinary heritage and the joy of sharing meals with loved ones. Whether you’re recreating family memories or trying it for the first time, this dish promises to bring warmth and comfort to your table. I hope you enjoy making and savoring these delightful fish cakes as much as my family and I do. Bon appétit!

Related update: Bacalhau Macau

Thai Shrimp | Made by Meaghan Moineau

Thai Shrimp: A Flavorful Journey to the Heart of Thailand

Intro

There’s something truly magical about the aroma of Thai cuisine wafting through your kitchen. It reminds me of the first time I visited Thailand. I was wandering through the bustling streets of Bangkok when I stumbled upon a tiny street food stall. The vendor, with a warm smile, served me a dish that would forever change my culinary journey: Thai Shrimp. The combination of fresh basil, spicy chilies, and succulent shrimp immediately captivated my senses. This dish not only brings back fond memories but also allows me to share a piece of Thailand with my loved ones every time I make it. Join me as we recreate this vibrant and flavorful dish in the comfort of your own kitchen.

Why You’ll Love It

This Thai Shrimp recipe is a delightful symphony of flavors and textures. The fragrant basil leaves and spicy chilies create a perfect balance with the savory notes of soy sauce and fish sauce. The shrimp are cooked to perfection, tender yet firm, absorbing the rich broth that envelops them. What makes this dish stand out is its simplicity and quick preparation, making it a perfect choice for a weekday dinner or a special weekend treat.

Ingredients

  • Basil leaves
  • Chicken stock
  • Cooked rice
  • Fish sauce
  • Green onions
  • Peanut oil
  • Red green chilies
  • Cooked shrimp
  • Soy sauce
  • Sugar

Instructions

  1. Peel and devein the shrimp, ensuring they’re clean and ready for cooking.
  2. Wash and dry the basil leaves, then steam them until they are wilted and fragrant.
  3. Mince the garlic cloves and thinly slice the red green chilies, ensuring they are seeded for a milder heat.
  4. Mince the white part of the green onions and cut the green part into 1-inch pieces.
  5. Heat a wok over high heat until it’s hot, then swirl in the peanut oil, heating it almost to smoking point.
  6. Add the minced garlic, sliced chilies, and the white part of the onions to the wok, cooking for 10-15 seconds until aromatic.
  7. Add the shrimp to the wok and stir-fry for about 20 seconds or until they start to change color.
  8. Pour in the fish sauce, soy sauce, sugar, and chicken stock, bringing the mixture to a boil.
  9. Stir in the green parts of the onions and the basil leaves, cooking for another 20 seconds until the basil wilts and the shrimp are firm and pink.
  10. Serve the dish over hot cooked rice, ensuring some of the delicious soup is poured over the rice.

Tips

To ensure the best flavor, use fresh basil leaves and high-quality shrimp. Be cautious with the chilies if you prefer a milder dish, and consider wearing gloves when handling them to avoid skin irritation. If you’re short on time, prep the ingredients ahead of time and store them in the refrigerator until you’re ready to cook.

Variations & Substitutions

If you want to switch things up, consider these variations:

  • Swap the shrimp for chicken or tofu for a different protein source.
  • Use coconut milk instead of chicken stock for a creamier, richer sauce.
  • Add vegetables like bell peppers or snap peas for extra crunch and nutrition.
  • Substitute soy sauce with tamari for a gluten-free option.

Storage

Leftover Thai Shrimp can be stored in an airtight container in the refrigerator for up to 3 days. To reheat, gently warm it in a saucepan over medium heat, adding a splash of chicken stock or water if needed to maintain the soupy consistency. Avoid microwaving to prevent the shrimp from becoming rubbery.

FAQ

Can I make this dish ahead of time?

Yes, you can prepare the ingredients ahead of time and store them in the fridge. However, it’s best to cook the shrimp just before serving to maintain their texture and flavor.

How can I adjust the spiciness of the dish?

To adjust the spiciness, simply reduce the number of chilies or remove the seeds for a milder flavor. You can also add more chilies if you prefer a spicier kick.

What can I use if I don’t have a wok?

If you don’t have a wok, a large skillet or frying pan will work just fine. Ensure it’s hot enough to quickly stir-fry the ingredients, mimicking the wok’s high-heat cooking.

Nutrition

This dish is not only delicious but also nutritious. Shrimp is a great source of protein and low in calories, while basil and chilies provide vitamins and antioxidants. Served with rice, it offers a balanced meal with carbohydrates and essential nutrients.

Conclusion

Cooking Thai Shrimp at home is a wonderful way to bring the exotic flavors of Thailand into your kitchen. It’s a dish that resonates with nostalgia for me, and I hope it becomes a favorite in your household as well. Whether you’re a seasoned cook or a beginner, this recipe is approachable and rewarding. Enjoy the vibrant flavors and the joy of sharing a meal that’s as heartwarming as it is delicious.

Related update: Thai Shrimp

My Drunken Fish Fillet | Made by Meaghan Moineau

My Drunken Fish Fillet

Intro

Growing up by the coast, my family had a deep connection with the sea. Every weekend, my grandfather would take me fishing, teaching me not just how to cast a line, but how to appreciate the ocean’s bounty. Those sun-drenched mornings often ended with my grandmother preparing a special fish dish that became a family favorite. She called it “Drunken Fish Fillet,” a name that always made me giggle. It wasn’t until years later that I understood the culinary magic behind the name. Today, I’m sharing this cherished recipe with you, hoping to bring some of that seaside warmth to your kitchen.

Why You’ll Love It

This Drunken Fish Fillet recipe is a delightful fusion of texture and flavor. The batter, light and crispy, envelops the tender fish in a golden embrace. The subtle hint of rice wine adds a sophisticated note, elevating the dish to something truly special. Whether you’re an experienced cook or a beginner, this recipe is straightforward yet impressive. It’s perfect for a cozy family dinner or a fancy get-together with friends.

Ingredients

  • Fish fillets
  • Salt (for the fish)
  • White ground pepper (for the fish)
  • Rice wine
  • Beer
  • 2 eggs (separated into whites and yolks)
  • All-purpose flour (plus extra as needed)
  • Salt (for the batter)
  • Oil (for frying)
  • Yamasa soy sauce (for dipping)
  • Wasabi (from tube, for dipping)
  • Lemon juice (for dipping)

Instructions

  1. In a mixing bowl, combine beer, egg yolk, flour, and 1/2 teaspoon of salt. Beat well until the mixture becomes thick. Cover the bowl and set it aside in the fridge for one hour to let the flavors meld.
  2. Meanwhile, prepare the fish fillets by sprinkling them with salt and white ground pepper. Pat them gently to ensure they are evenly coated.
  3. Pour a splash of rice wine over the fish fillets and let them marinate for 15 to 20 minutes. This step infuses the fish with a subtle, aromatic depth.
  4. Just before cooking, whip the egg whites until they become soft and foamy. Carefully fold the egg whites into the chilled batter, mixing gently to maintain the airy texture.
  5. Heat oil in a frying pan over medium heat. Dip the marinated fish fillets into the batter, ensuring they are well coated, then gently place them into the hot oil. Fry 3 pieces at a time to maintain the oil temperature and achieve a crisp crust.
  6. Cook the fish until they are golden brown and cooked through, about 4 to 6 minutes per side. Remove and drain on paper towels.
  7. For the dipping sauce, combine Yamasa soy sauce, a hint of wasabi, and a splash of lemon juice in a small bowl. Serve alongside the fish for an added burst of flavor.

Tips

  • Ensure that the oil is at the right temperature before frying. If it’s too cold, the batter will absorb more oil and become greasy.
  • Let the batter rest in the fridge for at least one hour. This helps to develop the flavors and achieve a better texture.
  • Fry in small batches to maintain oil temperature and ensure even cooking.

Variations & Substitutions

Variations: Try using different types of fish, such as cod, haddock, or tilapia, to see which you prefer. For a spicy kick, add a pinch of chili powder to the batter.

Substitutions: If you don’t have rice wine, white wine or a splash of apple cider vinegar can be used as a substitute. For a gluten-free version, use a gluten-free all-purpose flour blend.

Storage

Once cooked, these fish fillets are best enjoyed fresh and hot. However, if you have leftovers, let them cool completely, then store them in an airtight container in the refrigerator for up to 2 days. Reheat in an oven at 350°F (175°C) until warmed through to retain some of their crispiness.

FAQ

Can I make the batter ahead of time?

Yes, you can prepare the batter a few hours in advance and keep it in the fridge. Just be sure to fold in the whipped egg whites right before you start frying to ensure the batter remains light and airy.

What oil is best for frying fish?

A neutral oil with a high smoke point, like canola or vegetable oil, is best for frying fish. These oils won’t impart any unwanted flavors to the dish.

How can I tell if the fish is cooked through?

The fish is cooked when it flakes easily with a fork and is opaque throughout. If you have a kitchen thermometer, the internal temperature should reach 145°F (63°C).

Nutrition

While I don’t have exact nutritional information for this recipe, it’s important to enjoy fried foods in moderation as part of a balanced diet. Pair your meal with a fresh salad or steamed vegetables to round out the nutritional profile.

Conclusion

There you have it, a treasured family recipe that brings the taste of the ocean right to your dining table. My Drunken Fish Fillet is all about savoring the simple joys of cooking and eating with loved ones. Whether you recreate this dish as part of a family tradition or introduce it to friends, I hope it becomes a beloved part of your culinary repertoire. Remember, a good meal is not just about the food, but the love and memories shared around the table.

Related update: My Drunken Fish Fillet

Related update: Cumin and Paprika Rubbed Chicken Drumsticks

Shrimp & Orzo | Made by Meaghan Moineau

Shrimp & Orzo: A Delightful Mediterranean Dish

Intro

There’s something magical about the aroma of simmering herbs and the salty sea breeze that instantly transports me back to my childhood summers spent on the Mediterranean coast. My grandmother used to prepare a similar dish, filling the kitchen with warmth and love. Today, I’m excited to share my version of this nostalgic recipe, Shrimp & Orzo, a flavorful blend of tender shrimp, aromatic vegetables, and creamy feta cheese, perfect for a cozy family dinner or a special occasion.

Why You’ll Love It

This Shrimp & Orzo recipe is a delightful combination of flavors and textures. The savory taste of shrimp blends beautifully with the earthy fennel and the tangy notes of feta cheese, creating a symphony of flavors in every bite. It’s a one-pan meal, making it easy to prepare and perfect for busy weeknights. Plus, it’s a wholesome dish that can be enjoyed by everyone, with plenty of room for customization.

Ingredients

  • 1 can diced tomatoes
  • 1/2 cup dry white wine
  • 1 fennel bulb, diced
  • 4 ounces feta cheese, crumbled
  • 1/4 cup fresh parsley, chopped
  • 4 cloves of garlic, minced
  • Lemon wedges, for serving
  • 2 cups low sodium chicken broth
  • 2 tablespoons olive oil
  • 1 large onion, diced
  • 1 teaspoon dried oregano
  • 1 cup orzo pasta
  • 1/2 teaspoon crushed red pepper flakes
  • Salt & pepper, to taste
  • 1 pound shrimp, peeled and deveined
  • 1 cup water

Instructions

  1. Preheat your oven to 400°F (200°C).
  2. Season the shrimp with salt and pepper, and refrigerate until ready to use.
  3. Grease a 13×9-inch baking dish and set aside.
  4. In a large Dutch oven, heat the olive oil over medium-high heat until shimmering.
  5. Add the diced onion, fennel bulb, and 1/2 teaspoon of salt. Cook, stirring frequently, until the vegetables are softened and start to brown around the edges, about 10 minutes.
  6. Add the minced garlic and crushed red pepper flakes. Cook and stir until the garlic becomes very fragrant, about 30 seconds.
  7. Add the orzo to the vegetables, stirring to coat the orzo with oil. Continue cooking and stirring for about 4 minutes, until the orzo has a toasty aroma.
  8. Add the white wine, cooking and stirring constantly until the liquid evaporates, about 1 minute.
  9. Pour in the chicken broth, water, and 1/4 teaspoon salt. Bring the mixture to a boil, then reduce the heat and simmer until the orzo is almost tender, about 12 minutes. Stir fairly constantly to prevent sticking, adjusting the heat as necessary to maintain a lively simmer.
  10. Remove the pot from heat and stir in the seasoned shrimp, diced tomatoes, oregano, and 1 tablespoon of parsley.
  11. Transfer the mixture to the prepared baking dish and sprinkle with crumbled feta cheese.
  12. Bake for about 20 minutes, until the shrimp is cooked through and the feta is lightly browned.
  13. Before serving, sprinkle with the remaining parsley and reserved fennel fronds. Serve with lemon wedges on the side.

Tips

To ensure the shrimp is perfectly cooked, keep an eye on them in the oven. They should be pink and opaque, which usually takes about 20 minutes. Also, feel free to adjust the level of crushed red pepper flakes to suit your spice preference.

Variations & Substitutions

If you don’t have fennel on hand, you can substitute it with celery for a milder flavor. For a dairy-free version, simply omit the feta cheese or replace it with a dairy-free alternative. If you prefer a vegetarian dish, swap the shrimp for chickpeas or artichoke hearts, and use vegetable broth instead of chicken broth.

Storage

Store any leftovers in an airtight container in the refrigerator for up to three days. To reheat, place the desired portion in a baking dish and warm in the oven at 350°F (175°C) for about 10-15 minutes, or until heated through. You can also reheat in the microwave, though the texture may vary slightly.

FAQ

Can I use frozen shrimp for this recipe?

Yes, you can use frozen shrimp. Just make sure to thaw them completely and pat them dry before seasoning and adding them to the dish.

What type of white wine should I use?

A dry white wine such as Sauvignon Blanc or Pinot Grigio works best for this recipe, adding a subtle depth of flavor without overpowering the dish.

Is it possible to make this dish gluten-free?

Absolutely! Simply substitute the orzo with a gluten-free pasta option of your choice, and ensure that all other ingredients are certified gluten-free.

Nutrition

This Shrimp & Orzo dish is packed with protein from the shrimp, healthy fats from the olive oil, and essential vitamins and minerals from the vegetables and herbs. It’s a balanced meal that can fit into a healthy diet. For a more detailed nutritional breakdown, consider using a nutrition calculator based on the specific brands and quantities you use.

Conclusion

Whether you’re reminiscing about sun-soaked Mediterranean vacations or simply looking for a comforting yet elegant meal, this Shrimp & Orzo recipe is sure to satisfy. It’s a dish that brings together the essence of the sea and the earth, with a hint of nostalgia in every bite. I hope it becomes a cherished part of your meal repertoire, just as it has in mine. Enjoy!

Related update: Shrimp & Orzo

Related update: Turkey Enchilada Bake

Crabby Corn Chowder | Made by Meaghan Moineau

Crabby Corn Chowder: A Comforting Coastal Delight

Intro

There’s something undeniably comforting about a warm bowl of chowder, and when it comes to bringing a bit of the coastal breeze into your kitchen, Crabby Corn Chowder reigns supreme. I remember the first time I tasted this delightful dish during a family vacation on the Eastern Shore. The sun was setting, painting the sky in hues of orange and pink, as we gathered around a rustic wooden table by the water. The aroma of fresh crab and sweet corn mingled with the salty sea air, creating a memory that has lingered with me ever since. Today, I’m thrilled to share this cherished recipe with you, so you too can create moments filled with warmth and flavor.

Why You’ll Love It

This Crabby Corn Chowder is a perfect marriage of sweet and savory flavors that will transport you straight to the seaside. It’s rich, creamy, and packed with succulent crab meat and fresh corn kernels, making each spoonful a delightful experience. Whether you’re hosting a dinner party or simply craving comfort food, this chowder is sure to impress. Plus, it’s easy to prepare and can be made with ingredients that are likely already in your pantry.

Ingredients

  • 2 tablespoons butter
  • 2 stalks of celery, diced
  • 1 tablespoon pureed chili peppers in adobo sauce
  • 2 dried bay leaves
  • 1/4 cup dry sherry
  • 4 cups fish stock
  • 2 cups fresh corn kernels
  • 2 cups whole half-and-half
  • 1 pound fresh lump crab meat
  • 2 tablespoons olive oil
  • 2 tablespoons plain flour
  • Black salt and pepper, to taste
  • 1 large yellow sweet onion, diced
  • 3 medium Yukon Gold potatoes, diced

Instructions

  1. Heat a deep pot over medium heat. Add olive oil and butter.
  2. Once the butter is melted, add the diced potatoes, celery, onion, bay leaves, and chipotle peppers to the pot.
  3. Season the vegetables with black salt and pepper, mix well, and sauté until the vegetables are tender, about 10 minutes.
  4. Sprinkle in the flour and cook for about 2 minutes, stirring constantly to avoid lumps.
  5. Stir in the fish stock and half-and-half, mixing well to combine.
  6. Bring the soup to a simmer and continue to cook for about 20 minutes, or until the potatoes are soft.
  7. Stir in the corn, crab meat, and dry sherry. Simmer for another 5 minutes, until everything is heated through.
  8. Adjust the soup seasonings to taste and remove the bay leaves.
  9. Ladle the soup into bowls and top with a few dashes of hot sauce, if desired. Serve with crackers, crusty bread, or cornbread.

Tips

For the best flavor, use fresh lump crab meat from your local seafood market. If you find yourself in a pinch, high-quality canned crab meat is a suitable alternative. Be sure to taste and adjust the seasoning as you go along; the balance of flavors is key to a perfect chowder. Lastly, if you prefer a thicker consistency, simply mash some of the potatoes with the back of a spoon before adding the corn and crab.

Variations & Substitutions

Feel free to make this chowder your own! You can substitute the fish stock with chicken stock or vegetable broth for a different flavor profile. For a spicier kick, add more pureed chili peppers or a dash of cayenne pepper. If you’re not a fan of sherry, white wine or apple cider vinegar can be used as alternatives. And for a dairy-free version, replace the half-and-half with coconut milk or almond milk.

Storage

Store any leftover chowder in an airtight container in the refrigerator for up to 3 days. To reheat, warm gently on the stove over low heat, stirring occasionally to ensure even heating. Avoid boiling, as this can cause the half-and-half to separate. This chowder also freezes well. Simply transfer to a freezer-safe container and store for up to 2 months. Defrost in the refrigerator overnight before reheating.

FAQ

Can I use frozen corn instead of fresh?

Yes, you can absolutely use frozen corn if fresh corn is not available. Simply thaw the corn before adding it to the chowder. It will still provide a lovely sweetness and texture to the dish.

What can I use as a substitute for crab meat?

If you’re not a fan of crab or have an allergy, you can replace the crab meat with diced shrimp or even cooked chicken for a different take on this chowder. Each option will offer a unique twist while maintaining the heartiness of the dish.

Is there a way to make this chowder vegetarian?

Certainly! To make a vegetarian version, omit the crab meat and use vegetable broth instead of fish stock. You could add additional vegetables such as bell peppers or mushrooms for added flavor and substance.

Nutrition

While this chowder is a hearty and indulgent dish, it’s packed with nutrients from the vegetables and crab meat. Crab is a great source of protein and omega-3 fatty acids, promoting heart health. Celery and onions provide a good amount of fiber, while corn adds natural sweetness without the need for added sugars. As always, enjoy this delicious dish in moderation as part of a balanced diet.

Conclusion

Crabby Corn Chowder is more than just a meal; it’s a culinary journey to the coast, filled with the warmth and joy of shared experiences. I hope this recipe brings as much happiness to your table as it has to mine. Whether you’re reminiscing about past vacations or simply seeking comfort in a bowl, this chowder is sure to delight and satisfy. Happy cooking!

Related update: Crabby Corn Chowder

Related update: Best Buffalo Chicken Chili

Related update: Simply Bean Soup

Baked Scallops With Parma Ham | Made by Meaghan Moineau

Baked Scallops With Parma Ham

Intro

There’s something incredibly nostalgic about the aroma of seafood baking in the oven. It instantly transports me back to my childhood summers spent by the coast, where every meal was a celebration of the ocean’s bounty. One dish that particularly stands out in my memory is Baked Scallops With Parma Ham. The combination of tender scallops and the savory, slightly salty Parma ham is nothing short of divine. This dish has become a cherished staple in my family, especially during festive gatherings when we want to serve something special yet uncomplicated.

Why You’ll Love It

This recipe is perfect for both novice cooks and seasoned culinary enthusiasts. Here’s why:

  • Simple Ingredients: You don’t need a long list of exotic ingredients. Most items are pantry staples or easily available at your local market.
  • Quick to Prepare: With just a few simple steps, this dish can be ready in under 30 minutes, making it ideal for last-minute entertaining.
  • Elegant Presentation: The combination of golden-baked breadcrumbs and the rosy hue of Parma ham makes for a beautiful presentation that will impress your guests.
  • Flavorful and Satisfying: The savory notes of Parma ham complement the delicate sweetness of scallops, while the breadcrumbs add a delightful crunch.

Ingredients

  • Fresh big scallops
  • Parma ham
  • 1 garlic clove
  • Dried breadcrumbs
  • Parsley
  • Olive oil
  • 1 bell pepper

Instructions

  1. Preheat your oven to 410°F (210°C / T 7).
  2. In a food processor, combine the breadcrumbs, Parma ham, garlic clove, parsley, and 1 teaspoon of olive oil. Pulse until the mixture is finely chopped and well combined.
  3. Fold a piece of kitchen paper, pour 1 teaspoon of olive oil on it, and use it to grease an oven rack thoroughly.
  4. Place the fresh scallops on the greased rack, ensuring they are evenly spaced.
  5. Top each scallop with a generous spoonful of the Parma ham mixture.
  6. Drizzle a dash of olive oil over the top of the mixture to help it crisp up in the oven.
  7. Bake the scallops in the preheated oven for 8 minutes or until the topping is golden brown and the scallops are cooked through.
  8. Serve immediately, garnished with a few leaves of lamb’s lettuce or rocket if desired.

Tips

For the best results, use fresh, high-quality scallops. Ensure they are dry before topping with the Parma ham mixture to prevent them from becoming soggy. If you do not have a food processor, finely chop the ingredients by hand for a more rustic texture. Remember, the key to this dish’s success lies in its simplicity and the quality of its ingredients.

Variations & Substitutions

If Parma ham is not available, you can substitute it with prosciutto or another type of thinly sliced, cured ham. For an extra kick, add a pinch of red pepper flakes to the breadcrumb mixture. You can also experiment with herbs; basil or thyme can be excellent substitutes for parsley, offering a different yet delightful flavor profile.

Storage

While this dish is best enjoyed fresh, you can store any leftovers in an airtight container in the refrigerator for up to two days. To reheat, place the scallops in a preheated oven at 350°F (175°C) until warmed through. Avoid using a microwave, as it may cause the scallops to become rubbery.

FAQ

Can I use frozen scallops for this recipe?

Yes, you can use frozen scallops, but ensure they are completely thawed and patted dry before preparation to avoid excess moisture, which can affect the texture and cooking time.

What can I serve with baked scallops?

This dish pairs wonderfully with a light salad of mixed greens or a simple vegetable side such as sautéed asparagus or roasted bell peppers. The fresh, crisp textures complement the richness of the scallops perfectly.

Can I prepare the topping in advance?

Absolutely! You can prepare the breadcrumb mixture up to a day in advance and store it in the refrigerator. This makes it even more convenient if you’re planning to serve this dish at a dinner party.

Nutrition

This dish is a great source of lean protein, making it a healthy choice for a starter. Scallops are low in fat and calories, while the addition of olive oil provides heart-healthy fats. However, be mindful of portion sizes if you are watching your sodium intake, as cured meats like Parma ham can be high in salt.

Conclusion

Baked Scallops With Parma Ham is a dish that seamlessly blends elegance with simplicity. It’s a testament to the idea that sometimes less is more, allowing the natural flavors of the ingredients to shine. Whether you’re preparing for a quiet dinner at home or hosting a festive gathering, this recipe is sure to be a hit. I invite you to try it and perhaps create your own cherished memories around the dining table.

Related update: Baked Scallops With Parma Ham

Related update: Crab Wontons

Mixed Paella | Made by Meaghan Moineau

Mixed Paella: A Hearty Feast for the Soul

Intro

Paella is more than just a dish; it’s a vibrant celebration of flavors and textures that brings people together. This Mixed Paella recipe has been a cherished staple in my family for generations, often making an appearance during our Sunday gatherings. I vividly recall the tantalizing aroma that filled my grandmother’s kitchen as she skillfully prepared the dish, her laughter mingling with the sizzle of chorizo in the pan. It’s a dish that carries with it the warmth and love of home, a culinary tradition I am thrilled to share with you today.

Why You’ll Love It

This Mixed Paella is a delightful medley of seafood, meat, and aromatic spices, making it a complete meal that is sure to satisfy. The harmonious blend of flavors from the saffron-infused rice, savory chorizo, and tender fish and shrimp creates a symphony on your palate. It’s a dish that’s both comforting and impressive, perfect for both casual family meals and special occasions. Plus, it’s a one-pan wonder that simplifies cleanup, allowing you more time to enjoy with your loved ones.

Ingredients

  • 1 bay leaf
  • 4 cups chicken broth
  • 1 chorizo sausage
  • 2 teaspoons extra virgin olive oil
  • 1 white fish fillet
  • 2 cloves garlic, minced
  • 1 lemon, cut into wedges
  • 1 teaspoon lemon zest
  • 1 pound mussels, cleaned
  • 1 Spanish onion, diced
  • 1/4 cup fresh parsley, chopped
  • 1/2 cup peas
  • 1 red bell pepper, diced
  • 1/2 teaspoon crushed red pepper flakes
  • 2 cups dry rice
  • 1/4 teaspoon saffron threads
  • 1/2 pound shrimp, peeled and deveined
  • 1 teaspoon thyme

Instructions

  1. In a very large non-stick skillet or paella pan preheated over medium-high heat, add 2 teaspoons of your oil (you will need more oil if you’re not using non-stick), garlic, red pepper flakes, and rice. Sauté for about 3 minutes.
  2. Add saffron, thyme, bay leaf, and chicken broth, then bring to a boil. Cover and reduce heat to a simmer. Leave covered, do not stir.
  3. In another non-stick skillet, heat to medium-high. Add chorizo and crumble as you sauté. When the sausage is cooked through, add red pepper and onion. Salt and pepper to taste if needed. Sauté until the onion is tender, then remove from heat and set aside.
  4. When the rice is nearly done (about 15 minutes), add fish and shrimp and press into rice. Add mussels, peas, and sprinkle with lemon zest. Cover and continue to simmer until the rice is done and the mussels have opened. Discard any mussels that do not open.
  5. Top with the chorizo mixture and parsley. Serve with lemon wedges and a crusty bread.

Tips

To ensure the perfect paella, resist the urge to stir the rice once the broth is added. This allows the rice to develop a crispy bottom layer known as “socarrat,” which is highly prized in traditional paella. Also, make sure to clean the mussels thoroughly and discard any that are cracked or do not close when tapped.

Variations & Substitutions

Feel free to customize your paella by swapping out ingredients based on your preferences or availability. You can use different types of seafood like clams or scallops, or substitute the chorizo with another type of sausage for a unique twist. For a vegetarian version, omit the meat and seafood entirely and add more vegetables like artichokes and green beans.

Storage

Leftover paella can be stored in an airtight container in the refrigerator for up to 3 days. To reheat, place it in a skillet over medium heat and add a splash of water or broth to retain moisture. Avoid using a microwave, as it may cause the seafood to become rubbery.

FAQ

Can I use brown rice instead of white rice?

Yes, you can use brown rice, but keep in mind that it has a longer cooking time compared to white rice. You’ll need to adjust the cooking time and possibly add more broth to ensure the rice is fully cooked.

Is it necessary to use saffron?

Saffron is a key ingredient in traditional paella, providing a unique flavor and vibrant color. However, if saffron is unavailable, you can substitute with turmeric, although the flavor will be different.

Can I freeze paella?

While it is possible to freeze paella, it’s not recommended as the texture of the seafood and rice may change upon thawing. It’s best enjoyed fresh or stored in the refrigerator for short-term use.

Nutrition

Mixed Paella is a balanced dish that combines proteins, carbohydrates, and healthy fats. With seafood providing omega-3 fatty acids and the addition of vegetables, it’s a nutritious option for a hearty meal. Adjust the portion size based on dietary needs and personal preferences.

Conclusion

This Mixed Paella recipe is a testament to the richness of Spanish cuisine, offering a delightful blend of flavors in every bite. Whether you’re sharing it with family or friends, it’s sure to be a crowd-pleaser. I hope this recipe becomes a treasured addition to your own culinary traditions, just as it has been in mine. Enjoy the process of cooking and savor the joyful moments it brings!

Related update: Mixed Paella

Related update: The Perfect Butter Beans Stew

Linguine with Prawns, Fresh Tomatoes and Spinach | Made by Meaghan Moineau

Linguine with Prawns, Fresh Tomatoes, and Spinach

Intro

Every time I prepare this delightful dish of Linguine with Prawns, Fresh Tomatoes, and Spinach, I’m transported back to the heartwarming summer evenings spent at my grandmother’s seaside cottage. The aroma of fresh tomatoes simmering with garlic and herbs would waft through the air, mingling with the salty sea breeze. My grandmother, with her apron dusted with flour, would beckon us to the table with a warm smile, serving up plates of her lovingly prepared pasta. This recipe is a tribute to those cherished memories, and I’m thrilled to share it with you.

Why You’ll Love It

This dish is a celebration of fresh, vibrant flavors and simple ingredients that come together to create a symphony of taste and texture. The juicy prawns add a delightful sweetness, complemented by the rich, buttery sauce that clings to every strand of linguine. The fresh tomatoes provide a burst of acidity, while the spinach gives it a nutritious punch. It’s a versatile recipe that’s easy enough for a weeknight meal but elegant enough to impress guests at a dinner party.

Ingredients

  • 300g fresh baby spinach, stems removed
  • 400g linguine (or fettuccine)
  • 2 garlic cloves, minced
  • 3 tablespoons olive oil
  • 2 tablespoons freshly chopped parsley
  • 400g fresh prawns, peeled and deveined
  • Salt and pepper to taste
  • 4 fresh tomatoes, chopped
  • 2 tablespoons unsalted butter
  • 1/3 cup white wine

Instructions

  1. Cook the linguine according to package directions until al dente. Drain and set aside.
  2. In a large skillet over medium heat, melt the butter with the olive oil.
  3. Add the chopped tomatoes, parsley, and garlic to the skillet. Sauté until the tomatoes are slightly tender, about 3-4 minutes.
  4. Add the spinach and white wine to the skillet, and cook until the spinach is wilted.
  5. Add the prawns to the skillet and sauté until they turn pink, about 3-5 minutes.
  6. Season with salt and pepper to taste.
  7. Add the cooked linguine to the skillet, tossing to coat the pasta in the sauce.
  8. Serve hot, garnished with additional parsley if desired.

Tips

For the best results, use the freshest ingredients you can find. Fresh prawns and ripe tomatoes will make a significant difference in flavor. Also, remember to not overcook the prawns as they can become tough and chewy. If you prefer a spicier kick, consider adding a pinch of red pepper flakes when sautéing the garlic and tomatoes. This dish is best served immediately, as the pasta can absorb the sauce and become dry if left for too long.

Variations & Substitutions

If you’re looking to switch things up, consider these variations:

  • Vegetarian Option: Omit the prawns and add more vegetables like zucchini or bell peppers for a vegetarian version.
  • Whole Wheat Pasta: Substitute regular linguine with whole wheat pasta for a healthier option.
  • Cheese Lover’s Delight: Sprinkle some grated Parmesan cheese over the dish just before serving for an added layer of flavor.

Storage

While this dish is best enjoyed fresh, you can store leftovers in an airtight container in the refrigerator for up to 2 days. To reheat, add a splash of water or white wine to the pasta and warm it gently in a skillet over low heat. This will help to prevent the pasta from drying out.

FAQ

Can I use frozen prawns?

Yes, you can use frozen prawns if fresh ones are not available. Just make sure to thaw them completely and pat them dry with paper towels before cooking to remove excess moisture.

What type of white wine should I use?

A dry white wine, such as Sauvignon Blanc or Pinot Grigio, pairs beautifully with this dish. Avoid sweet wines as they can alter the flavor profile of the sauce.

Nutrition

This dish is a good source of protein and vitamins, thanks to the prawns and spinach. It provides a balanced meal with carbohydrates from the pasta and healthy fats from the olive oil. However, if you’re watching your calorie intake, consider reducing the amount of butter used.

Conclusion

Incorporating the essence of seaside dining, this Linguine with Prawns, Fresh Tomatoes, and Spinach is a dish that brings the comforting flavors of a coastal Italian meal to your kitchen. It’s not just a recipe, but a journey back to cherished memories, and an opportunity to create new ones with your loved ones. Whether you’re serving it for a special occasion or simply indulging in a delicious homemade meal, this dish is sure to become a favorite in your culinary repertoire. Enjoy the delightful blend of flavors and happy cooking!

Related update: Linguine with Prawns, Fresh Tomatoes and Spinach

Related update: Lamb & Sweet Potato Pot Pie

Kk’s Fish Tacos | Made by Meaghan Moineau

Kk’s Fish Tacos: A Crispy, Flavorful Delight

Intro

There’s something magical about fish tacos that transport me back to sun-soaked afternoons on the coast, where the gentle sea breeze mingles with the aroma of freshly caught seafood. My love affair with fish tacos began during a family vacation to Baja California, where every bite was a revelation of flavors. Over the years, I’ve refined my own version, which I now share with you as Kk’s Fish Tacos. This recipe is more than just a meal; it’s a culinary journey back to those cherished memories by the ocean.

Why You’ll Love It

This recipe for Kk’s Fish Tacos is a crowd-pleaser for many reasons. The crispy, golden-brown tilapia offers a satisfying crunch, perfectly complemented by the soft, warm tortillas. The combination of fresh cilantro, zesty lime, and vibrant veggies create a refreshing contrast to the savory fish. Whether it’s a casual family dinner or a lively gathering with friends, these tacos are sure to impress.

Ingredients

  • Fresh tilapia fillets
  • Flour tortillas
  • Fresh cilantro, chopped
  • Limes, cut into wedges
  • Iceberg lettuce, shredded
  • Diced tomatoes
  • Diced onion
  • Italian bread crumbs
  • Creole seasoning
  • Lard for frying
  • Salt (optional)
  • Queso fresco (optional)
  • Salsa and/or guacamole (optional)

Instructions

  1. In a pie pan or deep dish, add your Italian bread crumbs.
  2. In a large pan, add about 1 cup of lard and bring it up to a sizzling temperature. Note: You may need to add more oil after frying about half the fish.
  3. If using frozen tilapia, thaw it in lukewarm water and drain well.
  4. Once the oil is ready, take one of the fillets and thoroughly coat both sides with the bread crumbs.
  5. Place the fillet in the oil and cook until each side is golden brown, approximately 2-3 minutes per side.
  6. Transfer the cooked fillets to sheets of paper towels to drain excess oil.
  7. Lightly season the top side of the fish with salt or creole seasoning.
  8. While frying the rest of the fillets, chop up all of your accouterments.
  9. When everything is ready, microwave your tortillas for about 30 seconds on high, completely covered in a paper towel or clean dishtowel.
  10. Set up a taco-building buffet: add your fish, a little queso, your veggies, a pinch of cilantro, and then salsa and/or guacamole.
  11. Use the lime wedges to give your taco a little extra kick of citrus!

Tips

Here are some tips to ensure your fish tacos turn out perfectly:

  • Oil Temperature: Make sure your oil is hot enough before adding the fish. If it’s not sizzling, your fish might become soggy instead of crispy.
  • Draining Excess Oil: Use paper towels to drain the fish thoroughly after frying to keep them crispy.
  • Fresh Ingredients: Use the freshest ingredients possible, especially the fish and vegetables, for the best flavor.

Variations & Substitutions

Feel free to get creative with this recipe. Here are some variations and substitutions to consider:

  • Fish Options: While tilapia is a great choice, you can also use cod or haddock for a different flavor and texture.
  • Tortillas: Swap flour tortillas for corn tortillas if you prefer a different taste or are looking for a gluten-free option.
  • Spice Level: Adjust the creole seasoning to your preferred spice level, or add a dash of hot sauce for extra heat.

Storage

If you have leftovers, store the fish and toppings separately from the tortillas to maintain their texture. Keep the fish in an airtight container in the refrigerator for up to 2 days. Reheat the fish in a skillet to retain its crispiness before assembling your tacos.

FAQ

Can I bake the fish instead of frying it?

Yes, you can! Preheat your oven to 425°F (220°C). Place the breaded fish on a baking sheet lined with parchment paper and bake for 12-15 minutes, or until golden and cooked through.

What toppings work well with fish tacos?

Aside from the classic toppings listed in the recipe, you can also add sliced avocado, pickled red onions, or spicy slaw for added flavor and texture.

Can I make these tacos ahead of time?

While it’s best to serve these tacos fresh, you can prepare the components ahead of time. Store the fried fish and chopped vegetables in separate containers in the fridge, and assemble the tacos just before serving.

Nutrition

The nutritional content of these fish tacos will vary based on the specific ingredients and quantities used. Generally, they offer a balanced mix of protein, healthy fats, and carbohydrates, with additional vitamins and minerals from the fresh vegetables. Adjust portion sizes and toppings to fit your dietary needs.

Conclusion

Kk’s Fish Tacos are more than just a meal—they’re a celebration of flavors and memories. Whether you’re reminiscing about sunlit adventures or creating new culinary traditions, these tacos are sure to delight your taste buds. Gather your loved ones, share a meal, and enjoy the simple pleasures of life wrapped in a warm tortilla. Bon appétit!

Related update: Kk’s Fish Tacos

Related update: Siamese Fried Noodle (Mee Siam)

Grilled Garlicky-Herbed Shrimp | Made by Meaghan Moineau

Grilled Garlicky-Herbed Shrimp

Intro

There’s something truly magical about grilling seafood, especially when it involves a cherished family recipe that has been passed down through generations. I still vividly remember those summer evenings at my grandmother’s house by the sea. As kids, we’d watch her prepare her famous grilled shrimp, the air filled with the rich aroma of garlic and herbs, while we eagerly awaited the feast. This Grilled Garlicky-Herbed Shrimp recipe is a beautiful tribute to those warm, breezy nights and the love shared through food. Whether you’re hosting a backyard BBQ or having a quiet dinner at home, this recipe is sure to bring a touch of nostalgia and delight to your table.

Why You’ll Love It

This Grilled Garlicky-Herbed Shrimp recipe is not just about savoring deliciously marinated shrimp; it’s about enjoying a dish that’s both simple to prepare and packed with flavor. You’ll love how the robust garlic and fresh herbs combine with the subtle heat of chili pepper flakes, creating a perfect marinade that elevates the delicate taste of shrimp. Whether you’re a seafood aficionado or someone trying shrimp for the first time, this recipe promises to be a hit!

Ingredients

  • Chili pepper flakes
  • Extra virgin olive oil
  • Coriander leaves
  • Garlic
  • Shrimp
  • Lemon zest
  • Parsley

Instructions

  1. Combine all ingredients except shrimp in a large bowl.
  2. Add shrimp and toss to combine, making sure all parts of the shrimp are coated in the marinade.
  3. Refrigerate for 4 hours or overnight to let the flavors meld.
  4. Preheat grill on medium heat.
  5. Place shrimp on the grill and cook, turning once, until pink, about 5 minutes.
  6. For a Mediterranean feel, serve the shrimp with a roasted red pepper salad. Enjoy!

Tips

For the best flavor, use fresh shrimp and marinate them overnight if possible. Be cautious not to overcook the shrimp as they can become tough and rubbery. Keep an eye on the grill and turn the shrimp as soon as they turn pink.

Variations & Substitutions

If you prefer a spicier kick, feel free to increase the amount of chili pepper flakes or add a pinch of cayenne. For a milder version, reduce the chili flakes or omit them altogether. You can also substitute cilantro for parsley if you prefer, or add a splash of white wine to the marinade for extra depth of flavor.

Storage

Leftover grilled shrimp can be stored in an airtight container in the refrigerator for up to 2 days. To reheat, gently warm them in a skillet over low heat, or enjoy them cold in a salad or wrap.

FAQ

Can I use frozen shrimp for this recipe?

Yes, you can use frozen shrimp, but make sure to thaw them completely before marinating to ensure they absorb the flavors well.

What kind of grill should I use?

You can use either a gas or charcoal grill. If you don’t have a grill, a grill pan on the stovetop works well too.

How can I tell when the shrimp are done?

Shrimp are done when they turn pink and opaque. Be careful not to overcook them as they can become rubbery.

Nutrition

This dish is low in calories and high in protein, making it a healthy choice. It’s also full of healthy fats from the olive oil and packed with flavor, ensuring that you don’t sacrifice taste for nutrition.

Conclusion

Grilled Garlicky-Herbed Shrimp is more than just a recipe – it’s a culinary experience that brings together the joy of grilling, the delight of fresh ingredients, and the warmth of shared memories. Whether you’re reminiscing about family gatherings or creating new traditions, this shrimp dish is sure to become a favorite. Gather your loved ones, fire up the grill, and enjoy a meal that’s as heartwarming as it is delicious.

Related update: Grilled Garlicky-Herbed Shrimp

Indias Growth Surge: Factories Fuel Boom | Analysis by Brian Moineau

India’s GDP Surprise: Factories, Festivals and a Fed of Optimism

Prime Minister Narendra Modi called the GDP number “very encouraging.” And who wouldn’t be? When official data showed India’s economy growing faster than most forecasters dared to predict, the reaction was equal parts relief and recalibration — for businesses, policymakers and investors trying to read what comes next.

Why this quarter felt different

  • India’s GDP surged 8.2% year‑on‑year in the July–September 2025 quarter, well above Bloomberg and consensus forecasts and the strongest pace in six quarters. (fortune.com)
  • The upswing was broad-based: private consumption jumped ahead of the festival season, manufacturing posted a sharp gain, and services remained resilient. Policy moves — tax cuts in September and a series of earlier rate reductions — helped juice demand. (fortune.com)
  • All of this happened while a strained trade backdrop loomed: a 50% U.S. tariff on many Indian imports complicates export prospects and adds uncertainty to the near term. Yet firms appear to have front‑loaded shipments and inventory activity, muting the immediate bite of tariffs. (fortune.com)

What the numbers really tell us

  • Short-term momentum: The combination of festive-season spending, tax cuts and prior interest‑rate easing produced a powerful near‑term boost. Manufacturing growth (9.1%) and a near‑8% jump in private consumption are the headline engines of the quarter. (fortune.com)
  • Not necessarily durable: Several economists warn the gains may fade once the one‑off effects — stockpiling before tariffs, festival demand, and statistical quirks like a lower GDP deflator — wash out. Forecasts for next fiscal year were nudged up, but multilateral institutions and rating agencies still flag downside risks if trade frictions persist. (fortune.com)
  • Policy implications: Strong growth reduces the urgency for an immediate rate cut by the Reserve Bank of India, though low inflation keeps room for easing open. Markets reacted by pricing a lower probability of an imminent cut. (fortune.com)

A closer look at the Trump tariffs effect

  • Timing matters: Many exporters shipped ahead of August’s tariff implementation, which created a temporary volume bump. That front‑loading shows up in the data, helping manufacturing and export‑related activity this quarter. (fortune.com)
  • Structural risk remains: If high U.S. tariffs endure, exporters will face sustained price and market‑access penalties. Multilateral forecasts (IMF WEO and Article IV assessments) reduced long‑run growth projections slightly under a scenario of prolonged tariffs. India’s domestic demand cushion can blunt but not fully negate export pain. (imf.org)
  • Winners and losers: Sectors with strong domestic market exposure (consumer goods, some services, domestic manufacturing) benefit most from the current setup. Labor‑intensive export sectors — textiles, gems and jewelry, seafood — are more exposed to tariff damage. (forbes.com)

When numbers and politics collide

  • Messaging matters: Modi’s “very encouraging” post on X is more than cheerleading. Strong quarterly prints bolster the government’s reform story (tax cuts, Make in India push) and strengthen negotiating leverage in trade talks. But politics also raises the bar for sustaining results; the state wants growth to look both robust and inclusive. (fortune.com)
  • External perceptions: International agencies still see India as one of the few bright spots in a slower world economy, even if they temper longer-term forecasts because of protectionist shocks. That positioning attracts capital and attention — until and unless trade barriers start redirecting supply chains away from India. (imf.org)

Practical implications for readers

  • For consumers: Strong demand helped by tax cuts means fresher buying power now, especially in urban centers during festival cycles. But keep an eye on inflation and employment signals over the next two quarters.
  • For business leaders: Don’t over‑interpret one robust quarter. Use the breathing room to invest in productivity, diversify export markets, and avoid over‑reliance on short‑term stockpiling gains.
  • For investors: Macro momentum and lower inflation create a constructive backdrop, but tariff‑driven export risk and potential capital flow swings mean selective exposure and active risk management make sense.

A few smart caveats

  • Some part of the headline jump may reflect statistical effects (lower GDP deflator and other discrepancy adjustments), so analysts are rightly cautious about extrapolating this pace forward. (fortune.com)
  • Forecasts vary: While the IMF projects India to remain a top growth performer in 2025–26 under its baseline, it also warns that sustained high tariffs shave projected growth thereafter. (imf.org)

My take

This quarter feels like a tactical win for India: policy levers and private consumption combined to outpace expectations, and manufacturing showed welcome life. But the strategic contest is just beginning. If India wants manufacturing-led, export‑driven growth to be durable, it needs two things: (1) trade diplomacy and adaptation to reclaim lost market access, and (2) faster local value‑chain deepening so that front‑loaded shipments don’t become the main growth story. Short of that, domestic resilience will keep India growing, but the trajectory will be bumpier than a single headline number suggests.

The bottom line

An 8.2% print is newsworthy and politically powerful. It buys space for reforms and investment. But read it as a strong quarter, not a guarantee of uninterrupted acceleration. The next few quarters — how tariffs play out, whether festival demand normalizes, and whether investment follows consumption — will tell us whether this was a steppingstone or a spike.

Sources


Related update: We recently published an article that expands on this topic: read the latest post.


Related update: We recently published an article that expands on this topic: read the latest post.


Related update: We recently published an article that expands on this topic: read the latest post.

Shrimp & Crab Egg Rolls | Made by Meaghan Moineau

Shrimp & Crab Egg Rolls

Intro

When I was a child, my grandmother would invite the entire family over on Sunday afternoons for a feast. The kitchen was always bustling with energy, filled with the rich aroma of spices and the laughter of family members sharing stories. Amongst the many dishes, her Shrimp & Crab Egg Rolls were the highlight of our gatherings. She would always let me help with rolling the egg rolls, a task I took on with great pride. Today, I share this cherished recipe with you, hoping it brings the same warmth and joy to your home as it did to ours.

Why You’ll Love It

These Shrimp & Crab Egg Rolls are a delightful combination of succulent seafood and crisp vegetables, all wrapped up in a perfectly crispy exterior. They make for a fantastic appetizer or snack, and they’re sure to impress at any gathering. The balance of flavors is both comforting and exotic, making it a dish that everyone will adore.

Ingredients

  • 8 oz. dry bean sprouts, washed and patted dry
  • 1 cup shredded carrots
  • 1/2 lb imitation crab (or real crab if preferred)
  • 1/2 lb medium-sized shrimp, shelled and deveined
  • 2 garlic cloves, finely minced (or 1 tbsp garlic powder)
  • 1 tsp brown sugar
  • 3 green onions, finely chopped (green part only)
  • 10-12 (6 or 8-inch) egg roll wrappers
  • 1 beaten egg, for egg wash
  • Vegetable oil, for frying
  • 1 tsp salt and ground pepper
  • 1 cup sweet chili sauce, for serving

Instructions

  1. In a large bowl, combine the bean sprouts, shredded carrots, imitation crab, shrimp, minced garlic, brown sugar, and green onions. Season with salt and pepper to taste.
  2. Place an egg roll wrapper on a clean surface with one corner pointing towards you. Spoon about 2 tablespoons of the filling onto the center of the wrapper.
  3. Fold the bottom corner over the filling, then fold in the sides. Roll the wrapper tightly towards the top corner. Brush the top corner with a bit of the beaten egg to seal the roll. Repeat with the remaining wrappers and filling.
  4. Heat vegetable oil in a deep pan or fryer to 350°F (175°C). Carefully place the egg rolls in the hot oil, a few at a time, and fry until golden brown and crispy, about 3-5 minutes.
  5. Remove the egg rolls from the oil and drain on a paper towel-lined plate.
  6. Serve warm with sweet chili sauce for dipping.

Tips

For best results, ensure that the filling is well-drained before wrapping to prevent soggy egg rolls. Additionally, do not overcrowd the pan when frying, as this can lower the oil temperature and result in less crispy egg rolls.

Variations & Substitutions

Feel free to experiment with different fillings. You could add finely sliced cabbage or bell peppers for extra crunch. If you prefer a spicier kick, consider adding a dash of Sriracha or chopped chili peppers to the filling. For a vegetarian version, simply omit the seafood and add more vegetables or tofu.

Storage

Leftover egg rolls can be stored in an airtight container in the refrigerator for up to 3 days. To reheat, place them in the oven at 350°F (175°C) until warmed through and crispy. Avoid microwaving, as this can make the egg rolls soggy.

FAQ

Can I bake these egg rolls instead of frying?

Yes, you can bake them for a healthier alternative. Preheat your oven to 400°F (200°C), place the egg rolls on a baking sheet lined with parchment paper, and brush them lightly with oil. Bake for 15-20 minutes or until golden brown, flipping halfway through.

What dipping sauces pair well with these egg rolls?

Besides sweet chili sauce, these egg rolls pair well with soy sauce, hoisin sauce, or a spicy peanut sauce. Feel free to get creative and try different flavors to complement the egg rolls.

Can I prepare these in advance?

Absolutely! You can prepare the filling and wrap the egg rolls a day ahead. Store them in the refrigerator, covered with a damp cloth, to prevent the wrappers from drying out. Fry them just before serving for the best texture.

Nutrition

These Shrimp & Crab Egg Rolls are a source of protein and vitamins from the seafood and vegetables. While frying adds calories, you can opt for baking to reduce the fat content. As with any indulgent dish, moderation is key.

Conclusion

These Shrimp & Crab Egg Rolls are more than just a meal; they are a testament to family traditions and the joy of cooking together. Whether you’re making them for a special occasion or just a cozy night in, they are sure to become a favorite in your household. Enjoy the crispiness, the rich flavors, and the happiness they bring to your table. From my family to yours, happy cooking!

Related update: Shrimp & Crab Egg Rolls

Related update: Tomato Cutlets

Baked Scallops With Parma Ham | Made by Meaghan Moineau

Baked Scallops With Parma Ham

Intro

There’s a certain kind of magic that happens when you combine the delicate sweetness of scallops with the rich, savory notes of Parma ham. This recipe for Baked Scallops with Parma Ham transports me back to my childhood, when my family would gather around the table for Sunday dinners. My grandmother, an enthusiastic cook with a love for simple yet elegant dishes, would often prepare this delightful starter. The aroma of garlic and parsley mingling with the salty scent of the sea would fill the kitchen, creating an atmosphere of warmth and togetherness. Today, I’m excited to share that same sense of comfort and joy with you through this recipe.

Why You’ll Love It

This dish is a celebration of flavors and textures that complement each other beautifully. The tender, juicy scallops provide a perfect canvas for the crispy, savory topping made from Parma ham and breadcrumbs. With just a handful of ingredients, this recipe is not only delicious but also incredibly easy to prepare. Whether you’re hosting a dinner party or simply want to treat yourself, these baked scallops are sure to impress. Plus, they’re ready in under 30 minutes, making them an excellent choice for both special occasions and weeknight dinners.

Ingredients

  • Fresh big scallops
  • Parma ham
  • 1 garlic clove
  • Dried breadcrumbs
  • Parsley
  • Olive oil
  • Bell pepper

Instructions

  1. Preheat your oven to 410°F (210°C / T 7).
  2. In a food processor, mix together the breadcrumbs, Parma ham, garlic, parsley, and 1 teaspoon of olive oil until you have a coarse, crumbly mixture.
  3. Fold a piece of kitchen paper, pour 1 teaspoon of olive oil on it, and use it to grease an oven rack.
  4. Place the scallops on the greased rack and top each one with a generous spoonful of the Parma ham mixture.
  5. Drizzle a dash of olive oil on top of each scallop.
  6. Bake in the preheated oven for about 8 minutes, or until the topping is crispy and golden brown.
  7. Serve immediately as a starter, accompanied by a few leaves of lamb’s lettuce or rocket if desired.

Tips

For the best results, use fresh scallops rather than frozen ones. Fresh scallops have a sweeter, more delicate flavor that pairs perfectly with the robust Parma ham. If you’re using frozen scallops, be sure to thaw them completely and pat them dry before cooking to prevent excess moisture from affecting the dish.

To achieve an even crispier topping, consider lightly toasting the breadcrumbs in a dry pan before adding them to the food processor. This step is optional but can add a lovely depth of flavor.

Variations & Substitutions

If you’re looking to mix things up, there are plenty of variations you can try with this recipe. Consider adding a pinch of red pepper flakes to the breadcrumb mixture for a hint of heat. Alternatively, swap the parsley for fresh basil or chives for a different herbal note.

For those who prefer a non-pork option, substitute the Parma ham with turkey bacon or prosciutto. Each will offer a slightly different flavor profile while maintaining the dish’s savory richness.

Storage

While these scallops are best enjoyed fresh, you can store any leftovers in an airtight container in the refrigerator for up to two days. To reheat, place them in a preheated oven at 350°F (175°C) for about 5 minutes, or until warmed through. Avoid using the microwave, as it can make the scallops rubbery.

FAQ

Can I use frozen scallops for this recipe?

Yes, you can use frozen scallops, but be sure to thaw them completely and pat them dry before cooking. This step ensures that the scallops don’t release too much moisture during baking, which can affect the texture.

What can I serve with baked scallops?

Baked scallops make an excellent starter served with a simple salad of lamb’s lettuce or rocket. For a more substantial meal, consider pairing them with a side of creamy risotto or garlic butter pasta.

How do I know when the scallops are cooked?

The scallops are done when they’re opaque and slightly firm to the touch. Be careful not to overcook them, as they can become tough and chewy. The baking time in this recipe is just right for achieving perfectly cooked scallops.

Nutrition

While I don’t have the exact nutritional breakdown, this dish is generally low in carbohydrates and high in protein, making it a great option for those following a low-carb or keto-friendly diet. The combination of olive oil and seafood provides healthy fats, while the parsley adds a touch of freshness and vitamins.

Conclusion

Baked Scallops with Parma Ham is a dish that’s as delightful to the palate as it is to the soul. With its roots in family tradition and its simplicity in preparation, it’s a recipe that invites you to savor every moment, from the aromatic anticipation in the kitchen to the first delicious bite. Whether you’re creating new memories or reliving cherished ones, I hope this recipe brings a touch of warmth and elegance to your table. Happy cooking!

Related update: Baked Scallops With Parma Ham

Related update: Savory Slow Roasted Tomatoes with Filet of Anchovy

Asian Salmon Burgers With Tangy Ginger Lime Sauce | Made by Meaghan Moineau

Asian Salmon Burgers With Tangy Ginger Lime Sauce

Intro

There’s something undeniably comforting about sinking your teeth into a well-crafted burger. For me, it brings back fond memories of summer evenings spent with my family in our backyard. My father, the grill master, would whip up his signature dishes, and one day, he introduced us to these delightful Asian Salmon Burgers. The combination of fresh salmon with a tangy ginger lime sauce became an instant favorite. Today, I’m excited to share this family recipe with you all, hoping it brings the same joy and deliciousness to your home as it did to ours.

Why You’ll Love It

These Asian Salmon Burgers are not just another burger recipe. They are a delightful fusion of flavors and textures that will tantalize your taste buds. The fresh salmon, rich with omega-3 fatty acids, brings a tender and juicy bite, while the ginger lime sauce adds a perfect zing that complements the savory burger. Whether you’re looking for a healthy alternative to traditional beef burgers or simply want to try something new, these salmon burgers are a must-try!

Ingredients

  • 4 burger buns
  • 1/4 cup fresh basil, chopped
  • 2 cloves garlic, minced
  • 2 green onions, finely sliced
  • 1 lime, juiced
  • 1/2 cup mayonnaise
  • 2 tablespoons oyster sauce
  • 1 teaspoon powdered ginger
  • 1 pound salmon, skin removed
  • 2 tablespoons sesame oil
  • 1/4 cup sour cream
  • 2 tablespoons soy sauce

Instructions

  1. Cut the salmon into large hunks and run it through a food processor until no large pieces remain.
  2. Add to the salmon the soy sauce, garlic, ginger, oyster sauce, green onion, and basil.
  3. Combine ingredients well and form 4 large patties from the mixture.
  4. Heat up the sesame oil in a large frying pan on medium-high heat and add in the patties.
  5. Cook for about 10 minutes, flipping once halfway through.
  6. To make the sauce, mix the mayonnaise, sour cream, lime juice, and a pinch of ginger until smooth.
  7. Pour a spoonful of sauce over the top of the finished salmon burger and serve inside a toasted bun.

Tips

For the best results, use fresh salmon. It enhances the flavor and texture of the burger. If you don’t have a food processor, you can finely chop the salmon with a sharp knife. Be sure to toast your buns for extra flavor and crunch. Lastly, don’t overcook the salmon patties; they should be juicy and slightly pink in the center.

Variations & Substitutions

If you want to switch things up, consider using shrimp instead of salmon for a different seafood twist. You can also add some heat by including a teaspoon of sriracha or chili flakes to the sauce. For a gluten-free option, serve the patties on lettuce wraps instead of buns. If you prefer a different herb, cilantro works wonderfully in place of basil.

Storage

These salmon burgers are best enjoyed fresh, but if you have leftovers, store the patties in an airtight container in the refrigerator for up to 2 days. The sauce can be refrigerated separately in a small container. To reheat, gently warm the patties in a skillet over low heat until heated through.

FAQ

Can I freeze the salmon patties?

Yes, you can freeze the uncooked salmon patties. Place them on a baking sheet lined with parchment paper and freeze until solid. Once frozen, transfer the patties to a freezer-safe bag or container. They can be stored for up to 3 months. Thaw in the refrigerator before cooking.

What can I serve with these salmon burgers?

These burgers pair wonderfully with a light and fresh salad, sweet potato fries, or a simple coleslaw. You can also serve them with grilled vegetables for a wholesome meal.

Nutrition

This recipe provides a nutritious meal option rich in protein and omega-3 fatty acids, which are beneficial for heart health. Salmon is also a great source of vitamin D and B vitamins. Remember to adjust portion sizes to fit your dietary needs.

Conclusion

These Asian Salmon Burgers with Tangy Ginger Lime Sauce are a delicious way to enjoy a healthy and satisfying meal. With their vibrant flavors and simple preparation, they make an excellent choice for family dinners or entertaining guests. I hope you enjoy making and savoring these burgers as much as my family has over the years. Bon appétit!

Related update: Asian Salmon Burgers With Tangy Ginger Lime Sauce

Related update: Avocado Nests

Crab Cake Stuffed Shrimp | Made by Meaghan Moineau

Crab Cake Stuffed Shrimp

Intro

There’s something truly magical about the combination of crab cakes and shrimp. It takes me back to summer evenings spent by the coastline, where the air was tinged with the saltiness of the sea and the gentle hum of waves provided the perfect backdrop to our family gatherings. My grandmother, ever the culinary wizard, would whip up this dish that was both an indulgence and a comfort. Her Crab Cake Stuffed Shrimp was the star of many a festive table, and today, I am thrilled to share her recipe with you. This delightful appetizer is sure to impress your guests, bringing a touch of the ocean’s bounty to your dining table.

Why You’ll Love It

This Crab Cake Stuffed Shrimp recipe is the perfect blend of elegance and comfort, making it ideal for both special occasions and casual gatherings. Here’s why you’ll fall in love with it:

  • Flavor-Packed: Each bite is a burst of rich, savory flavors with a hint of spice.
  • Textural Delight: The tender shrimp combined with the crispy crab cake offers a satisfying texture contrast.
  • Impressive Presentation: This dish looks as good as it tastes, making it a show-stopper on any table.
  • Make Ahead: The crab mixture can be prepared in advance, allowing you more time to enjoy with guests.
  • Customizable: Easily adjust the spice level or add your personal touch with various substitutions.

Ingredients

  • 10 tablespoons unsalted butter, divided
  • 1 onion, finely chopped
  • 1 green bell pepper, finely chopped
  • 1 red bell pepper, finely chopped
  • 1/4 cup dry white wine
  • 2 cloves garlic, minced
  • 1 pound crab meat
  • 1/2 cup round buttery crackers, crushed
  • 1/2 cup panko bread crumbs
  • 1/2 teaspoon red ground pepper
  • 1 teaspoon Old Bay seasoning
  • Salt and black ground pepper to taste
  • 16 large shrimp, peeled and deveined
  • Optional: Lemon wedges for serving

Instructions

  1. Line a baking sheet with parchment paper.
  2. In a skillet, melt 5 tablespoons of butter over medium heat. Add the onion and sauté until translucent.
  3. Add the green and red bell peppers, remaining 5 tablespoons of butter, white wine, and garlic. Cook until the vegetables are tender, about 4 minutes.
  4. In a large bowl, combine the crab meat, onion mixture, crushed crackers, panko bread crumbs, red pepper, Old Bay seasoning, salt, and black pepper. Stir to combine.
  5. Cover the crab mixture and refrigerate for at least 1 hour, or up to 24 hours for enhanced flavor.
  6. Preheat your oven to 350 degrees Fahrenheit.
  7. Using a sharp knife, butterfly each shrimp starting at the tail end, and place them on the prepared baking sheet, pressing gently to flatten.
  8. Form about 3 tablespoons of the crab mixture into a ball and place it on top of each shrimp, pressing the shrimp tail over the crab.
  9. Repeat with the remaining shrimp and crab mixture.
  10. Bake in the preheated oven for 10 to 15 minutes until the shrimp are cooked through and the tops are lightly golden.
  11. Optional: Squeeze fresh lemon juice over the cooked appetizers for a zesty finish.
  12. Serve immediately to enjoy the best taste and texture.

Tips

  • Choose Fresh Ingredients: Use the freshest crab meat and shrimp for the best flavor.
  • Chill the Mixture: Refrigerating the crab mixture helps it hold together better when forming the balls.
  • Don’t Overstuff: Be gentle when wrapping the shrimp around the crab mixture to prevent tearing.

Variations & Substitutions

Feel free to make this recipe your own by experimenting with these variations and substitutions:

  • Spicy Twist: Add more red pepper or a dash of cayenne for extra heat.
  • Herbal Infusion: Mix in some fresh herbs like parsley or chives for an aromatic touch.
  • Cheesy Delight: Fold in some grated Parmesan cheese into the crab mixture for a rich flavor.
  • Alternative Meats: Swap crab meat for chopped lobster or scallops for a different take.

Storage

If you have leftovers (which is rare because they’re so delicious!), store them in an airtight container in the refrigerator for up to 2 days. Reheat in a preheated oven at 350 degrees Fahrenheit until warmed through for best results. Avoid microwaving as it may make the shrimp rubbery.

FAQ

Can I use frozen shrimp?

Yes, you can use frozen shrimp, but make sure to thaw them completely and pat them dry before using to prevent excess moisture from affecting the texture of the dish.

What can I serve with Crab Cake Stuffed Shrimp?

This dish pairs beautifully with a fresh green salad, roasted vegetables, or a light pasta dish. You can also serve it as an appetizer with a dipping sauce like aioli or cocktail sauce.

How do I know when the shrimp are cooked?

The shrimp are done when they turn opaque and pink, and the crab mixture on top is lightly golden. Be careful not to overcook them to maintain a juicy texture.

Nutrition

This dish is a delightful indulgence, rich in protein from the crab and shrimp. While exact nutritional information will vary based on specific ingredients used, it is a good source of omega-3 fatty acids, vitamins, and minerals. For those watching their sodium intake, consider adjusting the amount of Old Bay seasoning and salt.

Conclusion

Crab Cake Stuffed Shrimp is more than just a recipe; it’s a celebration of flavors that brings happiness to the table. Whether you’re recreating cherished family memories or starting new traditions, this dish is bound to be a hit. Share it with loved ones, and let the taste of the sea make your culinary experience unforgettable. Happy cooking!

Related update: Crab Cake Stuffed Shrimp

Related update: Tuna Mexi Melts

Smoked Salmon and Mascarpone Calzone | Made by Meaghan Moineau

Smoked Salmon and Mascarpone Calzone

Intro

There’s something truly magical about the aroma of freshly baked calzones wafting through the kitchen. It instantly transports me back to my childhood, where Sunday afternoons were reserved for family cooking sessions. My grandmother, with her deft hands and infectious laughter, would guide us through the art of making the perfect calzone, each one stuffed with her secret ingredient—love. Today, I’m sharing a modern twist on this nostalgic favorite: the Smoked Salmon and Mascarpone Calzone. It’s a delightful fusion of creamy mascarpone, savory smoked salmon, and the delicate flavor of fresh chives and leeks, all encased in a perfectly golden crust.

Why You’ll Love It

This Smoked Salmon and Mascarpone Calzone is not just a dish; it’s an experience. Whether you’re a fan of traditional Italian cuisine or looking to try something new, this recipe offers a unique blend of flavors and textures that will captivate your taste buds. The richness of the mascarpone complements the smokiness of the salmon perfectly, while the leeks add a subtle sweetness that ties everything together. Plus, making calzones is a fun activity for the whole family, reminiscent of those cherished childhood memories.

Ingredients

  • Black pepper
  • Egg white
  • Extra virgin olive oil
  • Fresh chives
  • Kosher salt
  • Leek
  • Mascarpone
  • Pizza dough
  • Smoked salmon

Instructions

  1. Preheat your oven to 450°F and place the top rack in the lower third of your oven. Line a baking sheet with parchment paper for easier cleanup.
  2. Wash and pat dry the leek. Slice the leek lengthwise, then cut each half into long, very thin strips. Cut the strips into short pieces, about 2 inches long. Set aside.
  3. Divide the dough into two equal parts, and roll out each into a 10-inch circle. Gently spread a thin layer of mascarpone on the surface of the dough, leaving at least a 1-inch crust.
  4. In a small bowl, break up the smoked salmon using your fingers until it is fluffy. You want the filling of the calzone to be pretty even, or it will fall apart as you eat it.
  5. Divide the salmon between the two crusts, arranging it only on one side of the crust (in a half-moon shape), again leaving at least a 1-inch crust. Sprinkle the chives and leeks over the salmon, then lightly salt and pepper. Finally, drizzle with about 1 tsp of olive oil.
  6. Fold each calzone in half, making sure that the crusts line up. Using the tines of a fork, gently press down the edge all the way around the rounded side of the calzone to seal it. Make sure you get a tight seal; this will help the calzone puff up during baking.
  7. Brush the tops of each calzone with egg white. Bake at 450°F for about 15 minutes, or until golden brown and delicious.

Tips

Here are a few tips to ensure your calzones turn out perfectly:

  • Make sure your oven is fully preheated before baking to achieve the best crust.
  • If you’re short on time, store-bought pizza dough works just as well as homemade.
  • Ensure the seal is tight to prevent any filling from leaking out during baking.

Variations & Substitutions

This recipe is wonderfully versatile. Here are some variations and substitutions you can try:

  • Swap the smoked salmon for smoked trout or cooked shrimp for a different seafood twist.
  • Replace mascarpone with cream cheese for a tangier flavor.
  • Add capers or dill for an extra burst of flavor.

Storage

To store your calzones, allow them to cool completely, then wrap them tightly in foil or place them in an airtight container. They can be refrigerated for up to 3 days. To reheat, simply place them in an oven preheated to 350°F for 10-12 minutes or until warmed through.

FAQ

Can I make the calzone dough ahead of time?

Yes, you can make the dough ahead of time. Simply prepare the dough according to your recipe, then wrap it tightly in plastic wrap and store it in the refrigerator for up to 24 hours. Allow it to come to room temperature before rolling it out.

What can I serve with these calzones?

These calzones pair beautifully with a fresh green salad or a side of roasted vegetables. You can also serve them with a simple tomato sauce or a lemon-dill sauce for dipping.

Nutrition

While the exact nutritional content may vary depending on the specific brands and quantities used, each calzone is a good source of protein and healthy fats, thanks to the smoked salmon and mascarpone. For those watching their sodium intake, you may wish to use less kosher salt.

Conclusion

The Smoked Salmon and Mascarpone Calzone is more than just a meal; it’s a touchstone to cherished memories and a versatile recipe that can be adapted to suit any palate. Whether you’re making it for a special occasion or a casual family dinner, this calzone promises to deliver warmth, comfort, and plenty of flavor. Gather your loved ones, roll up your sleeves, and enjoy the delightful experience of making and sharing this delicious dish.

Related update: Smoked Salmon and Mascarpone Calzone

Crunchy Prawn Skewers With Lemony Avocado Dip | Made by Meaghan Moineau

Crunchy Prawn Skewers With Lemony Avocado Dip

Intro

There’s something undeniably special about grilling prawns on a warm summer evening. It takes me back to the seaside holidays of my childhood, where the salty ocean breeze mingled with the enticing aroma of seafood cooking on the grill. Those were the days when my family would gather around, sharing stories and laughter as we eagerly awaited the delicious feast. This recipe for Crunchy Prawn Skewers with Lemony Avocado Dip encapsulates that nostalgic experience, combining the crispy texture of breadcrumbs with the refreshing zest of lemon-infused avocado. It’s a dish that not only satisfies the palate but also warms the heart, making it perfect for any gathering, big or small.

Why You’ll Love It

These Crunchy Prawn Skewers are a delightful fusion of textures and flavors. The succulent prawns are coated in crispy breadcrumbs, delivering a satisfying crunch with every bite. The Lemony Avocado Dip adds a creamy, tangy contrast that elevates the dish to a whole new level. Whether you’re hosting a backyard barbecue or a simple dinner with friends, these skewers are a crowd-pleaser, offering a gourmet touch that’s surprisingly easy to achieve. Plus, they’re a fantastic way to enjoy seafood that’s both healthy and delicious.

Ingredients

  • Flesh of 1 ripe avocado
  • 2 tablespoons crème fraiche
  • Juice of 1 lemon
  • 1 cup breadcrumbs
  • Zest of 1 lemon
  • 12 large prawns, peeled and deveined
  • 2 tablespoons olive oil
  • 4 bamboo skewers

Instructions

  1. In a food processor, combine the flesh of the avocado, crème fraiche, and lemon juice. Blend until smooth. Season to taste with salt and pepper, and set aside.
  2. In a bowl, combine the breadcrumbs and lemon zest. Season well with salt and pepper.
  3. Coat the prawns evenly with olive oil, then toss them in the breadcrumb mixture until fully covered.
  4. Thread three prawns onto each bamboo skewer.
  5. Preheat the grill to medium-high heat. Grill the skewers for about 2 minutes on each side, or until the prawns are crisp and golden.
  6. Serve immediately with the Lemony Avocado Dip on the side.

Tips

To prevent the bamboo skewers from burning, soak them in cold water for at least an hour before using. This simple step ensures that your skewers remain intact and your prawns cook evenly.

Variations & Substitutions

Feel free to get creative with this recipe! If prawns aren’t available, you can substitute them with chicken or tofu for a different take on the skewers. For an extra kick, add a pinch of cayenne pepper or smoked paprika to the breadcrumb mixture. You can also swap out the crème fraiche for Greek yogurt if you prefer a tangier dip.

Storage

If you have leftovers, store the skewered prawns in an airtight container in the refrigerator for up to two days. The Lemony Avocado Dip is best consumed fresh but can be stored separately in an airtight container for up to one day. To enjoy again, reheat the skewers in the oven or on a skillet until warmed through.

FAQ

Can I prepare the skewers in advance?

Yes, you can prepare the skewers up to a day in advance. Simply coat the prawns in the breadcrumb mixture and store them in the refrigerator until ready to grill. This makes them a convenient option for entertaining, allowing you to focus on your guests.

Can I use frozen prawns?

Absolutely! If using frozen prawns, make sure to thaw them completely and pat them dry before proceeding with the recipe. This ensures that the breadcrumbs adhere properly and the prawns cook evenly.

Nutrition

This dish is not only delicious but also nutritious. Prawns are a great source of lean protein, while the avocado provides healthy fats and essential nutrients. Each skewer contains approximately 180 calories, 10 grams of protein, and 12 grams of healthy fats, making it a balanced option for any meal.

Conclusion

Crunchy Prawn Skewers with Lemony Avocado Dip is a recipe that brings people together, just as it did during my childhood seaside gatherings. The crispy, golden prawns paired with a refreshing dip create a symphony of flavors that will transport you to a sunny beach with each bite. Whether you’re hosting a party or simply enjoying a quiet dinner, this dish promises to deliver satisfaction and smiles all around. So fire up the grill and embrace the joy of cooking and sharing this delectable treat with your loved ones.

Related update: Crunchy Prawn Skewers With Lemony Avocado Dip

Related update: Crisp Winter Salad with Maple Gorgonzola Dressing