Steak And Pepper Rounds With Rose Horseradish Garlic Creme Sauce | Made by Meaghan Moineau

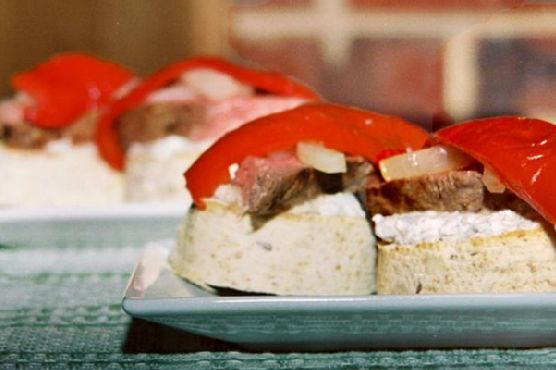
Steak And Pepper Rounds With Rose Horseradish Garlic Crème Sauce

Intro

There’s something about the aroma of steak sizzling on the grill that transports me back to summer evenings spent in my grandmother’s garden. She had a knack for turning simple ingredients into a feast, and this recipe is a tribute to those cherished memories. As the sun dipped below the horizon, we’d gather around the table, the air filled with laughter and the rich, savory scent of marinated steak. This dish, inspired by those warm, nostalgic evenings, combines tender beef with the vibrant flavors of roasted peppers and a creamy, horseradish-infused sauce, bringing a touch of elegance to any table.

Why You’ll Love It

This recipe is a delightful blend of flavors and textures that’s sure to impress your guests. Whether you’re hosting a summer barbecue or a cozy winter gathering, these steak and pepper rounds are perfect as both appetizers and hearty main courses. The creamy sauce, with its subtle hint of rose wine, perfectly complements the succulent steak and smoky peppers, making each bite a culinary experience. Plus, it’s a versatile dish that can easily be adapted to suit different tastes and dietary needs.

Ingredients

  • 1 tbsp olive oil, plus extra for sautéing
  • 1 whole garlic bulb
  • 1 boneless beef rib steak
  • 1 tbsp Worcestershire sauce
  • 1 tbsp Jack Daniels mustard
  • 1 tsp crushed red pepper flakes
  • 1/2 cup rose syrah wine
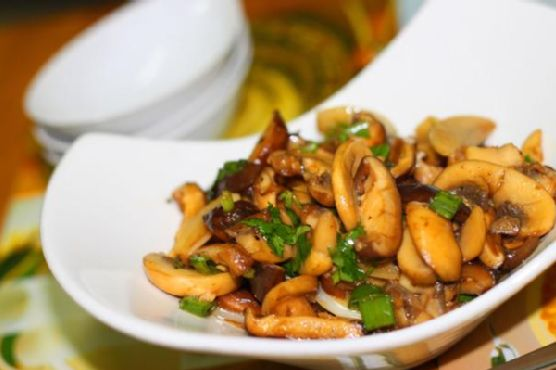
  • 1 onion, sliced into 3-inch strips
  • 1 cup red roasted pepper sections
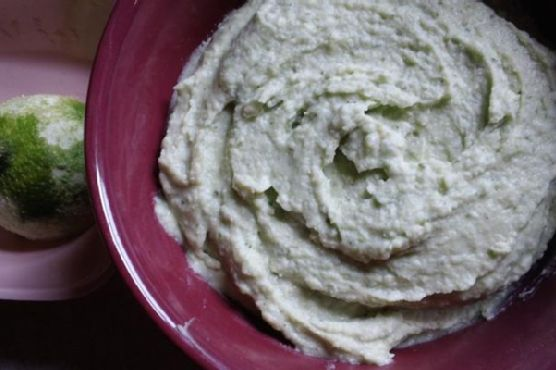
  • 1/2 cup mascarpone cheese
  • 1 tbsp horseradish
  • 4 cloves roasted garlic
  • 1 tsp fresh dried basil
  • 1 tsp fresh dried oregano
  • 1 tbsp fresh lemon juice
  • Salt and pepper, to taste
  • 1 loaf French bread, sliced into 1-inch rounds

Instructions

  1. Preheat your oven to 400°F. Drizzle 1 tbsp of olive oil over the garlic bulb and wrap it in aluminum foil. Place on a cookie sheet and roast for approximately 40 minutes. Once roasted, let it cool to touch.
  2. While the garlic is roasting, marinate the steak in a ziplock bag with Worcestershire sauce, Jack Daniels mustard, crushed red pepper flakes, and 1/2 cup of rose syrah wine. Toss to coat and let it sit while you slice the vegetables.
  3. Heat olive oil in a skillet over medium heat. Add the sliced onion and sauté until slightly browned and caramelized, about 20 minutes. Add the red roasted pepper sections and cook for another 10 to 15 minutes.
  4. Meanwhile, place the marinated steak on a roasting pan and broil in the oven or grill for approximately 5 to 10 minutes per side. Be careful not to overcook, as the steak will continue to cook after being removed from the heat. Let it rest before cutting.
  5. In a food processor, combine the mascarpone cheese, horseradish, and squeeze out 4 cloves of the roasted garlic. (Store the rest of the garlic bulb in an airtight container in the refrigerator for up to one week.) Pulse a few times to blend.
  6. Add the fresh dried basil, oregano, lemon juice, and a pinch of salt and pepper to the mixture and blend well.
  7. Slice the French bread into 1-inch rounds and lightly toast them in the oven or on a grill.
  8. Cut the steak into 1/8 to 1/4-inch strips.
  9. Spread the rose horseradish garlic crème sauce over each warm piece of bread. Top with a slice of steak and a spoonful of the onion and pepper mixture.

Tips

For the best flavor, allow the steak to marinate for at least an hour, or overnight if possible. Ensure your skillet is properly heated before adding the onions to achieve the perfect caramelization. When slicing the steak, always cut against the grain to ensure tenderness. Finally, if you like a bit more kick, feel free to increase the amount of horseradish in the sauce.

Variations & Substitutions

This recipe is highly adaptable. For a lighter version, use chicken breast or portobello mushrooms instead of steak. You can substitute the Jack Daniels mustard with Dijon mustard for a milder taste. If you’re avoiding alcohol, replace the rose syrah wine with beef broth. For a gluten-free option, use gluten-free bread or serve the toppings over a bed of arugula.

Storage

Store any leftover steak and pepper mixture in an airtight container in the refrigerator for up to three days. The sauce can also be refrigerated for up to a week. When ready to serve again, reheat the steak and pepper mixture gently in a skillet, and toast the bread fresh just before serving.

FAQ

Can I prepare the sauce ahead of time?

Yes, the sauce can be prepared up to three days in advance. Just store it in an airtight container in the refrigerator. Before serving, give it a good stir and adjust the seasoning if necessary.

What wine pairs well with this dish?

A glass of the same rose syrah wine used in the recipe would complement the dish beautifully. Alternatively, a full-bodied red like Cabernet Sauvignon would also work well, enhancing the rich flavors of the steak.

Can I use a different type of cheese?

Absolutely! If mascarpone isn’t available, cream cheese or ricotta can be used as substitutes. Keep in mind that cream cheese will yield a slightly tangier sauce.

Nutrition

Each serving contains approximately 250 calories, 18g of fat, 12g of carbohydrates, and 15g of protein. These values may vary slightly based on specific ingredients used and portion sizes.

Conclusion

Steak and Pepper Rounds with Rose Horseradish Garlic Crème Sauce is a delightful appetizer or main dish that brings together a symphony of flavors reminiscent of time-honored traditions and cherished family gatherings. Whether you’re making this for a special occasion or a cozy night in, it’s sure to become a favorite in your culinary repertoire. Enjoy the process of creating and savoring each bite, and feel free to share your own variations and stories in the comments below. Happy cooking!

Related update: Steak And Pepper Rounds With Rose Horseradish Garlic Creme Sauce

Related update: Ginger Chicken Stir-Fry

Related update: Alouette® Stuffed Mushroom Caps

Basil Lime White Bean Hummus | Made by Meaghan Moineau

Basil Lime White Bean Hummus

Intro

There’s something about the combination of fresh basil and lime that instantly transports me back to my childhood summers spent in my grandmother’s garden. She grew the most fragrant basil I’ve ever encountered, and we’d often pick a handful to mix into our meals. One of my favorite memories is sitting on her porch, a gentle breeze carrying the scent of fresh herbs as we dipped into a bowl of her homemade hummus. Inspired by those memories, I’ve created a recipe with a zesty twist: Basil Lime White Bean Hummus. It’s a delightful blend of creamy cannellini beans, aromatic basil, and a refreshing burst of lime that will bring a touch of sunshine to any snack or meal.

Why You’ll Love It

This Basil Lime White Bean Hummus is a refreshing take on the classic hummus, perfect for those who love a good twist on traditional flavors. Here are a few reasons why you’ll fall in love with it:

  • Quick and Easy: With just a few simple ingredients, you can whip up this hummus in no time.
  • Flavorful: The combination of basil and lime gives this hummus a unique and vibrant taste that stands out.
  • Healthy: Packed with protein and fiber from the beans, it’s a nutritious choice for any snack or meal.
  • Versatile: Perfect as a dip, spread, or even a salad dressing alternative.

Ingredients

  • 1 can of cannellini beans, drained and rinsed
  • 2 cloves of garlic
  • 1 cup of fresh basil leaves
  • Zest of 1 lime
  • Juice from 1 lime
  • 3 tablespoons of olive oil
  • 1/4 cup of water
  • Salt, to taste
  • Black pepper, to taste

Instructions

  1. In a food processor, combine the cannellini beans, garlic, basil leaves, lime zest, lime juice, and olive oil. Blend until the mixture is smooth.
  2. With the processor on, gradually add water to the mixture until you reach your desired consistency. You may need slightly more or less than 1/4 cup depending on your preference.
  3. Season with salt and black pepper to taste. Blend again to ensure everything is well mixed.
  4. Taste the hummus and adjust the seasoning if needed. If you prefer a more pronounced lime flavor, feel free to add a bit more lime juice.
  5. Transfer the hummus to a serving bowl and serve it with chips or fresh veggies. For the best flavor, allow it to chill before serving, but if you’re eager, enjoy it immediately!

Tips

To make the most of your Basil Lime White Bean Hummus, consider the following tips:

  • Use Fresh Ingredients: Fresh basil and freshly squeezed lime juice make a significant difference in flavor.
  • Adjust Consistency: If you prefer a thicker hummus, add less water. For a smoother, thinner consistency, add a bit more.
  • Garnish: Consider garnishing with a few whole basil leaves or a sprinkle of lime zest for an extra touch of flavor and presentation.

Variations & Substitutions

Feel free to customize the recipe to suit your taste preferences:

  • Herbs: Swap basil with cilantro for a different herbal note.
  • Beans: Substitute cannellini beans with chickpeas for a more traditional hummus base.
  • Spice: Add a pinch of red pepper flakes or a dash of hot sauce for a spicy kick.

Storage

Basil Lime White Bean Hummus can be stored in an airtight container in the refrigerator for up to 5 days. Before serving, you might want to stir it well, as some separation may occur. For longer storage, consider freezing it for up to 3 months. Thaw in the refrigerator and blend again before serving for the best texture.

FAQ

Can I use dried beans instead of canned?

Yes, you can use dried cannellini beans. Just make sure to soak them overnight and cook them thoroughly before using them in the recipe. You’ll need about 1.5 cups of cooked beans to replace a can.

What are the best dippers for this hummus?

This hummus pairs beautifully with a variety of dippers. Try it with fresh veggies like carrots, cucumbers, and bell peppers, or go for pita chips, whole-grain crackers, or even spread it on a sandwich or wrap.

Can I make it ahead of time?

Absolutely! In fact, the flavors tend to meld and improve after a few hours in the fridge. Just be sure to give it a good stir and check seasoning before serving.

Nutrition

This hummus is not only delicious but also nutritious. Each serving is packed with protein, healthy fats, and fiber. While nutritional values can vary based on the exact ingredients used, one serving of this hummus (about 1/4 cup) contains approximately:

  • Calories: 120
  • Protein: 4g
  • Fat: 8g
  • Carbohydrates: 10g
  • Fiber: 3g

Conclusion

Basil Lime White Bean Hummus is a delightful twist on a classic favorite, bringing a burst of fresh flavors that are perfect for any occasion. Whether you’re hosting a gathering, looking for a healthy snack, or simply craving something different, this hummus is sure to please. Easy to make, versatile, and packed with nutrition, it’s a recipe you’ll find yourself returning to time and again. So, gather your ingredients, fire up your food processor, and enjoy a taste of summer with every bite.

Related update: Basil Lime White Bean Hummus

Related update: Steak And Pepper Rounds With Rose Horseradish Garlic Creme Sauce

Stir Fry Mushrooms In Butter, Garlic And White Wine | Made by Meaghan Moineau

Stir Fry Mushrooms In Butter, Garlic And White Wine

Intro

There are few things more comforting than the sizzle of mushrooms in a hot pan, enveloped in the aroma of garlic and butter. This recipe for Stir Fry Mushrooms in Butter, Garlic, and White Wine takes me back to my grandmother’s cozy kitchen. I can vividly remember the way she would expertly toss a medley of mushrooms in her well-worn skillet, filling the room with a fragrance that promised a delightful meal. Her secret? A splash of white wine that added a touch of elegance, transforming a simple dish into something truly special. Today, I’m excited to share this recipe with you, hoping it brings as much warmth and joy to your table as it has to mine.

Why You’ll Love It

This dish is a celebration of flavors and textures. The mushrooms are tender and juicy, absorbing the richness of butter and the aromatic punch of garlic. A hint of white wine adds a sophisticated depth, while the teriyaki sauce and balsamic vinegar bring a delightful balance between sweet and tangy. Finished with a touch of chili oil for heat and fresh herbs for brightness, this dish is as versatile as it is delicious. Whether you’re a seasoned home cook or a beginner, you’ll find this recipe simple yet impressive.

Ingredients

  • Fresh shiitake mushrooms
  • White mushrooms
  • Garlic
  • Butter
  • White wine
  • Teriyaki sauce
  • Balsamic vinegar
  • Black ground pepper
  • Salt
  • Chili oil
  • Parsley
  • Diced spring onions

Instructions

  1. Melt the butter in a frying pan over medium heat.
  2. Add the garlic and stir-fry until fragrant, about 1 minute.
  3. Add the mushrooms and stir-fry for 30 seconds, allowing them to absorb the garlic-infused butter.
  4. Pour in the white wine and let it evaporate, infusing the mushrooms with its delicate flavor.
  5. Continue to fry the mushrooms for another minute.
  6. Add salt, black pepper, balsamic vinegar, teriyaki sauce, and chili oil. Fry for an additional minute, ensuring everything is well combined.
  7. Turn the heat to low and add parsley and diced spring onions. Mix well to incorporate the herbs’ freshness.
  8. Transfer the mushrooms to a serving plate and enjoy!

Tips

For the best results, use a mix of fresh shiitake and white mushrooms. Make sure the mushrooms are dry before adding them to the pan to achieve a nice golden-brown sear. If you want a more intense garlic flavor, add an extra clove or two. Always let the white wine fully evaporate to prevent the dish from tasting too acidic. Finally, adjust the amount of chili oil to your heat preference.

Variations & Substitutions

If you’re looking to switch things up, try adding some sliced bell peppers or snap peas for extra color and crunch. For a vegetarian-friendly version, ensure your teriyaki sauce is free of animal products. If you prefer a non-alcoholic version, substitute the white wine with vegetable broth. You can also use olive oil instead of butter for a lighter dish.

Storage

Leftover stir fry mushrooms can be stored in an airtight container in the refrigerator for up to 3 days. To reheat, simply warm them in a skillet over medium heat, adding a splash of water if needed to prevent drying out.

FAQ

Can I use other types of mushrooms?

Absolutely! Feel free to use any mushrooms you have on hand. Cremini, portobello, or oyster mushrooms would all work beautifully in this recipe.

What can I serve with stir fry mushrooms?

These mushrooms are incredibly versatile and can be served as a side dish with grilled meats, tossed with pasta, or even as a topping for bruschetta. They also make a great filling for an omelet or a savory crepe.

Nutrition

This dish is rich in antioxidants and essential nutrients provided by the mushrooms. The garlic and parsley contribute additional health benefits, such as boosting the immune system and providing anti-inflammatory properties. While butter and wine add richness, the dish is relatively low in calories and can be adjusted for dietary preferences.

Conclusion

Stir Fry Mushrooms in Butter, Garlic, and White Wine is more than just a dish; it’s a comforting experience that brings warmth to any table. Its simple preparation and complex flavors make it a perfect recipe for both everyday meals and special occasions. Whether you’re enjoying it as a side dish or the star of your meal, this recipe is sure to become a favorite. I hope you find as much joy in making and sharing this dish as I have.

Related update: Stir Fry Mushrooms In Butter, Garlic And White Wine

Related update: Basil Lime White Bean Hummus

Eggplant pizzette | Made by Meaghan Moineau

Eggplant Pizzette: A Delightful Twist on a Classic Dish

Intro

Eggplant pizzette has always held a special place in my heart. I vividly remember visiting my grandmother’s kitchen on summer afternoons, the air thick with the scent of fresh basil and the sizzle of tomatoes simmering on the stove. As a child, I would eagerly await her signature eggplant pizzette, a dish that never failed to bring the family together around the table. This recipe, inspired by her culinary magic, offers a modern twist on a cherished classic, ideal for both intimate gatherings and solo indulgence.

Why You’ll Love It

Eggplant pizzette is an innovative and delightful dish that brings together the best of both worlds: the comforting flavors of pizza and the health benefits of fresh vegetables. Whether you’re a lifelong vegetarian or simply looking to incorporate more plant-based meals into your diet, this recipe is a winner. It’s simple to prepare, requires minimal ingredients, and is perfect for a quick appetizer or a light, satisfying meal. You’ll love the way the creamy eggplant pairs with the fresh, zesty tomatoes and aromatic herbs, all topped with a layer of melted Swiss cheese for that extra touch of indulgence.

Ingredients

  • Round eggplant
  • Tomatoes
  • Swiss cheese
  • Fresh basil leaves
  • Fresh oregano leaves

Instructions

  1. Preheat your oven to 230°C (450°F) and prepare a non-stick pan by greasing it lightly with olive oil.
  2. Slice the eggplant into rounds, about 1/2 inch thick, and arrange them in the prepared pan.
  3. Bake the eggplant rounds in the oven for 10 minutes. This will soften them and bring out their natural flavors.
  4. Remove the pan from the oven, leaving the baked eggplant inside to retain its warmth.
  5. On each eggplant round, place a spoonful of chopped tomatoes, ensuring even coverage.
  6. Sprinkle fresh basil and oregano leaves over the tomatoes for a burst of herbal aroma.
  7. Top each round with a generous amount of grated Swiss cheese.
  8. Return the pan to the oven and bake for an additional 5 minutes. Watch closely until the cheese is melted and golden brown.
  9. Remove from the oven and allow to cool slightly before serving. Enjoy your pizzette warm or cooled as a delightful appetizer or small meal.

Tips

To make your eggplant pizzette truly shine, ensure that the eggplants are fresh and firm to the touch. If you prefer a slightly thicker texture, you can leave the eggplant rounds a bit thicker, but adjust the initial baking time accordingly. Also, feel free to experiment with the cheese; while Swiss cheese is recommended for its mild flavor, mozzarella or provolone can be great substitutes for a different taste experience.

Variations & Substitutions

The beauty of eggplant pizzette is its versatility. You can easily customize it to suit your taste preferences or dietary needs. For a vegan version, simply replace the Swiss cheese with your favorite plant-based cheese. If you’re looking for a spicier kick, add a sprinkle of red pepper flakes or a dash of hot sauce. Additionally, you can incorporate other toppings like olives, roasted red peppers, or caramelized onions to add more depth to the dish.

Storage

If you have leftovers, store them in an airtight container in the refrigerator for up to three days. To reheat, place the pizzette in a preheated oven at 180°C (350°F) for about 5 minutes, or until they are warmed through. Avoid microwaving, as it may cause the eggplant to become too soggy.

FAQ

Can I make the eggplant pizzette ahead of time?

Yes, you can prepare the eggplant rounds and toppings ahead of time. Assemble them right before the second baking stage to ensure the cheese melts perfectly and the flavors remain vibrant.

What can I serve with eggplant pizzette?

Eggplant pizzette pairs beautifully with a fresh green salad or a light pasta dish. You can also serve them alongside a charcuterie board for a more substantial appetizer spread.

Is eggplant a good substitute for pizza dough?

Absolutely! Eggplant offers a nutritious and gluten-free alternative to traditional pizza dough. It’s lower in calories and carbohydrates, making it a healthier option without compromising on flavor.

Nutrition

Eggplant pizzette is a nutritious dish, rich in fiber and essential vitamins. Eggplants are a good source of antioxidants and can help in maintaining heart health. Fresh tomatoes and herbs add to the nutritional profile with vitamins C and K, while Swiss cheese provides a good dose of calcium and protein.

Conclusion

Eggplant pizzette is more than just a recipe; it’s a culinary journey that marries tradition with creativity. Whether you’re recreating a childhood memory or discovering a new favorite dish, this recipe promises satisfaction in every bite. Enjoy this delightful twist on a classic, and don’t forget to share the experience with loved ones. Cooking is, after all, an act of love, and what better way to express it than with delicious food!

Related update: Eggplant pizzette

Related update: Honey Dijon Roasted Brussels Sprout

Hot Artichoke Crab Dip | Made by Meaghan Moineau

Hot Artichoke Crab Dip

Intro

There’s something magical about the aroma of a bubbling hot dip wafting through the house, heralding the arrival of friends and family. This Hot Artichoke Crab Dip recipe holds a special place in my heart, as it takes me back to countless family gatherings where laughter echoed through the rooms and the dip was the star of every appetizer table. I vividly remember my grandmother bringing out her signature dish, the sizzling crusty top crackling as it emerged from the oven. We all gathered around, eagerly dipping our bread into the creamy delight. Today, I continue the tradition, serving this decadent dip at every opportunity, and it never fails to delight!

Why You’ll Love It

This Hot Artichoke Crab Dip is not only easy to make but also irresistibly delicious. It’s creamy, cheesy, and loaded with chunks of artichoke and imitation crab, creating a symphony of flavors that captivate your taste buds. Whether you’re hosting a party or simply seeking comfort food, this dip is a crowd-pleaser that will have everyone coming back for more.

Ingredients

  • 1 cup mayonnaise
  • 1 cup sour cream
  • 1 cup shredded fresh parmesan cheese
  • 8 oz cream cheese, softened
  • 2 cloves garlic, minced
  • 1 small onion, finely chopped
  • 1 can (14 oz) artichoke hearts, drained and chopped
  • 8 oz fresh imitation crab meat, chopped

Instructions

  1. Preheat your oven to 350°F (175°C).
  2. In a microwave-safe bowl, soften the cream cheese for about 30 seconds in the microwave.
  3. Add mayonnaise, sour cream, parmesan cheese, minced garlic, chopped onion, artichoke hearts, and imitation crab meat to the softened cream cheese.
  4. Mix all the ingredients well until thoroughly combined.
  5. Transfer the mixture into a baking dish and spread it evenly.
  6. Bake in the preheated oven for 25-30 minutes, or until the top is golden and bubbly.
  7. Remove from the oven and let it cool slightly before serving.
  8. Serve with sliced baguette, crackers, or fresh vegetables. Enjoy!

Tips

  • Ensure the cream cheese is at room temperature before mixing; this helps in achieving a smooth consistency.
  • For an extra crispy top, consider sprinkling some additional parmesan cheese on top before baking.
  • If you prefer a spicier kick, add a pinch of red pepper flakes to the mixture.

Variations & Substitutions

If you’re feeling adventurous or need to accommodate dietary preferences, here are some suggestions:

  • Seafood Swap: Substitute imitation crab with real crab meat for a more authentic seafood flavor.
  • Cheese Variations: Try using a blend of cheeses like mozzarella or cheddar for a different flavor profile.
  • Vegan Option: Use vegan mayonnaise, cream cheese, and cheese substitutes along with artichoke and a plant-based protein like jackfruit.

Storage

Leftovers (if there are any!) can be stored in an airtight container in the refrigerator for up to 3 days. To reheat, simply place the dip back into the oven at 350°F until warmed through, or use a microwave for a quicker option.

FAQ

Can I make this dip ahead of time?

Absolutely! You can prepare the dip up to a day in advance. Simply mix all the ingredients and store in the fridge until you’re ready to bake. This makes it a convenient option for busy days or when hosting a gathering.

Can I freeze the dip?

While it’s possible to freeze this dip, dairy-based dips often change texture when frozen and reheated. If you choose to freeze, ensure it’s well-protected in an airtight container and plan to use it within a month for best results.

What can I use instead of imitation crab?

If you’re not a fan of imitation crab, feel free to use cooked, shredded real crab meat. Alternatively, shrimp or even cooked chicken could be interesting substitutes for a different twist.

Nutrition

While I don’t have exact nutritional data for this recipe, it’s worth noting that this dip is rich and indulgent. It’s best enjoyed in moderation, especially if you’re watching your calorie or fat intake. Consider pairing it with fresh veggies instead of bread for a lighter option.

Conclusion

The Hot Artichoke Crab Dip is more than just a dish; it’s a cherished tradition, a conversation starter, and a testament to the joy of sharing food with loved ones. Whether you’re reviving old memories or creating new ones, this warm, creamy, and flavorful dip is guaranteed to make your gatherings extra special. I hope you enjoy making and savoring it as much as I do. Happy dipping!

Related update: Hot Artichoke Crab Dip

Related update: Eggplant pizzette

Cream Cheese Stuffed Baby Bell Pepper Appetizer | Made by Meaghan Moineau

Cream Cheese Stuffed Baby Bell Pepper Appetizer

Intro

There’s something magical about bite-sized appetizers that sparks joy and brings people together. I remember the first time I tried stuffed baby bell peppers at a family gathering. My grandmother had prepared them with such care and love, and as soon as I took that first bite, I was hooked. The creamy filling combined with the sweet crunch of the pepper was an explosion of flavors that left a lasting impression. Since then, I’ve tried recreating that delightful experience in my own kitchen, and today, I’m thrilled to share this recipe with you.

Why You’ll Love It

This cream cheese stuffed baby bell pepper appetizer is perfect for gatherings, whether it’s a casual get-together or a festive holiday party. You’ll love how easy it is to prepare, and your guests will appreciate the burst of flavors in each bite. The combination of creamy cheese, crunchy walnuts, and the subtle heat of sriracha makes this dish an instant crowd-pleaser. Plus, it’s a versatile recipe that can be adapted to suit various dietary preferences.

Ingredients

  • Cream cheese
  • Garlic
  • Green onion
  • Black ground pepper
  • Olive oil
  • Salt
  • Snack peppers
  • Walnuts

Instructions

  1. Preheat the oven to 350 degrees.
  2. Cut the bell peppers lengthwise, remove the seeds and stems.
  3. Lightly oil the bell peppers by tossing them in a bowl with some olive oil.
  4. Place the peppers on a baking sheet skin-side down.
  5. Roast in the oven for 8-10 minutes until the edges begin to show some color. Remove from the oven and allow to cool.
  6. While the peppers are roasting, prepare your stuffing. Place the cream cheese, walnuts, garlic, salt, sriracha, and black pepper in a bowl and mix until creamy. Add the green onion and fold in to the cream cheese until combined. Test and adjust seasoning as needed.
  7. Heat your oven to 400 degrees.
  8. Use a spoon or a piping bag to stuff the peppers liberally and place them back on the baking sheet.
  9. If the cream cheese is very soft, place the baking sheet in the refrigerator for 15 minutes to allow it to set up.
  10. Bake in the oven for about 8 minutes. Then, change the oven setting to high broil and bake for an additional 2 minutes, until the tops of the cream cheese begin to brown.
  11. Put on a pretty plate and serve to your friends.

Tips

For best results, ensure your cream cheese is softened to room temperature before mixing. This makes it easier to combine with the other ingredients and ensures a smooth texture. If you’re using a food processor, pulse gently to avoid over-processing the walnuts. This will retain some texture and add a delightful crunch to your stuffing.

Variations & Substitutions

If you’re looking to switch things up, consider adding some crumbled feta or goat cheese to the stuffing for a tangy twist. For a nut-free version, you can replace walnuts with sunflower seeds or omit them altogether. If you prefer a milder flavor, reduce or eliminate the sriracha. Vegans can substitute the cream cheese with a plant-based alternative to create a dairy-free version of this delightful appetizer.

Storage

These stuffed peppers are best enjoyed fresh, but if you have leftovers, they can be stored in an airtight container in the refrigerator for up to 3 days. To reheat, place them in a preheated oven at 350 degrees for about 5-7 minutes or until warmed through.

FAQ

Can I make these stuffed peppers ahead of time?

Yes, you can prepare the stuffing and fill the peppers in advance. Store them in the fridge and simply bake them when you’re ready to serve. Just remember to adjust the baking time if they’re cold from the fridge.

What can I serve with these appetizers?

These stuffed peppers pair beautifully with a variety of dips like hummus or tzatziki. They also complement charcuterie boards and can be served alongside crackers, breadsticks, or fresh veggies.

Nutrition

This appetizer is a balanced blend of healthy fats from olive oil and walnuts, along with the protein-rich cheese filling. The peppers add a dose of vitamins and antioxidants, making this not just a delicious, but also a nutritious option for your gatherings.

Conclusion

These Cream Cheese Stuffed Baby Bell Peppers are a delightful addition to any appetizer spread. Their vibrant colors and rich flavors are sure to impress your guests and make your gatherings extra special. Whether you’re hosting a party or just want to enjoy a delicious snack, this easy-to-make recipe will quickly become a favorite in your repertoire. Enjoy!

Related update: Cream Cheese Stuffed Baby Bell Pepper Appetizer

Related update: Hot Artichoke Crab Dip

Baked Lemon~Lime Chicken Wings | Made by Meaghan Moineau

Baked Lemon~Lime Chicken Wings

Intro

There’s something incredibly comforting about a tray of freshly baked chicken wings, their aroma wafting through the kitchen, evoking memories of family gatherings and festive celebrations. I remember my grandmother’s kitchen, where she would prepare her signature lemon-lime chicken wings for every family gathering. The citrusy zing combined with the savory seasoning made it impossible to resist grabbing just one more wing. Inspired by her recipe, I’ve added my own twist to create these delightful Baked Lemon~Lime Chicken Wings. Perfect for a cozy night in or a festive get-together, these wings promise to be a hit with everyone at the table.

Why You’ll Love It

These Baked Lemon~Lime Chicken Wings are a delightful combination of tangy and savory flavors that dance on your taste buds. The recipe is simple enough for a weeknight dinner yet sophisticated enough to serve at a party. The marinade, bursting with fresh citrus juices, garlic, and a touch of sweetness, ensures that each wing is infused with flavor. Plus, baking the wings makes them a healthier alternative to fried wings, without compromising on that irresistible crispy texture.

Ingredients

  • 2 lbs chicken wings
  • Juice of 1 lemon
  • Juice of 1 lime
  • 4 cloves garlic, minced
  • 2 tablespoons honey
  • 1 tablespoon sugar
  • 1/4 cup red wine
  • 1/4 cup chicken broth
  • 2 tablespoons vegetable oil
  • 2 tablespoons Italian fresh parsley, chopped
  • 2 tablespoons fresh cilantro, chopped
  • Salt to taste
  • Freshly ground black pepper to taste

Instructions

  1. In a large mixing bowl, combine the lemon juice, lime juice, minced garlic, honey, sugar, red wine, chicken broth, vegetable oil, parsley, cilantro, salt, and freshly ground black pepper. Stir until the sugar is dissolved and the mixture is well combined.
  2. Add the chicken wings to the marinade, ensuring each wing is well coated. Cover the bowl with plastic wrap and refrigerate for at least 1 hour, allowing the flavors to penetrate the wings. For best results, marinate for a few hours.
  3. Preheat your oven to 400°F (200°C). Line a baking sheet with aluminum foil and place a wire rack on top to allow for even cooking.
  4. Arrange the marinated chicken wings on the wire rack, reserving the marinade for basting.
  5. Bake the wings in the preheated oven for 30 minutes. Then, remove them from the oven, baste with the reserved marinade, and return to the oven for another 10-15 minutes, or until the wings are golden brown and crispy.
  6. Remove from the oven and let them cool slightly before serving. Garnish with additional chopped parsley and cilantro if desired.

Tips

  • For extra crispy wings, turn on the broiler for the last 2-3 minutes of baking, but watch them closely to prevent burning.
  • Pat the wings dry with paper towels before marinating to help the skin crisp up better.

Variations & Substitutions

If you’re looking to switch things up, here are a few variations and substitutions you can try:

  • Sweet and Spicy: Add a teaspoon of chili flakes or a dash of hot sauce to the marinade for a spicy kick.
  • Herb Infusion: Swap the parsley and cilantro with fresh basil or thyme for a different herbaceous flavor.
  • Grilled Option: Instead of baking, grill the wings over medium heat to impart a smoky flavor.

Storage

Store any leftover wings in an airtight container in the refrigerator for up to 3 days. To reheat, place them in a preheated oven at 350°F (175°C) for about 10 minutes, or until warmed through. Avoid microwaving as it can make the skin soggy.

FAQ

Can I use chicken drumsticks instead of wings?

Yes, you can substitute chicken drumsticks for wings in this recipe. Just be sure to adjust the cooking time, as drumsticks may require a longer baking time to cook through.

How can I make these wings gluten-free?

To make this recipe gluten-free, ensure that the chicken broth and any other ingredients you use are labeled gluten-free. Most of the ingredients listed are naturally gluten-free, but it’s always best to check labels.

Nutrition

While the exact nutritional content will vary depending on portion sizes and specific brands used, these Baked Lemon~Lime Chicken Wings are generally lower in calories and fat compared to their fried counterparts, making them a healthier choice for wing lovers.

Conclusion

These Baked Lemon~Lime Chicken Wings are a delightful addition to any meal or gathering, bringing a burst of fresh flavors with every bite. Whether you’re reminiscing about family traditions or creating new memories at your own table, these wings are sure to become a cherished favorite. Serve them as an appetizer, party snack, or even a main dish alongside your favorite sides. Enjoy the vibrant taste and the satisfaction of sharing a homemade treat with your loved ones.

Related update: Baked Lemon~Lime Chicken Wings

Related update: Cream Cheese Stuffed Baby Bell Pepper Appetizer

Crab Wontons | Made by Meaghan Moineau

Delicious Crab Wontons: A Fusion of Flavor and Elegance

Intro

There’s something magical about the aroma of crab wontons wafting through the kitchen. As a child, I would watch my grandmother expertly fold wonton wrappers, her fingers moving deftly with years of practiced ease. Each fold was a promise of deliciousness to come. Today, I’m excited to share a modern twist on this classic recipe, bringing back fond memories while creating new ones. Whether enjoyed as an appetizer or a delightful snack, these crab wontons are sure to become a favorite in your household.

Why You’ll Love It

Crab wontons are not just a treat for the taste buds but also a feast for the senses. Here are a few reasons why you’ll fall in love with this recipe:

  • Easy to Make: With simple ingredients and straightforward instructions, this recipe is accessible even for novice cooks.
  • Healthy Twist: By using fat-free cream cheese and reduced-fat mayonnaise, you can enjoy these wontons guilt-free.
  • Flavorful Fusion: The combination of crab, cream cheese, and savory seasonings creates a rich, satisfying taste.
  • Perfect for Any Occasion: Whether you’re hosting a dinner party or enjoying a quiet night in, these wontons are versatile enough to suit any event.

Ingredients

  • 1 can of white crabmeat, drained
  • 4 oz fat-free cream cheese, softened
  • 2 tablespoons reduced-fat mayonnaise
  • 1 tablespoon soy sauce
  • 1 clove garlic, minced
  • 1/2 teaspoon onion powder
  • Fresh ground pepper, to taste
  • 12 wonton wrappers

Instructions

  1. Preheat your oven to 350°F (175°C).
  2. Spray a mini muffin tin with nonstick cooking spray to prevent sticking.
  3. In a medium bowl, combine the crab meat, cream cheese, mayonnaise, soy sauce, garlic, onion powder, and fresh ground pepper. Mix until all ingredients are well incorporated.
  4. Place one wonton wrapper in each of the 12 mini muffin cups. The edges of the wonton wrappers will extend beyond the cups and may need to be folded slightly to fit.
  5. Spoon the crab mixture into the center of each wonton cup, filling generously.
  6. Bake for 15 to 20 minutes, or until the edges of the wonton cups are golden brown and the filling is heated through.
  7. Remove from oven and let cool slightly before serving. Enjoy your delicious crab wontons!

Tips

To ensure the best results, consider these helpful tips:

  • Room Temperature Ingredients: Make sure the cream cheese is softened to room temperature for easier mixing.
  • Even Filling: Use a small cookie scoop or spoon to evenly distribute the crab mixture into the wonton cups.
  • Watch the Baking Time: Keep an eye on the wontons as they bake to avoid over-browning.

Variations & Substitutions

Feel free to customize your crab wontons with these variations:

  • Spicy Kick: Add a dash of hot sauce or a pinch of red pepper flakes to the crab mixture for some heat.
  • Cheesy Delight: Sprinkle a little grated Parmesan or mozzarella cheese on top of the crab mixture before baking.
  • Vegetarian Option: Substitute crab with finely chopped mushrooms or tofu for a vegetarian version.

Storage

If you have leftovers (which is rare!), store them in an airtight container in the refrigerator for up to 3 days. To reheat, place the wontons in a preheated oven at 350°F for about 5-7 minutes or until warmed through.

FAQ

Can I freeze crab wontons?

Yes, you can freeze them before baking. Arrange the filled wonton cups on a baking sheet, freeze until solid, then transfer to a freezer-safe bag. When ready to bake, add a few extra minutes to the baking time.

What can I serve with crab wontons?

Crab wontons pair well with a sweet chili sauce or soy sauce for dipping. They also complement a fresh side salad or a bowl of soup for a more substantial meal.

Nutrition

Each serving of crab wontons (2 pieces) contains approximately:

  • Calories: 120
  • Protein: 6g
  • Carbohydrates: 10g
  • Fat: 5g

Nutritional values are estimates and may vary based on specific products used.

Conclusion

These crab wontons are a delightful blend of savory flavors wrapped in a crispy wonton shell. Whether you’re reminiscing about family gatherings or creating new traditions, this recipe is sure to bring joy to your table. Easy to prepare and customize, crab wontons offer a touch of elegance to any occasion. Gather your loved ones, roll up your sleeves, and enjoy this delicious journey down memory lane. Happy cooking!

Related update: Crab Wontons

Related update: Baked Lemon~Lime Chicken Wings

Baked Scallops With Parma Ham | Made by Meaghan Moineau

Baked Scallops With Parma Ham

Intro

There’s something incredibly nostalgic about the aroma of seafood baking in the oven. It instantly transports me back to my childhood summers spent by the coast, where every meal was a celebration of the ocean’s bounty. One dish that particularly stands out in my memory is Baked Scallops With Parma Ham. The combination of tender scallops and the savory, slightly salty Parma ham is nothing short of divine. This dish has become a cherished staple in my family, especially during festive gatherings when we want to serve something special yet uncomplicated.

Why You’ll Love It

This recipe is perfect for both novice cooks and seasoned culinary enthusiasts. Here’s why:

  • Simple Ingredients: You don’t need a long list of exotic ingredients. Most items are pantry staples or easily available at your local market.
  • Quick to Prepare: With just a few simple steps, this dish can be ready in under 30 minutes, making it ideal for last-minute entertaining.
  • Elegant Presentation: The combination of golden-baked breadcrumbs and the rosy hue of Parma ham makes for a beautiful presentation that will impress your guests.
  • Flavorful and Satisfying: The savory notes of Parma ham complement the delicate sweetness of scallops, while the breadcrumbs add a delightful crunch.

Ingredients

  • Fresh big scallops
  • Parma ham
  • 1 garlic clove
  • Dried breadcrumbs
  • Parsley
  • Olive oil
  • 1 bell pepper

Instructions

  1. Preheat your oven to 410°F (210°C / T 7).
  2. In a food processor, combine the breadcrumbs, Parma ham, garlic clove, parsley, and 1 teaspoon of olive oil. Pulse until the mixture is finely chopped and well combined.
  3. Fold a piece of kitchen paper, pour 1 teaspoon of olive oil on it, and use it to grease an oven rack thoroughly.
  4. Place the fresh scallops on the greased rack, ensuring they are evenly spaced.
  5. Top each scallop with a generous spoonful of the Parma ham mixture.
  6. Drizzle a dash of olive oil over the top of the mixture to help it crisp up in the oven.
  7. Bake the scallops in the preheated oven for 8 minutes or until the topping is golden brown and the scallops are cooked through.
  8. Serve immediately, garnished with a few leaves of lamb’s lettuce or rocket if desired.

Tips

For the best results, use fresh, high-quality scallops. Ensure they are dry before topping with the Parma ham mixture to prevent them from becoming soggy. If you do not have a food processor, finely chop the ingredients by hand for a more rustic texture. Remember, the key to this dish’s success lies in its simplicity and the quality of its ingredients.

Variations & Substitutions

If Parma ham is not available, you can substitute it with prosciutto or another type of thinly sliced, cured ham. For an extra kick, add a pinch of red pepper flakes to the breadcrumb mixture. You can also experiment with herbs; basil or thyme can be excellent substitutes for parsley, offering a different yet delightful flavor profile.

Storage

While this dish is best enjoyed fresh, you can store any leftovers in an airtight container in the refrigerator for up to two days. To reheat, place the scallops in a preheated oven at 350°F (175°C) until warmed through. Avoid using a microwave, as it may cause the scallops to become rubbery.

FAQ

Can I use frozen scallops for this recipe?

Yes, you can use frozen scallops, but ensure they are completely thawed and patted dry before preparation to avoid excess moisture, which can affect the texture and cooking time.

What can I serve with baked scallops?

This dish pairs wonderfully with a light salad of mixed greens or a simple vegetable side such as sautéed asparagus or roasted bell peppers. The fresh, crisp textures complement the richness of the scallops perfectly.

Can I prepare the topping in advance?

Absolutely! You can prepare the breadcrumb mixture up to a day in advance and store it in the refrigerator. This makes it even more convenient if you’re planning to serve this dish at a dinner party.

Nutrition

This dish is a great source of lean protein, making it a healthy choice for a starter. Scallops are low in fat and calories, while the addition of olive oil provides heart-healthy fats. However, be mindful of portion sizes if you are watching your sodium intake, as cured meats like Parma ham can be high in salt.

Conclusion

Baked Scallops With Parma Ham is a dish that seamlessly blends elegance with simplicity. It’s a testament to the idea that sometimes less is more, allowing the natural flavors of the ingredients to shine. Whether you’re preparing for a quiet dinner at home or hosting a festive gathering, this recipe is sure to be a hit. I invite you to try it and perhaps create your own cherished memories around the dining table.

Related update: Baked Scallops With Parma Ham

Related update: Crab Wontons

Chavrie Caramelized Red Onion Tarts | Made by Meaghan Moineau

Chavrie Caramelized Red Onion Tarts

Intro

There’s something truly magical about the combination of sweet and savory flavors, and these Chavrie Caramelized Red Onion Tarts capture that magic perfectly. I remember the first time I tasted these delightful bites at a family gathering. My grandmother had just pulled them from the oven, and the rich, comforting aroma filled her cozy kitchen, mingling with laughter and stories from loved ones. With one bite, I was transported: the creamy goat cheese, the sweet caramelized onions, and the hint of tangy red grape jelly created an unforgettable flavor experience. That memory is what I hope to share with you today through this recipe.

Why You’ll Love It

These tarts are not just delicious; they are also incredibly easy to make and versatile. Whether you’re hosting a dinner party, looking for a unique appetizer for a holiday gathering, or simply want a special treat for yourself, these tarts will impress. The balance of flavors is impeccable, with the creamy goat cheese pairing beautifully with the sweet and tangy onion mixture.

Ingredients

  • 1 tablespoon vegetable oil
  • 2 tablespoons unsalted butter
  • 2 large red onions, minced
  • 2 tablespoons sugar
  • 2 tablespoons red grape jelly
  • 2 tablespoons red wine vinegar
  • 4 ounces goat cheese
  • Prepared tart shells

Instructions

  1. Heat the vegetable oil and butter over medium heat in a heavy-gauge skillet.
  2. Add the minced onions and cook until they’re translucent, about 10 minutes.
  3. Stir in the sugar, red grape jelly, and red wine vinegar.
  4. Continue cooking the mixture until it reaches a syrupy consistency, about 15 minutes, stirring occasionally.
  5. Remove from heat and allow the mixture to cool to room temperature.
  6. Place the tart shells on a baking tray and spoon 1 tablespoon of the onion mixture into each shell.
  7. Top each tart with a dollop of goat cheese.
  8. Bake in a preheated oven at 350°F (175°C) for 10-15 minutes, or until the tarts are warmed through and the goat cheese is slightly melted.
  9. Serve warm and enjoy!

Tips

Caramelizing onions can be a delicate process. Make sure to keep the heat at medium to avoid burning them. Stir frequently and be patient; the sweet, rich flavor is worth the time. If your onions start to stick, add a splash of water to deglaze the pan and continue cooking.

Variations & Substitutions

If you’re looking to switch things up, consider adding a sprinkle of fresh thyme or rosemary to the onion mixture for an herbal touch. For a different flavor profile, try using fig jam instead of grape jelly. If you or your guests are not a fan of goat cheese, a creamy brie or a sharp cheddar could also work well in this recipe.

Storage

These tarts are best enjoyed fresh, but if you have leftovers, store them in an airtight container in the refrigerator for up to 3 days. Reheat them in the oven at 300°F (150°C) for about 10 minutes before serving to regain their crispness and warmth.

FAQ

Can I make these tarts ahead of time?

Absolutely! You can prepare the onion mixture a day in advance and store it in the refrigerator. Assemble the tarts just before you’re ready to bake them for the best results.

What type of tart shells should I use?

Pre-made tart shells are convenient and work well for this recipe. Look for ones made from puff pastry for a flaky, buttery crust. You can also use phyllo dough or even make your own tart shells if time permits.

Can I freeze these tarts?

Yes, you can freeze the baked tarts. Allow them to cool completely, then wrap them tightly in plastic wrap and store in a freezer-safe bag. Reheat them directly from the freezer in a 350°F (175°C) oven for about 15-20 minutes.

Nutrition

Each tart contains approximately 150 calories, 8 grams of fat, 12 grams of carbohydrates, and 4 grams of protein. They are a delightful indulgence, so enjoy them in moderation as part of a balanced diet.

Conclusion

Chavrie Caramelized Red Onion Tarts are a delightful addition to any occasion. With their rich, savory-sweet flavor and elegant presentation, they are sure to impress your family and friends. I hope this recipe brings a touch of warmth and nostalgia to your table, just as it did for me all those years ago in my grandmother’s kitchen. Happy cooking!

Related update: Chavrie Caramelized Red Onion Tarts

Related update: Baked Scallops With Parma Ham

Pizza bites with pumpkin | Made by Meaghan Moineau

Pizza Bites with Pumpkin: A Delicious Twist on a Classic Favorite

Intro

Growing up, pizza nights were a cherished tradition in our family. The excitement of choosing toppings and watching the dough rise in the oven created an atmosphere of warmth and joy. As the weather turns cooler and pumpkins begin to adorn doorsteps, I am reminded of those cozy evenings shared with loved ones. Today, I’m thrilled to bring you a unique twist on a classic favorite—Pizza Bites with Pumpkin. This recipe combines the rich, earthy flavors of pumpkin with the savory goodness of cheese, creating a delightful treat that transports me right back to those beloved family gatherings.

Why You’ll Love It

These pizza bites are a perfect blend of nostalgia and innovation. They’re bite-sized, making them ideal for parties, snacks, or even a fun family meal. The addition of pumpkin adds a subtle sweetness that pairs beautifully with the savory cheeses and herbs. You’ll love how quick and easy this recipe is, and your guests will adore the surprise ingredient that makes these bites stand out. They’re also a great way to sneak in some extra veggies, making them a hit with both kids and adults alike.

Ingredients

  • Pumpkin
  • Olive oil
  • Feta cheese
  • Mozzarella cheese
  • Eggs
  • Dried oregano
  • Parsley
  • Garlic

Instructions

  1. Using a food processor, chop the pumpkin until it resembles rice-like granules.
  2. In a hot pan, sauté the pumpkin with olive oil for about 3 minutes, then set aside to cool.
  3. In a mixing bowl, combine feta and mozzarella cheeses. Add the eggs one at a time, mixing to combine.
  4. Add the cooled pumpkin and spices to the cheese mixture. Mix well until everything is well blended.
  5. Evenly spoon the mixture into the greased muffin tin molds.
  6. Press pizza dough down evenly and firmly in each mold. This step is crucial to ensure the bites stick together.
  7. Place in the oven and bake for 30 minutes at 200°C (392°F).
  8. Remove the pizza bites from the oven and let them set in the pan for 5-10 minutes before removing to cool completely. This step is important to prevent them from breaking apart.

Tips

To make your pizza bites even more flavorful, try using fresh herbs instead of dried ones. Fresh parsley and oregano can elevate the taste significantly. You can also add a pinch of chili flakes if you fancy a bit of heat. Remember, pressing the dough down firmly is essential to help the bites maintain their shape. Be patient and let them cool properly before removing from the molds.

Variations & Substitutions

If you’re looking to mix things up, try substituting the pumpkin with sweet potato for a different flavor profile. For a dairy-free version, you can use a vegan cheese substitute. Additionally, feel free to experiment with other herbs and spices that you love. Basil or thyme can be great alternatives to oregano and parsley.

Storage

These pizza bites can be stored in an airtight container in the refrigerator for up to 3 days. They can also be frozen for up to a month. If freezing, place them in a single layer on a baking sheet first, then transfer to a freezer-safe container once frozen. To reheat, simply pop them in the oven until warmed through.

FAQ

Can I make these pizza bites ahead of time?

Absolutely! You can prepare the mixture a day in advance and store it in the refrigerator. When ready to bake, simply spoon the mixture into the muffin tin molds and follow the baking instructions.

What can I serve with pizza bites?

These pizza bites pair wonderfully with a fresh green salad or a bowl of tomato soup. They’re also delicious on their own as a snack or appetizer.

Can I use canned pumpkin?

While fresh pumpkin is recommended for the best texture and flavor, canned pumpkin can be used in a pinch. Just make sure it’s not the pumpkin pie filling, as that contains added sugars and spices.

Nutrition

While the exact nutritional content will vary based on specific ingredient brands and quantities used, a typical serving of these pumpkin pizza bites is packed with protein from the cheese and eggs, and essential vitamins from the pumpkin. They provide a balanced snack option with a moderate amount of carbohydrates and fats.

Conclusion

Pizza Bites with Pumpkin are a delightful twist on a classic dish, bringing warmth and comfort to any occasion. They capture the essence of fall with their unique flavor combination and are sure to become a favorite in your household. I hope this recipe brings you as much joy and nostalgia as it has brought me. Happy cooking!

Related update: Pizza bites with pumpkin

Related update: Chavrie Caramelized Red Onion Tarts

Zucchini Ribbon Caper Salad | Made by Meaghan Moineau

Zucchini Ribbon Caper Salad

Intro

There’s something inherently magical about the simplicity of summer salads. Growing up, my grandmother’s garden was a vibrant tapestry of colors and textures, where we spent countless summer afternoons. Among her many garden treasures, zucchini was always in abundance, and she had a knack for turning it into the most delightful dishes. This Zucchini Ribbon Caper Salad is a tribute to those cherished moments—filled with fresh, crisp flavors reminiscent of sunny days spent in her backyard.

Why You’ll Love It

This Zucchini Ribbon Caper Salad is a symphony of flavors and textures that will captivate your taste buds. The crispness of the zucchini ribbons, the savory burst from the capers, and the aromatic dance of garlic and lemon zest create a dish that is both refreshing and satisfying. It’s an elegant addition to any meal, and its simplicity is matched only by its deliciousness. Perfect as a light appetizer or a side dish, this salad will become a staple in your culinary repertoire.

Ingredients

  • 2 medium zucchinis, thinly sliced into ribbons
  • 2 tablespoons capers
  • 1 clove garlic, minced
  • Zest of 1 lemon
  • 2 tablespoons olive oil
  • Salt and pepper to taste
  • 1 medium tomato, julienned
  • Dried parsley, for garnish

Instructions

  1. In a large bowl, toss the zucchini strips with the olive oil, lemon zest, lemon juice, garlic, salt, and pepper.
  2. Set aside and allow the mixture to marinate for 30 minutes. This step allows the flavors to meld beautifully and the zucchini to soften slightly.
  3. Divide the marinated zucchini between 2-3 plates.
  4. Top each serving with capers and julienned tomato.
  5. Drizzle any extra dressing over the salad, if desired.
  6. To garnish, sprinkle a pinch of dried parsley over each plate before serving.

Tips

For the best results, use fresh, firm zucchinis and a high-quality olive oil to enhance the flavor. A vegetable peeler or mandoline slicer works wonders for creating perfect zucchini ribbons. Remember to taste the salad before serving to ensure the seasoning is just right—sometimes a little extra lemon juice or a pinch of salt can make all the difference.

Variations & Substitutions

This salad is incredibly versatile, and you can easily adapt it to suit your tastes or what you have on hand:

  • Herbs: Fresh basil or mint can add a delightful twist to this salad. Simply chop and sprinkle over before serving.
  • Cheese: Add a sprinkle of feta or goat cheese for a creamy contrast to the crisp zucchini.
  • Olives: Substitute capers with chopped olives for a different kind of briny bite.

Storage

While this salad is best enjoyed fresh, you can store leftovers in an airtight container in the refrigerator for up to 2 days. Note that the zucchini may become more tender as it sits, but the flavors will continue to develop, making it even more delicious.

FAQ

Can I make this salad ahead of time?

Yes, you can prepare the salad up to a day in advance. Just keep the zucchini marinating in the refrigerator and add the capers and tomato just before serving to maintain their fresh texture.

What can I serve with this salad?

This salad pairs beautifully with grilled chicken, fish, or even a simple pasta dish. It’s also a lovely addition to a summer picnic or barbecue spread.

Is this salad vegan?

Yes, this Zucchini Ribbon Caper Salad is naturally vegan, making it a great choice for those following a plant-based diet.

Nutrition

This salad is not only delicious but also packed with nutrients. Zucchini is a low-calorie vegetable high in antioxidants, vitamin A, and fiber. The olive oil provides healthy fats, while the lemon and garlic contribute additional vitamins and immune-boosting properties.

Conclusion

Our Zucchini Ribbon Caper Salad is more than just a dish—it’s a celebration of fresh, vibrant flavors that bring a touch of brightness to any meal. Whether you’re looking to reminisce about summer days gone by or simply want to enjoy a nutritious, delightful salad, this recipe is sure to please. Gather your ingredients, embrace the simplicity, and savor the taste of summer with every bite. Enjoy!

Related update: Zucchini Ribbon Caper Salad

Related update: Mashed Potatoes with Garlic, Sage & Goat Cheese

Related update: Pizza bites with pumpkin

Related update: Traditional Panzanella

Perfect fish cakes | Made by Meaghan Moineau

Perfect Fish Cakes: A Hearty Homestyle Delight

Intro

There’s something about the aroma of fish cakes sizzling in a pan that instantly transports me back to my grandmother’s cozy kitchen. Every Sunday, she would whip up her famous fish cakes, and the entire family would gather around the table, eagerly waiting for the first bite. These tender, golden-brown cakes were more than just a meal; they were a tradition, a warm embrace on a plate. Today, I’m thrilled to share my version of her beloved recipe with you. These perfect fish cakes are easy to make, delightfully crispy on the outside, and melt-in-your-mouth tender on the inside. Whether you’re looking to recreate a nostalgic favorite or try something new, these fish cakes are sure to become a cherished addition to your recipe collection.

Why You’ll Love It

This recipe is a celebration of simple, fresh ingredients coming together to create something truly special. Here’s why you’ll love it:

  • Easy to prepare: With straightforward steps and minimal prep time, you can have these delicious fish cakes ready in no time.
  • Full of flavor: The combination of fresh herbs, zesty lemon, and a creamy homemade sauce makes these fish cakes incredibly flavorful.
  • Perfect for any occasion: Whether you’re serving them as a weeknight dinner or a party appetizer, these fish cakes are versatile and always impressive.
  • Nostalgic comfort food: These fish cakes bring a touch of home-cooked comfort to your table, reminiscent of cozy family gatherings and cherished memories.

Ingredients

  • 2 tablespoons mayonnaise
  • 1 tablespoon salted capers, rinsed and chopped
  • 1 tablespoon creamed horseradish
  • 1 tablespoon Dijon mustard
  • 1 shallot, finely chopped
  • 2 tablespoons parsley, chopped
  • 400g cod fillets
  • 2 bay leaves
  • 300ml milk
  • 300ml water
  • 400g potatoes, peeled and chopped
  • Salt, to taste
  • Zest of 1 lemon
  • 2 tablespoons fresh parsley, chopped
  • 2 tablespoons chives, finely chopped
  • Freshly ground pepper, to taste
  • Flour, for dusting
  • 1 large egg, beaten
  • 100g breadcrumbs
  • Sunflower oil, for frying
  • Lemon wedges, to serve

Instructions

  1. In a small bowl, mix together the mayonnaise, salted capers, creamed horseradish, Dijon mustard, shallot, and chopped parsley. Set aside.
  2. Place the cod fillets and bay leaves in a frying pan. Pour over the milk and water. Cover, bring to a boil, then lower the heat and simmer for 4 minutes. Remove from heat and let stand, covered, for 10 minutes to gently finish cooking the fish.
  3. Lift the fish out of the milk with a slotted spoon and place on a plate to cool. Discard the bay leaves.
  4. Meanwhile, in a separate pot, cook the potatoes in salted water for 10 minutes or until tender but not broken up. Drain and return them to the hot pan on the lowest heat, letting them dry out for 1 minute. Mash with a fork until light and fluffy.
  5. Remove potatoes from heat and stir in 1 tablespoon of the sauce, lemon zest, fresh parsley, pepper, and chives. Set aside.
  6. Drain any excess liquid from the fish, then flake it into large chunks and add to the mashed potatoes. Gently mix together with your hands until just combined, being careful not to break up the fish too much. Allow to cool.
  7. On a lightly floured board, shape the mixture into 4-6 cakes, each about 2.5 cm thick. Dip each cake in beaten egg, then coat with breadcrumbs.
  8. Transfer the cakes to a plate, cover, and chill for at least 30 minutes or up to a day ahead.
  9. Heat sunflower oil in a pan over medium heat. Fry the fish cakes for about 5 minutes on each side or until crisp and golden.
  10. Serve with the remaining sauce (add a squeeze of lemon zest to taste) and lemon wedges.

Tips

  • For extra crispiness, double-coat the fish cakes by repeating the egg and breadcrumb steps.
  • Ensure the oil is hot enough before frying to achieve the perfect golden crust.
  • Don’t overcrowd the pan while frying; work in batches if necessary.

Variations & Substitutions

Feel free to get creative with this recipe:

  • Fish: While cod is classic, you can also use haddock, salmon, or any firm white fish you prefer.
  • Herbs: Swap parsley and chives for dill or coriander for a different flavor profile.
  • Gluten-Free: Use gluten-free flour and breadcrumbs to accommodate dietary restrictions.

Storage

These fish cakes can be made ahead and stored in the refrigerator for up to 24 hours before frying. After cooking, store leftovers in an airtight container in the fridge for up to 3 days. To reheat, place them in a preheated oven at 180°C (350°F) for about 10 minutes or until heated through. These fish cakes also freeze well; just freeze before frying for up to 3 months.

FAQ

Can I use canned fish for this recipe?

Yes, you can use canned fish, such as salmon or tuna, as a convenient alternative. Just make sure to drain it well before mixing it with the potatoes.

What can I serve with these fish cakes?

These fish cakes pair beautifully with a fresh green salad, steamed vegetables, or a side of tartar sauce. For a heartier meal, serve them with rice or mashed potatoes.

How do I prevent the fish cakes from falling apart?

Ensuring the mixture is cool and not over-mixed will help the fish cakes hold their shape. Chilling them before frying also helps them maintain their form while cooking.

Nutrition

Each serving of these fish cakes is approximately 350 calories, with 15g fat, 35g carbohydrates, and 20g protein. They are a great source of omega-3 fatty acids, essential vitamins, and minerals.

Conclusion

These perfect fish cakes are more than just a meal; they are a tribute to cherished memories and the joy of sharing good food with loved ones. With their crispy exterior and tender, flavorful interior, they are sure to become a favorite in your home. I hope this recipe brings as much warmth and happiness to your table as it has to mine. Enjoy every bite!

Related update: Perfect fish cakes

Related update: All American Sloppy Joes

Traditional Panzanella | Made by Meaghan Moineau

Traditional Panzanella Recipe: A Taste of Italian Summer

Introduction

There’s something truly magical about the simplicity of Italian cuisine, and nothing epitomizes this more than the traditional Panzanella. I remember the first time I tasted this delightful Tuscan bread salad; it was a warm summer afternoon in Florence, sitting in a quaint trattoria with my grandmother. The vibrant colors of the fresh tomatoes, the aroma of basil, and the satisfying crunch of day-old bread soaked in olive oil and vinegar created an unforgettable symphony of flavors. This dish not only filled our bellies but also our hearts with cherished memories. I hope this recipe brings a little piece of Italy to your table and becomes a staple in your home, just as it has in mine.

Why You’ll Love It

Traditional Panzanella is a celebration of the freshest ingredients and the beauty of rustic cooking. Here’s why it’s sure to become a favorite:

  • Simple Ingredients: Made with just a handful of pantry staples and fresh produce, this recipe is all about quality ingredients shining through.
  • Quick and Easy: With minimal preparation and no cooking required, this dish is perfect for those hot summer days when you want something light yet satisfying.
  • Versatile and Adaptable: Easily customizable to suit your taste preferences, Panzanella is a great way to use up any leftover bread or vegetables you have on hand.
  • Healthy and Delicious: Packed with fresh vegetables and healthy fats from olive oil, it’s a nutritious option for any meal.

Ingredients

  • Six slices of day-old Tuscan bread
  • Extra virgin olive oil
  • Fresh basil leaves
  • One red onion
  • Red wine vinegar
  • Salt and pepper, to taste
  • Four ripe tomatoes

Instructions

  1. In a bowl, combine the bread with water and let it stand for at least 20 minutes or until it’s soft.
  2. Drain the bread and squeeze out as much water as you can. Crumble the bread and place it in a serving bowl.
  3. Scatter the tomatoes, onions, and chopped basil over the top of the bread.
  4. Dress the Panzanella with extra-virgin olive oil and vinegar. Season with salt and pepper and toss well.
  5. Taste and adjust the seasoning with more oil, salt, and vinegar according to your preference.
  6. Leave the Panzanella to stand for 15 minutes to allow the flavors to meld together. Serve at room temperature.

Tips

  • Choose the right bread: A rustic, crusty bread like Tuscan or sourdough works best. It should be slightly stale for the perfect texture.
  • Use the best tomatoes: Opt for ripe, juicy tomatoes for the best flavor. Heirloom varieties can add beautiful color and taste.
  • Let it rest: Allow the salad to sit for at least 15 minutes before serving to let the flavors meld.

Variations & Substitutions

Panzanella is incredibly adaptable, so feel free to make it your own:

  • Add protein: Include grilled chicken or tuna for a more substantial meal.
  • Incorporate more veggies: Cucumbers, bell peppers, or even olives can add extra flavor and texture.
  • Herb it up: Try adding parsley, oregano, or mint for a different aromatic profile.

Storage

Panzanella is best enjoyed fresh, but if you have leftovers, store them in an airtight container in the refrigerator for up to 2 days. Note that the bread will continue to absorb the dressing and may become softer. If you plan on making it ahead, keep the bread separate and combine just before serving.

FAQ

Can I use fresh bread instead of day-old bread?

While day-old bread is traditional and helps to achieve the right texture, you can use fresh bread in a pinch. Simply toast it lightly to dry it out before soaking.

Is there a gluten-free option for Panzanella?

Yes, you can make a gluten-free version by using gluten-free bread. Ensure the bread is sturdy enough to hold up to the soaking process.

Can I prepare Panzanella in advance?

It’s best to prepare Panzanella fresh to maintain the texture of the bread. However, you can chop the vegetables and prepare the dressing ahead of time, then combine just before serving.

Nutrition

This traditional Panzanella is a nutritious option that offers a balance of carbohydrates, healthy fats, and fresh vegetables. A typical serving provides approximately:

  • Calories: 250
  • Fat: 15g
  • Carbohydrates: 26g
  • Protein: 4g
  • Fiber: 3g

Conclusion

Traditional Panzanella is more than just a salad; it’s a testament to the beauty of simple, fresh ingredients coming together to create something extraordinary. Whether you’re enjoying it as a light lunch, a side dish, or a main course with added protein, this Tuscan classic is sure to delight your taste buds and transport you to a sun-drenched Italian countryside. Share it with loved ones, and create your own cherished memories around the table. Enjoy!

Related update: Traditional Panzanella

Related update: Zucchini Ribbon Caper Salad

Japanese Gyoza Pot Stickers | Made by Meaghan Moineau

Japanese Gyoza Pot Stickers

Intro

There’s something incredibly comforting about a plate of perfectly cooked gyoza, or Japanese pot stickers, their crispy bottoms contrasting with a tender, juicy filling. I remember visiting my grandmother’s house on weekends, the kitchen filled with the aromatic scent of sizzling gyoza. She would always let me assist, my small hands struggling to pleat the delicate wrappers just right. It was in those moments that I learned the art of cooking and the love that goes into each fold. Today, I’m excited to share this cherished recipe with you, bringing a piece of my childhood into your home.

Why You’ll Love It

This Japanese Gyoza recipe is a delightful blend of savory, spicy, and aromatic flavors. The combination of ground beef, cabbage, and spices wrapped in a delicate shell is truly irresistible. Whether you’re a seasoned cook or a beginner, these pot stickers are easy to make and perfect for any occasion. Plus, you can customize them with ingredients you love or have on hand!

Ingredients

  • 1/2 teaspoon black pepper
  • 2 cups finely chopped cabbage
  • 1 teaspoon chili sesame oil
  • 1/2 cup dried mushrooms, soaked in warm water and chopped
  • 2 teaspoons grated ginger root
  • 3 to 4 green onions, chopped
  • 1/2 pound ground beef
  • 2 tablespoons salad oil
  • 1 tablespoon sesame oil
  • 2 tablespoons Kikkoman soy sauce
  • 1 tablespoon cooking wine
  • Gyoza wrappers

Instructions

  1. Chop the cabbage finely, place it in a colander, and pour boiling water over it. Allow it to cool to the touch, then squeeze the cabbage well to remove excess water.
  2. In a large bowl, mix the cabbage, chopped green onions, chopped mushrooms, and grated ginger.
  3. In a separate bowl, combine the ground beef, cooking wine, soy sauce, sesame oil, and black pepper. Add this mixture to the bowl of vegetables and mix well.
  4. Place about 1 teaspoon of filling in the center of a gyoza wrapper. Fold the wrapper in half and pleat the edges to seal. If the edges don’t stick, dampen the inside edge with a little water, then pleat.
  5. Heat 2 tablespoons of salad oil in a large skillet over medium heat. Place the gyoza into the skillet, flat side down, and cook until the bottoms are golden brown.
  6. At the edge of the pan, carefully pour in a little water, up to 1/4 of the depth of the pot stickers. Cover the skillet, turn the heat to low, and simmer until the water has evaporated.

Tips

For best results, make sure to squeeze out as much water from the cabbage as possible to prevent the filling from becoming too wet. Also, when pleating the gyoza, try to make small, even pleats to ensure they cook uniformly and look appealing.

Variations & Substitutions

If you’re looking to switch things up, consider these variations:

  • Vegetarian: Replace the ground beef with finely chopped tofu or tempeh.
  • Spicy: Add a dash of chili flakes or a bit more chili sesame oil for an extra kick.
  • Different Proteins: Try ground pork or chicken instead of beef for a different flavor profile.

Storage

Leftover gyoza can be stored in an airtight container in the refrigerator for up to 3 days. To reheat, simply pan-fry them again to regain their crispy texture. You can also freeze uncooked gyoza for up to a month; just be sure to place them in a single layer on a baking sheet to freeze initially before transferring to a freezer bag.

FAQ

Can I use store-bought gyoza wrappers?

Absolutely! Store-bought gyoza wrappers are a convenient option and work perfectly for this recipe. Just be sure to keep them covered with a damp cloth to prevent them from drying out while you work.

How do I prevent the gyoza from sticking to the pan?

Make sure your pan is well-oiled and preheated before adding the gyoza. Adding water to the pan and covering it helps to steam the gyoza, which also prevents sticking. If they still stick, let them sit for a moment after cooking to allow them to release naturally.

Nutrition

While exact nutritional values can vary, each gyoza pot sticker typically contains around 70-80 calories, with a good balance of protein from the beef and vegetables. This makes them a tasty yet relatively light appetizer or main dish. For those watching their sodium intake, be mindful of the soy sauce content, or opt for a low-sodium version.

Conclusion

Japanese Gyoza Pot Stickers are a delightful treat that brings warmth and joy to any meal. Whether you’re making them for a family gathering, a dinner party, or simply to enjoy a taste of Japan at home, these pot stickers promise to be a hit. I hope this recipe brings the same joy to your kitchen as it has to mine. Happy cooking!

Related update: Japanese Gyoza Pot Stickers

Related update: Vegetarian Ratatouille

Candied Spiced Pecans | Made by Meaghan Moineau

Candied Spiced Pecans: A Sweet and Savory Delight

Intro

There’s something magical about the aroma of spiced pecans wafting through the house, especially during the holiday season. As a child, I remember my grandmother making batches of these delightful treats for family gatherings. The warmth of the spices combined with the sweetness of the sugar created an irresistible snack that had everyone reaching for more. Today, I’m excited to share this cherished recipe with you, hoping it brings as much joy to your home as it has to ours.

Why You’ll Love It

These Candied Spiced Pecans are a perfect blend of sweet and spicy, offering a crunchy texture that is as satisfying as it is delicious. Whether you’re looking for a quick snack, a topping for salads, or a thoughtful homemade gift, these pecans fit the bill. The combination of spices like cinnamon, cloves, and nutmeg, along with a hint of maple, makes them an irresistible treat that captures the essence of comfort and warmth.

Ingredients

  • 1 tsp allspice
  • 1/2 cup brown sugar
  • 2 tbsp butter
  • 1 tsp cinnamon
  • 1/2 cup granulated sugar
  • 1/4 tsp ground cloves
  • 1 tsp maple extract
  • 1/4 tsp nutmeg
  • 2 cups pecans
  • 1/4 cup water

Instructions

  1. Preheat your oven to 300°F (150°C). Line a cookie sheet with tin foil and coat it with cooking spray. Set aside.
  2. In a shallow bowl, sift together the granulated sugar, cinnamon, allspice, cloves, and nutmeg. Set aside.
  3. In a small bowl, whisk together the maple extract, brown sugar, and water.
  4. Over medium heat, melt the butter in a skillet. Slowly whisk in the brown sugar mixture and bring it to a boil.
  5. Add the pecans to the skillet and stir to coat them thoroughly. Simmer for about 1-2 minutes until well-coated.
  6. Using a slotted spoon, transfer the pecans to the reserved sugar and spice bowl. Coat the pecans evenly with the sugar mixture.
  7. Place the pecans evenly on the prepared cookie sheet and bake for 15 minutes. Stir the pecans and bake for an additional 15 minutes.
  8. Let the pecans cool completely before serving or storing.

Tips

For the best results, make sure to use fresh pecans. Older nuts can lose their natural oils and flavor. Be sure to stir the pecans halfway through the baking process to ensure even coating and roasting. Lastly, allow them to cool completely before storing to maintain their crispiness.

Variations & Substitutions

If you’re looking to switch things up, you can easily substitute walnuts or almonds for the pecans. For a spicier kick, consider adding a pinch of cayenne pepper to the spice mix. If maple extract isn’t available, vanilla extract works as a great alternative, providing a subtly different flavor profile.

Storage

Store your candied spiced pecans in an airtight container at room temperature. They should stay fresh for up to two weeks. You can also freeze them for longer storage, just be sure to let them thaw completely before serving to retain their crisp texture.

FAQ

Can I use salted butter for this recipe?

Yes, you can use salted butter, but it will slightly alter the flavor profile by adding a hint of saltiness. If you prefer to keep the recipe sweet, stick with unsalted butter.

How do I prevent the pecans from sticking together?

Ensure that the pecans are spread out evenly on the baking sheet and stirred halfway through the baking process. This will help prevent clumping and ensure each nut is evenly coated and roasted.

Can I make these pecans in advance?

Absolutely! These candied spiced pecans are perfect for making ahead of time. Just store them in an airtight container as mentioned, and they’ll be ready for any occasion.

Nutrition

While these candied spiced pecans are a treat, they’re also packed with nutrients. Pecans are a great source of healthy fats, fiber, and protein. However, due to the sugar content, it’s best to enjoy them in moderation as part of a balanced diet.

Conclusion

These Candied Spiced Pecans are not just a treat; they’re a tradition that brings warmth and joy to any occasion. Easy to make and incredibly versatile, they’re sure to become a favorite in your home, just as they have in ours. I hope this recipe inspires you to create delicious memories with your loved ones. Enjoy!

Related update: Candied Spiced Pecans

Related update: Medenjaci – Croatian Honey Spice Cookies

Related update: Japanese Gyoza Pot Stickers

Watercress Salad With Miso-Lime Dressing | Made by Meaghan Moineau

Watercress Salad With Miso-Lime Dressing

Intro

There’s something about the crisp, refreshing bite of a fresh salad that can transport you to a summer day, no matter what the season. This Watercress Salad with Miso-Lime Dressing is not just a dish; it’s a journey back to the lush gardens of my childhood. I fondly remember visiting my grandmother’s garden every summer. Her garden was abundant with vibrant greens, each leaf kissed by the sun. Among the rows of vegetables and herbs, watercress was always my favorite. The spicy, peppery leaves were irresistible, and I would often sneak a handful to munch on while she wasn’t looking. It’s no surprise that watercress remains a beloved ingredient in my kitchen. This recipe is inspired by those summers, combining the freshness of garden greens with a tangy miso-lime dressing that brings everything together in a perfect harmony of flavors.

Why You’ll Love It

This salad is a celebration of flavor and texture. It’s not just a salad; it’s an experience. Here’s why you’ll fall in love with it:

  • Fresh and Nutritious: Packed with vibrant greens and crunchy vegetables, this salad is a powerhouse of nutrients.
  • Easy to Make: With simple steps and readily available ingredients, you can whip this salad up in no time.
  • Flavorful Dressing: The Miso-Lime Dressing is the star, offering a perfect balance of tangy, sweet, and savory flavors.
  • Versatile: Great as a side dish or a light meal, and easily customizable to suit different tastes and dietary needs.

Ingredients

  • Fresh sprouts
  • Fresh mung bean sprouts
  • Entire green onions, sliced
  • Grape tomatoes, halved
  • Diced orange bell pepper
  • Cilantro, chopped
  • Sesame seeds
  • Watercress leaves
  • Miso-lime dressing (recipe follows)
  • Fresh squeezed lime juice
  • Sesame oil
  • White miso

Instructions

  1. In a large bowl, toss together the fresh sprouts, mung bean sprouts, sliced green onions, grape tomatoes, diced orange bell pepper, chopped cilantro, and sesame seeds.
  2. In a small bowl, whisk together the fresh squeezed lime juice, sesame oil, and white miso to create your Miso-Lime Dressing.
  3. Pour the dressing over the mixed sprouts and vegetables in the large bowl. Toss until everything is evenly coated.
  4. Divide the watercress leaves evenly among four plates, creating a bed for the salad.
  5. Top each plate with the mixed sprout salad, evenly distributing the Miso-Lime Dressing among them.
  6. Serve immediately and enjoy the delicious flavors!

Tips

  • Choose Fresh Ingredients: Fresh, high-quality ingredients make all the difference. Look for crisp, vibrant watercress and sprouts for the best flavor and texture.
  • Miso-Lime Dressing Consistency: Adjust the dressing’s consistency by adding a little water if it’s too thick or more lime juice for extra tang.
  • Toast the Sesame Seeds: For an added depth of flavor, lightly toast the sesame seeds before adding them to the salad.

Variations & Substitutions

Feel free to make this salad your own by experimenting with different ingredients and flavors:

  • Protein Boost: Add grilled chicken, shrimp, or tofu for a more filling meal.
  • Nutty Flavor: Swap sesame seeds for toasted almonds or pine nuts for a different crunch.
  • Spicy Kick: Add a dash of chili flakes or sliced jalapeños for some heat.
  • Other Greens: If watercress is unavailable, arugula or baby spinach make excellent substitutes.

Storage

This salad is best enjoyed fresh, but if you have leftovers, store them in an airtight container in the refrigerator for up to two days. Keep the dressing separate if you plan to store the salad for later, to prevent the greens from wilting.

FAQ

Can I make the dressing ahead of time?

Absolutely! The Miso-Lime Dressing can be made in advance and stored in the fridge for up to a week. Just give it a good shake or stir before using.

Is this salad vegan-friendly?

Yes, this salad is naturally vegan. Just ensure that all your ingredients, especially the miso, are vegan-certified if you follow a strict vegan diet.

Can I use another type of miso?

White miso is recommended for its mild flavor, but if you prefer a stronger taste, yellow or red miso can be used. Keep in mind that they will affect the overall flavor of the dressing.

Nutrition

This refreshing salad is not only delicious but also packed with nutrients. Watercress is a superfood rich in vitamins A, C, and K, while the sprouts provide a good source of protein and fiber. The Miso-Lime Dressing adds a healthy dose of probiotics thanks to the fermented miso, making this dish both tasty and nourishing.

Conclusion

Whether you’re looking to add more greens to your diet or simply searching for a delightful salad to brighten up your meals, this Watercress Salad with Miso-Lime Dressing is a fantastic choice. With its refreshing flavors, easy preparation, and health benefits, it’s a dish that you’ll want to make again and again. I hope this salad brings a bit of the garden’s joy to your table, just as it does to mine. Enjoy every crunchy, flavorful bite!

Related update: Watercress Salad With Miso-Lime Dressing

Related update: Yorkshire Pudding

Related update: Traditional Panzanella

Agedashi Tofu | Made by Meaghan Moineau

Agedashi Tofu: A Crispy Delight with a Silken Heart

Intro

There’s something magically comforting about a perfectly prepared dish of Agedashi Tofu. I remember the first time I encountered this delightful appetizer at a cozy Japanese restaurant tucked away in a busy Tokyo street. The warmth of the tofu, crisp on the outside and soft within, felt like a welcoming embrace. As the waiter set down the plate, the steam rose into the air, carrying the tantalizing aroma of fried goodness mixed with a hint of the savory hoisin sauce. That experience is forever etched in my memory as a moment of pure culinary joy. Today, I’m excited to share with you a simple yet authentic recipe for Agedashi Tofu, allowing you to recreate this beautiful dish in your own kitchen.

Why You’ll Love It

Agedashi Tofu is a dish that truly delights the senses. Its crispy exterior gives way to a soft, creamy interior, creating a contrast that’s both exciting and comforting. The sprinkle of fresh green onions adds a burst of color and a fresh, zesty flavor that complements the rich hoisin sauce perfectly. This recipe is straightforward and quick to prepare, making it an excellent choice for both weekday dinners and special occasions. Whether you’re a seasoned tofu lover or new to this versatile ingredient, this dish is sure to win you over.

Ingredients

  • 1 block silken tofu
  • Cornstarch, for dredging
  • Oil, for frying
  • 2 green onions, finely chopped
  • Hoisin sauce, for drizzling

Instructions

  1. Cut the tofu into 12 equal-sized cubes, handling gently to avoid breaking.
  2. Place the cornstarch on a plate or in a shallow bowl. Dredge each tofu cube in the cornstarch, ensuring all sides are coated thoroughly.
  3. In a medium-sized frying pan, heat enough oil so that the tofu cubes will be half-submerged when placed in the pan. The oil should be hot but not smoking.
  4. Fry the tofu cubes in the hot oil for 3 to 5 minutes on each side, or until they are golden brown and crispy. Avoid overcrowding the pan to ensure even frying.
  5. Once fried, remove the tofu cubes and let them drain on paper towels to remove excess oil.
  6. Place the tofu cubes on a serving dish. Sprinkle the chopped green onions over the top and drizzle with hoisin sauce.
  7. Serve immediately while the tofu is still warm and crispy.

Tips

For the best results, use silken tofu, which provides a creamy texture that contrasts beautifully with the crispy exterior. Be gentle when handling the tofu to keep it from breaking apart. Ensure your oil is hot enough to achieve that perfect crispiness without absorbing too much oil. A quick test is to drop a small piece of tofu into the oil; if it sizzles and rises to the surface, the oil is ready.

Variations & Substitutions

If you’re looking to add a twist to this classic dish, consider these variations:

  • Spicy Kick: Add a dash of chili oil or sprinkle some red pepper flakes on the tofu for a spicy version.
  • Gluten-Free: Substitute the hoisin sauce with a gluten-free alternative or tamari sauce.
  • Extra Flavor: Add a splash of soy sauce or ponzu to the hoisin for additional depth of flavor.

Storage

Agedashi Tofu is best enjoyed fresh for maximum crispiness. However, if you have leftovers, store them in an airtight container in the refrigerator for up to two days. Reheat in a hot pan with a little oil to restore some of the crispiness before serving. Avoid microwaving as it can make the tofu soggy.

FAQ

Can I use firm tofu instead of silken tofu?

While the recipe traditionally uses silken tofu for its creamy texture, you can use firm tofu if you prefer a slightly denser texture. The cooking method remains the same, but you might find the firm tofu easier to handle without breaking.

What oil is best for frying tofu?

Use a neutral oil with a high smoke point, such as vegetable oil, canola oil, or peanut oil. These oils will ensure your tofu crisps up nicely without imparting any unwanted flavors.

Is hoisin sauce necessary, or can I use something else?

Hoisin sauce adds a sweet and savory flavor that complements the tofu well. However, if you prefer a different taste, you can use soy sauce, teriyaki sauce, or even a splash of your favorite dipping sauce to customize the dish to your liking.

Nutrition

This delightful dish is not only tasty but also relatively low in calories, especially when compared to other fried foods. Tofu is a great source of protein and contains essential amino acids. It also provides iron, calcium, and other important minerals, making it a nutritious choice for vegetarians and meat-eaters alike. The key to keeping this dish healthy is to enjoy it in moderation and to thoroughly drain the tofu after frying to remove excess oil.

Conclusion

Agedashi Tofu is a beloved dish in Japanese cuisine, celebrated for its textural contrast and simple yet satisfying flavors. By following this recipe, you can bring a taste of Japan into your home and share a dish that’s sure to become a favorite at your dining table. Whether you’re reminiscing about a past trip or creating new memories with loved ones, this Agedashi Tofu recipe is a warm, inviting choice that promises to delight with every crispy bite. Enjoy!

Related update: Agedashi Tofu

Italian Tomato and Mozzarella Caprese | Made by Meaghan Moineau

Italian Tomato and Mozzarella Caprese

Intro

There’s something truly magical about the simplicity of Italian cuisine. The first time I tasted a Caprese salad was during a family trip to the Amalfi Coast. We were dining al fresco at a quaint little restaurant with views of the sparkling Mediterranean Sea. The sun was setting, casting a golden hue over everything, and the air was rich with the scent of fresh basil and ripe tomatoes. Every bite of that Caprese was an explosion of freshness and flavor, and I’ve been in love with this dish ever since.

Why You’ll Love It

The Italian Tomato and Mozzarella Caprese is a celebration of fresh, high-quality ingredients. It’s a dish that requires minimal preparation but delivers maximum flavor. This easy-to-make salad is perfect for any occasion, whether you’re hosting a summer barbecue, looking for a quick appetizer, or simply craving a taste of Italy. The combination of juicy vine-ripened tomatoes, creamy mozzarella, and fragrant basil, all drizzled with balsamic vinegar and olive oil, is nothing short of divine.

Ingredients

  • Fluid balsamic vinegar
  • Black pepper
  • Fresh basil leaves
  • Kosher salt
  • Olive oil
  • Dry sprinkle of oregano leaves
  • Fresh whole-milk mozzarella
  • Vine-ripened tomatoes

Instructions

  1. On a large platter, arrange sliced tomatoes and drizzle with balsamic vinegar.
  2. Place one basil leaf on top of each tomato slice.
  3. Slice mozzarella and place on top of basil leaves.
  4. Sprinkle oregano, salt, and black pepper on cheese and drizzle with the olive oil.

This recipe yields 4 servings.

Tips

To make the most of your Caprese salad, ensure that your ingredients are as fresh as possible. Look for bright red, firm tomatoes and fresh mozzarella that is soft and slightly springy to the touch. Use high-quality olive oil and balsamic vinegar to enhance the flavors. Remember, the key to a perfect Caprese is balance, so adjust the seasoning to your taste.

Variations & Substitutions

While the classic Caprese is delightful on its own, there are several ways you can mix things up:

  • Avocado: Add slices of ripe avocado for a creamy twist.
  • Pesto: Drizzle a little pesto over the top for an extra burst of basil flavor.
  • Prosciutto: For a heartier salad, add thin slices of prosciutto.
  • Buffalo Mozzarella: Substitute traditional mozzarella with buffalo mozzarella for a richer taste.

Storage

Caprese salad is best enjoyed fresh. However, if you have leftovers, store them in an airtight container in the refrigerator for up to 24 hours. Note that the tomatoes may release some juice, which can affect the texture of the salad. It’s a dish that shines in its freshness, so try to prepare only as much as you plan to eat.

FAQ

Can I make Caprese salad ahead of time?

While it’s best to assemble the salad just before serving, you can prepare the individual components a few hours ahead. Slice the tomatoes and mozzarella and store them separately in the refrigerator. Assemble the salad when you’re ready to serve.

What can I serve with Caprese salad?

Caprese salad is wonderfully versatile and can be served alongside grilled meats, pasta dishes, or crusty bread. It’s also a great addition to a charcuterie board.

Is Caprese salad healthy?

Yes, Caprese salad is a healthy choice. It’s packed with nutrients from the tomatoes and basil, and the mozzarella provides protein and calcium. Just be mindful of the olive oil and cheese if you’re watching your calorie intake.

Nutrition

Each serving of Caprese salad contains approximately:

  • Calories: 250
  • Protein: 12g
  • Fat: 20g
  • Carbohydrates: 8g
  • Fiber: 2g
  • Sugar: 6g

Conclusion

The Italian Tomato and Mozzarella Caprese is more than just a salad; it’s a tribute to the beauty of simple, fresh ingredients. Whether you’re reminiscing about a past Italian getaway or just looking to bring a taste of Italy to your table, this Caprese salad is sure to delight your taste buds. Enjoy each layer, each flavor, and let it transport you to a sun-drenched terrace overlooking the Mediterranean. Buon appetito!

Related update: Italian Tomato and Mozzarella Caprese

Related update: Arame Edamame Cucumber Salad

Related update: Agedashi Tofu

Red, White, and Blue Fruit Salsa | Made by Meaghan Moineau

Red, White, and Blue Fruit Salsa

Intro

There’s something undeniably nostalgic about summer gatherings. The aroma of freshly cut grass, children playing in the backyard, and the delightful chatter of family and friends create an atmosphere that’s hard to beat. One of my fondest memories is of July 4th celebrations at my grandmother’s house. The highlight for me was always the vibrant and refreshing fruit salsa she would make. Her recipe has been passed down to me, and today, I’m thrilled to share this Red, White, and Blue Fruit Salsa with you. It’s a dish that not only celebrates the colors of our flag but also captures the essence of those cherished summer days.

Why You’ll Love It

This Red, White, and Blue Fruit Salsa is a perfect blend of sweet and tangy flavors that will have your taste buds dancing. It’s incredibly easy to make, requiring just a handful of ingredients and minimal preparation time. Whether you’re hosting a summer barbecue, a patriotic holiday party, or simply craving a light and refreshing snack, this salsa is sure to impress. Plus, it’s a healthy alternative to traditional chips and dip, making it a hit with health-conscious guests.

Ingredients

  • 1 cup blueberries
  • 1 cup diced strawberries
  • 1/2 cup sweetened shredded coconut
  • 2 tablespoons lime juice
  • 2 tablespoons strawberry jam
  • Freedom Chips (to serve)

Instructions

  1. In a medium-sized bowl, combine the blueberries, diced strawberries, and sweetened shredded coconut. Gently mix them to ensure an even distribution.
  2. Add the lime juice and strawberry jam to the berry mixture. Stir well until all the ingredients are thoroughly combined.
  3. Cover the bowl with plastic wrap or a lid and refrigerate for at least an hour. This allows the flavors to meld together beautifully.
  4. Once chilled, serve the fruit salsa as an appetizer with Freedom Chips. Enjoy the burst of flavors and the delightful crunch of the chips.

Tips

For the best results, use fresh and ripe berries. Their natural sweetness will enhance the overall flavor of the salsa. If you want to add a bit of spice, consider sprinkling a pinch of chili powder or cayenne pepper into the mix for a subtle kick. Always taste the salsa before serving, as you may want to adjust the lime juice or jam to suit your personal preference.

Variations & Substitutions

Feel free to get creative with this recipe! You can substitute raspberries or blackberries for the blueberries if you prefer a different berry flavor. If you’re not a fan of coconut, try using finely chopped mint leaves instead for a refreshing twist. For a healthier option, use unsweetened shredded coconut. You can also experiment with different jams, such as raspberry or apricot, to change up the flavor profile.

Storage

Store any leftover salsa in an airtight container in the refrigerator for up to three days. Keep in mind that the berries might release some juice over time, so give the salsa a good stir before serving again. Unfortunately, this salsa does not freeze well due to the high water content of the fruit.

FAQ

Can I make this salsa ahead of time?

Absolutely! In fact, making it a day ahead can enhance the flavors even more. Just be sure to store it in the refrigerator and give it a good stir before serving.

What are Freedom Chips?

Freedom Chips are simply tortilla chips, but with a playful and patriotic twist. You can use any brand or make your own at home by cutting tortillas into your desired shape and baking or frying them until crispy.

Is there a way to make this salsa more savory?

Yes! You can add diced avocado, chopped cilantro, or a small amount of finely diced red onion to introduce savory elements to the salsa. These additions will complement the sweetness of the berries beautifully.

Nutrition

This fruit salsa is a nutritious choice, packed with vitamins and antioxidants from the fresh berries. It’s low in calories and contains healthy fats from the coconut. While the exact nutritional content will vary based on portion sizes, you can generally expect a serving to be low in fat and high in vitamin C, making it a guilt-free treat.

Conclusion

Red, White, and Blue Fruit Salsa is more than just a dish; it’s a celebration of summer and all the vibrant flavors it brings. Whether you’re reminiscing about past family gatherings or creating new memories, this salsa is sure to be a hit. Its simplicity, flexibility, and delightful taste make it a must-try for any occasion. So gather your loved ones, prepare this refreshing salsa, and let the festivities begin!

Related update: Red, White, and Blue Fruit Salsa

Related update: Italian Tomato and Mozzarella Caprese