How to Cook Sweet Potatoes on the Grill | Made by Meaghan Moineau

How to Cook Sweet Potatoes on the Grill | Made by Meaghan Moineau

Title: Grilled Sweet Potatoes: A Nostalgic Twist on a Classic Comfort Food
Description: Discover the joy of grilling sweet potatoes with our simple, flavor-packed recipe. Perfect for family gatherings, this dish is sure to evoke cherished memories while delighting your taste buds.

---


Grilled sweet potatoes aren't just a delicious treat; they're a bridge connecting us to memories of family gatherings and sun-kissed afternoons. Simple yet profound, this dish embodies the art of transforming humble ingredients into something truly special. In this post, I'll guide you through the process of making this delightful dish while sharing a nostalgic story that makes it even more personal.


Ingredients


- Sweet potatoes


- Butter


- Cinnamon


Instructions


1. Preheat and Prepare: Heat your grill to 350 degrees. The sweet aroma of cinnamon and butter will soon fill the air, creating an inviting atmosphere for family and friends.
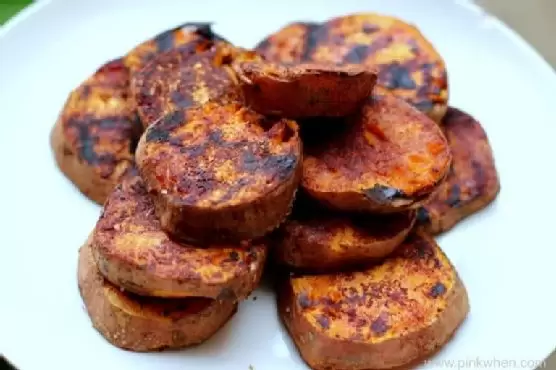
2. Slice and Season: Slice the sweet potatoes into 1-inch rounds. Spray both sides generously with butter before sprinkling them with cinnamon. This combination of flavors is utterly irresistible.
3. Grill to Perfection: Place a sheet of foil over the grilling grates to prevent sticking, and lay your sweet potato rounds directly onto the foil. Spray them once more with butter for that golden, crispy finish.
4. Cook with Care: Close the grill lid and let the sweet potatoes cook for about 30 minutes. To ensure they cook evenly, turn and flip the slices every 10 minutes, adding a touch more butter each time.

A Trip Down Memory Lane


Growing up, grilling sweet potatoes was more than just a culinary activity; it was a ritual that brought our family together. Every summer, we'd gather in the backyard, where my grandparents had set up the old grill under the shade of a sprawling oak tree. The air was always filled with laughter and the comforting scent of cinnamon wafting from the grill.


One particular summer afternoon stands out in my memory. My grandmother, with her gentle hands and warm smile, showed me how to slice the sweet potatoes just right. As the grill sizzled, she recounted stories of her youth, of how this simple dish had been a staple during family picnics. The tales of yesteryear, woven with love and nostalgia, added an extra layer of warmth to our meal.


It was during these moments that I learned the true magic of food—it has the power to connect us to our past, to the people we've loved and the memories we've cherished. Every time I grill sweet potatoes, I am transported back to those sun-dappled afternoons, surrounded by family, enveloped in love.


Difficulty Rating: 3/10


This recipe is wonderfully straightforward, perfect for beginners and seasoned grillers alike. Its simplicity allows the natural sweetness of the potatoes to shine, enhanced by the buttery cinnamon glaze.


Classification: Appetizer


While grilled sweet potatoes can certainly serve as a delightful side dish or even a light main course, their sweet and savory profile makes them an ideal appetizer. They set the stage for a meal that's both comforting and memorable.


---


Grilled sweet potatoes are more than just a dish; they're a celebration of family, of cherished memories, and of the joy found in simple pleasures. So, fire up the grill and let this recipe guide you on a delicious journey down memory lane.

Read more about Appetizers

Read more about Main Dishes

Read more about Desserts

Mediterranean Orzo Salad | Made by Meaghan Moineau

Mediterranean Orzo Salad | Made by Meaghan Moineau

Title: A Taste of the Mediterranean: Elevate Your Culinary Skills with a Zesty Orzo Salad
Description: Discover the vibrant flavors of the Mediterranean with our delightful Orzo Salad. This easy-to-follow recipe brings together fresh vegetables, aromatic herbs, and tangy feta for a refreshing meal that will transport your taste buds to sun-soaked shores. Dive into a nostalgic family memory that adds a personal touch to this culinary adventure.

---


There’s something magical about a dish that can transport you to a different place with just one bite. Our Mediterranean Orzo Salad does precisely that, capturing the essence of the sun-drenched Mediterranean region. This recipe combines fresh ingredients like orzo, crisp vegetables, and fragrant herbs, creating a symphony of flavors that’s both refreshing and satisfying.


Ingredients:


- Orzo


- Kosher salt


- Pine nuts


- Extra virgin olive oil (EVOO)


- Green onions


- Italian parsley


- Lemon zest


- Diced cucumber


- Green bell pepper


- Cherry tomatoes


- Red onion


- Pepperoncinis


- Feta cheese


- Red wine vinegar


Instructions:


1. Cook the Orzo: Begin by bringing a pot of water to a rapid boil. Generously salt the water and cook the orzo until tender, approximately 7-9 minutes. Drain and set aside to cool.
2. Toast the Pine Nuts: While the orzo is cooking, spread pine nuts on a baking sheet and toast lightly in the oven at 400°F. Once golden brown, remove from the oven and set aside.
3. Saute Aromatics: Heat two tablespoons of EVOO in a non-stick pan over medium heat. Sauté the chopped green onions for about 2 minutes. Add the parsley, lemon juice, lemon zest, toasted pine nuts, and cooked orzo. Sauté for an additional 3-4 minutes to allow the flavors to meld and absorb into the orzo. Remove from heat.
4. Combine Ingredients: In a large bowl, mix the sautéed orzo with diced cucumber, green bell pepper, cherry tomatoes, red onion, and pepperoncinis. Add the crumbled feta cheese, red wine vinegar, and the remaining six tablespoons of EVOO. Mix well to ensure all ingredients are evenly distributed.
5. Serve: This versatile dish can be refrigerated to let the flavors intensify or served immediately, perfectly fresh and vibrant.

Nostalgic Family Memory:


As I prepare this Mediterranean Orzo Salad, I’m flooded with memories of summer picnics by the sea with my family. Every year, we’d gather at my grandmother’s beach house, where the ocean breeze would mingle with the delicious aromas of her cooking. This salad was always the centerpiece of our picnic table, a dish that brought everyone together. My grandmother would laugh as she watched us devour it, her eyes twinkling with joy. To this day, each bite of this salad reminds me of those sun-drenched afternoons filled with laughter, love, and the simple pleasures of life.


Difficulty: 4/10


This Mediterranean Orzo Salad is straightforward to make, making it a perfect recipe for cooks of all levels. It’s a dish that allows you to enjoy the process and the result, without the stress of complicated techniques or hard-to-find ingredients.


Classification: Appetizer


This vibrant and flavorful salad is perfect as an appetizer, setting the stage for a delightful Mediterranean meal. Its refreshing taste and colorful presentation make it a standout dish that’s sure to impress your guests.


---


Embrace the flavors of the Mediterranean and bring a touch of sunshine to your table with this Mediterranean Orzo Salad. Whether it’s a cherished family gathering or a simple meal for yourself, this dish promises a journey of taste and nostalgia.

Read more about Appetizers

Read more about Main Dishes

Read more about Desserts

Sweet and Spicy Nuts | Made by Meaghan Moineau

Sweet and Spicy Nuts | Made by Meaghan Moineau

Title: "Sweet and Spicy Nuts: A Nostalgic Twist on a Classic Treat"
Description: Discover the delightful blend of flavors with our Sweet and Spicy Nuts recipe—an easy-to-make treat that perfectly balances sweetness with a hint of heat. This appetizer is more than just a snack; it's a journey down memory lane infused with family love and warmth. Ideal for any occasion, this recipe is sure to become a favorite in your household.

---


There's something magical about the aroma of spices wafting through a bustling kitchen. For me, it brings back cherished memories of my grandmother's cozy home during the holiday season. The Sweet and Spicy Nuts recipe is more than just a delectable treat; it's a nostalgic nod to those heartwarming times spent with family.


Ingredients:

- 2 tablespoons butter


- 1/2 teaspoon cayenne pepper


- 1/2 teaspoon ground cinnamon


- 1/2 teaspoon ground cumin


- 1/4 cup light brown sugar


- 2 cups mixed nuts (such as walnuts)


- 1/2 teaspoon salt


- 1 tablespoon water


Instructions:
1. Prepare the Spice Mix: In a small bowl, mix together the ground cumin, cayenne pepper, ground cinnamon, and salt. Set this aromatic blend aside for later.
2. Toast the Nuts: Heat a large dry skillet over medium heat. Add the mixed nuts and cook, stirring frequently, until they begin to toast, about 4 minutes. The nuts should be fragrant and just starting to brown. Transfer them to a small bowl and set aside.
3. Create the Glaze: In the same skillet, add the butter, light brown sugar, water, and the prepared spice mix. Cook, stirring constantly, until a rich glaze forms, about 1 minute.
4. Combine and Cook: Return the toasted nuts to the skillet. Toss them with the glaze until fully coated. Cook for an additional 1 to 2 minutes until the nuts are beautifully glazed and golden brown.
5. Cool and Store: Remove the nuts from the heat and transfer them to a baking sheet lined with aluminum foil. Use a fork to separate the nuts, ensuring they don't clump together. Let them cool for about 10 minutes until the sugar hardens. Store the nuts in an airtight container to maintain their irresistible crunch.
Nostalgic Family Memory:

Growing up, the holiday season at Grandma's house was always a highlight. Her kitchen was the heart of the home, where laughter blended seamlessly with the sounds of sizzling pans and clinking utensils. One of my fondest memories is sitting at the counter, eyes wide and eager, as she prepared her special Sweet and Spicy Nuts. She would let me help with mixing the spices—a task I took very seriously as a child.


Once the nuts were done, we'd sit together by the fireplace, sharing stories and snacking on the warm, freshly glazed nuts. The combination of sweet, spicy, and earthy flavors was, and still is, a testament to her culinary magic. This recipe, passed down through generations, continues to be a staple in our family gatherings, ensuring that Grandma's spirit lives on in every bite.


Difficulty Rating: 3 out of 10
Classification: Appetizer

Whether you're looking to add a little spice to your next gathering or simply want to indulge in a tasty treat, these Sweet and Spicy Nuts are a must-try. Perfect for sharing or savoring alone with a cherished memory, they bring a touch of warmth and nostalgia to any moment.

Read more about Appetizers

Read more about Main Dishes

Read more about Desserts

Avocado-Mango Salad With Grilled Shrimp | Made by Meaghan Moineau

Avocado-Mango Salad With Grilled Shrimp | Made by Meaghan Moineau

Title: A Taste of Summer: Avocado-Mango Salad with Grilled Shrimp
Description: Dive into the vibrant flavors of summer with our Avocado-Mango Salad with Grilled Shrimp. This delightful dish combines the creamy richness of Hass avocados with the sweet juiciness of mango and the savory succulence of grilled shrimp. A perfect blend of freshness and zest, this salad is ideal for a light lunch or a stunning appetizer at your next gathering. Follow along as we explore this recipe that's not only a treat for the taste buds but also a cherished family tradition.

---


A Journey Through Flavors: Avocado-Mango Salad with Grilled Shrimp

The sun was setting on a warm summer evening, the sky painted with hues of orange and pink, as my family gathered around the patio table. This scene repeats itself in my memory every time I prepare our beloved Avocado-Mango Salad with Grilled Shrimp. It was a dish my grandmother introduced to us during one of those lazy summer days when the air was thick with the scent of blooming jasmine, and laughter echoed through the backyard.


Ingredients:

- 1 lb shrimp, peeled and deveined


- 2 ripe Hass avocados, diced


- 1 cup diced mango


- Lime wedges for serving


- 2 tbsp red wine vinegar


- 2 tbsp fresh lime juice


- 1 tsp freshly grated ginger


- 1 tsp sugar


- 1 tsp Dijon mustard


- 1/4 cup canola oil


- 1/4 cup chopped cilantro


- 1 tsp lime zest


- 1 small diced habanero chile (optional for heat)


- 1/2 cup thinly sliced red onion


- Black salt and pepper to taste


Instructions:
1. Prepare the Grill: Preheat your gas grill to high. The robust flavors of grilled shrimp are the star of this dish, and a hot grill ensures they cook to perfection.
2. Marinate the Shrimp: In a bowl, combine red wine vinegar, fresh lime juice, ginger, sugar, and Dijon mustard. Slowly whisk in canola oil until emulsified. Add shrimp, ensuring they're well coated. Let them marinate for about 10 minutes.
3. Grill the Shrimp: Place the shrimp on the grill, cooking each side for about 2-3 minutes until they turn opaque and have a slight char. Remove and set aside.
4. Assemble the Salad: In a large bowl, combine diced avocados, mango, red onion, cilantro, lime zest, and diced habanero chile. Toss gently to keep the avocado from becoming mushy.
5. Dress and Serve: Drizzle some of the reserved marinade over the salad, season with black salt and pepper, and toss lightly. Top with the grilled shrimp and serve with lime wedges for an extra burst of citrus.
A Family Tradition:

This dish became a family staple not just for its flavor but for the memories it created. My grandmother would hum a little tune as she prepared the ingredients, her hands moving expertly through the tasks. We would gather around, eager to taste the first bite, which was always a symphony of flavors—sweet, tangy, spicy, and savory. Even now, as I prepare this dish for my own family, I am reminded of those precious moments of togetherness and love.


Difficulty Rating: 4/10
Classification: Appetizer

---


Embrace the tastes of summer and the warmth of family memories with this Avocado-Mango Salad with Grilled Shrimp. It's more than just a dish; it's a celebration of flavors and cherished moments shared with loved ones. Whether you're new to cooking or a seasoned chef, this recipe is sure to bring joy to your table. Enjoy!

Read more about Appetizers

Read more about Main Dishes

Read more about Desserts

Game Day Jerk Wings | Made by Meaghan Moineau

Game Day Jerk Wings | Made by Meaghan Moineau

Game Day Jerk Wings: A Spicy Kickoff to Flavorful Memories


Description:

Elevate your game day experience with our mouthwatering Game Day Jerk Wings! Infused with an aromatic blend of spices and a zesty jerk sauce, these wings promise to be the highlight of your gathering. Perfect for those who love a little heat and a lot of flavor, these wings are sure to score a touchdown with your taste buds. As an added bonus, serve them with crunchy carrot and celery sticks along with creamy blue cheese dressing for the ultimate game day snack.

Difficulty: 6/10

Classification: Appetizer


---


Ingredients:


- Split chicken wings


- 2 tbsp pasilla chile powder


- 1 tbsp kosher salt


- 1 tbsp black ground pepper


- 1 tsp ground cayenne pepper


- 1 tbsp Jamaican ground allspice


- 1 cup Pickapeppa sauce


- 1/2 cup unsalted butter


- 1/4 cup honey


- 2 tbsp Tabasco sauce


- 1 tsp red pepper flakes


- Carrot and celery sticks


- Blue cheese dressing


Instructions:


1. Prepare the Wings:

- Split wings apart into 2 sections and slash a slit in the flat part of each wing for quicker cooking.


2. Create the Dry Rub:

- In a bowl, combine the pasilla chile powder, kosher salt, black ground pepper, ground cayenne pepper, and Jamaican ground allspice.


- Sprinkle the mixture liberally over the wings (you don't need to use all of it). Refrigerate for at least 1 hour to let the flavors meld.


3. Make the Jerk Sauce:

- In a medium saucepan over low heat, combine Pickapeppa sauce, unsalted butter, honey, Tabasco sauce, and red pepper flakes. Stir until well incorporated.


4. Grill the Wings:

- Allow the wings to come to room temperature before grilling.


- Prepare your grill for medium-high direct heat. Grill the dry-rubbed wings for 20-25 minutes, turning constantly to achieve good grill marks without over-charring.


- Check the doneness by biting into the largest wing; if the juices run clear, they're ready.


5. Serve:

- Place the grilled wings in a large bowl and toss them with the jerk sauce.


- Serve hot with blue cheese dressing and a side of carrot and celery sticks.


---


A Nostalgic Flavor Journey


Growing up, game days were a family tradition in our house. It wasn’t just about the match on TV; it was an event filled with laughter, cheers, and of course, food that brought everyone together. The aroma of these jerk wings sizzling on the grill takes me back to those vibrant afternoons in my childhood home. My dad, the culinary mastermind, would meticulously prepare these wings, insisting that the secret lay in the perfect balance of spices.


I remember one particular Sunday when I was tasked with being his sous-chef. As we mixed the spices and prepared the grill, he shared stories of his own childhood — of how his father would make similar spicy wings for family gatherings. It was a ritual passed down through generations, each iteration adding its own unique twist.


The wings were always the star of the show, their spicy aroma drawing friends and neighbors alike. We’d gather around the table, each bite a delightful explosion of flavor, accompanied by the creamy cooling effect of blue cheese dressing. These wings weren't just a dish; they were a symbol of family unity and cherished memories.


As I prepare these wings today, I feel a sense of nostalgia, a connection to those joyous moments of togetherness. Whether you're a fan of the game or just a lover of good food, these Game Day Jerk Wings are sure to create lasting memories for your family, just as they have for mine.


---


Indulge in the perfect combination of spicy, sweet, and savory with our Game Day Jerk Wings — a must-have appetizer for any game day celebration!

Read more about Appetizers

Read more about Main Dishes

Read more about Desserts

Pulled Pork Nachos | Made by Meaghan Moineau

Pulled Pork Nachos | Made by Meaghan Moineau

Title: Unleashing Flavor: Pulled Pork Nachos Perfect for Any Gathering
Description: Dive into a savory blend of tender pulled pork and crunchy nacho chips with our Pulled Pork Nachos recipe. This dish is not just a treat for your taste buds, but a journey into cherished family memories, bringing the warmth of home-cooked meals to your table. Whether you're hosting a game day party or a casual get-together, these nachos will be the star of the show. Discover how to create this mouth-watering masterpiece and why it holds a special place in our hearts.

---


Pulled Pork Nachos: A Flavorful Fusion of Family and Feasting


In the world of comfort food, few dishes can match the irresistible allure of nachos. The combination of crispy chips, creamy cheese, and savory toppings is a universal favorite. Today, we’re elevating this classic snack with a twist that brings both flavor and nostalgia to the forefront: Pulled Pork Nachos.


A Nostalgic Note:

Growing up, Sunday afternoons were reserved for family gatherings at my grandparents' house. The aroma of cooking wafted through the air, a comforting indication that something delicious was underway. My grandfather, a culinary enthusiast, was known for his incredible slow-cooked pork. He would meticulously rub the pork shoulder with spices and let it simmer in the slow cooker, filling the house with a mouth-watering scent that drew everyone to the kitchen.


Once, during a particularly lively football game, my grandmother suggested transforming his pulled pork into an appetizer. With a twinkle in her eye, she layered crunchy nacho chips with the succulent pork, fresh pico de gallo, and a generous sprinkle of cheese. The result was nothing short of spectacular—a dish that quickly became a family staple, bringing us together over laughter, stories, and the shared joy of good food.


Ingredients:

- Nacho chips


- Pico de gallo


- Pork rub


- Pork shoulder


- Shredded cheese


- Sour cream (optional)


- Vegetable broth


Instructions:
1. Prepare the Pork: Start by cleaning the pork shoulder and patting it dry. Generously apply the pork rub, ensuring the shoulder is seasoned all over.
2. Slow Cooking Magic: Place the seasoned pork shoulder into a crock pot. Set the temperature to low, add in the vegetable broth, and allow it to cook for 8-10 hours. The slow cooking process ensures the pork becomes tender and flavorful.
3. Shred and Assemble: Once the pork is cooked, remove it from the slow cooker and shred it with forks. Arrange the nacho chips on a platter and top them with the shredded pork.
4. Top It Off: Add fresh pico de gallo for a burst of flavor and color. Sprinkle shredded cheese generously over the top, allowing it to melt into gooey perfection. For an extra creamy touch, add a dollop of sour cream.
Difficulty Rating: 4/10
Classification: Appetizer

This recipe is not just about creating a delectable dish; it's about crafting a culinary experience that brings people together. Pulled Pork Nachos are the perfect blend of savory, spicy, and creamy, making them an ideal appetizer for any occasion. Whether you're sharing them with family or friends, this nostalgic recipe is sure to create new memories and delight taste buds. Enjoy the journey of flavors and the warmth of shared moments with every bite.

Read more about Appetizers

Read more about Main Dishes

Read more about Desserts

Falafels With Tahini Sauce | Made by Meaghan Moineau

Falafels With Tahini Sauce | Made by Meaghan Moineau

Title: Savor the Flavors of Tradition: Falafels with Tahini Sauce
Description: Discover the heartwarming essence of homemade falafels with tahini sauce, a dish woven with family memories and vibrant flavors. Perfect as an appetizer or main dish, this recipe offers a delightful blend of Middle Eastern spices and nostalgia.

---


Falafels with Tahini Sauce: A Recipe Steeped in Family Tradition


There's something incredibly comforting about recreating a dish that has been a staple in family gatherings for generations. Falafels with tahini sauce is one such recipe that holds a special place in my heart, evoking memories of bustling kitchens, laughter, and the delightful aroma of spices. This Middle Eastern classic is not just a meal; it's a connection to my roots and a celebration of the rich tapestry of flavors that define my family heritage.


Ingredients:


For the Falafels:

- 1 cup garbanzo beans, soaked overnight and drained


- 1 onion, chopped


- 3 cloves garlic


- 1/4 cup fresh cilantro


- 1/4 cup fresh parsley


- 2 teaspoons ground cumin


- 1 teaspoon sea salt


- 1/2 teaspoon red dried pepper flakes


- 1 teaspoon baking powder


- Flour, as needed


For the Tahini Sauce:

- 1/2 cup tahini paste


- 1/4 cup water (more if needed)


- Juice of 2 lemons


- 2 cloves garlic


- 1/2 teaspoon sea salt


Instructions:


1. Prepare the Falafel Mixture:

- In a food processor, combine onion, garlic, cilantro, parsley, cumin, sea salt, red pepper flakes, and baking powder. Process until the mixture is crumbly.


- Transfer the mixture to a large bowl, adding flour a tablespoon at a time. Mix well until the mixture can be easily formed into balls or patties without falling apart.


- Refrigerate the mixture while preparing the tahini sauce.


2. Make the Tahini Sauce:

- In a food processor, combine tahini paste, water, lemon juice, garlic, and sea salt. Process until smooth. Adjust consistency by adding more water or lemon juice as desired.


3. Cooking the Falafels:

- Shape the chilled falafel mixture into balls or patties.


- Fry in a skillet over medium heat until golden brown on each side, or bake in a preheated oven at 375°F (190°C) for 20-25 minutes.


A Nostalgic Tale:


Every year, on the first Sunday of spring, my family would gather at my grandmother's house for a feast that marked the changing seasons. Among the plethora of dishes, the falafels with tahini sauce always took center stage. I remember watching my grandmother with awe as she skillfully shaped each falafel, her hands moving with an ease that only years of practice could bring. The kitchen would fill with a medley of scents—fresh herbs mingling with the earthy aroma of cumin and the subtle heat of the red pepper flakes.


As we sat around the table, my grandmother would share stories of her childhood, tales of bustling markets and sunlit kitchens. With each bite of falafel, we weren't just savoring a delicious dish; we were partaking in a tradition, a slice of our family's history that had been passed down through generations.


Difficulty Rating: 5/10


Classification: Appetizer/Main Dish

Creating falafels with tahini sauce is a culinary adventure that's both rewarding and nostalgic. With each step, from soaking the garbanzo beans to blending the perfect tahini sauce, you're not just making a meal; you're crafting a story, one that's rich in flavor and family legacy. Whether served as an appetizer or a main dish, this recipe is sure to become a cherished part of your own family traditions. Enjoy!

Read more about Appetizers

Read more about Main Dishes

Read more about Desserts

Spinach Salad with Strawberry Vinaigrette | Made by Meaghan Moineau

Spinach Salad with Strawberry Vinaigrette | Made by Meaghan Moineau

Title: A Taste of Summer: Spinach Salad with Strawberry Vinaigrette
Description: Dive into the refreshing flavors of our Spinach Salad with Strawberry Vinaigrette, a delightful dish that's both easy to prepare and bursting with vibrant colors and textures. This simple yet elegant salad combines the sweetness of strawberries with the savory notes of feta cheese and almonds, making it a perfect appetizer or light main dish. Join us as we explore this delightful recipe and share a nostalgic family memory that makes this salad extra special.

---


Spinach Salad with Strawberry Vinaigrette: A Family Favorite
Difficulty: 2/10
Category: Appetizer/Main Dish

---


There's something inherently special about the smell of fresh strawberries that instantly transports me back to my grandmother's kitchen. Every summer, our family would gather at her quaint countryside home, surrounded by fields ripe with the season's bounty. It was during these warm, sunlit afternoons that my grandmother would prepare her signature Spinach Salad with Strawberry Vinaigrette, a dish that has since become a beloved family tradition.


Ingredients:

- Fresh spinach leaves


- Strawberries (for salad and vinaigrette)


- Cooked chicken, sliced


- Feta cheese, crumbled


- Almonds, toasted


- Shallot, finely chopped


- Fresh thyme leaves


- Ground pepper, to taste


Strawberry Vinaigrette:

- Strawberries, hulled and sliced


- Balsamic vinegar


- Dijon mustard


- Water


Instructions:
1. Prepare the Vinaigrette: In a blender, combine a handful of sliced strawberries with a splash of balsamic vinegar, a teaspoon of Dijon mustard, and a dash of water. Blend until smooth and creamy. Set aside.
2. Assemble the Salad: On a large serving plate, arrange a generous bed of fresh spinach leaves. Top with sliced cooked chicken, crumbled feta cheese, and a sprinkle of toasted almonds for a delightful crunch. Add thinly sliced shallots and a few sprigs of fresh thyme.
3. Drizzle and Serve: Pour the strawberry vinaigrette over the salad, ensuring an even distribution of flavor. Finish with freshly ground pepper to taste.
4. Enjoy: Serve immediately and enjoy the blend of sweet, savory, and tangy flavors that celebrate the essence of summer.

---


A Nostalgic Memory:

As children, my siblings and I would eagerly assist in the kitchen, our hands sticky with strawberry juice as we helped prepare the vinaigrette. My grandmother, with her gentle smile and flour-dusted apron, would tell stories of her own childhood, weaving tales of picnics by the river and the secret family recipe passed down through generations.


This salad was more than just a meal; it was a celebration of family, love, and the simple joys of summer. Each bite is a reminder of those golden days, the laughter shared around the table, and the enduring legacy of flavors that connect us to our roots.


---


This Spinach Salad with Strawberry Vinaigrette is more than just a dish; it's a heartfelt tribute to the cherished memories that food can create. Whether you're enjoying it as a light appetizer or a main dish, may it bring warmth and joy to your table, just as it has to ours for generations.

Read more about Appetizers

Read more about Main Dishes

Read more about Desserts

Simple Squash Salad | Made by Meaghan Moineau

Simple Squash Salad | Made by Meaghan Moineau

Title: A Taste of Home: Simple Squash Salad to Savor Summer Memories
Description: Discover the joy of summer with our Simple Squash Salad, a refreshing dish that captures the essence of sunshine and family gatherings. This easy-to-make appetizer is packed with vibrant flavors and a nostalgic touch that will transport you back to cherished family moments.

---


As the summer sun casts its golden glow over the horizon, there's nothing quite like gathering with family around a picnic table. For me, summer memories are flavored with the tang of vinegar, the zest of lemon, and the vibrant colors of fresh vegetables. Our Simple Squash Salad is not just a dish—it's a time machine that takes me back to those lazy afternoons spent with loved ones.


Ingredients:

- 1 cup diced bell pepper


- 1 teaspoon black pepper


- A handful of fresh parsley, chopped


- 2 cloves garlic, minced


- 1 teaspoon garlic powder


- 2 tablespoons capers, plus 2 tablespoons caper juice


- 1 lemon, juiced


- 1 small onion, diced


- 1 teaspoon dried oregano


- 1/2 teaspoon red pepper flakes


- Salt to taste


- 1 teaspoon sugar


- 1/4 cup vinegar


- 2 cups diced zucchini


Instructions:
1. Prepare the Salad: In a large bowl, combine the diced bell pepper, diced zucchini, and diced onion. Add a handful of chopped fresh parsley for that burst of green and freshness.
2. Mix the Dressing: In a separate cup, whisk together minced garlic, garlic powder, capers with caper juice, lemon juice, dried oregano, red pepper flakes, black pepper, salt, sugar, and vinegar. Adjust the ingredients to taste, balancing the tanginess and the heat to your preference.
3. Combine and Chill: Pour the zesty dressing over the salad mixture and gently toss until all the vegetables are evenly coated. Cover the bowl and let the salad sit in the refrigerator for a few hours. This allows the flavors to meld beautifully, enhancing the salad's vibrant taste.
4. Serve and Enjoy: Once chilled, give the salad a final toss before serving. It's the perfect appetizer to kick off any meal, offering a refreshing crunch and a nostalgic nod to summer days gone by.
A Nostalgic Family Memory

Growing up, my family would host a big summer barbecue every year, an event that was the highlight of my childhood. I remember my grandmother standing by the kitchen counter, her hands deftly chopping vegetables, her laughter mingling with the clinking of dishes. She had a way of infusing love into every dish she made, and our Simple Squash Salad was no exception.


As kids, my cousins and I would sneak into the kitchen, eager to snatch a taste while the salad marinated in the fridge. When it was finally time to eat, we'd gather around the table, our plates piled high with colorful, fresh flavors. The salad was always a hit, its tangy dressing perfectly complementing the sweetness of the bell peppers and the subtle crunch of zucchini.


These memories are etched into my heart, a reminder of simpler times when the world was as vibrant and full of promise as the salad before us.


Difficulty Rating: 3/10
Classification: Appetizer

---


Recreate this simple yet delicious recipe and bring a slice of those cherished summer memories to your table. Whether it's a family gathering or a quiet dinner, our Simple Squash Salad is sure to be a hit, inviting smiles and sparking nostalgia with every bite.

Read more about Appetizers

Read more about Main Dishes

Read more about Desserts

Falafels With Tahini Sauce | Made by Meaghan Moineau

Falafels With Tahini Sauce | Made by Meaghan Moineau

Title: “Crispy Falafels with Creamy Tahini Sauce: A Journey Back to Family Gatherings”
Description: Dive into the heartwarming world of homemade falafels, a cherished Middle Eastern delight, paired with a lusciously smooth tahini sauce. This recipe, brimming with vibrant flavors and texture, will transport you to a lively family gathering where each bite is a nostalgic reminder of shared laughter and stories. Easy to make and delightful to taste, this appetizer is a perfect way to bring loved ones together around the table.

Falafels with Tahini Sauce: A Taste of Home and Nostalgia

Introduction

The aroma of falafels sizzling in the kitchen always takes me back to my grandmother’s house. Her tiny kitchen, filled with the chatter of family members, was the center of our universe. Every family gathering was incomplete without her signature falafels, crispy on the outside and soft on the inside, paired with a creamy, tangy tahini sauce.

Ingredients

For the Falafels:

– 1 cup garbanzo beans, soaked overnight and drained

– 1 medium onion, finely chopped

– 2 cloves garlic, minced

– 1/4 cup fresh cilantro, chopped

– 1/4 cup fresh parsley, chopped

– 1 teaspoon ground cumin

– 1 teaspoon sea salt

– 1/2 teaspoon red dried pepper flakes

– 1 teaspoon baking powder

– Flour, as needed

For the Tahini Sauce:

– 1/2 cup tahini paste

– 1/4 cup water

– Juice of 2 lemons

– 1 clove garlic, minced

– 1/2 teaspoon sea salt

Instructions

Falafels:

1. Begin by soaking the garbanzo beans overnight. Drain and set aside.

2. In a food processor, combine the garbanzo beans, onion, garlic, cilantro, parsley, cumin, sea salt, and red pepper flakes. Process until the mixture is crumbly.

3. Transfer the mixture to a large bowl. Gradually add the flour, one tablespoon at a time, mixing well until the mixture can easily be formed into balls or patties.

4. Shape the mixture into balls or patties. Place them in the refrigerator to chill while preparing the tahini sauce.

Tahini Sauce:

1. In the food processor, combine the tahini paste, water, lemon juice, garlic, and sea salt.

2. Process until smooth. Adjust the consistency by adding more water if the sauce is too thick, or more lemon juice for extra tang.

A Nostalgic Family Memory

One summer evening, as the sun dipped below the horizon, casting a golden glow over our backyard, my grandmother and I were in the kitchen, preparing her famous falafels. Despite the heat of the day, the kitchen was cool, and the scent of fresh herbs filled the air. As we formed the falafel mixture into balls, she shared stories of her childhood, how her mother would make falafels as a treat for special occasions.

I watched in awe as she effortlessly flipped the falafels in the pan, each one perfectly golden brown. We gathered around the table, the adults with their stories and laughter, the children eager to devour the delicious spread. The falafels were always the highlight, their crispy exterior giving way to a burst of flavors inside. The tahini sauce, with its creamy texture and hint of garlic, was the perfect accompaniment.

That evening, with the sound of cicadas in the background and the warmth of family around, I realized that food is more than just sustenance—it’s a vessel for memories and love.

Difficulty Rating

Difficulty: 5/10

Classification

This dish is a versatile appetizer, perfect for starting a meal with its rich flavors and delightful textures.

Falafels with tahini sauce are more than just a dish; they are a celebration of family, tradition, and the stories that bind us. As you savor each bite, may it bring warmth to your heart and a smile to your face, reminiscent of cherished family gatherings.

Read more about Appetizers

Read more about Main Dishes

Read more about Desserts

Related update: Lemon and Strawberry Loaf

Powerhouse Almond Matcha Superfood Smoothie | Made by Meaghan Moineau

Powerhouse Almond Matcha Superfood Smoothie | Made by Meaghan Moineau

Title: Unleash Your Energy with the Powerhouse Almond Matcha Superfood Smoothie
Description: Dive into the world of wellness with our Powerhouse Almond Matcha Superfood Smoothie. This vibrant, nutrient-packed blend is a delicious way to kickstart your day. Perfect for breakfast or a midday boost, this smoothie combines the creamy richness of almond butter with the refreshing zing of matcha and tropical fruits. Join us as we explore this delightful recipe and the cherished family memory that inspired it.

In the hustle and bustle of modern life, finding the perfect balance of health and taste can often feel like an elusive quest. But what if I told you that the secret lies in a simple, yet extraordinary, blend of ingredients? Enter the Powerhouse Almond Matcha Superfood Smoothie—a concoction that not only fuels your body but also brings a sense of nostalgia with every sip.

Growing up, Sunday mornings were a special time in our house. My grandmother, a spirited woman with a penchant for healthy living, would whip up what she called her “magic potions.” These weren’t your ordinary breakfast smoothies; they were vibrant elixirs, brimming with color and flavor, designed to invigorate our bodies and minds for the week ahead.

One particular Sunday, I remember vividly. The kitchen was filled with the comforting aroma of vanilla, mingling with the earthy scent of matcha. My grandmother stood by the blender, her eyes twinkling with mischief as she added a spoonful of almond butter—her secret ingredient. “This,” she said with a wink, “is what gives it the power.”

As a child, I didn’t quite understand the concept of superfoods. But I did understand that this smoothie was something special. It was creamy yet refreshing, with a perfect balance of sweetness and a subtle hint of green tea. It felt like a treat, yet it was packed with wholesome goodness.

Now, as an adult, I’ve recreated this memory in my own kitchen. The Powerhouse Almond Matcha Superfood Smoothie has become a staple in my household, not just for its health benefits but for the warm reminder of those cherished Sunday mornings.

Ingredients:

– 2 tablespoons unsalted natural almond butter

– 1 cup unsweetened almond milk

– 1 frozen banana

– 1 tablespoon chia seeds

– 1 cup baby kale

– 1/2 cup frozen mango pieces

– 1 teaspoon green matcha tea powder

– 1/2 cup frozen pineapple

– 1/2 teaspoon vanilla extract

Instructions:

1. Combine all of the ingredients in a blender.

2. Blend on high until smooth.

3. Serve immediately and enjoy the burst of flavor and energy!

Difficulty Rating: 3/10
Classification: Appetizer

This smoothie is not just a drink; it’s a celebration of vibrant, wholesome ingredients that work harmoniously to energize your day. Whether you’re a seasoned health enthusiast or just starting your journey, the Powerhouse Almond Matcha Superfood Smoothie is a perfect way to embrace wellness with a touch of nostalgia. So go ahead, take a sip, and let the memories flow.

Read more about Appetizers

Read more about Main Dishes

Read more about Desserts

Also try: Banana Smoothie Boost

Tomato Cucumber Salad | Made by Meaghan Moineau

Tomato Cucumber Salad | Made by Meaghan Moineau

Title: The Timeless Charm of Tomato Cucumber Salad: A Refreshing Taste of Family Memories
Description: Dive into the world of simple culinary delights with our Tomato Cucumber Salad recipe. This refreshing appetizer combines fresh ingredients with a nostalgic tale, offering a taste of home and cherished family moments. Perfect for summer gatherings or a light snack, this dish is sure to become a staple in your recipe repertoire.

---


There's a certain magic in the simplicity of a well-crafted salad. The fresh crunch of cucumbers paired with the sweet burst of cherry tomatoes creates a melody of flavors that dance on the palate. For me, the Tomato Cucumber Salad is not just a recipe; it's a cherished family memory.


Ingredients:

- 1 pint cherry tomatoes


- 1 medium cucumber, diced into 1cm cubes


- 2 cloves garlic, sliced


- 2 tablespoons lemon juice


- 3 tablespoons olive oil


- Black salt and pepper to taste


- 1 small shallot, chopped


- A handful of fresh parsley, chopped


Instructions:

1. Begin by heating the olive oil in a skillet over medium heat. Add the chopped shallot and sliced garlic, stirring occasionally, until they turn lightly golden. The aroma will be reminiscent of family kitchens, where love and laughter filled the air.


2. Once golden, remove from heat and stir in the lemon juice. Season with black salt and pepper, adjusting to taste.


3. Meanwhile, cut the cherry tomatoes into halves and dice the cucumber. Place them into a large salad bowl, their vibrant colors a feast for the eyes.


4. Pour the warm dressing over the tomato and cucumber mixture, ensuring every piece is coated with the rich, tangy flavors.


5. Toss gently with the fresh chopped parsley, a touch of green that brings the dish to life.


6. Chill the salad for at least an hour before serving. This allows the flavors to meld, reminiscent of the days when patience was a virtue learned in the kitchen.


A Nostalgic Tale:

Every summer, my family would gather at my grandparents' house, a place where time seemed to slow down. The garden, a tapestry of colors and scents, was always abundant with fresh produce. My grandmother, with her gentle hands, would guide me through the art of making this simple salad. It was here, amidst shared stories and laughter, that I learned the true essence of cooking: love and togetherness.


As we sat around the old wooden table, the Tomato Cucumber Salad would inevitably be the centerpiece. Its crisp, refreshing flavors were the perfect antidote to the summer heat. With each bite, I was transported back to those cherished moments, a reminder of the unbreakable bonds of family.


Difficulty Rating: 3/10
Classification: Appetizer

This Tomato Cucumber Salad is a testament to the power of food to connect us with our past and the people we love. It's an easy-to-make appetizer, perfect for any occasion and guaranteed to bring a smile to your face. Enjoy this delightful dish and create new memories with your loved ones.

Read more about Appetizers

Read more about Main Dishes

Read more about Desserts

Avocado and Orange Salad With Orange-Ginger Dressing | Made by Meaghan Moineau

Avocado and Orange Salad With Orange-Ginger Dressing | Made by Meaghan Moineau

A Taste of Sunshine: Avocado and Orange Salad With Orange-Ginger Dressing


A Fresh and Vibrant Twist on Tradition


In the heart of summer, when the sun casts its golden rays and the air buzzes with the sounds of nature, there's nothing quite like a refreshing salad to bring a burst of flavor to your table. Our Avocado and Orange Salad with Orange-Ginger Dressing is a celebration of vibrant colors and zesty tastes—a dish that promises to delight your senses. This simple yet elegant appetizer is not only a feast for the eyes but also a symphony of flavors that dance on your palate. With ingredients like creamy avocados, juicy oranges, and a tangy ginger dressing, this salad is both nourishing and uplifting.


Ingredients


- 2 ripe avocados, sliced


- 3 juicy oranges, segmented (reserve the juice from the leftover)


- 2 green onions, finely chopped


- 1/4 cup of fresh orange juice


- 2 tablespoons lemon juice


- 1 teaspoon fresh ginger paste


- 1 tablespoon agave syrup


- 2 tablespoons olive oil


- Salt and pepper to taste


Instructions


1. Prepare the Salad Base: Arrange the avocado and orange slices, overlapping each other, on a platter. Squeeze the juice from the leftover orange over the arranged slices. This not only adds a layer of flavor but also prevents the avocados from browning.
2. Add a Touch of Crunch: Sprinkle the finely chopped green onions over the salad. Add a pinch of salt to taste.
3. Chill: Cover the platter with cling film and refrigerate until you’re ready to serve. Chilling enhances the flavors and refreshes the salad.
4. Make the Dressing: In a blender, combine the orange juice, lemon juice, fresh ginger paste, agave syrup, and olive oil. Blend until smooth. Season with salt and pepper to taste.
5. Serve: Just before serving, pour the orange-ginger dressing over the salad. Allow it to soak in the flavors for a few minutes, and then serve immediately.

A Nostalgic Twist


This salad takes me back to my grandmother's sunlit kitchen, where the scent of oranges and ginger would fill the air. Every summer, our family would gather at her place for an afternoon of laughter and stories. As kids, we’d run around her garden, the sun warming our skin, while the adults prepared a feast inside. This salad was always part of the spread—a tradition that brought us together, a dish that spoke of simplicity and love.


I remember sitting at the dining table, the coolness of the salad a perfect contrast to the warmth of the day, the flavors reminding me of those endless summers and the joy of family. It's more than just a dish; it's a memory, a piece of nostalgia that I cherish with every bite.


Difficulty and Classification


With its straightforward preparation and minimal cooking required, this Avocado and Orange Salad earns a 3 out of 10 on the difficulty scale. It's a perfect appetizer, ideal for those who wish to enjoy a sophisticated yet easy-to-prepare dish that captures the essence of summer.


---


Whether you're hosting a dinner party or simply enjoying a quiet meal at home, this Avocado and Orange Salad with Orange-Ginger Dressing is a delightful addition to any menu. Its fresh ingredients and vibrant flavors make it a standout appetizer that will leave your guests craving more. So, gather your loved ones, share stories, and let this salad be a part of your cherished memories.

Read more about Appetizers

Read more about Main Dishes

Read more about Desserts

Kyuri Tsukemono | Made by Meaghan Moineau

Kyuri Tsukemono | Made by Meaghan Moineau

Title: Dive into Tradition: The Simplicity and Flavor of Kyuri Tsukemono
Description: Discover the art of Japanese pickling with Kyuri Tsukemono, a delightful cucumber dish that brings a touch of tradition and a burst of flavor to your table. Learn how to make this easy, yet captivating appetizer while delving into a nostalgic family story that highlights the magic of this simple recipe.

---


There's something almost magical about the simplicity of traditional recipes. They have a way of weaving themselves into our memories, becoming a comforting part of our lives. One such dish that has always held a special place in my heart is Kyuri Tsukemono, a Japanese cucumber pickle that's as easy to make as it is delicious to eat.


A Slice of Nostalgia

Growing up, I spent many summers at my grandmother's house in the countryside. Her garden was a lush paradise, overflowing with fresh vegetables, and cucumbers were always in abundance. I remember the sun casting a warm glow over her small kitchen as she taught me the art of making Kyuri Tsukemono. The process was simple, yet it felt like a sacred ritual passed down through generations.


"Remember," she'd say with a twinkle in her eye, "the secret is in the shaking." We would giggle as we shook the container, the rhythmic sound of cucumbers dancing around adding to the anticipation. It became our little tradition, a special bond sealed with the savory tang of soy sauce and the subtle kick of red chili peppers.


Ingredients:

- 3 to 4 Japanese cucumbers


- Soy sauce


- Rice vinegar


- Sesame oil


- Red dried chili peppers


Instructions:

1. Begin by rough chopping the cucumbers. The vibrant green of the cucumbers is a beautiful sight, promising freshness in every bite.


2. In a medium, securely sealable container, mix soy sauce, rice vinegar, and sesame oil. The combination of these ingredients creates a marinade that is both savory and aromatic, enhancing the natural flavor of the cucumbers.


3. Add the chopped cucumbers to the marinade. Close the container and give it a good shake. This step is not just functional; it's a nod to the cherished memories of my grandmother's kitchen.


4. Refrigerate for 1 to 2 hours, allowing the cucumbers to soak up the flavors. For an extra burst of flavor, shake the container periodically, or better yet, leave the cucumbers to marinate overnight. Note: the longer they stay in the marinade, the saltier they become. I've left them in the marinade for up to 3 days, and they were still delightfully crisp and flavorful.


5. Serve and enjoy! Kyuri Tsukemono makes for a refreshing appetizer that's perfect for any occasion.


Difficulty: 2/10
Classification: Appetizer

Every time I prepare Kyuri Tsukemono, I'm transported back to those cherished summer days. It's more than just a dish; it's a reminder of the love and joy shared in my grandmother's kitchen. As you embark on making your own batch of Kyuri Tsukemono, I hope you, too, create memories that will last a lifetime. Enjoy the simplicity and flavor of this traditional Japanese appetizer, and let it become a part of your culinary story.

Read more about Appetizers

Read more about Main Dishes

Read more about Desserts

Chilled Swiss Oatmeal | Made by Meaghan Moineau

Chilled Swiss Oatmeal | Made by Meaghan Moineau

Title: A Nostalgic Dive into Chilled Swiss Oatmeal: A Perfect Start to Your Day
Description: Discover the delightful simplicity of Chilled Swiss Oatmeal, a nutritious breakfast option that's rich in flavor and memories. This easy-to-make dish combines the wholesome goodness of oatmeal with the refreshing taste of fresh fruits and the crunch of walnuts. Perfect for busy mornings or leisurely brunches, it's a dish that will have you reminiscing about cherished family moments with every bite.

---


A Wholesome Morning with Chilled Swiss Oatmeal

There's something truly special about waking up to the comforting taste of Chilled Swiss Oatmeal. This delightful breakfast dish, rich in flavors and textures, has been a beloved staple in my family for generations. Easy to prepare and perfect for those who adore a nutritious start to their day, it's a recipe that brings both health and happiness to the table.


The Ingredients of Joy

To create this masterpiece, you'll need old-fashioned oatmeal, low-fat plain vanilla yogurt, and milk. These form the creamy base of our dish. Fresh slices of apple and banana, along with dried cranberries, infuse the oatmeal with a burst of natural sweetness and tang. Finally, a generous sprinkle of walnuts adds the perfect finishing touch, providing a satisfying crunch and a dose of heart-healthy fats.


Instructions for a Perfect Swiss Oatmeal

1. In a small bowl, combine the oatmeal, yogurt, and milk. Stir until well mixed. For best results, let this mixture sit for a few minutes or, ideally, several hours in the refrigerator.


2. Once chilled, add the freshly chopped apple and banana to the mix, along with the dried cranberries. Stir until all ingredients are well combined.


3. Just before serving, top with a handful of walnuts for added crunch and flavor.


*Note:* For the ultimate taste experience, allow the oatmeal to sit overnight. Add the fresh fruits right before serving to ensure they remain crisp and vibrant.


A Sprinkle of Nostalgia

This dish always takes me back to cozy Sunday mornings at my grandmother's house. I remember waking up to the aroma of freshly brewed coffee and the sight of my grandmother bustling around the kitchen, preparing breakfast for the family. Her Chilled Swiss Oatmeal was the highlight of those mornings, served with love and a side of warm smiles.


The anticipation of digging into a bowl of this chilled delight was almost as enjoyable as the taste itself. As children, my siblings and I would gather around the table, eagerly awaiting our turn to add our favorite toppings. For me, it was always a little extra walnut crunch. These breakfasts were more than just meals; they were family bonding sessions filled with laughter, stories, and the occasional playful banter.


Difficulty Rating and Classification
Difficulty: 3/10
Classification: Appetizer

Chilled Swiss Oatmeal is not just a dish; it's a journey back to simpler times, a reminder of the love and warmth shared around the breakfast table. Whether you're making it for yourself or sharing it with loved ones, this recipe is sure to become a cherished part of your morning routine. So, go ahead and indulge in the nostalgic flavors of Chilled Swiss Oatmeal, and create new memories with every delicious spoonful.

Read more about Appetizers

Read more about Main Dishes

Read more about Desserts

I Like My Peas with Pancetta | Made by Meaghan Moineau

I Like My Peas with Pancetta | Made by Meaghan Moineau

I Like My Peas with Pancetta: A Delightful Dance of Flavors and Memories


Description

Discover a timeless family classic with "I Like My Peas with Pancetta," where tender peas meet savory pancetta in a symphony of flavors. This dish, enriched with the freshness of cherry tomatoes and the aromatic embrace of garlic and onion, is not just a meal — it's a memory on a plate. Perfect for those nostalgic moments when food brings the family together, this appetizer is both simple and delightful, with a difficulty rating of 4 out of 10. Join us on a journey of taste and tradition, and learn how to create a dish that has been a staple in our family gatherings.

Ingredients

- 1 cup sweet fresh green peas

- 4 oz guanciale or pancetta, diced


- 1 medium onion, finely chopped


- 2 cloves garlic, minced


- 1 cup cherry tomatoes, halved


- 1 tablespoon red wine vinegar


- Fresh parsley, chopped


- Salt & pepper to taste


- Extra virgin olive oil


Instructions

1. Prepare the Peas: Bring a medium pot of water to a boil. Once boiling, add the peas and blanch for 2-3 minutes until they are half-cooked. Strain and reserve a spoonful of the pea-water.
2. Sauté the Pancetta: In a medium skillet over medium-low heat, slowly render down the diced pancetta for 4-5 minutes, ensuring it does not become crispy. If it begins to brown, remove the pan from the heat or lower the flame.
3. Aromatic Base: Add the minced garlic and chopped onion to the skillet. Sauté for 5-6 minutes until the onion is soft and translucent. For a vegetarian twist, simply omit the pancetta and sauté the onions and garlic in olive oil.
4. Enhance with Tomatoes: When the onions and garlic are nearly ready, add the cherry tomatoes to the skillet. Allow the flavors to meld together.
5. Combine and Cook: Toss the blanched peas into the skillet with the pancetta mixture. Add a spoonful of the reserved pea-water. Cook until the peas are tender yet still slightly firm to the bite. Adjust the seasoning with salt and pepper to your taste.
6. Finishing Touches: Just before serving, toss in the fresh parsley and drizzle with a generous amount of high-quality extra virgin olive oil.

A Family Memory

Growing up, "I Like My Peas with Pancetta" was more than just a dish; it was a cherished family tradition. Every summer, as the days grew longer and the sun kissed the earth with warmth, my grandmother and I would gather in her sunlit kitchen. She would hand me a basket of freshly picked peas from her garden, their sweetness a testament to her green thumb.

As we shelled peas together, she would recount stories of her childhood in the Italian countryside, where this humble dish was a staple at family gatherings. The aroma of pancetta sizzling on the stove and the vibrant colors of the fresh ingredients created a symphony that filled the kitchen with love and laughter.


Preparing this dish now transports me back to those carefree days, reminding me of the timeless bond between family and food. It's a reminder that, sometimes, the simplest ingredients create the most enduring memories.


Conclusion

"I Like My Peas with Pancetta" is an appetizer that brings together the richness of tradition and the simplicity of fresh ingredients. With its easy preparation and delightful flavors, it holds a special place at any family table. Whether you're enjoying it with loved ones or savoring it alone, this dish is a celebration of culinary heritage, perfect for any occasion.

Read more about Appetizers

Read more about Main Dishes

Read more about Desserts

One Bowl Jalapeno Cheddar Cornbread | Made by Meaghan Moineau

One Bowl Jalapeno Cheddar Cornbread | Made by Meaghan Moineau

Title: Spicing Up Tradition: One Bowl Jalapeno Cheddar Cornbread
Description: Discover the heartwarming blend of flavors in our One Bowl Jalapeno Cheddar Cornbread. This easy-to-make recipe is a delightful twist on a classic, blending spicy jalapenos with creamy cheddar and the comforting texture of cornbread. Perfect as an appetizer or side dish, this cornbread has a special place in our family gatherings.

---


Recipe: One Bowl Jalapeno Cheddar Cornbread
Difficulty: 3/10
Category: Appetizer / Side Dish

---


A Nostalgic Bite of Family Tradition


Every family has that one dish that feels like home—a recipe that transports you back to warm kitchens and laughter-filled dining rooms. For our family, that dish has always been Jalapeno Cheddar Cornbread. I remember my grandmother, her apron dusted with flour, humming to herself as she prepared this dish in her cozy kitchen. The air was always filled with the rich aroma of melting butter and the sharpness of cheddar cheese.


As a child, I would watch her, fascinated by the way she effortlessly mixed the ingredients in a single bowl. Her secret, she’d say with a wink, was the love she poured into every stir. As the bread baked, we’d all gather around the table, eagerly waiting for that first warm bite. The spicy kick of jalapenos combined with the creamy cheddar and sweet cornmeal was a taste that defined our family gatherings.


Ingredients


- 1 stick unsalted butter, melted


- 1 cup white sugar


- 2 large eggs


- 1 cup buttermilk


- 1 teaspoon baking soda


- 1 cup cornmeal


- 1 cup all-purpose flour


- 1/2 teaspoon salt


- 1 cup shredded cheddar cheese


- 1/2 cup canned diced jalapenos


- 1 fresh jalapeno, thinly sliced (for topping)


Instructions


1. Melt the Butter: Start by melting a stick of unsalted butter in a microwave-safe bowl. Microwave in 30-second intervals until fully melted.
2. Mix the Wet Ingredients: Whisk in the white sugar until well combined, followed by the eggs, ensuring the mixture is smooth.
3. Combine Buttermilk and Baking Soda: In a separate bowl, mix the buttermilk with baking soda, then pour this into the butter mixture. Stir until everything is well incorporated.
4. Incorporate the Dry Ingredients: Add cornmeal, flour, and salt to the mixture. Stir in the shredded cheddar cheese and canned diced jalapenos until just combined—be careful not to overmix.
5. Prepare the Oven and Pan: Preheat your oven to 375 degrees F. Prepare a mini loaf pan or an 8x8 pan with cooking spray.
6. Bake: Spoon the batter into the prepared pan. Top the batter with thinly sliced fresh jalapenos for an extra kick. Bake for about 25 to 35 minutes, depending on your pan size. Keep an eye on the cornbread as it bakes, and remove once a toothpick inserted comes out clean.
7. Cool and Serve: Let the loaves cool in the pan for a few minutes before transferring them to a cooling rack. Serve warm and enjoy the nostalgic blend of flavors that will surely become a staple in your family traditions.

Conclusion


This One Bowl Jalapeno Cheddar Cornbread isn't just a recipe; it's a piece of our family's story—a story of love, warmth, and shared meals. Whether you're making it for a holiday gathering or a simple weeknight dinner, this cornbread promises to bring a smile to your face and warmth to your heart. Serve it as an appetizer or side dish, and watch it become a beloved part of your own family's memories.

Read more about Appetizers

Read more about Main Dishes

Read more about Desserts

Quick N’ Easy Basil Pesto | Made by Meaghan Moineau

Quick N' Easy Basil Pesto | Made by Meaghan Moineau

Title: "Embrace the Flavors of Tradition: Quick N' Easy Basil Pesto Recipe"
Description: Dive into the rich, aromatic world of basil pesto with our Quick N' Easy recipe that promises to transport you back to cherished family gatherings. Whether you're a culinary novice or a seasoned home chef, this flavorful dish is sure to add a touch of nostalgia to your kitchen.

---


Quick N' Easy Basil Pesto: A Taste of Family Tradition

There's something undeniably comforting about the aroma of fresh basil mingling with the earthy tones of pine nuts and the pungent allure of garlic. For me, basil pesto isn't just a versatile condiment—it's a portal to sun-drenched summer afternoons spent in my grandmother's kitchen. It’s about the stories shared over the rhythmic hum of the food processor and the vibrant green concoction that would eventually grace our family table.


Ingredients:

- 2 cups fresh basil leaves


- 1/2 cup olive oil


- 1/3 cup pine nuts


- 2 cloves garlic


- 1/2 cup grated parmesan cheese


Instructions:

1. In a food processor, begin by adding a handful of fresh basil leaves, a drizzle of olive oil, a sprinkle of pine nuts, and a couple of garlic cloves.


2. Blend until the mixture starts to combine, then add the parmesan cheese.


3. Continue alternating the addition of ingredients, ensuring a smooth blend. If the pesto isn’t reaching the desired consistency, add more olive oil incrementally.


4. Use the pesto within 24 hours for optimal freshness, or freeze in plastic wrap-lined muffin cups for later use.


Difficulty Rating: 3/10
Classification: Appetizer
A Whiff of Nostalgia:

The first time I helped make basil pesto, I was perched on a stool, barely tall enough to see over the counter. My grandmother, with her gentle hands and warm smile, guided me through the process. She taught me the importance of patience and balance, of knowing just when to add more olive oil or sprinkle in a bit more cheese.


We would sit together, savoring the vibrant green pesto smeared over crusty bread, and she would tell me stories of her own childhood in the Italian countryside. Those afternoons were filled with laughter and learning, and while the pesto was delicious, it was the connection and love that made it truly special.


Today, whenever I make basil pesto, I’m reminded of those cherished moments. It’s amazing how a simple blend of ingredients can become a vessel for memories, transporting you to a different time and place.


Conclusion:

This Quick N' Easy Basil Pesto is more than just a recipe; it's an invitation to create your own memories. Perfect as an appetizer or to enhance your favorite dishes, it's a testament to the power of food in bringing people together. So, gather your loved ones, share stories, and enjoy the timeless flavors of basil pesto. Your taste buds—and your heart—will thank you.

Read more about Appetizers

Read more about Main Dishes

Read more about Desserts

Roasted Beet Hummus | Made by Meaghan Moineau

Roasted Beet Hummus | Made by Meaghan Moineau

A Vibrant Twist on Tradition: Roasted Beet Hummus


A Taste of Home: The Story Behind the Dish


There are few dishes that capture the essence of nostalgia quite like hummus. For me, the aroma of roasted beets mingling with garlic and cumin instantly transports me back to my grandmother's cozy kitchen. Her home was always filled with the comforting scent of freshly baked bread, and her table was a testament to her love for vibrant, soul-warming foods. I remember her teaching me the art of making hummus, our hands stained pink from the beets, as we laughed and shared stories of our family's culinary roots. It was in her kitchen that I learned the magic of simplicity—how a handful of ingredients could come together to create something truly extraordinary.


A Splash of Color: Roasted Beet Hummus Recipe


Ingredients:

- 2 medium-sized red roasted beets

- 1 can of cooked chickpeas (about 1.5 cups)


- 2 cloves of garlic


- 1 teaspoon ground cumin


- Juice of 1 lemon


- 3 tablespoons olive oil (plus more as needed)


- Salt to taste


- 3 tablespoons tahini sesame seed paste


Instructions:

1. Prepare the Beets: If you haven't done so already, roast your beets until tender. Once cool, peel and chop them into manageable pieces.
2. Blend the Base: In a food processor or blender, add the roasted beets, garlic, ground cumin, lemon juice, salt, and tahini. Pulse until the mixture is well blended and smooth.
3. Incorporate Chickpeas: Add the cooked chickpeas and olive oil to the mixture. Pulse until the chickpeas are just incorporated, achieving a smooth texture. If the hummus is too thick, gradually add more olive oil until you reach your desired consistency.
4. Serve and Enjoy: Transfer your vibrant beet hummus to a serving bowl. This dish pairs perfectly with warm pita or flatbread, making it an enticing appetizer for any gathering.

Difficulty Rating: 3/10


Roasted Beet Hummus is a delightful appetizer that’s as easy to make as it is to enjoy. With a difficulty rating of just 3 out of 10, it's accessible to chefs of all skill levels, offering a quick and satisfying splash of color and flavor to your table.


A Dish to Remember


Every time I make this Roasted Beet Hummus, I'm reminded of those cherished times spent with my grandmother. The vibrant color and earthy flavors are a testament to the beauty of simplicity and the joy of sharing meals with loved ones. Whether you're introducing this dish to your family for the first time or incorporating it into your regular culinary repertoire, Roasted Beet Hummus is sure to become a beloved staple, creating new memories and stories to be passed down through generations.


Keywords: Roasted Beet Hummus, Easy Appetizer, Family Recipe, Nostalgic Cooking, Vibrant Flavors, Mediterranean Cuisine

Read more about Appetizers

Read more about Main Dishes

Read more about Desserts

Sun Dried Tomato Stuffed Mushrooms | Made by Meaghan Moineau

Sun Dried Tomato Stuffed Mushrooms | Made by Meaghan Moineau

Savoring Nostalgia: Sun-Dried Tomato Stuffed Mushrooms


A Family Recipe That Transcends Generations


Introduction:

In the heart of every home, there’s a dish that sparks joy, evokes cherished memories, and unites family members around the dining table. For my family, that dish is Sun-Dried Tomato Stuffed Mushrooms. This delectable appetizer, with its rich blend of Mediterranean flavors, has been the centerpiece of our gatherings for as long as I can remember. Whether it's a festive holiday dinner or a casual Sunday brunch, these savory stuffed mushrooms never fail to bring a smile to our faces and warmth to our hearts.


Ingredients:

- White button mushrooms


- Bread crumbs


- Red diced roasted pepper


- Roasted garlic (from one bulb)


- Diced kalamata olives


- Diced onion


- Diced sun-dried tomatoes


- Olive oil


- Cream cheese


- Mozzarella


- Provolone


- Asiago


- Parmesan


- Romano


- Red pepper flakes


- Dried oregano


- Salt and pepper to taste


Instructions:

1. Preheat your oven to 350°F (175°C). Begin by cleaning the mushrooms and removing the stems. Lightly oil the mushroom caps and arrange them on a greased cookie sheet.


2. Finely dice the mushroom stems and set them aside. In a large bowl, combine cream cheese, mozzarella, provolone, asiago, parmesan, romano, half of the dried bread crumbs, red pepper flakes, and dried oregano. Stir until well combined. Season with salt and pepper to taste, then set aside.


3. Over medium heat, sauté the onions in olive oil until they become translucent. Add the diced mushroom stems and continue to sauté for one minute.


4. Stir in the roasted garlic, kalamata olives, roasted red peppers, and sun-dried tomatoes. Cook until the mixture is thoroughly heated.


5. Add the sautéed vegetables to the reserved cream cheese mixture and stir to combine.


6. Scoop one tablespoon of the mixture into each prepared mushroom cap. Sprinkle with the remaining bread crumbs and mozzarella cheese.


7. Bake in the oven for 20-25 minutes until the mushrooms are browned and the cheese is melted. Let them stand for 5 minutes before serving.


Difficulty Rating: 4/10
Classification: Appetizer
A Nostalgic Family Memory:

Every year, as the leaves turned golden and the air grew crisp, my grandmother would prepare her famous Sun-Dried Tomato Stuffed Mushrooms for our Thanksgiving feast. The kitchen would fill with the comforting aroma of garlic and roasted peppers, blending with the warm, creamy cheeses. As a child, I loved helping her mix the ingredients and stuff the mushroom caps, feeling as though I was contributing to our family tradition.


On one particular Thanksgiving, after the meal was devoured and the dishes were cleared, my grandmother shared a story of how she first discovered the recipe. She recounted her travels to the Mediterranean coast, where she fell in love with the vibrant flavors and simple yet exquisite ingredients that inspired her to create this dish. Listening to her tale, I realized that these mushrooms were more than just an appetizer; they were a symbol of her adventurous spirit and her love for family.


To this day, whenever I prepare Sun-Dried Tomato Stuffed Mushrooms, I'm reminded of my grandmother's laughter and the love she infused into every meal. These stuffed mushrooms continue to be a cherished part of our family gatherings, linking the past with the present and creating new memories for future generations to savor.

Read more about Appetizers

Read more about Main Dishes

Read more about Desserts