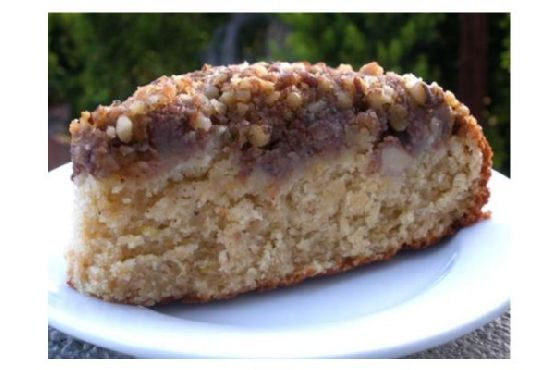
Gluten Free Almond Blueberry Coffee Cake
Intro
There’s something incredibly special about the aroma of a freshly baked coffee cake wafting through the house. It takes me back to my childhood, when my grandmother would bake her famous blueberry coffee cake every Sunday morning. We’d gather around the kitchen table, the sun streaming through the windows, and savor each bite of that tender, sweet cake. Today, I’m thrilled to share a gluten-free version inspired by those cherished memories: Gluten Free Almond Blueberry Coffee Cake. It’s a delightful treat that’s sure to become a favorite in your home too.
Why You’ll Love It
This Gluten Free Almond Blueberry Coffee Cake is a perfect blend of flavors and textures. It’s moist and tender, with a hint of nuttiness from the almonds and a burst of juicy sweetness from the blueberries. Whether you’re gluten-free or not, this cake is sure to delight. It’s easy to make, and the ingredients are simple and wholesome. Plus, the rustic topping of turbinado sugar and almonds adds a delightful crunch that makes this cake truly special.
Ingredients
- 2 cups gluten free flour
- 1 cup frozen blueberries
- 1 tablespoon gluten free flour
- 1/2 cup canola oil
- 1 large egg
- 1/2 cup vanilla yogurt
- 1/2 cup whole milk
- 1 cup granulated sugar
- 2 teaspoons baking powder
- 1/2 teaspoon xanthan gum
- 1/2 teaspoon fine sea salt
- 1/4 cup raw turbinado sugar
- 1/4 cup sliced almonds
Instructions
- Preheat your oven to 375 degrees F and spray a 9″ springform pan with nonstick spray. Set aside.
- In a large bowl, whisk together the egg, whole milk, vanilla yogurt, and canola oil. Set aside.
- In a separate medium bowl, whisk together 2 cups of the flour, granulated sugar, baking powder, xanthan gum, and fine sea salt.
- Add the dry ingredients to the wet and mix to combine until just moistened. Do not overmix.
- In a small bowl, combine 1 cup of the blueberries with the remaining 1 tablespoon flour. Fold the blueberries into the batter very gently until dispersed evenly. It is OK if they bleed just a little bit.
- Pour the batter into the prepared pan and flatten and even out with a spatula. Top with the remaining blueberries.
- In a small bowl, toss the turbinado sugar and almonds together. Sprinkle on top of the cake.
- Transfer the cake to the oven and bake for 30-35 minutes or until a toothpick comes out with just a few crumbs.
- Remove from heat and let cool in the pan for 15 minutes. Release the sides and transfer the cake to a wire rack to cool the rest of the way.
- Enjoy immediately or cover with plastic wrap and eat within 2 days.
Tips
For best results, make sure all your ingredients are at room temperature before beginning. This helps them to incorporate smoothly into the batter. Also, when folding in the blueberries, do so gently to avoid breaking them and turning your batter blue.
Variations & Substitutions
You can substitute the blueberries for other berries like raspberries or chopped strawberries. If you don’t have vanilla yogurt, plain yogurt with a splash of vanilla extract works just fine. For a dairy-free version, use almond milk and coconut yogurt.
Storage
This cake is best enjoyed fresh, but it can be stored in an airtight container at room temperature for up to 2 days. For longer storage, refrigerate it for up to 5 days or freeze for up to 3 months. Thaw overnight in the refrigerator and bring to room temperature before serving.
FAQ
Can I use fresh blueberries instead of frozen?
Yes, absolutely! If using fresh blueberries, there’s no need to coat them with flour. Just fold them into the batter gently and proceed with the recipe as directed.
What is xanthan gum and is it necessary?
Xanthan gum is a common additive in gluten-free baking that helps provide structure and elasticity. It mimics the binding effects of gluten, which is absent in gluten-free flours. For this recipe, it is recommended to maintain the texture of the cake.
Can I make this cake vegan?
To make this cake vegan, you can substitute the egg with a flax egg (1 tablespoon flaxseed meal mixed with 2.5 tablespoons water) and use plant-based milk and yogurt alternatives. Ensure all other ingredients, like your flour mix, are vegan-friendly.
Nutrition
This recipe makes approximately 8 servings. Each serving contains approximately:
- Calories: 320
- Carbohydrates: 45g
- Protein: 5g
- Fats: 15g
- Fiber: 3g
- Sugar: 20g
Please note that these values are approximate and can vary based on specific brands and measurements used.
Conclusion
This Gluten Free Almond Blueberry Coffee Cake is more than just a delightful treat; it’s a nod to cherished memories and a celebration of flavors and textures that everyone can enjoy. Whether you’re looking for a sweet addition to your brunch menu or a comforting afternoon snack, this cake is sure to impress. I hope you love this recipe as much as I do, and that it brings a touch of warmth and nostalgia to your kitchen.
Related update: Gluten Free Almond Blueberry Coffee Cake