Knishes – Potato Filling | Made by Meaghan Moineau

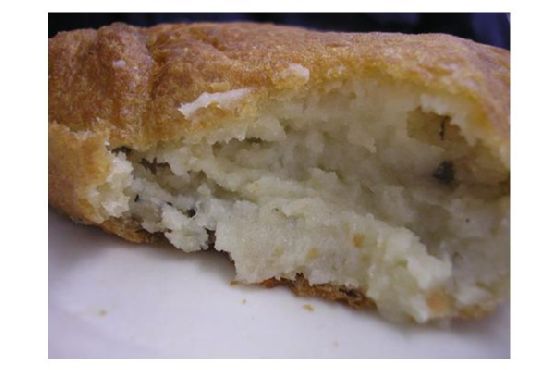
Knishes - Potato Filling | Made by Meaghan Moineau

Title: A Taste of Heritage: Crafting the Perfect Potato Knishes
Description: Dive into the rich tapestry of family tradition with our potato-filled knishes recipe. Discover the secrets behind this savory delight, steeped in nostalgia and bursting with flavor. Whether you're a seasoned chef or a kitchen novice, this guide will walk you through each step to create a dish that's truly a piece of culinary history.

---


There's something magical about the smell of onions browning in a pan, mingling with the richness of chicken fat. It's a scent that transports me back to my grandmother's cozy kitchen, where the aroma signaled the beginning of a cherished tradition: making potato knishes. These savory pastries, with their golden crust and fluffy filling, were more than just food; they were a symbol of our family's heritage, lovingly passed down through generations.


Ingredients:

- Chicken fat (or butter, if you prefer)


- 1 egg


- 2 large onions, finely chopped


- Freshly ground black pepper, to taste


- 4 medium potatoes, peeled and boiled


- Salt, to taste


Instructions:
1. Brown the Onions: Begin by heating the chicken fat in a large skillet over medium heat. Add the finely chopped onions and sauté until they are golden brown and caramelized, releasing their sweet, savory aroma.
2. Prepare the Filling: In a large mixing bowl, combine the boiled potatoes with the browned onions. Add in the egg, salt, and pepper. Using a fork or potato masher, beat the mixture until it's light and fluffy, ensuring that the flavors meld together beautifully.
3. Assemble the Knishes: Roll out your dough (store-bought or homemade) on a lightly floured surface. Cut the dough into squares or circles, depending on your preference. Place a generous spoonful of the potato mixture in the center of each piece. Fold the dough over the filling, sealing the edges to form a pocket.

Growing up, making knishes was a family affair. My siblings and I would gather around the kitchen table, eagerly watching our grandmother as she worked her magic with the dough. Her hands moved with a practiced grace, folding and sealing each knish with a loving touch. As we got older, she entrusted us with the task, guiding our clumsy fingers until we, too, could craft the perfect pastry.


For us, knishes were more than just an appetizer; they were a bridge to our past. Each bite was a reminder of the stories our grandmother told us—tales of her childhood, of family gatherings long before we were born. The knishes connected us to those who came before, to the traditions that shaped our family.


Difficulty Rating: 5/10

Crafting these knishes is a delightful blend of art and comfort. With a medium difficulty level, this dish is accessible to both budding cooks and seasoned chefs. It falls under the category of an appetizer, serving as a perfect prelude to a hearty meal.


Today, as I prepare knishes in my own kitchen, I feel a profound sense of gratitude. Gratitude for the recipes handed down, for the memories etched in my heart, and for the opportunity to share this piece of my heritage with my children. As they savor these warm, flaky pastries, I hope they, too, will feel the love and history that each knish embodies.

Read more about Appetizers

Read more about Main Dishes

Read more about Desserts

Herb and Cheddar Cordon Bleu | Made by Meaghan Moineau

Herb and Cheddar Cordon Bleu | Made by Meaghan Moineau

Title: Savoring Tradition: Herb and Cheddar Cordon Bleu
Description: Dive into a heartwarming family recipe that brings the comfort of home to your kitchen. Our Herb and Cheddar Cordon Bleu is a savory main dish that combines the richness of cheddar cheese, the smoky tenderness of deli ham, and the aromatic blend of herbs, providing an unforgettable culinary experience. Join us as we explore this dish that has been passed down through generations, complete with a nostalgic family story that adds a pinch of love to every bite.

---


Herb and Cheddar Cordon Bleu: A Taste of Family Legacy

There is something about the combination of herbs and cheddar that speaks directly to the heart. Every time I prepare this Herb and Cheddar Cordon Bleu, I am transported back to Sunday afternoons spent in my grandmother's kitchen, where the air was always filled with the comforting aroma of her culinary creations.


Ingredients You'll Need:

- 4 chicken breasts


- 4 slices of deli ham


- 4 slices of cheddar cheese


- 1 cup of breadcrumbs


- 1 teaspoon of dried marjoram


- 1 teaspoon of dried parsley


- 1 teaspoon of dried rosemary


- 1 egg


- 1/2 cup of flour


- Salt and pepper to taste


Instructions:
1. Preheat and Prep: Preheat your oven to 350°F (about 176°C). Take the chicken breasts and place them between two slices of wax paper. Using a rolling pin or meat mallet, flatten them until they're about a quarter of an inch thick.
2. Layer and Roll: On each flattened chicken breast, place a slice of ham and a slice of cheddar cheese. Roll each chicken breast as tightly as possible, securing with toothpicks or small skewers if needed.
3. The Coating Process: In a shallow baking dish, beat the egg. Prepare two more stations with foil or dishes: one for flour and another for a mixture of dried herbs and breadcrumbs. Coat each rolled chicken breast in flour, dip in the egg mixture, then press into the breadcrumb and herb mixture until fully covered.
4. Bake to Perfection: Place the prepared chicken in an oiled or buttered baking dish. Bake for about 30 minutes, or until the chicken is cooked through and the coating is golden brown.
A Bite of Nostalgia:

Growing up, Sunday dinners were a cherished tradition in our family. My grandmother, the matriarch of our culinary clan, would often prepare this Herb and Cheddar Cordon Bleu, filling her cozy kitchen with its irresistible scent. As a child, I would stand by her side, eagerly watching her every move, hoping to someday recreate her magic. The warmth of her kitchen, the gentle hum of her stories, and the love she infused into every dish were the soul of our family gatherings.


This dish, much like the memories it holds, is simple yet deeply satisfying. The medley of herbs and cheese wrapped in succulent chicken transports me back to those joyful Sundays, surrounded by laughter and love.


Difficulty Rating: 6/10
Category: Main Dish

Our Herb and Cheddar Cordon Bleu is a delightful nod to family traditions, perfect for any gathering that calls for warmth and nostalgia. Whether you're creating new memories or savoring old ones, this dish is sure to become a beloved staple in your home, too.

Read more about Appetizers

Read more about Main Dishes

Read more about Desserts

Ancho Chipotle Chili | Made by Meaghan Moineau

Ancho Chipotle Chili | Made by Meaghan Moineau

Title: "Spice Up Your Dinner Table with Ancho Chipotle Chili: A Hearty Family Favorite"
Description: Dive into the rich and smoky flavors of Ancho Chipotle Chili, a dish that brings warmth and nostalgia to any dinner table. Discover how this simple yet robust recipe, rated 6/10 in difficulty, can transform into a cherished family tradition. Perfect as a main dish, this chili combines savory ground beef, vibrant bell peppers, and the deep flavors of ancho and chipotle chiles, offering a symphony of taste in every bite.

---


There’s something uniquely comforting about a pot of chili simmering on the stove, its fragrant spices wafting through the house. For my family, Ancho Chipotle Chili isn't just a meal; it's a treasured tradition that brings us back to simpler times. This dish, rich in flavor and steeped in nostalgia, has been a staple at our family gatherings for generations.


Ingredients You'll Need:


- Dried ancho chile


- Vegetable bouillon powder


- Cumin


- Dried chipotle chile


- Fresh cilantro


- Ground beef


- Mushrooms


- Onion


- Dried oregano


- Red bell pepper


- Salt and pepper


- Tomato sauce


- Water


Instructions:


1. Prepare the Chiles: Start by slicing open the dried ancho and chipotle chiles to remove the seeds and pith. In a warm skillet over medium heat, toast the chiles for a few seconds on each side until they become fragrant—be careful not to burn them! Remember to wear gloves or wash your hands thoroughly after handling the chiles.
2. Soak the Chiles: Place the toasted chiles in a bowl or saucepan, pouring 250ml of boiling water over them. Allow them to soak for at least 15 minutes to soften.
3. Saute the Vegetables: In a large pot, sauté the chopped red bell pepper, onion, and mushrooms over medium heat until they are tender and aromatic.
4. Crisp the Beef: Meanwhile, in a separate skillet, fry the ground beef until it is crispy and browned.
5. Blend the Chiles: Once soaked, blend the chiles along with their soaking liquid to create a smooth paste.
6. Combine Ingredients: Add the crispy beef to the pot with sautéed vegetables, followed by the tomato sauce and blended chiles. If the mixture requires more liquid, add beef or vegetable broth (or water mixed with bouillon powder) until everything is adequately covered.
7. Season and Simmer: Season the chili with salt, pepper, cumin, and oregano to taste. Allow it to simmer gently for about 45 minutes, or until it reaches your desired thickness.
8. Serve: Ladle the chili into bowls and garnish with fresh cilantro for a burst of freshness.

A Taste of Family Tradition


Every time I prepare Ancho Chipotle Chili, I am transported back to my grandmother's kitchen. I remember the joy of watching her work her magic, effortlessly blending spices and ingredients. The kitchen was always filled with the laughter of cousins and the clatter of dishes, a symphony of sounds that signaled a meal made with love.


One particular memory stands out: a chilly autumn evening when the whole family gathered after a day of apple picking. We were all huddled around the table, bowls of steaming chili in front of us, as my grandmother recounted stories of our ancestors' culinary adventures. That night, the warmth of the chili was more than just physical; it was a reminder of our shared history and the love that binds us.


Difficulty Rating: 6/10


This Ancho Chipotle Chili recipe is moderately easy to prepare, making it accessible for both novice and experienced cooks. With a bit of patience and attention to detail, you'll create a dish that's sure to become a beloved staple in your own family tradition.


Classification: Main Dish


Whether served at a family gathering or a casual weeknight dinner, this chili is sure to satisfy and delight. Its robust flavors and hearty ingredients make it the perfect main dish to warm your heart and soul. So, gather your loved ones, share stories, and savor the taste of tradition with every spoonful.

Read more about Appetizers

Read more about Main Dishes

Read more about Desserts

Cheesy Bacon Burger with Spicy Chipotle Aiolo Sauce | Made by Meaghan Moineau

Cheesy Bacon Burger with Spicy Chipotle Aiolo Sauce | Made by Meaghan Moineau

Title: The Ultimate Cheesy Bacon Burger with Spicy Chipotle Aioli: A Flavor Explosion to Remember
Description: Dive into the rich, savory world of the Cheesy Bacon Burger with Spicy Chipotle Aioli Sauce. This mouthwatering dish combines the smoky heat of chipotle with the creamy goodness of Laughing Cow cheese, all encased in a juicy burger. Perfect for summer cookouts or family gatherings, this burger is not just a meal but a memory in the making.

---


The Ultimate Cheesy Bacon Burger with Spicy Chipotle Aioli: A Flavor Explosion to Remember


When it comes to comfort food, few things can compete with a juicy burger fresh off the grill. The Cheesy Bacon Burger with Spicy Chipotle Aioli Sauce is a testament to this, marrying the rich, smoky flavors of chipotle chiles and turkey bacon with the creamy delight of Laughing Cow cheese. It's a dish that doesn't just satisfy your hunger but also evokes sweet family memories.


Ingredients You'll Need


- For the Burger:

- 8 oz lean ground beef


- 4 wedges of Laughing Cow Swiss cheese


- 4 slices of cooked turkey bacon


- 1 green bell pepper, diced


- 1 onion, diced


- 1 tsp garlic powder


- 1/2 tsp ground black pepper


- Whole wheat hamburger buns


- For the Spicy Chipotle Aioli Sauce:

- 2 chipotle chiles in adobo, minced


- 1/2 cup fat-free mayonnaise


- 1/4 cup Greek yogurt


- 1 clove garlic, minced


- 1 tbsp fresh lime juice


- 1/2 tsp ground cumin


Instructions


For the Burgers:
1. Prepare the Bacon and Veggies: In a pan, cook the turkey bacon according to the package instructions. Once done, set aside. In the same pan, add diced bell pepper and onion. Cook until tender, about 10 minutes.
2. Season the Beef: In a small bowl, combine the ground beef with garlic powder and black pepper, mixing well.
3. Form the Patties: Divide the seasoned beef into 8 equal pieces, approximately 2 oz each. Flatten each piece and place half a wedge of cheese on top. Cover with another piece of beef, sealing the edges to keep the cheese from oozing out.
4. Grill to Perfection: Place the burgers on the grill and cook for about 5 minutes on each side, or until done to your liking.
5. Assemble the Burger: Place the cooked burger on a whole wheat bun, top with turkey bacon, cooked peppers, onions, and a generous dollop of spicy chipotle aioli sauce.
For the Spicy Chipotle Aioli Sauce:
1. Mix It Up: In a small bowl, combine minced chipotle chiles, mayonnaise, Greek yogurt, minced garlic, lime juice, and ground cumin. Whisk until well blended. This yields about 3/4 cup or 12 tablespoons of sauce.

A Nostalgic Family Memory


As I prepare this delicious burger, I'm reminded of the summer barbecues at my grandmother's house. The smoky aroma of grilled meat mixed with the laughter of family filled the air. My father, the grill master, would always hand me the first sizzling burger, packed with cheese and topped with his secret spicy sauce. As a child, I would sit at the picnic table, eagerly awaiting that first bite, knowing it would be another cherished memory added to our family gatherings.


Difficulty Rating: 6/10


This flavorful burger is classified as a Main Dish. While the recipe involves several steps, from preparing the sauce to grilling the burgers, it is straightforward and highly rewarding. With a bit of preparation, even novice cooks can bring this delightful dish to life.

Dive into this recipe, and let it become a cherished memory for your family, just as it is for mine. Whether for a casual weeknight dinner or a lively family cookout, the Cheesy Bacon Burger with Spicy Chipotle Aioli is sure to be a hit. Enjoy the blend of flavors and the joy of good company around the table.

Read more about Appetizers

Read more about Main Dishes

Read more about Desserts

Three-Cup Chicken | Made by Meaghan Moineau

Three-Cup Chicken | Made by Meaghan Moineau

Title: Unveiling the Soul of Taiwanese Cuisine: The Irresistible Allure of Three-Cup Chicken
Description: Discover the rich flavors and heartwarming stories behind Three-Cup Chicken, a classic Taiwanese main dish. With its aromatic blend of basil, garlic, and ginger, this recipe invites you on a journey to savor the essence of tradition and family memories. Rated 6/10 in difficulty, Three-Cup Chicken is an adventure for your culinary skills and your taste buds.

---


In the world of Taiwanese cuisine, few dishes capture the heart and soul of tradition quite like Three-Cup Chicken. This vibrant main dish, renowned for its aromatic blend of basil, bulb garlic, and old ginger, is more than just a culinary delight—it's a journey into the depths of family warmth and cherished memories.


A Taste of Tradition: The Recipe


To create this flavorful masterpiece, you will need the following ingredients: fresh basil, bulb garlic, slices of old ginger, a generous splash of rice wine, the nutty essence of sesame oil, a rich soy sauce, crisp spring onions, a hint of sugar, and, of course, a whole chicken.


Begin by marinating the chicken with soy sauce, sesame oil, and rice wine. Allow these flavors to mingle for at least six hours, though letting them meld overnight is best. Once the marination is complete, let the chicken come to room temperature.


Next, heat some sesame oil in a wok or claypot until it's sizzling hot. Introduce the garlic, ginger, and spring onions, frying them briefly until their fragrance fills the air. Add the chicken, searing it to seal in the flavors. Keep stir-frying as you pour in the marinade liquid and a sprinkle of sugar.


Once you achieve a rolling boil, cover the wok or claypot, letting it simmer gently over a small flame. Allow the liquid to evaporate completely, leaving the chicken caramelized, with just the right touch of char. The result should be a sizzling dish, ready to be served with pride.


A Nostalgic Journey: Family Memories


The aroma of Three-Cup Chicken always takes me back to my grandmother's cozy kitchen, where every meal was a labor of love. As a child, I would watch in awe as she expertly prepared this dish, each step a testament to her culinary prowess. The kitchen would fill with the comforting scents of garlic and ginger, enveloping us in a warm embrace that only home-cooked meals can provide.


I remember one particular family gathering when my grandmother, with her usual flair, prepared Three-Cup Chicken for a Sunday dinner. As we sat around the table, the chicken, glistening with its caramelized glaze, was the star of the meal. Each bite was a burst of flavor, a perfect harmony of sweet, salty, and aromatic notes. As we shared stories and laughter, I realized that this dish was more than just food; it was a bridge connecting generations, a reminder of our shared heritage and love.


Culinary Adventure: Difficulty and Classification


Rated at a moderate 6/10 on the difficulty scale, Three-Cup Chicken offers a manageable challenge for home cooks eager to explore Taiwanese cuisine. Its rich, complex flavors make it a proud addition to any table as a main dish.


In Conclusion


Three-Cup Chicken is not merely a recipe; it's an invitation to partake in a culinary tradition steeped in history and family bonds. Whether you're a seasoned chef or an enthusiastic home cook, this dish promises a rewarding experience, both in its preparation and in the joy it brings to those who gather to share it. Dive into the world of Taiwanese flavors and let Three-Cup Chicken be your guide on this delicious journey.

Read more about Appetizers

Read more about Main Dishes

Read more about Desserts

How to Make the Best Chili | Made by Meaghan Moineau

How to Make the Best Chili | Made by Meaghan Moineau

The Ultimate Comfort: How to Make the Best Chili


Discover the Heartwarming Recipe That's Been a Family Favorite for Generations


Chili holds a special place in many hearts, often evoking memories of cozy family gatherings and the delightful aroma that fills the kitchen on a chilly day. This blog post will guide you through making the best chili you've ever tasted, with a recipe that's easy to follow and bursting with flavor. This hearty dish is the perfect main course to warm your soul and satisfy your taste buds.


Ingredients You'll Need:


- 1 bell pepper, chopped


- 1 can of kidney beans


- 1 can of pinto beans


- 1 pound lean ground beef


- 1 large onion, chopped


- 1 can of tomato juice


- 1 can of tomato paste (optional substitute)


- 2 cups water


- 2 tablespoons chili powder


- 1 teaspoon cayenne pepper


- 1 teaspoon ground cumin


- 1 teaspoon black pepper


- 1 teaspoon oregano


- 1 tablespoon white sugar


Instructions:


1. Brown the Ground Beef: In a deep skillet, brown the lean ground beef over medium heat until it is fully cooked, then drain the excess fat.
2. Combine Ingredients: In a large pot over high heat, add the cooked ground beef, tomato juice, kidney beans, pinto beans, water, and tomato paste. Stir in the chili powder, cumin, black pepper, oregano, sugar, cayenne pepper, chopped bell pepper, and onions.
3. Bring to a Boil: Allow the mixture to come to a boil, stirring occasionally.
4. Simmer: Once boiling, reduce the heat and let it simmer uncovered for 2 hours. This allows the flavors to meld perfectly, creating a rich and savory chili.

A Nostalgic Memory


I vividly remember the first time I helped my grandmother make this chili. It was a cold winter evening, and the snow was gently falling outside. The kitchen was warm and inviting, filled with laughter and the comforting aroma of simmering spices. My grandmother handed me a wooden spoon, and with her guidance, I stirred the pot, watching as the ingredients melded into a rich, hearty stew. We shared stories and sipped hot cocoa while the chili simmered, creating a cherished memory that I hold dear to this day. Every time I prepare this dish, I'm transported back to that cozy kitchen, surrounded by love and the promise of a delicious meal shared with family.


Difficulty Rating: 4/10


With its straightforward instructions and readily available ingredients, this chili recipe is perfect for cooks of all skill levels. The most challenging part is waiting patiently as the chili simmers, allowing the flavors to develop fully.


Classification: Main Dish


This chili is more than just a meal—it's an experience. Perfect for family dinners, potlucks, or anytime you crave something hearty and satisfying. Serve it with a side of cornbread or over a bed of rice for an even heartier meal.


Conclusion


Making the best chili doesn't have to be complicated. With this simple recipe, you can create a dish that's not only delicious but also steeped in tradition and nostalgia. Whether you're a seasoned chef or a novice cook, this chili will become a staple in your kitchen, bringing warmth and joy to your family for years to come. So, grab your ingredients and get ready to savor the ultimate comfort food!

Read more about Appetizers

Read more about Main Dishes

Read more about Desserts

chilli chicken | Made by Meaghan Moineau

chilli chicken | Made by Meaghan Moineau

Title: "Spicy Nostalgia: The Flavorful Journey of Chilli Chicken"
Description: Dive into the rich, aromatic world of Chilli Chicken—a dish that not only tantalizes your taste buds but also stirs heartwarming family memories. From the vibrant colors of bell peppers to the savory depth of soya sauce, learn how this dish has become a beloved staple at our family gatherings. Rated 6/10 in difficulty, this versatile delight can be served as an appetizer or a main dish. Discover a cherished family story intertwined with this recipe and find complete cooking instructions at Swasthi's Recipes.

---


Spicy Nostalgia: The Flavorful Journey of Chilli Chicken

There’s something magical about family recipes—they are time machines that transport you back to cherished moments, filled with warmth, laughter, and the comforting aroma of home-cooked meals. Chilli Chicken, with its spicy allure and vibrant colors, holds a special place in my heart, not just as a dish but as a treasured family memory.


A Burst of Flavors and Colors

The beauty of Chilli Chicken lies in its simplicity and the explosion of flavors it offers. The key ingredients—bell peppers, boneless chicken breast, and slit green chilies—create a colorful medley that is as pleasing to the eye as it is to the palate. The essential spices—red chili powder and pepper powder—bring a fiery kick, while garlic and onion add depth and aroma. The sticky, savory embrace of soya sauce, combined with the tangy notes of vinegar and the subtle sweetness of sugar, create a harmonious balance that is simply irresistible.


A Family Tradition

Every family gathering at our house was incomplete without a sizzling platter of Chilli Chicken. I vividly remember my grandmother bustling around the kitchen, her hands deftly working through the ingredients, her face lit with a loving smile. The air would fill with the intoxicating aroma of garlic sizzling in oil, mixing with the spicy scent of red chili powder. It was a sensory symphony that signaled the start of another memorable feast.


One particular instance stands out in my memory: a chilly winter evening when the entire family was gathered around the dining table, the warmth of laughter and stories enveloping us like a cozy blanket. My grandmother placed the dish in the center, and as the steam rose, so did our anticipation. With each bite of the tender chicken and crunchy bell peppers, we were transported to a world where flavors danced on our tongues and time seemed to stand still.


Creating Your Own Memories

While nostalgia adds a unique flavor to Chilli Chicken, creating your own memories with this dish is just as delightful. Rated 6/10 in difficulty, it’s accessible yet rewarding, making it perfect for a family dinner or a casual gathering with friends. Whether you choose to serve it as an appetizer or the main dish, Chilli Chicken promises to be the star of the meal.


For those looking to recreate this flavorful journey, detailed instructions can be found at Swasthi's Recipes. Embrace the joy of cooking as you experiment with the ingredients, perhaps adding your own twist to make it uniquely yours.


In the end, Chilli Chicken is more than just a dish; it's a connection to the past, a celebration of the present, and an invitation to create future memories. So, gather your loved ones, roll up your sleeves, and let the rich, spicy aroma of Chilli Chicken weave its magic into your family story.


---


Whether you're a seasoned cook or a culinary novice, Chilli Chicken is an adventure worth embarking on. So, why not dig in and let this dish become a delicious chapter in your own family’s story?

Read more about Appetizers

Read more about Main Dishes

Read more about Desserts

Pan Seared Lamb Loin With Chimichurri & Roasted Trio Squash Salad With Goat Cheese and Pinenuts | Made by Meaghan Moineau

Pan Seared Lamb Loin With Chimichurri & Roasted Trio Squash Salad With Goat Cheese and Pinenuts | Made by Meaghan Moineau

Title: Savoring Tradition: Pan-Seared Lamb Loin with Chimichurri & Roasted Trio Squash Salad
Description: Discover the rich flavors and comforting nostalgia of our Pan-Seared Lamb Loin with Chimichurri paired with a Roasted Trio Squash Salad adorned with Goat Cheese and Pine Nuts. This main dish not only tantalizes your taste buds but also carries the warmth of cherished family memories. Experience a culinary journey that brings together the zest of fresh herbs and the heartwarming glow of the holiday table.

---


When it comes to family gatherings, few dishes evoke the warmth and comfort of home like a beautifully prepared lamb loin. As the holiday season approaches, I find myself reminiscing about the countless family dinners centered around this delightful dish. The aroma of fresh herbs mingling with the rich, savory lamb was a staple at our holiday table, a tradition passed down through generations.


Ingredients:

- Cilantro


- Extra virgin olive oil


- Flat leaf parsley


- Garlic clove


- Black ground pepper


- Kosher salt and pepper


- Lamb loin chops


- Lemon


- Mint


- Pine nuts


- Red pepper flakes


- Shallot


Instructions:
1. Preheat Your Oven: Start by preheating your oven to 400°F, setting the stage for a dish that’s sure to impress.
2. Prepare the Chimichurri: In a large bowl, combine cilantro, flat leaf parsley, minced garlic, lemon juice, mint, and a hint of red pepper flakes. Blend with extra virgin olive oil until you achieve a smooth consistency. Season to taste with kosher salt and freshly ground black pepper.
3. Sear the Lamb: Heat a large, heavy-bottomed pan with a splash of olive oil until it begins to smoke. Season each side of the lamb loin chops with salt and pepper. Sear them for about 2 minutes per side to lock in those delicious juices.
4. Oven Finish: Transfer the seared lamb to the preheated oven.

- For rare, roast for 2-3 minutes.


- For medium rare, extend to 6-8 minutes.


- For medium, let it cook for 9-11 minutes.


- For well done, aim for 12-14 minutes.


Remember, the lamb continues to cook after it's out of the oven, so adjust your times accordingly.


5. Roasted Trio Squash Salad: As the lamb cooks, prepare a medley of roasted squash. Toss sliced squash with olive oil, salt, and pepper, then roast until tender. Finish with a sprinkle of goat cheese and toasted pine nuts for a delightful crunch.
A Nostalgic Twist:

This dish always brings me back to a particular winter evening at my grandmother's house. The fireplace crackled, casting a warm glow across the dining room. I remember watching her skillfully sear the lamb, her hands moving with the confidence of years of practice. As we sat around the table, the laughter of my cousins filled the room, and the scent of chimichurri and roasted squash wrapped us in a cozy embrace. These moments, filled with love and laughter, are the essence of why I cherish this dish.


Difficulty: 6/10
Classification: Main Dish

---


Whether you’re creating new memories or savoring the nostalgia of family traditions, this Pan-Seared Lamb Loin with Chimichurri and Roasted Trio Squash Salad is sure to become a beloved part of your culinary repertoire. Indulge in the symphony of flavors and share a meal that speaks the universal language of love and togetherness.

Read more about Appetizers

Read more about Main Dishes

Read more about Desserts

Cider-Braised Pork Shoulder With Caramelized Onion and Apple Confit | Made by Meaghan Moineau

Cider-Braised Pork Shoulder With Caramelized Onion and Apple Confit | Made by Meaghan Moineau

Title: A Taste of Autumn: Cider-Braised Pork Shoulder with Caramelized Onion and Apple Confit
Description:

Dive into the heartwarming flavors of fall with our Cider-Braised Pork Shoulder with Caramelized Onion and Apple Confit. This main dish, rated 7 out of 10 on the difficulty scale, beautifully marries the rich, savory notes of pork with the sweet, tangy essence of apples and onions. As you savor each bite, you'll be transported back to cherished family gatherings and the cozy warmth of a kitchen filled with laughter and love.


---


The Recipe for Nostalgia and Comfort

When the leaves start to turn and the air crisps with the promise of autumn, there's nothing quite like gathering around a table with loved ones to share a meal that encapsulates the essence of the season. Our Cider-Braised Pork Shoulder with Caramelized Onion and Apple Confit isn't just a dish; it's a journey back to those nostalgic family dinners that marked the change of seasons.


Ingredients:

- 1 tied pork shoulder


- Black salt and pepper, to taste


- Olive oil


- 2 large yellow onions, thinly sliced


- 1/4 cup Calvados brandy


- 2 Granny Smith apples, peeled and sliced


- 4 garlic cloves, minced


- 1 teaspoon fresh dried thyme


- 2 cups apple cider


- 1 cup chicken stock


- 2 tablespoons Dijon mustard


Instructions:
1. Preheat and Prepare:

Begin by preheating your oven to 400°F (200°C). Pat the pork shoulder dry with paper towels and generously season with black salt and pepper.


2. Sear the Pork:

Heat olive oil in a large ovenproof pot or Dutch oven over medium-high heat. Brown the pork on all sides, turning with tongs, for about 6-8 minutes per side to create a rich, savory crust. Transfer the pork to a plate.


3. Caramelize the Onions:

Pour off excess fat from the pot, leaving just enough to coat the bottom. Add the sliced onions and 1 teaspoon of salt. Sauté over medium heat, stirring occasionally, until the onions are soft and deeply golden brown, about 18-20 minutes.


4. Deglaze and Build Flavor:

Stir in the Calvados to deglaze the pan, scraping up any browned bits. Add the apple slices, minced garlic, and thyme, cooking for an additional 30 seconds until fragrant.


5. Braise the Pork:

Nestle the pork shoulder back into the pot, ensuring it's surrounded by the onion mixture. Pour in the apple cider and chicken stock. Cover the pot and place it in the oven, reducing the heat to 325°F (163°C). Braise until the pork is incredibly tender, about 2 1/2 to 3 hours.


6. Finish the Sauce:

Once cooked, transfer the pork to a cutting board and remove the kitchen strings. Boil the onion and apple mixture over high heat until the liquid is slightly reduced and thickened, about 2 minutes. Stir in the Dijon mustard and season to taste with additional salt and pepper.


7. Serve and Enjoy:

Slice the tender pork into serving pieces and arrange them on a platter or individual plates. Generously spoon the caramelized onion and apple confit over and around the meat, allowing the flavors to meld beautifully.


A Family Memory:

This dish always reminds me of the autumn evenings spent at my grandmother's house. The warmth of her kitchen, the aroma of apples and onions slowly caramelizing, and the sound of laughter echoing through the rooms. One particular fall, as the first snowflakes began to dance in the air, she taught me how to prepare this very dish. My small hands struggled to tie the pork, but her gentle guidance and the promise of a comforting meal kept me eager to learn. As we sat down to dinner, wrapped in the cozy embrace of family, I realized that this was more than just a recipe—it was a legacy of love and tradition.


Conclusion:

This Cider-Braised Pork Shoulder with Caramelized Onion and Apple Confit is more than a main dish; it's a celebration of the season and a testament to the power of food to bring us together. As you recreate this dish, may it fill your home with warmth and your heart with cherished memories.

Read more about Appetizers

Read more about Main Dishes

Read more about Desserts

Big Batch Smoothie Bowl | Made by Meaghan Moineau

Big Batch Smoothie Bowl | Made by Meaghan Moineau

Title: Nourishing Nostalgia: The Big Batch Smoothie Bowl That Revives Family Memories
Description:

Step into a world where wholesome ingredients meet cherished family moments. Our Big Batch Smoothie Bowl is more than just a breakfast treat—it's a blend of flavors and memories, perfect for those who crave both nutrition and nostalgia.


---


The Big Batch Smoothie Bowl: A Wholesome Family Tradition

There's something magical about the clinking of spoons and the chatter of family gathered around the kitchen table. For me, the Big Batch Smoothie Bowl isn't just a delightful dish; it's a cherished family tradition that brings back vivid memories of sunlit mornings and joyous laughter.


Ingredients:

- Whey protein


- Frozen strawberries


- Frozen blueberries


- Bananas


- Pomegranate seeds


- Walnuts


- Pumpkin seeds


- Flaxseed


- Granola


Instructions:

1. Begin by blending the frozen strawberries and blueberries with creamy kefir and a scoop of whey protein. This step is best done ahead of time, allowing the mixture to rest until it reaches the perfect temperature—not too icy, just refreshingly cool.


2. Once your blend is ready, portion out each serving into inviting bowls. Top them with slices of ripe bananas, a generous sprinkle of pomegranate seeds, crunchy granola, and a dusting of ground walnuts and flaxseed. For an added burst of flavor and texture, scatter a few pumpkin seeds on top.


3. Gather your loved ones and savor each spoonful, enjoying not just the taste, but the moments shared together.


A Walk Down Memory Lane:

This smoothie bowl brings me back to summer mornings at my grandparents' house. I remember waking up to the aroma of ripe fruits and the soft hum of the blender. My grandmother would call us to the kitchen, her eyes twinkling with warmth and love.


As we sat around the table, each bowl was a masterpiece—vibrant colors of berries, the crunch of granola, and the subtle nuttiness of flaxseed. It wasn't just breakfast; it was a celebration of togetherness. My grandfather would share stories of his childhood, and we'd listen, captivated by tales of a simpler time.


Even now, as I prepare this dish for my own family, it's as if I'm honoring those memories, carrying forward a tradition that nourishes both body and soul. The Big Batch Smoothie Bowl is a testament to the power of food to connect generations, creating bonds that transcend time.


Difficulty Rating: 3/10

This recipe is as easy as it is delightful, with minimal preparation and maximum enjoyment.


Classification: Main Dish

While often enjoyed as a breakfast treat, the hearty ingredients make this smoothie bowl a satisfying main dish, perfect for starting the day on a healthy and happy note.


---


Embrace the blend of flavors and family memories with our Big Batch Smoothie Bowl. A dish that's as nourishing as it is nostalgic, allowing you to savor both the taste and the tradition, one spoonful at a time.

Read more about Appetizers

Read more about Main Dishes

Read more about Desserts

Chicken Piccata With Angel Hair Pasta | Made by Meaghan Moineau

Chicken Piccata With Angel Hair Pasta | Made by Meaghan Moineau

Zesty Chicken Piccata With Angel Hair Pasta: A Timeless Family Classic


Description


Discover the tangy and savory delight of Chicken Piccata with Angel Hair Pasta, a dish that balances bright citrus notes with the richness of a buttery sauce, all harmonized with tender chicken and delicate pasta. This main dish not only promises a burst of flavor but also serves as a nostalgic journey back to family gatherings marked by laughter, love, and unforgettable meals. Perfect for a weeknight dinner or a special occasion, this recipe is rated 6/10 in difficulty and will leave your taste buds dancing with joy.


---


A Walk Down Memory Lane


Growing up, Sunday dinners were a cherished tradition in our family. My grandmother would spend the afternoon bustling around the kitchen, her apron dusted with flour and a twinkle in her eye as she orchestrated the meal that would bring us all together. Chicken Piccata with Angel Hair Pasta was a staple, a dish that magically combined her Sicilian roots with a touch of modern flair.


I remember the way the kitchen smelled, the citrusy aroma of fresh lemons mingling with the savory scent of sautéed garlic and olive oil. As children, my cousins and I would gather around the table, eagerly awaiting the moment when she would place the steaming platter before us. Each bite was a revelation—the tangy capers popping against the tender chicken and the delicate strands of pasta soaking up the rich, buttery sauce.


Those evenings were filled with stories and laughter, the kind of moments that linger long after the plates have been cleared. To this day, every time I prepare this dish, I can almost hear my grandmother's gentle laughter and feel the warmth of those family gatherings. It's more than just a meal; it's a connection to the past, a way to keep those precious memories alive.


---


Ingredients


- 1 cup all-purpose flour


- 8 oz angel hair pasta


- 2 boneless chicken breasts


- 2 tablespoons capers


- 1 cup chicken broth


- Fresh basil, chopped


- 2 diced garlic cloves


- Black kosher salt and pepper to taste


- Zest and juice of 2 lemons


- 3 tablespoons olive oil, divided


- 1 teaspoon red chili flakes


- 2 diced Roma tomatoes


- 3 tablespoons unsalted butter


---


Instructions


1. Prepare the Chicken:

Place 1 cup of flour in a shallow dish. Using a sharp knife, slice each chicken breast in half. Cover each piece with wax paper and use a kitchen mallet to pound them to about ½ inch thick. Season the chicken generously with salt and pepper. Coat the chicken pieces in flour, shaking off any excess.


2. Cook the Chicken:

In a large skillet, heat 2 tablespoons of olive oil over medium heat. Add the chicken to the skillet and sauté each side until golden brown, about 3-4 minutes per side. Once cooked, transfer the chicken to a clean plate and cover with aluminum foil.


3. Boil the Pasta:

Begin boiling the angel hair pasta according to package instructions.


4. Make the Sauce:

Using the same skillet, add the remaining olive oil and sauté the garlic until aromatic, avoiding browning. Add red chili flakes, capers, lemon juice, lemon slices, zest, and chicken broth. Use a wooden spoon to scrape up any brown bits from the skillet. Increase heat to medium-high and allow the liquid to reduce by half.


5. Finish the Sauce:

In a small bowl, mash together 1 tablespoon of flour and the butter. Whisk into the reducing liquid, cooking for 1-2 minutes. Ensure the sauce is smooth and adjust seasoning with salt and pepper.


6. Combine Everything:

Drain the cooked pasta and toss it in the lemon caper sauce with tomatoes and basil, reserving a few spoonfuls of sauce. Adjust seasoning if needed.


7. Serve:

Plate the pasta and top each serving with a piece of chicken. Spoon the reserved lemon caper sauce over the chicken and pasta. Serve immediately.


---


Conclusion


Recreate this delicious Chicken Piccata with Angel Hair Pasta and transport yourself to a place where every meal becomes a memory worth savoring. Whether you're sharing it with family or enjoying a quiet evening at home, this dish promises to delight with its robust flavors and heartwarming nostalgia.

Read more about Appetizers

Read more about Main Dishes

Read more about Desserts

Bacalhau Macau | Made by Meaghan Moineau

Bacalhau Macau | Made by Meaghan Moineau

Title: Rediscovering Bacalhau Macau: A Delectable Fusion of Flavors
Description: Dive into the heartwarming world of Bacalhau Macau, a delightful fusion of Portuguese and Macanese cuisines. This recipe, with its rich flavors and crispy textures, promises to transport you to a time when family gatherings were filled with laughter, stories, and the comforting aroma of home-cooked meals.

---


Bacalhau Macau: A Journey Through Flavor and Family Traditions

There's something inherently magical about dishes that have the power to evoke cherished memories, to transport us back to a simpler time when the world seemed a bit more connected, and every meal was a celebration of togetherness. Bacalhau Macau is one such dish, a testament to the rich culinary tapestry woven by the Portuguese and Macanese cultures. This recipe, with its crispy-on-the-outside, fluffy-on-the-inside fish cakes, is not just a meal but a gateway to nostalgia.


Ingredients:

- 2 salt cod fillets


- 2 russet (Idaho) potatoes, diced


- 2 tablespoons butter


- 2 green onions, chopped


- 1/4 cup chopped cilantro


- 1/4 cup oil-cured olives, chopped


- 1 egg white


- 1 tablespoon sesame oil


- 1 teaspoon salt


- 2 cloves garlic, minced


- 1 teaspoon grated ginger


- 1/2 teaspoon white pepper


- 1/2 cup whipping cream


- 1 egg


- 1 cup Japanese breadcrumbs


- Vegetable oil, for frying


Instructions:

1. Begin by placing the salt cod in a bowl and covering it with cold water. Allow it to soak for 6 to 8 hours, changing the water at least once or twice during this time. Once soaked, drain, rinse thoroughly, and pat dry. Carefully shred the fish with your fingers.


2. In a medium saucepan, bring 3 inches of water to a boil. Add the diced potatoes and cook until tender, about 10 to 12 minutes. Drain and briefly return the potatoes to the pan to evaporate any excess moisture. Mash the potatoes until smooth, then whisk in the butter.


3. Stir the shredded cod into the mashed potatoes, followed by the green onions, cilantro, olives, egg white, sesame oil, salt, garlic, ginger, and white pepper. Mix until well combined.


4. In a chilled bowl, whip the cream until soft peaks form. Gently fold the whipped cream into the cod mixture using a rubber spatula.


5. Using two large soup spoons, shape about 3 tablespoons of the cod-potato mixture into an oval fish cake. Continue shaping until all the mixture is used, setting each cod cake on a baking sheet as you go.


6. Spread the breadcrumbs on a plate. Beat the egg in a wide, shallow bowl. Dip each cod cake in the egg, allowing any excess to drip off, then roll it in breadcrumbs to coat all sides. Place the coated fish cakes on a baking sheet.


7. Heat a large skillet over medium heat and add 1/4 inch of vegetable oil. Once the oil is hot, add as many cod cakes as fit without touching. Cook, turning once, until golden brown, about 5 to 7 minutes. Remove with a slotted spoon and drain on paper towels. Repeat with any remaining cakes.


8. Serve the Bacalhau Macau warm, reveling in the delightful blend of flavors that have stood the test of time.


A Nostalgic Note:

Growing up, Bacalhau Macau was a staple at our family gatherings. My grandmother, a beacon of culinary wisdom, would often recount tales of her childhood in Macau as she meticulously prepared this dish. Her kitchen was a symphony of sizzling sounds and aromatic scents, a sensory feast that drew our family together like bees to honey. We would gather around the table, eagerly awaiting the first bite, and as the crispy exterior gave way to the savory, pillowy interior, stories of the past would flow, binding us in a shared history that was as rich and textured as the dish itself.


Difficulty Rating: 6/10
Classification: Main Dish

Bacalhau Macau is more than a meal; it's an experience, a testament to the enduring power of family and the timeless joy of sharing food and stories. Whether you're steeped in the tradition of this dish or discovering it for the first time, may it bring warmth and connection to your table as it has to ours.

Read more about Appetizers

Read more about Main Dishes

Read more about Desserts

Herbivoracious’ White Bean and Kale Soup | Made by Meaghan Moineau

Herbivoracious' White Bean and Kale Soup | Made by Meaghan Moineau

Savoring Simplicity: Herbivoracious' White Bean and Kale Soup Recipe


A Comforting Bowl of Nostalgia and Nutrition


In the hustle and bustle of modern life, it's often the simplest things that bring the most comfort. Herbivoracious' White Bean and Kale Soup is one of those treasured recipes that seamlessly blends heartiness with wholesomeness. Whether you're a seasoned chef or a culinary novice, this soup is your gateway to a world of flavors that marries nutrition with nostalgia.


Ingredients


- 2 tablespoons olive oil
- 1 medium onion, diced
- 3 cloves garlic, whole
- 2 carrots, diced
- 1 teaspoon kosher salt
- 2 bay leaves
- 1 tablespoon fresh rosemary leaves
- Choice of Parmesan rind, dried porcini, or broth powder
- 1 cup dried white navy beans
- 6 cups water
- 1 bunch dinosaur kale, chopped
- Juice of 1 lemon
- Extra-virgin olive oil for drizzling

Instructions


Pressure Cooker Method


1. Sauté the Vegetables: In the pressure cooker, heat olive oil over medium-high heat. Sauté the onion, garlic, carrot, and salt until the onion is translucent, about 4 minutes.
2. Add Aromatics and Beans: Stir in the bay leaves, rosemary, and your choice of Parmesan rind, dried porcini, or broth powder. Add the dried beans and water.
3. Pressure Cook: Seal the pressure cooker and bring to high pressure. Cook for 40 minutes, then allow the pressure to release naturally.
4. Finalize the Soup: Open the lid, remove the bay leaves and Parmesan rind. Add the kale and lemon juice, and simmer for 10 minutes until the kale is tender. Adjust seasoning to taste.
5. Serve: Garnish with a generous drizzle of extra-virgin olive oil before serving.

Stovetop Method


1. Prepare the Beans: Soak beans overnight in ample water. Drain and place them in a large saucepan with enough water to cover by 2 inches. Bring to a boil, then reduce heat and simmer until tender, about 1 ½ to 2 hours. Drain, reserving the broth.
2. Sauté the Vegetables: In a large saucepan, heat olive oil over medium-high heat. Sauté the onion, garlic, carrot, and salt until the onion is translucent, about 4 minutes.
3. Simmer the Soup Base: Add 4 cups of the reserved bean broth, bay leaves, rosemary, and your choice of Parmesan rind, dried porcini, or broth powder. Simmer for 30 minutes.
4. Complete the Soup: Remove bay leaves and Parmesan rind. Add the cooked beans, kale, and lemon juice, simmering for 10 minutes until the kale is tender.
5. Serve: Adjust seasoning and serve with a drizzle of extra-virgin olive oil.

A Nostalgic Taste of Home


Growing up, Sundays were a time for family gatherings, where stories were shared and laughter echoed through the house. My grandmother often made a version of this White Bean and Kale Soup, filling the kitchen with its irresistible aroma. I remember sitting at her worn wooden table, watching the steam rise from my bowl as she recounted tales from her childhood. This soup, with its rustic charm and hearty flavors, became a symbol of family love and togetherness. Even today, every spoonful takes me back to those cherished moments, reminding me of the warmth and comfort of home.


Difficulty Rating: 4/10


Herbivoracious' White Bean and Kale Soup is a delightful main dish that's simple to prepare, making it accessible to cooks of all skill levels. With a bit of patience and love, this recipe transforms basic ingredients into a nourishing meal that feeds both body and soul.


Embrace the culinary journey of creating this comforting dish, and allow it to become a staple in your family's collection of wholesome recipes. Whether you're gathering around the table with loved ones or seeking solitude with a good book, this soup is a testament to the power of simplicity and the joy of homemade goodness.

Read more about Appetizers

Read more about Main Dishes

Read more about Desserts

Vietnamese Banh Mi | Made by Meaghan Moineau

Vietnamese Banh Mi | Made by Meaghan Moineau

Title: "Savory Memories: Crafting the Perfect Vietnamese Banh Mi"
Description: Dive into the delightful world of Vietnamese cuisine with our authentic Banh Mi recipe. Learn how to combine flavorful ingredients and create a sandwich that’s not just a meal, but a nostalgic journey. Perfectly balanced with tender pork, fresh herbs, and tangy pickles, this Banh Mi is rated 5/10 in difficulty and is a fulfilling main dish.

---


A Taste of Home: The Vietnamese Banh Mi


In the realm of Vietnamese cuisine, Banh Mi stands out as a testament to the country's rich culinary tapestry. This delightful sandwich, with its perfect balance of flavors and textures, has not only become a street food favorite but also a cherished dish in our family. Today, I’m excited to share both a beloved recipe and a heartwarming story that brings this dish to life.


Ingredients


- Rolls


- Pork loin, thinly sliced


- 2 cloves garlic, minced


- 3 tablespoons fish sauce


- 1 tablespoon sugar


- Freshly ground black pepper


- 1 small onion, sliced


- 2 tablespoons vegetable oil


- 1 teaspoon sesame seed oil


- Mayonnaise


- Fresh cilantro sprigs


- Pickled carrot and daikon


- Pâté


- Cucumber, sliced


- Jalapeño, sliced


Instructions


1. Marinate the Pork: In a large plastic bag, combine garlic, fish sauce, sugar, black pepper, onion, vegetable oil, and sesame seed oil. Mix well until the sugar dissolves completely. Add the thinly sliced pork loin to the marinade, ensuring each piece is well-coated. Seal the bag and let it marinate in the refrigerator for at least 1 hour to absorb all the flavors.
2. Cook the Pork: Heat a pan over medium heat. Remove the pork from the marinade and cook the slices in a single layer. Once one side is cooked, flip each piece to ensure even cooking on both sides. Once done, let the pork rest for 10 minutes before slicing into strips.
3. Assemble the Banh Mi: Slice the rolls in half and spread a generous layer of mayonnaise on one side. Add a layer of pâté on the other side. Carefully layer the pork strips, pickled carrot and daikon, cucumber slices, jalapeño, and cilantro sprigs inside the roll. Close the sandwich and serve immediately.

A Nostalgic Journey


Growing up, Banh Mi was more than just a meal; it was a symbol of home and togetherness. I vividly remember Sunday mornings bustling with activity in our kitchen. My grandmother, with her gentle hands and wise smile, would carefully prepare the marinade, a secret recipe she brought with her from Vietnam. As the pork sizzled on the pan, the aroma would fill our home, drawing everyone to the kitchen.


We would gather around the table, eagerly waiting to assemble our sandwiches. Each ingredient was a story, from the tart pickled vegetables representing the vibrant markets of Saigon, to the fresh cilantro, reminiscent of the herbs in our garden. The Banh Mi was not just a sandwich; it was a bridge to our heritage and a delicious reminder of the love that bound our family together.


Recipe Difficulty and Classification


This Vietnamese Banh Mi recipe is rated 5/10 in difficulty, making it accessible for home cooks while still providing a satisfying culinary challenge. Classified as a main dish, it offers a complete meal experience that is both filling and flavorful.


Whether you’re a seasoned chef or a home cook exploring new cuisines, this Banh Mi recipe invites you to savor not just a meal, but a memory. As you take your first bite, may it transport you to a place of warmth, nostalgia, and culinary delight. Enjoy!

Read more about Appetizers

Read more about Main Dishes

Read more about Desserts

Chicken Sausage, White Bean and Cabbage Soup | Made by Meaghan Moineau

Chicken Sausage, White Bean and Cabbage Soup | Made by Meaghan Moineau

Title: A Hearty Hug in a Bowl: Chicken Sausage, White Bean, and Cabbage Soup
Description: Discover the comforting flavors of our Chicken Sausage, White Bean, and Cabbage Soup—a perfect blend of savory and wholesome ingredients. This easy-to-make, one-pot wonder is ideal for chilly nights and family gatherings. With a touch of nostalgia and warmth in every spoonful, this recipe is a must-try for anyone seeking a delicious and nourishing meal.

---


As the leaves turn golden and the air gets crisp, there’s nothing quite like a steaming bowl of soup to bring warmth and comfort to your soul. Our Chicken Sausage, White Bean, and Cabbage Soup is more than just a dish—it's a heartfelt embrace, a reminder of cozy family dinners, and a delicious way to celebrate the flavors of the season.


Ingredients


- Olive oil


- 1 white onion, chopped


- 2 diced carrots


- Salt and black pepper to taste


- 3 cloves garlic, minced


- 1/2 teaspoon crushed red pepper flakes


- 1 pound Italian mild chicken sausage


- 6 cups low sodium vegetable stock


- 2 cans white beans, drained and rinsed


- 1 small green cabbage, thinly sliced


Instructions


1. Start with Sautéing: In a large pot, heat olive oil over medium heat. Add chopped onions and sauté until tender, about 8 minutes.
2. Add Vegetables: Toss in diced carrots and continue cooking for another 5 minutes. Season with salt, pepper, garlic, and red pepper flakes; cook for another minute.
3. Cook the Sausage: Remove the sausage from its casing and break it into small chunks in the pot. Toss with vegetables to brown the meat, cooking for another 8-10 minutes.
4. Simmer the Soup: Pour in the vegetable stock, enough to cover all ingredients, and bring to a gentle simmer.
5. Incorporate Beans and Cabbage: Add the white beans and cabbage, stirring to combine. Simmer, covered, until the cabbage is wilted but not mushy, about 10 minutes. Taste and adjust seasoning with more salt or pepper if needed.

A Nostalgic Note


This soup takes me back to my grandmother's kitchen, where I spent countless chilly afternoons enveloped in the warmth of her loving care. The aroma of sautéed onions and garlic would drift through the house, a sign that something truly special was being prepared. As a child, I loved watching her add each ingredient with precision and care, taking the time to let the flavors meld into something magical. Her secret ingredient wasn't in the spice rack but rather in the love and joy she infused into every meal. Each bite was a reminder of her nurturing spirit and the cherished family memories we created around her table.


Difficulty and Classification


Difficulty: 3/10 - This soup is straightforward and perfect for beginners and seasoned cooks alike, offering a hassle-free cooking experience.
Classification: Main Dish - Packed with protein and hearty vegetables, this soup is a fulfilling main dish that holds its own as a complete and satisfying meal.

Whether you're looking to recreate a piece of nostalgia or simply enjoy a flavorful and hearty meal, this Chicken Sausage, White Bean, and Cabbage Soup is sure to become a beloved favorite in your home. Gather your loved ones and savor the simple joys of cooking and sharing a meal together.

Read more about Appetizers

Read more about Main Dishes

Read more about Desserts

Frittata with Mushrooms, Thyme, and Parmigiano Cheese | Made by Meaghan Moineau

Frittata with Mushrooms, Thyme, and Parmigiano Cheese | Made by Meaghan Moineau

Title: Savoring Sunday Mornings: Frittata with Mushrooms, Thyme, and Parmigiano Cheese
Description: Discover the comforting flavors of a classic frittata with mushrooms, thyme, and Parmigiano cheese. This delicious and easy-to-make dish is perfect for breakfast, brunch, or a light dinner. Immerse yourself in a nostalgic family memory that adds a personal touch to this tasty recipe. Rated 4 out of 10 in difficulty, this main dish will surely become a family favorite.

---


Frittata with Mushrooms, Thyme, and Parmigiano Cheese

Sunday mornings have always had a special place in my heart. Growing up, they were synonymous with family gatherings around the kitchen table, the warmth of the sun streaming through the windows, and the irresistible aroma of a frittata cooking in the oven. This recipe for Frittata with Mushrooms, Thyme, and Parmigiano Cheese brings back those cherished memories and is a delightful way to start any day.


Ingredients:

- 3 eggs


- 2 egg replacements


- 1 cup trimmed fresh mushrooms


- 1 tablespoon fresh thyme leaves


- 2 green onions, sliced


- Freshly ground black pepper


- 1/2 cup canned whole half and half


- 1/2 cup freshly grated Parmigiano cheese


- Salt to taste


- Cooking spray or butter for the pan


Instructions:

1. Preheat your oven to 350 degrees Fahrenheit. Later, you'll switch it to "Broil."


2. Heat an 8-inch ovenproof skillet over medium-high heat and coat it with cooking spray or butter.


3. Add the mushrooms and green onions to the pan; sauté for about 12 minutes or until the mushrooms are nicely browned.


4. In a medium bowl, combine the eggs and egg replacement with the half and half, Parmesan cheese, thyme, salt, and pepper. Whisk everything together until thoroughly mixed.


5. Pour the egg and cheese mixture into the same pan with the sautéed mushrooms and green onions.


6. Cover the pan and cook over medium heat for about 6 minutes, or until the mixture is just a little liquid-y/runny on top.


7. Transfer the pan to the oven and bake at 350 degrees for another 5-10 minutes, until the frittata is completely set.


8. Change the oven setting to "Broil." Place the pan on the lowest rack and broil for about 2 minutes, or until the top is a golden brown color.


I remember sitting at the kitchen table, watching my grandmother skillfully prepare this dish. She would tell us stories of her childhood, her voice weaving tales of family traditions and the importance of sharing meals together. The frittata, infused with the earthy flavors of mushrooms and thyme, was always a highlight of our Sunday brunches, bringing everyone together and creating lasting memories.


Difficulty: 4/10
Classification: Main Dish

This frittata recipe, with its rich flavors and simple preparation, is a testament to the power of food to connect us to our past and to each other. Whether you’re sharing it with family or enjoying it on your own, it's sure to become a beloved staple in your culinary repertoire. So, gather your loved ones and savor the experience of making and enjoying this delightful dish.

Read more about Appetizers

Read more about Main Dishes

Read more about Desserts

Farro & Leek Soup | Made by Meaghan Moineau

Farro & Leek Soup | Made by Meaghan Moineau

Title:

Hearty Comfort in a Bowl: The Timeless Allure of Farro & Leek Soup


Description:

Dive into the nourishing warmth of Farro & Leek Soup, a dish that marries the rustic charm of ancient grains with the delicate flavors of leeks and herbs. This blog post takes you on a culinary journey, complete with a heartwarming family memory, and offers a simple yet flavorful recipe that’s perfect for any season. Discover why this soup is not just a meal, but a cherished tradition.


---


A Nostalgic Journey with Farro & Leek Soup

There's something deeply comforting about a bowl of soup. It’s warmth, aroma, and the memories it evokes. For me, Farro & Leek Soup is a gateway to cherished family moments. Growing up, our kitchen was the heart of the home, especially during the chilly months when my grandmother would lovingly prepare this hearty soup. The scent of leeks and herbs wafting through the house was the signal that warmth and love were soon to embrace us.


The Secret to a Simple Yet Flavorful Soup
What makes Farro & Leek Soup so special is its simplicity. With just a few humble ingredients, you can create a dish that is not only satisfying but also deeply nourishing. Here's how you can recreate this classic family favorite:
Ingredients:

- 2 tablespoons olive oil


- 3 white leeks, thinly sliced


- 200 grams farro


- 2 stalks of celery, diced


- 2 carrots, diced


- 1 onion, diced


- 4 cups meat stock (homemade is best, no bouillon cubes)


- 1 sprig of thyme


- 1 bay leaf


- Parmesan cheese, for garnish


- Salt & pepper, to taste


Instructions:
1. Prepare the Base: In a heavy-bottomed pot, heat the olive oil over medium-low heat. Add the leeks, celery, carrots, and onion. Sweat the vegetables until they become translucent and soft, ensuring they do not brown. If they start to stick, reduce the heat and add a spoonful of water.
2. Incorporate the Farro: Add the farro to the pot, toasting it with the vegetables for 1-2 minutes to enhance its nutty flavor.
3. Simmer with Stock and Herbs: Introduce the thyme, bay leaf, and meat stock to the mix. Season with salt and pepper to your preference. Bring the soup to a low simmer and let it cook for 30-40 minutes until the farro is tender, stirring occasionally.
4. Adjust the Consistency: Depending on your preference, you can adjust the consistency of the soup. For a stew-like texture, hold back some of the stock. For a more soupy consistency, feel free to add more stock.
5. Finish and Serve: Drizzle with extra virgin olive oil, sprinkle with freshly grated Parmesan cheese, and serve hot with a side of toasty bread.
A Dish Beyond the Kitchen

Every spoonful of this soup takes me back to my grandmother's kitchen, where laughter mingled with the aroma of cooking. It was a place where stories were shared, and bonds were strengthened. Today, as I prepare Farro & Leek Soup for my own family, I am reminded of the timeless nature of food and its power to connect generations.


Difficulty Level: 4/10
Classification: Main Dish

With its rich flavors and wholesome ingredients, Farro & Leek Soup is more than just a meal; it is a tradition, a memory, a hug in a bowl. Whether you're seeking comfort on a cold day or a light yet satisfying main dish, this soup is sure to become a cherished favorite in your home, just as it has in mine.

Read more about Appetizers

Read more about Main Dishes

Read more about Desserts

A Post Thanksgiving “sopa De Tortilla” | Made by Meaghan Moineau

A Post Thanksgiving “sopa De Tortilla” | Made by Meaghan Moineau

A Heartwarming Post-Thanksgiving Tradition: Sopa De Tortilla


Description:

Transform your Thanksgiving leftovers into a comforting and delicious Sopa De Tortilla. This flavorful Mexican-inspired dish is a wonderful way to make use of leftover turkey while warming the soul with its rich and aromatic broth. Perfect for chilly post-holiday days, this recipe will become a cherished family tradition.

---


As the last leaves fall and the vibrant hues of autumn begin to fade, our family gathers once more around the table, not for a grand feast, but for something even more special—a humble bowl of Sopa De Tortilla. This post-Thanksgiving tradition has been passed down through generations, a beloved ritual that warms not just our bodies but our hearts.


Ingredients:

- 1 whole turkey breast

- 1 avocado, cubed


- 2 large carrots, peeled and cubed


- 2 stalks of celery, chopped


- 1 bunch of cilantro (stems and leaves separated)


- 2 tablespoons olive oil


- 2 cloves garlic, quartered


- 1 large onion, quartered


- 1 roasted poblano pepper, peeled and deveined


- 1 8 oz. can organic stewed tomatoes


- 1 cup fried tortilla strips or good quality store-bought tortilla chips


- Ground cumin, to taste


- Salt, to taste


Instructions:


1. Prepare the Stock:

- In a large stockpot, drizzle 2 tablespoons of olive oil and add the quartered onion, garlic, and turkey breast.


- Add the carrot peels, and 2 stalks of celery, and cilantro stems.


- Fill the pot with water until it is three-quarters full. Cover and boil for 1-2 hours, ensuring the stock does not reduce to less than a quarter of the pot.


- Remove the turkey from the bone and reserve the meat. Discard the bone and vegetables. Strain the stock and set aside 1-2 cups per guest for the soup, freezing any leftovers for future use.


2. Make the Soup:

- In a blender, combine the stewed tomatoes, olive oil, a pinch of salt, and the roasted poblano pepper. Puree and set aside.


- Add cubed carrots and chopped celery to the stock and boil for 30 minutes until tender.


- Gradually add the pureed pepper-tomato mixture to the broth.


- Include 1/3 cup of turkey meat per cup of stock, allowing it to simmer.


- Adjust seasoning with salt and a pinch of ground cumin.


3. Serve:

- Ladle the soup into bowls, topping with additional turkey meat, tortilla strips, fresh cilantro, and cubed avocado.


Nostalgic Family Memory:


Every year, after the Thanksgiving festivities have quieted down, my grandmother would gather us in the kitchen and retell the story of how this Sopa De Tortilla became our family's tradition. It began decades ago when her parents, having immigrated from Mexico, found themselves facing their first American Thanksgiving. Not wanting to waste the leftover turkey, they decided to create a dish reminiscent of their homeland. This was how our family's version of Sopa De Tortilla was born—a fusion of cultures, flavors, and love.


As we sit around the table, savoring each spoonful, I'm reminded of the countless stories shared and the laughter that filled our home, year after year. This simple soup connects us to our roots and to each other, making every post-Thanksgiving gathering a cherished memory.


Difficulty: 5/10

Classification: Main Dish


---


This Sopa De Tortilla is more than just a meal; it's a celebration of family and tradition. May it bring warmth and joy to your home as it has to ours.

Read more about Appetizers

Read more about Main Dishes

Read more about Desserts

Instant Pot Chicken Tacos | Made by Meaghan Moineau

Instant Pot Chicken Tacos | Made by Meaghan Moineau

Instant Pot Chicken Tacos: A Quick, Flavorful Feast for the Whole Family


Description


Discover the magic of Instant Pot Chicken Tacos, a delicious and easy meal that brings families together. With simple ingredients like chicken breasts, purple onion, and canned salsa, this dish transforms into a mouthwatering main course that's sure to please. Perfect for busy weeknights or a casual dinner party, these tacos capture the essence of home-cooked comfort food in a fraction of the time. Dive into this recipe and enjoy a taste of nostalgia with every bite.


A Nostalgic Family Memory


Growing up, Taco Tuesdays were a cherished tradition in our household. As the sun dipped below the horizon, casting a warm glow over our kitchen, my siblings and I would gather around the table, eagerly awaiting the sizzling sounds and tantalizing aromas that filled the air. Mom would always make her signature chicken tacos, a recipe passed down from her grandmother. The kitchen buzzed with laughter and stories as we chopped fresh onions and seasoned the chicken with care.


One particular Tuesday stands out in my memory. It was a chilly autumn evening, and the first hint of winter's bite was in the air. Mom had recently received an Instant Pot as a gift, and she was eager to try it out with our beloved taco recipe. We were skeptical at first—could this new gadget really recreate the flavors we held so dear?


As the Instant Pot worked its magic, we shared stories of past family adventures and dreamed of future ones. The smell of seasoned chicken and salsa wafted through the room, and our mouths watered in anticipation. When the timer finally beeped, signaling the end of the cooking process, we gathered around as Mom carefully lifted the lid.


The result was nothing short of spectacular. The chicken was tender and infused with the rich flavors of taco seasoning and salsa. As we bit into our tacos, the familiar taste of lime juice and savory chicken transported us back to a simpler time. That evening, we realized that while the method had changed, the heart of our family tradition remained unchanged.


Recipe


Ingredients


- 2 chicken breasts


- Black pepper


- 1 tablespoon taco seasoning


- 1 purple onion, sliced


- 1 cup canned salsa


- 2 tablespoons lime juice


Instructions


1. Season both sides of the chicken breasts with black pepper and taco seasoning.


2. Place the seasoned chicken into the bottom of the Instant Pot.


3. Top the chicken with sliced purple onion and canned salsa.


4. Secure the Instant Pot lid into the lock position.


5. Select the Poultry setting and set the timer for 12 minutes.


6. Once cooking is complete, allow the Instant Pot to naturally release pressure for 20 minutes.


7. Carefully remove the chicken from the Instant Pot and shred it using two forks.


8. Sprinkle the shredded chicken with lime juice for added zest.


9. Serve over rice or with warm tortillas for a delightful taco experience.


Difficulty Rating


This recipe is rated a 3 out of 10 for difficulty, making it an ideal choice for cooks of all skill levels. Its simplicity and efficiency make it a fantastic option for those new to using an Instant Pot or anyone looking for a quick, satisfying meal.


Classification


Instant Pot Chicken Tacos are classified as a Main Dish, perfect for family dinners or entertaining guests with minimal fuss.


---


Embrace the ease and flavor of Instant Pot Chicken Tacos, and create new family memories with this delightful dish. Whether you're a seasoned cook or just starting out, this recipe is sure to become a beloved staple in your culinary repertoire.

Read more about Appetizers

Read more about Main Dishes

Read more about Desserts

Cabbage and sausages in beer | Made by Meaghan Moineau

Cabbage and sausages in beer | Made by Meaghan Moineau

Title: A Heartwarming Bowl: Cabbage and Sausages in Beer
Description: Dive into a comfort food classic with our Cabbage and Sausages in Beer recipe. This simple yet flavorful main dish combines savory smoked sausages with the earthy goodness of cabbage and the subtle sweetness of beer. Perfect for a cozy family dinner, this dish will fill your kitchen with mouthwatering aromas and your heart with nostalgia.

---


There are certain dishes that transport us back in time, evoking memories that are as rich and comforting as the flavors themselves. Our Cabbage and Sausages in Beer recipe is one such culinary time machine, whisking me back to countless family gatherings in my grandmother's warm, bustling kitchen.


A Stroll Down Memory Lane


Growing up, Sunday dinners at Grandma's house were a cherished ritual. The savory aroma of smoked sausages simmering in beer would greet us at the door, mingling with the laughter of cousins and the comforting hum of adult conversation. The centerpiece of our family feast was always a heaping bowl of cabbage and sausages, tender and steaming, served with a side of thick, crusty bread.


Grandma had a knack for turning simple ingredients into something magical. She would melt a generous pat of butter in her well-loved pot, adding diced onions that would sizzle and turn golden, filling the room with a sweet, caramelized scent. A sprinkle of sugar and salt would follow, her wooden spoon working its way around the pan with the precision of years of practice.


Next came the beer—a splash of golden liquid that bubbled and hissed as it hit the pan, its malty aroma inviting everyone to gather around. The sausages were nestled in among the cabbage and potatoes, their smoky essence infusing the entire dish. The pot, brimming with promise, would simmer gently, allowing the flavors to meld into a comforting symphony.


Creating Your Own Memories


To recreate this dish, start by melting butter in a large pan over medium-low heat. Add the onions, a pinch of sugar, and a dash of salt. Stir frequently, watching as the onions transform into a golden hue, about 5-8 minutes. Pour in the beer, scraping up any flavorful bits clinging to the bottom of the pan.


Introduce the smoked sausages, green cabbage, and potatoes into this aromatic mix. Let the dish simmer, covered, for 20 minutes or until the vegetables are tender and full of flavor. Serve the sausages and veggies in big bowls, ensuring each serving is accompanied by plenty of the rich cooking liquid. A sprinkle of freshly cracked pepper adds the final touch.


A Dish for Every Occasion


This recipe, with its simple ingredients and deep, satisfying flavors, makes for a perfect main dish. It's a 3 out of 10 on the difficulty scale, making it accessible for cooks of all skill levels. Whether you're looking to create new family traditions or simply need a hearty meal for a chilly evening, this Cabbage and Sausages in Beer will not disappoint.


As you savor each bite, let the comforting flavors remind you of the warmth of family and the simple joys of a meal shared with loved ones. Here's to creating your own cherished memories around the dining table. Enjoy!

Read more about Appetizers

Read more about Main Dishes

Read more about Desserts