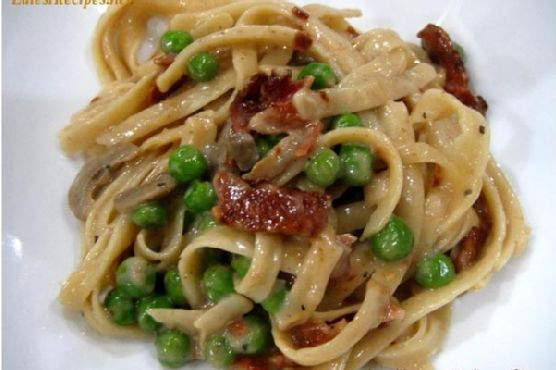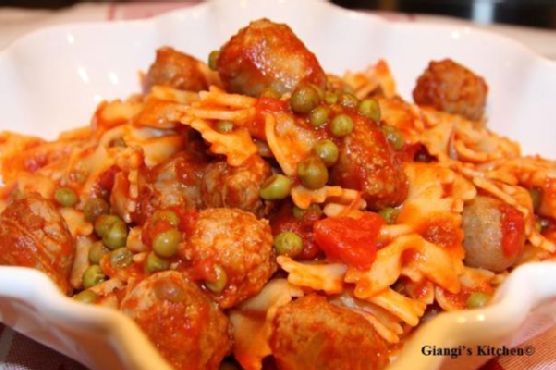
Pasta with Peas and Italian Sausage

Intro
There’s something truly comforting about a warm bowl of pasta, especially when it carries the flavors of childhood memories. I remember visiting my grandmother’s house every Sunday. The air would be filled with the aroma of her cooking — the scent of rich tomatoes simmering, sweet Italian sausage sizzling, and the gentle warmth of olive oil. This recipe for Pasta with Peas and Italian Sausage brings me back to those simple, joyful days around her dining table. It’s a dish that holds a special place in my heart, and I’m thrilled to share it with you.
Why You’ll Love It
This dish is a perfect blend of savory and sweet, with the sausages adding depth and the peas bringing a hint of sweetness. It’s easy to prepare, making it ideal for a quick weeknight dinner. Plus, the combination of wholesome ingredients creates a balanced meal that’s both satisfying and delicious. Whether you’re cooking for family or friends, this pasta is sure to be a hit.
Ingredients
- 1 tablespoon butter
- 1 cup canned tomatoes
- 12 ounces farfalle pasta
- 1 pound Italian sweet sausage, casings removed
- 2 tablespoons olive oil
- 1 cup frozen peas
- Salt and pepper to taste
- 1 cup Pomi strained tomato sauce
Instructions
- Cook the pasta according to the package directions. Drain and set aside.
- In a very large skillet over medium heat, add the olive oil and sausage. Sauté until the sausage is slightly browned all over.
- Add the frozen peas and canned tomatoes to the skillet. Season with salt and pepper to taste.
- Lower the heat to medium and let it cook for another 10 to 15 minutes, allowing the flavors to meld together.
- Return the drained pasta to the pan. Add the butter and Pomi strained tomato sauce.
- Mix everything well to ensure the pasta is coated with the sauce and sausage mixture.
- Serve hot and enjoy your nostalgic feast!
Tips
To ensure your pasta is cooked to perfection, aim for an al dente texture — firm to the bite. This adds a lovely contrast to the softness of the peas and the sausage. Also, be sure to taste the sauce as it cooks and adjust the seasoning as needed. A pinch of red pepper flakes can add a delightful kick if you prefer a bit of heat.
Variations & Substitutions
If you’re looking to mix things up, consider swapping the sausage for ground turkey or chicken for a lighter version. You can also use fresh peas instead of frozen for a fresher taste. If you prefer a vegetarian option, omit the sausage and add more vegetables like bell peppers or mushrooms for added texture and flavor.
Storage
Leftovers can be stored in an airtight container in the refrigerator for up to 3 days. To reheat, simply warm on the stove over medium heat, adding a splash of water if necessary to loosen the sauce. This dish is also freezer-friendly. Store in a freezer-safe container for up to 2 months. Thaw in the refrigerator before reheating.
FAQ
Can I make this dish gluten-free?
Absolutely! Simply substitute the farfalle pasta with your favorite gluten-free pasta. Ensure that the sausage is also gluten-free, as some brands may include gluten-containing fillers.
What can I use instead of Pomi tomato sauce?
If you can’t find Pomi, any high-quality strained tomato sauce will work. Alternatively, you can blend canned tomatoes until smooth for a homemade version.
Can I add cheese to this pasta?
Yes, you can! A sprinkle of grated Parmesan cheese on top adds a rich, nutty flavor that complements the dish beautifully. Feel free to add it right before serving.
Nutrition
This pasta dish is a well-rounded meal, providing carbohydrates, protein, and vital nutrients. The peas add fiber and vitamins, while the sausage offers protein and iron. Keep portion sizes in mind to maintain a balanced diet.
Conclusion
Pasta with Peas and Italian Sausage is not just a dish; it’s a journey back to simpler times, filled with laughter, love, and hearty meals. Whether you’re recreating family memories or making new ones, this recipe is sure to bring warmth and joy to your table. I hope you enjoy making and sharing this meal as much as I do. Happy cooking!
Related update: Pasta with Peas and Italian Sausage
Related update: Venison Stew