Best Baked Macaroni and Cheese | Made by Meaghan Moineau

Best Baked Macaroni and Cheese

Intro

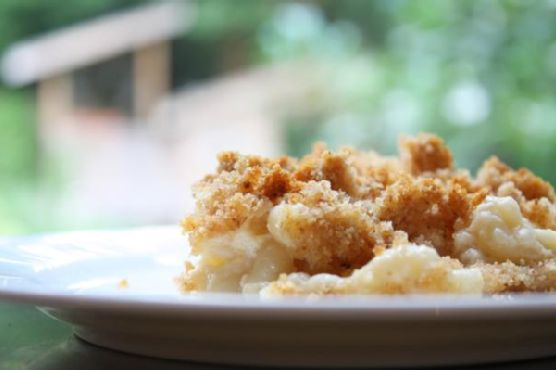
Nothing brings back childhood memories quite like a warm, creamy, and gooey dish of baked macaroni and cheese. I remember, as a child, eagerly waiting in the kitchen as the comforting aroma of bubbling cheese wafted through the air, signaling that dinner was almost ready. My grandmother would always make her signature baked macaroni and cheese during family gatherings, serving it as a centerpiece that brought everyone together. Today, I’m sharing a beloved recipe that captures the essence of those cherished moments. This dish marries the rich flavors of gruyere and white cheddar with a hint of spice, creating a perfectly balanced and utterly indulgent meal that’s sure to become a favorite in your home too.

Why You’ll Love It

This baked macaroni and cheese is a classic comfort food elevated by a few key ingredients and techniques:

  • Rich and Creamy: The combination of gruyere and white cheddar creates a luxurious cheese sauce that’s creamy and full of flavor.
  • Perfectly Spiced: A touch of cayenne and nutmeg adds warmth and complexity to the dish without overpowering the delicate cheese flavors.
  • Crunchy Topping: The buttery breadcrumb topping provides a delightful contrast to the smooth, cheesy interior.
  • Customizable: This recipe is versatile and can be easily adapted to suit your taste preferences or dietary needs.

Ingredients

  • 1/2 teaspoon black pepper
  • 1/4 teaspoon cayenne pepper
  • 1 pound elbow macaroni
  • 1/4 cup flour
  • 2 cups grated gruyere cheese
  • 1 teaspoon kosher salt
  • 1/4 teaspoon nutmeg
  • 8 tablespoons unsalted butter
  • 4 slices white bread, torn into pieces
  • 4 cups grated white cheddar cheese
  • 5 cups whole milk

Instructions

  1. Heat the oven to 375 degrees Fahrenheit. Butter a 3-quart casserole dish; set aside.
  2. Place bread pieces in a medium bowl. In a small saucepan over medium heat, melt 2 tablespoons butter. Pour butter into the bowl with bread, and toss. Set the breadcrumbs aside.
  3. In a medium saucepan set over medium heat, heat milk.
  4. Melt the remaining 6 tablespoons butter in a high-sided skillet over medium heat. When the butter bubbles, add flour. Cook, stirring, for 1 minute.
  5. Slowly pour hot milk into the flour-butter mixture while whisking. Continue cooking, whisking constantly, until the mixture bubbles and becomes thick. Remove the pan from the heat.
  6. Stir in salt, nutmeg, black pepper, cayenne pepper, 3 cups cheddar, and 1 1/2 cups gruyere. Set cheese sauce aside.
  7. Fill a large saucepan with water. Bring to a boil. Add macaroni; cook 2 to 3 fewer minutes than the manufacturer’s directions, until the outside of the pasta is cooked and

    Related update: Best Baked Macaroni and Cheese

    Related update: Cheese Tortellini Alfredo

Avocado Chicken Salad | Made by Meaghan Moineau

Avocado Chicken Salad

Intro

There’s something incredibly comforting about a hearty salad that satisfies both the taste buds and the soul. This Avocado Chicken Salad is more than just a meal; it’s a journey back to my grandmother’s sunny kitchen, where the aroma of freshly cooked chicken and the zest of lime filled the air. I remember sitting at her wooden table, the afternoon sun streaming through the windows, eagerly awaiting the delightful concoction she would prepare. With each bite, I felt wrapped in warmth and love. This recipe is my attempt to recreate that magic and share it with you.

Why You’ll Love It

This Avocado Chicken Salad is a delightful blend of flavors and textures that will leave you craving more. Here’s why you’ll love it:

  • Quick and Easy: This recipe is perfect for a busy weekday lunch or a light dinner. It comes together in under 30 minutes!
  • Healthy and Nutritious: Packed with protein from the chicken and healthy fats from the avocado, it’s a balanced meal that supports a healthy lifestyle.
  • Flavorful: The combination of creamy avocado, tender chicken, and fresh lime juice creates a refreshing and satisfying dish.
  • Versatile: It’s perfect on its own, or you can serve it with crusty bread or in a wrap for a more filling option.

Ingredients

  • 2 ripe avocados
  • 1 cup cherry tomatoes
  • 2 tablespoons extra virgin olive oil
  • 2 limes, juiced
  • 2 tablespoons mayonnaise
  • Black pepper to taste
  • 4 cups shredded mixed salad greens
  • 1 skinless boneless chicken breast

Instructions

  1. Season the chicken breast with a little salt and pepper.
  2. Place the chicken in a pot of boiling water and cook until done, approximately 12-15 minutes.
  3. Remove the chicken from the water and allow it to cool, then cut into cubes and set aside.
  4. Cut the avocados into cubes.
  5. In a large bowl, combine the mixed salad greens with olive oil and lime juice. Toss well.
  6. Divide the mixed salad into two serving bowls.
  7. Evenly distribute the avocado cubes, chicken, and cherry tomatoes over the salad in each bowl.
  8. Drizzle mayonnaise and sprinkle a dash of black pepper over the salad.
  9. Serve immediately and enjoy!

Tips

  • Ripe Avocados: Make sure to use ripe avocados for the best texture. They should yield slightly when pressed.
  • Perfectly Cooked Chicken: To ensure the chicken is cooked perfectly, use a meat thermometer. The internal temperature should reach 165°F (74°C).
  • Fresh Ingredients: Use fresh lime juice and high-quality olive oil for the best flavors.

Variations & Substitutions

This salad is wonderfully versatile. Here are some ideas to make it your own:

  • Spicy Kick: Add a pinch of cayenne pepper or some sliced jalapeños for a spicy version.
  • Herbs: Fresh herbs like cilantro or basil can add an extra layer of flavor.
  • Vegan Option: Replace chicken with chickpeas and use vegan mayonnaise to make it plant-based.
  • Cheesy Delight: Sprinkle some feta or goat cheese for added creaminess.

Storage

This salad is best enjoyed fresh. However, if you have leftovers, store them in an airtight container in the refrigerator for up to two days. Keep the salad dressing separate if possible to prevent the greens from becoming soggy.

FAQ

Can I use grilled chicken instead of boiled?

Absolutely! Grilled chicken adds a smoky flavor to the salad and works perfectly. Just ensure it’s cooked through and cooled before cutting into cubes.

What can I use instead of mayonnaise?

If you’re not a fan of mayonnaise, you can substitute it with Greek yogurt or a light vinaigrette for a different but equally delicious taste.

Nutrition

This Avocado Chicken Salad is not only delicious but also nutritious. It’s high in protein and healthy fats, making it a great option for a balanced meal. Avocados are a great source of vitamins C, E, K, and B-6, as well as riboflavin, niacin, folate, pantothenic acid, magnesium, and potassium. Remember, nutritional values can vary based on the specific ingredients and quantities used.

Conclusion

This Avocado Chicken Salad is a celebration of fresh, wholesome ingredients and simple preparation. It’s a dish that brings a touch of nostalgia and comfort with every bite. Whether you’re enjoying it for lunch, dinner, or a gathering with friends, it’s sure to impress with its vibrant flavors and satisfying texture. I hope it becomes a cherished favorite in your home, just as it is in mine. Enjoy your culinary journey!

Related update: Avocado Chicken Salad

Related update: Best Baked Macaroni and Cheese

Pittata – Pizza Frittata | Made by Meaghan Moineau

Pittata – Pizza Frittata: A Delicious Twist on Classic Breakfast

Intro

Growing up, Sunday mornings were a sacred time in our household. The aroma of freshly brewed coffee mingled with the sounds of sizzling bacon, creating a comforting symphony that signaled the start of a leisurely day. My mother, with her extraordinary culinary skills, would whisk together the most delightful dishes, but there was one that always stood out – the pittata. A clever blend of pizza and frittata, this dish was the embodiment of indulgence and creativity. Today, I’m thrilled to share this cherished recipe with you, bringing a piece of my family tradition to your kitchen.

Why You’ll Love It

The pittata is a versatile dish that combines the best of two worlds: the savory satisfaction of pizza and the fluffy, protein-packed delight of a frittata. It’s perfect for breakfast, brunch, or even a light dinner, offering a filling meal that’s both quick to prepare and utterly delicious. Whether you’re hosting a gathering or simply looking to treat yourself, this dish is sure to impress with its simple ingredients and depth of flavor.

Ingredients

  • 6 large eggs
  • 1/4 cup fresh basil, chopped
  • 1/4 cup milk (optional)
  • 1/2 cup grated parmesan cheese
  • 1/4 cup sliced pepperoni
  • 1/2 cup shredded mozzarella cheese
  • Salt and pepper to taste
  • Cooking fat (e.g., olive oil, butter)

Instructions

  1. Preheat your oven to ~450°F (230°C), using the top heat setting only.
  2. On the stove, heat your choice of cooking fat in a large oven-safe skillet over medium heat.
  3. In a bowl, beat the eggs with milk, salt, pepper, and any herbs or spices you desire.
  4. Add any additional ingredients (except cheese) to the skillet. For this recipe, we keep it simple, but feel free to include cooked or quick-cooking vegetables like bell peppers.
  5. Pour the egg mixture into the skillet, tilting it to evenly distribute around any add-ins.
  6. Distribute the shredded mozzarella cheese and pepperoni slices over the egg mixture.
  7. Allow the eggs to cook on the stove until the edges are set, leaving the center slightly jiggly.
  8. Generously top with parmesan cheese.
  9. Transfer the skillet to the preheated oven and bake until the eggs are puffed, browned, and the center is firm.
  10. Remove from the oven and let the pittata cool for a couple of minutes before slicing into wedges.

Tips

For the best results, ensure that your skillet is well-greased to prevent sticking. Keep an eye on the pittata as it bakes; it can go from perfectly puffed to overcooked quickly. Use a toothpick to check that the center is set if you’re unsure. Lastly, let it rest slightly before serving; this makes cutting it into neat wedges much easier.

Variations & Substitutions

One of the joys of a pittata is its adaptability. Feel free to experiment with different herbs, spices, or cheeses. Swap pepperoni for sausage, or go vegetarian with mushrooms and spinach. For a dairy-free option, skip the milk and use a plant-based cheese alternative. The possibilities are endless, ensuring every pittata is a unique creation.

Storage

Store any leftover pittata in an airtight container in the refrigerator for up to three days. To reheat, warm it in the oven or a skillet over low heat until heated through, or microwave individual slices for about 30 seconds. For longer storage, freeze individual portions and reheat directly from frozen for a quick and easy meal.

FAQ

Can I make the pittata ahead of time?

Yes, you can prepare the pittata a day in advance. Simply follow the instructions until baking, then cover and refrigerate the skillet. When ready to bake, allow it to come to room temperature before placing it in the oven.

What can I serve with pittata?

Pittata pairs beautifully with a simple green salad, fresh fruit, or crusty bread. For a heartier meal, consider serving it with roasted potatoes or a side of bacon or sausage.

Is there a way to make it spicier?

For a spicier kick, add crushed red pepper flakes, diced jalapeños, or a splash of your favorite hot sauce to the egg mixture before cooking.

Nutrition

While the exact nutritional content will vary with portion sizes and specific ingredients used, a typical slice of pittata (1/6 of the whole) provides approximately 200 calories, 15g of protein, and 15g of fat, making it a hearty, satisfying dish that’s also relatively low in carbohydrates.

Conclusion

The pittata is more than just a meal; it’s a nod to creativity and the joy of cooking. Whether you’re reliving cherished memories or creating new ones, this dish is sure to become a staple in your recipe repertoire. I hope you find as much comfort and joy in making and sharing this dish as I have over the years. Bon appétit!

Related update: Pittata – Pizza Frittata

Related update: Mixed Berry Yogurt with Almonds

Pork Menudo | Made by Meaghan Moineau

Pork Menudo: A Filipino Comfort Dish

Intro

Pork Menudo has always held a special place at our family dinners. I remember my grandmother making it every Sunday, the aroma wafting through the house even before we reached the doorstep. She would prepare it with such care, adding a pinch of nostalgia to every bite. This dish is a quintessential part of Filipino cuisine, embodying the warmth and comfort of home. It’s a recipe that’s been passed down through generations, each adding their own twist. Today, I’m excited to share this beloved recipe with you, hoping it brings the same joy and comfort to your table.

Why You’ll Love It

There are so many reasons to fall in love with Pork Menudo. First, it’s a hearty and filling dish that’s perfect for any occasion, from casual family dinners to festive celebrations. The combination of savory pork, sweet raisins, and rich liver creates a symphony of flavors that dance on your taste buds. Additionally, it’s a versatile recipe that can be easily adapted to suit your preferences or dietary needs. Plus, the ingredients are simple and readily available, making it an accessible dish for home cooks of all skill levels.

Ingredients

  • 1 red bell pepper, diced
  • 2 tablespoons butter
  • 1 cup diced carrots
  • 1 chorizo, sliced
  • 1 cup cooked garbanzo beans
  • 4 cloves garlic, minced
  • 2 tablespoons oil
  • 1 onion, chopped
  • 1 cup frozen green peas
  • 1 bell pepper, diced
  • 1/2 pound pork livers, chopped
  • 1 pound pork cubes
  • 2 cups diced potatoes
  • 1/4 cup raisins
  • Salt, to taste
  • 2 tomatoes, chopped

Instructions

  1. Heat your wok or big kawali. Make sure it’s hot before you put oil.
  2. Fry the potatoes until half-cooked. Set aside.
  3. On the same pan, add butter and garlic. Do not burn the garlic.
  4. Add the pork, tomatoes, onions, and bell pepper. Add salt and pepper to taste. You can also add 1 pork cube for a richer flavor.
  5. Reduce to low heat. Juices will eventually come out from the vegetables so no need to add water.
  6. Cover, stirring occasionally. Simmer until pork is tender or until the liquid has almost dried up leaving a thick sauce.
  7. Add the liver, cover for about 5 minutes. I’m adding the liver at a later part because we don’t want to overcook it. Liver cooks fast and can be tough if overdone.
  8. Add the potatoes, carrots, green peas, and raisins (and the rest of the ingredients, if any).
  9. Simmer for 15 more minutes stirring occasionally.
  10. Serve with steamed rice.

Tips

For the best Pork Menudo, use fresh pork and liver to ensure the meat retains its flavor and tenderness. When frying the potatoes, ensure they are golden brown to add texture. Don’t rush the simmering process; allowing the pork to cook slowly ensures it absorbs all the rich flavors. Lastly, taste and adjust the seasoning as needed to suit your palate.

Variations & Substitutions

If you’re not a fan of liver, you can substitute it with chicken gizzards or simply omit it. For a vegetarian twist, replace the pork with tofu and add more vegetables like zucchini or eggplant. You can also swap the raisins for dried apricots if you prefer a different kind of sweetness. If you want a spicier kick, include a chopped chili pepper.

Storage

Pork Menudo can be stored in an airtight container in the refrigerator for up to 3 days. To reheat, simply place it in a pot over low heat until warmed through. You can also freeze it for up to a month, but be sure to allow it to cool completely before freezing to maintain the texture and flavor.

FAQ

Can I make Pork Menudo in advance?

Yes, Pork Menudo is a great make-ahead dish. In fact, it often tastes better the next day as the flavors have more time to meld together. Simply store it in the fridge and reheat before serving.

What can I serve with Pork Menudo?

Pork Menudo is traditionally served with steamed white rice, but you can pair it with garlic fried rice for an extra flavor boost. For a complete meal, serve it alongside a fresh green salad or pickled vegetables.

Nutrition

This recipe serves approximately 4 people. Each serving contains roughly 400 calories, 20g of fat, 30g of carbohydrates, and 25g of protein. It’s a hearty dish that provides a good balance of macronutrients.

Conclusion

Pork Menudo is more than just a dish; it’s a culinary embrace, a reminder of home, and a celebration of Filipino culture. Whether you’re enjoying it for the first time or it’s been a staple in your kitchen for years, I hope this recipe brings warmth and satisfaction to your dining experience. Gather your loved ones, serve it with a smile, and enjoy every mouthful of this delicious, comforting dish. Happy cooking!

Related update: Pork Menudo

Related update: Pittata - Pizza Frittata

Spicy Black-Eyed Pea Curry with Swiss Chard and Roasted Eggplant | Made by Meaghan Moineau

Spicy Black-Eyed Pea Curry with Swiss Chard and Roasted Eggplant

Intro

There’s a certain magic that happens in the kitchen when the aroma of spices fills the air, reminiscent of home-cooked meals that warm the heart and soul. I remember the first time I encountered black-eyed peas in a dish. It was at a family gathering during the holidays, where each dish had its own story and tradition. My grandmother, with her gentle hands and warm smile, would serve a spicy black-eyed pea curry that quickly became the centerpiece of our gatherings. Her secret? A generous helping of roasted eggplant and leafy greens that made the dish as hearty as it was flavorful. Inspired by those cherished moments, I’ve recreated this Spicy Black-Eyed Pea Curry with Swiss Chard and Roasted Eggplant, a dish that’s both comforting and nourishing, perfect for sharing with loved ones.

Why You’ll Love It

This curry is a delightful fusion of flavors and textures. The creamy black-eyed peas intertwine with the smoky, tender roasted eggplant, while the Swiss chard adds a burst of color and nutrition. The medley of spices, including curry powder, garam masala, and cumin, creates a rich, aromatic base that elevates the humble ingredients into a memorable meal. Whether you’re a seasoned cook or a beginner looking to explore new flavors, this recipe is both accessible and rewarding. It’s a versatile dish that can be enjoyed on its own or paired with rice or bread for a complete meal.

Ingredients

  • 1 cup cooked dried black-eyed peas
  • 1 tablespoon curry powder
  • 1 teaspoon garam masala
  • 1 eggplant, preferably Italian globe
  • 1 teaspoon ground coriander
  • 1 teaspoon ground cumin
  • 1/2 teaspoon ground mustard powder
  • Juice of 1 lemon
  • 2 tablespoons olive oil
  • 2-3 red or green chilies, finely chopped
  • Sea salt to taste
  • 2 shallots, finely chopped
  • 2 cups Swiss chard, trimmed and chopped
  • 1 large tomato, chopped
  • 1/2 cup water, plus more as needed

Instructions

  1. Rinse the black-eyed peas and soak them in several inches of water for 6 hours or overnight. Drain and rinse again. Transfer to a large saucepan, cover with fresh water, and bring to a boil. Reduce heat to medium-low, cover, and simmer for 40 to 60 minutes until the peas are tender but not falling apart. Drain and set aside.
  2. To prepare the eggplant, cut off the stem and bottom edge, then halve it lengthwise. Score the flesh into a diagonal pattern, being careful not to cut through the skin. Sprinkle with salt and let it sit for 40 minutes. Rinse and squeeze out excess water.
  3. Brush the eggplant with olive oil and place it in a roasting pan. Bake in a preheated 400°F oven until the flesh appears collapsed and wrinkly, about 30-40 minutes. Remove from heat, let cool for 10 minutes, then scoop out the flesh. If too watery, drain using a strainer. Set aside.
  4. In the same saucepan used for the black-eyed peas, heat the olive oil over medium heat. Add shallots and chilies, sautéing for 2-3 minutes.
  5. Add curry powder, garam masala, ground coriander, cumin, and mustard powder. Stir for another minute until fragrant.
  6. Add the chopped tomato and cook for a few more minutes. Then, add the roasted eggplant and cooked black-eyed peas, stirring frequently.
  7. Pour a few tablespoons of water into the pan. Gradually add Swiss chard, allowing it to wilt before adding more. Add more water as necessary to maintain desired consistency.
  8. Stir in the lemon juice and salt to taste. Remove from heat, cover, and let the curry sit for a few minutes before serving.

Tips

For best results, ensure the black-eyed peas are cooked perfectly tender but not mushy. The eggplant’s roasting time may vary depending on its size; keep an eye on it to achieve the desired texture. Adjust the level of spice by adding more or fewer chilies, based on your heat preference.

Variations & Substitutions

Feel free to experiment with different greens such as spinach or kale if Swiss chard is unavailable. For an added protein boost, consider tossing in some cooked chickpeas. If you prefer a milder curry, use less curry powder and add a dollop of coconut milk for creaminess.

Storage

Store any leftovers in an airtight container in the refrigerator for up to 3 days. This curry also freezes well; simply thaw and reheat on the stove over low heat, adding a splash of water if needed to reach the desired consistency.

FAQ

Can I use canned black-eyed peas for this recipe?

Yes, you can use canned black-eyed peas if you’re short on time. Just be sure to rinse and drain them thoroughly before adding them to the dish.

What other vegetables can I add to this curry?

Feel free to add other vegetables such as bell peppers, zucchini, or carrots. Just be sure to adjust the cooking time accordingly so that all the vegetables are tender.

Is this recipe vegan?

Yes, this Spicy Black-Eyed Pea Curry with Swiss Chard and Roasted Eggplant is entirely vegan, making it a delicious choice for those following a plant-based diet.

Nutrition

This curry is a nutritious powerhouse, rich in fiber, vitamins, and minerals. Black-eyed peas are an excellent source of protein and iron, while Swiss chard provides vitamins A, C, and K. Eggplant adds antioxidants and dietary fiber, making this dish both wholesome and satisfying.

Conclusion

Embark on a culinary adventure with this Spicy Black-Eyed Pea Curry with Swiss Chard and Roasted Eggplant. It’s a dish that brings warmth to the table and joy to those who share it. Whether you’re reminiscing about childhood memories or creating new ones, this curry is sure to become a beloved staple in your kitchen. Enjoy the rich tapestry of flavors and the simplicity of ingredients that come together in this heartwarming meal. Happy cooking!

Related update: Spicy Black-Eyed Pea Curry with Swiss Chard and Roasted Eggplant

Related update: Pork Menudo

Japanese Gyoza Pot Stickers | Made by Meaghan Moineau

Japanese Gyoza Pot Stickers

Intro

There’s something truly magical about gathering around the kitchen table with loved ones, folding gyoza wrappers, and sharing stories. I remember as a child, watching my grandmother skillfully pleat the edges of these delightful Japanese pot stickers, her hands moving with a rhythm that spoke of years of practice. The savory aroma of sizzling gyoza would fill the room, creating an atmosphere of warmth and anticipation. Today, I share with you a recipe that brings back those cherished memories and allows you to create your own.

Why You’ll Love It

This Japanese Gyoza Pot Stickers recipe is a perfect blend of savory and umami flavors wrapped in a tender yet crispy shell. Not only are they incredibly delicious, but they’re also versatile and can be served as appetizers, snacks, or even a main course. The combination of seasoned ground beef with aromatic vegetables and the unique touch of chili sesame oil makes each bite an explosion of flavor. Plus, making them from scratch is a fun and rewarding experience that allows you to create a connection with this beloved Japanese tradition.

Ingredients

  • Black pepper, to taste
  • 1 cup cabbage, finely chopped
  • 1 teaspoon chili sesame oil
  • 1/4 cup dried mushrooms, soaked in warm water and chopped
  • 2 teaspoons grated ginger root
  • 3 to 4 green onions, finely chopped
  • 1 pound ground beef
  • 2 tablespoons salad oil
  • 1 teaspoon sesame oil
  • 2 tablespoons Kikkoman soy sauce
  • 1 tablespoon cooking wine
  • Gyoza wrappers

Instructions

  1. Chop the cabbage finely and place it in a colander. Pour boiling water over the cabbage, then let it cool until it’s comfortable to touch. Squeeze the cabbage well to remove excess water.
  2. In a large bowl, combine the cabbage, chopped green onions, chopped mushrooms, and grated ginger.
  3. In a separate bowl, mix the ground beef with cooking wine, soy sauce, sesame oil, and black pepper. Add the vegetable mixture to the beef and mix well.
  4. Place about 1 teaspoon of filling in the center of a gyoza wrapper. Fold the wrapper in half and pleat the edges to seal. If the edges do not stick, dampen the inside edge with a little water before pleating.
  5. Heat 2 tablespoons of salad oil in a pan over medium heat. Place the gyoza in the pan, flat side down.
  6. At the edge of the pan, carefully pour in a little water, up to 1/4 of the depth of the pot stickers. Cover the pan, reduce the heat to low, and let the gyoza simmer until all the water has evaporated.

Tips

For the best results, make sure not to overfill the gyoza wrappers as this can make sealing difficult and lead to bursting during cooking. When pleating the edges, use a firm but gentle touch to ensure they are securely sealed. Additionally, using a non-stick pan can help prevent sticking during the cooking process.

Variations & Substitutions

If you prefer a vegetarian version, simply replace the ground beef with finely chopped tofu or a plant-based meat substitute. You can also experiment with different vegetables such as carrots or bell peppers to add a unique twist. For a spicier kick, increase the amount of chili sesame oil or add a dash of hot sauce to the filling mixture.

Storage

To store leftover gyoza, let them cool to room temperature before placing them in an airtight container. They can be refrigerated for up to 3 days. For longer storage, consider freezing them in a single layer on a baking sheet before transferring to a freezer bag. Frozen gyoza can be cooked directly from the freezer, just increase the cooking time slightly.

FAQ

Can I make the gyoza filling in advance?

Absolutely! You can prepare the filling up to a day in advance and store it in the refrigerator. This can actually help the flavors meld together, resulting in a more flavorful filling.

What if I can’t find gyoza wrappers?

If gyoza wrappers are unavailable, you can use wonton wrappers as a substitute. They may be slightly thinner, so handle them with care when pleating and sealing.

How do I prevent the gyoza from sticking to the pan?

Ensure your pan is well-oiled and preheated before adding the gyoza. A non-stick pan can also help. If they do stick, allow them to cool briefly before gently loosening with a spatula.

Nutrition

This gyoza recipe offers a balanced combination of protein, vegetables, and healthy fats. Each serving (4-5 pot stickers) contains approximately 250 calories, 14g of protein, 20g of carbohydrates, and 12g of fat. Adjust the portion size based on your dietary needs and preferences.

Conclusion

Making Japanese Gyoza Pot Stickers at home is a delightful experience that brings the authentic flavors of Japan into your kitchen. Whether you’re recreating cherished family memories or starting new traditions, these pot stickers are sure to become a favorite. Enjoy the process of crafting each gyoza, savor the rich and complex flavors, and share them with those you love. Happy cooking!

Related update: Japanese Gyoza Pot Stickers

Related update: Spicy Black-Eyed Pea Curry with Swiss Chard and Roasted Eggplant

Related update: Curry Leaves Potato Chips

chilli chicken | Made by Meaghan Moineau

Chilli Chicken: A Spicy Delight to Warm Your Heart

Intro

Growing up, there was always a dish that brought a gleam to my eyes and warmth to my heart: my grandmother’s Chilli Chicken. I remember the tantalizing aroma wafting through her cozy kitchen on chilly evenings, drawing us in like moths to a flame. The sizzle of the chicken hitting the hot pan was music to our ears, and her special blend of spices was the magic that made it all come together. Today, I’m thrilled to share this cherished recipe with you, so you too can bring a touch of spice and nostalgia to your home.

Why You’ll Love It

If you’re a fan of bold flavors and a little heat, this Chilli Chicken recipe is sure to become a favorite in your household. Not only does it pack a punch with its spicy kick, but it’s also incredibly versatile and can be customized to suit your taste preferences. Perfect for a cozy family dinner or a festive gathering, this dish is a surefire crowd-pleaser. Plus, it’s a great way to introduce a bit of culinary adventure into your weeknight meals with minimal fuss.

Ingredients

  • 2 boneless chicken breasts, cut into bite-sized pieces
  • 1 bell pepper / capsicum, sliced
  • 1 onion, sliced
  • 2 green chilies, slit
  • 2 tablespoons corn flour
  • 2 teaspoons red chili powder
  • 1 teaspoon pepper powder
  • 3 tablespoons oil
  • 2 tablespoons soya sauce
  • 2 tablespoons chilli sauce
  • 1 tablespoon vinegar
  • 1 tablespoon sugar
  • 2 cloves garlic, minced
  • Spring onions, chopped, for garnish

Instructions

  1. Find complete instructions on Swasthi’s recipes.

Tips

For the best results, use fresh ingredients wherever possible. Make sure to cut the chicken and vegetables into uniform pieces to ensure even cooking. Don’t overcrowd the pan when frying the chicken, as this will steam rather than sear the meat, resulting in a loss of texture. Lastly, taste as you go—adjust the seasoning and spice levels to suit your palate.

Variations & Substitutions

Feel free to experiment with this recipe by adding your favorite vegetables such as broccoli, carrots, or mushrooms. If you prefer a less spicy version, reduce the amount of chili powder or omit the green chilies. For a gluten-free alternative, use tamari instead of soy sauce. Vegetarian? Swap out the chicken for paneer or tofu for a delightful meat-free version.

Storage

Chilli Chicken can be stored in an airtight container in the refrigerator for up to three days. For longer storage, you can freeze it for up to a month. To reheat, simply thaw overnight in the refrigerator and gently warm in a pan over medium heat, adding a splash of water if necessary to maintain its saucy consistency.

FAQ

Can I make this dish ahead of time?

Absolutely! Chilli Chicken can be prepared ahead of time and stored in the refrigerator. The flavors will meld beautifully, making it even more delicious the next day. Just reheat and serve.

What can I serve with Chilli Chicken?

This dish pairs wonderfully with steamed rice, fried rice, or noodles. You could also serve it with a simple side of stir-fried vegetables for a complete meal.

Is there a way to reduce the spiciness?

If you’re sensitive to heat, you can tone down the spiciness by reducing the amount of chili powder and green chilies. Adding a little more sugar can also help balance the heat.

Nutrition

Chilli Chicken is a protein-rich dish with a moderate amount of carbohydrates and fats. The exact nutritional values will depend on the specific quantities and brands of ingredients used, but on average, a serving provides approximately:

  • Calories: 250
  • Protein: 20g
  • Carbohydrates: 15g
  • Fat: 10g

Keep in mind that nutritional values can vary, so it’s always a good idea to check the ingredients you use if you’re tracking your intake.

Conclusion

Chilli Chicken is more than just a dish; it’s an experience that brings people together with its vibrant flavors and comforting warmth. Whether you’re recreating cherished memories or forging new ones, this recipe is sure to become a staple in your culinary repertoire. So roll up your sleeves, gather your ingredients, and embark on a flavorful journey that promises to delight your taste buds and warm your heart. Enjoy every bite!

Related update: chilli chicken

Related update: Moroccan Carrot Soup

Liz’s Lomo Saltado | Made by Meaghan Moineau

Liz’s Lomo Saltado

Intro

Welcome to my kitchen! Today, I’m sharing a recipe that’s close to my heart – Liz’s Lomo Saltado. This dish takes me back to my childhood, where Sundays were reserved for family gatherings around a table brimming with laughter, love, and delicious food. My grandmother, Liz, would prepare this Peruvian classic with such passion and precision, ensuring every bite was a burst of flavor. Her secret? A perfect balance of spices and fresh ingredients. I hope this recipe brings you a taste of Peru and a touch of nostalgia, just as it does for me.

Why You’ll Love It

Lomo Saltado is a dish that beautifully combines the flavors of Peru with Asian influences. You’ll love it because:

  • Simple and Quick: This recipe comes together in just about 30 minutes, making it a perfect weeknight meal.
  • Flavorful Fusion: The blend of soy sauce, cumin, and red wine vinegar creates an irresistible savory and tangy profile.
  • Versatile: It’s perfect for meat lovers but can be adapted for vegetarians too.
  • Colorful Presentation: The vibrant mix of peppers and tomatoes makes this dish as visually appealing as it is delicious.

Ingredients

  • 1 lb beef tenderloin, cut into chunks
  • 1 tsp cumin
  • 1 tsp complete seasoning
  • 1 green bell pepper, sliced
  • 1 red bell pepper, sliced
  • 1 yellow onion, sliced
  • 2 garlic cloves, minced
  • 1 jalapeno pepper, minced
  • 2 tbsp red wine vinegar
  • 3 tbsp soy sauce
  • 2 plum tomatoes, cut into chunks
  • 1 bag of frozen french fries
  • Fresh cilantro, chopped for garnish

Instructions

  1. Prepare the frozen french fries according to package directions. Set aside when complete and keep warm.
  2. Heat a large wok or skillet over medium-high heat.
  3. Sauté the onions and bell peppers until translucent, about 10 minutes.
  4. Add the garlic and jalapeno and cook for an additional minute. Mix everything until combined.
  5. Add the beef chunks, cumin, complete seasoning, soy sauce, and red wine vinegar. Mix well and cook until beef is no longer pink, about 5 to 7 minutes.
  6. Add the tomato chunks, cover, and cook for an additional 5 minutes.
  7. When ready to serve, add the french fries and toss everything gently together.
  8. Serve lomo saltado over a bed of white rice and garnish with freshly chopped cilantro leaves. Enjoy with aji sauce on the side.

Tips

  • For the best results, use fresh and high-quality beef tenderloin. The tenderness of the meat is key to a great Lomo Saltado.
  • Don’t overcook the vegetables. They should remain slightly crisp to add texture to the dish.
  • Feel free to adjust the amount of jalapeno based on your spice preference. You can remove the seeds to lessen the heat.

Variations & Substitutions

If you’re looking to make this recipe your own, consider these variations and substitutions:

  • Vegetarian Option: Replace beef with mushrooms or tofu. You can still use the same marinade and cooking process.
  • Different Meats: Try using chicken or pork if you prefer a different protein.
  • Alternative Peppers: Use poblano or Anaheim peppers instead of bell peppers for a different flavor profile.

Storage

Leftovers can be stored in an airtight container in the refrigerator for up to 3 days. To reheat, warm in a skillet over medium heat until heated through. It’s best to keep the fries separate until serving to maintain their texture.

FAQ

Can I make Lomo Saltado in advance?

Yes, you can prepare the meat and vegetable mixture in advance and store it in the refrigerator for up to 24 hours. Reheat before serving and add the fries fresh for the best taste and texture.

What can I serve with Lomo Saltado?

Lomo Saltado is traditionally served with white rice, but you can also serve it with quinoa or a side salad for a lighter option. Aji sauce is a popular accompaniment that adds a nice spicy kick.

Nutrition

This dish is a good source of protein and vitamins from the fresh vegetables. However, if you’re watching your sodium intake, consider using a low-sodium soy sauce.

Conclusion

Liz’s Lomo Saltado is more than just a meal; it’s a celebration of flavors and cultures coming together in a single dish. Whether you’re making it for a family gathering or a cozy dinner at home, this recipe promises to deliver both warmth and satisfaction. I hope you enjoy making and eating it as much as I do. Don’t forget to share your experience and let us know how it turned out!

Related update: Liz’s Lomo Saltado

Related update: chilli chicken

Baked Tortellini In Red Sauce | Made by Meaghan Moineau

Baked Tortellini In Red Sauce

Intro

Growing up, Sunday family dinners were a beloved ritual in our home. The tantalizing aroma of tomatoes and garlic simmering on the stove would draw everyone into the kitchen, setting the stage for an evening of laughter, stories, and delicious food. One of my all-time favorite dishes from those cherished meals was my grandmother’s Baked Tortellini in Red Sauce. With its warm, comforting flavors and perfectly baked, cheesy top, it’s a dish that brings back fond memories each time I make it. Today, I’m thrilled to share this beloved recipe with you, hoping it becomes a staple in your home too.

Why You’ll Love It

This Baked Tortellini in Red Sauce is the epitome of comfort food, combining the richness of a homemade tomato sauce with the creamy, satisfying texture of cheese-filled tortellini. It’s a dish that feels both indulgent and heartwarming, perfect for a cozy family dinner or a special gathering with friends. The ingredients are simple, yet they come together to create a symphony of flavors with every bite. Plus, it’s easy to prepare, making it perfect for those busy weeknights when you crave something homemade without the fuss.

Ingredients

  • 2 cloves garlic, minced
  • 1/2 cup grated Grana Padano cheese
  • 1 cup coarsely grated mozzarella
  • 2 tablespoons olive oil
  • 1 medium onion, chopped
  • 1 teaspoon dried oregano
  • Salt and pepper to taste
  • 1 teaspoon sugar
  • 2 cans (14 ounces each) chopped tomatoes with juice
  • 1 pound fresh tortellini

Instructions

  1. Preheat your oven to 240°C (464°F) and lightly oil a baking dish.
  2. In a large pan, heat the olive oil over medium heat. Add the chopped onion and minced garlic, sautéing for about 5 minutes until the onion is translucent.
  3. Season the onion and garlic with salt, pepper, and dried oregano.
  4. Add the chopped tomatoes and their juice to the pan. Stir to combine and season again with salt, pepper, and oregano.
  5. Bring the mixture to a boil, then sprinkle in the sugar and reduce the heat. Let it simmer on low heat for 20 minutes, allowing the flavors to meld. Adjust seasoning to taste.
  6. While the sauce is simmering, bring a pot of salted water to a boil. Plunge the fresh tortellini into the boiling water and cook just until they float to the surface. Drain and return them to the pot.
  7. Toss the cooked tortellini with the tomato sauce, ensuring each piece is well coated.
  8. Transfer the tortellini and sauce mixture to the prepared baking dish. Sprinkle evenly with the grated Grana Padano and mozzarella cheese.
  9. Bake in the preheated oven for 20-25 minutes, until the cheese is golden and bubbly and the surface is well baked.
  10. Remove from the oven and let the dish stand for 5 minutes before serving. Enjoy with a fresh green salad for a complete meal.

Tips

For an even richer flavor, consider adding a splash of red wine to the tomato sauce as it simmers. If you prefer a spicier kick, a pinch of red pepper flakes can elevate the dish nicely. Remember to taste and adjust the seasoning of the sauce before combining it with the pasta.

Variations & Substitutions

Feel free to customize this recipe to suit your taste or dietary needs. Substitute the Grana Padano cheese with Parmesan for a slightly different flavor. For a vegetarian version, ensure your tortellini is filled with cheese or vegetables. You can also add sautéed mushrooms or spinach for an extra layer of flavor and nutrition.

Storage

Leftovers can be stored in an airtight container in the refrigerator for up to 3 days. To reheat, simply place the tortellini in a preheated oven at 180°C (356°F) until warmed through, or microwave individual portions until hot.

FAQ

Can I use frozen tortellini instead of fresh?

Yes, you can use frozen tortellini. Simply follow the package instructions for cooking time, and proceed with the recipe as directed.

Is it possible to make this dish ahead of time?

Absolutely! You can prepare the tomato sauce and cook the tortellini ahead of time. Combine them in the baking dish, cover and refrigerate for up to a day. When ready to serve, sprinkle with cheese and bake as directed, adding a few extra minutes to the baking time if needed.

Nutrition

While the exact nutritional information will vary based on the brands and specific ingredients used, a generous serving of this baked tortellini dish is a good source of protein and calcium, thanks to the cheese and pasta. For those watching their sodium intake, consider using low-sodium canned tomatoes and adjusting the amount of salt added throughout the recipe.

Conclusion

There’s something truly special about a dish that can transport you back in time, evoking memories of family gatherings and cherished moments. This Baked Tortellini in Red Sauce is not only a simple, satisfying meal but also a culinary hug that brings warmth and comfort to the table. Whether you’re making it for your family or sharing it with friends, it’s sure to become a favorite in your home, just as it has in mine. Enjoy every bite and the memories it creates!

Related update: Baked Tortellini In Red Sauce

Related update: Liz's Lomo Saltado

Marinated Flat Iron Steak | Made by Meaghan Moineau

Marinated Flat Iron Steak: A Flavorful Delight

Intro

There’s something incredibly nostalgic about the sizzle of a steak hitting a hot grill. Growing up, summer evenings were often spent in the backyard with my family, gathered around the barbecue as the aroma of marinated meat filled the air. My dad would always let me help prepare the marinade, and I remember the joy of mixing the ingredients together, the sharp tang of balsamic vinegar mixing with the earthy aroma of fresh herbs. This Marinated Flat Iron Steak recipe brings back those cherished memories and promises to create new ones for your family and friends.

Why You’ll Love It

This Marinated Flat Iron Steak recipe is a delicious blend of simplicity and flavor, perfect for weeknight dinners or weekend gatherings. Here’s why you’ll love it:

  • Quick and Easy: With a straightforward marinade and minimal prep time, this recipe fits perfectly into busy schedules.
  • Flavorful: The combination of balsamic vinegar, dijon mustard, and fresh herbs infuses the steak with a vibrant taste.
  • Versatile: Whether you’re hosting a summer barbecue or looking for a cozy indoor dinner, this steak is a crowd-pleaser.
  • Memorable: Each bite is a reminder of sunny days and joyful gatherings, making it not just a meal, but a shared experience.

Ingredients

  • Balsamic vinegar
  • Dijon mustard
  • Flat iron steak
  • Garlic cloves
  • Ginger
  • Fresh herbs: rosemary
  • Lemon zest
  • Lemons
  • Mayonnaise
  • Olive oil
  • Salt and pepper

Instructions

  1. Cut the flat iron steak lengthwise to form two equal strips.
  2. In a large baking pan or Ziploc bag, combine balsamic vinegar, dijon mustard, minced garlic, grated ginger, chopped fresh rosemary, lemon zest, juice of the lemons, mayonnaise, olive oil, salt, and pepper to form the marinade.
  3. Add the steak strips to the marinade, ensuring they are well-coated. Cover, or seal the bag, and place in the refrigerator for at least an hour, or overnight for deeper flavor.
  4. Preheat your BBQ to high heat. Once hot, place the marinated steaks on the grill.
  5. Cover and cook for 3 minutes on one side.
  6. Flip the steaks and cook the other side for another 3 minutes, or until they reach your desired level of doneness.
  7. Remove from the grill and let the steaks rest for 5 minutes before slicing and serving.

Tips

To ensure your steak is perfectly cooked and flavorful, consider these tips:

  • Marinate Longer: For a more intense flavor, let the steak marinate overnight.
  • Room Temperature: Allow the steak to come to room temperature before grilling for even cooking.
  • Rest the Meat: Letting the steak rest after cooking will help retain its juices, ensuring a juicy bite.

Variations & Substitutions

This recipe is wonderfully adaptable to suit your tastes and dietary needs:

  • Herbs: Swap rosemary for thyme or oregano for different herbal notes.
  • Citrus Twist: Use lime or orange zest instead of lemon for a different citrus profile.
  • Spicy Kick: Add a pinch of red pepper flakes to the marinade for some heat.
  • Dietary Adjustments: For a dairy-free version, ensure your mayonnaise is plant-based.

Storage

If you have leftovers, store them properly to maintain their flavor:

  • Refrigeration: Store cooked steak in an airtight container in the refrigerator for up to 3 days.
  • Freezing: You can freeze the cooked steak for up to 2 months. Wrap it tightly in plastic wrap and place in a freezer-safe bag.
  • Reheating: Reheat gently in a skillet over medium heat or in the oven to prevent the steak from drying out.

FAQ

Can I use a different cut of steak?

Absolutely! While flat iron steak is great due to its tenderness and flavor, you can use this marinade with other cuts like flank steak, skirt steak, or even ribeye. Just adjust the cooking time based on the thickness and type of steak.

What side dishes pair well with this steak?

This steak pairs wonderfully with a variety of sides. Consider serving it with grilled vegetables, a fresh garden salad, or creamy mashed potatoes for a complete meal.

How do I know when the steak is done?

Use a meat thermometer to check the internal temperature. For medium-rare, aim for 135°F (57°C), for medium 145°F (63°C), and for well-done, 160°F (71°C). Remember that the steak will continue to cook a bit as it rests.

Nutrition

While the exact nutrition can vary based on the size of your steak and the exact amount of marinade, a typical serving of this marinated flat iron steak provides essential nutrients like protein, healthy fats from olive oil, and vitamins from the herbs and lemon. It’s a wholesome choice that fits well into a balanced diet.

Conclusion

Creating delicious meals that bring people together is a true joy, and this Marinated Flat Iron Steak recipe is perfect for just that. With its rich flavors and simple preparation, it’s sure to become a favorite at your table, just as it has been at mine. Whether you’re reminiscing about past gatherings or creating new memories, this dish is a wonderful way to celebrate the joy of cooking and sharing good food with loved ones.

Related update: Marinated Flat Iron Steak

Related update: Swiss Chard Wraps

Related update: Baked Tortellini In Red Sauce

Rotisserie Chicken and Bean Tostadas | Made by Meaghan Moineau

Rotisserie Chicken and Bean Tostadas

Intro

Every summer, my family would gather in my grandmother’s backyard for a weekend barbecue. The air was always filled with the sound of laughter and the mouthwatering aroma of her famous tostadas sizzling on the grill. These weren’t just any tostadas; they were a medley of flavors that united us all. Today, I’m excited to share a version of this beloved recipe with you: Rotisserie Chicken and Bean Tostadas. This dish not only reminds me of those cherished family moments but also provides a quick and delicious meal that can be whipped up on a busy weeknight.

Why You’ll Love It

These Rotisserie Chicken and Bean Tostadas are a delightful twist on a classic Mexican favorite. They’re perfect for when you want something delicious, yet easy to prepare. The combination of crunchy corn tortillas, creamy refried beans, savory chicken, and fresh toppings creates a symphony of textures and flavors. Plus, the use of a store-bought rotisserie chicken means minimal cooking time, allowing you more moments to savor and less time in the kitchen.

Ingredients

  • Shredded rotisserie chicken
  • Corn tortillas
  • Canned refried beans
  • Diced tomato
  • Jalapeño
  • Shredded iceberg lettuce
  • Cotija cheese
  • Lime
  • Guacamole
  • Salsa

Instructions

  1. Preheat your oven to 350 degrees Fahrenheit.
  2. Place the corn tortillas on a cookie sheet and bake them for 16-17 minutes, or until the edges brown and curl.
  3. Allow the cooked tortillas to cool at room temperature.
  4. To build the tostadas, start by spreading 1-2 tablespoons of refried beans on each tortilla.
  5. Top each tortilla with a handful of shredded rotisserie chicken, shredded iceberg lettuce, diced tomato, and guacamole.
  6. Drizzle each tostada with the juice of one lime wedge.
  7. Sprinkle generously with cotija cheese.
  8. Drizzle with salsa and garnish with slices of jalapeño.
  9. Serve the tostadas open-faced. This recipe makes 6 tostadas, with a serving size of 2 tostadas per person.

Tips

For the crispiest tostadas, make sure your tortillas are spaced apart on the baking sheet to allow for even browning. Additionally, if you prefer a more intense lime flavor, consider zesting some lime over the tostadas for an extra zing. Lastly, for a bit of smoky flavor, lightly grill the tortillas before baking them.

Variations & Substitutions

If you’re looking to switch things up, there are plenty of ways to customize these tostadas. Try using flour tortillas for a softer base or swap the rotisserie chicken with grilled shrimp for a seafood twist. For those who prefer a vegetarian option, substitute the chicken with sautéed mushrooms or grilled vegetables. If cotija cheese is unavailable, feta or queso fresco work as excellent alternatives.

Storage

While these tostadas are best enjoyed fresh, any leftovers can be stored. Keep the toppings and toasted tortillas separate to prevent sogginess. Store the tortillas in an airtight container at room temperature and refrigerate the toppings in separate containers. Reheat the tortillas in the oven for a few minutes before assembling your tostadas again.

FAQ

Can I make the tostadas ahead of time?

Yes, you can prepare the individual components ahead of time. Bake the tortillas and store them in an airtight container. Prepare the toppings and store them in the fridge. Assemble the tostadas just before serving for the best texture and flavor.

What can I serve with these tostadas?

These tostadas pair well with a side of Mexican rice or a refreshing bean salad. If you’re hosting a party, consider serving them alongside a platter of chips, salsa, and guacamole for a complete Mexican-inspired feast.

Nutrition

Each serving of two tostadas is an excellent source of protein and fiber, thanks to the chicken and beans. The fresh vegetables add a boost of vitamins, while the cheese provides calcium. For a lighter version, you can reduce the amount of cheese and guacamole used.

Conclusion

Rotisserie Chicken and Bean Tostadas offer a delicious journey through flavors and textures, reminiscent of cherished family gatherings. Whether you’re making them for a weeknight dinner or a festive occasion, they promise to bring joy and satisfaction to the table. I hope this recipe becomes a part of your family’s cherished memories, just as it has been for mine. Enjoy every crunchy, flavorful bite!

Related update: Rotisserie Chicken and Bean Tostadas

Related update: Marinated Flat Iron Steak

Chicken Suya | Made by Meaghan Moineau

Deliciously Spiced Chicken Suya: A Taste of West Africa

Intro

Chicken Suya is a delightful and spicy grilled chicken recipe originating from West Africa, particularly Nigeria. This dish holds a special place in my heart, as it reminds me of warm summer evenings in Lagos, where the aroma of sizzling suya from roadside vendors filled the air. As a child, my family and I would often take strolls through the bustling city streets, stopping to indulge in this delectable treat. The succulent, spicy flavor of Chicken Suya has been a cherished part of my culinary journey, and I’m thrilled to share this recipe with you.

Why You’ll Love It

There are countless reasons to fall in love with Chicken Suya. Here are just a few:

  • Bold Flavors: The suya spice blend is a powerhouse of taste, combining ground peanuts, ginger, garlic, and chili powder to create a savory and slightly spicy profile that is utterly irresistible.
  • Simple Ingredients: Despite its complex flavor, Chicken Suya requires only a handful of ingredients that you likely already have in your pantry.
  • Versatile Dish: This dish can serve as a main course, appetizer, or even a snack. It’s perfect for gatherings, barbecues, or a cozy night in.
  • Healthy and Satisfying: Grilling the chicken keeps it lean, while the spices provide a burst of nutrition and taste.

Ingredients

  • 2-3 tablespoons suya spice
  • 1 whole chicken, cut into parts
  • 1 teaspoon chili powder
  • 2 tablespoons groundnut oil (or any cooking oil)
  • 2 seasoning cubes
  • 1 onion, sliced
  • 2 tomatoes, sliced
  • Salt to taste

Instructions

  1. Preheat your oven to 500°F (260°C).
  2. Wash the chicken pieces thoroughly and pat them dry with a paper towel.
  3. In a large bowl, combine the suya spice, chili powder, seasoning cubes, and salt. Mix well.
  4. Add the chicken to the bowl, ensuring that each piece is generously coated with the spice mixture.
  5. Drizzle the groundnut oil over the seasoned chicken and give it a good mix to ensure even distribution.
  6. Arrange the chicken pieces on a baking sheet lined with aluminum foil.
  7. Place the baking sheet in the preheated oven and grill for 40 minutes. Be sure to check the chicken occasionally, flipping it to ensure it cooks evenly on both sides.
  8. Once the chicken is cooked through and has a beautiful char, remove it from the oven.
  9. Serve hot, garnished with sliced onions, tomatoes, and an extra sprinkle of suya spice for added flavor.

Tips

  • For an authentic taste, try using a grill instead of an oven. The smoky flavor from the charcoal enhances the suya’s taste.
  • If you prefer a milder heat, adjust the amount of chili powder to suit your taste.
  • Rest the chicken for a few minutes after grilling to allow the juices to redistribute, ensuring a moist and flavorful bite.

Variations & Substitutions

If you’re looking to shake things up, consider these variations:

  • Protein Swap: While chicken is traditional, you can use beef, goat meat, or even tofu for a vegetarian option.
  • Nut-Free: If you have a peanut allergy, substitute the suya spice with a nut-free spice blend.
  • Additional Veggies: Add bell peppers or mushrooms to the grill for an extra layer of flavor and texture.

Storage

Leftover Chicken Suya can be stored in an airtight container in the refrigerator for up to 3 days. To reheat, place the chicken in a preheated oven at 350°F (175°C) for about 10 minutes or until warmed through. You can also freeze the cooked chicken for up to 2 months. Thaw overnight in the refrigerator before reheating.

FAQ

Can I prepare the suya spice blend at home?

Absolutely! To make your own suya spice blend, you can combine roasted peanuts, ground ginger, garlic powder, onion powder, paprika, and chili powder. Blend them together until you reach a fine consistency. Store in an airtight jar for future use.

How can I make my Chicken Suya extra crispy?

For an extra crispy texture, finish the grilled chicken under the broiler for a few minutes. Keep a close eye on it to prevent burning, and you’ll achieve a delightful crunch.

Nutrition

Chicken Suya is a nutritious option rich in protein and flavor. While exact nutritional values depend on portion sizes, a typical serving provides:

  • Calories: Approximately 250-300 per serving
  • Protein: 25-30g
  • Fat: 15-20g
  • Carbohydrates: 5-10g

It’s a great choice for those looking to maintain a balanced diet without sacrificing taste.

Conclusion

Chicken Suya is more than just a meal; it’s a culinary experience that transports you to the vibrant streets of West Africa. With its bold flavors and tantalizing aroma, it’s sure to become a favorite in your household. Whether you’re hosting a gathering or enjoying a quiet dinner at home, this dish promises to deliver satisfaction with every bite. I hope you enjoy making and eating this Chicken Suya as much as I do. Bon appétit!

Related update: Chicken Suya

Related update: Rotisserie Chicken and Bean Tostadas

The Perfect Butter Beans Stew | Made by Meaghan Moineau

The Perfect Butter Beans Stew

Intro

Welcome to a cozy corner of my kitchen, where the aroma of simmering stews fills the air and warms the soul. Today, I’m thrilled to share with you a recipe that holds a special place in my heart: The Perfect Butter Beans Stew. This dish is more than just a meal; it’s a comforting embrace on a chilly day, a nostalgic reminder of family gatherings and heartwarming stories shared around the dinner table.

When I was a child, my grandmother’s kitchen was the heartbeat of our home. I remember watching her effortlessly create magic in her pots, her hands moving deftly, her eyes alight with joy. The butter beans stew was a family favorite, a recipe passed down through generations, each iteration lovingly tweaked and perfected. Today, I’m excited to pass this cherished recipe on to you, hoping it will bring the same warmth and joy to your home as it has to mine.

Why You’ll Love It

This butter beans stew is a celebration of simple, wholesome ingredients coming together to create a symphony of flavors. Here’s why you’ll love it:

  • Hearty and Nutritious: Packed with protein-rich butter beans and a medley of aromatic spices, this stew is both satisfying and nourishing.
  • Simple Ingredients: You’ll find most of these ingredients in your pantry, making it an accessible dish for any day of the week.
  • Versatile: Enjoy it as a standalone meal, or serve it as a side dish with your favorite protein.
  • Comforting: Perfect for those colder months when you crave a warm, home-cooked meal.

Ingredients

  • 1 cup dry lima beans, soaked overnight
  • 2 diced onions
  • 3 garlic cloves, minced
  • 1 teaspoon dry tarragon
  • 1 tablespoon canned fresh tarragon
  • 2 teaspoons sweet paprika
  • 2 bay leaves
  • 3 tablespoons unrefined sunflower oil
  • 1 teaspoon ground pepper
  • Salt to taste

Instructions

For the full step-by-step instructions, including tips and techniques to perfect this dish, please visit my blog at http://gourmandelle.com/the-perfect-butter-beans-stew/.

Tips

  • Soak the Beans: Don’t skip soaking the butter beans overnight. This step ensures they cook evenly and reach the perfect, tender texture.
  • Season Generously: Don’t be shy with the spices. The tarragon and paprika are key to developing the stew’s rich, savory flavor.
  • Simmer Slowly: Allow the stew to simmer on low heat. This slow cooking process melds the flavors beautifully.

Variations & Substitutions

Feel free to customize this stew to suit your taste preferences or dietary needs:

  • Vegetarian Option: For a vegetarian version, replace the unrefined sunflower oil with olive oil, and enhance the flavor with vegetable broth instead of water.
  • Spicy Kick: Add a pinch of chili flakes or a dash of hot sauce if you prefer your stews with a bit of heat.
  • Herb Variations: Swap the tarragon with rosemary or thyme for a different herbaceous note.

Storage

This butter beans stew stores beautifully, making it a perfect make-ahead meal:

  • Refrigerator: Store in an airtight container in the fridge for up to 4 days.
  • Freezer: For longer storage, freeze the stew in individual portions. It will keep well for up to 3 months.
  • Reheating: Reheat gently on the stove over low heat, adding a splash of water or broth if needed to adjust the consistency.

FAQ

Can I use canned beans instead of dried?

Yes, you can use canned butter beans as a convenient alternative. Simply rinse and drain them before adding them to the stew. Keep in mind that the cooking time will be reduced since canned beans are pre-cooked.

What can I serve with butter beans stew?

This stew pairs wonderfully with crusty bread, rice, or quinoa. A fresh green salad or roasted vegetables also complement the rich flavors of the stew beautifully.

Nutrition

This butter beans stew is a nutritious powerhouse, offering a good balance of protein, fiber, and essential vitamins. While the exact nutrition will vary based on portion size, here’s a rough estimate per serving:

  • Calories: Approximately 250-300 calories
  • Protein: 12-15 grams
  • Fiber: 8-10 grams
  • Fat: 10 grams

Conclusion

The Perfect Butter Beans Stew is more than a recipe; it’s a culinary journey back to simpler times, filled with warmth and love. As you savor each spoonful, may it bring you the same comfort and joy it has brought my family for generations. I hope this stew becomes a staple in your kitchen, weaving its way into your cherished food memories. Thank you for joining me on this delicious adventure. Happy cooking!

Related update: The Perfect Butter Beans Stew

Related update: Chicken Suya

Beef Carrot Stew | Made by Meaghan Moineau

Beef Carrot Stew

Intro

There’s something incredibly comforting about a hearty stew, and this Beef Carrot Stew is no exception. I remember the first time I learned to make this dish; it was a chilly afternoon at my grandmother’s house. The kitchen was filled with the warm, inviting aroma of stewing beef and spices. She called it her “magic stew” because it had the power to bring the whole family together, no matter how busy we were. Now, every time I make it, I’m transported back to those cozy afternoons filled with laughter and love. This recipe has become a cherished staple in my home, and I’m excited to share it with you.

Why You’ll Love It

This Beef Carrot Stew is a delightful fusion of flavors and textures that will warm your soul. Here’s why you’ll fall in love with it:

  • Rich & Flavorful: The blend of spices, garlic, and ginger infuses the stew with a depth of flavor that’s both comforting and tantalizing.
  • Nutritious: Packed with the goodness of carrots and beef, it’s a wholesome meal that nourishes your body.
  • Versatile: Pairs beautifully with a variety of sides like rice, yam, plantain, or pasta, making it a perfect fit for any meal.
  • Easy to Make: With simple steps and easily accessible ingredients, you can whip up this stew with minimal fuss.

Ingredients

  • Scent leaves
  • Cooked beef
  • Carrots
  • Curry
  • Garlic
  • Ginger
  • Seasoning cubes
  • Bulb of onion
  • Cooking spoons of blended tatashe-pepper mix
  • Cooking spoons of vegetable oil

Instructions

  1. Scrape, wash, and boil your carrots until they are soft. Place them in a blender without water and grind until completely shredded.
  2. In a pot, heat up your vegetable oil and fry the onions, garlic, and ginger until they are fragrant.
  3. Add the tatashe-pepper mix and the cooked beef to the pot. Allow the mixture to simmer on low heat for about 10-15 minutes.
  4. Season the stew with curry, seasoning cubes, and any other preferred spices. Stir well to combine.
  5. Add the shredded carrots to the pot, stirring them in. Let the stew simmer on low heat for another 3-5 minutes.
  6. Finally, add the chopped scent leaves, stir them in, and serve the stew hot with your choice of rice, yam, plantain, pasta, or any other accompaniment.

Tips

  • Fresh Ingredients: Use fresh garlic, ginger, and scent leaves for the best flavor.
  • Simmer Time: Allowing the stew to simmer slowly helps develop the rich flavors.
  • Consistent Slicing: Ensure the carrots are evenly shredded for a uniform texture.
  • Tasting: Taste the stew during cooking and adjust the seasoning as necessary.

Variations & Substitutions

If you want to switch things up, consider these variations and substitutions:

  • Protein Swap: Substitute beef with chicken or tofu for a different protein profile.
  • Vegetable Additions: Add potatoes or bell peppers for extra bulk and flavor.
  • Spice Level: Adjust the amount of tatashe-pepper mix for more or less heat.
  • Herb Alternatives: If scent leaves are unavailable, basil or cilantro can be used as alternatives.

Storage

Store any leftovers in an airtight container in the refrigerator for up to 3 days. To reheat, warm the stew gently on the stove over low heat, adding a splash of water if needed to loosen the consistency.

FAQ

Can I make this stew ahead of time?

Absolutely! This stew can be made a day ahead and stored in the fridge. In fact, the flavors often deepen and become even more delicious after resting overnight.

Is this stew freezer-friendly?

Yes, you can freeze Beef Carrot Stew for up to three months. Ensure it is fully cooled before transferring it to a freezer-safe container. Thaw it in the refrigerator overnight before reheating.

What can I serve with this stew?

This stew pairs wonderfully with a variety of side dishes. Serve it with steamed rice, boiled yams, fried plantains, or even crusty bread to soak up the flavorful sauce.

Nutrition

This Beef Carrot Stew is not only delicious but also nutritious. Rich in protein from the beef and packed with vitamins from the carrots and scent leaves, it’s a meal that supports both your taste buds and your health goals. For a more detailed nutritional breakdown, consider using a recipe nutrition calculator with the specific brands and quantities you use.

Conclusion

Beef Carrot Stew is more than just a meal; it’s a comforting dish that brings warmth and joy to any occasion. Whether you’re sharing it with family on a quiet evening or serving it to friends at a lively gathering, this stew is sure to impress with its rich flavors and hearty ingredients. I hope this recipe becomes a beloved part of your culinary repertoire, just as it has in mine. Happy cooking!

Related update: Beef Carrot Stew

Related update: The Perfect Butter Beans Stew

Creamy White Chili | Made by Meaghan Moineau

Creamy White Chili: A Hearty Bowl of Comfort

Intro

There’s something uniquely comforting about a steaming bowl of chili, especially when it carries with it memories of family gatherings and cozy winter evenings. My journey with this Creamy White Chili began years ago, in my grandmother’s bustling kitchen. She would often prepare this dish during the chilly months, its rich aroma filling the house as we eagerly awaited dinnertime. The combination of tender chicken, creamy beans, and a hint of spice was always the ultimate comfort food, sparking laughter and conversation around the table. It is this warmth and nostalgia that I hope to share with you through this recipe.

Why You’ll Love It

This Creamy White Chili is a delightful twist on the traditional red chili recipes you may be accustomed to. Here are a few reasons why you’ll fall in love with this dish:

  • Rich and Creamy: The addition of heavy whipping cream and sour cream creates a luscious texture that’s incredibly satisfying.
  • Flavorful and Spicy: The combination of cumin, oregano, and green chilies provides a depth of flavor with just the right amount of heat.
  • Quick and Simple: With minimal prep time and easy-to-find ingredients, this recipe is perfect for a weeknight dinner or a cozy weekend meal.
  • Family-Friendly: Kids and adults alike will enjoy this comforting bowl of chili, making it a great option for family meals.

Ingredients

  • 1 tablespoon olive oil
  • 1 pound chicken, diced
  • 1 onion, chopped
  • 2 cloves garlic, minced
  • 2 cups canned chicken broth
  • 2 cans (15 ounces each) great northern beans, drained and rinsed
  • 1 can (4 ounces) green chilies, diced
  • 1 teaspoon cumin
  • 1 teaspoon oregano
  • Salt and black pepper to taste
  • 1 cup sour cream
  • 1/2 cup heavy whipping cream
  • 1 cup shredded cheddar cheese

Instructions

  1. In a heavy saucepan, heat the olive oil over medium heat. Add the diced chicken, chopped onion, and minced garlic. Sauté until the chicken is cooked through and the onion is translucent, about 8-10 minutes.
  2. Stir in the chicken broth, great northern beans, and diced green chilies. Add the cumin, oregano, salt, and black pepper. Bring the mixture to a simmer.
  3. Reduce the heat to low and let it simmer for 20 minutes, allowing the flavors to meld together.
  4. Remove the saucepan from the heat and stir in the sour cream and heavy whipping cream until well combined.
  5. Ladle the chili into bowls and top with shredded cheddar cheese. Serve hot and enjoy!

Tips

  • Prepping Ingredients: To save time, prepare all your ingredients before you start cooking. Dice the chicken, chop the onion, and mince the garlic ahead of time.
  • Sautéing Perfectly: Ensure the chicken is cooked thoroughly but remains tender by keeping an eye on the heat and stirring frequently.
  • Adjusting Spice Levels: If you prefer a milder chili, reduce the amount of green chilies or use a milder variety.

Variations & Substitutions

Feel free to get creative with this recipe by trying these variations and substitutions:

  • Meat Substitutions: Substitute the chicken with turkey or beef for a different flavor profile.
  • Vegetarian Version: Omit the chicken and use vegetable broth to create a vegetarian-friendly chili.
  • Add Some Veggies: Incorporate additional vegetables such as bell peppers or corn for added texture and nutrition.
  • Cheesy Twist: Experiment with different cheeses, such as Monterey Jack or Pepper Jack, for a unique taste.

Storage

This Creamy White Chili stores well, making it a perfect make-ahead meal:

  • Refrigeration: Store leftover chili in an airtight container in the refrigerator for up to 3 days. Reheat gently on the stovetop or in the microwave before serving.
  • Freezing: For longer storage, freeze the chili in a freezer-safe container for up to 2 months. Thaw in the refrigerator overnight and reheat before enjoying.

FAQ

Can I use fresh chilies instead of canned green chilies?

Yes, you can use fresh green chilies if you prefer. Simply roast or sauté them before adding to the chili for a similar flavor profile.

How can I make this chili spicier?

If you love a bit more heat, consider adding a pinch of cayenne pepper or a few dashes of hot sauce to the chili while it simmers.

Is it possible to make this dish dairy-free?

Yes, you can make a dairy-free version by using coconut cream instead of heavy whipping cream and a dairy-free cheese alternative. Just keep in mind that the flavor may vary slightly.

Nutrition

While I don’t have exact nutritional information for this recipe, it’s important to note that this chili is a hearty dish rich in protein and calcium, thanks to the chicken and cheese. Adjust portion sizes and ingredients to meet your dietary needs.

Conclusion

Making Creamy White Chili is like wrapping yourself in a warm, comforting blanket on a cold day. From the rich, creamy texture to the delightful hint of spice, it’s a dish that brings both warmth and joy to the table. Whether you’re cooking for family, friends, or simply treating yourself, this recipe is sure to become a cherished favorite. I hope this dish brings as much happiness and nostalgia to your home as it does to mine. Enjoy every spoonful!

Related update: Creamy White Chili

Related update: Beef Carrot Stew

Slow Cooker Kahlua Pork with Sweet Chili Pineapple Sauce | Made by Meaghan Moineau

Slow Cooker Kahlua Pork with Sweet Chili Pineapple Sauce

Intro

There’s something magical about the aroma of a slow-cooked meal wafting through the house, especially when it’s a dish that has been a family favorite for generations. I can still vividly recall the Sunday afternoons at my grandmother’s house, where family gatherings were synonymous with her signature Kahlua Pork. As kids, we would eagerly await the moment when the tender, flavorful pork would be served, accompanied by the sweet and tangy pineapple sauce. This recipe is my homage to those cherished memories, with a modern twist that brings the flavors to life in a convenient slow-cooker format.

Why You’ll Love It

This Slow Cooker Kahlua Pork with Sweet Chili Pineapple Sauce is the perfect blend of savory and sweet, with a hint of smokiness that makes it irresistible. It’s incredibly easy to prepare, requiring minimal effort but delivering maximum flavor. The slow cooker does all the hard work, breaking down the pork until it’s melt-in-your-mouth tender. The sweet chili pineapple sauce adds a zesty kick that perfectly complements the richness of the pork. Whether you’re hosting a gathering or just want a comforting meal for the family, this dish is sure to become a staple in your home.

Ingredients

  • 4 lbs pork butt
  • 2 tablespoons liquid smoke
  • 1 tablespoon regular sea salt
  • 1 cup pineapple juice
  • 1/4 cup rice vinegar
  • 1/4 cup honey
  • 2 tablespoons garlic chili sauce
  • 2 tablespoons hoisin sauce

Instructions

  1. Place the pork, fat side up, in the slow cooker.
  2. Using a fork, pierce the roast all over and pour the liquid smoke over it to coat.
  3. Sprinkle the sea salt evenly over the roast and cover.
  4. Cook on low for 10 hours, until the meat begins to fall apart when shredded with a fork.
  5. In a small saucepan, whisk together the pineapple juice, rice vinegar, honey, chili sauce, and hoisin sauce.
  6. Bring the mixture to a boil and cook the sauce until reduced by half, stirring frequently with a heat-resistant spatula.
  7. Set aside the sauce once reduced.
  8. When the roast is done, transfer to a cutting board and shred the meat using two forks.
  9. Return the shredded meat back to the slow cooker and serve immediately with the sauce.

Tips

For best results, choose a pork butt with good marbling, as the fat will render down during cooking, keeping the meat juicy and flavorful. If you prefer a bit of spice, feel free to adjust the amount of garlic chili sauce to your liking. Keep an eye on the sauce as it reduces to ensure it doesn’t burn, and remember to stir frequently.

Variations & Substitutions

If you’re looking for a different flavor profile, you can substitute the hoisin sauce with soy sauce for a less sweet, more savory sauce. For a tropical twist, try adding crushed pineapples to the sauce during the reduction process. Vegetarians can swap the pork for jackfruit, which mimics the texture of shredded meat and absorbs flavors beautifully.

Storage

Leftovers can be stored in an airtight container in the refrigerator for up to 4 days. Reheat gently on the stovetop or in the microwave, adding a splash of water or pineapple juice to keep the meat moist. You can also freeze the pork and sauce in separate containers for up to 3 months. Thaw in the refrigerator overnight before reheating.

FAQ

Can I use a different cut of pork?

Yes, you can use pork shoulder or pork loin as alternatives. However, keep in mind that pork loin is leaner and may not be as tender as pork butt or shoulder. Adjust the cooking time accordingly and monitor the tenderness of the meat.

What can I serve with this dish?

This Kahlua Pork pairs wonderfully with steamed rice or a side of roasted vegetables. For a complete Hawaiian-inspired meal, consider serving it with macaroni salad and coleslaw.

Is there a way to make it in the oven?

Absolutely! Preheat your oven to 325°F (165°C). Follow the preparation steps and place the pork in a roasting pan. Cover tightly with foil and bake for 5-6 hours, until the pork is tender and easily shredded.

Nutrition

This dish is a source of protein and offers a delightful balance of sweet and savory flavors. The sauce contains natural sweetness from honey and pineapple juice, making it more nutrient-dense than sugar-laden alternatives. If you’re watching your sodium intake, consider using a reduced-sodium soy sauce in place of hoisin sauce.

Conclusion

This Slow Cooker Kahlua Pork with Sweet Chili Pineapple Sauce is a testament to the power of simple ingredients and traditional cooking methods. It’s a dish that brings people together, creating a sense of warmth and nostalgia with every bite. Whether it’s for a special occasion or a cozy family dinner, this recipe is sure to become a beloved fixture in your culinary repertoire. Enjoy the flavors, and may it bring as much joy to your table as it has to mine!

Related update: Slow Cooker Kahlua Pork with Sweet Chili Pineapple Sauce

Related update: Creamy White Chili

Osso Buco | Made by Meaghan Moineau

Osso Buco: A Timeless Italian Classic

Intro

There’s something magical about the aroma of a slowly simmering pot of osso buco. It takes me back to my grandmother’s kitchen, where the warmth and comfort of her delicious meals enveloped us like a loving embrace. She would often prepare osso buco on special Sundays, filling the house with the tantalizing scent of veal shanks melding with fresh herbs and zesty lemon. Those cherished family gatherings, filled with laughter and stories, remain etched in my heart. Today, I’m excited to share this classic Italian recipe with you, hoping it becomes a beloved favorite in your home just as it is in mine.

Why You’ll Love It

Osso buco is not just a dish; it’s an experience. This traditional Italian stew is a beautiful blend of flavors and textures that will transport you to the heart of Italy. The slow-cooked veal shanks become incredibly tender, with the marrow adding a rich depth to the sauce. The citrusy hint of lemon rind and the fresh burst of parsley elevate the dish, making it a perfect balance of hearty and fresh. Whether you’re hosting a dinner party or enjoying a cozy night in, this dish is sure to impress and satisfy.

Ingredients

  • 4 veal shanks
  • 1/4 cup fresh parsley, chopped
  • Rind of 1 lemon, grated
  • 1/2 cup flour, for dredging
  • 1 bell pepper, chopped
  • 2 tablespoons olive oil
  • 2 cloves garlic, minced
  • 1 onion, finely chopped
  • 2 cups chicken stock
  • 1 cup dry white wine
  • 1 cup tomato sauce

Instructions

  1. Dredge the veal shanks in seasoned flour, shaking off any excess.
  2. Heat the olive oil in a large, deep pan over medium heat. Add the veal shanks and sauté until they are lightly browned on all sides. Remove and set aside.
  3. In the same pan, add the garlic and onion. Sauté until the onion is translucent, about 5 minutes.
  4. Return the veal shanks to the pan. Pour the boiling chicken stock, white wine, and tomato sauce over the meat.
  5. Cover the pan and let it simmer on low heat for about 1 1/2 hours, or until the meat is tender and falling off the bone.
  6. Just before serving, stir in the chopped parsley and grated lemon rind.
  7. Serve the osso buco over a bed of saffron rice, allowing the sauce to soak into the grains.

Tips

For the best results, use high-quality veal shanks with a good amount of marrow. This will enhance the flavor of the dish. Be patient while simmering the osso buco; the longer it cooks, the more tender the meat will become. Make sure to taste the sauce and adjust the seasoning as needed, adding salt and pepper to your preference.

Variations & Substitutions

If veal isn’t to your taste or is unavailable, you can substitute with beef shanks. They offer a similar texture and richness. For a different flavor profile, consider adding a splash of balsamic vinegar or a teaspoon of rosemary. If you prefer a thicker sauce, mix a tablespoon of cornstarch with cold water and stir it into the sauce towards the end of cooking.

Storage

Osso buco keeps well and can be refrigerated in an airtight container for up to three days. To reheat, gently warm it on the stovetop over low heat or in the microwave. This dish also freezes beautifully. Simply allow it to cool completely before transferring to a freezer-safe container. It will keep in the freezer for up to three months. Thaw overnight in the refrigerator before reheating.

FAQ

Can I prepare osso buco in advance?

Absolutely! In fact, osso buco often tastes even better the next day as the flavors have more time to meld together. You can prepare it a day ahead and store it in the refrigerator. Simply reheat before serving.

What should I serve with osso buco?

Osso buco is traditionally served with risotto alla Milanese, a saffron-infused risotto. However, you can also pair it with creamy mashed potatoes, polenta, or a simple crusty bread to soak up the delicious sauce.

Nutrition

This dish is rich in protein and provides a good amount of iron and zinc, thanks to the veal. While it is a hearty dish with some fat content, you can balance it with a side of vegetables or a fresh salad. The use of fresh herbs and lemon also adds vitamin C and antioxidants, contributing to a well-rounded meal.

Conclusion

Osso buco is a dish that brings people together, fostering a sense of warmth and community. With its rich flavors and comforting presence, it’s a meal that turns ordinary occasions into special ones. Whether it’s a Sunday family dinner or a festive gathering, this Italian classic is sure to leave a lasting impression. I hope this recipe becomes as cherished in your culinary repertoire as it is in mine. Enjoy the journey of creating and savoring this timeless dish, and may it fill your home with love and delicious memories.

Related update: Osso Buco

Related update: Slow Cooker Kahlua Pork with Sweet Chili Pineapple Sauce

Coconut Israeli Couscous Studded With Pomegranate | Made by Meaghan Moineau

Coconut Israeli Couscous Studded With Pomegranate

Intro

Growing up, I remember the sweet scent of cinnamon and coconut wafting through our kitchen during family gatherings. These were the times when my grandmother would prepare her famous coconut couscous, a dish so comforting and aromatic that it became a family tradition. It wasn’t just a meal; it was a vessel of memories, filled with laughter and warmth. Today’s recipe, Coconut Israeli Couscous Studded with Pomegranate, is a tribute to those cherished moments. It’s a dish that combines the creamy texture of coconut milk with the delightful surprise of pomegranate seeds, creating a symphony of flavors that will dance on your palate.

Why You’ll Love It

This recipe is a beautiful fusion of flavors and textures. The soft, chewy Israeli couscous absorbs the rich, creamy coconut milk, while the pomegranate seeds add a burst of freshness and color. The subtle hint of cardamom and cinnamon brings warmth and depth, making this dish a perfect addition to any meal. Whether you’re looking for a unique side dish or a comforting main course, you’ll fall in love with this coconut couscous.

Ingredients

  • 1 cup milk
  • 1 can (13.5 oz) unsweetened coconut milk
  • 3 green cardamom pods
  • 1/2 teaspoon ground cinnamon
  • 2 tablespoons sugar
  • 1 cup Israeli couscous
  • Seeds from half a pomegranate

Instructions

  1. Smash the cardamom pods open with the flat side of your knife, just like you would with a garlic clove.
  2. In a saucepan, combine the milk, coconut milk, and cardamom. Place over low heat and bring to just below a boil, stirring occasionally. It should become slightly foamy.
  3. Strain out the cardamom pods since the shells are not so pleasant to eat.
  4. Add the Israeli couscous to the saucepan and simmer on low for 10-12 minutes, until all the liquid is absorbed. The couscous should be tender but still have some chew to it.
  5. Stir in the ground cinnamon, sugar, and pomegranate seeds. Mix well to combine.

Tips

For best results, use fresh pomegranate seeds. They add a delightful crunch and freshness to the dish. If you find the couscous is absorbing the liquid too quickly, feel free to add a bit more milk to ensure it cooks evenly. Always taste and adjust the sweetness to your preference.

Variations & Substitutions

If you don’t have pomegranate seeds on hand, or if you’re not a fan, you can easily substitute them with raisins or dried cranberries. Both options will add a lovely sweetness and chewy texture. For a nutty twist, sprinkle some toasted almonds or pistachios on top before serving.

Storage

Store any leftover couscous in an airtight container in the refrigerator for up to 3 days. To reheat, simply add a splash of milk to the couscous and heat it gently on the stovetop, stirring occasionally.

FAQ

Can I use regular couscous instead of Israeli couscous?

Yes, you can use regular couscous, but be aware that the cooking time will be shorter, and the texture will be different. Israeli couscous is larger and chewier, which makes it an excellent choice for this creamy dish.

Is there a substitute for coconut milk?

If you’re not a fan of coconut milk or have an allergy, you can use almond milk or cashew milk as an alternative. Keep in mind, though, that the coconut flavor is integral to the dish’s profile, so the result will be slightly different.

How can I make this dish vegan?

To make this recipe vegan, replace the regular milk with a plant-based milk of your choice, such as almond or oat milk. The rest of the ingredients are already plant-based, making this a simple adjustment.

Nutrition

While I don’t have an exact nutritional breakdown for this dish, it’s worth noting that coconut milk adds healthy fats, and pomegranate seeds are rich in antioxidants. This dish offers a good balance of carbohydrates, fats, and a touch of sweetness.

Conclusion

Coconut Israeli Couscous Studded with Pomegranate is more than just a meal; it’s an experience. Each bite is a trip down memory lane, bringing warmth and joy to your table. Easy to prepare yet rich in flavor, this dish is perfect for both special occasions and simple family dinners. Enjoy the comforting taste and let it create new memories for you and your loved ones. Happy cooking!

Related update: Coconut Israeli Couscous Studded With Pomegranate

Related update: Osso Buco

Spinach and Gorgonzola Stuffed Flank Steak | Made by Meaghan Moineau

Spinach and Gorgonzola Stuffed Flank Steak

Intro

There’s something incredibly comforting about a stuffed flank steak. As a child, I remember watching my grandmother prepare a similar dish on Sunday afternoons. The aroma of sizzling steak mingled with the earthy scent of sautéed spinach would waft through the house, signaling to everyone that a special meal was about to be served. It was a time for family, laughter, and the anticipation of a delicious dinner. Now, I carry on that tradition with my version of Spinach and Gorgonzola Stuffed Flank Steak, a dish that combines savory flavors and tender textures, perfect for gatherings or a cozy night in.

Why You’ll Love It

This Spinach and Gorgonzola Stuffed Flank Steak is a true crowd-pleaser. It’s a stunning centerpiece for any dinner table yet surprisingly easy to prepare. The combination of rich blue gorgonzola and nutrient-packed spinach creates a flavorful filling that elevates the lean flank steak to new heights. The dish offers a perfect balance of flavors with the creamy cheese complementing the robust steak, while the spinach adds a touch of freshness. Whether you’re cooking for family or entertaining guests, this recipe is sure to impress.

Ingredients

  • 1 lean flank steak
  • 3 tablespoons olive oil, divided
  • 1 shallot, finely chopped
  • 2 cups fresh spinach, roughly chopped
  • 1/2 cup fresh bread crumbs
  • 1/2 cup blue gorgonzola, crumbled
  • Salt and pepper, to taste

Instructions

  1. Preheat your oven to 375°F (190°C).
  2. Butterfly the steak by using a long sharp knife. Hold the knife parallel to the work surface and cut through the long side of the steak, stopping about 1/2 inch from the opposite side. If the steak is already thin, pound it with a mallet to 1/2 inch thick.
  3. In a large skillet over medium heat, add 1 tablespoon of olive oil. Sauté the shallots until soft, about 2 minutes.
  4. Add the spinach to the skillet and cook until just wilted, about 2 to 3 minutes. Transfer the spinach to a colander.
  5. Once the spinach is cool enough to handle, squeeze out all the moisture and transfer it to a medium bowl. Stir in the bread crumbs and gorgonzola. Season with salt and pepper.
  6. Place the steak on a sheet of plastic wrap. Evenly smear the spinach mixture over the steak, leaving about a 1-inch border along the side edge.
  7. Beginning with the side nearest you, use the plastic wrap as an aid to roll up the steak, gently pressing on the filling. Tie the rolled steak with twine at 2-3 inch intervals.
  8. Season the outside of the steak with salt and pepper.
  9. Heat the remaining 2 tablespoons of olive oil in a large ovenproof skillet over medium-high heat. Sear the roast on all sides, about 2 minutes per side.
  10. Place the skillet in the oven and roast for 20 to 25 minutes.
  11. Transfer the steak to a cutting board, tent with aluminum foil, and allow it to rest for 10 minutes.
  12. To serve, remove the twine from the roast and cut into 1/2 inch to 1 inch thick slices.

Tips

For best results, make sure your steak is evenly pounded to the correct thickness before filling and rolling. This helps ensure even cooking. When searing the steak, make sure your skillet is hot enough to create a good crust, which will seal in the juices. Letting the meat rest after roasting is crucial to maintaining its juiciness, so resist the temptation to cut into it too soon!

Variations & Substitutions

If blue gorgonzola isn’t to your taste, feel free to substitute it with feta or goat cheese for a milder flavor. For a spicier kick, add a pinch of red pepper flakes to the spinach mixture. You can also experiment with adding other herbs like thyme or rosemary for additional aroma and depth.

Storage

Leftover stuffed flank steak can be stored in an airtight container in the refrigerator for up to 3 days. To reheat, place slices in a covered dish and warm in a low oven or microwave until heated through. For longer storage, consider freezing individual slices wrapped in foil and stored in a freezer-safe bag for up to 3 months.

FAQ

Can I prepare the stuffed flank steak in advance?

Yes, you can prepare the stuffed flank steak up to a day in advance. Simply follow the instructions up to the point of searing the steak. Once rolled and tied, store it in the refrigerator, wrapped in plastic wrap. When ready to cook, remove it from the fridge, let it sit at room temperature for about 30 minutes, and continue with the recipe.

What side dishes pair well with this dish?

This dish pairs beautifully with a variety of sides. Consider serving it with garlic mashed potatoes, roasted vegetables, or a fresh garden salad. A side of crusty bread is perfect for soaking up the delicious juices.

Nutrition

This dish is rich in protein and iron, provided by the flank steak and spinach. Blue gorgonzola adds calcium and a unique flavor profile, while the olive oil contributes healthy fats. Remember to enjoy in moderation as part of a balanced diet.

Conclusion

Spinach and Gorgonzola Stuffed Flank Steak is a delightful dish that combines the best of both worlds: flavor and elegance. It’s a recipe that harkens back to cherished family traditions while providing a fresh and modern twist. Whether you’re hosting a dinner party or simply enjoying a special meal with loved ones, this dish is sure to leave a lasting impression. Happy cooking, and may your kitchen be filled with warmth and delicious aromas!

Related update: Spinach and Gorgonzola Stuffed Flank Steak

Related update: Coconut Israeli Couscous Studded With Pomegranate

Smoky Chicken Tacos | Made by Meaghan Moineau

Smoky Chicken Tacos

Intro

There’s something magical about gathering around the dinner table with loved ones, sharing a meal that brings both comfort and delight. I remember my grandmother’s kitchen, filled with the rich aroma of spices and the sizzle of something delicious on the stove. It was in her cozy kitchen that I first fell in love with the art of cooking, learning the beauty of simple ingredients transformed into something extraordinary.

Today, I’m excited to share a recipe that embodies that same warmth and joy: Smoky Chicken Tacos. This dish is a celebration of bold flavors and vibrant colors, a true fiesta on your plate. Whether you’re hosting a casual dinner or simply craving something deliciously satisfying, these tacos are sure to become a family favorite.

Why You’ll Love It

Smoky Chicken Tacos are not only incredibly tasty, but they’re also easy to make and perfect for any occasion. The combination of tender chicken, fresh veggies, and creamy toppings creates a delightful balance of textures and flavors. The smokiness from the spices pairs perfectly with the bright, zesty notes from the lime, making each bite a true taste experience. Plus, they’re customizable, so everyone can enjoy them just the way they like!

Ingredients

  • 4 skinless boneless chicken breasts
  • 2 tablespoons extra virgin olive oil (evoo)
  • 1 teaspoon chili powder
  • 1 teaspoon cumin
  • 1 teaspoon garlic powder
  • 1 teaspoon onion powder
  • Salt and pepper to taste
  • 2 limes (juice of one, extra for serving)
  • 8 corn tortillas
  • 2 cups shredded cabbage
  • 1 cup cooked corn
  • 1 red onion, thinly sliced
  • 1-2 jalapeno peppers, sliced
  • 2 roma tomatoes, diced
  • 1 avocado, sliced
  • Fresh cilantro, chopped
  • Salsa, for serving
  • Sour cream, for serving

Instructions

  1. Preheat your oven to 400 degrees Fahrenheit.
  2. In a small bowl, combine the chili powder, cumin, garlic powder, onion powder, salt, and pepper.
  3. Rub the chicken breasts with the extra virgin olive oil and coat evenly with the spice mixture on both sides.
  4. Place the seasoned chicken on a baking sheet and bake in the preheated oven for 20-25 minutes, or until cooked through and juices run clear.
  5. Once done, remove the chicken from the oven and squeeze the juice of one lime over the cooked chicken. Let it rest for a few minutes before slicing.
  6. While the chicken rests, warm the corn tortillas in a dry skillet over medium heat until pliable.
  7. Assemble the tacos by layering slices of chicken, shredded cabbage, cooked corn, red onion, jalapeno slices, roma tomatoes, and avocado in the corn tortillas.
  8. Garnish with fresh cilantro and an extra squeeze of lime juice.
  9. Serve with salsa and sour cream on the side. Enjoy!

Tips

For the juiciest chicken, let it rest for a few minutes after baking before slicing. This allows the juices to redistribute, ensuring each bite is moist and flavorful. Also, warming your tortillas properly can make a huge difference in the overall texture of your tacos, so don’t skip that step!

Variations & Substitutions

Feel free to customize these tacos to suit your taste. You can substitute chicken with beef or turkey for a different protein base. For a vegetarian option, swap the chicken for roasted vegetables or black beans. Add a handful of cheese if you like extra creaminess, or switch up the toppings with your favorite taco additions like pickled onions or hot sauce.

Storage

If you have leftovers, store the chicken and toppings separately in airtight containers in the refrigerator. They should keep well for up to three days. To reheat, warm the chicken in a skillet over medium heat until heated through, and enjoy assembling fresh tacos again!

FAQ

Can I use flour tortillas instead of corn tortillas?

Absolutely! While corn tortillas add a traditional touch and a slightly different texture, flour tortillas work just as well and are just as delicious.

What can I serve with these tacos?

These tacos pair wonderfully with a side of Mexican rice or a simple salad. You could also serve them with chips and guacamole for a complete Mexican meal experience.

How can I make these tacos spicier?

If you love heat, consider adding more jalapeno slices, a sprinkle of cayenne pepper in the spice mix, or a spicy salsa to your tacos.

Nutrition

Each serving of these smoky chicken tacos is packed with protein and fresh vegetables, making them a nutritious choice for any meal. Depending on the toppings and accompaniments, the calorie count can vary, but sticking with fresh, whole ingredients ensures a wholesome and balanced meal.

Conclusion

Smoky Chicken Tacos are more than just a meal; they’re a culinary experience that brings people together with every bite. Whether you’re reminiscing about family dinners past or creating new memories with friends and loved ones, these tacos are sure to bring joy and satisfaction to your table. So gather your ingredients, invite your favorite people, and savor the delightful flavors of this simple yet spectacular dish.

Related update: Smoky Chicken Tacos

Related update: Spinach and Gorgonzola Stuffed Flank Steak