Blackened Cajun Chicken | Made by Meaghan Moineau

Blackened Cajun Chicken | Made by Meaghan Moineau

Spicing Up Family Gatherings: A Nostalgic Journey with Blackened Cajun Chicken


Description:

Discover the rich flavors and cherished memories behind our Blackened Cajun Chicken recipe. This main dish, rated a 6 out of 10 in difficulty, combines aromatic spices with tender chicken, creating a culinary masterpiece that is perfect for any family gathering. Join us as we delve into the heartwarming story that makes this dish a family favorite, and learn how to recreate it in your own kitchen.

---


A Trip Down Memory Lane


In the heart of our family kitchen, the aroma of spices would dance through the air, signaling the start of our cherished Sunday gatherings. My grandmother, the culinary matriarch of our family, had a talent for transforming simple ingredients into unforgettable meals. Her Blackened Cajun Chicken was no exception.


Every Sunday, as the sun began to set, our family would gather around the large oak table that had witnessed countless memories. The table, with its worn edges and a few inevitable scratches, was a symbol of unity. It was here that stories were shared, laughter echoed, and bonds were strengthened. The centerpiece of these gatherings was always my grandmother’s Blackened Cajun Chicken, a dish that encapsulated the spirit of our family.


The Secret to Flavorful Memories


The magic of this recipe lies in the carefully curated blend of spices. Each ingredient plays a crucial role in creating the symphony of flavors that define this dish. The combination of bay leaves, black pepper, brown sugar, cayenne pepper, dried rosemary, dried thyme, dry mustard, garlic powder, ground cumin, onion powder, paprika, and salt creates a seasoning mix that not only enhances the chicken but also tells a story of tradition and love.


Ingredients:

- Bay leaves

- Black pepper


- Brown sugar


- Cayenne pepper


- Dried rosemary


- Dried thyme


- Dry mustard


- Garlic powder


- Ground cumin


- Onion powder


- Paprika


- Salt


- Chicken


Instructions:

1. Prepare the Seasoning Mix: In a bowl, combine all the seasonings. This mix is enough for two chickens and can be made ahead and stored in an airtight container until needed.
2. Season the Chicken: Place the chicken in a 13- by 9- by 2-inch baking pan. Rub it generously with half of the seasoning mixture. Cover the pan and refrigerate overnight to let the flavors meld.
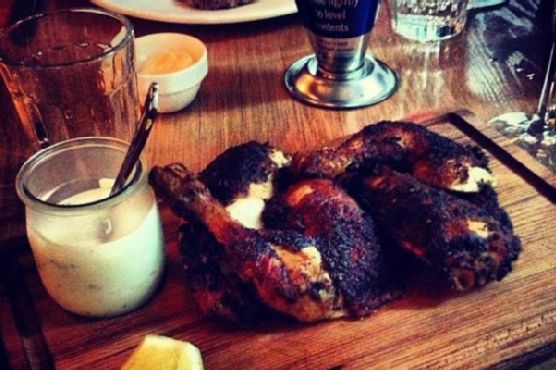
3. Grilling the Chicken: Preheat your grill and set it to medium heat. Grill the chicken, covered, over medium coals for 30 to 45 minutes, turning once, until the juices run clear. This process ensures the chicken is succulent and infused with the rich flavors of the spices.

A Culinary Legacy


As the years went by, the tradition of preparing Blackened Cajun Chicken was passed down to me. Each time I recreate this dish, I am transported back to those cherished Sunday evenings, surrounded by family and the warmth of shared stories. Today, I invite you to bring this tradition into your home and create your own memories with each flavorful bite.


Conclusion


Blackened Cajun Chicken is more than just a meal; it's a celebration of family, history, and the joy of cooking. Whether you're a seasoned chef or a novice in the kitchen, this recipe offers an opportunity to connect with loved ones over a dish that is as rich in flavor as it is in nostalgia. So, fire up the grill, gather your family, and create a legacy of your own with this timeless recipe.

Read more about Appetizers

Read more about Main Dishes

Read more about Desserts

Wildwood Ovens Bourbon Apple Glazed Cedar Plank Salmon | Made by Meaghan Moineau

Wildwood Ovens Bourbon Apple Glazed Cedar Plank Salmon | Made by Meaghan Moineau

Savory Memories: Wildwood Ovens Bourbon Apple Glazed Cedar Plank Salmon


Description

Discover the exquisite flavors of the Wildwood Ovens Bourbon Apple Glazed Cedar Plank Salmon—a dish that combines the sweetness of apple juice and brown sugar with the robust taste of bourbon whiskey. This recipe captures the essence of outdoor cooking, perfect for those who love a hint of nostalgia in their culinary adventures. Rated 7 out of 10 in difficulty, this main dish is ideal for impressing guests at your next gathering.

---


Ingredients

- Cedar plank

- Salmon filet


- 1 cup apple juice


- ½ cup brown sugar


- 2 cloves garlic, minced


- ¼ cup bourbon whiskey


- 1 tsp kosher salt


- 1 tsp freshly cracked black pepper


- Olive oil for brushing


Instructions


1. Prepare the Cedar Plank: Begin by soaking the cedar plank in water for at least 2 hours. This step is crucial to prevent the wood from burning and to infuse the salmon with a subtle smoky flavor.
2. Prepare the Salmon: Rinse the salmon under cold water and pat dry with paper towels. Season both sides with kosher salt and freshly cracked black pepper. Brush the skin side with olive oil to prevent sticking.
3. Make the Apple Bourbon Glaze:

- Place a medium saucepan over medium-high heat and carefully add the bourbon whiskey.


- Use caution, as the alcohol can ignite; never pour directly from the bottle.


- Once the alcohol is reduced to a small amount, add the apple juice, brown sugar, and minced garlic.


- Continue to cook over medium-high heat until the mixture reduces to about a third of its original volume, achieving a texture slightly thinner than syrup.


4. Cook the Salmon:

- Place the seasoned salmon on the cedar plank, skin side down.


- Set the cedar plank on a medium-high grill, or in a wood-fired oven pre-heated to 500°F, near the fire.


- Use a probe thermometer to check the internal temperature of the salmon after 10 minutes, and every 5 minutes thereafter.


- Once the salmon reaches an internal temperature of at least 100°F, begin brushing on the apple glaze. Repeat this step every few minutes.


- Cook until the salmon reaches desired doneness, typically around 145°F for medium-rare.


A Nostalgic Touch


Growing up, family gatherings were always centered around the grill in our backyard. My grandfather was the grill master, and his cedar plank salmon was legendary. I remember the anticipation as the smoke billowed, and the sweet aroma of the apple bourbon glaze filled the air. It was more than just a meal; it was a celebration of family and tradition.


One summer evening, as the sun dipped below the horizon, we gathered around the picnic table, eager to taste the masterpiece. My grandfather, with his usual twinkle in his eye, would recount stories of his own childhood, weaving tales that made us laugh and appreciate each bite even more. This recipe is a tribute to those cherished memories, a reminder of the love and warmth that food can bring.


Conclusion


The Wildwood Ovens Bourbon Apple Glazed Cedar Plank Salmon is more than just a dish; it's a culinary journey that captures the essence of family, tradition, and the joy of cooking. Whether you're a seasoned chef or an adventurous home cook, this recipe promises a delightful experience that will transport you to a place of nostalgia and flavor.


---


Try this recipe at your next gathering and create your own memories around the table. Let the flavors of bourbon and apple take you back to simpler times, and may your kitchen be filled with the warmth of family and the joy of good food.

Read more about Appetizers

Read more about Main Dishes

Read more about Desserts

Pasta e Fagioli (Pasta and Beans) | Made by Meaghan Moineau

Pasta e Fagioli (Pasta and Beans) | Made by Meaghan Moineau

Title: A Hearty Hug in a Bowl: The Comforting Magic of Pasta e Fagioli
Description: Dive into the heartwarming world of Pasta e Fagioli, a classic Italian dish that wraps you in warmth and nostalgia. Discover the simple, yet flavorful recipe that has been a cherished family tradition, bringing loved ones together around the dinner table.

---


Pasta e Fagioli: A Timeless Italian Classic

There's something undeniably comforting about a bowl of Pasta e Fagioli. As the leaves begin to turn and the air grows crisp, this hearty dish becomes a staple in my kitchen—a recipe passed down through generations, each spoonful steeped in love and tradition. Today, I'll share not only the recipe but also a treasured family memory that makes this dish so special.


Ingredients:

- 2 tablespoons olive oil


- 1 cup diced onion


- 2 cups diced tomatoes (or marinara sauce)


- 1 garlic clove, minced


- 4 cups low sodium vegetable stock


- 2 cups water


- 1 teaspoon salt


- 1/2 teaspoon black pepper


- 1/4 teaspoon red pepper flakes


- 1 cup elbow macaroni


- 1 can (15 oz) cannellini beans, drained and rinsed


- 1/4 cup fresh parsley, chopped


- Parmesan cheese, for serving


- Additional parsley for garnish


Instructions:

1. In a large stock pan over medium-high heat, add the olive oil and diced onion. Sauté until the onion becomes tender and translucent, about 3 minutes.


2. Stir in the diced tomatoes and minced garlic. Cook for 1-2 minutes, ensuring the garlic doesn't burn.


3. Pour in the vegetable stock and water, then season with salt, black pepper, and red pepper flakes. Bring to a gentle boil.


4. Add the elbow macaroni, reduce the heat, and let it cook until it's about 3/4 of the way done (still slightly firm).


5. Stir in the cannellini beans and continue cooking until the pasta is fully cooked, approximately 10-15 minutes.


6. Fold in the fresh parsley towards the end of the cooking time. Adjust seasoning to taste.


7. Serve in individual bowls, garnished with extra parsley and a generous sprinkle of Parmesan cheese.


Nostalgic Memory:

The aroma of Pasta e Fagioli always transports me back to my grandmother's cozy kitchen, where laughter and love filled the air as much as the smell of simmering soup did. Every autumn, our family would gather at her house for Sunday dinner—a tradition that felt like an unspoken promise of warmth and togetherness. I remember sitting around the long wooden table, my grandmother proudly ladling “pasta fazool” into each bowl, her eyes twinkling as she recounted tales from her childhood in Italy. These stories, woven into the fabric of our family history, served as the perfect seasoning for our meal. This dish was not just sustenance; it was a celebration of heritage, a reminder of where we came from, and a testament to the simple joy of sharing a meal with loved ones.


Difficulty Rating: 4/10
Category: Main Dish

Pasta e Fagioli is an uncomplicated, yet deeply satisfying dish. Its simplicity is part of its charm, making it an accessible recipe for both novice and seasoned cooks alike. As you prepare it, I hope you find as much warmth and connection in this dish as our family has over the years. Buon appetito!

Read more about Appetizers

Read more about Main Dishes

Read more about Desserts

Cheesy Chicken Enchilada Quinoa Casserole | Made by Meaghan Moineau

Cheesy Chicken Enchilada Quinoa Casserole | Made by Meaghan Moineau

Title: Savor the Memories: How Cheesy Chicken Enchilada Quinoa Casserole Became a Family Favorite
Description: Dive into the flavors of our Cheesy Chicken Enchilada Quinoa Casserole, a delightful main dish that brings comfort and nostalgia to your dining table. This easy-to-follow recipe combines the heartiness of quinoa and chicken with the zest of enchilada sauce and spices, creating a meal that is as memorable as it is delicious. Gather around, as we share a cherished family story that makes this dish even more special.

---


There’s something magical about the aroma of a sizzling casserole wafting through the house. It has a way of drawing family members to the kitchen, eyes wide with anticipation and mouths watering in delight. For my family, the Cheesy Chicken Enchilada Quinoa Casserole has been that trademark dish, one that not only satisfies our cravings but also brings us closer together.


The story of how this dish became a staple in our household begins with a family reunion at my grandmother’s old country home. It was a tumultuous time—the kind where every room buzzed with laughter, children played hide and seek in the garden, and the adults gathered around the kitchen, catching up over steaming mugs of coffee. It was during this reunion that my aunt introduced us to her latest culinary creation—a dish she dubbed the Cheesy Chicken Enchilada Quinoa Casserole.


As she pulled the casserole dish from the oven, the golden-brown top layer of cheese bubbled and hissed, releasing a symphony of scents that hinted at the adventure of flavors beneath. It was a simple yet effective recipe—a blend of cooked quinoa, shredded chicken, and canned black beans, all enveloped in a luscious verde enchilada sauce. The addition of spices like cumin, chili powder, and both black and white pepper gave it a subtle kick, while the fresh toppings of avocado, Roma tomatoes, and cilantro brought a refreshing finish.


We gathered around the dining table, plates in hand, eager to taste the dish that had been the talk of the afternoon. As the first forkful hit my tongue, I was enveloped in a warm, cheesy embrace, the tang of tomatoes mingling with the smoky cumin and the slight heat of chili. Each bite was a revelation, a harmonious blend of textures and flavors that felt both exotic and comfortingly familiar.


That day, the Cheesy Chicken Enchilada Quinoa Casserole became more than just a meal—it became a family tradition. It’s a dish that reminds us of those special gatherings, of the laughter shared, and of the simple joy of being together. Now, whenever we whip up this casserole, it’s not just about feeding our bodies but nourishing our souls, evoking memories of home and togetherness.


Difficulty Level: 4/10 - This dish is quite simple to prepare, making it perfect for both beginner and experienced cooks looking for a quick, satisfying meal.
Classification: Main Dish

Whether you’re looking to create new memories or revisit old ones, this Cheesy Chicken Enchilada Quinoa Casserole is sure to become a cherished part of your family’s culinary repertoire. So, gather your loved ones, set the table, and let the magic of this dish bring everyone together, one delicious bite at a time.

Read more about Appetizers

Read more about Main Dishes

Read more about Desserts

Cod with tomatoes, olives and polenta | Made by Meaghan Moineau

Cod with tomatoes, olives and polenta | Made by Meaghan Moineau

Title: Savoring Tradition: Cod with Tomatoes, Olives, and Polenta - A Heartfelt Italian Feast
Description: Dive into the flavors of the Mediterranean with our Cod with Tomatoes, Olives, and Polenta recipe. This main dish, rated at a moderate difficulty of 5/10, combines the fresh taste of cod with the tangy depth of olives and tomatoes, all served alongside creamy polenta. It's a nostalgic culinary journey that warms the soul and brings back cherished family memories.

---


A Culinary Journey Through Time: Cod with Tomatoes, Olives, and Polenta

In the heart of our family kitchen, the aroma of cod simmering with ripe tomatoes and briny olives was synonymous with Sunday gatherings. This dish, steeped in tradition and rich in flavor, was a staple at our family table. It was a recipe passed down from my Nonna, a cherished family heirloom that we lovingly recreated, preserving its authenticity with each preparation.


Ingredients:

- Fresh cod fillets


- Black olives


- Tomatoes


- Dry white wine


- Fresh parsley


- Olive oil


- Fresh and dry oregano


- Corn flour


- Instant corn polenta


- Salt


- White pepper


- Water


Instructions:
1. Prepare the Cod: If your fillets are frozen, be sure to thaw them beforehand. In a shallow dish, mix corn flour with a pinch of salt and white pepper. Dredge each fillet through the seasoned flour, coating evenly.
2. Sauté the Fillets: Heat olive oil in a large skillet over medium heat. Sauté the fillets, allowing them to cook for about 3 minutes on each side until they develop a golden crust. Once done, sprinkle the fillets with a splash of dry white wine, letting it sizzle and infuse the fish with its delicate aroma.
3. Create the Sauce: Add chopped tomatoes and black olives to the skillet, letting them mingle with the fish. Cook this vibrant mixture for about 5 minutes, until the tomatoes soften and release their juices.
4. Finish with Herbs: Before serving, garnish the fillets with freshly chopped parsley and a sprinkle of oregano, both dry and fresh, to elevate the dish with their fragrant essence.
5. Craft the Polenta: In a separate pot, bring water to a boil. Add a dash of white wine, a sprinkle of salt, and a hint of dry oregano. Gradually stir in the instant polenta, whisking continuously for about 5 minutes until it thickens to your desired consistency. If the mixture becomes too thick, add a bit more boiling water.
6. Serve: Allow the polenta to cool slightly before serving it alongside the cod, ensuring each bite is a comforting blend of flavors.
A Taste of Nostalgia:

This dish is more than just a meal; it's a portal to cherished memories. I remember standing on a stool beside my mother, my small hands eager to help as she expertly coated the cod in flour, her eyes twinkling with the joy of passing down our family tradition. The kitchen was filled with laughter and stories of my grandparents' adventures in the Italian countryside, where this recipe was born.


As the sun dipped below the horizon, our family gathered around the table, the comforting warmth of this dish uniting us. Each bite was a celebration of our heritage, a reminder of the love and labor that went into creating this masterpiece.


Difficulty: 5/10
Classification: Main Dish

---


Whether you're recreating this dish for a special occasion or a cozy family dinner, our Cod with Tomatoes, Olives, and Polenta is a delightful reminder of the simple pleasures of life. It's a taste of nostalgia, a journey through tradition, and a testament to the power of food to bring families together. Enjoy this recipe, and may it become a beloved part of your own culinary story.

Read more about Appetizers

Read more about Main Dishes

Read more about Desserts

Baked Chicken Thighs with Satay Sauce and Tomato Salad | Made by Meaghan Moineau

Baked Chicken Thighs with Satay Sauce and Tomato Salad | Made by Meaghan Moineau

A Taste of Nostalgia: Baked Chicken Thighs with Satay Sauce and Tomato Salad


Rediscovering Family Traditions Through Flavorful Journeys


In today’s fast-paced world, where culinary trends come and go, it’s comforting to return to the dishes that have stood the test of time. One such dish that brings a wave of nostalgia and familial warmth is Baked Chicken Thighs with Satay Sauce and Tomato Salad. This recipe is not just a feast for the taste buds but a heartwarming journey back to simpler times when family gatherings were the highlight of the week.


A Culinary Walk Down Memory Lane


Growing up, weekends were always a special time in our household. It was a tradition to gather at my grandmother's house where the aroma of spices and roasting chicken filled the air, promising an evening of laughter, stories, and delicious food. She had a magical touch with her Baked Chicken Thighs with Satay Sauce, a recipe that has been passed down through generations.


I remember the kitchen bustling with activity as everyone chipped in, from my grandfather carefully preparing the marinade with just the right amount of ginger and garlic to my mother artfully arranging the tomato salad. The real magic happened when my grandmother, with her seasoned hands, coated the chicken thighs with the marinade. The anticipation only grew as the chicken baked to perfection, filling the house with the scent of toasted sesame and savory satay.


Ingredients


For the Chicken:

- Chicken thighs

- Salt and pepper


- Cayenne pepper


- Light soy sauce


- Apple cider vinegar


- Peanut butter


- Sesame oil


- Satay sauce


- Walnuts


- Ginger


- Garlic


- Water


- Honey


For the Tomato Salad:

- Diced tomatoes

- Celery leaves


- Mirin


- Olive oil


Instructions


1. Prepare the Marinade: In a large bowl, mix the salt, pepper, cayenne pepper, light soy sauce, apple cider vinegar, peanut butter, sesame oil, satay sauce, walnuts, ginger, garlic, water, and honey. Stir until you achieve a smooth consistency.
2. Marinate the Chicken: Evenly coat the chicken thighs with the marinade. Allow the chicken to rest for at least 15 minutes, but for the best results, let it marinate overnight in the refrigerator.
3. Bake the Chicken: Preheat your oven to 180°C (356°F). Arrange the marinated chicken thighs on a baking rack placed over a baking pan. Cover the pan with foil to lock in moisture and bake for 45 minutes to one hour until the chicken is tender and cooked through.
4. Prepare the Tomato Salad: In a separate bowl, combine diced tomatoes, celery leaves, mirin, and olive oil. Toss gently to mix.
5. Serve and Enjoy: Once the chicken is done, serve hot alongside the fresh tomato salad. Savor each bite and enjoy a dish that’s as much about the flavors as it is about family memories.

A Dish to Cherish


This recipe, steeped in family tradition, is rated a 5 out of 10 on the difficulty scale, making it accessible for both novice and experienced home cooks. As a Main Dish, it promises to be the centerpiece of any meal, bringing together the richness of baked chicken and the freshness of a vibrant tomato salad.

A Lasting Legacy


Every time I prepare this dish, I’m transported back to those cherished weekends. It’s more than just a recipe; it’s a celebration of family, tradition, and love. Whether you’re cooking for your own family or hosting a gathering of friends, Baked Chicken Thighs with Satay Sauce and Tomato Salad is sure to create new memories while honoring the old. So, gather your loved ones, roll up your sleeves, and let’s take a delicious trip down memory lane together.

Read more about Appetizers

Read more about Main Dishes

Read more about Desserts

Palak-tofu (bean curd) | Made by Meaghan Moineau

Palak-tofu (bean curd) | Made by Meaghan Moineau

A Culinary Journey: Embracing Comfort with Palak-Tofu Delight


Discover the Heartwarming Recipe that Combines Tradition and Taste


Description: Dive into the comforting embrace of Palak-Tofu, a rich and flavorful dish that brings together the nutritional goodness of spinach and the delightful texture of tofu. This recipe not only tantalizes your taste buds but also carries the warmth of cherished family memories. Rated 6/10 on the difficulty scale, this main dish is perfect for those looking to explore a classic Indian delicacy with a modern twist.

---


A Nostalgic Journey into the Heart of Indian Cuisine


Growing up, Sundays were synonymous with family gatherings at my grandmother's house. The kitchen would come alive with the aroma of spices, laughter, and the warmth of togetherness. Among the array of delectable dishes, her Palak-Tofu was an all-time favorite. The vibrant green of the spinach, combined with the creamy texture of tofu, was a sight to behold and a treat to savor.


My grandmother would often recount stories of her childhood, where fresh spinach was handpicked from her family’s garden. As she lovingly prepared the dish, she would tell us how each ingredient was chosen with care, much like the love she poured into her cooking. This recipe is a tribute to her legacy, a reminder of the simple joys of life, and the magic that unfolds when tradition meets the table.


Ingredients:


- 1 block of tofu


- 2 cups of palak (spinach)


- 2 tablespoons of oil


- 1 tablespoon of butter


- 1 teaspoon of coriander powder


- 1 teaspoon of cumin seeds


- 1 teaspoon of garam masala


- 1 tablespoon of ginger-garlic paste


- 2 green chillies, finely chopped


- 2 tablespoons of kasuri methi (dried fenugreek leaves)


- 1 cup of cream or milk


- 2 onions, finely chopped


- 2 tomatoes, chopped


- 1/2 teaspoon of turmeric


- Salt to taste


Instructions:


1. Sauté the Onions: Heat 1 tablespoon of oil in a pan. Add the onions and sauté until they turn golden brown.
2. Aromatic Base: Stir in the ginger-garlic paste and sauté for a minute. Add the green chillies and chopped tomatoes, and sauté until the tomatoes soften.
3. Wilt the Palak: Add the washed, uncut palak to the mixture and sauté for about 5 minutes until the leaves wilt. Remove from heat and allow it to cool.
4. Create the Palak Paste: Once cooled, grind the mixture to a coarse paste in a blender. Set aside.
5. Prepare the Tofu: In the same pan, add another tablespoon of oil and sauté the tofu cubes with a pinch of salt and turmeric for about 2 minutes. Remove from the pan and set aside.
6. Cook the Palak: Return the coarse palak paste to the pan, add salt to taste along with coriander powder, and let it cook on a low flame for 10 minutes.
7. Combine and Season: Add the sautéed tofu cubes into the pan, mixing well. Crush the kasuri methi between your palms and stir it into the mixture.
8. Creamy Finish: Pour in the milk or cream, mix well, and cover the pan. Let it simmer on a low flame for 5 minutes.
9. Final Touch: Drop in the butter for added creaminess and finish with a sprinkle of garam masala.
10. Serve: Serve hot with roti or paratha, and let the flavors take you on a nostalgic culinary journey.

---


The Palak-Tofu recipe is more than just a dish; it's a passage through time, connecting us to our roots and the love that binds families together. Whether you're a seasoned cook or a culinary explorer, this dish promises a heartwarming experience that lingers long after the meal is over. Enjoy every bite as you create new memories with your loved ones.

Read more about Appetizers

Read more about Main Dishes

Read more about Desserts

Rice Stuffed Bell Peppers (Zeytinyagli Biber Dolmasi) | Made by Meaghan Moineau

Rice Stuffed Bell Peppers (Zeytinyagli Biber Dolmasi) | Made by Meaghan Moineau

A Taste of Tradition: Rice Stuffed Bell Peppers (Zeytinyağlı Biber Dolması)


Experience the Heartfelt Flavors of a Timeless Turkish Delicacy


Introduction


There's a certain magic that comes with recreating traditional dishes, especially when they transport you back to cherished family gatherings. One such dish, the Rice Stuffed Bell Peppers, or Zeytinyağlı Biber Dolması, is a testament to the rich culinary heritage of Turkey. This delightful blend of aromatic spices and tender bell peppers filled with a savory rice mixture is both comforting and flavorful, making it a must-try for anyone looking to explore authentic Turkish cuisine.


Difficulty Level: 5/10
Category: Main Dish

Ingredients


- Bell peppers


- Olive oil


- Onions


- Tomatoes


- Tomato paste


- Rice


- Salt


- Sugar


- Allspice


- Cinnamon


- Dried or fresh mint


- Water


Instructions


1. Prepare the Peppers:

Begin by cutting the tops off the bell peppers, removing the seeds, and washing them thoroughly. Set aside to dry.


2. Create the Filling:

In a large pan, lightly sauté the onions in olive oil until they are translucent. Stir in the chopped tomatoes and tomato paste, allowing them to cook for an additional 3 minutes.


3. Cook the Rice:

Add the rice to the onion-tomato mixture and braise it for about 5 minutes. Then, add salt, sugar, allspice, cinnamon, and mint, along with hot water. Allow the mixture to simmer until all the liquid has evaporated. Let it cool for a short while.


4. Stuff the Peppers:

Using a spoon, fill each bell pepper with the rice mixture. Place a slice of tomato on top of each pepper to act as a cap.


5. Cook the Dolmasi:

Arrange the stuffed peppers in a large saucepan or pot. Add enough water to reach halfway up the sides of the peppers. Cover with a lid and cook on low heat for about 15-20 minutes.


6. Serve and Enjoy:

Serve the rice-stuffed bell peppers warm or hot, and enjoy the blend of spices and textures that make this dish so special.


A Nostalgic Family Memory


Growing up, Sunday afternoons at my grandmother's house were filled with the intoxicating aromas of her cooking. Zeytinyağlı Biber Dolması was always a family favorite, and its preparation was a cherished ritual. I can still picture my grandmother, her hands deftly crafting each stuffed pepper with care, while recounting tales of her childhood in the vibrant streets of Istanbul.


The kitchen buzzed with laughter and stories, a symphony of clinking pots and shared memories. We would gather around the table, eager to taste the fruits of her labor. Each bite of the dolmasi was a flavor-packed journey, the spices dancing on our tongues, mingling with the sweetness of the peppers.


These meals were more than just food; they were a connection to our heritage, a bridge linking us to generations past. Every time I prepare this dish, I am transported back to those warm, love-filled Sundays, and I feel a deep sense of gratitude for the culinary legacy passed down to me.


Conclusion


Rice Stuffed Bell Peppers (Zeytinyağlı Biber Dolması) is more than just a meal; it's an experience, a journey into the heart of Turkish culture and family traditions. Whether you're a seasoned cook or a curious beginner, this recipe offers a taste of nostalgia and the opportunity to create lasting memories around the dinner table. So, gather your ingredients, embrace the process, and enjoy the rich, savory flavors of this timeless dish.

Read more about Appetizers

Read more about Main Dishes

Read more about Desserts

Creamy Shrimp Bisque | Made by Meaghan Moineau

Creamy Shrimp Bisque | Made by Meaghan Moineau

Title: A Bowl of Comfort: Crafting the Perfect Creamy Shrimp Bisque
Description: Dive into the heartwarming flavors of our Creamy Shrimp Bisque, a dish that marries the ocean's bounty with rich, creamy indulgence. With a hint of nostalgia and a sprinkle of warmth, this bisque is not just a meal but a cherished memory in a bowl. Join us as we explore this delightful recipe, its roots, and how to make it a staple in your kitchen.

---


A Bowl of Comfort: Crafting the Perfect Creamy Shrimp Bisque

When the leaves start to turn and the air takes on that familiar crisp chill, there’s nothing quite like a steaming bowl of soup to bring comfort to the soul. For me, the Creamy Shrimp Bisque is more than just a dish—it’s a cherished family tradition, a memory wrapped in the aroma of sautéed onions and the gentle bubbling of a savory broth.


Ingredients:

- 2 celery stalks, chopped


- 4 green onions, sliced


- 4 tablespoons butter


- 3 cloves garlic, minced


- 1/4 cup flour


- 2 cups half & half


- 3 cups fish stock


- 2 tablespoons fresh parsley, chopped


- 1 pound cooked shrimp, peeled and deveined


- 1 cup diced potatoes


- 1/4 teaspoon cayenne pepper


- 1 teaspoon onion powder


- 1 teaspoon garlic powder


- 1 teaspoon Old Bay seasoning


- Salt & pepper to taste


Instructions:

1. In a medium saucepan, melt the butter over medium heat. Add the celery and green onions, stirring occasionally until tender, about 10 minutes.


2. Add the garlic and sauté for another 3-4 minutes until fragrant.


3. Stir in the flour, cooking for about 5 minutes to eliminate the raw flour taste.


4. Add the diced potatoes and half & half, allowing them to simmer over medium heat for another 5 minutes.


5. Stir in the fish stock, parsley, and all of the seasonings, letting the mixture cook for an additional 10 minutes until thick and bubbly.


6. Add the cooked shrimp, and let simmer for another 10 minutes.


7. Optional: Cook crispy bacon pieces and set aside. Use the bacon drippings to sauté the onion and celery for an added smoky flavor. Once the bisque is ladled into bowls, sprinkle the top with crispy bacon bits.


A Journey Through Time:

Every spoonful of this Creamy Shrimp Bisque transports me back to cozy winter evenings spent in my grandmother’s kitchen. The warmth from her stove enveloped us as she lovingly stirred her pot of bisque, the rich aroma filling the room and our hearts. It was a dish that always brought our family together—each bowl a testament to her culinary skill and the love she poured into every meal.


One particular winter, during a rare snowstorm, our family huddled around the fireplace, bowls of her bisque in hand, sharing stories and laughter. That night, the bisque was more than a meal; it was a reminder of the warmth of family and the simple joys of life. It was on that snowy night that my husband suggested adding crispy bacon, a twist that has since become a family favorite.


Difficulty Rating: 5/10
Classification: Main Dish

This Creamy Shrimp Bisque strikes the perfect balance between simplicity and elegance, making it an inviting main dish for any occasion. Whether you’re a seasoned chef or a home cook looking to impress, this recipe promises not only flavor but the creation of lasting memories around your dining table.


So, as you embark on this culinary journey, remember that each ingredient, each stir of the pot, is an opportunity to create your own cherished family traditions. Let this bisque be the canvas upon which you paint your own stories, one comforting spoonful at a time.

Read more about Appetizers

Read more about Main Dishes

Read more about Desserts

Jean’s Seafood Gumbo | Made by Meaghan Moineau

Jean's Seafood Gumbo | Made by Meaghan Moineau

Title: "Stirring Up Tradition: Jean's Seafood Gumbo - A Heartfelt Creole Classic"


Description:

Dive into the rich flavors and history of Jean's Seafood Gumbo, a classic Creole dish that brings together family traditions and the bold taste of Louisiana. This main dish, with a difficulty rating of 8/10, promises a culinary journey through the bayous, capturing the essence of Southern hospitality in every savory bite.

---


A Whiff of the Past: The Allure of Jean's Seafood Gumbo


There’s something magical about certain dishes, those that have the power to transport us back in time, evoking memories of family gatherings, laughter, and the comforting hum of a bustling kitchen. One such dish in my family is Jean’s Seafood Gumbo, a recipe that has been passed down through generations, each iteration infused with love and a dash of Creole spirit.


Growing up, Sundays at Grandma Jean’s house were nothing short of an event. The aroma of her gumbo would greet us at the door, a warm invitation that promised a day filled with hearty laughter and full bellies. We’d gather in her cozy kitchen, the heart of our family home, watching as she expertly peeled shrimp and chopped vegetables, her hands a blur of practiced precision. Grandma Jean would often tell stories of her own childhood in Louisiana, where she learned the art of gumbo from her mother, who learned it from her own.


Each ingredient was carefully selected and prepared, with fresh shrimp and blue crabs forming the soul of the dish. The process was a family affair, with each of us taking turns stirring the pot and adding a pinch of this or a dash of that, under Grandma Jean’s watchful eye. It was here, enveloped in the fragrant steam of the gumbo pot, that we learned the importance of patience, of letting the roux develop its deep, nutty hue, and allowing the flavors to meld into a harmonious symphony.


A Step-by-Step Guide to Jean's Seafood Gumbo


Ingredients:

- Fresh shrimp, blue fresh crabs


- Celery, parsley, green peppers, onion, green onions, garlic


- Bay leaves, tomato paste, vegetable oil, flour


- Salt, black ground pepper, dried thyme, Worcestershire sauce


- Whole canned tomatoes, Tabasco sauce, Creole seasoning


- Smoked andouille, filé powder, fresh okra


- White Louisiana rice


Instructions:
1. Create the Stock: In a large 14-16 quart pot, bring two quarts of water to a boil. Peel and devein shrimp, saving the heads and hulls. Boil these in the pot for 30 minutes to an hour for a rich Creole stock. Strain and discard the heads and hulls.
2. Prepare the Crabs: Clean the fresh crabs, discarding the hard shell and yellow insides. Set aside.
3. Chop the Vegetables: Dice celery, parsley, peppers, onions, and garlic, keeping the celery and parsley separate.
4. Start the Gumbo: Return the shrimp stock to the stove, adding crabs and bay leaves. Stir in celery, parsley, and tomato paste, bringing the pot to a gentle boil before reducing to a simmer.
5. Make the Roux: In a heavy skillet, heat vegetable oil over medium-low heat and slowly add flour, stirring continuously until the roux reaches a dark mahogany color.
6. Combine Ingredients: Add onions, garlic, and green peppers to the roux. Pour the mixture into the gumbo pot, adding water if necessary, and bring to a boil. Reduce the heat, cover, and let the gumbo simmer.
7. Season and Simmer: Add salt, pepper, thyme, Worcestershire sauce, Tabasco sauce, and Creole seasoning to taste. Fry the sausages and okra separately before adding to the gumbo. Stir in chopped tomatoes, bringing everything to a boil, then simmer for 2½ to 3 hours.
8. Finish the Dish: Add shrimp and stir in filé powder, cooking for an additional 20-30 minutes. Adjust seasonings as needed.
9. Serve: Serve over white Louisiana rice and enjoy the taste of tradition.

Rating and Classification


Difficulty: 8/10
Classification: Main Dish

As the years have passed, Jean’s Seafood Gumbo has remained a cherished symbol of family unity and culinary heritage. It’s more than just a meal; it’s a celebration of our roots, a testament to the power of food to bring people together. Whether you’re a seasoned chef or a gumbo novice, this dish is sure to fill your home with warmth, laughter, and the irresistible essence of Creole cuisine.

Read more about Appetizers

Read more about Main Dishes

Read more about Desserts

Tuna Noodle Casserole: Mommie Cooks | Made by Meaghan Moineau

Tuna Noodle Casserole: Mommie Cooks | Made by Meaghan Moineau

Title: “Tuna Noodle Casserole: A Warm Hug from Mommie’s Kitchen”
Description: Dive into the heartwarming world of comfort food with our Tuna Noodle Casserole recipe. This nostalgic dish, straight from Mommie’s kitchen, combines simplicity with heartwarming flavors, making it the perfect main dish for family gatherings. Easy to prepare and packed with wholesome ingredients, this casserole is sure to become a beloved staple at your dining table.

---


The Timeless Comfort of Tuna Noodle Casserole


In the hustle and bustle of modern life, there’s something profoundly comforting about a dish that takes you back to the warmth of your childhood. For me, Tuna Noodle Casserole is more than just a meal; it's a cherished memory that evokes the love and care of my mother’s kitchen.


A Walk Down Memory Lane


Growing up, Sunday afternoons were always special. The whole family would gather around the kitchen table, the air filled with laughter and the enticing aroma of my mom’s Tuna Noodle Casserole baking in the oven. I can vividly recall sneaking into the kitchen, drawn by the irresistible smell of cheese melting over the bubbling casserole, and the sight of my mom expertly crafting her signature dish.


She would always tell us the story of how she learned the recipe from her own mother, a tradition passed down through generations, each adding their own little twist. For her, it was the splash of sherry that set her version apart, adding a subtle depth of flavor that made every mouthful a delight.


Recipe: Tuna Noodle Casserole


Ingredients:

- 5 tablespoons butter, divided


- 1 clove garlic, minced


- 1 onion, chopped


- 2 celery sticks, diced


- 1 can mushrooms, drained


- 1 can peas, drained


- 2 cans tuna, drained


- 1/4 cup flour


- 1 cup milk


- 1/2 cup chicken broth


- 1/4 cup sherry


- 1 jar pimientos, drained


- Salt and pepper to taste


- 12 oz cooked egg noodles


- 1 cup cheese, grated


- 1 cup bread crumbs


- Fresh parsley, chopped


Instructions:
1. Start with the Veggies: Melt 1 tablespoon of butter in a pan over medium heat. Add garlic, onion, celery, mushrooms, and a pinch of salt and pepper. Cook for 3 to 4 minutes until the veggies are tender.
2. Make the Roux: Remove the veggies from the pan. Lower the heat to medium-low, then melt the remaining 4 tablespoons of butter. Stir in 1/4 cup of flour to form a roux.
3. Create the Sauce: Gradually add milk, sherry, and chicken broth to the roux, whisking continuously. Bring to a boil, then reduce heat and simmer until the sauce thickens.
4. Mix Together: Return the veggies to the pan and add tuna, peas, and pimientos. Stir in the cooked noodles until everything is well combined.
5. Assemble the Casserole: Pour the mixture into an oven-safe dish. Top with bread crumbs and cheese, and sprinkle with parsley.
6. Bake: Preheat your oven to 350°F (175°C) and bake for 20 minutes or until the cheese is golden and bubbling.

Difficulty Rating: 4/10


This comforting main dish is relatively easy to prepare, making it an ideal choice for both novice cooks and seasoned chefs seeking a taste of nostalgia.


---


As I share this recipe with my own children, I find joy in knowing that they, too, will carry forward this delicious tradition. The warmth and love my mother infused into her cooking are what I strive to pass down, one casserole at a time.


So, gather your loved ones, savor each bite, and let this Tuna Noodle Casserole be your family’s new favorite comfort meal. Enjoy the stories, the laughter, and the love that comes with every serving.

Read more about Appetizers

Read more about Main Dishes

Read more about Desserts

Masala-Tofu Burger | Made by Meaghan Moineau

Masala-Tofu Burger | Made by Meaghan Moineau

Title: Savor the Spice: A Journey with the Masala-Tofu Burger
Description: Uncover the vibrant flavors of Indian cuisine with our Masala-Tofu Burger recipe. Perfectly spiced and richly textured, this burger is a delightful fusion of tradition and modern culinary innovation. Join me as I share a cherished family memory associated with this dish, bringing warmth and nostalgia to your table.

---


There’s a certain magic in the kitchen when the smell of sizzling spices fills the air. My journey with the Masala-Tofu Burger is reminiscent of lazy Sunday afternoons spent in my grandmother's kitchen. The memories of those days are fragrant with the aroma of mustard seeds popping in hot oil and the earthy scent of cumin and turmeric wafting around us.


Growing up, my grandmother was a culinary artist in her own right. Her kitchen was a haven where spices were her paints, and the dishes she crafted were masterpieces that told stories of our rich cultural heritage. One particular afternoon stands out in my memory. It was a family gathering, a boisterous affair filled with laughter and the sound of clinking plates. She decided to surprise us all with her innovative twist on a classic dish: the Masala-Tofu Burger.


The Star Ingredient: Tofu
The foundation of this flavorful burger is tofu, a versatile ingredient that beautifully absorbs the spices. Before we dive into the preparation, let's gather our ingredients:

- White onion


- Diced red, orange, and green bell peppers


- Frozen peas and carrots mix


- Green chillies


- Tofu


- Diced boiled potato


- Garlic


- Black mustard seeds


- Curry leaves


- Hing


- Cumin powder


- Turmeric


- Lemon


- Salt


- Cilantro


- Indian breadcrumbs


- Vegetable oil


- PAM Original Flavor spray


- Red or white onion


- Beefsteak tomatoes


- Mint-cilantro chutney spread


- Portuguese rolls


A Flavorful Symphony: Cooking Instructions
1. Spice Infusion: In a large skillet over medium-high heat, spray a generous amount of PAM and add oil. Add mustard seeds and sauté for 30 seconds until you hear popping noises. Carefully add the curry leaves, as they tend to pop in hot oil.
2. Building the Base: Add onions and peppers, sweat for about 30 seconds. Introduce chopped garlic, chilies, and turmeric, sautéing for 5-7 minutes until the onions and peppers soften.
3. Vegetable Mix: Incorporate the peas and carrots mixture, cumin powder, and salt. Sauté for 7-10 minutes until all veggies are soft and cooked through.
4. Tofu Magic: In a small bowl, marinate cubed tofu with a pinch of turmeric, cumin powder, coarse black pepper, and optional cayenne pepper. Once the veggies are cooked, add the tofu to the skillet, sautéing until slightly brown and crumbly.
5. Flavor Balancing: Add juice from half a lemon and half of the chopped cilantro. Mix in the diced boiled potato, tossing until everything is well-coated. Taste for salt and spices.
6. Forming Patties: Mash the mixture until mushy and the veggies are small. Once cooled, mix in breadcrumbs until the mixture is firm enough to form into four thick patties. Wrap in plastic wrap until ready to use.
7. Cooking the Patties: In a small skillet sprayed with PAM over medium-high heat, cook each patty for about 2 minutes on each side until browned and crispy.
8. Assembling the Burger: Sauté thick slices of onion until charred and slightly soft. Spread a generous amount of mint-cilantro chutney on each side of the Portuguese rolls, place the burger, onions, tomato slices, and cilantro leaves on top. Serve with a slice of lemon and reduced-fat chips on the side.
A Bite of Nostalgia

As I took my first bite, I was transported back to that family gathering. The flavors were a symphony, each note perfectly played. This dish, rated a 6 out of 10 in difficulty, is a Main Dish that embodies both comfort and adventure. It's a celebration of family, culture, and the shared joy of creating something beautiful together.


Whether you are revisiting old memories or creating new ones, the Masala-Tofu Burger is a testament to the power of food to connect us to our roots and each other. Enjoy the journey of flavors and the stories they tell.

Read more about Appetizers

Read more about Main Dishes

Read more about Desserts

Knockwurst with sauerkraut | Made by Meaghan Moineau

Knockwurst with sauerkraut | Made by Meaghan Moineau

Title: A Taste of Tradition: Knockwurst with Sauerkraut
Description: Dive into a heartwarming culinary journey with our Knockwurst with Sauerkraut recipe. This delightful main dish blends savory and sweet flavors, capturing the essence of a cherished family tradition. Rated 5 out of 10 in difficulty, it's a dish that's as accessible as it is delicious. Join us as we explore the rich history and personal stories behind this comforting classic.

---


A Taste of Tradition: Knockwurst with Sauerkraut


There’s something magical about the way food can transport us back in time, evoking memories long tucked away in the corners of our minds. For me, Knockwurst with Sauerkraut is one such dish that never fails to whisk me back to the warm, bustling kitchen of my grandmother’s house.


Every Sunday, my family would gather around her old wooden dining table, the air thick with anticipation and the fragrant aroma of knockwurst sizzling in the pan. My grandmother, with her flour-dusted apron and twinkling eyes, would hum her favorite tunes as she prepared this beloved meal, a ritual that has since become a cherished family tradition.


Ingredients:

- 1 onion, chopped

- 1 cup beer


- 1 cup water


- 2 tablespoons cornstarch


- 2 tablespoons brown mustard


- 1 tablespoon molasses


- 1 teaspoon caraway seed


- 1/2 teaspoon ground allspice


- 1/4 teaspoon pepper


- 1 rutabaga, peeled and cubed


- 6 cooked knockwurst sausages


- 2 cooking apples, cored and cut into wedges


- 1 can (16 ounces) sauerkraut, drained and rinsed


Instructions:


1. Brown the Knockwurst: Begin by buttering a medium fry pan. Heat the knockwurst until browned, about 10-12 minutes, ensuring they are evenly cooked and flavorful.
2. Prepare the Sauerkraut: Drain the sauerkraut, rinse it under cold water, and drain well to remove excess salt and tang.
3. Cook the Onion: In a large pot, cook the chopped onion until tender but not browned, allowing its natural sweetness to emerge.
4. Combine and Thicken: Stir in the beer for a rich, malty base. In a 2-cup glass measure, combine water, cornstarch, brown mustard, molasses, caraway seed, allspice, and pepper. Stir this mixture into the onions and cook until thickened and bubbly.
5. Add the Vegetables: Add the cubed rutabaga, cover, and cook for 15 minutes until slightly softened.
6. Mix Everything Together: Stir in the browned knockwurst, apple wedges, and rinsed sauerkraut. Cover and cook for an additional 15 to 20 minutes, allowing the flavors to meld and the apples to become tender.

A Nostalgic Memory


As a child, I remember standing on tiptoes, peeking over the kitchen counter to watch my grandmother masterfully blend these ingredients. The kitchen would fill with laughter and stories, as my grandfather shared tales of his childhood in Germany, where knockwurst was a staple on their dinner table. This dish was more than just a meal; it was a celebration of our heritage and a reminder of the love that binds us.


Difficulty Rating: 5/10


This recipe is perfect for those looking to explore traditional flavors without feeling overwhelmed. Its straightforward steps make it accessible to both novice and experienced cooks alike.


Classification: Main Dish


Knockwurst with Sauerkraut is a classic main dish, ideal for family gatherings or a comforting weeknight dinner. Serve it with crusty bread or mashed potatoes to soak up the delicious sauce.


---


Food has a unique way of connecting us to our past, and with each bite of this Knockwurst with Sauerkraut, you too can share in a piece of my family's story. Whether you’re seeking comfort, tradition, or simply a new culinary adventure, this recipe promises to deliver all that and more. Enjoy!

Read more about Appetizers

Read more about Main Dishes

Read more about Desserts

Ginger Lentils With Carrots and Fresh Herbs | Made by Meaghan Moineau

Ginger Lentils With Carrots and Fresh Herbs | Made by Meaghan Moineau

A Symphony of Flavors: Ginger Lentils with Carrots and Fresh Herbs


A Culinary Journey Down Memory Lane


Have you ever stumbled upon a dish that not only tantalizes your taste buds but also transports you back to cherished moments from the past? Our recipe for Ginger Lentils with Carrots and Fresh Herbs is one such culinary masterpiece. It's a delightful blend of vibrant ingredients that tells a story of tradition, warmth, and nostalgia, all in one bowl.


Description


Discover the zestful symphony of flavors in our Ginger Lentils with Carrots and Fresh Herbs. This dish combines the earthy richness of lentils with the zesty brightness of fresh ginger, creating a harmonious balance that is both comforting and invigorating. Carrots, sautéed with aromatic cumin seeds, add a subtle sweetness, while fresh mint leaves lend a refreshing touch. The creamy avocado and tangy lemon juice bring all the elements together, creating a dish that is as wholesome as it is delicious. Perfect as a main dish, this recipe is a celebration of seasonal produce and simple, nourishing ingredients.


Ingredients


- 1 avocado, diced


- 2 medium carrots, peeled and sliced


- 1 teaspoon cumin seeds


- 1 tablespoon fresh ginger, peeled and grated


- A handful of fresh mint leaves, chopped


- Juice of 1 lemon


- 1 cup lentils, cooked


- 1 tablespoon raw honey


- Sea salt, to taste


Instructions


1. Begin by peeling and slicing the carrots. In a skillet, sauté the carrot slices with cumin seeds over medium heat for about 15 minutes, or until they are tender and aromatic. Remove from the heat and let them cool.


2. While the carrots are cooling, peel and grate the fresh ginger. In a small bowl, combine the grated ginger with the juice of one lemon, raw honey, fresh mint, and sea salt. Taste the dressing and adjust the seasoning to your liking.


3. In a large mixing bowl, combine the sautéed carrots, cooked lentils, and diced avocado. Pour the ginger-mint dressing over the mixture and toss gently to ensure everything is well coated.


4. Serve immediately, and enjoy the medley of flavors and textures.


A Nostalgic Family Memory


As I prepare this dish, I'm reminded of lazy Sunday afternoons spent in my grandmother's kitchen. Her home was always filled with the comforting aroma of spices and the sound of laughter. She had a knack for turning simple ingredients into extraordinary dishes, much like this one. I remember sitting at her kitchen table, eagerly waiting for a taste of whatever she was cooking. It was in her kitchen that I learned the art of balancing flavors and appreciating the beauty of fresh, wholesome ingredients.


This recipe is a tribute to those times and to the love and warmth that my grandmother infused into every meal she made. Each bite of these ginger lentils brings me back to those cherished moments, reminding me of the importance of family, tradition, and good food.


Difficulty


Rated 4 out of 10, this recipe is accessible to cooks of all skill levels.


Classification


This flavorful dish makes a satisfying and nutritious main dish, perfect for a cozy dinner or a special family gathering.


---


Whether you're cooking for your family or simply seeking a delicious meal to enjoy on your own, our Ginger Lentils with Carrots and Fresh Herbs is sure to delight. With its vibrant ingredients and nostalgic roots, it's more than just a dish—it's a journey back to the heart of home cooking.

Read more about Appetizers

Read more about Main Dishes

Read more about Desserts

Ancho Chipotle Chili | Made by Meaghan Moineau

Ancho Chipotle Chili | Made by Meaghan Moineau

Title: "A Hearty Bowl of Memories: Ancho Chipotle Chili"
Description: Dive into the rich, smoky flavors of our Ancho Chipotle Chili, a dish that not only warms the body but also the soul. Infused with nostalgia and packed with robust spices, this recipe will transport your taste buds to a cherished family gathering. A main dish that is both fulfilling and heartwarming, learn how to create your own culinary masterpiece that rates a 6 out of 10 in difficulty.

---


A Hearty Bowl of Memories: Ancho Chipotle Chili

As the leaves turn golden and the crisp autumn air ushers us indoors, nothing beckons the warmth of shared family moments quite like a steaming pot of chili. Today, I’m taking you on a flavorful journey with our Ancho Chipotle Chili, a recipe that intertwines the zest of vibrant ingredients with the tapestry of heartfelt memories.


A Nostalgic Aroma

The first time I encountered the savory embrace of Ancho Chipotle Chili was during one of our family reunions at my grandparents' rustic cabin. The aroma of toasted chilies and seasoned beef wafted through the air, creating a magnetic pull that drew everyone towards the kitchen. Just like our family, this dish is a harmonious blend of diverse elements, each ingredient contributing its unique note to the symphony of flavors.


The Recipe Unfolds

*Ingredients:*


- 1 dried ancho chile


- 1 dried chipotle chile


- 5 grams vegetable bouillon powder


- 1 teaspoon cumin


- Fresh cilantro, for garnish


- 1 lb ground beef


- 1 cup mushrooms, chopped


- 1 onion, diced


- 1 teaspoon dried oregano


- 1 red bell pepper, chopped


- Salt and pepper to taste


- 1 can (15 oz) tomato sauce


- 500 ml water


*Instructions:*


1. Preparing the Chilies: Begin by slicing open the dried ancho and chipotle chilies. Remove the seeds and pith carefully. Toast the chilies in a warm skillet over medium heat, pressing them flat with a spatula until they're fragrant—just a few seconds on each side. This step is crucial for releasing their smoky essence. Transfer the toasted chilies to a bowl, pour 250 ml of boiling water over them, and let them soak for at least 15 minutes.
2. Sautéing the Vegetables: In a large pot, sauté the bell pepper, onion, and mushrooms over medium heat until they soften and release their flavors.
3. Frying the Beef: Simultaneously, in a separate hot skillet, fry the ground beef until it's crispy and browned. The sizzle and aroma will be your guide.
4. Blending the Chilies: As the beef cooks, blend the soaked chilies with their soaking liquid. This forms a rich chili paste that is the heart of our dish.
5. Simmering the Chili: Combine the crispy beef with the sautéed vegetables in the large pot. Pour in the tomato sauce and blended chili paste. If the mixture seems a bit dry, add some broth—made from the remaining 250 ml of water and bouillon powder—until everything is just covered. Season generously with salt, pepper, cumin, and oregano to taste.
6. Let It Simmer: Allow the chili to simmer gently for about 45 minutes, or until it reaches your desired thickness.
7. Serve and Savor: Garnish with fresh cilantro and serve hot, reveling in the deep, smoky flavors that promise comfort with every spoonful.
A Taste of Togetherness

This dish, with its complexity and warmth, mirrors the very essence of family gatherings. Though the ingredients are varied, together they create a cohesive and comforting experience—much like those cherished times spent with loved ones. So, as you prepare this Ancho Chipotle Chili, may it not only fill your home with its inviting aroma but also your heart with the warmth of fond memories.


Difficulty Rating: 6/10
Classification: Main Dish

In conclusion, every bowl of Ancho Chipotle Chili is more than just a meal; it's an invitation to reminisce, to connect, and to savor the moment. Whether you're sharing it with family or enjoying a quiet evening alone, this dish is sure to become a staple in your autumn repertoire, just as it has in mine.

Read more about Appetizers

Read more about Main Dishes

Read more about Desserts

Spinach, Tomato & Onion Couscous | Made by Meaghan Moineau

Spinach, Tomato & Onion Couscous | Made by Meaghan Moineau

Title: A Taste of Home: Spinach, Tomato & Onion Couscous
Description: Discover the warmth and nostalgia of our Spinach, Tomato & Onion Couscous recipe. This delightful dish, enriched with feta and pine nuts, is more than just a meal; it's a journey back to cherished family gatherings. Join us as we explore this wholesome main dish, easy enough for a weeknight dinner yet special enough to evoke fond memories. Difficulty: 3/10.

---


As the days grow shorter and the air turns crisp, I find myself yearning for the comforting flavors of my childhood. One dish that always brings back fond memories is the Spinach, Tomato & Onion Couscous. This simple yet flavorful meal is more than a recipe; it's a reminder of cozy family dinners and the laughter that filled our home.


I remember the first time my mother made this dish. It was a chilly autumn evening, and the kitchen was filled with the aromatic blend of sautéed onions and tomatoes. My siblings and I would gather around the table, eagerly waiting for the vibrant colors and enticing smells of the meal to fill our plates.


Ingredients You'll Need:

- Whole-wheat couscous


- Fresh spinach


- Tomatoes


- Red onion


- Olive oil


- Pine nuts


- Feta cheese


- Salt


- Water


Instructions:

1. Begin by bringing water and half the salt to a boil in a small pan. Once bubbling, add the couscous, give it a quick stir, and cover with a lid. Remove from heat, allowing it to sit and absorb the flavors while you prepare the vegetables.


2. In a large pan over medium-high heat, warm the olive oil. Once hot, add the onions, sautéing until they begin to brown. The sizzling sound and sweet aroma always remind me of watching my mother expertly move around the kitchen, a comforting sight that never grows old.


3. Add the tomatoes and remaining salt, sautéing until they start to wilt—this takes merely seconds. Then, add the spinach, cooking just until it wilts but retains its bright, inviting green color. Stir in the pine nuts, and remove the pan from the heat. Season with salt and pepper to taste.


4. Pour the couscous into a large bowl, add the sautéed vegetables, and sprinkle in the crumbled feta. Toss everything together until well combined, and top with extra feta for that rich, tangy finish.


A Nostalgic Journey:

This dish was always a family favorite, especially during fall gatherings. I vividly remember the warmth of the kitchen, the laughter echoing through the house, and the way this meal brought us all together. My grandmother would often share stories from her youth as we savored each bite, her tales as rich and satisfying as the meal itself.


As you prepare this Spinach, Tomato & Onion Couscous, I hope it brings you the same sense of comfort and connection it has always brought to my family. It's an easy-to-make main dish, with a difficulty level of just 3 out of 10, yet its simplicity is what makes it so special.


Whether you're creating new memories or reminiscing about old ones, may this dish warm your heart and home as it has mine for many years. Enjoy this culinary journey, and let it be a staple in your family traditions for generations to come.

Read more about Appetizers

Read more about Main Dishes

Read more about Desserts

Lemon Chickpea & Tomato Stew | Made by Meaghan Moineau

Lemon Chickpea & Tomato Stew | Made by Meaghan Moineau

Delightful Comfort: Lemon Chickpea & Tomato Stew
Description:

Indulge in the heartwarming flavors of our Lemon Chickpea & Tomato Stew, a dish that combines the vibrant essence of fresh ingredients with the nostalgia of cherished family gatherings. This stew, lovingly crafted with aromatic herbs and zesty lemon, offers a delightful culinary experience that transports you back to cozy family dinners. Perfect as a main dish, it pairs wonderfully with warm crusty bread, making it a comforting choice for any occasion.


---


A Nostalgic Journey Through Flavor

The aroma of lemon zest mingling with garlic and oregano wafting through the kitchen instantly takes me back to my grandmother's cozy home on a chilly autumn evening. She would often prepare her signature Lemon Chickpea & Tomato Stew, a dish that became a staple at our family gatherings. As the stew simmered gently on the stove, we would gather around the kitchen table, the warmth of the oven-dried tomatoes and the subtle heat of the jalapeño chili creating an inviting atmosphere.


I remember my grandmother recounting tales of her own childhood, how this dish was a symbol of love and togetherness in her home. The tangy burst of fresh lemon zest combined with the hearty chickpeas and rich chicken broth created a symphony of flavors that brought comfort to the soul. Each spoonful was a reminder of the love and laughter shared around the table, a tradition I now carry forward with my own family.


---


Lemon Chickpea & Tomato Stew Recipe
Ingredients:

- Olive oil


- 1 shallot, finely chopped


- 2 garlic cloves, minced


- 1 canned chickpeas, drained and rinsed


- 1 jalapeño chili, sliced


- 1/2 teaspoon dried oregano


- 1 bay leaf, broken


- 1/4 teaspoon crushed red pepper


- Salt & pepper to taste


- 4 cups chicken broth


- Zest and juice of 1 fresh lemon


- 1/2 cup dried oven tomatoes


- 2 cups fresh spinach, loosely packed


Instructions:

1. In a large saucepan, heat the olive oil over medium heat. Add the shallot and garlic, cooking until soft, about 5 minutes.


2. Stir in the chickpeas, jalapeño chili, oregano, bay leaf, and crushed red pepper. Season with salt and pepper. Cook, stirring frequently, until the herbs are fragrant and the chickpeas are hot and starting to brown, about 5-7 minutes.


3. Pour in the chicken broth, lemon zest, and lemon juice. Bring to a boil, then reduce the heat and simmer until the broth is reduced by half, about 20 minutes.


4. Stir in the dried oven tomatoes, garlic, and spinach. Simmer for an additional 5 minutes.


5. Remove the bay leaf, adjust seasoning with salt and pepper, and serve hot with warm crusty bread.


Difficulty Rating: 4/10
Classification: Main Dish

This Lemon Chickpea & Tomato Stew is not just a meal; it's a heartfelt tribute to family traditions and the joy of sharing a delicious dish with loved ones. Its simple preparation and rich flavor profile make it an ideal choice for any home cook looking to create lasting memories around the dinner table. Enjoy this delightful stew and let it become a cherished part of your own family gatherings.

Read more about Appetizers

Read more about Main Dishes

Read more about Desserts

Sun Dried Tomato and Herb Baked Eggs | Made by Meaghan Moineau

Sun Dried Tomato and Herb Baked Eggs | Made by Meaghan Moineau

Title: A Taste of Tradition: Sun Dried Tomato and Herb Baked Eggs
Description: Dive into the heartwarming flavors of our Sun Dried Tomato and Herb Baked Eggs—a simple yet elegant dish that merges the aromatic charm of fresh herbs with the rich, tangy essence of sun-dried tomatoes. Perfect as a main dish for a leisurely brunch, this recipe not only delights the palate but also stirs the soul with memories of family gatherings and cherished traditions.

---


There's something incredibly comforting about a dish that brings back the warmth of family gatherings and the nostalgia of time spent in the kitchen with loved ones. Our Sun Dried Tomato and Herb Baked Eggs is one such recipe—a timeless favorite that has graced our family table for generations, marking countless Sunday brunches and special occasions.


A Family Memory


Growing up, Sunday mornings were a sacred ritual in our household. The kitchen would come alive with the aroma of fresh herbs and the sizzle of olive oil, as my grandmother prepared her signature baked eggs. I fondly remember sitting perched on a stool, watching her every move as she expertly lined the bottom of a ramekin with sun-dried tomatoes, their deep red hues contrasting beautifully against the white porcelain.


"These tomatoes," she would say, "are like little bursts of sunshine captured in a jar." And indeed, they were. Plucked from her garden at the height of summer and preserved with care, those tomatoes carried with them the essence of sunlit days and the promise of comfort in the colder months.


The eggs, nestled atop the tomatoes, were a testament to simplicity—a reminder that the best dishes often require few ingredients, provided they are fresh and full of flavor. As she sprinkled the eggs with freshly chopped basil and parsley, the kitchen filled with an earthy fragrance that was both invigorating and soothing.


The Recipe


Ingredients:

- 2 eggs


- Fresh basil, chopped


- Fresh parsley, chopped


- Olive oil


- Sun-dried tomatoes


Instructions:

1. Preheat your oven to 350°F (175°C).


2. Generously coat the inside of a ramekin or oven-safe dish with olive oil.


3. Line the bottom of the dish with sun-dried tomatoes.


4. Carefully crack two eggs over the tomatoes, ensuring the yolks remain intact.


5. Sprinkle with freshly chopped basil and parsley to taste.


6. Bake uncovered for 15-20 minutes, or until the egg whites are firm.


7. Serve immediately, garnished with additional herbs if desired.


As the eggs bake, the sun-dried tomatoes infuse the dish with their rich, tangy flavor, while the herbs add a layer of freshness that elevates the entire experience. Served straight from the oven, these baked eggs are a testament to the beauty of uncomplicated, wholesome cooking.


Difficulty and Classification


This dish is a breeze to prepare, with a difficulty rating of just 3 out of 10. Its simplicity makes it an ideal main dish for brunch, perfect for both novice cooks and seasoned culinary enthusiasts. Whether you're recreating cherished family memories or starting new traditions of your own, these Sun Dried Tomato and Herb Baked Eggs are sure to become a beloved staple in your kitchen.


---


So gather your loved ones, set the table, and let the heartwarming flavors of this classic dish transport you to a place where food is not just nourishment, but a celebration of family and tradition.

Read more about Appetizers

Read more about Main Dishes

Read more about Desserts

Colcannon | Made by Meaghan Moineau

Colcannon | Made by Meaghan Moineau

A Taste of Tradition: Colcannon, A Hearty Irish Classic


Recreating Family Memories with Every Bite


Colcannon, a traditional Irish dish, is more than just a meal; it's a cherished piece of my family history. This comforting blend of creamy mashed potatoes and cabbage takes me back to my grandmother's kitchen, a place filled with laughter, storytelling, and the warmth of a hearty meal shared among loved ones.


Ingredients You'll Need:


- 2 rashers of optional bacon


- Butter


- 1 head of cabbage


- Stems of green onions


- Milk


- Fresh parsley


- Pepper


- Potatoes


- Salt


A Step-by-Step Guide to Making Colcannon:


1. Prepare the Cabbage: Start by cutting into the top of the cabbage, hollowing it out while leaving 3-4 outer leaves intact. Reserve the hollowed-out portion for later use.
2. Cook the Cabbage: Plunge the hollowed-out cabbage head into a large pot of boiling water. Let it simmer for about 5 minutes or until it is tender-crisp, ensuring it maintains its shape. Quickly cool it in cold water, then invert and drain.
3. Chop and Stir Fry: Chop the reserved cabbage pieces until you have about 1 1/2 cups. Stir fry them in butter along with the green onions until they are tender and set aside.
4. Mash the Potatoes: Boil the potatoes until tender, then mash them, incorporating milk, salt, and pepper to taste.
5. Combine: Stir in the sautéed cabbage mixture and add a sprinkle of fresh parsley for garnish.

A Dish Steeped in Nostalgia


I vividly remember the first time I helped my grandmother make Colcannon. The kitchen was filled with the savory aroma of butter and onions sizzling in the pan. My grandmother, with her gentle hands, showed me how to hollow out the cabbage, a task I found both fascinating and challenging. The kitchen was a flurry of activity, with my cousins setting the table and my grandfather recounting tales of his youth in Ireland.


As we sat down to enjoy the meal, I realized that Colcannon was not just food; it was a vessel of memories, stories, and traditions passed down through generations. Each bite was a reminder of who we were and where we came from, a connection to our roots and to each other.


Difficulty Rating: 4/10


Colcannon is a straightforward dish that even novice cooks can master with a bit of practice. The most challenging part might be hollowing out the cabbage, but with patience, it becomes an enjoyable task.


Classification: Main Dish


Colcannon is hearty and filling, making it a perfect main dish that embodies the essence of comfort food. It pairs beautifully with meats like ham or sausages, but it can also stand alone as a satisfying vegetarian meal.


Conclusion


Recreating this traditional Colcannon recipe allows me to honor my family's heritage while creating new memories in my own kitchen. Each time I prepare it, I am reminded of the love, warmth, and laughter that filled my grandmother's home. I hope this recipe brings the same joy and connection to your family table, creating new stories and memories for generations to come.

Read more about Appetizers

Read more about Main Dishes

Read more about Desserts

Coffee-braised Short Ribs | Made by Meaghan Moineau

Coffee-braised Short Ribs | Made by Meaghan Moineau

Title: "Savory Memories: The Art of Coffee-Braised Short Ribs"


Description: Dive into the rich, aromatic world of Coffee-Braised Short Ribs—a dish that combines the warmth of family gatherings with the robust flavors of a unique culinary masterpiece. Perfectly tender ribs, braised to perfection with a hint of coffee and a medley of spices, this main dish is your ticket to a memorable dining experience.


---


Introduction


In the heart of every cherished family gathering lies a dish that brings everyone together, sparking joy and nostalgia with every bite. For my family, that dish has always been Coffee-Braised Short Ribs. The mere thought of it conjures images of bustling kitchens, cozy dining rooms, and laughter echoing through the house as we eagerly await the masterpiece emerging from the oven. In this blog post, I'll guide you through creating this heartwarming dish, sharing a piece of my family's history along the way.


A Family Memory


Growing up, Sunday afternoons were reserved for family dinners at my grandmother's house. The aroma of slow-cooked meals wafted through the air, promising a feast that would satisfy both the belly and the soul. My grandmother, a culinary magician in her own right, introduced us to Coffee-Braised Short Ribs one chilly autumn evening. The melding of savory and slightly sweet flavors, enriched by the depth of freshly brewed coffee, created a culinary symphony that left a lasting impression on all of us.


As we sat around the table, my grandmother regaled us with stories of her childhood, where she first learned to cook by her mother's side. Her eyes twinkled with a mix of nostalgia and pride as she recounted how this dish was a staple in their household—an ode to her heritage and a symbol of familial love. Each bite was a journey back in time, a connection to our roots, and a reminder of the warmth and comfort that family brings.


Recipe: Coffee-Braised Short Ribs


Ingredients:

- Short ribs


- Salt and pepper (to taste)


- Olive oil


- 1 yellow onion, chopped


- 1 red bell pepper, chopped


- 1 jalapeño, chopped


- 4 garlic cloves, minced


- 1 tablespoon ancho chile powder


- 1 tablespoon dried oregano


- 1 tablespoon ground cumin


- 1 cup strong freshly brewed coffee


- 1 can diced tomatoes with juice


- 2 tablespoons tomato paste


- 2 tablespoons dark brown sugar


- Fresh cilantro, chopped (for garnish)


Instructions:

1. Preheat your oven to 300°F (150°C).


2. Heat olive oil in a large heavy stockpot over medium-high heat.


3. Season the short ribs with salt and pepper. Add them to the pot in batches, browning each side for about 4 minutes. Transfer to a platter.


4. In the same pot, add onion, red bell pepper, and jalapeño. Reduce heat to medium, cover, and cook until the onion is tender, stirring occasionally (about 6 minutes).


5. Stir in garlic and sauté uncovered for 1 minute.


6. Add brown sugar, ancho chile powder, oregano, and cumin, stirring for 15 seconds.


7. Pour in the coffee, tomatoes with juice, and tomato paste, bringing the mixture to a boil while scraping up the browned bits.


8. Return the ribs and any juices to the pot, bring to a boil, then cover and bake in the oven until the meat is very tender, about 1 hour and 45 minutes.


9. Spoon off fat from the surface of the sauce. Season the sauce to taste with salt and pepper.


10. Transfer ribs to a platter and spoon the sauce over top. Sprinkle with chopped cilantro.


Conclusion


This Coffee-Braised Short Ribs recipe is more than just a meal; it's a journey through time, a celebration of family, and a testament to the power of food to connect us to our roots. With its deep, complex flavors and tender, succulent meat, this dish is sure to become a staple in your own family gatherings, creating new memories and traditions for years to come.


Difficulty Rating: 7/10

Classification: Main Dish


Whether you're creating new memories or revisiting old ones, this dish promises to be a highlight of any gathering. Enjoy, and may your home be filled with warmth, laughter, and the delightful aroma of Coffee-Braised Short Ribs.

Read more about Appetizers

Read more about Main Dishes

Read more about Desserts