Caramel Macchiato Cake | Made by Meaghan Moineau

Caramel Macchiato Cake

Intro

There’s something magical about the aroma of coffee and caramel mingling in the air. It takes me back to lazy Sunday afternoons at my grandmother’s house, where the fragrant scent of freshly brewed coffee and the sweet promise of caramel treats filled the kitchen. Inspired by those cherished memories, this Caramel Macchiato Cake captures the essence of those moments in a delectable dessert that combines the rich flavors of coffee, chocolate, and caramel. Whether you’re a coffee lover or a dessert enthusiast, this cake is designed to bring warmth and joy to your table.

Why You’ll Love It

This Caramel Macchiato Cake is more than just a cake; it’s an experience. Here are a few reasons why you’ll fall head over heels for this delightful dessert:

  • Rich and Flavorful: The combination of chocolate, coffee, and caramel creates a symphony of flavors that dance on your taste buds.
  • Perfect for All Occasions: Whether it’s a birthday, a family gathering, or just a treat for yourself, this cake is sure to impress.
  • Easy to Make: With a few simple ingredients and steps, you’ll have a show-stopping dessert without spending hours in the kitchen.

Ingredients

  • Butter
  • Condensed milk
  • White corn syrup
  • Unflavored gelatin powder
  • Chocolate cake mix
  • Granulated sugar
  • Heavy whipping cream
  • Coffee
  • Powdered sugar
  • Water

Instructions

  1. Make the Cake Layers: Follow the chocolate cake box instructions to make three layers. Add an extra box of mix if needed to ensure you have enough batter for three layers. Add the instant coffee directly to the batter, stir, and let it sit for a few minutes to allow the coffee to dissolve.
  2. Divide the batter evenly into three 8-inch cake pans. Bake according to the box instructions.
  3. Once the cakes are cool, place a large plate on top of each pan and invert so that the plate is on the bottom. Tap the top of the pan a few times and gently wiggle to remove the pan from the cake. Repeat for the other two layers. Wrap the cake layers in plastic wrap and refrigerate for at least 2 hours or overnight.
  4. Make the Caramel: In a small saucepan over medium-low heat, combine the butter, condensed milk, white corn syrup, and granulated sugar. Stir and cook until the mixture reaches a dark golden brown color, stirring frequently to prevent burning.
  5. Once the caramel is ready, let it cool slightly before using it to layer and top the cake.
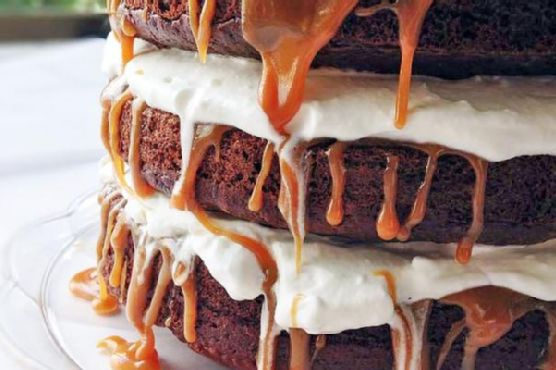
  6. Layer the cake with caramel and frosting of your choice, and drizzle more caramel on top for a beautiful finish.

Tips

To ensure your Caramel Macchiato Cake turns out perfectly, consider these helpful tips:

  • Chill the Cake Layers: Chilling the cake layers makes them easier to handle and frost.
  • Keep an Eye on the Caramel: Caramel can go from perfect to burnt quickly, so stir continuously and watch for the color change.
  • Use Quality Coffee: The coffee flavor is essential in this cake, so use a good quality coffee for the best results.

Variations & Substitutions

Feel free to make this cake your own by trying out some of these variations and substitutions:

  • Chocolate Variation: Add chocolate chips to the batter for extra chocolatey goodness.
  • Nutty Twist: Sprinkle chopped nuts between the layers for added texture and flavor.
  • Alternative Frosting: Try a cream cheese frosting for a tangy contrast to the sweet caramel.
  • Dairy-Free: Use dairy-free substitutes for butter and cream to make the cake suitable for those with dairy allergies.

Storage

To store your Caramel Macchiato Cake, wrap it tightly in plastic wrap or place it in an airtight container. It can be stored at room temperature for up to 3 days or in the refrigerator for up to a week. For longer storage, wrap the cake in plastic wrap and aluminum foil, then freeze for up to 3 months. Thaw in the refrigerator before serving.

FAQ

Can I use instant coffee instead of brewed coffee?

Yes, you can use instant coffee. Simply dissolve it in a bit of hot water before adding it to the batter for a stronger coffee flavor.

How do I prevent my caramel from burning?

Keep the heat on medium-low and stir the caramel constantly. Watch for the color change to a dark golden brown and remove it from heat immediately once it reaches that point.

Nutrition

This Caramel Macchiato Cake is a decadent treat, perfect for special occasions. While it’s not the lowest in calories, it is certainly rich in flavor and satisfaction. Enjoy a slice in moderation as part of a balanced diet.

Conclusion

The Caramel Macchiato Cake is a celebration of flavors and a delightful nod to the cherished memories of cozy afternoons filled with the aroma of coffee and caramel. Whether you’re making it for a special occasion or simply to enjoy a slice of comfort, this cake is sure to become a favorite. So gather your ingredients, embrace the warmth of your kitchen, and create a dessert that will surely bring smiles and sweet memories to those who share it with you.

Related update: Caramel Macchiato Cake

Mashed Potatoes with Garlic, Sage & Goat Cheese | Made by Meaghan Moineau

Mashed Potatoes with Garlic, Sage & Goat Cheese

Intro

There’s something truly comforting about a bowl of creamy mashed potatoes. For me, it brings back memories of Sunday family dinners at my grandmother’s house. The kitchen would be filled with the savory aroma of garlic and sage, enticing everyone to gather around the table. Her secret ingredient? A dash of tangy goat cheese that elevated the dish to something extraordinary. Today, I’m excited to share this cherished recipe with you, hoping it becomes a staple in your home just as it has been in mine.

Why You’ll Love It

This mashed potato recipe is not just any side dish; it’s a rich and flavorful experience. The creaminess of the goat cheese blends perfectly with the earthy notes of sage, creating a dish that’s both comforting and sophisticated. It’s the ideal side for your holiday gatherings, yet simple enough for a weeknight meal. Plus, with just a handful of ingredients, it’s as easy to prepare as it is delicious.

Ingredients

  • 4 large baking potatoes, peeled and cubed
  • 3 cloves of garlic, minced
  • 1 Chavrie goat cheese pyramid (or 5 oz of any soft goat cheese)
  • 2 tablespoons olive oil
  • 2 teaspoons fresh sage, finely chopped
  • Salt and black pepper to taste

Instructions

  1. In a medium saucepan, cook the potatoes in salted water until tender, about 15 minutes.
  2. Drain the potatoes and return them to the saucepan.
  3. While still warm, add the olive oil, garlic, and Chavrie Goat Cheese.
  4. Whip the potatoes with handheld mixers until the ingredients are blended and the desired consistency is obtained.
  5. Season with salt and black pepper to taste.
  6. Garnish with fresh sage before serving.

Tips

For perfectly fluffy mashed potatoes, make sure to thoroughly drain them before adding other ingredients. If you prefer a smoother texture, you can pass the potatoes through a ricer before mixing. Adjust the amount of garlic and sage according to your taste preference. Remember, the goat cheese adds a unique tang, so you may need less salt than usual.

Variations & Substitutions

If goat cheese isn’t to your liking, you can substitute it with cream cheese or even a bit of sour cream for a similar creamy texture. For a vegan version, use a vegan cream cheese alternative and replace the olive oil with a vegan butter. You can also experiment with different herbs like rosemary or thyme for a new flavor profile.

Storage

Store any leftover mashed potatoes in an airtight container in the refrigerator for up to three days. Reheat gently on the stove or in the microwave, adding a splash of milk or broth to restore the creamy texture. Unfortunately, mashed potatoes don’t freeze well as they can become grainy, so it’s best to enjoy them fresh.

FAQ

Can I prepare this dish in advance?

Yes, you can prepare the mashed potatoes a day in advance. Simply store them in the fridge and reheat before serving. Adding a little extra olive oil or milk when reheating can help maintain their creaminess.

What is the best potato type for mashing?

For the creamiest mashed potatoes, use starchy potatoes like Russets or Yukon Golds. They break down easily and absorb flavors well, resulting in a smooth, fluffy texture.

Can I make this recipe without a mixer?

Absolutely! While a mixer makes the job easier, you can use a potato masher or even a fork. The texture will be more rustic, which some people prefer.

Nutrition

This dish is not only delicious but also nutritious. The potatoes provide a good source of vitamins C and B6, while the goat cheese adds protein and calcium. Just be mindful of portion sizes if you’re watching your calorie intake, as the cheese and olive oil can add up.

Conclusion

Mashed Potatoes with Garlic, Sage & Goat Cheese is a dish that brings warmth and flavor to any table. Whether it’s a holiday feast or a simple family dinner, this recipe promises to be a crowd-pleaser. I hope you enjoy this family favorite as much as we do. Don’t forget to share your creations with us and let us know how it turned out!

Related update: Mashed Potatoes with Garlic, Sage & Goat Cheese

Spicy Coconut French Toast | Made by Meaghan Moineau

Spicy Coconut French Toast

Intro

Growing up, Sunday mornings in my family were synonymous with the enticing aroma of French toast wafting through the house. My grandmother would always prepare a classic version that was simple yet utterly delightful. However, as I grew older and started experimenting with flavors, I found that adding a hint of spice and a tropical twist transformed this beloved breakfast staple into something truly extraordinary. And thus, the Spicy Coconut French Toast was born—a dish that combines the warmth of nostalgia with a burst of exciting flavors, perfect for any brunch table.

Why You’ll Love It

This Spicy Coconut French Toast is a delightful departure from the traditional. Here’s why it will become a favorite in your home:

  • Unique Flavor Profile: The combination of coconut and a hint of cayenne pepper adds a surprising yet harmonious twist to the classic French toast.
  • Perfect for Special Occasions: Whether it’s a weekend brunch or a special breakfast gathering, this dish is sure to impress your guests.
  • Simple Ingredients: Despite its gourmet appearance, this recipe uses everyday ingredients that you likely already have in your pantry.
  • Quick and Easy: It takes just a few steps to prepare, making it ideal for both leisurely mornings and busy days.

Ingredients

  • 4 large eggs
  • 1 loaf French bread, sliced thickly
  • Oil for frying
  • 1/2 teaspoon ground cayenne pepper
  • 1/4 cup maple syrup
  • 1/4 teaspoon nutmeg
  • Pinch of salt
  • 1 tablespoon sugar
  • 1 cup sweetened shredded coconut
  • 1 teaspoon vanilla extract
  • 1 cup whole milk

Instructions

  1. Heat a large skillet over medium heat.
  2. In a baking dish or large bowl, whisk together the milk, eggs, salt, vanilla extract, sugar, cayenne pepper, and nutmeg.
  3. Pour the shredded coconut onto a plate.
  4. Pour enough oil into the skillet to completely coat the bottom.
  5. Dip each slice of bread into the egg mixture, allowing it to soak for 15-20 seconds per side.
  6. Then, dip the soaked bread slices into the coconut, ensuring an even coat on both sides.
  7. Once the oil is hot, start frying one slice as a test batch. Cook for 1 minute on each side, watching for a crispy golden-brown crust. The coconut may turn a deep brown, but avoid letting it burn.
  8. If the coconut browns before the crust forms, reduce the heat slightly. Add more oil as needed and continue frying the remaining slices.
  9. Serve warm with maple syrup and fresh berries for a delightful breakfast experience.

Tips

  • Use stale bread if possible, as it soaks up the egg mixture better without getting too soggy.
  • Adjust the amount of cayenne pepper to suit your spice preference.
  • Test the oil temperature by dropping a small piece of bread into it. If it sizzles and browns slowly, it’s ready.

Variations & Substitutions

  • Dairy-Free Version: Substitute whole milk with almond milk or coconut milk for a dairy-free alternative.
  • Gluten-Free Option: Use gluten-free bread to accommodate dietary restrictions.
  • Extra Spice: Add a pinch of cinnamon for an additional layer of warmth and spice in the flavor.

Storage

Store any leftover French toast in an airtight container in the refrigerator for up to 2 days. To reheat, place the slices in a toaster oven or on a skillet over medium heat until warmed through. Avoid microwaving to retain the crispy texture.

FAQ

Can I make this recipe ahead of time?

While it’s best enjoyed fresh, you can prepare the egg mixture and slice the bread the night before. Store them separately and quickly assemble and fry the French toast in the morning for a quick breakfast.

What can I serve with Spicy Coconut French Toast?

This dish pairs beautifully with fresh fruit, crispy bacon, or a dollop of whipped cream. For a more savory option, consider serving it with scrambled eggs or a sausage link.

Nutrition

Each serving of Spicy Coconut French Toast provides approximately:

  • Calories: 350
  • Protein: 8g
  • Carbohydrates: 45g
  • Fat: 15g
  • Sugar: 14g

Note: Nutritional values are estimates and can vary based on specific ingredients and preparation methods.

Conclusion

Spicy Coconut French Toast is a delightful fusion of sweet, spicy, and tropical flavors that will make your breakfast or brunch spread truly special. Its crispy exterior and soft, flavorful interior create a perfect bite every time. Whether you’re making it for your family or serving it at a gathering, this dish is bound to become a cherished favorite. So gather your ingredients, fire up the skillet, and indulge in a breakfast experience that’s both comforting and exciting. Enjoy!

Related update: Spicy Coconut French Toast

Related update: French Toast Croissants with Strawberries

Avocado Chicken Salad | Made by Meaghan Moineau

Avocado Chicken Salad: A Fresh and Flavorful Delight

Intro

There’s something undeniably nostalgic about a well-crafted salad. As a child, I fondly remember summer afternoons at my grandmother’s house, where the scent of fresh herbs from her garden filled the air. She would often prepare a simple yet delightful chicken salad, serving it with a smile that made every bite taste like home. Inspired by those cherished memories, I’ve crafted this Avocado Chicken Salad that combines the creamy richness of avocado with succulent chicken, topped with a zesty and refreshing dressing. It’s a dish that brings back those warm, comforting moments with every mouthful.

Why You’ll Love It

This Avocado Chicken Salad is more than just a meal; it’s a symphony of flavors and textures that will tantalize your taste buds. Here’s why you’ll fall in love with it:

  • Fresh and Nutritious: Packed with healthy fats from avocados and lean protein from chicken, this salad is a nutritious powerhouse.
  • Quick and Easy: With simple ingredients and straightforward steps, you can whip up this delicious salad in no time.
  • Customizable: Whether you’re serving it as a light lunch or a hearty dinner, this salad can be easily adjusted to fit your preferences.
  • Great for Meal Prep: Prepare it in advance for a convenient grab-and-go meal during the busy week.

Ingredients

  • 2 ripe avocados, cut into cubes
  • 1 cup cherry tomatoes, halved
  • 2 tablespoons extra virgin olive oil
  • Juice of 2 limes
  • 3 tablespoons mayonnaise
  • 1 teaspoon black pepper, plus more to taste
  • 4 cups shredded mixed salad greens
  • 2 skinless, boneless chicken breasts
  • Salt, to taste

Instructions

  1. Season the chicken breasts with a pinch of salt and pepper. Place in a pot of boiling water and cook until fully cooked through, about 15-20 minutes. Remove from water, let cool, then cut into cubes. Set aside.
  2. In a large bowl, place the shredded mixed salad greens. Drizzle with olive oil and lime juice, tossing well to coat the leaves evenly.
  3. Divide the dressed salad greens into two serving bowls.
  4. Evenly distribute the cubed avocados, cubed chicken, and halved cherry tomatoes on top of the salad in each bowl.
  5. Drizzle the mayonnaise over the top, and finish with a dash of black pepper.
  6. Serve immediately and enjoy the fresh, vibrant flavors!

Tips

For the best results, use ripe avocados that yield slightly to gentle pressure. If you’re making this salad ahead of time, prepare the ingredients separately and combine them just before serving to maintain the freshness and texture of the salad.

Variations & Substitutions

Feel free to get creative with this salad! Here are some variations and substitutions you might consider:

  • Add Crunch: Toss in some roasted nuts or seeds for an added crunch and a boost in nutrition.
  • Herbal Twist: Fresh herbs like cilantro or basil can elevate the flavors of the salad.
  • Protein Alternatives: For a different protein source, substitute the chicken with grilled shrimp or chickpeas for a vegetarian option.
  • Dairy-Free Option: Swap mayonnaise with a dairy-free yogurt or avocado-based dressing.

Storage

To store, keep the salad components separate in airtight containers in the refrigerator for up to 3 days. Assemble the salad just before serving to ensure the flavors remain vibrant and the ingredients stay fresh.

FAQ

Can I use leftover chicken for this salad?

Absolutely! Using leftover roasted or grilled chicken is a great way to save time and reduce waste. Just ensure the chicken is well-seasoned to enhance the overall flavor of the salad.

What can I do to prevent the avocados from browning?

To keep avocados from browning, squeeze a little extra lime juice over them. The acidity in the lime juice will slow down the oxidation process, keeping your avocados looking fresh and green.

Nutrition

This Avocado Chicken Salad is not only delicious but also nutritious. Each serving is packed with healthy fats, lean protein, and a variety of vitamins and minerals from the fresh vegetables. It’s a wholesome, balanced meal that will keep you energized and satisfied.

Conclusion

There you have it, a delightful Avocado Chicken Salad that’s both a treat for the taste buds and a nod to the comforting salads from my childhood. Whether you’re enjoying it on a sunny afternoon or packing it for a nutritious lunch, this salad is sure to become a favorite in your culinary repertoire. So gather your ingredients, take a trip down memory lane, and savor the simple pleasures of this fresh and flavorful dish. Bon appétit!

Related update: Avocado Chicken Salad

Baked Caramel Custard | Made by Meaghan Moineau

Baked Caramel Custard: A Sweet Journey Back in Time

Intro

There’s something magical about the aroma of caramel wafting through the kitchen. It transports me back to my grandmother’s cozy home, where weekends were filled with warmth and the promise of something sweet baking in the oven. Her Baked Caramel Custard was a family favorite, a simple yet elegant dessert that graced our table on special occasions and ordinary days alike. Each spoonful was a creamy, dreamy reminder of home, love, and the art of simple cooking. Today, I invite you to join me on this nostalgic journey and create your own sweet memories with this timeless recipe.

Why You’ll Love It

This Baked Caramel Custard is a delightful dessert that blends the rich, buttery flavor of caramel with the smoothness of custard. It’s not only a treat for the palate but also a feast for the eyes with its glossy, amber top. This recipe is perfect for those who appreciate simple ingredients coming together to create something extraordinary. Whether you’re new to custard-making or a seasoned pro, this recipe is easy to follow and promises a dessert that’s as satisfying to make as it is to eat.

Ingredients

  • Egg substitute
  • 1 egg yolk
  • Evaporated skim milk
  • Port wine
  • Skim milk
  • Sugar plus
  • Sugar
  • Vanilla

Instructions

  1. Preheat the oven to 350°F (175°C).
  2. Scald the evaporated skim milk and skim milk together in a heavy saucepan. Remove from heat and set aside.
  3. In a skillet over medium heat, caramelize the sugar until it melts and turns a golden brown.
  4. Slowly add the milk mixture to the caramelized sugar, stirring constantly until the sugar dissolves completely.
  5. In a medium bowl, beat the egg substitute and egg yolk together until lemon-colored.
  6. Add the milk mixture, port wine, and vanilla to the eggs, stirring well to combine.
  7. Pour the custard mixture into 6 custard cups and place them in a baking dish.
  8. Add boiling water to the baking dish, ensuring the water reaches halfway up the sides of the cups.
  9. Bake in the preheated oven for 35 to 40 minutes, or until the custards are set.
  10. Remove the custard cups from the oven and chill completely in the refrigerator.
  11. Once chilled, place a dessert plate on top of each custard cup and invert to serve.

Tips

For the perfect caramel, keep a close eye on the sugar as it melts. It can go from golden to burnt very quickly, so be ready to remove it from the heat as soon as it reaches the desired color. Additionally, when adding the milk to the caramel, pour slowly to avoid splattering and ensure a smooth mixture.

Variations & Substitutions

If you’re looking to adapt this recipe, consider using almond milk in place of skim milk for a nutty flavor. For a boozy twist, swap out the port wine for a favorite liqueur. You can also add a pinch of sea salt to the caramel for a salted caramel version that balances sweet with savory.

Storage

Store any leftover custard in the refrigerator, covered, for up to three days. This dessert is best enjoyed chilled, so feel free to prepare it a day in advance for a fuss-free treat.

FAQ

Can I make this custard without the egg substitute?

Yes, you can replace the egg substitute with an additional egg yolk if you prefer a richer custard.

How do I know when the custard is set?

The custard is set when it jiggles slightly in the center but is firm around the edges. A knife inserted into the center should come out clean.

Nutrition

This recipe yields six servings, with each serving being approximately 1/2 cup. While specific nutritional values will vary depending on ingredient brands and substitutions, this custard is generally lower in fat due to the use of skim milk and egg substitutes. It’s a delightful indulgence that can fit into a balanced diet.

Conclusion

Baked Caramel Custard is more than just a dessert; it’s a comforting reminder of simpler times and the joy of creating something special from everyday ingredients. Whether you’re making it for a family gathering or a quiet night in, this recipe is sure to delight and impress. So grab your apron, preheat the oven, and let the sweet journey begin!

Related update: Baked Caramel Custard

Related update: Gluten Free Profiteroles

Related update: Wild Blueberry Lemon Muffins

Rustic Brie Toasts with Wild Mushroom, Cranberry and Shallot | Made by Meaghan Moineau

Rustic Brie Toasts with Wild Mushroom, Cranberry, and Shallot

Intro

There’s something remarkably comforting about the scent of earthy mushrooms mingling with the crisp sweetness of cranberries and the savory richness of melted brie. This recipe for Rustic Brie Toasts with Wild Mushroom, Cranberry, and Shallot captures the essence of autumn in every bite. I remember my grandmother preparing something similar during our family gatherings in the fall. She’d gather us around her long wooden table, the fireplace crackling in the background, and serve these toasty delights as a warm-up to our festive meals. The aroma alone would draw us in, and the first bite was always a revelation of flavors. These toasts are a nod to those cherished moments and are perfect for sharing new memories with loved ones.

Why You’ll Love It

This recipe is a perfect blend of savory and sweet, offering a gourmet twist on the classic toast. The combination of creamy brie with the nuttiness of wild mushrooms and the tartness of cranberries creates a complex flavor profile that’s sure to impress. Not only are these toasts a breeze to make, but they also serve as an elegant appetizer for any occasion. Whether you’re hosting a dinner party or enjoying a quiet night by the fireplace, these toasts will elevate your dining experience.

Ingredients

  • Diced wild mushrooms
  • Diced shallot
  • 1/4 cup dried cranberries (juice sweetened if possible)
  • Fresh thyme
  • Rustic baguette
  • Olive oil
  • Wedge of beautiful brie cheese
  • Salt and pepper

Instructions

  1. Start by preheating your oven to 350 degrees Fahrenheit.
  2. While the oven is preheating, heat the olive oil in a sauté pan over medium heat.
  3. Add the diced shallot, wild mushrooms, cranberries, and a few sprigs of fresh thyme to the pan.
  4. Sauté the mixture for a few minutes until the shallot begins to wilt and the mushrooms are tender.
  5. Season with salt and pepper to taste and set aside to cool.
  6. Slice a rustic baguette into 12 pieces.
  7. Place a slice of brie on each piece of bread.
  8. Top each toast with a spoonful of the cranberry, mushroom, and shallot mixture.
  9. Arrange the toasts on an oiled cookie sheet.
  10. Bake the toasts for 15 minutes or until the brie just begins to melt.
  11. Remove from oven and serve warm. Enjoy!

Tips

  • For a more intense flavor, allow the mushroom mixture to marinate for an hour before assembling the toasts.
  • Use a sharp knife or serrated bread knife to ensure clean slices of baguette.
  • Consider using a mix of wild mushrooms for a more complex flavor profile.

Variations & Substitutions

If you prefer a different cheese, camembert can be a lovely substitute for brie, offering a similar creamy texture. For those who enjoy a bit of heat, consider adding a pinch of red pepper flakes to the mushroom mixture. If you’re avoiding gluten, opt for gluten-free bread or crackers.

Storage

While these toasts are best enjoyed fresh, any leftovers can be stored in an airtight container in the refrigerator for up to two days. To reheat, place them back in the oven at a low temperature until warmed through. Avoid microwaving, as this can make the bread soggy.

FAQ

Can I prepare the mushroom mixture in advance?

Yes, you can prepare the mushroom mixture a day in advance. Store it in an airtight container in the refrigerator and assemble the toasts just before baking.

What type of cranberries should I use?

For this recipe, juice-sweetened dried cranberries add just the right amount of sweetness. However, you can use regular dried cranberries if you prefer.

Is there a way to make this recipe vegan?

Absolutely! Replace the brie with a vegan cheese alternative and use olive oil or vegan butter for sautéing.

Nutrition

This appetizer is a delightful treat but remember that it is rich and indulgent. Each toast provides a balance of carbohydrates from the baguette, healthy fats from the olive oil and cheese, and a touch of sweetness from the cranberries. Consume in moderation as part of a balanced diet.

Conclusion

Rustic Brie Toasts with Wild Mushroom, Cranberry, and Shallot are a wonderful way to celebrate the flavors of the season. They’re simple to prepare, yet sophisticated enough to make any occasion feel special. Whether you’re rekindling old traditions or starting new ones, these toasts are sure to bring warmth and joy to your table. Enjoy them with a glass of your favorite wine or a mug of hot cider for a truly cozy experience. Bon appétit!

Related update: Rustic Brie Toasts with Wild Mushroom, Cranberry and Shallot

Related update: Roasted Red Pepper & Tomato Salsa

Carrot and Coriander Soup | Made by Meaghan Moineau

Carrot and Coriander Soup

Intro

There’s something undeniably comforting about a warm bowl of soup that not only satiates hunger but also soothes the soul. Growing up, I remember visiting my grandmother’s house on crisp autumn afternoons, where the inviting aroma of her signature carrot and coriander soup would welcome us at the door. It was more than just a meal; it was a hug in a bowl, filled with love and warmth that transcended generations. Today, I want to share this beloved recipe with you, so you can bring a bit of that warmth into your home too.

Why You’ll Love It

This carrot and coriander soup is not just a simple recipe; it’s an experience. Here’s why you’ll adore it:

  • Flavor-packed: The natural sweetness of carrots combines beautifully with the citrusy hint of orange juice and the earthy warmth of coriander.
  • Healthy: Packed with vitamins and antioxidants, this soup is as nourishing as it is delicious.
  • Easy to make: With just a handful of ingredients and simple steps, you’ll have a stunning soup on your table in no time.
  • Versatile: Perfect as a starter, side, or even as a light main dish.

Ingredients

  • 6 large carrots, peeled and roughly chopped
  • 1 large onion, chopped
  • 2 tablespoons olive oil
  • 1 teaspoon ground coriander
  • 1/2 cup fresh orange juice
  • 4 cups water
  • Salt, to taste
  • Pepper, to taste
  • Fresh coriander, for garnish

Instructions

  1. In a deep pot, heat the olive oil over medium heat. Add the chopped onions and sauté until they are soft and translucent.
  2. Stir in the carrots, allowing them to cook and soften slightly, about 5 minutes.
  3. Add the water, salt, and pepper. Cover the pot and let it simmer until the carrots are fully cooked and tender, about 20-25 minutes.
  4. Stir in the orange juice and ground coriander, letting it cook for an additional 2 minutes to blend the flavors.
  5. Carefully puree the soup in a blender until smooth and creamy. Adjust seasoning if necessary.
  6. Garnish with fresh coriander and serve the soup hot.

Tips

  • For an extra creamy texture, add a splash of coconut milk or cream before blending.
  • Use fresh coriander for garnish to add a pop of color and fresh flavor.
  • Always be cautious when blending hot liquids; allow the soup to cool slightly before blending, and do it in batches if necessary.

Variations & Substitutions

  • Spicy Kick: Add a pinch of cayenne pepper or a dash of hot sauce for a spicy version.
  • Herbal Twist: Try adding thyme or rosemary for an herbal aroma.
  • Low-Carb Option: Substitute half of the carrots with cauliflower for a lower-carb alternative.

Storage

This soup stores wonderfully, making it a great make-ahead option. Allow the soup to cool completely before transferring it to an airtight container. It can be stored in the refrigerator for up to 5 days. For longer storage, freeze the soup for up to 3 months. When ready to enjoy, simply thaw and reheat gently on the stove.

FAQ

Can I use vegetable broth instead of water?

Absolutely! Using vegetable broth will add more depth of flavor to the soup. Just be mindful of the salt content, as broth can be saltier than water.

Is this soup vegan?

Yes, this carrot and coriander soup is naturally vegan as long as you use olive oil for sautéing the onions. It’s a delightful plant-based option that everyone can enjoy.

How can I thicken the soup if needed?

If you prefer a thicker consistency, you can add a small potato when cooking the carrots. The potato will blend into the soup, adding body and creaminess without altering the flavor.

Nutrition

This wholesome soup is low in calories and high in nutrients. Carrots are an excellent source of beta-carotene, fiber, vitamin K1, and antioxidants. The addition of orange juice provides a boost of vitamin C. Overall, it’s a heartwarming dish that’s both nutritious and delightful.

Conclusion

Carrot and coriander soup is a classic recipe that brings warmth and joy to any table. Whether you’re looking to recreate a nostalgic family recipe or simply want to enjoy a healthy, delicious meal, this soup is sure to become a favorite in your household. Gather your ingredients, follow the simple steps, and indulge in the comforting flavors of this delightful soup. Bon appétit!

Related update: Carrot and Coriander Soup

Related update: Asian Salmon Burgers With Tangy Ginger Lime Sauce

Related update: Mashed Potatoes with Garlic, Sage & Goat Cheese

Related update: Baked Scallops With Parma Ham

Vegan Strawberry Shortcake served with Vegan Whipped Cream | Made by Meaghan Moineau

Vegan Strawberry Shortcake Served with Vegan Whipped Cream

Introduction

There’s something magical about the first bite of a strawberry shortcake that transports me back to my grandmother’s kitchen. I remember those warm summer evenings when we would gather around the wooden table, eagerly awaiting her famous dessert. Her recipe was a family treasure, but as I’ve embraced a plant-based lifestyle, I’ve recreated this classic with a vegan twist. Today, I’m thrilled to share this Vegan Strawberry Shortcake recipe served with a luscious vegan whipped cream. It’s a dessert that captures the essence of summer and love in every bite.

Why You’ll Love It

This Vegan Strawberry Shortcake is not only a delightful treat for the taste buds but also a heartwarming nod to traditional desserts with a modern, plant-based spin. Here’s why you’ll love it:

  • Simple Ingredients: Made with pantry staples, this recipe is both accessible and economical.
  • Quick and Easy: With minimal prep and bake time, you can whip up this dessert in under an hour.
  • Perfectly Balanced: The sweetness of the strawberries and the lightness of the shortcake are perfectly complemented by the creamy, dreamy vegan whipped topping.
  • Family-Friendly: This is a dessert that everyone, regardless of dietary preferences, can enjoy together.

Ingredients

  • 1 cup flour
  • 1/2 cup almond meal
  • 1/4 cup turbinado sugar
  • 1 teaspoon baking soda
  • 1/4 teaspoon salt
  • 3/4 cup almond milk
  • 1 teaspoon apple cider vinegar
  • 1/4 cup vegetable oil
  • Tiny drop of almond extract
  • 1 pint fresh strawberries, sliced
  • Vegan whipped cream (store-bought or homemade)

Instructions

  1. Preheat your oven to 400 degrees F (200 degrees C).
  2. Add the sliced strawberries to a glass bowl and refrigerate until ready to use.
  3. In a medium-sized bowl, combine the flour, almond meal, baking soda, and salt. Mix well.
  4. In a small bowl, combine 1 teaspoon of water with the turbinado sugar, stirring slightly to help dissolve the sugar.
  5. In a large bowl, whisk together the almond milk, apple cider vinegar, vegetable oil, sugar mixture, and almond extract.
  6. Make a well in the center of the dry ingredients and gradually add the wet ingredients. Mix until just combined.
  7. Line two baking sheets with parchment paper.
  8. Drop the batter by generous tablespoons onto the sheets, spacing them a few inches apart. You should aim for 5 per baking sheet.
  9. Bake for 10-12 minutes, or until the shortcakes are just slightly golden.
  10. Allow the shortcakes to cool completely before slicing them in half with a serrated knife.
  11. Add a generous dollop of vegan whipped topping to the bottom half of each shortcake, followed by a spoonful of strawberries.
  12. Top with the remaining shortcake half, adding a bit more whipped topping and a few strawberries on top.
  13. Serve on individual dessert plates and enjoy!

Tips

  • Chill Your Tools: For an extra fluffy whipped topping, chill your mixing bowl and beaters in the freezer for about 10 minutes before whipping.
  • Use Fresh Strawberries: Fresh, ripe strawberries will yield the best flavor. Avoid using frozen strawberries as they can become mushy.
  • Don’t Overmix: When combining wet and dry ingredients, mix just until combined to ensure light and fluffy shortcakes.

Variations & Substitutions

This recipe is versatile and can be easily adapted to suit your preferences or dietary needs:

  • Replace almond milk with any other non-dairy milk, such as soy or oat milk.
  • Substitute almond meal with oat flour for a nut-free version.
  • For a citrus twist, add a teaspoon of lemon zest to the batter.
  • Experiment with different fruits such as blueberries or raspberries for a new flavor profile.

Storage

These shortcakes are best enjoyed fresh, but if you have leftovers, store them in an airtight container at room temperature for up to 2 days. Assemble with the whipped topping and strawberries just before serving to maintain their texture and freshness. The vegan whipped cream can be stored in the refrigerator for up to 3 days.

FAQ

Can I make the shortcakes gluten-free?

Yes, you can substitute the all-purpose flour with a gluten-free flour blend. Ensure the blend contains xanthan gum to help mimic the texture of traditional flour.

What can I use instead of turbinado sugar?

If turbinado sugar is not available, you can use coconut sugar or light brown sugar as a substitute. Both will provide a similar flavor and texture.

How can I make homemade vegan whipped cream?

To make homemade vegan whipped cream, chill a can of full-fat coconut milk overnight. Scoop out the solid cream and whip it with a little powdered sugar and vanilla extract until fluffy.

Nutrition

Each serving of Vegan Strawberry Shortcake contains approximately:

  • Calories: 250
  • Fat: 12g
  • Carbohydrates: 32g
  • Protein: 4g
  • Fiber: 3g
  • Sugar: 14g

Conclusion

Whether you’re a seasoned vegan or simply looking to explore plant-based desserts, this Vegan Strawberry Shortcake is sure to delight. With its light and airy texture, juicy strawberries, and creamy topping, it’s a recipe that embodies the joy of summer. Gather your loved ones, share a slice, and create new sweet memories that will last a lifetime. Enjoy!

Related update: Vegan Strawberry Shortcake served with Vegan Whipped Cream

Related update: Baked Caramel Custard

Pear and Pesto Crostini | Made by Meaghan Moineau

Pear and Pesto Crostini

Intro

There’s something magical about the combination of pear and pesto that instantly transports me back to my grandmother’s kitchen. I remember sitting at her rustic wooden table, eagerly watching as she prepared a variety of appetizers for our family gatherings. The distinct aroma of fresh basil and the nutty scent of roasted pine nuts would fill the air, creating an inviting atmosphere that welcomed everyone. Among all her creations, the Pear and Pesto Crostini stood out, a perfect blend of savory and sweet, crispy and creamy. Today, I’m excited to share this cherished family recipe with you.

Why You’ll Love It

This Pear and Pesto Crostini is not just a delightful appetizer; it’s a conversation starter. The crispiness of the French bread, the fragrant and nutty pesto, paired with the tender sweetness of the bosc pear, make for a symphony of flavors and textures in every bite. It’s elegant enough for a holiday party, yet simple enough to whip up for a casual weekend snack. Plus, it’s a great way to impress your guests with minimal effort!

Ingredients

  • French bread
  • Fresh basil leaves
  • 1 garlic clove
  • Pine nuts
  • Pecorino Romano cheese
  • Your best olive oil
  • Salt and pepper to taste
  • 1 Bosc pear

Instructions

  1. Preheat your oven to 400 degrees Fahrenheit.
  2. Slice the French loaf into 1/2-inch-thick slices.
  3. Brush or spray the slices with olive oil and place them on a baking sheet.
  4. Toast the bread in the oven for 10-15 minutes, or until the edges are a deep golden brown. Remove from the oven and set aside.
  5. While the bread is toasting, make your pesto. In a food processor, combine basil leaves, garlic clove, pine nuts, and Pecorino Romano cheese. Pulse until the mixture is coarse in texture, resembling coarse sand.
  6. Add in the olive oil and process until fully incorporated. Taste and adjust with salt and pepper if needed.
  7. Scrape the pesto into a serving bowl or dish and set aside. You should have about 3/4 cup of pesto.
  8. Slice the Bosc pear thinly, and when ready to serve, top each toasted bread slice with a generous spread of pesto and a slice of pear.

Tips

  • For the best results, use high-quality olive oil, as it significantly enhances the flavor of the pesto.
  • To prevent your pears from browning, you can toss them with a little lemon juice before placing them on the crostini.
  • If you’re making these for a party, you can prepare the components ahead of time and assemble just before serving.

Variations & Substitutions

If you’re in the mood for a twist, consider swapping the Pecorino Romano for Parmesan cheese, which offers a slightly milder taste. You can also experiment with different nuts — walnuts or almonds can be a delightful substitute for pine nuts. For a touch of sweetness, drizzle a bit of honey over the top right before serving. Lastly, if pears are out of season, feel free to use apples or figs as an alternative fruit topping.

Storage

If you have leftovers (though they tend to disappear quickly!), store the components separately. Keep the toasted bread in an airtight container at room temperature for up to two days. The pesto can be stored in the refrigerator for up to a week. Just give it a stir before using it again. Unfortunately, sliced pears do not store well, so it’s best to slice them fresh as needed.

FAQ

Can I make the pesto in advance?

Yes, absolutely! The pesto can be made up to a week in advance and stored in an airtight container in the refrigerator. Just give it a good stir before using it, as the oil may separate over time.

What type of bread works best for crostini?

French bread is a classic choice due to its crusty exterior and soft interior, which toasts up perfectly. However, a baguette or ciabatta can also be used if you prefer a slightly different texture.

Is there a nut-free version of this recipe?

Definitely! You can omit the pine nuts entirely from the pesto, or substitute them with sunflower seeds for a nut-free version. The pesto will still be deliciously flavorful!

Nutrition

While I don’t have the exact nutritional breakdown, this appetizer is fairly light, especially if you’re mindful of the amount of olive oil used. The pears add a natural sweetness and a dose of fiber, while the pesto offers healthy fats from the olive oil and pine nuts. It’s a wonderful choice for those looking to indulge without guilt.

Conclusion

Whether you’re hosting a dinner party or looking for a delicious way to enjoy a quiet evening at home, this Pear and Pesto Crostini will not disappoint. It’s a testament to the power of simple, high-quality ingredients coming together to create something truly special. I hope this recipe brings as much joy to your table as it has to mine over the years. Enjoy every bite!

Related update: Pear and Pesto Crostini

Related update: Rustic Brie Toasts with Wild Mushroom, Cranberry and Shallot

Caramelised Onion and Mushroom Quiche | Made by Meaghan Moineau

Caramelised Onion and Mushroom Quiche

Intro

As the autumn leaves began to fall and the air turned crisp, my grandmother would always bake her famous Caramelised Onion and Mushroom Quiche. The aroma of caramelized onions and earthy mushrooms wafting through the house signaled the start of cozy family gatherings. This quiche was more than just a dish; it was a tradition, a warm embrace on a chilly day. Today, I’m excited to share this beloved recipe with you, hoping it brings as much warmth and joy to your home as it has to mine.

Why You’ll Love It

This Caramelised Onion and Mushroom Quiche is a delightful blend of rich flavors and textures. The sweetness of the caramelized onions complements the savory mushrooms, all enveloped in a creamy, cheesy filling. It’s the perfect dish for brunch, a light lunch, or a comforting dinner. Not only is it delicious, but it’s also incredibly easy to make, making it a great choice for both novice cooks and seasoned chefs alike.

Ingredients

  • One nine-inch pie shell
  • 2 tablespoons olive oil
  • 2 large white onions, thinly sliced
  • 2 cloves garlic, minced
  • 1/2 teaspoon dried chilli flakes
  • 8 ounces mushrooms, sliced
  • 1 teaspoon dried thyme
  • 3 large eggs
  • 1 cup half and half cream
  • 1 cup grated havarti cheese
  • Salt and pepper to taste

Instructions

  1. Preheat your oven to 400°F (200°C). Dock the pie shell with a fork and bake for 10 to 15 minutes until it is lightly golden.
  2. While the pie shell is baking, heat the olive oil in a large skillet over high heat. Add the onions, garlic, and chilli flakes. Cook until the onions are caramelized, about ten minutes.
  3. Add the mushrooms to the skillet and continue to cook on high until the mushrooms are also caramelized, about five minutes.
  4. Remove the skillet from the heat and stir in the thyme, salt, and pepper. Set aside to cool slightly.
  5. In a large bowl, beat the eggs together with the cream and half of the grated cheese.
  6. Stir the onion and mushroom mixture into the egg mixture and mix well.
  7. Place the pre-baked pie shell on a cookie tray to catch any potential overflow. Pour the filling into the pie shell.
  8. Sprinkle the remaining cheese on top of the filling.
  9. Reduce the oven temperature to 375°F (190°C) and bake the quiche until the filling is set and the top is golden, about 25-30 minutes.
  10. Allow the quiche to cool for a few minutes before serving. Enjoy it warm from the oven.

Tips

To ensure your quiche bakes evenly, consider using a pie crust shield or tin foil to protect the edges from over-browning. Allow the quiche to cool slightly before slicing to help it set completely. Pair it with a simple green salad or a warm cup of soup for a complete meal.

Variations & Substitutions

Feel free to experiment with this recipe by adding your favorite vegetables such as spinach or bell peppers. For a different flavor profile, swap out the havarti cheese with gruyère or cheddar. If you prefer a spicier dish, increase the amount of chilli flakes or add a dash of hot sauce to the egg mixture.

Storage

Store any leftover quiche in an airtight container in the refrigerator for up to three days. To reheat, place slices in a preheated oven at 350°F (175°C) until warmed through. You can also freeze the quiche for up to a month. Be sure to wrap it tightly in plastic wrap and foil before freezing.

FAQ

Can I use a homemade pie crust?

Absolutely! A homemade pie crust can add an extra layer of flavor and flakiness. Just be sure to blind bake it as instructed to prevent a soggy bottom.

Can I make this quiche ahead of time?

Yes, this quiche can be made a day ahead. Simply prepare and bake it as directed, then store it in the refrigerator. Reheat in the oven before serving for a fresh-from-the-oven taste.

Is this quiche gluten-free?

To make this quiche gluten-free, substitute the regular pie shell with a gluten-free pie crust. Ensure all other ingredients are certified gluten-free as well.

Nutrition

This quiche is a good source of protein and calcium, thanks to the eggs and cheese. It contains approximately 300 calories per serving, making it a satisfying yet moderate choice. For a lighter version, consider using milk instead of half and half cream and reducing the cheese by half.

Conclusion

Whether you’re hosting a brunch or seeking a comforting meal on a chilly evening, this Caramelised Onion and Mushroom Quiche is sure to delight. The combination of caramelized onions and mushrooms, nestled in a creamy, cheesy filling, is both comforting and indulgent. I hope this recipe becomes a cherished favorite in your home, just as it is in mine. Happy cooking!

Related update: Caramelised Onion and Mushroom Quiche

Asparagus and Pea Soup: Real Convenience Food | Made by Meaghan Moineau

Asparagus and Pea Soup: Real Convenience Food

Intro

Growing up, one of my fondest memories was gathering around the kitchen table with my family for a bowl of my grandmother’s homemade soup. The aroma of fresh vegetables simmering on the stove was a comforting promise of warmth and nourishment. Fast forward to today, I find myself reaching for those same comforts, but with the ease and simplicity that modern life demands. This Asparagus and Pea Soup is the perfect blend of nostalgia and convenience. It’s a recipe that brings back those cherished memories while fitting seamlessly into a busy lifestyle.

Why You’ll Love It

This Asparagus and Pea Soup is not just a treat for your taste buds but also a boon for your schedule. It’s quick to prepare, requiring minimal ingredients and time, yet it’s packed with flavor and nutrition. Whether you’re looking for a light lunch, a starter for a dinner party, or a comforting evening meal, this soup fits the bill. The vibrant color and fresh taste make it a dish you’ll return to time and again.

Ingredients

  • 1 bag of frozen asparagus
  • 2 tablespoons extra virgin olive oil (EVOO)
  • 2 cloves of garlic, chopped
  • 1 onion, chopped
  • 1 cup frozen peas
  • 4 cups low sodium vegetable broth
  • Salt and pepper to taste
  • Pinch of red pepper flakes (optional)
  • Chives, for garnish
  • Creme fraiche, sour cream, or Greek yogurt, for serving

Instructions

  1. Chop the garlic and onions.
  2. In a large pot, heat the EVOO over medium heat. Add the chopped onions and sauté for a few minutes until they start to become translucent.
  3. Add the garlic to the pot and continue to cook for another couple of minutes.
  4. Add the whole bag of frozen asparagus to the pot and pour in the vegetable broth until everything is covered.
  5. Season with salt, pepper, and a pinch of red pepper flakes if you’re using them.
  6. Simmer the mixture until the asparagus is bright green and tender. If the asparagus is thawed, this will only take a couple of minutes.
  7. Turn off the heat and use an immersion blender to puree the soup until smooth.
  8. Add the frozen peas to the soup. The residual heat will thaw them quickly. Puree again until the soup reaches your desired thickness.
  9. Serve hot, topped with chives and a dollop of creme fraiche, sour cream, or Greek yogurt.

Tips

To ensure the best flavor, be sure not to overcook the asparagus. As soon as it turns bright green and tender, it’s ready to be blended. If you don’t have an immersion blender, you can carefully transfer the soup to a regular blender in batches. Just be sure to let it cool slightly before blending to avoid any accidents.

Variations & Substitutions

Feel free to experiment with this recipe by adding other green vegetables such as spinach or kale. If you prefer a richer taste, substitute a portion of the vegetable broth with coconut milk or cream. For a more robust flavor, try roasting the asparagus before adding it to the soup. You can also add a handful of fresh herbs like basil or mint for an extra burst of flavor.

Storage

This soup stores beautifully, making it ideal for meal prep. Store any leftovers in an airtight container in the refrigerator for up to three days. For longer storage, freeze the soup in individual portions for up to three months. When ready to eat, thaw in the refrigerator overnight and reheat on the stove.

FAQ

Can I use fresh asparagus instead of frozen?

Absolutely! Fresh asparagus will work wonderfully in this recipe. Just be sure to trim the ends and cut them into smaller pieces before adding them to the pot. The cooking time may be slightly reduced, so keep an eye on the color and tenderness of the asparagus.

Is there a way to make this soup vegan?

Yes, this soup is naturally vegan as long as you choose to garnish it with a plant-based option like coconut yogurt or a drizzle of olive oil instead of creme fraiche or sour cream.

What can I serve with this soup?

This soup pairs well with crusty bread or a simple side salad. If you’re looking for something more substantial, try serving it with a grilled cheese sandwich or a quinoa salad.

Nutrition

This Asparagus and Pea Soup is a nutritious choice, providing a good source of fiber, vitamins A and C from the asparagus, and protein from the peas. The vegetable broth keeps it light and low in calories, while the optional toppings add a touch of indulgence without going overboard.

Conclusion

With its vibrant color and refreshing taste, Asparagus and Pea Soup is a delightful way to enjoy the flavors of spring year-round. Whether you’re reminiscing about comforting family meals or creating new traditions of your own, this recipe is sure to find a place in your culinary repertoire. So grab that bag of frozen asparagus and get ready to savor simplicity at its finest. Enjoy!

Related update: Asparagus and Pea Soup: Real Convenience Food

Related update: Pear and Pesto Crostini

Related update: Carrot and Coriander Soup

Harvest Hash | Made by Meaghan Moineau

Harvest Hash: A Cozy Fall Recipe

Intro

Autumn is a season that evokes a sense of warmth, comfort, and nostalgia. For me, it means gathering around the family table, sharing stories, and indulging in hearty dishes that capture the essence of fall. One of my favorite recipes during this time of year is Harvest Hash. This dish is a delightful medley of sweet potatoes, crispy bacon, caramelized onions, and honeyed apples—all roasted to perfection. I remember my grandmother preparing this dish in her cozy kitchen, the aroma filling the house and signaling that it was time to settle in for a delicious meal. Now, I’m excited to share this recipe with you, adding a modern twist to a cherished family tradition.

Why You’ll Love It

Harvest Hash is not just a meal; it’s a celebration of fall flavors. Whether you’re hosting a family dinner, looking for a festive side dish, or simply craving comfort food, this recipe is sure to impress. Here’s why you’ll love it:

  • Easy to Make: With simple ingredients and straightforward instructions, even novice cooks can master this dish.
  • Flavorful: The combination of sweet, savory, and smoky flavors creates a symphony in every bite.
  • Versatile: Enjoy it as a side dish, a main course, or add it to your brunch spread.
  • Nutritious: Packed with vitamins and minerals, it’s a healthy addition to your fall menu.

Ingredients

  • 2 medium sweet potatoes, peeled and diced
  • 4 slices of bacon, chopped
  • 1 red onion, diced
  • 2 honeycrisp apples, cored and diced
  • 3 tablespoons extra virgin olive oil (EVOO)
  • 1 teaspoon kosher salt

Instructions

  1. Preheat your oven to 400°F (200°C).
  2. In a large bowl, add the diced sweet potatoes. Drizzle with 2 tablespoons of EVOO and sprinkle with kosher salt. Toss to coat evenly.
  3. Spread the sweet potatoes on a baking sheet in a single layer. Roast in the oven until tender but not mushy, about 10-15 minutes. Remove from the oven and set aside.
  4. In a large frying pan, heat 1 tablespoon of EVOO over medium heat. Add the chopped bacon and cook until it starts to get crisp, about 5 minutes.
  5. Add the diced onion to the pan with the bacon. Sauté until the onions are soft and tender, approximately 5 minutes.
  6. Add the diced apples to the pan and cook for an additional 3-4 minutes, stirring occasionally.
  7. Stir in the roasted sweet potatoes. Cook everything together until the sweet potatoes start to get a little crisp around the edges, about 6-8 minutes.
  8. Serve immediately, perhaps alongside a juicy ham steak, and enjoy all the flavors of fall!

Tips

  • Uniform Cuts: Make sure to dice the sweet potatoes and apples evenly to ensure they cook at the same rate.
  • Crispy Bacon: For extra crispy bacon, cook it separately and sprinkle on top just before serving.
  • Adjust Seasoning: Taste as you go and adjust the seasoning to suit your preference. A pinch of cinnamon can enhance the fall flavors.

Variations & Substitutions

This recipe is versatile and can be adapted to suit different tastes and dietary needs:

  • Vegetarian: Omit the bacon and add nuts like pecans or walnuts for a crunchy texture.
  • Spicy Twist: Add a dash of cayenne pepper or crushed red pepper flakes for some heat.
  • Different Apples: Try using Granny Smith or Fuji apples for a different flavor profile.

Storage

Store any leftovers in an airtight container in the refrigerator for up to 3 days. Reheat gently on the stovetop or in the microwave before serving. Unfortunately, this dish doesn’t freeze well due to the texture changes in potatoes and apples.

FAQ

Can I make this recipe ahead of time?

Yes, you can prepare the components separately in advance. Roast the sweet potatoes and cook the bacon mixture, then combine and reheat everything just before serving.

What can I serve with Harvest Hash?

Harvest Hash pairs beautifully with roasted meats like chicken, pork, or ham. It also works well as part of a brunch spread alongside eggs and a fresh salad.

Is there a way to make this dish healthier?

To reduce fat content, you can use turkey bacon instead of regular bacon and cut back on the olive oil. Adding more vegetables like Brussels sprouts or kale can also boost the nutritional value.

Nutrition

This dish is a great source of vitamins A and C, fiber, and healthy fats. Sweet potatoes provide complex carbohydrates, while apples add natural sweetness and additional fiber. If you’re watching your sodium intake, adjust the amount of kosher salt used.

Conclusion

Harvest Hash is more than just a dish—it’s a comforting embrace of fall flavors that brings warmth and joy to your table. Whether you’re sharing it with loved ones or savoring it on a quiet evening, this recipe is sure to become a favorite in your autumn repertoire. I hope this dish brings as much joy and nostalgia to your home as it has to mine. Happy cooking!

Related update: Harvest Hash

Related update: Caramelised Onion and Mushroom Quiche

Huli-Huli Chicken | Made by Meaghan Moineau

Deliciously Tangy Huli-Huli Chicken Recipe

Introduction

There’s a certain kind of magic in the air as the sweet and savory aroma of Huli-Huli Chicken wafts through the backyard. This Hawaiian classic brings back fond memories of family gatherings and warm summer evenings spent under the stars. I remember my grandmother flipping chicken on the grill, her laughter mingling with the sizzle of meat. She always had a way of turning simple ingredients into unforgettable meals. Today, I’m thrilled to share this cherished recipe with you, so you can create your own memories over a plate of delicious Huli-Huli Chicken.

Why You’ll Love It

This Huli-Huli Chicken recipe is a delightful blend of flavors that will transport you straight to the Hawaiian islands. Here’s why you’ll fall head over heels for this dish:

  • Authentic Taste: The combination of sweet, tangy, and savory flavors creates an irresistible taste that’s true to its Hawaiian roots.
  • Easy to Prepare: With a few simple steps and ingredients, you’ll have a dinner that’s both impressive and effortless.
  • Perfect for Grilling: This recipe is ideal for a barbecue, adding a tropical twist to your cookout.
  • Family-Friendly: Both kids and adults will love the flavor of this chicken, making it a great choice for family meals.

Ingredients

  • 8 chicken drumsticks
  • 4 chicken thighs
  • 4 cloves garlic, smashed
  • 1 piece ginger root, smashed
  • 3 tablespoons kosher salt
  • 1 pineapple, sliced

Instructions

  1. Prepare the Brine: In a large bowl, mix together water, sugar, salt, garlic, ginger, and thyme to create the brine.
  2. Marinate the Chicken: Place the chicken drumsticks and thighs into a large resealable bag and pour the brine over them. Seal the bag and refrigerate for at least 1 hour, but not more than 4 hours.
  3. Make the Sauce: Combine the sauce ingredients in a saucepan, stir, and simmer until the sauce thickens. Strain off the sauce into a bowl and set aside.
  4. Grill the Chicken: Remove the chicken from the brine and grill over medium heat until the skin is medium brown and the chicken is cooked through to the bone.
  5. Grill the Pineapple: Place the pineapple slices on the grill alongside the chicken.
  6. Baste and Serve: Lightly baste the chicken and pineapple with the sauce. Turn and baste 2-3 times every 2-3 minutes. Remove from the grill and serve hot.

Tips

For the best Huli-Huli Chicken, keep these tips in mind:

  • Don’t Over-Marinate: While marinating is key to infusing flavor, leaving the chicken in the brine for too long can make it too salty.
  • Keep the Grill Hot: Maintaining a consistent grill temperature ensures the chicken cooks evenly without drying out.
  • Baste Frequently: Regular basting with the sauce adds layers of flavor and keeps the chicken moist.

Variations & Substitutions

Feel free to make this recipe your own with these variations:

  • Use Different Cuts: While drumsticks and thighs are traditional, you can use chicken breasts or wings if preferred.
  • Spice it Up: Add a pinch of cayenne pepper or some chili flakes to the sauce for a spicier kick.
  • Try Different Fruits: If pineapple isn’t your favorite, try grilling mango or peaches for a different fruity flavor.

Storage

If you have leftovers, store them in an airtight container in the refrigerator for up to 3 days. To reheat, place the chicken in an oven-safe dish and warm it in the oven at 350°F until heated through. Avoid microwaving to prevent the chicken from becoming rubbery.

FAQ

Can I make this recipe without a grill?

Absolutely! You can achieve similar results using a grill pan on your stovetop. Sear the chicken on high heat to get a nice char, then finish cooking in a preheated oven at 375°F.

What should I serve with Huli-Huli Chicken?

This dish pairs beautifully with steamed rice, a fresh green salad, or coleslaw. You could also serve it with grilled vegetables for a well-rounded meal.

Can I prepare the sauce in advance?

Yes, you can make the sauce a day ahead and store it in the refrigerator. Just reheat it gently on the stove before basting the chicken and pineapple.

Nutrition

While exact nutritional values will vary based on portion sizes and specific ingredients used, Huli-Huli Chicken is generally a good source of protein and contains vitamins from the pineapple. For those monitoring their intake, consider using low-sodium soy sauce to reduce salt content.

Conclusion

Huli-Huli Chicken is more than just a meal; it’s a celebration of flavors and traditions that bring people together. Whether you’re hosting a summer barbecue or simply looking to add a little aloha spirit to your dinner table, this recipe is sure to delight. I hope you enjoy making and sharing this dish as much as I have over the years. Mahalo for joining me on this culinary journey!

Related update: Huli-Huli Chicken

Related update: Harvest Hash

Traditional Panzanella | Made by Meaghan Moineau

Traditional Panzanella: A Taste of Tuscan Summer

Intro

Ah, Panzanella! This delightful Tuscan salad offers a bite of sun-drenched summer days and leisurely family gatherings. My first encounter with this classic dish was at my grandmother’s kitchen table in Italy, where every meal was an event, and every dish told a story. As a child, I eagerly watched her transform day-old bread and the ripest tomatoes from her garden into a flavorful masterpiece. The aroma of fresh basil mingling with olive oil and vinegar still transports me back to those cherished summer afternoons. Now, I invite you to experience the simple joys and deep flavors of this traditional Panzanella recipe, a dish that captures the essence of Tuscany in every bite.

Why You’ll Love It

Why will you love this Traditional Panzanella? Let me count the ways:

  • Simple Ingredients: This recipe calls for just a handful of ingredients, most of which you may already have in your pantry.
  • Quick and Easy: With minimal preparation and no cooking required, it’s a perfect dish for busy days.
  • Refreshing and Flavorful: The combination of juicy tomatoes, fragrant basil, and tangy vinegar is refreshing and full of flavor.
  • Sustainable: It’s a great way to use up day-old bread, preventing waste and creating something delicious.
  • Versatile: Easily adaptable to suit your taste preferences or dietary needs.

Ingredients

  • 6 slices of day-old Tuscan bread
  • 1/4 cup extra virgin olive oil
  • 1 cup fresh basil leaves, chopped
  • 1 red onion, thinly sliced
  • 2 tablespoons red wine vinegar
  • Salt and pepper, to taste
  • 4 ripe tomatoes, diced

Instructions

  1. In a large bowl, combine the bread with enough water to cover and let it stand for at least 20 minutes or until it’s soft.
  2. Drain the bread and squeeze out as much water as you can. Crumble the bread into a serving bowl.
  3. Scatter the diced tomatoes, sliced onions, and chopped basil over the crumbled bread.
  4. Dress the Panzanella with extra virgin olive oil and red wine vinegar. Season with salt and pepper and toss well to combine.
  5. Taste and adjust the seasoning with more olive oil, salt, or vinegar as needed.
  6. Leave the Panzanella to stand for about 15 minutes to allow the flavors to meld. Serve at room temperature.

Tips

For the best Panzanella, use high-quality ingredients. Opt for the freshest tomatoes you can find, and don’t skimp on the olive oil—it’s integral to the salad’s flavor. If your bread is very hard, allow it to soak a bit longer until it’s sufficiently softened. Lastly, Panzanella is best when served at room temperature, allowing the flavors to fully develop.

Variations & Substitutions

Panzanella is a wonderfully adaptable dish. Here are a few ideas to make it your own:

  • Add Protein: For a heartier salad, add some fresh mozzarella, grilled chicken, or canned tuna.
  • Vegetable Variations: Include cucumbers, bell peppers, or even olives for added crunch and flavor.
  • Herb Alternatives: If basil isn’t your favorite, try parsley or mint for a different herbal note.
  • Different Breads: While traditional Panzanella uses Tuscan bread, any crusty bread like ciabatta or a baguette will work.

Storage

Panzanella is best enjoyed fresh, but if you have leftovers, store them in an airtight container in the refrigerator for up to one day. Keep in mind that the bread will continue to absorb moisture and flavors, so you may need to refresh the salad with a bit more olive oil or vinegar before serving.

FAQ

Can I use fresh bread instead of day-old bread?

While you can use fresh bread, day-old or slightly stale bread is preferred as it holds up better to the dressing and maintains a pleasant texture. If using fresh bread, you might consider toasting it lightly first.

Can I make Panzanella ahead of time?

Panzanella is best made shortly before serving, as this allows the bread to soak up the flavors without becoming too soggy. However, you can prepare the vegetables and dressing a few hours in advance and combine them with the bread just before serving.

What kind of vinegar should I use?

Red wine vinegar is traditional for Panzanella, lending a tangy depth to the dish. However, feel free to experiment with other vinegars like balsamic or apple cider for a unique twist.

Nutrition

This traditional Panzanella is a nutritious addition to any meal. Rich in vitamins A and C from the tomatoes and basil, and healthy fats from the olive oil, it’s a wholesome and satisfying choice. The dish is naturally vegan and can be gluten-free if made with gluten-free bread.

Conclusion

Traditional Panzanella is more than just a salad; it’s a celebration of summer flavors and culinary heritage. With its simple preparation and fresh, vibrant ingredients, it’s no wonder this dish has been cherished across generations. Whether you’re hosting a garden party or enjoying a quiet family dinner, Panzanella brings a touch of Tuscany to your table. I hope this recipe finds a special place in your home, creating new memories as it has for me. Buon appetito!

Related update: Traditional Panzanella

Related update: Avocado Chicken Salad

Valentine Hearts | Made by Meaghan Moineau

Valentine Hearts: A Sweet Treat for Your Loved Ones

Intro

Every Valentine’s Day, my grandmother would bake a special treat that filled the house with the aroma of love and sweetness. As a child, I would watch her gracefully craft heart-shaped pastries, her hands moving with a rhythm that spoke of years of experience and love. Inspired by her legacy, I’ve created my own version of this beloved dessert: Valentine Hearts. These delightful puff pastries, filled with crème fraiche and fresh strawberries, are perfect for sharing with your loved ones. Join me as we bring a touch of nostalgia and romance to your kitchen with this simple yet elegant recipe.

Why You’ll Love It

Valentine Hearts are a beautiful and delicious way to show someone you care. Not only are they visually stunning, but they also combine the flaky, buttery goodness of puff pastry with the creamy richness of crème fraiche and the natural sweetness of strawberries. This dessert is perfect for any occasion where you want to impress with minimal effort. Plus, the aroma of these pastries baking in your oven will fill your home with warmth and love.

Ingredients

  • Puff pastry
  • 1 egg, beaten for glaze
  • Castor sugar
  • Canned crème fraiche
  • Fresh strawberries
  • Plain chocolate

Instructions

  1. Preheat your oven to 220 degrees C (425 F).
  2. Thaw the puff pastry sheet according to the instructions on the box.
  3. Unroll the pastry sheet and cut out around 8 hearts using a heart-shaped cookie cutter.
  4. Prick each heart with a fork, brush with beaten egg, and sprinkle lightly with some castor sugar.
  5. Place these hearts on a greased baking sheet and bake for about 10 minutes until they are risen and golden brown.
  6. Let the pastry hearts cool completely.
  7. Slice the strawberries and split the cooled hearts horizontally using a sharp knife.
  8. Sandwich the heart halves together with crème fraiche and sliced strawberries.
  9. Drizzle melted plain chocolate over the tops and dust with a bit more castor sugar.

Tips

For the best results, ensure the puff pastry is well-chilled before cutting and baking. This helps them puff up beautifully. When slicing the hearts, use a very sharp knife to prevent crumbling. If you’re preparing these ahead of time, keep the components separate and assemble just before serving to maintain the pastry’s crispness.

Variations & Substitutions

If crème fraiche isn’t available, you can substitute it with whipped cream or mascarpone cheese for a similar texture and taste. For a fruity twist, consider adding raspberries or blueberries to the strawberry filling. If you prefer a different kind of chocolate, white chocolate can be a delightful alternative for drizzling.

Storage

Valentine Hearts are best enjoyed fresh on the day they are made. However, if you have leftovers, store them in an airtight container in the refrigerator for up to two days. Keep the pastry and filling separate if possible, and assemble just before serving to preserve the texture.

FAQ

Can I make the pastry hearts in advance?

Yes, you can bake the pastry hearts a day in advance. Store them in an airtight container at room temperature and assemble them with the filling just before serving.

What if I don’t have a heart-shaped cookie cutter?

No worries! You can easily create a heart shape by cutting the pastry into squares and trimming the top corners to form a heart. Alternatively, you can use any other shape cutter you have on hand.

Can I use frozen strawberries instead of fresh ones?

While fresh strawberries are recommended for their texture and flavor, you can use thawed frozen strawberries in a pinch. Just be sure to drain any excess liquid to avoid soggy pastries.

Nutrition

This dessert is meant to be a treat, so indulge in moderation. The combination of puff pastry, crème fraiche, and chocolate provides a rich and satisfying flavor profile, while the strawberries add a fresh and nutritious element. Remember, the joy of sharing these with loved ones is as wholesome as the ingredients themselves.

Conclusion

Valentine Hearts are more than just a dessert; they are a symbol of love and thoughtfulness. Whether you’re sharing them with a romantic partner, family, or friends, these sweet treats are sure to make any occasion special. The simplicity of the recipe allows you to focus on the joy of baking and sharing, creating memories that will last long after the last crumb is gone. So preheat your oven, gather your ingredients, and let the love-filled aroma of Valentine Hearts fill your home. Happy Valentine’s Day!

Related update: Valentine Hearts

Related update: Vegan Strawberry Shortcake served with Vegan Whipped Cream

Gluten Free Quinoa and Corn Flour Crepes | Made by Meaghan Moineau

Gluten Free Quinoa and Corn Flour Crepes

Intro

Crepes have always held a special place in my heart. Growing up, Sundays were reserved for family brunches where my grandmother would whip up her famous crepes. We would gather around the kitchen, eagerly waiting for our turn to enjoy those golden, delicate pancakes. As I grew older and my dietary needs changed, I sought to recreate those cherished moments with a gluten-free twist. Enter the Gluten Free Quinoa and Corn Flour Crepes, a modern take on a timeless classic. These crepes are not only a nod to my past but also a delicious new memory in the making.

Why You’ll Love It

Our Gluten Free Quinoa and Corn Flour Crepes are a delightful blend of tradition and innovation. Here’s why you’ll fall head over heels for them:

  • Gluten-Free Goodness: Made with quinoa and corn flour, these crepes cater to those with gluten sensitivities without compromising on taste or texture.
  • Nutrient-Rich: Packed with proteins and fiber, they make for a wholesome breakfast or snack.
  • Versatile: Fill them with sweet or savory fillings, and they become the perfect canvas for any meal.
  • Easy to Make: With simple ingredients and straightforward steps, they’re perfect for beginner cooks and seasoned chefs alike.

Ingredients

  • 2 tablespoons virgin coconut oil, melted
  • 1 cup corn flour
  • 2 tablespoons ground flax seeds
  • 1 tablespoon maple syrup
  • 1 cup quinoa flour
  • 2 1/2 cups hemp milk, plus more if needed
  • 1/2 teaspoon sea salt
  • 1/4 cup tapioca flour
  • 1/4 teaspoon xanthan gum

Instructions

  1. Whisk the corn flour, quinoa flour, tapioca flour, sea salt, and xanthan gum together in a large bowl.
  2. In a separate bowl, mix the hemp milk, ground flax seeds, maple syrup, and melted coconut oil.
  3. Combine the wet ingredients with the dry ingredients, mixing gently. If the batter is too thick, add more hemp milk, a few tablespoons at a time, until you achieve a pourable consistency.
  4. Allow the batter to rest in the refrigerator for at least 30 minutes. This step is crucial for the dry ingredients to fully absorb the liquids, ensuring smooth and pliable crepes.
  5. Heat a nonstick skillet over medium heat and add a small amount of coconut oil.
  6. Pour about 1/2 cup of batter into the skillet, swirling the pan to spread the batter into a thin layer. Quickly fill any holes with additional batter.
  7. Cook until the top of the crepe looks dry, about 1 minute. Gently loosen the edges with a spatula and flip the crepe, cooking the other side for 30 to 60 seconds.
  8. Transfer the cooked crepe to a plate and keep warm. You can fill the crepe while it’s still in the pan with your choice of fillings.
  9. Repeat the process, adding more coconut oil as needed, until all the batter is used.

Tips

  • Rest the Batter: Allowing the batter to rest is key. This helps to achieve the right texture and prevents the crepes from breaking.
  • Adjust Consistency: The batter should be thin enough to spread easily. Don’t hesitate to add more hemp milk if needed.
  • Perfect Flip: Practice makes perfect! Use your fingers or a spatula to flip the crepes gently.

Variations & Substitutions

  • Flour Alternatives: If you don’t have quinoa flour, you can substitute it with almond flour or buckwheat flour for a different flavor profile.
  • Filling Ideas: Enjoy them with nut butter and bananas for a sweet treat, or try smoked salmon and cream cheese for a savory option.
  • Milk Options: Substitute hemp milk with almond milk or coconut milk for a different taste.

Storage

To store leftover crepes, place them in an airtight container, separating each crepe with parchment paper to prevent sticking. They can be refrigerated for up to three days. To reheat, simply warm them in a skillet over low heat until heated through.

FAQ

Can I make the batter ahead of time?

Yes, you can prepare the batter up to a day in advance. Store it in the refrigerator and give it a good stir before using. You may need to adjust the consistency with a little more hemp milk if it’s thickened overnight.

What if my crepes keep sticking to the pan?

Ensure your skillet is well-heated and use a good nonstick pan. Adding a small amount of coconut oil before each crepe can also help prevent sticking.

Nutrition

Each serving of these gluten-free crepes is not only delicious but also packed with nutrients. You’ll find a good source of protein, fiber, and healthy fats, making them a balanced choice for any meal.

Conclusion

Whether you’re reminiscing about cherished family gatherings or creating new traditions, these Gluten Free Quinoa and Corn Flour Crepes are a delightful addition to any meal. With their delicate texture and versatile nature, they’ll quickly become a staple in your kitchen. So go ahead, give them a try and watch as they bring joy to your table, one crepe at a time.

Related update: Gluten Free Quinoa and Corn Flour Crepes

Related update: Spicy Coconut French Toast

OREO Cookie Balls – Snowman | Made by Meaghan Moineau

OREO Cookie Balls – Snowman

Intro

As the first snowflakes start to fall, there’s a certain magic that fills the air. Growing up, my siblings and I would rush outside, our noses turning rosy as we built snowmen in the front yard. Those chilly afternoons always ended with us huddled around the kitchen table, indulging in sweet treats that our mom had prepared. One of our favorite snowy day indulgences was her OREO Cookie Balls—transformed into adorable snowmen. These delightful bites encapsulate the joy of winter and the warmth of family gatherings.

Why You’ll Love It

These OREO Cookie Balls are the perfect combination of rich, chocolatey goodness and creamy decadence, all encased in a fun, wintry theme. They’re incredibly easy to make, requiring minimal ingredients, and are an absolute hit at any holiday gathering. Whether you’re hosting a festive party or simply enjoying a cozy night in, these snowman-themed treats will bring smiles to all.

Ingredients

  • 1 package of OREO Cookies
  • 8 oz cream cheese, softened
  • 16 oz Baker’s chocolate, melted
  • Rolo chocolate candy
  • Black gel icing
  • Orange gel icing
  • Additional supplies to decorate snowmen (e.g., mini chocolate chips, pretzel sticks)

Instructions

  1. Take the entire package of OREO Cookies, including the filling, and crush them in a large gallon ziplock bag until you have fine crumbs.
  2. Empty the cookie crumbs into a large mixing bowl.
  3. Add the softened cream cheese to the bowl.
  4. Mix well on medium speed until fully combined and smooth.
  5. Use a 1-inch cookie scoop to portion out the mixture, then roll into balls using the palms of your hands.
  6. Place the cookie balls on a cookie sheet and freeze for about 10 minutes to firm up.
  7. Melt the Baker’s chocolate according to the package instructions.
  8. Dip each cookie ball into the melted chocolate, ensuring it is fully coated, and then place on a wax paper-covered cookie sheet.
  9. Decorate with Rolo candies for hats, and use black and orange gel icing to create eyes and noses. Additional supplies can be used for further decoration, such as mini chocolate chips for buttons or pretzel sticks for arms.
  10. Place the decorated cookie balls in the refrigerator for an hour to harden completely.

Tips

For the best results, ensure your cream cheese is thoroughly softened before mixing. This will help achieve a smooth, homogeneous mixture. When dipping the cookie balls in chocolate, use a fork to lift them out, allowing excess chocolate to drip off for a cleaner finish.

Variations & Substitutions

Feel free to get creative with the decorations! You can use colored sprinkles or edible glitter for added festive flair. If you’re not a fan of Baker’s chocolate, white chocolate can also be used for a different flavor profile. Vegan cream cheese and chocolate alternatives can turn this recipe into a plant-based delight.

Storage

Store these OREO Cookie Balls in an airtight container in the refrigerator for up to a week. If you’d like to make them ahead of time, they can also be frozen for up to a month. Just be sure to thaw them in the refrigerator before serving.

FAQ

Can I use a different type of cookie instead of OREOs?

While OREOs provide the classic taste and texture, you can experiment with other sandwich cookies for different flavors. Just ensure they’re similar in composition for best results.

Is it necessary to freeze the cookie balls before dipping them in chocolate?

Freezing helps the balls hold their shape and makes them easier to dip in chocolate. This step is important for achieving a smooth coating.

How can I make these treats gluten-free?

Simply substitute the OREO Cookies with a gluten-free sandwich cookie option. Ensure all other ingredients, like the chocolate and cream cheese, are also certified gluten-free.

Nutrition

While these treats are indulgent, it’s good to savor them in moderation. Each snowman OREO Cookie Ball is approximately 120 calories, with the majority coming from healthy fats and carbohydrates. Enjoy as a festive treat alongside a balanced diet.

Conclusion

OREO Cookie Balls – Snowman are a whimsical and delicious addition to any winter celebration. They capture the joy of the season and are perfect for sharing with loved ones. Whether you’re reminiscing about childhood snow days or creating new memories with your own family, these treats will warm your heart and delight your taste buds. Gather your ingredients, invite the kids to help with the decorating, and enjoy the magic of creating these sweet little snowmen together!

Related update: OREO Cookie Balls – Snowman

Related update: Valentine Hearts

French Toast Croissants with Strawberries | Made by Meaghan Moineau

French Toast Croissants with Strawberries

Introduction

There’s something undeniably magical about the aroma of French toast wafting through the house on a lazy weekend morning. This recipe for French Toast Croissants with Strawberries is a delightful twist on the classic breakfast favorite. I still remember the first time I made this dish; it was a chilly Sunday morning, and my little kitchen was filled with warmth and laughter. My grandmother, who was visiting from France, watched as I nervously whisked the ingredients together, offering gentle guidance and stories of her own childhood in Paris. It became an instant family favorite, invoking memories of cozy brunches and shared stories. I hope this recipe brings a touch of that same magic to your home.

Why You’ll Love It

This recipe is a delightful blend of rich, buttery croissants and the sweet, tangy pop of fresh strawberries. It’s perfect for a special brunch or a lazy morning treat. The croissants soak up the egg mixture beautifully, creating a creamy, custard-like interior while maintaining a crisp, golden exterior. The orange butter adds a zingy freshness, perfectly complementing the sweetness of the strawberries. Whether you’re serving it to guests or indulging yourself, these French Toast Croissants are sure to impress.

Ingredients

  • 4 tablespoons butter, divided
  • 4 plain croissants, split
  • 2 eggs
  • 1/2 cup milk
  • 1 teaspoon grated orange peel
  • 1 tablespoon powdered sugar
  • Fresh strawberries, sliced
  • Orange butter (optional, see tips for recipe)

Instructions

  1. In a small mixer bowl, beat together all the orange butter ingredients at medium speed, scraping the bowl often, until light and fluffy (1 to 2 minutes); set aside.
  2. In a pie pan, stir together the milk, eggs, and 1 teaspoon of orange peel.
  3. In a 10-inch skillet or griddle, melt 2 tablespoons of butter over medium heat.
  4. Dip 4 croissant halves into the egg mixture, turning to coat both sides.
  5. Place the croissant halves, cut side down, in the skillet. Cook, turning once, until golden brown (3 to 4 minutes on each side). Remove to a serving platter; keep warm.
  6. Repeat with the remaining 2 tablespoons of butter and 4 croissant halves.
  7. Dust croissant halves with powdered sugar; serve with orange butter and fresh strawberries.

Tips

  • Use day-old croissants if possible; they will soak up the egg mixture better without becoming too soggy.
  • For the orange butter, simply mix softened butter with a bit of orange zest and a touch of honey or sugar.
  • Ensure your skillet is not too hot to prevent burning the croissants before the inside is cooked.

Variations & Substitutions

  • Fruits: While strawberries are delightful, you can use blueberries, raspberries, or sliced peaches for a different flavor profile.
  • Dairy-Free: Substitute the milk with almond milk or coconut milk, and use a dairy-free butter alternative.
  • Spices: Add a dash of cinnamon or nutmeg to the egg mixture for an extra layer of flavor.

Storage

French Toast Croissants are best enjoyed fresh. However, if you have leftovers, store them in an airtight container in the refrigerator for up to 2 days. Reheat them in a skillet over medium heat until warmed through. Avoid microwaving as it may make them soggy.

FAQ

Can I prepare the egg mixture ahead of time?

Yes, you can prepare the egg mixture a few hours in advance. Store it in the refrigerator and give it a good stir before using.

How can I make this recipe gluten-free?

To make this recipe gluten-free, use gluten-free croissants. The rest of the ingredients are naturally gluten-free.

Nutrition

While indulgent, this dish provides a good balance of protein and carbohydrates to start your day off right. Each serving contains approximately:

  • Calories: 450
  • Protein: 8g
  • Carbohydrates: 38g
  • Fat: 28g
  • Sugar: 10g

Please note that these values are estimates and can vary based on specific ingredients used.

Conclusion

French Toast Croissants with Strawberries is a dish that brings together comfort and elegance. Whether you’re reminiscing about a trip to Paris or simply treating yourself to a luxurious breakfast at home, this recipe is sure to delight. The combination of buttery croissants, fresh strawberries, and a hint of citrus will transport you to a cozy café, even if just for a moment. I hope you enjoy making and sharing this recipe as much as my family has over the years. Bon appétit!

Related update: French Toast Croissants with Strawberries

Related update: Huli-Huli Chicken

Tuna Mexi Melts | Made by Meaghan Moineau

Tuna Mexi Melts

Intro

Welcome to a delightful fusion of flavors with our Tuna Mexi Melts! This recipe is a warm homage to my childhood, where every family gathering would invariably feature a platter of deliciously cheesy, spicy snacks. My grandmother, the undisputed queen of kitchen creativity, would whip up her signature tuna melts with a twist that made them memorable. Now, I’m thrilled to share this cherished recipe with you, hoping it brings as much joy to your table as it has to ours for generations.

Why You’ll Love It

These Tuna Mexi Melts are more than just a snack; they’re a celebration of bold, vibrant flavors. The creamy, spicy tuna mixture topped with melted pepper jack cheese on crispy French bread is a treat for your taste buds. Whether you’re looking for a quick lunch, a party appetizer, or a cozy dinner option, these melts are versatile and easy to make, ensuring you’ll have more time to enjoy with your loved ones.

Ingredients

  • 1 loaf of French bread
  • 2 tablespoons butter, melted
  • 1 teaspoon chile powder
  • 1 teaspoon cumin
  • 1 teaspoon garlic powder
  • 1/2 cup sour cream
  • 2 cans of tuna, drained
  • 1/2 cup green onions, chopped
  • 1 jalapeno, diced
  • 1 tablespoon lime juice
  • 1/4 cup cilantro, chopped
  • 2 roma tomatoes, diced
  • 1/2 teaspoon paprika
  • Salt, to taste
  • 1 cup shredded cheddar cheese
  • 8 slices pepper jack cheese
  • Your favorite picante sauce

Instructions

  1. Preheat your oven to 350 degrees Fahrenheit.
  2. Start by preparing the picante sauce. Combine all sauce ingredients in a food processor and blend until smooth. Season with salt to taste.
  3. Slice the French bread into 1-inch slices. Brush each slice with melted butter.
  4. Sprinkle the slices with cumin, chile powder, and garlic powder for added flavor.
  5. In a mixing bowl, combine sour cream, tuna, green onions, jalapeno, lime juice, cilantro, roma tomatoes, paprika, and shredded cheddar cheese. Mix until well combined.
  6. Spoon a generous amount of the tuna mixture onto each bread slice.
  7. Top each with a slice of pepper jack cheese.
  8. Place the prepared slices on a baking sheet and bake for 10-15 minutes, or until the cheese is melted and bubbling.
  9. Serve warm with a side of picante sauce for dipping.

Tips

For the best results, use fresh, crusty French bread. If you prefer a spicier kick, consider adding extra jalapeno or a pinch of cayenne pepper. Make sure to drain the tuna well to avoid a soggy mixture. Always taste the mixture before placing it on the bread to adjust seasoning to your preference.

Variations & Substitutions

If you want to switch things up, try using different types of cheese. Monterey Jack or even a sharp cheddar can add a unique flavor profile. For those who prefer a lighter version, Greek yogurt can be a substitute for sour cream. Vegetarians can replace tuna with mashed chickpeas for a similar texture.

Storage

Tuna Mexi Melts are best enjoyed fresh out of the oven. However, if you have leftovers, store them in an airtight container in the refrigerator for up to two days. To reheat, place them in the oven at 350 degrees Fahrenheit until warmed through.

FAQ

Can I make the tuna mixture in advance?

Absolutely! You can prepare the tuna mixture a day ahead and store it in the refrigerator. This can enhance the flavors, making your melts even tastier.

What can I serve with Tuna Mexi Melts?

These melts pair wonderfully with a fresh salad or a bowl of tomato soup. They also make a great addition to a party platter with other finger foods.

Can I use canned tuna in oil?

Yes, you can use canned tuna in oil, but make sure to drain it thoroughly to prevent the mixture from becoming too oily.

Nutrition

While these tasty treats are indulgent, they do provide a good source of protein from the tuna and calcium from the cheese. To make them a bit healthier, consider using whole grain bread and reducing the amount of cheese.

Conclusion

Tuna Mexi Melts are a delightful, easy-to-make treat that will become a household favorite. With their bold flavors and cheesy goodness, they are perfect for any occasion. Whether you’re reminiscing about family gatherings or creating new memories, these melts bring comfort and joy to every bite. Enjoy the warmth and satisfaction of making a dish that is not only delicious but also a piece of my family’s culinary history. Happy cooking!

Related update: Tuna Mexi Melts

Related update: OREO Cookie Balls – Snowman

Cinnamon Sugar Fried Apples | Made by Meaghan Moineau

Cinnamon Sugar Fried Apples

Intro

There’s something about the aroma of cinnamon and apples wafting through the kitchen that just feels like home. Growing up, my grandmother would often make a batch of her famous cinnamon sugar fried apples on chilly autumn afternoons. She’d tell me stories of how her mother taught her the recipe, and we’d share laughter and warmth over this simple yet delightful treat. Today, I’m excited to share this beloved recipe with you, allowing you to create your own sweet memories.

Why You’ll Love It

These cinnamon sugar fried apples are a delightful treat that combines the tartness of fresh apples with the warm, sweet flavors of cinnamon and sugar. The crispy batter encasing the tender apple slices provides a perfect texture contrast, making each bite a delicious experience. Whether you serve them as a dessert, a snack, or a unique side dish, these fried apples are sure to become a family favorite.

Ingredients

  • 1 cup all-purpose flour
  • 3-4 fresh apples, cored and sliced 1 cm thick
  • 1/2 cup brown sugar
  • 1 tablespoon ground cinnamon
  • 2 large eggs, lightly beaten
  • 1/4 cup granulated sugar
  • Zest of 1 lemon
  • 1 cup milk
  • Vegetable oil, for frying
  • 1/4 teaspoon salt
  • 2 tablespoons unsalted butter, melted

Instructions

  1. In a mixing bowl, combine all-purpose flour, salt, and granulated sugar. Slowly whisk in the milk, followed by the lightly beaten eggs, lemon zest, and melted unsalted butter. Mix until the batter is smooth and lump-free.
  2. Cover the bowl with plastic wrap and let the batter rest at room temperature for 30 minutes. This step allows the flour to fully hydrate and results in a better texture.
  3. Meanwhile, prepare your apples by coring and slicing them into 1 cm thick rings. Set them aside.
  4. Heat the vegetable oil in a deep skillet or frying pan over medium heat until it reaches 350°F (175°C).
  5. Once the batter has rested, dip each apple slice into the batter, ensuring it is fully coated.
  6. Carefully place the battered apple slices into the hot oil. Fry them in batches, making sure not to overcrowd the pan.
  7. Fry each side until golden brown, about 2-3 minutes per side. Use a slotted spoon to remove the apples from the oil and drain them well on a plate lined with double paper towels.
  8. In a small bowl, mix together the brown sugar and ground cinnamon. Sprinkle this mixture over the hot fried apple slices.
  9. Serve the cinnamon sugar fried apples immediately for the best taste and texture.

Tips

To ensure the best results, make sure your oil is at the right temperature before frying. If the oil is too hot, the batter will burn before the apple is cooked through. If it’s too cool, the apples will absorb too much oil and become soggy. Use a thermometer for accuracy. Additionally, using a tart apple variety like Granny Smith will provide a nice balance with the sweetness of the cinnamon sugar coating.

Variations & Substitutions

If you’d like to change things up, consider adding a pinch of nutmeg or ginger to the cinnamon sugar mixture for a spicier kick. For a different flavor profile, try using apple cider in place of milk in the batter. If you’re looking for a gluten-free option, substitute the all-purpose flour with a gluten-free flour blend.

Storage

While these fried apples are best enjoyed fresh, you can store any leftovers in an airtight container in the refrigerator for up to two days. To reheat, place them on a baking sheet and warm them in a preheated oven at 350°F (175°C) for about 5-7 minutes. This will help them regain some of their original crispiness.

FAQ

Can I use other fruits instead of apples?

Yes, you can experiment with other fruits like pears or peaches. Make sure the fruit is firm enough to hold its shape during frying.

What is the best type of apple for this recipe?

Granny Smith apples are a great choice because of their tart flavor and firm texture, which holds up well during frying. However, feel free to use your favorite apple variety.

Can I make the batter in advance?

Yes, you can prepare the batter a day in advance. Store it covered in the refrigerator and give it a good stir before using.

Nutrition

While I don’t have exact nutritional information, it’s important to note that these fried apples are a treat and should be enjoyed in moderation. They are rich in sugars and fats, but also offer the benefits of fiber and vitamins from the apples. Pair them with a balanced diet for a delightful indulgence.

Conclusion

Cinnamon sugar fried apples are more than just a dessert; they’re a connection to fond memories and a way to create new ones with family and friends. Whether you’re serving them at a gathering or enjoying them on a cozy night in, these apples are sure to bring warmth and joy. I hope this recipe finds a special place in your heart and kitchen, just as it has in mine.

Related update: Cinnamon Sugar Fried Apples