
It was one of those sunny afternoons that just begged for something refreshing. I had spent the morning wrestling with my garden, pulling stubborn weeds and discovering a love for dirt under my nails. The sun felt like a warm hug, and by the time I was done, I craved something more than just plain water. I wanted zing, spice, and a little sparkle to stay energized for the rest of the day. That’s when the idea of making Turmeric Ginger Beer popped into my head. It’s vibrant, it’s zesty, and it’s surprisingly easy to whip up! Whether you’re lounging in the garden or need a pick-me-up after a long day, this drink is like sunshine in a glass.
Jump to Recipe
What You’ll Need
I bet you already have most of the ingredients for this concoction stashed away in your pantry or fridge. The magic lies in the harmony of spices and fresh ingredients that make this drink pop.
- Fresh ginger
- Turmeric
- Cardamom pods
- Coriander seeds
- Lemon zest
- Sugar
- Water
- Soda water
- Lemon juice
How to Make Turmeric Ginger Beer
- Start with the syrup: Grate the ginger and turmeric. Trust me, your kitchen will smell incredible.
- Place the ginger, turmeric, cardamom pods, coriander seeds, lemon zest, sugar, and water in a saucepan. Bring it to a boil.
- As the mixture boils, reduce the heat and let it simmer for 10 minutes. This is where the flavors deepen.
- Remove the pan from heat and let the spices infuse the syrup as it comes to room temperature. This step takes patience but is oh-so worth it.
- Strain the syrup through a regular strainer, then again through a fine-mesh tea strainer to catch all the bits. Store it in the fridge where it’ll keep for several weeks.
- Ready to mix? Measure 2 tablespoons of the syrup into an eight-ounce glass.
- Lightly crush a lemon peel and some mint leaves with the back of a spoon right in the glass. This releases their oils and aroma.
- Squeeze the juice from a quarter of a lemon into the glass. Add ice and top with soda water. Give it a gentle stir and enjoy!
Cook’s Notes
Here’s the thing: this syrup is your new best friend. Keep it in the fridge, and you’ll have an instant refresher whenever you need one. If you’re planning for a party, make it a day ahead — the flavors get even better with time. Just remember not to boil the syrup too aggressively, or you might end up with a bitter taste from the spices. To avoid a messy kitchen, use a spoon to peel your ginger and turmeric — it’s a neat little trick that saves time and effort.
Make It Your Own
- For a sweeter kick, swap soda water with ginger ale; it adds an extra ginger punch.
- Want something a little more exotic? Add a few crushed basil leaves for an aromatic twist.
- Swap lemon with lime for a tangier version — it’s a whole new vibe.
- Go alcohol-free for a kids’ version, or add a splash of rum for a sneaky adult twist.
If you try this, I’d love to hear how it turns out — drop a comment or tag me! Your experiences and twists make every recipe an adventure. Cheers to sunny days and flavorful sips!
Related update: Turmeric Ginger Beer
Related update: Sourdough Stuffing with Sage Sausage and Apples
Related update: Spiced Apple Cider

Alright, picture this: It’s Wednesday evening, halfway through a week that feels like it’s been two weeks long, and you’re in dire need of something indulgent but not overly complicated. That’s the exact moment I found myself in last week when I decided to whip up a Banana Pudding Cake. This isn’t just any banana dessert; it’s got layers of moist cake, creamy custard, and a light-as-air whipped cream topping that makes it feel like a hug on a plate. Plus, it’s a great way to use up those slightly too-ripe bananas staring you down on the counter. The best part? You probably have most of the ingredients already lying around. Trust me, this is the dessert you deserve after adulting so hard all week. Jump to Recipe
What You’ll Need
This isn’t your typical mile-long ingredient list. Chances are you already have most of this.
- Bananas
- Vanilla wafers
- Egg yolks
- Eggs
- Flour
- Sugar
- Baking powder
- Cocoa powder
- Milk
- Salt
- Pudding
- Vanilla extract
- Heavy whipping cream
- Powdered sugar
- Whipped cream
How to Make Banana Pudding Cake
- Preheat your oven to 350°F (175°C). In a large bowl, beat the egg yolks with sugar until the mixture gets that pale, creamy consistency, and set it aside.
- In the bowl of an electric mixer, whip the egg whites until they form stiff peaks that hold their shape like a dream.
- Gently add the baking powder, processed wafers, and cocoa to the egg yolk mixture. It gets a bit thick and fudgy here; you’re on the right track.
- Drop about 1/4 of the whipped egg whites into the larger bowl and fold lightly to get things started. Then fold in the remaining whites carefully until no streaks remain.
- Line a jellyroll sheet pan with parchment paper, ensuring it covers all sides, and spray the paper with non-stick floured baking spray.
- Spread the cake batter evenly over the paper, making sure it covers the entire pan, and bake it in your preheated oven for 15-20 minutes. The cake should feel springy to the touch.
- Let the cake cool completely on the sheet—this will take at least 30 minutes to an hour, so patience, my friend.
- Meanwhile, mix sugar, flour, and salt in the top of a double boiler. If you don’t have one, improvise with a saucepan over another with boiling water.
- Blend in the egg yolks and milk, then cook uncovered while stirring constantly for 10 to 12 minutes, or until the mixture thickens nicely. Remove from heat and stir in the vanilla extract.
- Once your cake is cooled, carefully lift the parchment paper, remove the cake from the pan, and place it on a flat surface. Starting from the short end, cut into three even pieces.
- Assemble your masterpiece by placing the first layer of cake on a serving platter. Spread half of the custard over the top, then cover with a third of the banana slices and a third of the crumbled wafers.
- Top with the next piece of cake and repeat, making sure to reserve a few bananas and crumbled cookies for later. Spread the final amount of custard onto the top layer of cake.
- Refrigerate the whole cake for at least 2 hours or until you’re ready to serve. This chill time is crucial for the flavors to really meld together.
- Just before serving, whip up the cream topping. Combine all ingredients in a large mixing bowl and beat until the cream thickens and becomes stiff.
- Spread the whipped cream over the cake and top with the reserved banana slices and wafers right before serving to keep everything fresh and delightful.
Cook’s Notes
This cake is best made ahead, allowing time for the flavors to develop in the fridge. Just keep the final toppings off until serving time to avoid any sad, brown bananas. Store leftovers in an airtight container in the fridge for up to 3 days, though the bananas might start to look a little tired by then. Don’t worry, the taste will still be on point!
- If you’re in a hurry, ready-made pudding can be used in place of homemade custard, but honestly, the homemade is worth the little extra effort.
- To avoid the dreaded banana browning, toss the slices in a bit of lemon juice before layering them in the cake.
Make It Your Own
- Go chocolatey: Sprinkle some mini chocolate chips between the layers for a chocolate-banana twist.
- Nutty buddy: Add a layer of crushed pecans or walnuts for a bit of crunch.
- Berry bliss: Substitute half of the banana slices with fresh strawberries for a fruity variation.
- Gluten-free: Use gluten-free vanilla wafers and your favorite gluten-free flour blend for the cake.
If you try this, I’d love to hear how it turns out—drop a comment or tag me! Happy baking, friends. Let’s make mid-week desserts a thing, because why not?
Related update: Banana Pudding Cake
Related update: Crispy Rhubarb Pockets

Picture this: it’s a chilly Wednesday evening, the kind when the sun sets way too early, and you’re standing in the kitchen with a hungry family waiting in the wings. You need something comforting, something that smells like home. Enter my Tasty Easy Meatloaf. It’s the perfect solution for those mid-week blues when time and patience are in short supply. This isn’t just any meatloaf—it’s juicy, flavorful, and topped with a tangy-sweet glaze that’ll make you wonder why you ever made it any other way. Plus, it’s a straightforward, one-bowl wonder that even the busiest of us can tackle. Trust me, this is the kind of comforting dish that makes life just a little bit easier. Jump to Recipe
What You’ll Need
This ingredient list is delightfully simple and, with any luck, your pantry already holds the key players.
- Ground beef
- Bulk sausage
- Breadcrumbs
- Diced onion
- Egg
- Salt
- Pepper
- Cumin
- Garlic powder
- Canned tomato sauce
- Cider vinegar
- Brown sugar
- Whole grain mustard
- Water
- Worcestershire sauce
How to Make Tasty Easy Meatloaf
- Preheat your oven to 350°F. You want it warm and welcoming, just like this meatloaf will be.
- In a large bowl, combine the ground beef, bulk sausage, breadcrumbs, diced onion, egg, salt, pepper, cumin, and garlic powder. Use your fingers to mix until just combined—overmixing can make the meatloaf tough.
- Gently shape the mixture into a loaf and place it in a shallow, ovenproof pan. It’s like shaping a sandcastle but more delicious.
- In a small bowl, stir together the remaining canned tomato sauce, cider vinegar, brown sugar, whole grain mustard, water, and Worcestershire sauce. This is your glaze, sweet and tangy perfection.
- Pour the glaze over the meatloaf. Make sure it gets nice and cozy with your loaf.
- Bake in the oven for about an hour, until the meatloaf is cooked through and the house smells inviting. Every 20 minutes, lovingly spoon some of the glaze back over the top to keep it juicy and flavorful.
- Remove from the oven and let it rest for 10 minutes. This step is crucial for sealing in the juices.
Cook’s Notes
This meatloaf is a forgiving dish, but here are a few tips to ensure success:
- Make sure not to overwork the meat mixture; it should just hold together.
- The glaze is your best friend—baste frequently for extra flavor.
- Leftovers make fantastic sandwiches, so don’t be shy about doubling the recipe.
- Store leftovers in the fridge for up to 3 days, or freeze for up to a month for a quick meal later.
Make It Your Own
- Swap the ground beef for ground turkey for a lighter version.
- Add chopped bell peppers to the meat mixture for a bit of sweetness and color.
- For a spicy kick, mix in some diced jalapeños with the onions.
- Vegetarian? Replace the meat with a mix of lentils and mushrooms for a hearty substitute.
If you try this, I’d love to hear how it turns out—drop a comment or tag me! Your kitchen adventures are my favorite kind of stories. Bon appétit!
Related update: Tasty Easy Meatloaf
Related update: Hard-Boiled Egg Gratin In A Bechamel Sauce
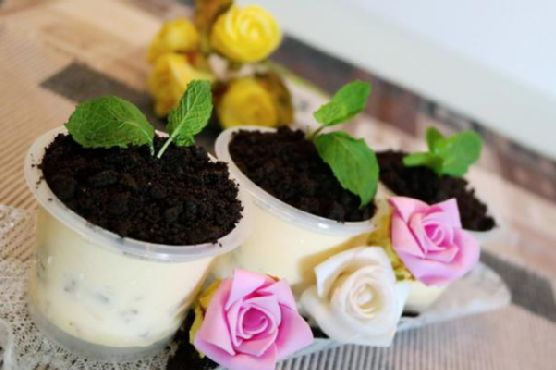
It was a seemingly ordinary Tuesday evening, and I found myself staring at the contents of my freezer, feeling a bit uninspired. A pint of vanilla bean ice cream caught my eye, and suddenly, I was reminded of a cute dessert idea I’d seen earlier — those adorable potted plant ice cream treats. I mean, who wouldn’t want to dig their spoon into what looks like a tiny pot of dirt, only to find a luscious, creamy surprise underneath? Perfect for Valentine’s Day or just because, these desserts are delightfully simple to make and never fail to impress with their whimsical presentation. They come together quickly and are the kind of thing you can whip up on a whim, which, as a busy home cook, is exactly the kind of recipe I adore.
Jump to Recipe
What You’ll Need
Chances are you already have most of this hanging around, but the way these flavors and textures come together is just magical.
- Vanilla bean ice-cream
- Diced palm seeds
- Mixed nuts
- Blueberries
- Oreo cookies
- Parsley
How to Make Valentine’s Day Potted Plant Ice-Cream Desserts
- Start by separating the Oreo cookies; remove the cream filling and set it aside (or snack on it, no judgment here!). Pound the cookies until they transform into fine crumbs that resemble rich, dark soil.
- In a mixing bowl, combine the vanilla bean ice-cream with the diced palm seeds, mixed nuts, and a handful of blueberries. The idea is to get a balanced mix of creaminess, crunch, and bursts of fruity freshness.
- Divide this heavenly mixture into your serving cups. It doesn’t have to be perfect — a little messiness adds to the charm. Place these in the freezer for a good chill.
- Once your ice-cream cups are well-frozen, generously top each one with the Oreo cookie crumbs to create that authentic “soil” look.
- Just before serving, insert a sprig of parsley into each cup. Voilà! You’ve got yourself some delightful potted plant ice-cream desserts that are sure to wow anyone lucky enough to dig in.
Cook’s Notes
Making these desserts is almost as fun as eating them. Remember, the less perfect they look, the better — we’re aiming for a natural, earthy vibe. If you’re prepping ahead, keep the ice-cream mix in the freezer until just before serving, then add the cookie crumbs and parsley. Leftovers (if you have any!) can stay in the freezer for a few days, but be sure to add fresh parsley right before serving again to keep that vibrant green pop.
Make It Your Own
- Swap the vanilla bean ice-cream for chocolate if you want that extra chocolatey punch — it’s a game-changer!
- Try using mint leaves instead of parsley for a refreshing twist and a subtle hint of minty fragrance.
- For a tropical vibe, substitute the blueberries with chunks of pineapple or mango.
- If you’re nuts about nuts, add a sprinkle of crushed pistachios on top of the “soil” for extra crunch and color.
If you try this, I’d love to hear how it turns out — drop a comment or tag me in your potted plant creations! Trust me, these little delightful desserts will grow on you just as they have on me. Happy cooking!
Related update: Valentine’s Day Potted Plant Ice-Cream Desserts
Related update: Banana Pudding Cake

The other night, I found myself staring into my pantry, that familiar feeling of “what on earth can I make for dinner?” creeping in. It was one of those long days where you’re just too exhausted to whip up anything too complicated. That’s when I remembered Turbo Chicken. It’s the perfect mix of comforting and impressive, with just the right amount of effort to make you feel like a kitchen hero without breaking a sweat. The best part? The crispy skin and juicy meat are practically a hug on a plate. So, let’s dive in together!
Jump to Recipe
What You’ll Need
The beauty of this dish lies in its simplicity. Chances are you already have most of these on hand, so no need for a last-minute grocery run. Here’s what you’ll gather:
- Whole chicken
- Soy sauce
- Salt
- Calamansi (or lemon/lime if you can’t find it)
- Baking flour dissolved in water
- Gravy from the turbo broiler drippings
- Bell pepper
How to Make Turbo Chicken
- Start by giving that chicken a loving rubdown with soy sauce, salt, and calamansi. Don’t be shy—massage it inside and out as if you’re making it the most relaxed chicken ever.
- Let the chicken marinate for about 10-20 minutes on each side. This is the perfect time to set up your turbo broiler and perhaps sip on a glass of something refreshing.
- Place a small baking pan at the bottom of the turbo broiler to catch all those wonderful drippings. Trust me, you’ll want this later for the gravy magic.
- Set the chicken in the turbo broiler, crank up the heat to 250 degrees, and let it work its magic for 30 minutes.
- After 30 minutes, turn the chicken over. Give it another 10 minutes to achieve the crispiest golden brown skin you’ve ever seen.
- While the chicken finishes up, grab those drippings and pour them into a small pan over low heat. Stir in the flour dissolved in water until silky smooth, then add salt, pepper, and a splash of calamansi to taste.
- Once your chicken is done and rested, carve it up and drizzle it with that beautiful gravy. Voilà! Dinner is served.
Cook’s Notes
Let me just say, the turbo broiler can be your best friend in the kitchen if you let it. It cooks everything evenly and gives you that crispy skin we all crave. Just be sure to watch your chicken closely after flipping it—those last 10 minutes can make all the difference between perfect and a tad too crispy.
Got leftovers? Lucky you! Store them in an airtight container in the fridge, and they’ll keep beautifully for up to three days. Reheat gently to keep all those juices locked in.
Make It Your Own
Feel like getting creative? Here are a few fun twists:
- Swap the chicken for some crispy tofu for a vegetarian-friendly version. Just adjust the cooking time accordingly.
- Add a hint of heat by including some chili flakes in your marinade.
- Throw in some garlic cloves inside the chicken cavity for an aromatic twist.
- Mix in a tablespoon of honey with your soy sauce marinade for a sweet and savory combo.
If you try this, I’d love to hear how it turns out — drop a comment or tag me! Can’t wait to see how you make Turbo Chicken your own. Happy cooking, friends! 🐔
Related update: Turbo Chicken
Related update: Tasty Easy Meatloaf

It was one of those evenings where the day just didn’t stop. You know the kind—I spent too long in traffic, the grocery store was packed, and let’s not even talk about the email avalanche. As I finally stepped into the kitchen, I was craving something that’s both comforting and invigorating. I remembered a recipe tucked away for a rainy day, one that combines creamy coconut with warming spices and fresh fish—Linefish Simmered In A Spiced Coconut Gravy. It’s the kind of dish that feels like a warm hug but also has a playful kick to it. The real beauty? Once you’ve got everything prepped, it practically cooks on its own, allowing you to sip a glass of your favorite white wine as the magic happens.
Jump to Recipe
What You’ll Need
I promise, most of these ingredients are pantry staples, lurking in the back of your cupboard just waiting for their time to shine. And those that aren’t, well, they’re totally worth the trip.
- Garlic
- Fresh thumb-sized piece of ginger
- Red chilli powder
- Turmeric
- Salt
- Tamarind pulp
- Vegetable oil
- Brown mustard seeds
- Fenugreek seeds
- Whole cloves
- White whole cardamom pods
- Thumb-length quill of cinnamon
- Onions
- Coconut milk
- Powdered cumin
- Black freshly milled pepper
- Fresh cilantro
- White fresh firm-fleshed fish fillets
- White fresh kilograms (assuming this means the right quantity for your crowd!)
How to Make Linefish Simmered In A Spiced Coconut Gravy
- Start by cutting the fish into large, hearty chunks. Toss them into a bowl, sneaking in half of that aromatic garlic and ginger while you’re at it. Sprinkle generously with chilli powder, turmeric, and a bit of salt. Give it all a good mix and let it chill in the fridge for a cool 30 minutes.
- While your fish is taking a breather, soften that tamarind pulp in a cup of warm water. It’s like giving it a little spa treatment for 20 minutes.
- Heat the vegetable oil in a large saucepan over a high flame. As soon as it’s shimmering, in go the mustard seeds, fenugreek, cloves, cardamom, and cinnamon. Let them sizzle and pop — this is when your kitchen starts to smell divine.
- Add the onions along with the reserved ginger and garlic to the party. Fry them briskly for about 10 minutes until they’re golden brown and fragrant.
- Mash the softened tamarind pulp into its soaking water with your fingers. Strain this tangy liquid over the onions and discard the leftover pulp.
- Pour in the creamy coconut milk and sprinkle the cumin powder. Give it a good stir and let it simmer for about 15 minutes, letting the flavors meld into a fragrant gravy.
- Gently tip the marinated fish cubes into the sauce. Stir them in with care and let them simmer until just cooked, about 7 minutes. You’re aiming for tender, not tough!
- Finish with a flourish of fresh cilantro sprinkled on top. Serve your creation hot with a side of Basmati rice, and enjoy the bliss that follows.
Cook’s Notes
Here’s the deal: fresh ingredients are non-negotiable here. They make all the difference. Also, when cooking the spices, keep an ear out for the mustard seeds popping. It’s their way of telling you they’re ready. This dish is best enjoyed fresh, but if you need to make it ahead, do the prep steps and store the marinated fish and sauce separately in the fridge. Just combine and simmer when you’re ready to serve. Leftovers? They’re even better the next day, as the flavors deepen. Just keep them in an airtight container in the fridge for up to two days.
Make It Your Own
- Not a fan of fish? Swap it out for crispy tofu chunks for a vegetarian twist. Just adjust the marinating time to let those flavors soak in.
- If you’re feeling adventurous, substitute the white fish with shrimp. Just be mindful; shrimp cooks a lot faster, so adjust the simmering time accordingly.
- Add a handful of baby spinach at the end for a pop of color and nutrients. It wilts beautifully into the sauce.
- For a richer texture, throw in a handful of cashew nuts while simmering the sauce. They’ll soften up and add a lovely creaminess.
If you try this, I’d love to hear how it turns out—drop a comment or tag me! Whether it’s your first taste or a comforting regular, this dish is a keeper. Enjoy every spoonful!
Related update: Linefish Simmered In A Spiced Coconut Gravy
Related update: Turbo Chicken

Last Tuesday, I found myself in need of a pick-me-up. It was one of those dreary afternoons when everything seemed to drag. The sky was grey, the email inbox was overflowing, and honestly, I just wanted something sweet and gooey to make it all better. That’s when I remembered these Chocolate Chip Peanut Butter Mallow Dessert Bars. Trust me, they’re the kind of treat that can turn any day around. Quick to whip up, using ingredients you likely already have kicking around your pantry, these bars are a perfect mix of chocolatey, peanut buttery magic with a delightful marshmallow surprise. They’re everything you didn’t know you needed.
Jump to Recipe
What You’ll Need
This is one of those recipes where a quick pantry dive will probably yield most of what you need. The combination of these ingredients is pure joy.
- 1 package of chocolate chip cookie mix
- 1 egg
- 3 tablespoons of milk
- 1/2 cup of butter, melted
- 1/2 cup of peanut butter
- 1 cup of marshmallows
- Drizzle of chocolate syrup
How to Make Chocolate Chip Peanut Butter Mallow Dessert Bars
- Preheat your oven to 375°F (190°C). While it warms, grab a mixing bowl and stir together the chocolate chip cookie mix, egg, milk, and melted butter until smooth. It should be creamy and thick but pliable enough to spread.
- Grease an 8×8 baking pan well. Trust me, you’ll thank yourself later. Spread the cookie mixture evenly into the bottom of the pan. The more even, the better it’ll bake.
- Pop the pan into the oven for 15-20 minutes. You’ll know it’s ready when the edges are golden and the center looks set and slightly puffed. Your kitchen will smell like heaven by now.
- Take the pan out and immediately spread the peanut butter evenly over the hot cookie base. The warmth will help it glide smoothly.
- Top the peanut butter layer with marshmallows. Feel free to sneak a few into your mouth — I won’t tell.
- Return the pan to the oven for a few more minutes, just until the marshmallows start to melt and get a little golden on the tips.
- Remove from the oven and use a spatula to spread the marshmallows evenly over the peanut butter layer, creating a gooey, sticky blanket.
- Drizzle the chocolate syrup over the top. Let it cool to set completely before cutting into squares. This is the hardest part — waiting! But I promise it’s worth it.
Cook’s Notes
Keep an eye on the marshmallows when you pop the pan back in the oven. They can go from beautifully melted to burnt in a blink. If you’re making these ahead, let them cool completely before storing them in an airtight container at room temperature. They’ll keep for about 3-4 days, not that they’ll last that long! For leftovers, a quick zap in the microwave will bring back that gooey goodness.
Make It Your Own
- Nut Swap: Substitute the peanut butter with almond or cashew butter for a different nutty twist.
- S’mores Style: Add a layer of crushed graham crackers in between the peanut butter and marshmallows for a classic s’mores flavor.
- Extra Chocolatey: Mix in a handful of chocolate chips into the cookie dough batter for extra bursts of chocolate with every bite.
- Spice It Up: Stir a teaspoon of cinnamon into the cookie mix for a warm, spiced undertone.
If you try this, I’d love to hear how it turns out — drop a comment or tag me! There’s nothing like sharing a good recipe and seeing everyone’s delicious results. Happy baking, and may your days be as sweet as these bars!
Related update: Chocolate Chip Peanut Butter Mallow Dessert Bars
Related update: Valentine's Day Potted Plant Ice-Cream Desserts
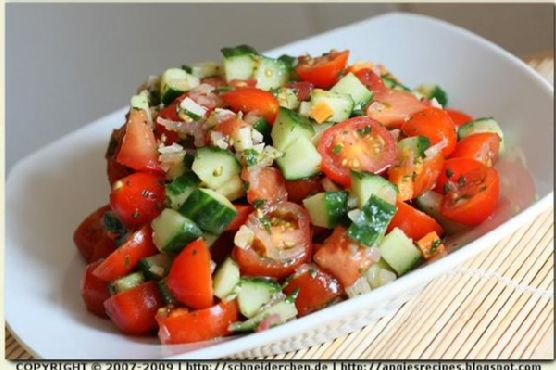
It was one of those hectic Tuesday evenings, you know the kind where the laundry is beckoning, emails are piling up, and yet your stomach still somehow wants to be fed. There I was, standing in front of my refrigerator, hoping for some culinary inspiration to jump out and save me from splurging on takeout for the third night in a row. My eyes landed on that lonely basket of cherry tomatoes and a half-used cucumber. Suddenly, a memory of a zesty Tomato Cucumber Salad from a sunlit café popped into my head. The beauty of this dish is its simplicity and the fact that it’s much more than the sum of its parts: refreshing yet satisfying, quick yet elegantly reminiscent of summer picnics. It’s the kind of dish that comes together with a handful of pantry staples, a little bit of chopping, and a splash of creativity. Easy enough to whip up in under 30 minutes, and impressive enough to make you feel like a culinary genius.
Jump to Recipe
What You’ll Need
This Tomato Cucumber Salad is all about letting simple ingredients shine. Chances are you already have most of this hanging around in your kitchen.
- Cherry tomatoes – the sweeter, the better!
- Diced cucumber – refreshing crunch is a must.
- Sliced garlic
- Lemon juice
- Olive oil – go for the good stuff if you can.
- Black salt and pepper
- Shallot – for a hint of sweet oniony goodness.
- Fresh parsley
How to Make Tomato Cucumber Salad
- Start by heating a splash of olive oil in a skillet over medium heat. When the oil shimmers, toss in the chopped shallot and sliced garlic. Stir-fry gently, keeping an eye out for a lightly golden hue. The kitchen should start smelling divine right about now.
- Remove the skillet from the heat and introduce a bright splash of lemon juice to the mix. The sizzle will tell you the dressing is coming together beautifully. Season with a sprinkle of black salt and a few cracks of pepper to taste.
- As the dressing takes a moment to cool, cut your cherry tomatoes into halves and dice the cucumber into cheerful 1cm cubes. Toss them both into a salad bowl, ready to soak up all the goodness.
- Pour the warm dressing over the tomato and cucumber combo, and toss gently. The fresh parsley should be added last, offering a vibrant pop of color and flavor.
- Cover the bowl and let the salad chill in the fridge for about an hour. This helps the flavors to meld into a harmonious chorus of tangy, sweet, and savory.
Cook’s Notes
This salad is as forgiving as it is delicious. If you’re running short on time, you can skip the chilling, but letting it sit in the fridge does wonders for flavor mingling. If you’ve got leftovers, they’ll keep in an airtight container in the fridge for a day or two, though the tomatoes may soften slightly. Avoid over-stirring after refrigeration if you prefer your salad to stay crisp.
Make It Your Own
- Swap the cucumber for crisp, thinly sliced fennel for an aromatic twist.
- Add a handful of crumbled feta for a creamy contrast.
- Throw in some roasted chickpeas for extra protein and crunch.
- Use fresh basil leaves instead of parsley for a fragrant, pesto-esque vibe.
If you try this, I’d love to hear how it turns out — drop a comment or tag me! This salad is a little taste of sunshine on your plate, and I hope it brings a bright spot to your day, just like it did for mine. Enjoy!
Related update: Tomato Cucumber Salad
Related update: Quinoa Salad with Barberries & Nuts
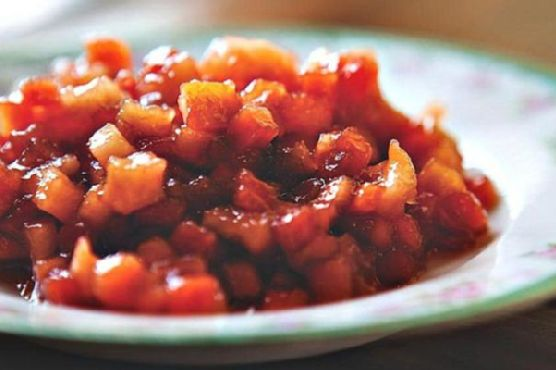
I recently found myself staring at a couple of Honeycrisp apples on my kitchen counter, feeling the first whispers of autumn in the air. You know the days when you can finally break out your sweaters but you still need sunglasses? That’s when my mind started tiptoeing towards something warm and cozy. I mean, what could be better than making a quick, delightful fall fruit compote that ties together all the best flavors of the season? The best part? You don’t need a culinary degree to whip this up. It’s a simple, heart-warming recipe that gives you that “kitchen hero” feeling without the sweat. Plus, it pairs perfectly with so many things, like crispy potato latkes or a dollop of ice cream.
Jump to Recipe
What You’ll Need
Trust me, chances are you already have most of this in your pantry or fridge. The real stars here are the cozy, autumnal ingredients that just sing when they’re together.
- 2 tablespoons of butter
- 2 cups of diced honeycrisp apples
- 1 cup of diced pears
- 1/2 cup of dried cherries
- 1/4 cup of brown sugar
- 1 tablespoon of apple cider vinegar
- 1 cup of apple juice
- 1 cinnamon stick
How to Make Fall Fruit Compote
- Start by melting the butter in a medium-sized saucepan over high heat. You’ll know it’s ready when it starts to smell nutty and divine.
- Once the butter is melted, toss in those diced apples, pears, dried cherries, vinegar, apple juice, brown sugar, and the cinnamon stick. Give it a good stir to coat everything in buttery goodness.
- Let it cook for about 5 minutes. You want the mixture to start bubbling, and the smell will be pure fall magic.
- Turn the heat down to medium and let it simmer for a few more minutes, just until the fruit is tender and the syrupy liquid has mostly reduced. If things start to stick, splash in a little more apple juice to keep it all juicy and lush.
- Once it’s all tender and gorgeous, you’re done! Serve warm and enjoy the fruit-laden spoonfuls of autumn joy.
Cook’s Notes
Let’s chat about some practical tidbits to make your compote experience as smooth as butter. First off, don’t forget that compote thickens as it cools, so don’t worry if it looks a little saucy at first. If you’re planning to serve it later, just warm it up slightly before serving to get back that perfect consistency. If you find yourself with leftovers, pop them in a sealed container in the fridge, and it will stay happy for about a week. This compote is perfect to make ahead of time, especially if you’re planning to dazzle some guests a day or two later.
Make It Your Own
Let’s play around with this compote base because, trust me, versatility is its middle name.
- Swap out the apples for ripe peaches if they’re still in season. They add a lovely, juicy dimension.
- Try cranberries instead of dried cherries for a tarter twist. A little zing never hurt anyone!
- For a boozy touch, replace half the apple juice with a splash of bourbon or rum. It makes things just a little more grown-up.
- Add a pinch of ground ginger or nutmeg for extra warmth and spice. Your taste buds will thank you.
If you give this autumnal delight a go, I’d love to hear how it turns out — drop a comment or tag me in your fall feasting pics! Happy cooking, friend!
Related update: Fall Fruit Compote
Related update: Chocolate Chip Peanut Butter Mallow Dessert Bars
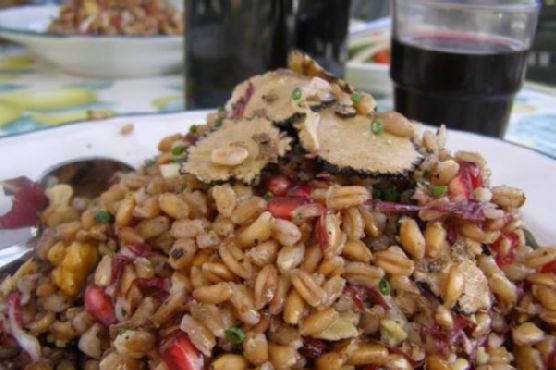
Picture this: It’s a chilly autumn afternoon, and the sun is giving off that perfect golden hue that makes everything look like a scene from a cozy movie. I’m in my kitchen, wearing my favorite oversized sweater, and I’ve got a craving for something that’s nourishing but still feels like a treat. Enter my Fall Farro Salad with Pomegranate, Walnut & Truffles. This dish is like a warm hug in a bowl, combining nutty farro with the sweet burst of pomegranate seeds, the earthy depth of truffles, and the crunch of walnuts. It’s quick to put together yet tastes like you’ve been working on it for hours. Trust me, this is the kind of recipe that’ll make you feel like a culinary genius with minimal effort, perfect for a weeknight dinner or impressing friends over a weekend brunch.
Jump to Recipe
What You’ll Need
Most of these ingredients are pantry staples, so you might already find them hanging out in your kitchen. Here’s what you need:
- 1 cup farro
- 2 tablespoons extra virgin olive oil
- 1/2 cup pomegranate seeds
- 1/2 cup walnuts, roughly chopped
- 1/2 head radicchio, thinly sliced
- 1/4 cup parmesan, shaved into ribbons
- 2 teaspoons truffle oil
- 1 tablespoon balsamic vinegar
- Salt and pepper, to taste
How to Make Fall Farro Salad with Pomegranate, Walnut & Truffles
- Start by cooking the farro. Bring a pot of cold water to a boil, and don’t forget a pinch of salt. Toss in the farro and let it cook until it’s al dente—about 20-35 minutes. You can throw in some vegetable scraps like a carrot or celery if you have them, for added flavor.
- While the farro is cooking, toast the walnuts in a dry pan over medium heat. Keep an eye on them and stir occasionally, until they are golden and fragrant. This should take about 5-7 minutes.
- In a large bowl, whisk together the extra virgin olive oil, balsamic vinegar, truffle oil, salt, and pepper. This dressing will bring everything together with a luxurious, earthy flavor.
- Once the farro is cooked, drain it and let it cool slightly. You want it warm but not piping hot.
- Add the farro to the bowl with the dressing, and toss until the grains are well coated.
- Gently fold in the radicchio, pomegranate seeds, and toasted walnuts. The radicchio should soften slightly but remain crisp.
- Finish by shaving parmesan over the top. A vegetable peeler works wonders here for creating beautiful, thin ribbons.
- Give it a final toss, taste, and tweak any seasoning if needed. Serve immediately and enjoy the medley of textures and flavors!
Cook’s Notes
Let’s chat about farro for a second. It’s an ancient grain, so it’s a bit chewy and wonderfully nutty, perfect for absorbing all the dressing goodness. Don’t skimp on toasting your walnuts; it makes a world of difference in flavor. Also, this salad is best enjoyed fresh, but if you do have leftovers, they’ll keep in the fridge for a day or two. Just know that the radicchio might lose some of its crispness.
Make It Your Own
Feel free to remix this salad with these variations:
- Swap the farro for quinoa if you’re looking for a gluten-free option.
- Substitute walnuts with pecans or almonds for a different nutty dimension.
- Try adding grilled chicken or crispy tofu for extra protein.
- Love cheese? Crumbled goat cheese can replace parmesan for a tangier kick.
If you try this, I’d love to hear how it turns out — drop a comment or tag me! Cooking is all about experimenting and finding what makes your taste buds sing, so have fun with it.
Related update: Fall Farro Salad with Pomegranate, Walnut & Truffles
Related update: Tomato Cucumber Salad

A few weekends ago, I found myself with a bowl of ripe pears staring back at me from the counter, practically begging to be transformed into something special. It was one of those blustery autumn afternoons where the leaves were doing their dance down the street, and all I wanted was a cozy dessert that felt both comforting and indulgent. Enter Oven Roasted Pears with Blackberry Sauce—a dish that marries the rich sweetness of roasted fruit with the tangy brightness of blackberries. It sounds fancy but is as easy as pie (actually, even easier since there’s no crust to wrestle with!). This little number is perfect for impressing your dinner guests or just treating yourself on a Tuesday night. Jump to Recipe
What You’ll Need
Chances are, you already have most of these hanging out in your pantry and fridge. This recipe is all about letting a few simple ingredients shine.
- Pears (ripe but firm)
- Unsalted butter
- Blackberries (fresh and juicy)
- Juice from a lemon
- Powdered sugar
- Confectioners sugar
- Cream of tartar
- Egg whites
- Granulated sugar
- Bittersweet chocolate
How to Make Oven Roasted Pears With Blackberry Sauce
- Preheat your oven to 450°F. Begin by peeling, coring, and quartering the pears. Melt the unsalted butter in a large casserole or baking dish over high heat. A 10-quart Dutch oven works perfectly for this.
- Once the butter is melted and sizzling, add the pear quarters. Cook them for about 10 minutes, stirring occasionally, until they’re golden brown all over. The aroma will be absolutely irresistible.
- Transfer your dish to the oven and let the pears roast for another 7 to 10 minutes. You’ll know they’re ready when a paring knife easily pierces through. Once done, take them out of the oven and let them cool to room temperature.
- As the pears cool, wash and dry the blackberries—my salad spinner is a lifesaver for this! Reserve a handful for garnishing later.
- In a food processor, blend 3 cups of blackberries with powdered sugar and lemon juice until smooth. Pour this vibrant sauce into a bowl and set aside.
- Now, for the meringue kisses! Preheat the oven to 275°F. Line a full-size sheet pan with a silpat mat or parchment paper lightly sprayed with cooking spray.
- In a food processor, give the granulated sugar a blitz for about a minute until it’s superfine. Transfer it to a bowl. Next, process the confectioners sugar and bittersweet chocolate together until the chocolate is reduced to tiny flecks.
- Using a mixer, beat the egg whites at a slow speed until they start to froth. Add the cream of tartar and crank up the speed to high, beating until stiff peaks form.
- Gradually add the superfine sugar, continuing to beat for another two minutes. Transfer this fluffy mixture to a pastry bag fitted with a star tip.
- Pipe out little meringue kisses onto the lined baking sheet, giving each a small peak by pushing the tip into the dollop and pulling away quickly.
- Place the meringues in the oven for an hour and a half. They’re done when they feel hard to the touch, perfectly dried out.
- To serve, spoon the blackberry sauce onto each plate, arrange 3 or 4 pear quarters on top, add a few meringue kisses, and garnish with those reserved whole blackberries.
Cook’s Notes
Here’s the thing, timing is everything with this dessert. You want the pears to still have a bit of bite, so don’t over-roast them. The meringue kisses can be made ahead of time and stored in an airtight container for up to a week. If you’re prepping the blackberry sauce ahead, keep it in the fridge for a day or two, but don’t add the lemon juice until just before serving to keep that bright flavor.
Make It Your Own
- Swap the blackberries for raspberries for a different berry twist.
- Add a splash of vanilla extract to the meringue mixture for a subtle aromatic boost.
- For a dairy-free option, use coconut oil instead of butter when roasting the pears.
- Garnish with some toasted chopped nuts (like hazelnuts or almonds) for a crunchy contrast.
If you try this recipe, I’d love to hear how it turns out—drop a comment below or tag me on social media with your delicious creations!
Related update: Oven Roasted Pears With Blackberry Sauce
Related update: Fall Fruit Compote

It was one of those evenings where the idea of putting together a lavish meal seemed both daunting and completely out of the question. You know the kind, right? Where you’re caught between wanting something special for dinner because it’s been a long week and yet, you really don’t want to spend ages in the kitchen. That’s when Valentine’s Chicken Marsala came to the rescue. It’s the kind of dish that hits that perfect sweet spot: impressive enough that it feels like a treat, yet simple enough that you’re not sweating it out at the stove. Plus, there’s something truly comforting about the aroma of Marsala wine and garlic wafting through the house. Trust me, this is worth making whenever you need a bit of mid-week magic.
Jump to Recipe
What You’ll Need
I love that this recipe doesn’t require a trip to a specialty store. Chances are you already have most of these goodies lounging in your pantry or fridge. Here’s what you’ll need:
- Fresh mushrooms
- Skinless boneless chicken breast
- Garlic
- Butter
- Olive oil
- Seasoned breadcrumbs or coating mix
- Marsala wine
- Heavy cream
- Cooked pasta (optional, but recommended for soaking up that wonderful sauce!)
How to Make Valentine’s Chicken Marsala
- Start by prepping your ingredients. Slice the mushrooms nice and thin — they’ll shrink down and soak up all the flavors. For the chicken, place the breast between two sheets of wax paper and give it a good pounding with a mallet until it’s about 1/4 inch thick. This helps it cook evenly.
- Next, dredge the chicken breast in seasoned breadcrumbs. Make sure it’s well-coated for that satisfying crunch.
- Now, heat up a heavy stainless or cast iron pan. Trust me, this isn’t the time for non-stick. Add butter and olive oil, letting the butter melt until it’s bubbly and fragrant.
- Place the chicken breast in the pan and let it brown on both sides. You’re looking for that beautiful golden color that screams “delicious.” Once browned, remove it from the pan and set aside.
- In the same pan, add a touch more olive oil if needed and toss in the sliced mushrooms and minced garlic. Sauté until the mushrooms are tender and the garlic is giving off an intoxicating aroma.
- Time to deglaze! Pour in the Marsala wine, using a wooden spoon to scrape up all the yummy bits stuck to the pan. This is where a lot of the flavor magic happens.
- Return the browned chicken breast to the pan. Bring the mixture to a boil, then reduce to a gentle simmer. Cover and let it do its thing for about 30 minutes, allowing the chicken to soak up all those amazing flavors.
- After simmering, remove the chicken from the pan again. Increase the heat slightly and add the heavy cream. Let the sauce reduce by about half — it should be rich, creamy, and oh-so-delicious.
- Serve the chicken and sauce over cooked pasta, or keep it low-carb and enjoy as is. Either way, it’s heavenly.
Cook’s Notes
Cooking can sometimes feel like a dance, and it’s all about timing and adjustments. If your sauce looks too thin after adding the cream, give it a bit more time to reduce. On the flip side, if it’s too thick, a splash of chicken stock or even a bit more wine can help. Store any leftovers in an airtight container in the fridge for up to three days. Reheat gently on the stove with a splash of water or stock to loosen the sauce. And yes, it’s just as tasty the next day.
Make It Your Own
You can totally switch things up with this recipe. Here are some ideas to get those creative juices flowing:
- Swap the chicken for crispy tofu if you’re aiming for a vegetarian twist. Just make sure to press the tofu well before dredging it in breadcrumbs.
- Try using portobello mushrooms for a meatier texture that complements the chicken beautifully.
- If Marsala wine isn’t your thing, a dry white wine can work wonders as well, giving the dish a slightly different but equally delicious profile.
- For a gluten-free version, use gluten-free breadcrumbs or even almond flour to coat the chicken.
If you try this, I’d love to hear how it turns out — drop a comment or tag me! Whether it’s a quiet dinner for two or a treat-yourself kind of night, this dish is sure to bring a touch of joy to your table. Enjoy the delicious journey!
Related update: Valentine’s Chicken Marsala
Related update: Oxtail Ragout
Related update: Linefish Simmered In A Spiced Coconut Gravy

Picture this: it’s a Wednesday evening, halfway through the week, and my energy is fading faster than the daylight. The fridge is a bit barren, just the usual suspects left to fend for themselves. That’s when I remember this quick and comforting recipe that feels like a mini victory every time: Green Beans with Pearl Onions and Salmon. This dish is a total lifesaver — it’s elegant enough to make me feel like a culinary genius yet simple enough for my tired brain to handle. Plus, the mix of green beans and pearl onions gives me that cozy, satisfying vibe I crave without having to spend hours in the kitchen.
Jump to Recipe
What You’ll Need
Before we dive in, let me just say that this ingredient list is as friendly as it gets — you might not even need a grocery run! Here’s what you’ll gather:
- Frozen green beans
- Frozen pearl onions
- Olive oil
- Unsalted butter
- Chicken stock
- Brown sugar
- Salt and pepper
- Skinless salmon steaks
How to Make Green Beans with Pearl Onions and Salmon
- Start by grabbing a large pot and filling it with some water. Toss in those trusty frozen green beans and pearl onions, cover it up, and let them cook over medium heat until they’re tender — you’ll know they’re ready when they give a little bit under a fork. Drain away the water and set them aside for their moment to shine.
- Now, heat up a large skillet with one tablespoon of butter and the olive oil over medium-high heat. When the butter is melted and the oil is shimmering, add the green beans and pearl onions. Sauté for about a minute until they start to sizzle and get that lovely sheen.
- Add the chicken stock to the party and let it cook for another minute until it’s all evaporated. This step brings out a deeper flavor in the veggies.
- Lower the heat to low and stir in another tablespoon of butter with the brown sugar. Mix gently until the veggies are slightly caramelized with a sweet glaze. Remove from the heat and keep them warm and cozy.
- Without washing the skillet (we love saving dishes!), return it to medium-high heat and melt a teaspoon of butter right in the center. Place the salmon steaks over the melted butter, season them generously with salt and pepper, and let them cook for 3-5 minutes. You’re looking for a golden crust that’s the envy of all salmon.
- Flip each salmon steak and cook for another 3 minutes until they’re cooked through but still tender. You know it’s ready when it flakes easily with a fork.
- To serve, lay the green beans and pearl onions on plates, then lovingly place a salmon steak on top. Voila! Dinner is served.
Cook’s Notes
Here’s a little secret: this dish is all about timing and listening to those sweet sizzles. Make sure to keep an eye on the salmon to avoid overcooking — you want that crispy outside and tender inside. As for the green beans and onions, the key is not to rush the caramelization. Let them take their time to get that nice color.
If you’re thinking ahead, you can totally make the green beans and onions a day in advance and store them in an airtight container in the fridge. Just reheat them gently before serving. Leftovers? Sure thing! They’re a dream for lunch the next day or even a fancy brunch with a poached egg on top.
Make It Your Own
This dish is a canvas for creativity! Here are some ideas to mix things up:
- Swap the salmon for crispy tofu if you’re going for a plant-based option. Just pan-fry the tofu until golden on both sides.
- Use maple syrup instead of brown sugar for a different kind of sweetness that pairs beautifully with the veggies.
- Add a handful of toasted almonds or pine nuts for some crunch and extra flavor.
- Try a splash of balsamic vinegar at the end for a tangy twist that brightens up the dish.
If you try this, I’d love to hear how it turns out — drop a comment or tag me on social media! Your kitchen adventures are the best part of sharing recipes. Enjoy every bite!
Related update: Green Beans with Pearl Onions and Salmon
Related update: Valentine's Chicken Marsala

It was one of those chilly fall afternoons when the leaves were swirling outside, and my pantry was looking a bit sparse. I was craving something cozy but hadn’t done a proper grocery run. Luckily, I did have a few seasonal staples on hand, including a couple of butternut squashes that had been staring at me every time I opened the pantry door. A quick rummage through the fridge and spice rack, and voilà! This Roasted Butternut Squash and Sage Dip was born. It’s a creamy, savory dip with just a hint of sweetness from the roasted squash and an earthy touch from the sage. Perfect for those moments when you want to impress without the fuss. Plus, it makes your kitchen smell divine.
Jump to Recipe
What You’ll Need
The beauty of this dip is that it relies on simple, fresh ingredients that you might already have. The key is in the roasting, which brings out all the deep, wonderful flavors.
- Two butternut squash
- Olive oil
- Fresh sage
- Garlic powder
- Fresh ground pepper
- Sea salt
- Onion
- Garlic
- Anchovy (trust me on this one!)
- Goat cheese
How to Make Roasted Butternut Squash and Sage Dip
- Preheat your oven to 350 degrees. This is the perfect time to cozy up and let your kitchen get warm and inviting.
- In a big bowl, mix together some olive oil, fresh sage, a few dashes of salt, pepper, and garlic powder. Toss in the butternut squash cubes, making sure each piece is well-coated with the herby goodness.
- Spread the squash out on a large baking sheet. You want them in a single layer, so they roast up nice and caramelized. Bake for about 30 minutes, or until they are tender and golden at the edges.
- While the squash is doing its thing, sauté chopped onion, anchovy fillets, and garlic in a bit of extra virgin olive oil. Cook them until the onion is soft and the anchovy has melted into the mix. The aroma is heavenly.
- Once the squash is done, let it cool just enough to handle. This way, you’re not nuking your fingers when you move to the next step.
- In a food processor, combine the roasted squash, onion mixture, and about 1/4 cup of crumbled goat cheese. Blend until smooth and creamy. You may need to scrape down the sides a couple of times to get everything evenly mixed.
- Transfer the dip into a pretty bowl because presentation matters! Serve it up with pita wedges, breadsticks, or a colorful array of veggies.
Cook’s Notes
This dip is pretty forgiving and flexible, perfect for those “let’s wing it” cooking sessions. If you’re prepping in advance, you can roast the squash and make the sautéed onion mixture the day before. Just keep them in separate containers in the fridge and blend them up with the cheese when you’re ready to serve. It will keep well in the fridge for about 3 days, though it never lasts that long at my house! If the dip thickens too much after chilling, a splash of olive oil or a bit of warm water stirred in should bring it back to life.
Make It Your Own
This is where the fun begins—don’t be afraid to play around with this recipe!
- Swap the goat cheese for feta if you want a saltier, tangier vibe.
- For a vegan version, skip the anchovy and goat cheese, subbing in roasted red peppers for extra depth.
- Add a pinch of red pepper flakes to the roasting mix for a bit of heat.
- Use sweet potatoes instead of butternut squash for an earthier sweetness.
If you try this, I’d love to hear how it turns out—drop a comment or tag me! Nothing makes me happier than seeing all the delicious ways you bring these recipes to life. Enjoy!
Related update: Roasted Butternut Squash and Sage Dip
Related update: Breaded Shrimp and Spicy Mayo Appetizer

It was one of those evenings when the wind had a bite to it, and all I wanted was something warm and comforting that didn’t require a trip to the store. I peeked into my pantry and there it was — a can of artichoke hearts, a block of cream cheese, and some fresh spinach that had seen better days. It was like they were whispering, “Make something delicious out of us.” And thus, this Warm Spinach Artichoke Dip was born. It’s the kind of dish that’s easy to throw together when you need a little pick-me-up, perfect for snacking or impressing friends without breaking a sweat. The rich, creamy texture and the burst of garlicky goodness is just what you need at the end of a long day.
Jump to Recipe
What You’ll Need
I bet you’ve got most of this stuff in your kitchen already. It’s all about the handful of key players that bring everything together into a cozy, irresistible dip.
- Olive oil
- Artichoke hearts
- Garlic
- Red chili flakes
- Salt
- Baby spinach
- Cream cheese
- Parmesan cheese
- Lemon juice
- Black pepper
How to Make Warm Spinach Artichoke Dip
- Start by placing the olive oil, artichoke hearts, garlic, red chili flakes, and a pinch of salt in a small pot. Cover it up and let it simmer on low heat for an hour. Your kitchen will smell fantastic, a hint that you’re on the right track.
- Once the artichokes are fragrant, add the baby spinach to the pot. Cover it again and steam the leaves for about 2 minutes, just until they wilt and turn a vibrant green.
- Transfer everything from the pot into a food processor. Add the cream cheese, parmesan cheese, and a splash of lemon juice. Pulse until the mixture is chunky but well-combined, a texture that promises every scoop will be packed with flavor.
- Finally, garnish with a sprinkle of black pepper and serve it up with some warm, crusty bread — because trust me, you’ll want something sturdy to scoop up all that goodness.
Cook’s Notes
This dip is pretty forgiving, but here are some tips to keep it extra tasty. Make sure to simmer the artichokes long enough to really let the flavors meld. You can make this dip ahead of time and store it in the fridge for a couple of days. When you’re ready to serve, just reheat gently on the stove. If you find yourself with leftovers (unlikely, but possible), they make a killer sandwich spread or a pasta sauce with a bit of extra cream or milk.
Make It Your Own
- Swap the artichoke hearts for marinated artichokes if you want a little extra zing to your dip.
- Mix in some crispy bacon bits for a smoky touch that complements the creamy base.
- Use feta cheese instead of parmesan for a tangy twist.
- Add a handful of chopped sun-dried tomatoes for a burst of sweetness and color.
If you try this, I’d love to hear how it turns out — drop a comment or tag me! Whether it becomes your go-to for cozy nights in or a star at your next gathering, I hope this dip brings a little warmth and joy to your table.
Related update: Warm Spinach Artichoke Dip
Related update: Roasted Butternut Squash and Sage Dip

It was one of those sticky summer afternoons when the sun refused to set and the heat clung to every corner of my kitchen. I had just about given up on finding a dessert that felt right for the weather — something light and refreshing that wouldn’t require me to turn my kitchen into a sauna. That’s when the idea for these Lemon Bars hit me. They’re a sunshine-packed treat that’s as easy as they are impressive, giving you that sweet-tart zing without the fuss. Plus, they’re perfect for prepping ahead, which means more time for sipping iced tea on the porch. Whether you’re looking to whip up something special for a summer BBQ or just craving a burst of citrus, these Lemon Bars are your golden ticket.
Jump to Recipe
What You’ll Need
Chances are you already have most of this in your kitchen, making these bars a snap to put together.
- Butter, melted
- Cream cheese
- Flour
- Regular size containers of lemon pudding
- Milk
- Cool whip
- Nuts, chopped
- Powdered sugar
How to Make Lemon Bars
- Preheat your oven to 350°F. Mix the flour and melted butter together with a beater until combined. You’ll know it’s ready when it resembles coarse crumbs.
- Press this mixture firmly into the bottom of a 13 x 9 inch pan, creating a base layer. Bake it for about 20 minutes, or until it’s golden and fragrant.
- Remove from the oven and let it cool completely. Patience is key here!
- In a separate bowl, beat the cream cheese and powdered sugar until smooth and creamy. Blend in one cup of whipped topping. You’ll want a silky, spreadable texture.
- Once the pastry is cool, smoothly spread the cream cheese mixture over it, ensuring an even layer.
- Next, beat the instant pudding with milk until it thickens. Spread this lemony goodness over the cream cheese layer.
- Top everything with the remaining whipped topping, spreading it gently across the surface.
- Finish with a sprinkle of chopped nuts for a bit of crunch. Refrigerate overnight or for at least 3 hours. Let these bars chill until firm before serving.
- When ready to indulge, cut into 24 bars and enjoy the sunshine on a plate!
Cook’s Notes
These Lemon Bars are pretty forgiving, but there are a few things to keep in mind. Make sure the crust has time to cool completely before adding the cream cheese layer, as rushing this part can lead to a melty mess. For those moments when time isn’t on your side, pop your pan in the fridge to speed things up. If you’re planning ahead, rest assured these bars keep wonderfully in the fridge for up to three days. Just be sure to cover them tightly to keep them fresh.
Make It Your Own
- Swap the nuts for toasted coconut to give it a tropical twist.
- Use lime pudding instead of lemon for a zesty variation that’s equally delicious.
- Add a layer of fresh raspberries between the cream cheese and pudding layers for a burst of berry flavor.
- For a nut-free version, simply omit the nuts or replace them with white chocolate shavings.
If you try this, I’d love to hear how it turns out — drop a comment or tag me! There’s something magical about sharing food, and I hope these Lemon Bars bring a little sunshine to your day. Happy baking!
Related update: Lemon Bars
Related update: Oven Roasted Pears With Blackberry Sauce

On a Tuesday evening, not too long ago, I found myself staring into the fridge, contemplating yet another night of uninspired dinner options. It was one of those weeks where everything felt like it was on fast-forward, and the idea of cooking anything complicated sent me straight to visions of takeout menus. But then, I spotted those lonely boneless chicken breasts tucked away in the fridge and suddenly remembered a recipe that’s delightfully simple yet tastes like you’ve been at it for hours — Grilled Chicken Hunter Style. The beauty of this dish lies in its comforting flavors, reminiscent of a cozy Italian bistro, but with the ease suited for a hectic weeknight. Trust me, this is comfort food that’s as flavorful as it is straightforward to whip up.
Jump to Recipe
What You’ll Need
If your pantry is anything like mine, you probably have most of these ingredients already. This recipe is all about using what you’ve got and letting a few key ingredients really shine.
- Boneless chicken breasts
- Extra virgin olive oil
- Green bell pepper
- Mamma Lombardi’s marinara sauce
- Mushrooms
- Red bell pepper
- Romano cheese
- Black salt and pepper
How to Make Grilled Chicken Hunter Style
- First, let’s get those chicken breasts soaking up some flavor. Coat them well in 1 ounce of extra virgin olive oil and set them aside. This will keep them juicy and give them a lovely sear on the grill.
- Next, grab a 2-quart sauce pot and heat up 2 ounces of extra virgin olive oil over medium heat. Toss in the green bell pepper, red bell pepper, and mushrooms. Cook these until they begin to brown slightly, releasing a sweet aroma that fills the kitchen.
- Once the veggies are just right, add in the Mamma Lombardi’s marinara sauce. Sprinkle in some salt and freshly ground black pepper to taste. Let it all simmer together for about 12 minutes, stirring occasionally. The sauce should become rich and aromatic.
- While the sauce is simmering, fire up your grill. Grill the chicken breasts until they’re thoroughly cooked through and juicy, with those beautiful charred grill marks — about 6-8 minutes per side depending on thickness.
- To finish, arrange the grilled chicken on a serving tray. Ladle that beautiful, fragrant sauce generously over the top and sprinkle with grated Romano cheese. Serve it hot and enjoy!
Cook’s Notes
Here’s the thing about this dish: it’s forgiving. Forgot the mushrooms? No problem. Only have yellow bell peppers? They’ll work too. The essence of this meal is in the grill-marked chicken and that savory sauce. For leftovers, store the chicken and sauce separately in airtight containers in the fridge for up to 3 days. Reheat gently on the stove with a splash of water or broth if the sauce has thickened. This dish can also be prepped ahead; just make the sauce a day early and grill the chicken fresh.
Make It Your Own
- For a vegetarian twist, swap the chicken for crispy tofu. Just press and grill it the same way, soaking it in the olive oil first.
- Add a kick by stirring in some red pepper flakes or a dash of hot sauce to the marinara.
- Experiment with cheese! Replace Romano with Parmesan or even a sharp cheddar for a different flavor profile.
- Mix in some sautéed onions with the peppers and mushrooms for extra sweetness and depth.
If you try this, I’d love to hear how it turns out — drop a comment or tag me! Whether it’s a busy Tuesday or a lazy Sunday, this Grilled Chicken Hunter Style might just become your new go-to. Enjoy every delicious bite!
Related update: Grilled Chicken Hunter Style

Last Tuesday, I found myself staring into the fridge at 6 p.m. with a growling stomach and no dinner plans. You know the feeling, right? That weeknight scramble where you’re just trying to conjure up something quick yet satisfying. Lucky for me, an almost forgotten can of tuna and some leftover boiled eggs saved the day. Enter these deliciously simple Tuna Stuffed Hard-Boiled Eggs—a perfect blend of creamy and tangy, ready in a flash and impressive enough that you might actually look forward to making them again. Whether you’re crafting a light lunch or a snack for a spontaneous get-together, these little bites are exactly what you need.
Jump to Recipe
What You’ll Need
The beauty here is that you probably have all these ingredients lounging in your kitchen. It’s a simple yet delightful list that packs a punch.
- 6 hard-boiled eggs
- 1 can of tuna, drained
- 1/4 cup finely chopped onion
- 1/4 cup grated carrot
- 2 tablespoons chopped parsley
- 1 tablespoon fresh lemon juice
- 1/4 cup corn kernels for garnish
How to Make Tuna Stuffed Hard-Boiled Eggs
- Start by peeling those perfectly boiled eggs and slicing them in half lengthwise. Scoop the yolks into a bowl and place the whites on a plate.
- In the bowl with the yolks, add the drained tuna, chopped onion, grated carrot, parsley, and a squeeze of fresh lemon juice. Mash everything together with a fork until it’s well combined and creamy.
- Spoon or pipe the tuna mixture back into the egg whites, filling each hollow generously. You’ll want the filling to have a slightly mounded look.
- To finish, sprinkle the tops with corn kernels. They add a sweet pop and a dash of color—plus, who doesn’t love a little crunch?
Cook’s Notes
If you’re boiling the eggs specifically for this recipe, a 9-minute boil should give you that perfect firm yolk. To prevent overcooking them (nobody likes a green-tinged yolk!), immediately plunge them into an ice bath after boiling.
- For a smoother filling, try blending the mixture in a food processor. It’s not necessary, but it adds a touch of elegance.
- You can make the filling a day ahead—just store it in an airtight container in the fridge. Stuff the eggs just before serving for the freshest result.
- Leftovers can be stored in the fridge for up to 2 days, but honestly, they’re so good, you probably won’t have any!
Make It Your Own
- Swap the tuna for canned salmon or even shredded chicken for a different flavor profile.
- Love a bit of heat? Add a spoonful of sriracha or a pinch of cayenne pepper to the tuna mixture for a spicy kick.
- If you’re a fan of herbs, try swapping parsley for dill or basil for a fresh twist.
- For added creaminess, mix in a tablespoon of mayo or Greek yogurt with the tuna filling.
If you try this, I’d love to hear how it turns out—drop a comment or tag me! These eggs might just become your new go-to when you’re in a pinch. Happy cooking!
Related update: Tuna Stuffed Hard-Boiled Eggs
Related update: Warm Spinach Artichoke Dip

Picture this: It’s a breezy Sunday afternoon, my playlist is on shuffle, and I’m craving something snacky yet a little indulgent. I open the pantry, and there they are, my trusty canned chickpeas staring back at me like they know they’re about to be transformed. Last week, I had a major kitchen mishap with a new bread recipe that turned out more like a weapon than a loaf, so today I’m sticking to something foolproof and fabulous—Cinnamon & Sugar Roasted Chickpeas. These little morsels are not only super easy to whip up, but they also bring that sweet, crunchy magic that’s like a hug for your taste buds, without any of the guilt. Plus, they make my whole kitchen smell like a cinnamon wonderland, which is a win-win for everyone involved.
Jump to Recipe
What You’ll Need
What’s great about this recipe is that you likely already have most of these gems hanging around in your kitchen. We’re talking pantry staples with a sweet twist!
- 1 can of garbanzo beans (aka chickpeas)
- 1 tablespoon olive oil
- 1 tablespoon maple syrup
- 1 teaspoon cinnamon
- 1 tablespoon cane sugar
How to Make Cinnamon & Sugar Roasted Chickpeas
- First things first, preheat your oven to 425°F. Trust me, having it nice and hot is key for the perfect crunch.
- Line a baking sheet with parchment paper or a silicone mat. It makes cleanup super easy and keeps the chickpeas from sticking.
- Drain and rinse the chickpeas thoroughly. This is your chance to say goodbye to that canning liquid!
- Take two sheets of paper towels, lay one down, spread the chickpeas out, and use the other to gently pat them dry. You want them as dry as possible to achieve that crispy texture.
- While you’re drying, pick out any skins that have come loose. It’s not a big deal if you can’t get them all—just do your best!
- In a small bowl, mix the dried chickpeas with olive oil, maple syrup, and cinnamon until every little bean is well-coated and looking scrumptious.
- Spread the chickpeas on your prepared baking sheet in a single layer. Bake for 15 minutes, enjoy a dance break or clean up the kitchen.
- After 15 minutes, stir the chickpeas to ensure even baking. Return them to the oven, baking in 3-4 minute increments until they’re beautifully browned and dried to your liking. Remember, the longer they roast, the crunchier they’ll get, but keep an eye out to prevent burning.
- Once out of the oven, let them cool for a bit. Then, sprinkle the cane sugar over them while they’re still warm but not hot. Toss them gently to coat.
- Now, dig in and enjoy these delightful nuggets of crunchy sweetness!
Cook’s Notes
If you’re anything like me, you’ll want to store these in an airtight container if they last longer than a day (spoiler: they might not!). They generally stay fresh and crunchy for a couple of days, but after that, they tend to soften up. No worries though—they’re still tasty! For the impatient snackers, remember the necessity of drying the chickpeas; moisture is the enemy of crunch. Also, I wouldn’t recommend skipping the parchment paper unless you want a sticky mess on your hands.
Make It Your Own
- Feeling spicy? Add a pinch of cayenne pepper to the mix for a sweet and spicy combo that’ll keep you on your toes.
- Swap the maple syrup for honey if you’re after a deeper, richer sweetness.
- Use coconut oil instead of olive oil for a subtle tropical twist that pairs beautifully with the cinnamon.
- For a festive flair, sprinkle a bit of nutmeg or pumpkin pie spice into the mix. Hello, holiday vibes!
If you try this, I’d love to hear how it turns out—drop a comment or tag me in your snack-tastic creations! Your oven and chickpeas await, my friend. Snack on!
Related update: Cinnamon & Sugar Roasted Chickpeas
Related update: Tuna Stuffed Hard-Boiled Eggs
So there I was, staring at the contents of my fridge, wondering how I could whip up something that felt more like a brunch celebration and less like a “what’s-left-in-the-fridge” scramble. It was one of those days when you crave something cozy yet impressive, especially when your best friend calls and says she’s popping over in half an hour. Enter: Mini Spinach and Feta Quiches. They’re this magical combination of simplicity and elegance, bursting with savory flavors and just the right amount of cheese. Plus, they bake up quickly, so you can spend more time chatting and less time cooking. Trust me, these little quiches are worth every moment spent waiting for them to puff up in the oven. Perfect for a casual get-together or a solo treat with a cup of coffee.
Jump to Recipe
What You’ll Need
What’s great about these quiches is that they’re made with ingredients you probably have on hand or are easy to grab on a quick grocery run. Here’s the lineup:
- Eggs – because what is a quiche without eggs?
- Half-and-half – for that creamy, luscious texture.
- Garlic – a subtle kick with lots of flavor.
- Frozen spinach – convenient and just right for this dish.
- Onion – for a touch of sweetness and depth.
- Basil – fresh and aromatic, a lovely herbaceous note.
- Low-fat shredded cheddar cheese – because cheese is life.
- Feta cheese – tangy, crumbly, and oh-so-delicious.
- Salt and pepper – essential for balancing flavors.
How to Make Mini Spinach and Feta Quiches
- Preheat your oven to 375°F (190°C). This is your time to collect your thoughts and maybe sip on some coffee, knowing deliciousness is coming soon.
- Set a large skillet over medium heat and coat it well with olive oil spray. Wait until the oil shimmers like a little lake under the sun.
- Add the garlic. Stir it around for about 30 seconds, just until it releases that irresistible aroma. No burnt garlic here!
- Add the chopped onion with a sprinkle of salt and pepper. Turn the heat up slightly to medium-high and cook, stirring often, until the onion turns a light golden brown.
- Now, fold in the spinach, chopped basil, and another pinch of salt and pepper. Lower the heat to medium and let it all mingle for about 10 to 15 minutes, stirring occasionally. Taste and adjust the seasoning if needed.
- Meanwhile, in a large bowl, whisk together the eggs, feta cheese, half-and-half, some more salt and pepper. Make sure it’s well blended, like a team of flavors ready to win.
- Spray your mini muffin pans generously with more olive oil spray. You don’t want any quiches sticking around here when it’s time to serve.
- Distribute the spinach mixture evenly among the muffin cups, about a tablespoon each. Follow this up with a tablespoon of the egg mixture in each cup.
- Bake in your preheated oven for 15 minutes, until the edges start to set and the tops look a little puffy.
- Pull out the pans and sprinkle each quiche with a touch of reserved shredded cheddar. Pop them back in the oven for about 5 more minutes, until the cheese on top is a beautiful golden brown.
- Let them cool slightly before serving. They’re delightful warm or at room temperature, with the flavors singing together perfectly.
Cook’s Notes
These quiches are ultra flexible, which is what I love most about them. You can make them a day ahead if you’re planning for a brunch or party. Just store them in an airtight container in the fridge and reheat gently in the oven or microwave. They stay good for about 3 days, though they rarely last that long at my house!
- Don’t overfill the muffin cups. The filling puffs up a bit during baking, so leave a little space to avoid spillage.
- If you’re chopping onions and they make you cry, try chilling them in the fridge for a bit beforehand. It helps, promise!
Make It Your Own
- Protein Punch: Swap out the spinach for sautéed mushrooms and add some cooked, crumbled bacon for a heartier bite.
- Spice it Up: Sprinkle a little smoked paprika or cayenne into the egg mixture for an unexpected kick.
- Go Green: Use kale or Swiss chard instead of spinach for a different leafy green vibe.
- Cheese Swap: Try sharp cheddar or even a nutty Gruyère if you’re out of feta. It’ll change the flavor profile in the best way.
If you try this, I’d absolutely love to hear how it turns out — drop a comment or tag me! May your kitchen be filled with the aroma of baking goodness and the satisfaction of a job deliciously done. 🍴✨
Related update: Mini Spinach and Feta Quiches