
It was one of those grey, lazy Sundays when the weather had no intention of letting you out of the house. My kids were bored, the couch had become a kingdom of pillows, and we were in desperate need of a fun kitchen project that would end with something delightful to snack on. That’s how we landed on making homemade animal crackers. It’s the perfect rainy-day activity that promises not just giggles and flour-covered noses but also a batch of wonderfully crunchy, subtly spiced crackers that beat anything from a box. Plus, they’re surprisingly simple to whip up with ingredients that are probably lounging in your pantry right now. Jump to Recipe
What You’ll Need
The beauty of these animal crackers is in their simplicity. Chances are you already have most of this hanging around in your kitchen. Here’s what you’ll need:
- Butter – the base of flavor and texture
- Brown sugar – for that slight caramel sweetness
- Egg – to bind it all together
- Vanilla – a warm aroma booster
- Cinnamon – the spice that whispers “home”
- Allspice – for a hint of mystery spice
- Salt – because sweet needs balance
- Baking powder – to lift them ever so slightly
- Oats – for a bit of texture
- Flour – the backbone of the dough
- Cocoa powder – optional, but oh what it adds!
How to Make Homemade Animal Crackers
Ready to dive in? Let’s do this!
- In a mixing bowl, cream together the butter and brown sugar until the mixture is light and fluffy. You should see it lighten in color slightly.
- Add in the egg and vanilla, and mix until everything is well combined and smooth.
- Sprinkle in the cinnamon, allspice, and salt. The dough will start to smell like a cozy autumn afternoon.
- Mix in the baking powder, oats, and flour. If you’re going the chocolatey route, replace some of the flour with cocoa powder as you measure.
- Once everything is incorporated, form the dough into a ball. It will be a bit sticky, but that’s okay!
- Wrap it in plastic wrap and let that dough chill in the fridge for at least an hour, but overnight is perfectly fine too.
- When you’re ready, preheat your oven to 350°F. Pull the dough from the fridge, grab a hunk, and roll it out to a 1/4″ thickness. Think of it as your edible crafting clay.
- Use your favorite animal-shaped cookie cutters to stamp out shapes and place them on a cookie sheet lined with parchment paper. Give them a little breathing room—they need space to grow!
- Bake for 5-7 minutes. Keep an eye out—once they turn golden and fragrant, you’re in business.
Cook’s Notes
Here’s the deal: don’t skip the chilling. It makes the dough easier to handle and helps the flavors meld together nicely. If you’re planning ahead, this dough holds well in the fridge for about 24 hours. Once baked, keep the crackers in an airtight container. They should stay crunchy and delicious for about a week, if they last that long. Remember to roll the dough evenly, so all your crackers bake at the same rate. And if they get a little too golden, don’t worry, that just means more crunch.
Make It Your Own
Feel free to play around with the recipe. Here are some ideas:
- Swap the cinnamon for nutmeg or ginger for a different kind of spice.
- Add a handful of mini chocolate chips to the dough for a surprise treat.
- Replace the oats with shredded coconut for a tropical twist.
- Use almond extract instead of vanilla for a nuttier flavor.
If you try this, I’d love to hear how it turns out—drop a comment or tag me! These little guys are a joy to make and even more fun to eat, so I hope they bring a bit of joy to your table too. Happy baking!
Related update: Homemade Animal Crackers
Related update: Brownie Cake gluten free, dairy free

Last Tuesday, I found myself staring into the depths of my pantry, desperately seeking inspiration for dinner. It was one of those weeks where time slipped through my fingers, and suddenly, it was 6 PM, and my stomach was growling loud enough to scare the cat. That’s when I stumbled upon my trusty bag of brown rice and a can of mushrooms. With a bit of onion, a splash of oil, and a pinch of this and that, I transformed these humble staples into a warm, fragrant Brown Rice Mushroom Pilaf. It’s the kind of dish that feels cozy and effortless, yet tastes like you put in way more effort than you actually did. Perfect for those busy nights when you need something quick but also crave-worthy.
Jump to Recipe
What You’ll Need
This dish relies on a few simple ingredients, and chances are you already have most of them lurking in your kitchen.
- 1 tablespoon unrefined sunflower oil
- 1 medium onion, chopped
- 1 can (about 12 oz) of fresh mushrooms, drained and sliced
- 1 cup brown rice
- 2 cups water
- Sea salt to taste
- Ground pepper to taste
How to Make Brown Rice Mushroom Pilaf
- Start by heating the sunflower oil in a large saucepan over medium heat. You want the oil to be shimmering but not smoking.
- Add the chopped onion and sliced mushrooms. Sauté for about 5 minutes, stirring occasionally, until the onion is translucent and the mushrooms are golden and fragrant.
- Stir in the brown rice, ensuring every grain is coated with the oil and mingling with the onions and mushrooms.
- Pour in the water, then sprinkle with sea salt and ground pepper. Give it a gentle stir to combine.
- Bring the mixture to a boil. Once it’s bubbling, reduce the heat to low, cover the pan, and let it simmer for 30 minutes.
- After 30 minutes, remove the pan from the heat but keep it covered. Let it rest for about 10 minutes, allowing the rice to absorb any remaining liquid.
- Fluff the pilaf with a fork before serving. Taste and adjust the seasoning if needed.
Cook’s Notes
If you find that the rice hasn’t absorbed all the water after resting, simply return it to the heat for a few more minutes. This dish can be made ahead of time and stored in the fridge for up to four days. Just reheat it gently on the stove or in the microwave, adding a splash of water to prevent it from drying out. Avoid using high heat when reheating, as it might make the rice too tough.
Make It Your Own
- Swap the canned mushrooms for fresh ones, like cremini or shiitake, for a richer flavor.
- Stir in a handful of frozen peas during the last few minutes of cooking for a pop of color and sweetness.
- For a protein boost, add cooked shredded chicken or crispy tofu just before serving.
- Mix in some chopped fresh herbs like parsley or thyme to brighten the dish.
If you try this, I’d love to hear how it turns out — drop a comment or tag me! Cooking is all about experimenting and making a dish your own, so don’t be shy to tweak it to your taste. Enjoy every bite!
Related update: Brown Rice Mushroom Pilaf

Picture this: it’s a busy Tuesday evening, and I’m racing against the clock to get dinner ready before my favorite show starts. My fridge is a chaotic jigsaw puzzle of assorted jars and half-emptied condiments. I’m craving something hearty but not the usual weekday fare that I’ve cycled through a million times. Enter the Sweet Mustard BBQ Pork Chops. They’re my go-to when I want something that feels special without the fuss of a complicated recipe. These pork chops are a harmony of sweet, tangy, and savory flavors that dance on your taste buds, all thanks to a marinade that takes about five minutes to throw together. Trust me, you’ll want these on your dinner rotation.
Jump to Recipe
What You’ll Need
If you’re like me, you might already have most of these ingredients hanging out in your pantry and fridge—the kind of staples that are real lifesavers.
- 4 bone-in pork chops
- Dijon mustard
- 3 cloves of garlic, minced
- Coarsely ground black pepper
- Honey
- Juice of one lemon
- Soy sauce
How to Make Sweet Mustard BBQ Pork Chops
- In a medium-sized bowl, whisk together the honey, Dijon mustard, lemon juice, soy sauce, and minced garlic until smooth. You want the honey to meld into the mix without a trace—it might take a minute or two.
- Place your pork chops in a large resealable plastic container or a trusty zip-top bag. Pour the marinade over them, making sure every inch of those chops gets some love.
- Seal the container or bag and pop it into the fridge. Let those flavors get cozy for at least 4 hours, but if you can swing it, overnight is where the magic happens. Give the container a shake or the bag a turn every now and then.
- When you’re ready to cook, fire up your grill to medium-high heat. Take the pork chops out of the fridge and let them come to room temp while you prep the grill.
- Sprinkle freshly cracked black pepper on both sides of the chops. The pepper adds a nice bit of heat to balance the sweetness.
- Grill the pork chops for about 5-7 minutes per side. You’re looking for a beautiful char and an internal temp of 145°F to 150°F. Feel free to brush on some leftover marinade as they cook, but if they start to burn, move them to a cooler spot on the grill.
- Once done, transfer the chops to a platter, cover them with foil, and let them rest for 5 minutes. This step is key—juices will redistribute, making every bite moist and tender.
- Serve these beauties with your favorite sides and watch them disappear.
Cook’s Notes
A couple of things I’ve picked up along the way: First, make sure to use bone-in pork chops. They’re less likely to dry out on the grill, and the bone adds some lovely flavor. Also, when you’re grilling, keep a little extra marinade handy for basting, but do it sparingly towards the end to avoid burning. If you’re new to grilling, a meat thermometer is your best friend—it takes the guesswork out of knowing when the meat is done.
For leftovers (if there are any!), store them in an airtight container in the fridge for up to three days. They’re fantastic cold in a salad or warmed up for a quick lunch.
Make It Your Own
I get it—sometimes you want to throw in a twist. Here are a few ideas to switch things up:
- Swap the pork for crispy tofu. Just press and cube the tofu, and marinate it the same way. Grill until it’s golden and crisp.
- Try adding a tablespoon of sriracha to the marinade for a sweet and spicy kick.
- If you’re out of lemon, lime juice works beautifully for a slightly different tang.
- Throw in some fresh rosemary or thyme into the marinade for an herbal note that complements the sweetness.
If you try this, I’d love to hear how it turns out—drop a comment or tag me! Whether you stick to the script or put your own spin on it, these pork chops are a winner. Enjoy the flavors and the simplicity, and happy cooking!
Related update: Sweet Mustard BBQ Pork Chops
Related update: Mini Stuffed Mexican Bell Peppers

Last Tuesday, in the middle of a chaotic week, I found myself staring at the fridge, desperate for something that felt like a hug in meal form. With a 7 PM deadline looming and my brain fried from Zoom meetings, I needed comfort food that wouldn’t take forever. Enter: Cheesy Pasta in a Pot. This dish is my go-to for those nights when I crave something hearty and fuss-free. It’s got layers of rich flavors wrapped in gooey cheese, and the best part is that I can make it with pantry staples I already have on hand. It’s the kind of meal that turns a hectic evening into a cozy, personal retreat. Trust me, one bite and you’ll feel like you’re wrapped in a warm blanket.
Jump to Recipe
What You’ll Need
You might find that you already have most of these ingredients waiting for you. It’s a pantry-friendly recipe, with the kind of ingredients that beg to be transformed into something special.
- 1 pound lean ground beef
- 1 medium onion, chopped
- 2 cloves garlic, minced
- 1 jar (24 ounces) spaghetti sauce
- 1 can (14.5 ounces) stewed tomatoes, undrained
- 1 can (4 ounces) sliced mushrooms, undrained
- 12 ounces shell pasta
- 4 slices provolone cheese
- 2 cups shredded mozzarella cheese
How to Make Cheesy Pasta in a Pot
- Preheat your oven to 350°F (175°C). This sets the stage for the magic to happen.
- In a large pan, heat a little oil over medium-high heat and add the ground beef. Cook, stirring often, until the meat is browned and crumbly. The kitchen should start to smell amazing as the beef sizzles away.
- Drain any excess fat from the pan, because nobody likes greasy pasta.
- Add the chopped onions and minced garlic to the pan. Stir them in and let everything cook until the onions are soft and fragrant.
- Pour in the jar of spaghetti sauce, stewed tomatoes, and the undrained mushrooms. Stir well to combine all these saucy elements. Let this simmer for about 20 minutes, stirring occasionally, until the onions are tender and everything is melded together beautifully.
- Meanwhile, cook the shell pasta according to the package directions. Once cooked, drain and rinse the pasta with cold water to stop the cooking process.
- In a deep casserole dish, layer half of the pasta. Top that with half of the meat sauce mixture.
- Cover this first layer with slices of provolone cheese. It’s like laying a cheesy blanket over the pasta.
- Repeat with the remaining pasta and meat sauce, finishing with an ample topping of mozzarella cheese.
- Cover the casserole with foil and bake in your preheated oven for 35-40 minutes. The anticipation should be building as the kitchen fills with mouth-watering aromas.
- Remove the cover and continue baking until the mozzarella is melted and just begins to brown, about 5 more minutes.
- Serve hot, and enjoy the cheesy, comforting goodness.
Cook’s Notes
Here are a few things I’ve learned along the way. First, don’t skimp on letting the sauce simmer — the flavors deepen beautifully during this time. If you’re prepping this dish ahead of time, assemble everything, cover it, and pop it into the fridge. When you’re ready to bake, just add a few extra minutes to the cooking time. Leftovers, if there are any, reheat nicely in the oven; just cover with foil to prevent the cheese from getting too brown.
Make It Your Own
Feel free to tweak this recipe to suit your taste buds or dietary needs:
- Swap the ground beef for ground turkey or chicken for a lighter version.
- Use whole wheat or gluten-free pasta if you’re looking for a healthier or allergy-friendly option.
- Add a handful of fresh spinach or kale to the sauce for an extra boost of greens.
- For a vegetarian version, replace the meat with a can of drained and rinsed chickpeas or black beans.
If you try this Cheesy Pasta in a Pot, I would love to hear how it turns out for you! Drop a comment below or tag me on social media with your cheesy creations. Enjoy every comforting bite!
Related update: Cheesy Pasta in a Pot
Related update: Brown Rice Mushroom Pilaf

Last Tuesday, I found myself staring at a bag of carrots in my fridge. There they were, looking slightly disheveled and in need of a purpose. It was one of those days when I craved something sweet yet healthy, something that didn’t scream “I’m trying too hard.” Enter my raw carrot cake. It’s a little slice of indulgence that’s as wholesome as it is easy to make. No oven, no fuss, just pure deliciousness. The magic of this recipe lies in the simplicity and the satisfying blend of warm spices mingling with the natural sweetness of fruits. Trust me; this cake is your ticket to dessert heaven on a weeknight hustle.
Jump to Recipe
What You’ll Need
Ah, the ingredient list that’s as generous as your pantry. Chances are, you already have most of these lying around.
- Carrots
- Raisins
- Dried apricots
- Mixed peel
- Date purée
- Almond flour
- Desiccated coconut
- Ginger powder
- Cinnamon powder
- Cloves
How to Make Raw Carrot Cake
- Start by pulsing the carrots, raisins, date purée, and spices in a blender. You want a rough blend, where the carrots still have some texture. The aroma of ginger and cinnamon will instantly hit you, setting the vibe just right.
- Next, drop in the chopped apricots and mixed peel. Pulse a couple of times until they are well incorporated but not fully obliterated — those little bursts of flavor are the hidden gems of this cake.
- Transfer the mixture into a large bowl. Add the almond flour and desiccated coconut, and mix well. You’ll notice the mixture coming together, thick and cohesive, almost begging to be molded.
- Press the mixture into a large cake pan. Ensure it’s even and smooth out the top with a spatula. Refrigerate uncovered until it sets, which should take about an hour.
- Once set, cut the cake into bite-sized squares. You have the option to frost them with whipped cream or roll them into balls and dust with desiccated coconut for an added flair.
Cook’s Notes
A few things to keep in mind while embarking on this carrot cake journey. The trickiest part is pulsing the mixture just right. You don’t want a puree; the goal is a chunky texture. As for storing, these delightful squares can be kept in the fridge for up to a week. If you’re planning ahead, you can make the mixture a day before and let it sit in the fridge, setting aside those frosting duties for the last minute. Just remember, if you opt for whipped cream, apply it just before serving to retain its fresh appeal.
Make It Your Own
This recipe is your canvas, and a few tweaks can lead to new masterpieces.
- Swap the raisins for dried cranberries to add a tart twist.
- Use walnut or pecan flour instead of almond flour for a different nutty flavor.
- For a tropical vibe, add some crushed pineapple (well-drained) into the mix.
- If you’re a fan of spice, add a pinch of nutmeg to the mixture for an extra kick.
If you try this, I’d love to hear how it turns out — drop a comment or tag me! I can’t wait to see your take on this raw carrot cake delight.
Related update: Raw Carrot Cake
Related update: Cheesy Pasta in a Pot

One chilly autumn evening, I found myself staring into the pantry, craving something hearty and nourishing. There it was, hidden behind cans of beans and tomatoes—a lone can of pumpkin puree. It was like finding a forgotten treasure, and suddenly, the idea of Vegetarian Bean and Pumpkin Chili was born. This dish is perfect for those evenings when you want warmth and comfort without spending hours in the kitchen. The best part? It fills your home with an aroma that makes it feel like you’ve been simmering magic all day. Imagine a chili that’s rich, smoky, with a hint of sweetness from the pumpkin and the perfect amount of spice. It’s like a cozy sweater for your taste buds. Trust me, once you try this, it’ll become one of your weeknight go-tos.
Jump to Recipe
What You’ll Need
You might be surprised to find that you already have most of these ingredients hanging out in your pantry and fridge, just waiting to be turned into something fabulous.
- Canned tomatoes
- Canned pumpkin puree
- 2 serrano chiles
- 2 chipotle chiles in adobo
- Vegetable stock – the unsung hero in making all the flavors meld together
- Water
- 1 onion, chopped
- 3 cloves garlic, minced
- 1 tsp cumin
- 1 cinnamon stick
- 1 tsp ground coriander
- Salt to taste
- 1 tbsp chili powder
- Several dashes of Tabasco (or to your liking)
- Your choice of beans, rinsed and soaked overnight
- Optional garnishes: shredded cheese, cilantro, sour cream
How to Make Vegetarian Bean and Pumpkin Chili
- Start by giving your beans a good rinse and soak them in water overnight. This not only softens them but also makes them easier to digest.
- After soaking, rinse the beans once more and place them in your trusty slow cooker. This is where the magic happens with minimal effort.
- Add the canned tomatoes and pumpkin puree to the slow cooker, coating the beans in that vibrant, sunset-orange color.
- Stir in the chopped onion, minced garlic, serrano chiles, and chipotle chiles in adobo. These layers of flavor will start to build as they cook.
- Add the vegetable stock and a bit of water to ensure everything is comfortably covered and ready to soak up all those spices.
- Now for the spices: toss in cumin, the cinnamon stick, ground coriander, chili powder, and a pinch of salt. Stir gently until all ingredients are well mixed.
- Set the slow cooker on low and let it do its thing for about 8 hours. You’ll know it’s ready when the beans are tender and the kitchen smells warm and inviting.
- Before serving, give it a taste and adjust the seasonings as needed. A little more salt or a few more dashes of Tabasco might be just the kick it needs.
- Ladle the chili into bowls and top with your favorite garnishes. I love a sprinkle of shredded cheese, fresh cilantro, and a dollop of sour cream.
Cook’s Notes
When making this chili, the slow cooker is your best friend. You can put everything together in the morning and let it simmer all day. For a more intense flavor, roast the chiles beforehand or sauté the onions and garlic in a little olive oil before adding them to the slow cooker. If you’ve got leftovers, they’ll keep in the fridge for about 5 days and freeze beautifully for up to 3 months. Just reheat slowly on the stove to maintain that rich flavor. And hey, this chili actually tastes better the next day as the flavors have more time to mingle.
Make It Your Own
If you’re feeling adventurous or just want to switch things up, here are a few ideas to make this chili truly your own:
- Swap the serrano chiles for jalapeños if you want a milder spice level.
- Add a cup of corn kernels for a touch of sweetness and extra texture.
- Replace the vegetable stock with mushroom broth for an earthy twist.
- For a smoky kick, add a teaspoon of smoked paprika.
If you give this chili a try, I’d love to hear how it turns out! Drop a comment below or tag me in your cozy bowl photos. Enjoy every spoonful of this autumn-inspired goodness!
Related update: Vegetarian Bean and Pumpkin Chili
Related update: Wisconsin Beer Cheese Soup

The other night, I was in one of those classic “stare into the fridge and hope something inspiring jumps out” moments. You know the ones — it’s midweek, the craving for takeout battles with my desire to not change out of my sweatpants. That’s when my eyes landed on a bag of red potatoes sitting unassumingly on the shelf. A lightbulb went off, and I remembered the simple joy of pan-fried potato wedges. They’re the perfect mix of indulgent and straightforward, and they come together faster than you’d expect. Crispy on the outside, soft on the inside, these are the kind of potatoes that make you feel like you’ve done something miraculous with very little effort. They’re comforting, and you always have the ingredients on hand. Plus, they make your kitchen smell like a dream.
Jump to Recipe
What You’ll Need
Not to brag, but chances are you already have most of this in your pantry or fridge, which makes this recipe a real lifesaver when you need something quick and satisfying.
- Red potatoes – The star of the show. Their texture is perfect for that crispy outside and soft inside.
- Seasoning salt – A bit of savory magic that levels up the flavor.
- Garlic powder – Adds a hint of earthy aroma.
- Onion powder – Because who can say no to a touch of oniony goodness?
- Black pepper – Just a pinch for a subtle heat.
- Canola oil – For frying to that perfect golden brown.
How to Make Pan Fried Potato Wedges
- Start by preheating your canola oil in a good-quality nonstick pan over medium heat. You want the oil to shimmer but not smoke — that’s when you know it’s ready.
- While the oil is heating, slice your red potatoes into wedges. Think thick enough to hold their shape, but thin enough to cook through.
- In a bowl, season those wedges with seasoning salt, garlic powder, onion powder, and black pepper. Toss them until they’re well-coated and you can smell the spices mixing together.
- Carefully place the potatoes in a single layer in the pan. This is key — crowding the pan will steam them instead of giving them that sought-after crispiness.
- Let them cook on one side without turning until they’re golden brown and crispy. You’ll know they’re ready to flip when they release easily from the pan.
- Flip the wedges and repeat on the other side. Your kitchen will smell amazing at this point, and your patience will be rewarded!
- Once both sides are perfectly crispy, remove the wedges from the pan and serve them hot. Trust me, they lose their magic if left to cool for too long.
Cook’s Notes
These potato wedges are pretty forgiving, but here are a few things to keep in mind. Make sure not to rush the cooking time; the key is to let them get really crispy on that first side before you flip them. If you don’t have red potatoes, Yukon Golds are a solid alternative. Store any leftovers in an airtight container in the fridge and reheat them in a hot oven to bring back some of their initial crispiness. But honestly, leftovers are rare because they tend to disappear the moment they hit the table.
Make It Your Own
Feeling adventurous? Here are some fun ideas to make these wedges uniquely yours:
- Spicy Kick: Mix some cayenne pepper in with the seasoning for a spicy version that’ll warm you up from the inside out.
- Herb Infusion: Sprinkle some dried rosemary or thyme over the wedges before frying for an aromatic twist.
- Cheesy Delight: After frying, toss the hot wedges with freshly grated Parmesan for an irresistible cheesy layer.
- Sweet & Savory: Swap garlic powder for cinnamon and add a sprinkle of sugar for a sweet and savory take.
If you give these pan-fried potato wedges a whirl, I’d love to hear how they turned out! Drop me a comment below or tag me in your crispy potato pics. Let’s make weeknight dinners a little more delicious together!
Related update: Pan Fried Potato Wedges
Related update: Homemade Animal Crackers

One rainy Tuesday night, I found myself staring at an almost-empty fridge, pondering what kind of magic I could muster up. You know those evenings when you’re craving something sweet but don’t want to fuss around with a dozen ingredients? Enter: Baked Caramel Custard. It’s that classy, melt-in-your-mouth treat that feels like a hug after a long day. The best part? You probably have most of what you need in your pantry already. Plus, it’s secretly impressive — looks like a million bucks, but simple enough for a weeknight adventure. Trust me, this is one of those desserts you’ll keep coming back to whenever you need a little pick-me-up.
Jump to Recipe
What You’ll Need
This recipe is all about simplicity with a touch of elegance. No need to run to a fancy gourmet store, just grab these from your kitchen:
- Egg substitute
- 1 egg yolk
- 1 can of evaporated skim milk
- Sugar (plus a little extra for that rich caramel)
- 1 cup skim milk
- 2 tablespoons port wine
- 1 teaspoon vanilla extract
How to Make Baked Caramel Custard
- Preheat your oven to 350 degrees. Get it nice and toasty for the custards.
- In a heavy saucepan, scald the evaporated skim milk and skim milk together. You’ll know it’s ready when tiny bubbles start forming around the edges—don’t let it boil!
- Meanwhile, in a skillet over medium heat, caramelize the sugar. Watch closely as it melts and transforms into a golden brown liquid; don’t let it burn.
- Carefully pour the warm milk into the caramelized sugar, stirring constantly. Keep stirring until the sugar is completely dissolved into the milky mixture.
- In a medium bowl, beat the egg substitute and yolk together. Aim for that dreamy lemon color.
- Slowly add the sugary milk mixture to the eggs, whisking constantly to avoid scrambling. Add in the port and vanilla, and give it a good stir.
- Divide the mixture evenly into 6 custard cups. Place them in a baking dish.
- Pour boiling water into the baking dish until it reaches halfway up the sides of the cups. This water bath will ensure the custards cook gently and evenly.
- Bake for 35 to 40 minutes until the custards are set. You’ll know they’re done when a gentle jiggle in the center is all that remains.
- Once out of the oven, let them cool completely in the refrigerator. When chilled, invert each onto a dessert plate and serve immediately.
Cook’s Notes
Don’t rush the caramelizing process! It’s a bit of a dance and takes patience, but it’s worth every second. If your caramel starts to smell burnt, toss it and start again. Trust me, burnt sugar is not what you want here.
- Make these ahead of time and store them in the fridge – they’ll keep beautifully for up to three days. Perfect for a make-ahead dessert when entertaining.
- For leftovers (if you have any!), keep them covered in the fridge, but let’s be honest, you’ll be sneaking spoonfuls until they’re gone.
Make It Your Own
- Swap the port wine for a splash of your favorite rum or bourbon for an adult-only twist.
- Add a pinch of cinnamon or nutmeg to the milk mixture for a warm, spiced note.
- For a dairy-free option, use coconut milk instead of skim milk and evaporated milk. Bonus: It’ll add a lovely tropical flavor.
- If you like your custard with a bit of crunch, sprinkle some crushed pistachios or almonds on top before serving.
If you try this, I’d love to hear how it turns out — drop a comment or tag me! Enjoy the creamy, caramel goodness, friends!
Related update: Baked Caramel Custard
Related update: Raw Carrot Cake
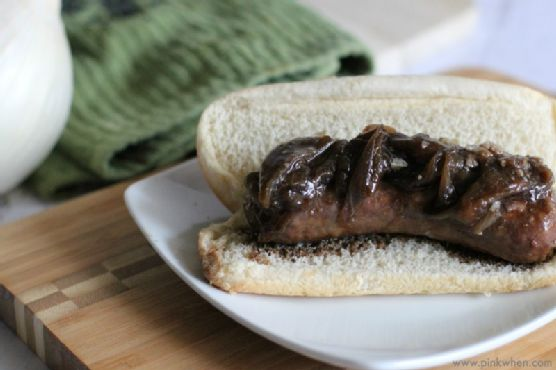
It was one of those weeks where everything seemed to be going at double speed. You know the kind? Work was hectic, my inbox was overflowing, and the kids had back-to-back soccer practices. By Friday, I was craving something bold, comforting, and just a little indulgent. Enter: Guinness and Brats. This dish is the kind of recipe that makes you feel like a weekend warrior even on a Tuesday night. It’s smoky, savory, and hearty enough to make you forget the chaos of the week. Plus, there’s something incredibly satisfying about cooking with beer, especially when it’s a robust Guinness Stout. So, let’s dive into this dish that turns a few humble ingredients into a weeknight hero.
Jump to Recipe
What You’ll Need
It’s a short and sweet list of ingredients, with a touch of the unexpected. Chances are you already have most of this, or at least something close enough to swap in:
- Bratwurst – the star of the show, so choose your favorite kind!
- Guinness Stout – the magic ingredient that marries everything together.
- Onions – go for sweet or yellow, quartered for those lovely caramelized edges.
- Hotdog buns – soft or crusty, whatever you prefer for wrapping up all that goodness.
How to Make Guinness and Brats
- Preheat your grill to about 400°F. You want it nice and hot to do justice to these brats.
- In a large cast iron skillet, nestle your bratwurst links and scatter the quartered onions around them. Pour an entire bottle of Guinness Stout over the top. The aroma as it sizzles is just divine.
- Place the skillet directly on the grill and close the lid. Let the magic happen as the Guinness starts to bubble and the flavors meld together.
- Every 5-10 minutes, open the lid and give everything a good toss. The onions should be getting golden, and the brats will be plumping up beautifully.
- After about 45 minutes to an hour, everything should be perfectly cooked. The brats should be juicy and the onions caramelized in that lovely stout reduction.
- Take a brat and some of those luscious onions, and tuck them into a hotdog bun. Serve immediately, and enjoy the praises you’ll undoubtedly receive.
Cook’s Notes
Cooking on the grill adds a wonderful smoky depth you just can’t fake, but if the weather is uncooperative, you can make this on the stovetop or in the oven. Just keep in mind that stovetop cooking may require more frequent stirring to prevent sticking. Leftovers (if there are any!) can be stored in an airtight container in the fridge for up to 3 days. They reheat beautifully, and you can even slice the brats and onions to toss with pasta for a quick lunch.
Make It Your Own
- Swap the bratwurst for spicy Italian sausage if you crave a kick.
- Use a different stout or dark beer if you’re not a fan of Guinness — just make sure it’s something full-bodied.
- Try adding bell peppers to the mix for a bit of sweetness and color.
- For a lighter option, serve the brats and onions over a bed of greens instead of in a bun.
If you try this, I’d love to hear how it turns out — drop a comment or tag me! There’s something so rewarding about sharing a meal that feels like a mini celebration. Enjoy!
Related update: Guinness and Brats
Related update: Pan Fried Potato Wedges
Related update: Sweet Mustard BBQ Pork Chops

Last Tuesday, as the autumn breeze swept through my kitchen window, I found myself craving something warm and cozy. I had just returned from a brisk walk, the kind that leaves your cheeks rosy and fingers tingling. That’s when the idea of spiced apple cider popped into my head. It’s the perfect drink to transition into the cooler months – comforting, aromatic, and surprisingly easy to whip up. There’s something magical about the way the spices blend with the apple juice, evoking a sense of nostalgia and warmth. Plus, it fills your home with the most inviting aroma. Trust me, this spiced apple cider is exactly what you need on a chilly day, especially if you’re looking for a quick pick-me-up or a delightful way to impress your guests without spending hours in the kitchen.
Jump to Recipe
What You’ll Need
Most of these ingredients are already sitting in your pantry, waiting to be transformed into a cozy beverage.
- Allspice
- Freshly apple juice
- Cinnamon sticks
- Ginger
- Maple syrup
- Nutmeg
- Orange
- Water
How to Make Spiced Apple Cider
- In a large non-reactive pot, combine all the ingredients. Give them a gentle stir to ensure everything is well-mixed.
- Bring the mixture to a boil over medium-high heat. You’ll notice the aroma of spices filling your kitchen — that’s when you know you’re on the right track.
- Let it boil for about 5 minutes, just enough for the flavors to start mingling and becoming friends.
- Cover the pot, reduce the heat, and let it simmer gently for 30-40 minutes. This is when the magic happens, and the flavors deepen into a warm hug in a mug.
- Next, line a colander with cheesecloth and strain the cider. This will give you a smooth, clear drink free of any spice bits.
- Serve it warm in your favorite mug. And if it’s been one of those days, feel free to spike it with a little dark rum for an extra kick.
Cook’s Notes
When making this cider, patience is your best friend. Allowing it to simmer means the spices have the chance to really infuse the apple juice, creating that perfect balance of flavor. If you’re planning ahead, you can make the cider in the morning and reheat it gently before serving. The flavors will actually become more pronounced over time.
- Store any leftovers in the fridge for up to 4 days. Reheat gently on the stove or in the microwave.
- Be cautious when boiling; too high heat can evaporate your cider down more than you’d like.
Make It Your Own
- Swap the maple syrup with honey for a different layer of sweetness.
- Add a splash of lemon juice for a hint of citrusy brightness.
- Replace water with apple brandy for a stronger apple flavor and a boozy twist.
- Introduce star anise for an extra depth of flavor, giving your cider a slightly licorice note.
If you try this, I’d love to hear how it turns out — drop a comment or tag me! Your kitchen adventures are what make sharing these recipes so rewarding.
Related update: Spiced Apple Cider

It was one of those evenings where autumn seemed to have secretly slipped into the neighborhood overnight. The air felt crisp, and the leaves were giving their best dance moves, swirling to the ground with every gust of wind. I found myself craving something warm and reassuring, a cozy bowl of soup that would wrap around me like my favorite blanket. That’s when I remembered this Roasted Garlic & Butternut Parmesan Soup — a velvety concoction that feels fancy enough for any dinner party but is as easy as pie to whip up on a weekday. Not to mention, the house smells absolutely divine with the heady scent of roasted garlic and caramelized squash wafting from the kitchen. It’s like giving your taste buds a great big hug.
Jump to Recipe
What You’ll Need
Funny thing about this soup is its simplicity; you probably have most of these ingredients lounging in your kitchen already. Let’s get to it:
- Butternut squash – the star of our show
- Sweet onion – for that subtle, sweet depth
- An entire head of garlic – because nobody ever said no to roasted garlic
- Olive oil – a generous drizzle makes everything better
- Sea salt – enhances all the flavors
- Chicken stock – or vegetable for a vegetarian twist
- Shredded romano cheese – for that salty, nutty finish
- Whole milk – adds creaminess without overpowering
How to Make Roasted Garlic & Butternut Parmesan Soup
- Preheat your oven to 400°F (200°C). This is the perfect time to pour yourself a glass of wine, if you’re into that!
- In a large roasting pan, toss together the butternut squash and onion slices. Drizzle them generously with olive oil and a good sprinkle of sea salt. Trust me, the caramelization is what makes it magical.
- Take about 12 inches of parchment paper and place the whole head of garlic right in the center. Drizzle it with olive oil and sea salt, then wrap it tightly. Pop this little package in foil for a cozy wrap — think of it as a garlic spa treatment.
- Place the garlic package beside your roasting pan in the oven. Bake for about 45 minutes, or until the squash is tender and garlic is mushy. The aroma will be your timer.
- Once roasted to perfection, add the squash and onion (and all those lovely pan juices!) to a glass blender. Pour in chicken stock until you reach the desired consistency, and blend until smooth.
- Squeeze the mushy garlic from its skin directly into the blender, along with all the olive oil from its package. Blend again until everything is luxuriously smooth.
- Pour the mixture into a large saucepan. Stir in the shredded romano cheese and whole milk. Heat gently to a simmer — don’t rush this step; it’s where flavors meld.
- Let it simmer for about 10 minutes, allowing the flavors to deepen. Serve it up with an extra drizzle of olive oil and a sprinkle of romano cheese. Voilà, dinner is served!
Cook’s Notes
So here’s the thing — make sure your butternut squash is cubed evenly. It’ll roast better that way, and we want each piece to soak up that olive oil magic. You can prep the squash and onion the night before if you’re tight on time. As for storage, this soup keeps beautifully in the fridge for up to 3 days and freezes like a charm. Just be sure to reheat gently, stirring often to maintain that creamy texture. Oh, and if you don’t have a glass blender, a good immersion blender will do the trick just fine.
Make It Your Own
This soup is pretty versatile; here are a few fun twists:
- Swap the chicken stock for vegetable stock to keep it vegetarian but still flavorful.
- Replace romano cheese with aged cheddar for a sharper tang.
- For a vegan version, substitute milk with coconut milk and the cheese with nutritional yeast.
- Add a pinch of nutmeg or cinnamon for a warm, spicy note that complements the squash.
If you try this, I’d love to hear how it turns out — drop a comment or tag me! Happy cooking, and may your kitchen be filled with laughter and delicious aromas.
Related update: Roasted Garlic & Butternut Parmesan Soup
Related update: Vegetarian Bean and Pumpkin Chili

The craving hit me like a ton of bricks on a random Tuesday night. You know the type — the one where you’re suddenly transported to that cozy pub you used to frequent, with a plate of crispy shrimp and a cold drink in hand. However, instead of heading out, I was determined to recreate that same vibe right in my own kitchen. That’s how this Breaded Shrimp and Spicy Mayo Appetizer came to life. It’s the kind of dish that makes you feel like a rockstar chef without creating a mountain of dirty dishes. Trust me, it’s worth every minute you spend on it, especially when you bite into the perfectly crispy shrimp, complemented by the kick of spicy mayo. Whether you’re hosting a small gathering or just treating yourself, this recipe is a keeper.
Jump to Recipe
What You’ll Need
This recipe is delightfully straightforward, and I’m willing to bet you already have most of the ingredients lounging in your pantry. Here’s what you’ll need:
- All-purpose flour
- Bread crumbs
- Chili powder
- Egg
- Garlic powder
- Mayonnaise
- Onion powder
- Suya pepper (your secret weapon for flavor!)
- Salt
- Canned shrimp
- Sriracha sauce
How to Make Breaded Shrimp and Spicy Mayo Appetizer
- Start by peeling and deveining your shrimp. Leave the tail on if you’re feeling fancy — it makes for a great handle.
- Season the shrimp generously with suya pepper, and let them sit for a bit. The spice will do its magic while you prep the rest.
- In a small bowl, whisk the egg until it’s a smooth, sunny yellow, then set it aside for dunking duty.
- In another bowl, mix the all-purpose flour with onion powder, garlic powder, chili powder, and a pinch of salt. This is your flavor-packed coating.
- Take each shrimp and give it a loving coat in the seasoned flour. Dunk it in the egg mixture, making sure it’s fully covered, and finally, roll it in the breadcrumbs.
- Heat up your oil in a pan over medium heat. Once it’s shimmering, it’s time to fry. Place the shrimp in gently, cooking them until they’re golden brown on both sides, filling your kitchen with a mouth-watering aroma.
- For the spicy mayo, mix two tablespoons of mayonnaise with one tablespoon of sriracha sauce until you have a beautifully smooth and spicy dip.
- Serve your crispy shrimp hot, with a generous dollop of spicy mayo on the side. Enjoy the crunch and kick with every bite!
Cook’s Notes
Here are a few things I’ve learned along the way. First, don’t skimp on the seasoning — the suya pepper really elevates the shrimp. Also, make sure your oil is hot enough before you start frying; otherwise, you’ll end up with greasy shrimp instead of crispy perfection. If you’re making this ahead, fry the shrimp and keep them warm in the oven at a low temperature. They’ll stay crisp without drying out. Leftovers (if there are any!) can be stored in an airtight container in the fridge, but they’re best enjoyed fresh.
Make It Your Own
Here are some fun twists for when you’re feeling adventurous:
- Swap the shrimp for crispy tofu if you’re catering to vegetarian friends. The seasoning works well with tofu too!
- Try adding some lemon zest to the bread crumbs for a citrusy zing that pairs beautifully with the spicy mayo.
- If you love garlic, increase the garlic powder in the flour mix and add a dash of fresh minced garlic to the mayo for a garlic-lover’s dream.
- Add a sprinkle of parmesan cheese to the breadcrumbs for a cheesy twist on the classic breading.
If you try this, I’d love to hear how it turns out — drop a comment or tag me on social media! Whether you stick to the script or put your twist on it, I’m excited to see these shrimp bring joy to your table.
Related update: Breaded Shrimp and Spicy Mayo Appetizer

Picture this: It’s a Saturday afternoon, and I’m in the kitchen with my son. We’re both craving something sweet but don’t want to spend hours baking. Suddenly, the idea hits me—OREO Cookie Balls! These aren’t just any cookie balls; we’re going to turn them into adorable snowmen. It feels like the perfect plan for a chilly day when you want something as comforting as a warm sweater but as easy as a quick snack. The best part? You probably already have most of the ingredients in your pantry. Trust me, these little bites are worth making. They’re quick and fun, especially if you have little helpers around.
Jump to Recipe
What You’ll Need
So here’s the deal: These ingredients are as simple as it gets. You might even have them stashed away already. Let’s dive in:
- A full package of OREO Cookies
- One block of cream cheese (softened to room temperature)
- Baker’s chocolate (for melting)
- Rolo chocolate candy
- Black gel icing (for the eyes and buttons)
- Orange gel icing (for the nose)
- Additional supplies to decorate snowmen (think scarves made of licorice or hats from mini peanut butter cups)
How to Make OREO Cookie Balls – Snowman
Ready? Let’s make some magic happen!
- First, grab your package of OREO Cookies. Without removing the filling, crush them up in a large gallon-sized ziplock bag. You want fine crumbs, so give them a good whack!
- Pour your cookie crumbs into a large mixing bowl, and add in the softened cream cheese. Mix these together on medium speed until you have a smooth, dough-like consistency.
- Take a 1-inch cookie scoop (or just eyeball it) to portion out the mixture. Roll each scoop between your palms to form smooth, even balls.
- Place the cookie balls on a cookie sheet and pop them in the freezer for about 10 minutes. This helps them firm up a bit.
- While they’re chilling, melt your Baker’s chocolate according to the package instructions. You want it smooth and glossy, ready for dipping.
- Remove the cookie balls from the freezer and dip each one into the melted chocolate. Use a fork to lift them out, letting any excess chocolate drip off before placing them on a wax paper-lined cookie sheet.
- With a gentle touch, add the Rolo chocolate candy on top for the hat while the chocolate is still wet.
- Chill your snowmen in the refrigerator for about an hour until the chocolate shell is firm and set.
- Now, the fun part—decorate! Use the black gel icing for eyes and buttons, and the orange gel icing for the cute little carrot nose. Let your creativity shine with any additional decorations you like.
Cook’s Notes
Alright, let’s talk strategy. If the OREO dough feels too sticky, chill it in the fridge for a bit. It makes rolling much easier. Regarding the chocolate, avoid overheating it—give it slow, gentle warmth so it won’t seize. For storage, these snowmen can chill out in the fridge for up to a week or stay cozy in the freezer for about a month. Just make sure they’re in an airtight container to keep them fresh. If you’re planning to make these ahead of time, consider doing the base a day in advance to save on last-minute hustle.
Make It Your Own
Feel like changing things up? Here’s how you can shake up the snowman scene:
- Swap the Baker’s chocolate with white chocolate for an even snowier look.
- Use colored gel icing to create vibrant scarves or hats.
- Add crushed peppermint candy to the cookie crumb mixture for a holiday twist.
- Substitute the Rolo candy with a mini marshmallow for a softer hat look.
If you try this, I’d love to hear how it turns out—drop a comment or tag me! Let’s share some sweet little snowmen with the world. Happy decorating!
Related update: OREO Cookie Balls – Snowman
Related update: Chocoholic's Deep Dark Dream Chiffon Cake

Picture this: it’s a late Tuesday night, and I’ve got a serious craving for something sweet. The kind of craving that whispers, “bake something now, or forever hold your peace.” But who has the energy for an elaborate dessert after a long day? I need something quick, comforting, and chocolatey. Enter: my 10 Minute Brownies. This recipe is the superhero of the sweet-tooth world. It’s so simple, you could practically make it with your eyes closed. Plus, it’s got this lush, fudgy texture thanks to a surprising ingredient — unsweetened applesauce. So, if you find yourself in need of a quick chocolate fix that feels both indulgent and guilt-free, these brownies are your answer.
Jump to Recipe
What You’ll Need
You might be surprised at how basic the ingredient list is. Spoiler: you likely have most of these on hand. Here’s what you’ll need to get started:
- Canola oil – for that perfect moist texture.
- Semisweet chocolate chips – because what’s a brownie without chocolate?
- Unsweetened applesauce – our secret for keeping it moist without extra fat.
- Sugar – for that classic brownie sweetness.
- Vanilla extract – for a hint of flavor depth.
- Unbleached flour – a staple!
- Baking powder – gives it that slight lift, so they aren’t bricks.
- Finely-chopped walnuts – optional, but they add a nice crunch.
How to Make 10 Minute Brownies
- Preheat your oven to 350 degrees F. Grab a 6 x 9 inch baking pan, lightly oil it, and set it aside for later.
- In a small saucepan over low heat, combine the canola oil and semisweet chocolate chips. Stir occasionally until the chocolate melts into a silky, smooth mixture. Remove from heat and let it cool slightly.
- In a large bowl, mix the unsweetened applesauce, sugar, and vanilla extract until everything is well blended. You should smell that sweet, vanilla aroma.
- Pour the cooled chocolate mixture into your applesauce blend. Whip it up until it’s smooth and shiny.
- Add in the unbleached flour, baking powder, and finely-chopped walnuts. Stir just until everything is combined; you don’t want to overmix and end up with tough brownies.
- Spoon the batter into your prepared baking pan, smoothing the top with a spatula.
- Bake in the oven for 25 to 30 minutes. You’ll know they’re done when the top springs back gently upon touch. The kitchen will smell like chocolate heaven by now!
- Allow the brownies to cool completely before cutting them into luscious squares. This waiting game is tough, but so worth it.
Cook’s Notes
Let’s be real, these brownies are pretty forgiving. But here are a few tips to ensure you get the best results every time. First, be careful not to overbake them. You’re going for fudgy, not crumbly. They might look a little underdone when you first pull them out, but they’ll firm up as they cool. For storing, keep them in an airtight container in the fridge, and they’ll stay fresh for up to a week — not that they’ll last that long!
Make It Your Own
The beauty of this recipe is its flexibility. Here are some delicious variations you can try:
- Nut-free: Skip the walnuts if you’re not a fan or have allergies. Consider adding a handful of chocolate chips instead for extra gooeyness.
- Gluten-free: Swap the unbleached flour for a gluten-free blend. No one will even know the difference.
- Peanut butter swirls: Dollop some peanut butter over the batter before baking and swirl it in with a knife for a nutty twist.
- Raspberry delight: Throw in a handful of fresh or frozen raspberries for a fruity surprise that pairs beautifully with the chocolate.
If you try this, I’d love to hear how it turns out — drop a comment or tag me! Happy baking, friends. 🍫✨
Related update: 10 Minute Brownies
Related update: OREO Cookie Balls – Snowman
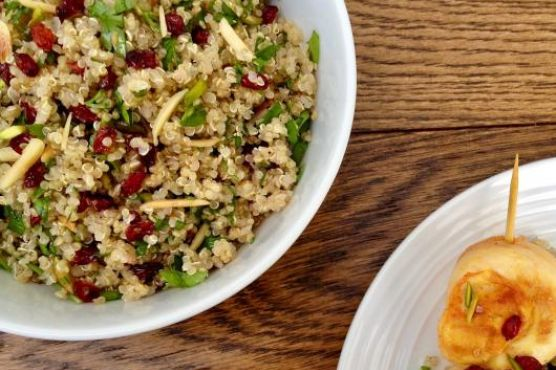
On a chilly Tuesday evening, I found myself rummaging through my pantry, desperate for something that felt like a hug in a bowl but wouldn’t keep me hostage in the kitchen. I wanted something earthy yet vibrant, complex but not fussy. That’s when a bag of quinoa caught my eye, nestled behind a family of lentils. With a little inspiration from the tangy barberries I’d recently discovered at the market and a stash of nuts that begged to be toasted to life, this Quinoa Salad with Barberries & Nuts was born. It’s the kind of dish that fills the kitchen with warm, toasty aromas and feels fancy enough to impress, but is simple enough to whip up on a weeknight.
Jump to Recipe
What You’ll Need
There’s a good chance you already have most of these ingredients hanging around, just waiting for a chance to shine. Here’s what you’ll gather:
- Quinoa – the blank canvas for all the flavor.
- Water – to cook the quinoa to fluffy perfection.
- Salt – always the unsung hero.
- Olive oil – for toasting and dressing.
- Barberries – those tangy pops of flavor.
- Slivered almonds – for that nutty crunch.
- Slivered pistachios – because why not double down on nuts?
- Coriander – a fresh, herby kick.
- Mint – because everything deserves a little minty brightness.
How to Make Quinoa Salad with Barberries & Nuts
- Start by rinsing the quinoa under cool running water using a sieve. This little bath removes any bitterness. Once rinsed, drain thoroughly.
- In a medium saucepan, pour boiling water over the quinoa. Add a generous pinch of salt, stir, and cook over medium-low heat. You’re looking for the quinoa to be tender yet retain a slight bite. Drain again in a sieve if needed.
- While the quinoa is doing its thing, turn your attention to the barberries. Pick them over, rinse them clean in a sieve, and let them dry a bit on some kitchen paper.
- In another saucepan, heat 1 tablespoon of olive oil over medium heat. Toss in the slivered almonds and toast them lightly. When they’re golden and fragrant, add the pistachios. Keep an eye on them; nuts can burn quickly!
- Add the rest of the olive oil and the rinsed barberries to the pan with the nuts. Cook briefly until the barberries are shiny and slightly puffed. Remove from heat.
- Save a tablespoon of the nut and barberry mixture for garnish later. Combine the remaining nut-barberry mixture with the cooked quinoa along with the chopped coriander and mint.
- Return the quinoa mixture to the pot. Cover with a lid and let it sit over low heat for about ten minutes until everything is well heated and steam is rising. The aroma will make it hard to wait!
- Fluff the quinoa with a fork, drizzle a little extra olive oil, give it a twist of black pepper if you’re feeling it, and then sprinkle over the reserved nut-barberry mix and herbs.
- Serve this beauty as a star on its own or let it play the perfect sidekick to any main dish.
Cook’s Notes
I won’t lie, this dish is forgiving. Quinoa can be prepped a day ahead and kept in the fridge, making this a great make-ahead option. If you end up with leftovers (lucky you!), it holds up well in the fridge for up to 3 days. Just give it a gentle reheat on the stove or enjoy it cold—it’s pretty versatile. Be mindful when toasting the nuts; they love to go from golden to charred in a heartbeat.
Make It Your Own
- Swap the barberries for dried cranberries if they’re more readily available. The sweetness will complement the nuts beautifully.
- Not a fan of pistachios? Use toasted hazelnuts instead for an equally delicious crunch.
- For a protein boost, toss in some shredded cooked chicken or crispy tofu cubes.
- If coriander and mint aren’t your jam, try parsley and basil for a different herby note.
If you try this, I’d love to hear how it turns out—drop a comment or tag me on social media! It’s always a joy to see your creations and hear your twists on the recipe. Enjoy the journey from pantry to plate!
Related update: Quinoa Salad with Barberries & Nuts
Related update: Garlic Lime Grilled Chicken Salad
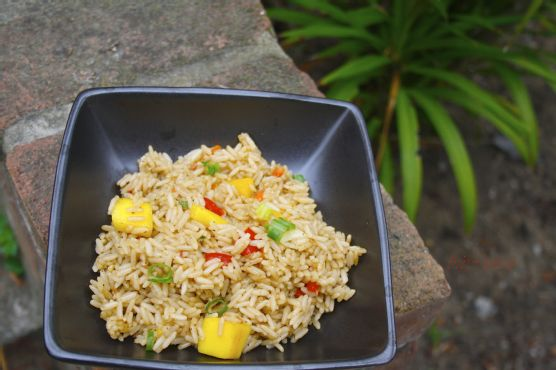
I had one of those days where the sun just wouldn’t quit, blazing through my kitchen window, taunting me while I was craving something light but satisfying. The usual suspects in my pantry were looking tired, and I wanted something that just screamed “refreshing.” Enter Mango Fried Rice, my answer to a summer evening where you want a meal that’s as breezy and colorful as you’d imagine a tropical getaway to be. This dish is one of those delightful concoctions that’s both a little fancy and incredibly simple to pull off. The sweetness of the mango mixed with the savory notes of the fried rice is the comfort you didn’t know you needed. Trust me, it’ll impress your taste buds—and maybe anyone else lucky enough to share it with you.
Jump to Recipe
What You’ll Need
I love this ingredient list because it feels like a scavenger hunt in your own kitchen. Chances are you’re already halfway there.
- 1 cup rice
- 1 1/2 cups chicken stock
- 1 large mango, cubed
- Mixed vegetables (like carrots, peas, and bell peppers)
- 1 scotch bonnet pepper, chopped
- 1-2 seasoning cubes
How to Make Mango Fried Rice
- First, wash your rice thoroughly. You want those grains shining like little pearls.
- Bring it to a gentle boil on medium heat with just a splash of water. No need to drown it; we’re going minimalist here since the chicken stock’s coming in hot later.
- As soon as the rice turns slightly soft and absorbs that initial water, it’s time to reduce the heat. Pour in the chicken stock and let it work its magic. Cook until all that flavorful stock is absorbed and the rice is dry.
- Now, crank up the heat a bit and stir in the chopped vegetables and that fiery scotch bonnet pepper. It’s like a spa day for your rice, soaking up all those vibrant colors and flavors.
- Crumble in your seasoning cube. Oh, the savory goodness! Give it a gentle toss so it’s evenly distributed.
- Finally, gently fold in your cubed mango. You’re aiming for a harmonious blend of sweet and savory. Serve it warm with any protein you fancy. Chicken is my go-to, but hey, follow your heart!
Cook’s Notes
Let’s chat about how to keep this masterpiece at its peak. First off, if your chicken stock is homemade and has a bit of oil, you’re golden—no need for additional oil. Store leftovers in the fridge for up to three days, but good luck having any left over! If you’re meal prepping, cook everything except the mango and add it fresh when you’re ready to eat. Nobody wants mushy mango, trust me. Common misstep: rushing the rice. Give it the time it needs to soak up those flavors!
Make It Your Own
Feeling adventurous? Here are some ideas to switch things up:
- Go vegetarian by swapping the chicken stock for vegetable broth and adding some crispy tofu.
- Kick up the heat with an extra scotch bonnet. Fire lovers, this one’s for you!
- Try pineapple instead of mango for a tangier twist.
- Add a handful of roasted cashews for some crunch and extra protein.
If you give this Mango Fried Rice a whirl, I’d love to hear how it turns out—drop a comment or tag me in your culinary adventures! Enjoy the sweet and savory carnival in your mouth! 🌟
Related update: Mango Fried Rice
Related update: The Blarney Burger
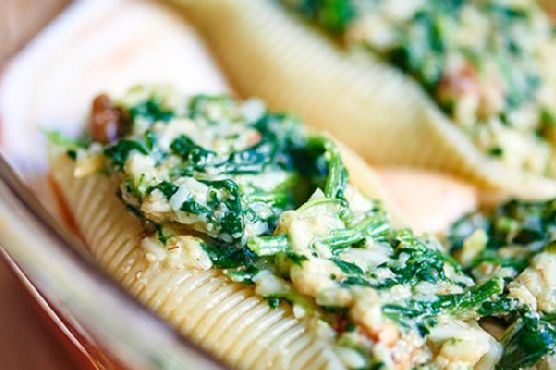
Picture this: it’s a chilly Tuesday evening, and you’re staring into the depths of your fridge, hoping for dinner inspiration to leap out at you. That’s when you remember those jumbo pasta shells you bought on impulse, sitting in the pantry like a promise of comfort. Enter the magic of Cheesy Spinach Stuffed Shells — a dish that ticks all the boxes when you want something warm, cheesy, and convincingly fancy without the fuss. This recipe is the kind of thing you can whip up with stuff you’ve probably already got lying around. It’s got the creamy, melty goodness of cheese, the nutritious punch of spinach, and the satisfying bite of perfectly cooked pasta — all drenched in a dreamy layer of sauce. Whether you’re feeding the family or impressing a date, these stuffed shells are your ticket to a happy, full belly.
Jump to Recipe
What You’ll Need
The beauty of this recipe is in its simplicity — we’re talking ingredients you likely have on hand, with a few star players you can grab on your next grocery run. Here’s what you’ll need:
- Jumbo shells
- Cooked frozen spinach
- Wheat germ
- Shredded parmesan cheese
- Chopped pecans
- Shredded Mexican cheese blend
- Diced green onions
- Salt and dried basil
- Eggs
- Water
- Alfredo sauce
- Spaghetti sauce
How to Make Cheesy Spinach Stuffed Shells
Ready for the good stuff? Let’s dive in!
- Start by bringing a large pot of salted water to a boil. Add in the jumbo shells and cook them for about 9 minutes — they should be al dente, as they’ll finish cooking in the oven. Drain them and let them sit face down on a paper towel to get rid of excess water.
- While those shells are having their moment, pop your frozen spinach in the microwave, following the box instructions, but skip adding water. Once cooked, squeeze out as much water as you can.
- In a large mixing bowl, combine the cooked spinach with wheat germ, parmesan cheese, Mexican cheese blend, chopped pecans, and finely diced green onions. Toss in some salt, a dash of pepper, and about a teaspoon of dried basil — feel free to adjust this to taste, and if you’re adventurous, a pinch of nutmeg could be interesting!
- Crack in two eggs and add a splash of water to the mixture. Stir until everything is well combined — the eggs should be incorporated smoothly into the mix.
- Stuff each shell generously with the spinach mixture. You’ll have enough filling for about 16 to 20 shells.
- Preheat your oven to 350 degrees. Grab an 8×8 or a 9×11 inch baking dish and give it a good spray with cooking spray.
- Spread a thin layer of Alfredo sauce on the bottom of the dish, followed by a layer of spaghetti sauce. This double-sauce base is what dreams are made of!
- Arrange the stuffed shells over the sauce base, then drape them with the remaining sauce. Make sure each shell gets some sauce love!
- Bake in the preheated oven for 30-35 minutes, or until the sauces are bubbly and make your kitchen smell like a cozy Italian bistro.
Cook’s Notes
Here’s the scoop: this dish is forgiving, so don’t stress if your shells aren’t perfectly stuffed or your sauce layers are a bit uneven. If you’re making it ahead, you can assemble everything, cover, and stash it in the fridge for a day or two. When you’re ready, just pop it in the oven and extend the baking time by about 10-15 minutes. Leftovers? Lucky you! They reheat beautifully in the microwave or oven. Just sprinkle a splash of water if you’re microwaving to keep things nice and saucy.
Make It Your Own
Here’s where you can get creative:
- Go nut-free: If pecans aren’t your thing, swap them out for sunflower seeds for that crunch.
- Protein punch: Mix in some cooked chicken sausage into the filling for a meatier bite.
- Gluten-free option: Use gluten-free pasta shells and ensure your sauces are gluten-free too.
- Spicier spin: Add a pinch of chili flakes into the filling or use a spicy Mexican cheese blend.
If you try this, I’d love to hear how it turns out — drop a comment or tag me! Cooking should be fun and delicious, so play with it and make it yours. Happy cooking, friend!
Related update: Cheesy Spinach Stuffed Shells
Related update: Mango Fried Rice
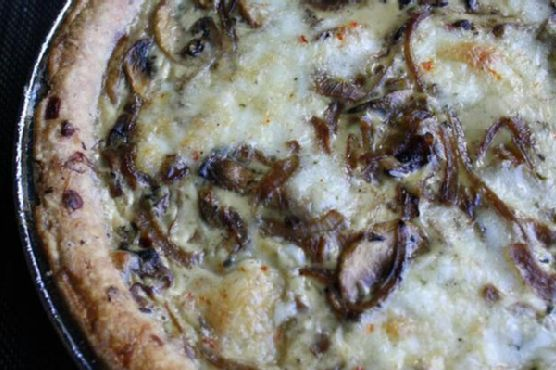
The other day, I found myself staring into the depths of my fridge, battling that familiar weeknight dilemma: what to make for dinner that feels both comforting and a little bit special. The answer came subtly as I caught sight of a lone pie shell resting on the bottom shelf. Voilà — Caramelised Onion and Mushroom Quiche! It’s the kind of dish that fills your kitchen with the most irresistible aroma, promising warmth and satisfaction in every bite. Plus, it’s a breeze to pull together with ingredients you probably already have lounging in your pantry and fridge. Let me tell you, this quiche is your new best friend for those hectic days when you crave something homemade but without the fuss.
Jump to Recipe
What You’ll Need
This ingredient list is delightfully straightforward, and chances are you already have most of these at home. Here’s what you’ll need to whip up this delicious quiche:
- A pre-made nine-inch pie shell
- 2 tablespoons of olive oil
- 2 large white onions, thinly sliced
- 2 cloves of garlic, minced
- 1/2 teaspoon of dried chilli flakes
- 8 ounces of mushrooms, sliced
- 1 teaspoon of dried thyme
- 3 eggs
- 1 cup of half and half cream
- 1 cup of grated havarti cheese
- Salt and pepper, to taste
How to Make Caramelised Onion and Mushroom Quiche
- Preheat your oven to 400°F. Take your nine-inch pie shell and dock it with a fork to prevent it from puffing up. Slide it into the oven and let it bake for 10 to 15 minutes until it’s lightly golden.
- While the pie shell is crisping up, heat the olive oil in a large skillet over medium-high heat. Add the onions, garlic, and chilli flakes. Stir occasionally and let them cook until the onions are rich, brown, and caramelised, about 10 minutes.
- Next, toss the mushrooms into the skillet. Keep the heat on high and let the mushrooms caramelise as well, which should take around 5 minutes. The mushrooms will soak up all those lovely flavors. Once they’re ready, remove the skillet from the heat and stir in the thyme, salt, and pepper.
- In a large mixing bowl, beat the eggs together with the half and half cream. Stir in half of the grated havarti cheese. Combine this mixture with the onion-mushroom blend, mixing thoroughly until everything is well integrated.
- Place the pre-baked pie shell on a cookie tray — this is your shield against any unexpected spills. Pour the filling into the pie shell, spreading it evenly. Sprinkle the remaining cheese over the top.
- Reduce the oven temperature to 375°F. Bake the quiche until the filling is set — it will be firm to the touch and have a gorgeous golden hue. This should take about 25 to 30 minutes. Serve warm and get ready for those taste buds to rejoice!
Cook’s Notes
Cooking can sometimes be a bit unpredictable, so here are a few tips to ensure your quiche turns out perfect every time. First, make sure those onions are well caramelised; they should be a deep golden brown. This adds depth and sweetness to the quiche. Don’t rush the process — good things take time! Also, remember to taste your filling before adding it to the shell to adjust the seasoning. If you want to make this ahead, you can prepare the filling and bake the pie shell a day before; just assemble and bake right before serving. Leftovers (if any!) can be stored in the fridge and reheated gently in the oven.
Make It Your Own
This quiche is wonderfully versatile. Here’s how you can mix it up:
- Swap the mushrooms for crispy tofu if you’re looking for a vegetarian protein boost.
- Use Swiss cheese or even cheddar if you prefer a sharper flavor profile.
- Throw in some baby spinach with the mushrooms for extra greens.
- Substitute the dried thyme with fresh basil for a different herbal note.
If you try this, I’d love to hear how it turns out — drop a comment or tag me on social media! Cooking is all about experimenting and most importantly, enjoying every step of the way. Can’t wait to hear from you!
Related update: Caramelised Onion and Mushroom Quiche

It was one of those drizzly, stay-inside afternoons when a sudden craving hit me — something sweet but tangy, with a satisfying crunch. My pantry didn’t offer much in the way of excitement, but there was rhubarb in the fridge and an untouched packet of phyllo dough languishing in the freezer. That’s when the idea for Crispy Rhubarb Pockets was born. Trust me, this dish is worth making not just because it’s the perfect balance of tart and sweet, but also because it’s beautifully rustic and so very satisfying. It’s the kind of dessert that looks like you’ve put in a lot of effort when really, it’s just a clever little trick. Plus, who doesn’t love a crispy bite-sized treat?
Jump to Recipe
What You’ll Need
Honestly, you probably have most of these ingredients at home. It’s a grab-and-go situation, making it perfect for those spontaneous baking whims.
- Diced rhubarb – the heart of our pockets, bringing the tangy goodness
- Granulated sugar – to sweeten the deal
- Cornstarch – our trusty thickener
- Salt – just a pinch to balance flavors
- Vanilla extract – a splash for that warm, comforting aroma
- Phyllo sheets – the secret to crispy, flaky pockets
- Melted butter – for brushing, because butter makes everything better
- Water – to help seal those delicious pockets
How to Make Crispy Rhubarb Pockets
- In a medium saucepan, toss in the diced rhubarb, sugar, cornstarch, and salt. Set it over medium-low heat. As it warms up, stir occasionally. You’ll know it’s ready when the rhubarb releases its liquid and starts breaking down into a thick, chunky sauce — give it about 10 minutes.
- Take the pan off the heat and stir in the vanilla extract. Let this mixture cool to room temperature. The vanilla will mingle with the rhubarb, creating a divine aroma that fills the kitchen.
- Grab your phyllo sheets and layer four of them, brushing each layer with melted butter. Phyllo is delicate, so handle with care, and don’t skimp on the butter — it’s key to that golden crunch.
- Preheat your oven to 350 degrees F. While it warms up, cut four 4-inch squares from your buttered phyllo stack. Precision isn’t necessary; rustic is charming.
- Spoon 2 teaspoons of the rhubarb filling into the center of each square. Now, brush from the edge of the filling to each point of the square lightly with water. This is the part where you channel your inner artist.
- Gather the points of the square and pinch them together just above the filling, forming a little pouch. Brush it all over with more butter. Repeat this artistic process for all four pouches.
- Arrange the pouches on an ungreased cookie sheet or baking pan, spacing them at least an inch apart. Into the preheated oven they go for 12 to 15 minutes, or until they’re golden brown and begging to be devoured.
- Remove the pouches from the oven and let them cool on a wire rack for about 5 minutes. They’re equally delightful warm or at room temperature, so serve according to your patience level!
Cook’s Notes
So, a few things to keep in mind: first, don’t rush the rhubarb cooking process; it needs time to release its magic. Phyllo can be a bit tricky since it dries out quickly, so keep it covered with a damp cloth while you work. If you make these ahead of time, you can store them in an airtight container for up to two days. Just pop them back in a warmed oven to re-crisp them. Leftovers (if there are any) are wonderful with a dollop of vanilla ice cream.
Make It Your Own
There’s plenty of room to play around with this recipe:
- Swap the rhubarb for diced apples and add a sprinkle of cinnamon for a fall vibe.
- If you’re a fan of berries, mix in some strawberries with the rhubarb for a sweeter, juicier filling.
- Try adding a handful of chopped nuts to the filling for some extra crunch and depth.
- If vanilla isn’t your thing, lemon zest can add a zesty twist to the filling.
If you try this, I’d love to hear how it turns out — drop a comment or tag me! Whether you stick to the original recipe or venture into variations, these little pockets are sure to delight. Happy baking!
Related update: Crispy Rhubarb Pockets
Related update: 10 Minute Brownies
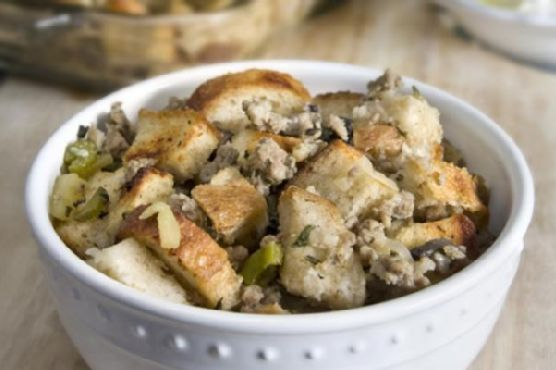
I found myself in a bit of a culinary pickle last Wednesday. You know those days when you’re just craving something hearty and flavorful, but the thought of spending hours in the kitchen makes you want to order takeout instead? Well, I was there — staring at my pantry with determination to whip up something that screams fall comfort but doesn’t require half my day. Enter the Sourdough Stuffing with Sage Sausage and Apples. This dish checks all the boxes: rich flavors from the sausage, a hint of sweetness from the apples, and earthy herbs that make your kitchen smell like an autumn hug. It’s surprisingly simple to make and perfect for a cozy weeknight dinner or an impressive side for a festive gathering.
Jump to Recipe
What You’ll Need
This dish is all about layers of flavor with ingredients you might already have around. The key players? Let’s just say **sourdough bread** and **sage sausage** are ready to steal the show.
- 1 pound of **sage sausage**
- 3 tablespoons of **butter**, divided
- 2 shallots, finely chopped
- 2 cloves of garlic, minced
- 3 stalks of celery, diced
- 1 **apple**, diced
- 6 ounces of **portobello mushrooms**, diced
- 1 teaspoon of **fresh thyme**
- 1 tablespoon of **fresh sage**, chopped
- 1/2 cup of **dry white wine**
- 1 loaf of whole wheat sourdough bread, diced
- 2 cups of **chicken broth**
- Salt and pepper, to taste
How to Make Sourdough Stuffing with Sage Sausage and Apples
- In a large skillet over medium heat, cook the sausage until it’s no longer pink, breaking it up with a spoon as it cooks; this should take about 10 minutes. Once cooked, drain the fat and set the sausage aside.
- In the same skillet, melt 1 tablespoon of butter. Add the shallots, garlic, celery, apple, and mushrooms. Sauté until the veggies are tender and the mixture is fragrant, about 8 minutes. Sprinkle with thyme and sage, stirring to combine.
- Pour the wine over the vegetable mix, using a wooden spoon to scrape up any browned bits from the bottom of the pan. Let it simmer for about 2 minutes, allowing the alcohol to evaporate.
- In a large bowl, combine the cooked sausage with the vegetable mixture. Add the diced sourdough bread and 2 tablespoons of butter. Pour the chicken broth over everything, stirring well so the bread absorbs the broth evenly. You’ll want the bread to be moist but not overly soggy.
- Transfer the stuffing into a 9×13 inch casserole dish, spreading it out evenly. Cover with foil and bake in a preheated oven at 350°F (175°C) for 20 minutes.
- Remove the foil, dot the top of the stuffing with the remaining tablespoon of butter, and return to the oven. Bake uncovered for an additional 10 minutes, or until the top is golden and slightly crispy. Serve immediately for maximum coziness.
Cook’s Notes
Here’s the thing with stuffing — it’s forgiving. Just remember, dry bread is your friend, as it’ll soak up all those delicious juices. If your bread isn’t dry enough, you can pop it in the oven at a low temperature to dry it out before starting.
Leftovers? Absolutely! Store them in an airtight container in the fridge for up to three days. You can reheat in the oven or microwave, but add a splash of broth to avoid drying it out. This stuffing can also be made a day ahead; just assemble it as directed, cover, and keep it in the fridge. Pop it in the oven when you’re ready to serve.
Make It Your Own
- Vegetarian Twist: Swap out the sausage for a plant-based alternative or use crispy cubes of tofu for a veggie-friendly option.
- Gluten-Free Version: Use your favorite gluten-free bread instead of sourdough. The texture will be slightly different, but it’ll still taste amazing.
- Nuts About Nuts: Add a handful of chopped walnuts or pecans for a bit of crunch and extra flavor depth.
- Cheese Please: Sprinkle some grated Parmesan or Gruyère over the top just before the final bake for a cheesy crust.
If you try this, I’d love to hear how it turns out — drop a comment or tag me! Whether you’re serving it up for a holiday spread or just wanting to turn a regular dinner into something special, this stuffing is bound to become a favorite. Enjoy every bite!
Related update: Sourdough Stuffing with Sage Sausage and Apples
Related update: Cheesy Spinach Stuffed Shells