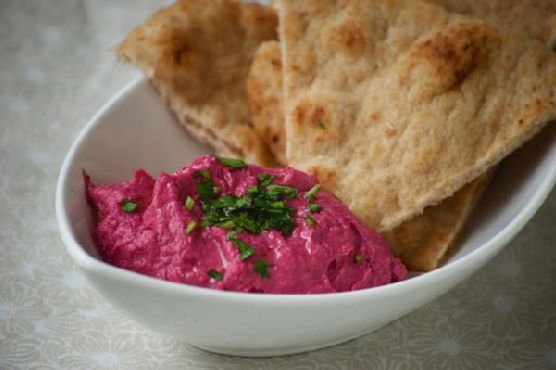
Roasted Beet Hummus | Made by Meaghan Moineau
A Vibrant Twist on Tradition: Roasted Beet Hummus
A Taste of Home: The Story Behind the Dish
There are few dishes that capture the essence of nostalgia quite like hummus. For me, the aroma of roasted beets mingling with garlic and cumin instantly transports me back to my grandmother's cozy kitchen. Her home was always filled with the comforting scent of freshly baked bread, and her table was a testament to her love for vibrant, soul-warming foods. I remember her teaching me the art of making hummus, our hands stained pink from the beets, as we laughed and shared stories of our family's culinary roots. It was in her kitchen that I learned the magic of simplicity—how a handful of ingredients could come together to create something truly extraordinary.
A Splash of Color: Roasted Beet Hummus Recipe
Ingredients:
- 2 medium-sized red roasted beets- 1 can of cooked chickpeas (about 1.5 cups)
- 2 cloves of garlic
- 1 teaspoon ground cumin
- Juice of 1 lemon
- 3 tablespoons olive oil (plus more as needed)
- Salt to taste
- 3 tablespoons tahini sesame seed paste
Instructions:
1. Prepare the Beets: If you haven't done so already, roast your beets until tender. Once cool, peel and chop them into manageable pieces.2. Blend the Base: In a food processor or blender, add the roasted beets, garlic, ground cumin, lemon juice, salt, and tahini. Pulse until the mixture is well blended and smooth.
3. Incorporate Chickpeas: Add the cooked chickpeas and olive oil to the mixture. Pulse until the chickpeas are just incorporated, achieving a smooth texture. If the hummus is too thick, gradually add more olive oil until you reach your desired consistency.
4. Serve and Enjoy: Transfer your vibrant beet hummus to a serving bowl. This dish pairs perfectly with warm pita or flatbread, making it an enticing appetizer for any gathering.
Difficulty Rating: 3/10
Roasted Beet Hummus is a delightful appetizer that’s as easy to make as it is to enjoy. With a difficulty rating of just 3 out of 10, it's accessible to chefs of all skill levels, offering a quick and satisfying splash of color and flavor to your table.
A Dish to Remember
Every time I make this Roasted Beet Hummus, I'm reminded of those cherished times spent with my grandmother. The vibrant color and earthy flavors are a testament to the beauty of simplicity and the joy of sharing meals with loved ones. Whether you're introducing this dish to your family for the first time or incorporating it into your regular culinary repertoire, Roasted Beet Hummus is sure to become a beloved staple, creating new memories and stories to be passed down through generations.