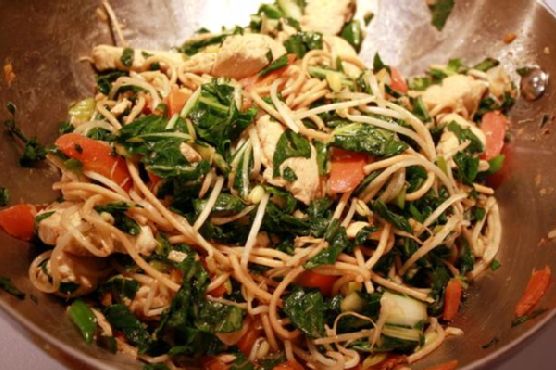
Chicken Lo Mein | Made by Meaghan Moineau
Title: "Savoring Memories: A Delicious Chicken Lo Mein Adventure"Description: Dive into the delightful world of Chicken Lo Mein, a flavorful journey that combines tender chicken, vibrant vegetables, and a savory sauce. This recipe is a breeze to prepare, making it the perfect main dish for any occasion. Share in a nostalgic family memory as you recreate this beloved classic in your own kitchen.
---
There is something truly magical about the aroma of garlic and ginger sizzling in a skillet; it has the power to transport us back to cherished moments spent with family. For me, Chicken Lo Mein is more than just a dish—it's a culinary time machine, whisking me back to Sunday evenings at my grandmother's house. The kitchen was always bustling with activity, filled with laughter and the clatter of pots and pans, as we eagerly awaited the delicious meal to come.
Ingredients:
- 1 tablespoon peanut oil
- 2 cloves garlic, minced
- 1 tablespoon fresh ginger, minced
- 1 pound skinless, boneless chicken breast, cut into thin strips
- 1 large carrot, julienned
- 1 cup mushrooms, sliced
- 1 cup bok choy, chopped
- 1 cup bean sprouts
- 1/4 cup low sodium chicken broth
- 1/4 cup low sodium soy sauce
- 4 scallions, sliced
- 8 ounces cooked spaghetti
Instructions:
1. In a large nonstick skillet, heat the peanut oil over medium heat. Add the minced ginger and garlic, and let them cook for about 1 minute, releasing their fragrant aroma.
2. Increase the heat to medium-high and add the chicken strips and julienned carrot to the skillet. Stirring occasionally, cook until the chicken is lightly browned, approximately 2 minutes.
3. Introduce the mushrooms, bok choy, and bean sprouts to the mix. Pour in the chicken broth and soy sauce, stirring constantly. Cook until the carrot is tender-crisp, about 3 minutes.
4. Finally, stir in the cooked spaghetti and sliced scallions. Allow everything to heat through for about 1 minute, ensuring the noodles are well-coated in the savory sauce.
Nostalgic Memory:
Every time I make Chicken Lo Mein, I am reminded of my grandmother's kitchen—a place that was warm and welcoming, always buzzing with love and delicious food. One particular memory stands out: my grandmother teaching me how to julienne carrots, her hands guiding mine as we carefully sliced the vibrant orange vegetables. These lessons were not just about cooking; they were about patience, precision, and the simple joy of creating something with your own hands.
Back then, the kitchen was where stories were shared, and wisdom was passed down. Preparing meals together was a family affair, one that brought us closer and created a tapestry of memories that I cherish to this day. Chicken Lo Mein was often at the heart of these gatherings—a dish that embodies the love and care that went into every family meal.
Rate Difficulty: 4/10
Classification: Main Dish
This Chicken Lo Mein recipe is not only easy to prepare but also a delightful way to create new memories with your loved ones. Whether you're an experienced cook or a kitchen novice, this dish promises to deliver a burst of flavor and nostalgia, making it the perfect addition to any family meal. Enjoy the journey as you bring the tastes and stories of the past into your home.