Tru Chocolate Martini | Made by Meaghan Moineau

Tru Chocolate Martini | Made by Meaghan Moineau

Title: Sipping Sweet Memories: The Tru Chocolate Martini
Description: Discover the delightful blend of nostalgia and indulgence with the Tru Chocolate Martini. This elegant dessert cocktail is more than just a drink—it's a gateway to cherished family memories. Join us as we explore a recipe that combines the smooth warmth of vanilla vodka with the rich allure of chocolate, all while sharing a heartfelt story from the past.

---


Sipping Sweet Memories: The Tru Chocolate Martini

When it comes to crafting the perfect cocktail, the Tru Chocolate Martini stands out as a luxurious treat, perfect for dessert lovers. This delightful concoction brings together the creamy richness of vanilla vodka and the bittersweet notes of chocolate, creating a symphony of flavors that dance on the palate. But beyond its exquisite taste, this martini holds a special place in my heart, tied to a cherished family memory that I hold dear.


Ingredients:

- Tru vanilla vodka


- White crème de cocoa


- Ice


- Bittersweet chocolate (for garnish)


- Chocolate kisses (for garnish)


- Martini glasses


Instructions:
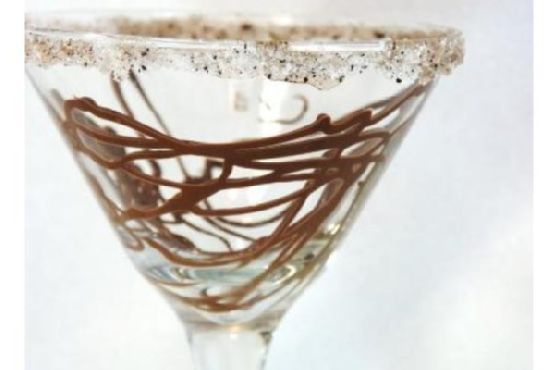
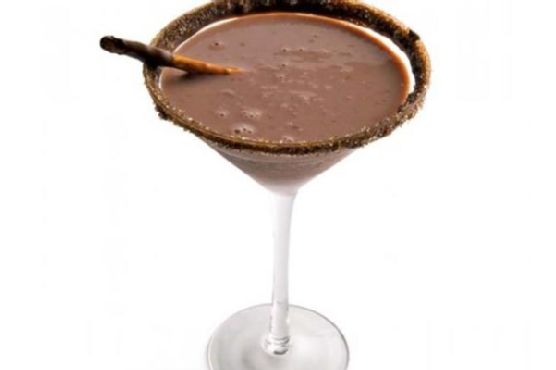
1. Prepare the Glasses: Begin by gently melting the bittersweet chocolate in a microwave, using 30-second increments to ensure it doesn’t burn. Pour the melted chocolate onto a flat saucer. Take each chilled martini glass and dip its rim into the chocolate, swirling to coat the lip with a decadent layer of sweetness.
2. Mix the Martini: Fill a metal cocktail shaker with ice and shake for about 10 seconds until the shaker feels icy to the touch. Add the Tru vanilla vodka and white crème de cocoa. Shake again to chill the mixture for 15 seconds.
3. Serve with Style: Strain the very cold liquid into the prepared martini glasses. As the cocktail settles, watch it transform into a clear, elegant drink. For a finishing touch, garnish the rim of the glass with a strip of orange peel or a chocolate kiss.
4. Enjoy: Sip slowly, savoring the flavors and letting each taste transport you to a world of sweet indulgence.
Difficulty Rating: 4/10 - Easy
Classification: Dessert
A Nostalgic Sip of Family History

As I sip on my Tru Chocolate Martini, memories of a particular family gathering flood back to me. It was a chilly winter evening, and my family had gathered around the fireplace for our annual holiday celebration. My grandmother, known for her sweet tooth and love for fine spirits, introduced us to her latest creation—a chocolate martini that promised warmth and indulgence.


I watched with wide-eyed wonder as she expertly dipped the rims of the glasses in melted chocolate, her hands steady and sure. The air was filled with laughter and the aroma of chocolate mingling with the subtle vanilla notes from the vodka. As we clinked our glasses together, I remember feeling an overwhelming sense of belonging and joy.


That evening, as we shared stories and sipped our martinis, I realized that this drink was more than just a cocktail. It was a vessel of connection, bringing us together through shared experiences and cherished traditions. Every time I make a Tru Chocolate Martini, I am reminded of that night and the warmth of family—a reminder that some of the best moments in life are simple, sweet, and shared with those we love.


So, whether you're hosting a gathering or simply indulging in a quiet night at home, let the Tru Chocolate Martini be your companion. Its rich flavors and comforting aroma will surely make any moment feel special, while also inviting you to create your own sweet memories.

Read more about Appetizers

Read more about Main Dishes

Read more about Desserts

Classic Buttermilk Pie | Made by Meaghan Moineau

Classic Buttermilk Pie | Made by Meaghan Moineau

Title: A Slice of Nostalgia: Crafting the Perfect Classic Buttermilk Pie
Description: Dive into the heartwarming world of classic Southern desserts with our detailed guide on baking the perfect Buttermilk Pie. Experience a taste of tradition with a story that brings warmth to your kitchen, while enjoying a dessert that is a staple for any family gathering. Simple ingredients and step-by-step instructions make this a delightful treat to prepare and savor.

---


There are few desserts that capture the essence of Southern tradition quite like the Classic Buttermilk Pie. With its rich, custardy filling and buttery crust, this pie is more than just a sweet treat; it's a slice of history that brings back memories of family gatherings and cherished moments around the dinner table.


Ingredients:

- 1/2 cup butter, melted

- 1 cup buttermilk


- 3 large eggs


- 3 tablespoons all-purpose flour


- 2 cups sugar


- 1 unbaked 9-inch pie shell


- 1 teaspoon vanilla extract


Instructions:

1. Preheat the Oven: Set your oven to 325 degrees Fahrenheit to ensure a gentle, even bake for the custard filling.
2. Prepare the Filling: In a mixing bowl, slightly beat the eggs. Gradually add in the sugar and flour, ensuring a smooth consistency without lumps. Stir in the melted butter, mixing thoroughly.
3. Combine Flavors: Pour in the buttermilk and vanilla extract, blending them into the egg mixture until well combined.
4. Prepare the Pie Shell: Lightly dust the unbaked pie shell with a bit of flour to help the filling adhere and bake evenly.
5. Assemble the Pie: Pour the prepared batter into the pie shell. Sprinkle a little more flour on top, which will help create a slight crust on the custard as it bakes.
6. Bake to Perfection: Place the pie in the preheated oven and bake for approximately 1 hour, or until the custard is set and a gentle jiggle is observed only in the center.

Family Nostalgia:

Growing up, family gatherings at my grandmother's house were never complete without the presence of her famous Buttermilk Pie. I remember the anticipation that would build as the sweet aroma wafted through the house, signaling that dessert time was near. My cousins and I would circle the kitchen like bees to honey, eagerly waiting for that first slice.

Grandma would always serve the pie warm, its golden crust giving way to a rich, creamy filling that melted in our mouths. Each bite was a comforting reminder of the love and care she poured into all her recipes. Now, every time I bake this pie, it feels like a warm hug from her, a cherished tradition I am proud to continue and share with my own family.


Difficulty Rating: 3/10

This pie is classified as a Dessert, and its simplicity makes it an approachable recipe for bakers of all skill levels, yet it delivers a profound depth of flavor that belies its ease of preparation.

---


This Classic Buttermilk Pie is not just a dessert—it's a connection to the past, a testament to the enduring power of family recipes to bring people together. Whether you're a seasoned baker or new to the kitchen, this pie is sure to become a beloved addition to your culinary repertoire. Enjoy a slice of nostalgia and savor the sweetness of tradition with every bite.

Read more about Appetizers

Read more about Main Dishes

Read more about Desserts

Cherry Lime Mojito | Made by Meaghan Moineau

Cherry Lime Mojito | Made by Meaghan Moineau

Title: "Sip into Nostalgia with a Refreshing Cherry Lime Mojito"
Description: Dive into the delightful world of the Cherry Lime Mojito, a cocktail that brings together the vibrant flavors of cherries, mint, and lime. This refreshing drink is perfect for any gathering and is sure to evoke fond family memories. With a difficulty rating of 4 out of 10, it's an easy-to-make dessert-like drink that will transport you to a simpler time.

---


As the warm breeze of summer makes its way through the porch screens, I can't help but reminisce about the long, lazy afternoons spent at my grandmother’s house. Her backyard was a haven, brimming with lush greenery and the sweet scent of blooming flowers. But more than anything, it was the laughter and love that permeated the air during our family gatherings that made those days unforgettable.


One particular memory that stands out is when Grandma introduced us to the Cherry Lime Mojito, a drink that quickly became a family favorite. It was a hot July afternoon, and the elders were gathered around the patio table, chatting animatedly as we kids played tag under the shade of the old oak tree. Grandma emerged from the kitchen with a tray of vibrant, colorful glasses filled with her signature mojito.


The Cherry Lime Mojito is a delightful concoction that combines the tartness of cherries with the refreshing zest of lime and the aromatic touch of mint leaves. Here's how to recreate this nostalgic drink that will surely bring a splash of joy and a hint of nostalgia to your gatherings.


Ingredients:

- Fresh cherries


- A handful of mint leaves


- 1 lime, sliced


- 2 teaspoons demerara sugar


- 2 ounces of white rum


- Carbonated water


Instructions:
1. Muddle for Memories: Begin by placing the cherries, mint leaves, demerara sugar, and lime slices in a tall glass. Use a muddler or the back of a spoon to gently crush the ingredients together. This process releases the juices and oils, creating a fragrant and flavorful base for your mojito.
2. Ice it Up: Add a few ice cubes to the glass, providing the perfect chill for your refreshing drink.
3. The Spirit of Celebration: Pour in the white rum, letting it mingle with the muddled mixture.
4. Fizz and Finish: Fill the glass the rest of the way with carbonated water, giving your mojito that delightful effervescence. Stir gently to combine all the flavors.
5. Serve and Savor: Garnish with a sprig of mint and a cherry on top. Serve immediately and let the nostalgia wash over you with every sip.

This Cherry Lime Mojito isn't just a drink; it's a bridge to cherished memories, a testament to the joy of family gatherings, and a celebration of the simple pleasures in life. Classified as a dessert-like drink, it’s the perfect sweet ending to a day filled with laughter and love.


With a difficulty rating of 4 out of 10, this mojito is accessible to even the novice mixologist. Its simplicity and flavor make it a go-to choice for any occasion. So, next time you’re looking to add a touch of nostalgia to your gathering, shake up a Cherry Lime Mojito and toast to the memories that bind us all. Cheers!

Read more about Appetizers

Read more about Main Dishes

Read more about Desserts

Roasted Cauliflower and Leek Soup | Made by Meaghan Moineau

Roasted Cauliflower and Leek Soup | Made by Meaghan Moineau

Title: Comfort in a Bowl: Roasted Cauliflower and Leek Soup Recipe
Description: Discover the warmth and nostalgia of our Roasted Cauliflower and Leek Soup, an easy-to-make recipe that brings families together. With its rich, savory flavors, this dish is perfect for cozy dinners or as a starter to any meal.

---


As the leaves turn golden and a crisp chill fills the air, there's nothing quite like the comforting embrace of a warm bowl of soup. Today, I'm excited to share a beloved family recipe that has warmed our hearts and filled our home with delightful aromas—Roasted Cauliflower and Leek Soup.


Ingredients:

- 1 head of cauliflower, chopped


- 3 green and white parts of leeks, cleaned and chopped


- 4 cloves of garlic, peeled


- 2 tablespoons olive oil


- 2 cans of chicken broth


- Kosher salt, to taste


- Freshly ground black pepper, to taste


Instructions:
1. Preheat Your Oven: Start by preheating your oven to 425°F (220°C).
2. Prepare the Vegetables: Spread the chopped cauliflower, leeks, and garlic evenly on a baking sheet. Drizzle with olive oil and toss the vegetables until they are thoroughly coated. Sprinkle with kosher salt.
3. Roast to Perfection: Place the baking sheet in the oven and roast for 40-45 minutes. You'll know they're ready when the vegetables are browned on the edges and slightly softened.
4. Create the Soup Base: Transfer the roasted vegetables into a saucepan. Add the chicken broth and season with freshly ground black pepper to taste.
5. Bring to a Bubble: Heat the mixture over medium-high heat until it begins to bubble gently.
6. Blend Until Smooth: Using an immersion blender, puree the soup until it reaches a smooth, creamy consistency. If you’re using a regular blender, be cautious with hot liquids—vent the lid slightly to avoid any kitchen mishaps.
Nostalgic Family Memory:

This soup has been a staple in our family for as long as I can remember. Every autumn, my mother would gather us around in the kitchen, teaching us the art of roasting vegetables. I vividly recall the way the kitchen would fill with the sweet, nutty aroma of cauliflower and leeks mingling in the oven. It was more than just a soup—it was an event. We would eagerly await that first creamy spoonful, knowing it signaled the start of cozy nights spent together, sharing stories and laughter. This dish, with its deep flavors and heartwarming memories, always reminds me of the love and warmth that comes with family.


Difficulty Rating: 3/10
Classification: Appetizer

This Roasted Cauliflower and Leek Soup is not only easy to prepare but also a delightful way to bring a touch of nostalgia and comfort to your table. Whether you serve it as an appetizer or enjoy it as a light meal, it's sure to become a cherished favorite in your culinary repertoire. So, gather your loved ones, and let this simple yet flavorful soup create new memories for you and your family. Enjoy!

Read more about Appetizers

Read more about Main Dishes

Read more about Desserts

Stuffed zucchini with rice and mushroom | Made by Meaghan Moineau

Stuffed zucchini with rice and mushroom | Made by Meaghan Moineau

Title: Reliving Childhood Memories with Stuffed Zucchini Delight
Description: Discover the heartwarming allure of Stuffed Zucchini with Rice and Mushroom, a dish that marries the comforting flavors of fresh vegetables and savory fillings. Learn how to create this delightful main dish and immerse yourself in a nostalgic family tale that harks back to simpler times.

---


A Taste of Nostalgia: Stuffed Zucchini with Rice and Mushroom

When I think of Stuffed Zucchini with Rice and Mushroom, I am transported back to the warm, sunlit kitchen of my grandmother's house. The aroma of fresh zucchinis and savory mushrooms filled the air, creating an inviting atmosphere that promised a delicious family meal. This dish wasn't just food; it was a tradition, a celebration of togetherness that brought our family closer with every bite.


Growing up, weekends were reserved for family gatherings, where everyone would converge at my grandmother's home, bringing along stories, laughter, and appetites. The highlight of these gatherings was always the Stuffed Zucchini with Rice and Mushroom. Grandmother, with her nimble fingers and gentle smile, would prepare this dish with love, transforming simple ingredients into a symphony of flavors.


The zucchinis, fresh from the local farmer's market, were hollowed out with precision, ready to cradle the savory filling of rice, mushrooms, and bell peppers. The red onions and garlic, sautéed in a splash of oil, added a rich depth of flavor that was both comforting and familiar. As the filling simmered, the kitchen filled with the scent of melting cheese and tomato sauce—an aroma that signaled the anticipation of a meal shared with loved ones.


As a child, I had the important role of sprinkling the final touch of cheese over the stuffed zucchinis before they went into the oven. Watching the cheese melt and bubble over the golden zucchinis was a sight to behold, one that promised a delicious feast was soon to follow.


Today, I recreate this dish not just to savor its delectable taste but to relive those cherished moments of family, laughter, and love. Stuffed Zucchini with Rice and Mushroom is more than a meal; it's a bridge to the past, a way to keep those who are gone, ever present in our lives.


Difficulty Rating: 5/10
Classification: Main Dish

For detailed instructions on how to make this comforting and delicious Stuffed Zucchini with Rice and Mushroom, visit myzucchinirecipes.com. Whether you're looking to relive a cherished memory or create new ones, this dish is sure to bring warmth and joy to your dining table.

Read more about Appetizers

Read more about Main Dishes

Read more about Desserts

Cinnamon Eggless Coffee Cake | Made by Meaghan Moineau

Cinnamon Eggless Coffee Cake | Made by Meaghan Moineau

Title: A Nostalgic Brew: Eggless Cinnamon Coffee Cake
Description: Discover the comforting embrace of our Cinnamon Eggless Coffee Cake, a delightful dessert that brings back cherished family memories with every bite. This easy-to-make, aromatic cake is perfect for sharing with loved ones over a cup of tea or coffee. Follow our simple recipe and relive the warmth of home.

---


There's something truly magical about the aroma of cinnamon wafting through the kitchen, mingling with the rich scent of freshly brewed coffee. It instantly transports me back to cozy Sunday afternoons at my grandmother's house, where the air was always filled with warmth, laughter, and the promise of a delicious treat. The Cinnamon Eggless Coffee Cake was a staple in our family, a dessert that held the power to unite us all at the table, sharing stories and creating memories.


Ingredients for Nostalgia:

- 1 cup all-purpose flour


- 1 cup wholewheat flour


- 1 cup powdered sugar (plus 1 tsp. for sprinkling)


- 1/2 cup vegetable oil


- 1 tbsp vinegar


- 1 tbsp coffee powder


- 1 tsp cinnamon powder


- 1 tsp baking soda


- 1/2 tsp salt


- 1 tsp vanilla essence


- 1 cup curd


- 1/2 cup strong coffee decoction


Instructions to Create Magic:
1. Preheat & Prepare: Preheat your oven to 180°C (350°F) for 10 minutes. Grease a rectangular baking tin and set it aside.
2. Sift Dry Ingredients: In a large bowl, sift together the all-purpose flour, wholewheat flour, coffee powder, cinnamon powder, baking soda, and salt. Repeat the sifting process three times to ensure a smooth texture.
3. Mix Sugar & Oil: In another bowl, beat the powdered sugar and vegetable oil until light and fluffy, approximately 10 minutes of mixing.
4. Combine Wet Ingredients: Add the curd, strong coffee decoction, vanilla essence, and vinegar to the sugar and oil mixture, stirring thoroughly.
5. Blend Together: Gently fold the wet mixture into the dry ingredients, mixing lightly until the batter resembles a uniform paste. Avoid over-mixing; 10-12 gentle strokes should suffice.
6. Prepare to Bake: Pour the prepared batter into the greased baking tin. Sprinkle the reserved teaspoon of sugar over the top for a subtle sweet crust.
7. Bake: Place the tin in the preheated oven and bake for 25-30 minutes. Check for doneness by inserting a clean knife; if it comes out clean, your cake is ready. If not, bake for a few more minutes.
8. Cool & Serve: Once baked, remove the cake from the oven and allow it to cool on a wire rack. Cut into desired shapes and serve with tea or coffee. This cake remains fresh for a week, allowing you to enjoy its comforting taste over several days.

In our family, this cake wasn't just a dessert; it was a tradition. I remember my grandmother's gentle hands guiding mine as we mixed the ingredients, her stories blending with the sweet aroma filling the room. Each slice of cake was a slice of our family history, rich with love and laughter.


Difficulty Level: 4/10
Classification: Dessert
Conclusion:

This Cinnamon Eggless Coffee Cake is more than just a treat—it's a vessel for nostalgia, a bridge to the past that you can bake in your own kitchen today. Gather your loved ones, brew a pot of coffee, and let this delightful dessert bring warmth and joy to your home, just as it did for our family.

Read more about Appetizers

Read more about Main Dishes

Read more about Desserts

Endive Appetizer With Blue Cheese, Dried Cranberries and Walnuts | Made by Meaghan Moineau

Endive Appetizer With Blue Cheese, Dried Cranberries and Walnuts | Made by Meaghan Moineau

Title: A Taste of Tradition: Endive Appetizer with Blue Cheese, Dried Cranberries, and Walnuts
Description: Discover the delicious blend of flavors in our Endive Appetizer with Blue Cheese, Dried Cranberries, and Walnuts. This elegant yet simple appetizer is perfect for any gathering and brings back cherished family memories. Learn how to create this delightful dish with our easy-to-follow recipe.

---


A Taste of Tradition: Endive Appetizer with Blue Cheese, Dried Cranberries, and Walnuts

There’s something magical about a dish that can transport you back in time, evoking memories of family gatherings and shared laughter. Our Endive Appetizer with Blue Cheese, Dried Cranberries, and Walnuts does just that. This delightful appetizer, with its perfect balance of flavors, has been a staple at our family reunions for as long as I can remember.


Ingredients:

- 2 apples, thinly sliced


- 1/4 cup light balsamic vinaigrette


- 3 heads of Belgian endive, leaves separated


- 1 cup crumbled blue cheese


- 1/2 cup dried cranberries


- 1/2 cup walnut pieces


Instructions:
1. Toast the Walnuts: Begin by toasting the walnut pieces in a dry skillet over medium heat for about two minutes, or until they become fragrant. Make sure to stir them occasionally to prevent burning. Once toasted, set them aside to cool.
2. Prepare the Platters: Arrange the apple slices on one platter, and the endive leaves on another. The contrast of colors from the apples and endive will make for an impressive presentation.
3. Mix the Toppings: In a medium bowl, combine the cooled walnuts, dried cranberries, and blue cheese. This mixture will serve as the flavorful topping for your endive leaves.
4. Assemble the Appetizer: Top each endive leaf with approximately one tablespoon of the cheese mixture. Add a drop or two of light balsamic vinaigrette to each leaf for a touch of acidity that complements the flavors.
5. Serve with Apples: Place the remaining cheese mixture in a bowl to serve alongside the apple slices. The crispness of the apples pairs wonderfully with the creamy blue cheese and the sweet-tart cranberries.
A Nostalgic Journey:

This dish is more than just a combination of flavors; it’s a journey back to summer picnics at my grandparents’ house. I can still picture the large oak tree in their backyard, under which we’d spread out a checkered blanket. My grandmother, with her gentle smile, would bring out a tray of these endive appetizers. The adults would savor them with a glass of wine, while we, the kids, would nibble on the apple slices, occasionally sneaking bites of the cheese mixture.


As the years have passed, this appetizer has become a symbol of those cherished moments. Whenever I make it, I’m reminded of the laughter, the stories, and the love that surrounded us. It’s a dish that not only delights the palate but also warms the heart.


Difficulty: 3/10
Classification: Appetizer

Whether you’re hosting a formal dinner or a casual get-together, this Endive Appetizer with Blue Cheese, Dried Cranberries, and Walnuts is sure to impress your guests. Its simplicity belies its elegance, making it the perfect choice for any occasion. Enjoy the delightful flavors and create your own treasured memories with this timeless recipe.

Read more about Appetizers

Read more about Main Dishes

Read more about Desserts

Mangoes with Rum and Ice Cream | Made by Meaghan Moineau

Mangoes with Rum and Ice Cream | Made by Meaghan Moineau

Title: Tropical Bliss: Mangoes with Rum and Ice Cream


Description:

Dive into a tropical paradise with our delectable Mangoes with Rum and Ice Cream recipe. This exquisite dessert, brimming with vibrant flavors and a hint of nostalgia, will transport you to sun-kissed beaches and carefree summer days. Easy to prepare yet impressively indulgent, this dish is a must-try for fruit and dessert lovers alike.

---


A Nostalgic Journey with a Tropical Twist


As the summer sun began to set, casting a golden hue over the horizon, our family would gather on the porch, eagerly anticipating the sweet treat that had become a cherished tradition. Mangoes with Rum and Ice Cream was more than just a dessert; it was a celebration of the season and a gentle reminder of cherished moments shared with loved ones.


I vividly remember my grandmother, her hands deftly peeling the ripe mangoes, ensuring every slice was free of the green flesh that might mar the golden perfection. She had a knack for transforming simple ingredients into culinary masterpieces, and this dish was no exception. The scent of fresh lime and dark rum would waft through the air, mingling with the laughter and stories that filled the evening.


The secret to her Mangoes with Rum and Ice Cream was in the marinade—a tantalizing blend of sugar, dark rum, freshly squeezed lime juice, and the zest of lime rind. The mango pieces would soak up this flavorful concoction, chilling to perfection while we shared stories and memories on those warm summer nights.


When served, the dessert was a feast for the senses. The vibrant mango slices, glistening with their rum-infused marinade, nestled atop velvety scoops of vanilla ice cream, creating a symphony of flavors with every bite. Each spoonful was a tropical escape, a small indulgence that captured the essence of summer.


This recipe is not just about the flavors; it's about the memories that accompany each serving. It's about the joy of sharing a lovingly prepared dessert with those closest to you, and the simple pleasure of savoring a dish that transcends the ordinary.


Recipe: Mangoes with Rum and Ice Cream


Ingredients:

- Fresh mangoes


- 1/4 cup sugar


- 1/4 cup dark rum


- 2 tablespoons fresh lime juice


- 1 teaspoon grated lime rind


- Vanilla ice cream


Instructions:

1. Peel the mangoes, ensuring all green-colored flesh is removed. Carefully slice the mango around the pit into 1/2-inch thick pieces, discarding the pit.


2. In a bowl, combine the sugar, dark rum, grated lime rind, and fresh lime juice. Mix well until the sugar is dissolved.


3. Add the mango slices to the bowl, gently mixing to ensure each piece is coated with the marinade.


4. Chill the mixture in the refrigerator for a couple of hours, allowing the flavors to meld beautifully.


5. Serve the mangoes alone in chilled glasses or over generous scoops of vanilla ice cream for an indulgent treat.


Difficulty Rating: 3/10
Classification: Dessert

Embrace the nostalgia and share this tropical delight with your loved ones, creating new memories that will be cherished for years to come. Whether enjoyed on a balmy evening or as a refreshing end to a meal, Mangoes with Rum and Ice Cream is a testament to the simple joys of life.

Read more about Appetizers

Read more about Main Dishes

Read more about Desserts

No-bake Toasted Coconut Chocolate Cake with Chocolate Macaroon Cookies | Made by Meaghan Moineau

No-bake Toasted Coconut Chocolate Cake with Chocolate Macaroon Cookies | Made by Meaghan Moineau

Title: A Slice of Nostalgia: No-Bake Toasted Coconut Chocolate Cake with Chocolate Macaroon Cookies
Description: Dive into the delightful world of our No-Bake Toasted Coconut Chocolate Cake, paired perfectly with Chocolate Macaroon Cookies. This guilt-free dessert, enriched with the goodness of avocados, coconut, and dark carob powder, promises to be a crowd-pleaser for all occasions. Join us as we blend culinary creativity with cherished family memories, creating not just a dish, but an experience.

---


No-Bake Toasted Coconut Chocolate Cake with Chocolate Macaroon Cookies


A Journey Through Flavors and Memories


Few things evoke emotions quite like the scents and flavors of a beloved family recipe. For me, this No-Bake Toasted Coconut Chocolate Cake with Chocolate Macaroon Cookies is more than just a dessert; it's a portal to treasured moments spent in my grandmother's cozy kitchen.


Ingredients:


- 1 cup avocados


- ½ cup dark carob powder


- 1 cup chocolate chips


- 1 cup coconut


- ½ cup coconut oil


- 1 cup dates


- ¼ cup maple syrup


- ½ cup peanut butter


- 1 cup pecans


- 1 cup unsweetened coconut


- 1 tsp vanilla bean extract


Instructions:


Crust:
1. Optional Step: Begin by soaking the pecans for at least an hour to soften them, enhancing their natural sweetness.

2. In a blender or food processor, pulse the pecans and dates until finely chopped.


3. Press this mixture into the base of your preferred pan, creating an even layer for your cake's crust.


4. Place the pan in the fridge, allowing the crust to firm up as you prepare the filling.


Filling:

1. In your food processor or blender, combine the dark carob powder, ripe avocados, maple syrup, and coconut oil.


2. Blend until the mixture is silky smooth, with a consistency reminiscent of a decadent chocolate mousse.


3. Pour the filling over the prepared crust, spreading it evenly.


Topping:

1. Sprinkle a generous layer of shredded unsweetened coconut and chocolate chips over the top.


2. For the macaroon cookies, blend coconut, peanut butter, and vanilla bean extract until well combined. Form small cookie shapes and place them on top of the cake.


3. Refrigerate the cake for at least 2 hours or until fully set.


Family Story: A Nostalgic Touch


Every summer, my grandmother would gather the family for an afternoon of baking and storytelling. Her kitchen was a haven, filled with laughter, the sweet aroma of chocolate, and tales from her youth. One particular story that stayed with me was about her first attempt at making a no-bake cake during the sweltering heat of July. With no air conditioning, she had to get creative to avoid turning on the oven. Her ingenuity led to the creation of this very recipe.


I remember watching her blend the ingredients with a twinkle in her eye, recounting how she once surprised my grandfather with this cake on their anniversary. The delight in her voice as she shared how he had been amazed at its rich taste and creamy texture without any baking was infectious. This memory, much like the recipe, has been passed down through generations, serving as a reminder of the simple joys and love that bind us.


Difficulty Rating: 4/10


This recipe is straightforward, perfect for both novice and experienced cooks looking to indulge in a deliciously healthy treat without the fuss of baking.


Classification: Dessert


Indulge in this rich, velvety dessert that stays true to the essence of homemade goodness. Whether it's a family gathering or a quiet evening treat, this No-Bake Toasted Coconut Chocolate Cake with Chocolate Macaroon Cookies is sure to become a staple in your dessert repertoire, creating memories for years to come.

Read more about Appetizers

Read more about Main Dishes

Read more about Desserts

Instant Pot Chicken Taco Soup | Made by Meaghan Moineau

Instant Pot Chicken Taco Soup | Made by Meaghan Moineau

Title: Warm Up Your Evenings with Instant Pot Chicken Taco Soup: A Flavorful Journey Down Memory Lane
Description: Dive into the heartwarming flavors of our Instant Pot Chicken Taco Soup, a delightful and easy-to-make main dish that brings family memories and comfort to your table. Perfect for busy weeknights, this soup is rich with spices and packed with nutritious ingredients that will surely make it a family favorite.

---


Instant Pot Chicken Taco Soup: A Nostalgic Culinary Experience


As the leaves begin to fall and the days grow shorter, there's nothing quite like the comforting embrace of a steaming bowl of soup. Today, I'm thrilled to share with you a recipe that not only warms the body but also the soul: Instant Pot Chicken Taco Soup. This dish is a symphony of flavors, blending the zest of Mexican spices with the wholesome goodness of chicken and vegetables. It’s a main dish that’s as easy to prepare as it is delicious, with a difficulty rating of just 3 out of 10.


Ingredients for a Flavor-Packed Bowl


- Boneless, skinless chicken breasts


- 1 can of black beans, drained and rinsed


- 1 can of corn, drained


- 1 can of green chilis


- 1 can of diced tomatoes, including juice


- 2 tablespoons chili powder


- 1 tablespoon dried cilantro


- 1 green bell pepper, diced


- 2 green onions, sliced


- 1 tablespoon olive oil


- 1 onion, diced


- 2 cups of water


Instructions: A Quick and Easy Preparation


1. Sauté the Vegetables: Press the 'Sauté' button on your Instant Pot and heat the olive oil. Add the diced onion and bell pepper, sautéing until they become translucent and fragrant.
2. Combine the Ingredients: Add the canned tomatoes (including their juice) and water to the pot, making sure to scrape any delicious bits from the bottom. This step ensures a flavorful base and prevents sticking.
3. Add Main Ingredients: Place the chicken breasts in the pot, followed by chili powder, corn, black beans, sliced green onions, green chilis, and half a cup of cilantro.
4. Cook Under Pressure: Lock the lid of the Instant Pot and press the 'Manual' or 'Pressure Cook' button, setting the time for 15 minutes.
5. Release and Shred: Once the time is up, do a quick release until the valve drops. Unlock the lid and carefully shred the chicken using two forks. Let the soup simmer for an additional 5 minutes to fully meld the flavors.
6. Serve and Enjoy: Ladle the soup into bowls and customize with your favorite toppings like sour cream, cheese, or avocado for an added touch of creaminess and flavor.

A Trip Down Memory Lane


This recipe holds a special place in my heart, as it takes me back to cozy winter evenings spent with my family. I vividly remember the aroma of spices wafting through our kitchen as my grandmother prepared a similar dish. The warmth and love she infused into her cooking were palpable with every bite. As we gathered around the dinner table, sharing stories and laughter, this soup became more than just a meal; it was a tradition, a moment of togetherness that I cherish deeply.


Conclusion


Our Instant Pot Chicken Taco Soup is more than just a dish; it's a celebration of flavors and memories. Whether you're a seasoned cook or a beginner, this recipe is designed to be simple yet satisfying, making it perfect for a delightful family dinner. So, gather your loved ones, and let this soup bring a taste of nostalgia and warmth to your table. Enjoy every spoonful!

Read more about Appetizers

Read more about Main Dishes

Read more about Desserts

Easy Eclairs | Made by Meaghan Moineau

Easy Eclairs | Made by Meaghan Moineau

Sweet Nostalgia: Crafting Easy Eclairs at Home


Introduction


There's something undeniably magical about sinking your teeth into a perfectly crafted éclair. The crisp choux pastry, the decadent pastry cream, and the glossy chocolate ganache create a symphony of flavors and textures that dance on your palate. Today, we're diving into the delightful world of eclairs with a recipe that is not only easy to follow but also rich in nostalgia. Join me as I share my family’s cherished recipe for Easy Eclairs, a dessert that has been a staple in our family gatherings.


A Taste of Memories: The Story Behind the Recipe


Growing up, my grandmother's kitchen was always filled with the inviting aroma of freshly baked goods. Sunday afternoons were reserved for baking, and eclairs were a family favorite. I remember standing on a stool, barely able to reach the counter, watching in awe as my grandmother expertly piped the choux pastry onto the baking tray. Her hands moved with a grace that only years of practice could achieve. The kitchen would fill with laughter and stories, and the sweet anticipation of biting into a freshly made éclair was a feeling I'll never forget. Today, whenever I make these eclairs, I am transported back to those warm afternoons, surrounded by love and the comforting hum of family chatter.


Recipe: Easy Eclairs


Ingredients


Choux Pastry:

- 1 cup water

- 1/2 cup full cream milk


- 1/2 cup butter


- 1 tablespoon sugar


- 1/4 teaspoon salt


- 1 cup plain flour


- 4 eggs


Pastry Cream:

- 2 cups milk

- 1/2 cup sugar


- 4 egg yolks


- 1/4 cup cornstarch


- 1/2 cup cream


Chocolate Ganache:

- 1 cup cream

- 200g dark chocolate, chopped


Instructions


Choux Pastry:

1. Preheat your oven to 180°C (356°F). Line a baking tray with parchment paper or a baking mat.

2. In a saucepan, combine water, milk, butter, sugar, and salt. Bring to a boil over medium heat.


3. Stir in flour quickly and continue to cook over low heat, stirring constantly, until the mixture pulls away from the sides of the pan and forms a ball.


4. Transfer the dough to a mixing bowl. Beat on low speed with an electric mixer for about 3 minutes to cool slightly.


5. Add eggs one at a time, beating well after each addition.


6. Cover the bowl with plastic wrap and chill in the fridge for at least 30 minutes (up to 24 hours if needed).


7. Fill the chilled dough into a piping bag. Pipe into small logs about 5 cm in length on the baking tray.


8. Bake for 20-25 minutes until golden brown. Pierce a small hole to allow steam to escape and prevent sogginess. Optionally, return to the oven for another 2 minutes to dry.


9. Allow to cool on a rack.


Pastry Cream:

1. Place all ingredients in a saucepan and whisk until combined.

2. Heat over medium heat, stirring continuously, until the mixture thickens into a paste.


3. Remove from heat and transfer to a bowl. Cover with plastic wrap and chill until fully set.


4. Once chilled, fill a piping bag with the pastry cream and fill the cooled eclairs.


Chocolate Ganache:

1. Heat cream in a saucepan until just about boiling.

2. Remove from heat and stir in chopped dark chocolate until melted and smooth.


3. Allow to cool and thicken. Dip or drizzle over filled eclairs.


Difficulty Rating: 5/10


Classification: Dessert


Conclusion


Crafting these easy eclairs is not just about the end product; it’s about the journey through memories and the joy of creating something delicious from scratch. Whether you're an experienced baker or a novice, this recipe is a delightful way to bring a touch of elegance to your dessert table. So why not gather your loved ones, share stories, and create your own sweet memories over a batch of homemade eclairs? Happy baking!

Read more about Appetizers

Read more about Main Dishes

Read more about Desserts

Banana & Oreo Muffin | Made by Meaghan Moineau

Banana & Oreo Muffin | Made by Meaghan Moineau

Title: Nostalgia Baked Fresh: Banana & Oreo Muffins
Description: Dive into the delightful fusion of flavors with our Banana & Oreo Muffin recipe! This scrumptious dessert combines the moist sweetness of bananas with the beloved crunch of Oreo cookies, creating a treat that’s sure to bring back fond memories. Perfect as a comforting dessert, this easy-to-follow recipe will transport you back to cozy family gatherings, all while tantalizing your taste buds. Discover the joy of baking and sharing a piece of nostalgia with your loved ones.

---


Banana & Oreo Muffin Recipe


Difficulty: 3/10
Category: Dessert

Ingredients:

- 1/2 cup butter, softened

- 3/4 cup sugar


- 1 1/2 cups all-purpose flour


- 1 tsp baking powder


- 1/2 tsp baking soda


- 1 large egg


- 1/2 cup condensed milk


- 2 ripe bananas, mashed


- 1 tsp vanilla essence


- 1/2 tsp banana essence


- 10 Oreo cookies


Instructions:

1. Prepare the Dry Ingredients:

Sift the flour, baking powder, and baking soda together in a medium-sized bowl and set aside.


2. Crush the Oreos:

Remove the cream from the Oreo cookies. Place the cookies in a ziplock bag and crush them into fine crumbs using a rolling pin.


3. Cream the Butter and Sugar:

In a large mixing bowl, use an electric beater to cream the butter and sugar until the mixture is light and fluffy. This should take about 3 minutes on medium speed.


4. Add Wet Ingredients:

Beat in the egg, ensuring the mixture is well combined with no egg traces. Add the mashed bananas, vanilla essence, and condensed milk. Give it a quick whisk to blend it all together.


5. Combine with Dry Ingredients:

Lower the mixer speed and gradually add the flour mixture to the wet ingredients. Blend until the batter is smooth.


6. Incorporate Oreo Crumbs:

Gently fold the crushed Oreo crumbs into the batter until well combined.


7. Prepare for Baking:

Scoop the batter into prepared muffin cups, filling each about 3/4 full. Top with extra banana slices and Oreo cookie pieces for added flair.


8. Bake:

Preheat the oven to 180°C (350°F). Bake the muffins for 20-25 minutes or until a toothpick inserted into the center comes out clean.


---


A Whiff of Nostalgia


Growing up, Sunday afternoons were always a time for family gatherings at Grandma's house. The aroma of freshly baked goods would greet us as we walked through the door, an invisible hug that promised warmth and love. Among the spread of treats, her Banana & Oreo Muffins stood out, not just for their heavenly taste but for the laughter and stories shared around the kitchen table as we savored each bite.


I remember the first time I helped her bake these muffins. My small hands were clumsy, scattering flour and sugar across the countertop, but Grandma's patient guidance turned it into an adventure rather than a chore. As we crushed the Oreos, she would tell tales of her own childhood, painting vivid pictures of a time long past. Those afternoons taught me the power of food to bring people together, to forge connections across generations.


Today, as I bake these muffins in my own kitchen, the memories come flooding back. Each step of the recipe is a breadcrumb trail leading back to those cherished moments. Every bite is a reminder of the joy and love that flavored my childhood, and I hope it can bring a taste of that nostalgia to your home too.


---


Whether you're a seasoned baker or a beginner, this Banana & Oreo Muffin recipe is a delightful way to create new memories while honoring the old. Enjoy the process and the delicious results!

Read more about Appetizers

Read more about Main Dishes

Read more about Desserts

Fusilli With Zucchini Flowers, Ricotta and Saffron | Made by Meaghan Moineau

Fusilli With Zucchini Flowers, Ricotta and Saffron | Made by Meaghan Moineau

A Taste of Nostalgia: Fusilli With Zucchini Flowers, Ricotta, and Saffron


A Delightful Culinary Journey


In the heart of Italian cuisine, simplicity meets elegance in a dish that encapsulates the vibrant flavors of summer: Fusilli with Zucchini Flowers, Ricotta, and Saffron. This delightful recipe not only brings together the rich and creamy textures of ricotta and the aromatic warmth of saffron but also weaves a tapestry of memories that will transport you back to cherished family gatherings.


Ingredients That Dance on Your Palate


- 1 red onion, finely chopped


- 2 tablespoons of extra virgin olive oil (EVO)


- 1/4 cup sliced almonds


- A pinch of salt


- 8 zucchini flowers, stems and pistils removed, cut into strips


- 200g Fusilloro Verrigni or Fusilloni


- 1/2 cup ricotta cheese


- A generous pinch of saffron


- Salt and pepper to taste


Instructions: Crafting a Memory


1. Sauté with Love: Begin by washing and finely chopping the red onion. In a pan, gently dry the onion with a drizzle of extra virgin olive oil and a pinch of salt. Add the sliced almonds, allowing them to toast lightly, enhancing their nutty aroma.
2. A Floral Touch: Discard the stem and pistil of the zucchini flowers, slicing them into delicate strips. Add these to the pan, stirring briefly before turning off the heat. The flowers will imbue the mixture with a subtle sweetness.
3. Perfect Pasta: In a pot of boiling salted water, drop the Fusilloro Verrigni or Fusilloni. Cook for 9 minutes until al dente, ensuring the pasta retains a satisfying bite.
4. Creamy Dream: In a bowl, mix the ricotta cheese with saffron, adding a spoonful of pasta cooking water to achieve a smooth, creamy consistency. Season with salt and pepper.
5. Bringing It All Together: Drain the pasta and add it to the pan with the sautéed zucchini flowers. Pour in the saffron cream, mixing gently to coat the fusilli in the luscious sauce.
6. Serve and Savor: Plate your creation immediately, savoring each bite as the flavors meld together harmoniously.

Difficulty Rating: 4/10


This dish is approachable for most home cooks and promises an impressive result with minimal effort. It makes for a beautiful Main Dish that celebrates the season's bounty.

A Walk Down Memory Lane


Growing up, summer Sundays were synonymous with family lunches at Nonna's house. Her kitchen, filled with laughter and the aroma of fresh ingredients, was a sanctuary where time seemed to stand still. One of my fondest memories was watching her prepare this very dish, Fusilli with Zucchini Flowers, Ricotta, and Saffron. She would enlist my help to carefully pick zucchini flowers from the garden, teaching me to appreciate the beauty of nature's gifts.


As we cooked side by side, Nonna would share stories of her childhood, painting vivid pictures of bustling Italian markets and sun-drenched fields. Each ingredient held a story, a tradition passed down through generations. Sitting around the table, surrounded by loved ones, the dish was more than just a meal; it was a testament to our heritage, a reminder of the simple joys that bind us together.


This recipe is a homage to those precious moments, an invitation to create your own memories and savor the timeless flavors that connect us all. So, gather your loved ones, and let the magic of Italian cuisine bring a piece of my family's story into your home. Buon appetito!

Read more about Appetizers

Read more about Main Dishes

Read more about Desserts

Creamy Mushrooms Over Soba Noodles (Vegan) | Made by Meaghan Moineau

Creamy Mushrooms Over Soba Noodles (Vegan) | Made by Meaghan Moineau

Title: A Taste of Home: Creamy Vegan Mushrooms Over Soba Noodles
Description: Dive into a comforting, plant-based culinary experience with our Creamy Mushrooms Over Soba Noodles. This vegan dish combines the earthy flavors of mushrooms with a rich, creamy sauce, all elegantly draped over soba noodles. Perfect for a cozy dinner, this recipe is inspired by cherished family memories and is sure to bring warmth to your table.

---


There's something about the aroma of sautéed mushrooms wafting through the kitchen that transports me back to my grandmother's house. As a child, I would sit on the tall stool by the counter, watching her expertly toss ingredients into her well-worn pan, each movement a dance she had perfected over the years. Her version of creamy mushrooms over soba noodles was a family favorite, a dish that brought us together around the table, warming both our hearts and bellies.


Fast forward to today, and I find myself recreating this beloved dish with a modern twist—making it entirely vegan while keeping its comforting essence intact. This recipe, Creamy Mushrooms Over Soba Noodles, is a tribute to those cherished moments and the simple joy of sharing a delicious meal with loved ones.


Ingredients:

- 2 tablespoons Earth Balance buttery spread


- 2 cups cremini mushrooms (or your choice), sliced


- 2 cups white mushrooms, sliced


- 3 cloves garlic, minced


- 2 tablespoons all-purpose flour


- 1 cup unsweetened soy milk


- 1/4 cup white wine


- 1 tablespoon fresh thyme, plus more for garnish


- 1 tablespoon lemon juice


- Salt & pepper to taste


- 8 ounces soba noodles


Instructions:
1. Sauté the Mushrooms: Melt 1 tablespoon of Earth Balance in a sauté pan over medium heat. Add the sliced mushrooms and minced garlic, stirring occasionally until the mushrooms are dark and reduced. Set the mushrooms aside.
2. Make the Roux: In the same pan, melt the remaining tablespoon of Earth Balance. Stir in the all-purpose flour, cooking and stirring for about a minute until it forms a roux to thicken your sauce.
3. Create the Sauce: Slowly add the soy milk to the roux, stirring continuously until the mixture is smooth and thickened. Return the mushrooms to the pan, then add the lemon juice, fresh thyme, salt, and pepper.
4. Add the Wine: Pour in the white wine and continue to cook the sauce until it reduces and reaches a pleasant, creamy consistency.
5. Serve: Cook the soba noodles according to package instructions, then divide them into bowls. Ladle the creamy mushroom sauce over the noodles and garnish with sprigs of fresh thyme if desired.
6. Enjoy: Relish the flavors and memories with each bite.

---


Difficulty: 4/10
Classification: Main Dish

---


This recipe is more than just a meal; it's a journey back to simpler times, a connection to family, and a celebration of plant-based cooking. Whether you're sharing it with loved ones or savoring it solo, this dish promises to deliver warmth, nostalgia, and satisfaction. Bon appétit!

Read more about Appetizers

Read more about Main Dishes

Read more about Desserts

Homemade Apple Almond Granola Bars | Made by Meaghan Moineau

Homemade Apple Almond Granola Bars | Made by Meaghan Moineau

Title: Crunchy Comfort: Homemade Apple Almond Granola Bars for Every Heartfelt Moment
Description: Dive into the delightful world of homemade apple almond granola bars. This easy-to-make recipe not only offers a delicious, nutritious snack but also brings back cherished family memories. Perfect for breakfast on the go or a healthy dessert, these granola bars are sure to become a staple in your kitchen.

---


There's something inherently comforting about the aroma of baking apples and cinnamon wafting through the house. It stirs a sense of nostalgia, transporting me back to chilly autumn afternoons spent in my grandmother's warm kitchen. She would be bustling around, preparing various delights for the family. One of my fondest memories is of her apple almond granola bars—a treat that was both simple and satisfying.


A Family Tradition Rekindled

As a child, I eagerly watched my grandmother as she mixed together rolled oats, ground flax seed, and oat bran with a sprinkle of cinnamon, the spices dancing in the air. The sweet touch of honey would follow, bringing everything together into a harmonious blend. My favorite part was helping her chop up the apples and almonds, little tasks that made me feel like an essential part of the culinary process.


Those granola bars were more than just a snack; they were a symbol of love and togetherness. Each bite was infused with the warmth of family gatherings and laughter that echoed through the kitchen—a tradition that I've carried into my own home, recreating that same cozy atmosphere for my children.


Recipe for Homemade Apple Almond Granola Bars
Ingredients:

- 2 cups rolled oats


- 1/4 cup ground flax seed


- 1/4 cup oat bran


- 1/4 cup wheat bran


- 1/4 teaspoon salt


- 1 teaspoon baking powder


- 1 teaspoon cinnamon


- 1/4 cup sugar substitute


- 1/4 cup unsweetened coconut


- 1/2 cup non-fat milk


- 1/4 cup sweet honey


- 1 large egg


- 1 teaspoon vanilla extract


- 1 apple, peeled and chopped


- 1/2 cup almonds, chopped


Instructions:

1. Preheat your oven to 350°F (175°C). Lightly spray a 9x13 inch pan with non-stick cooking spray.


2. In a large mixing bowl, combine the rolled oats, ground flax seed, oat bran, wheat bran, salt, baking powder, cinnamon, sugar substitute, and unsweetened coconut. Stir until all the ingredients are well mixed.


3. Add in the non-fat milk, sweet honey, egg, and vanilla extract. Stir until the mixture is fully combined.


4. Gently fold in the chopped apple and almonds, ensuring they are evenly distributed throughout the mixture.


5. Press the mixture firmly into the prepared pan, creating an even layer.


6. Bake for 15-20 minutes, or until the edges start to brown and the kitchen is filled with a tantalizing aroma.


7. Allow the granola to cool for about 10 minutes. Cut into bars while still warm, then let them cool completely before serving.


Difficulty Rating: 4/10
Classification: Dessert

These homemade apple almond granola bars are a testament to the timeless bond between family and food. Easy to make yet packed with flavor and nutrition, they're perfect for a quick breakfast, a healthy dessert, or a nostalgic snack that takes you back to simpler times. Share this recipe with loved ones, and continue creating cherished memories in your kitchen.

Read more about Appetizers

Read more about Main Dishes

Read more about Desserts

Easy Homemade Oreo Cookies | Made by Meaghan Moineau

Easy Homemade Oreo Cookies | Made by Meaghan Moineau

Title: Nostalgic Delights: Easy Homemade Oreo Cookies to Sweeten Your Day
Description: Dive into the delightful world of homemade treats with our Easy Homemade Oreo Cookies recipe. This simple yet rewarding dessert will not only satisfy your sweet tooth but also transport you back to fond family memories. Discover how a few ingredients can come together to create magic in your kitchen, and relive the joy of baking with loved ones.

---


There's something undeniably heartwarming about biting into a freshly baked cookie. The soft crunch, the creamy filling, and the burst of sweetness all come together to create a moment of pure joy. Our Easy Homemade Oreo Cookies recipe is a testament to this simple pleasure, and it comes with a sprinkle of nostalgia.


Ingredients:

- 8 oz cream cheese


- 2 eggs


- 1 box of chocolate cake mix


- 1 cup icing sugar


- ½ cup margarine


- 2 tablespoons milk


- ¼ cup oil


- 1 teaspoon vanilla extract


Instructions:

1. Preheat your oven to 325°F (163°C).


2. In a gigantic bowl, combine the cream cheese, eggs, chocolate cake mix, margarine, milk, oil, and vanilla extract. Mix thoroughly. If the bowl seems too crowded, consider mixing in parts to ensure everything is well-blended.


3. Roll the dough into small balls. Remember, the smaller the balls, the more cookies you'll have to enjoy!


4. Place the dough balls on a baking sheet and bake for 8 to 10 minutes. Once done, gently flatten them with a spatula.


5. Transfer the cookies to wire racks and let them cool completely.


6. For the filling, beat the icing sugar with a bit of cream cheese until smooth. Feel free to get creative with flavors and colors—try mint extract with light green food coloring for a refreshing twist.


7. Once cooled, spread the icing between two cookies to form delightful sandwiches.


8. Store your homemade Oreo cookies in the refrigerator or freezer to keep them fresh.


A Sweet Family Memory:

I remember the first time I made these cookies with my grandmother during one rainy afternoon. The house was filled with the comforting aroma of chocolate, and the sound of rain tapping against the windows created a cozy ambiance. We laughed as flour dusted our noses and chocolate smeared our aprons. My grandmother, with her gentle hands, showed me how to roll the dough just right.


After baking, we sat at the kitchen table, assembling the cookies with our chosen mint filling, each bite taking us to a world of sweet nostalgia. It wasn’t just about the cookies; it was about the time spent together, the stories shared, and the love poured into every step. These homemade Oreo cookies became a family favorite, a treat that brought us together time and time again.


Difficulty Rating: 3/10
Classification: Dessert

Whether you’re recreating a cherished family memory or starting a new tradition, these Easy Homemade Oreo Cookies are sure to bring smiles to your table. Enjoy every bite, and remember—the best ingredients are always love and laughter.

Read more about Appetizers

Read more about Main Dishes

Read more about Desserts

Coffee Cream Martinis | Made by Meaghan Moineau

Coffee Cream Martinis | Made by Meaghan Moineau

Sip into Nostalgia: The Irresistible Coffee Cream Martinis


Description

Indulge in the luxurious blend of rich coffee and creamy liqueurs with our Coffee Cream Martinis. This decadent dessert cocktail, dusted with a coffee-sugar rim and drizzled with chocolate, is perfect for savoring cherished memories. Whether you're hosting a dinner party or simply unwinding after a long day, this recipe will transport you to a moment of warmth and nostalgia. Easy to make and even easier to enjoy, these martinis promise to be a delightful end to any evening.

---


A Sip of Memory: The Family Tradition of Coffee Cream Martinis


Coffee Cream Martinis have always been more than just a delicious drink for my family—they're a cherished tradition passed down through generations. I remember my grandmother pulling out her vintage martini glasses every holiday season, the anticipation of her signature cocktail bringing our family together in a way that nothing else could.


As a child, I'd watch in awe as she expertly mixed the ingredients, her hands moving with practiced grace. The kitchen would fill with the rich aroma of coffee and the sweet scent of chocolate, a sensory delight that signaled the festivities had truly begun. Her laughter would echo through the room as she rimmed each glass with a mixture of sugar and coffee grounds, ensuring every sip was perfect.


While the adults enjoyed their Coffee Cream Martinis, I would sit at the kitchen table, sipping on my own "mocktail" version, feeling like a part of the grown-up world. Those moments were filled with stories of past holiday gatherings, laughter, and love, creating a tapestry of memories that I treasure to this day.


Now, as I prepare these martinis for my own family, I feel a connection to my grandmother and the traditions she instilled. The simple act of mixing vodka, Baileys, and Kahlua together, and watching the chocolate syrup cascade down the inside of the glass, brings a piece of the past into the present. It's a reminder that, while life may change, the comfort of family and the joy of shared moments remain constant.


---


Recipe: Coffee Cream Martinis


Ingredients:

- Granulated sugar

- Ground coffee


- Vodka


- Baileys Irish Cream


- Kahlua


- Chocolate syrup


- Ice cubes


Instructions:

1. Prepare the Rim: In a small bowl, combine the granulated sugar and ground coffee, mixing well. Spoon a layer of the mixture onto a plate. Moisten the rim of a martini glass with water, then hold it upside down and press into the sugar-coffee mixture to create a nice rim. Set aside.
2. Mix the Martini: Fill a martini shaker three-fourths full with ice cubes. Add vodka, Baileys, and Kahlua. Shake vigorously until condensation forms on the outside of the shaker.
3. Serve: Drizzle chocolate syrup on the inside of the prepared martini glass. Strain the martini mixture into the glass and serve immediately.

---


Difficulty: 3/10


Classification: Dessert


Indulge in a sip of nostalgia and create cherished memories with every glass of Coffee Cream Martinis. Whether you're revisiting old family traditions or starting new ones, this delightful cocktail is sure to become a beloved staple in your home. Cheers to the joy of family and the timeless pleasure of a well-crafted martini!

Read more about Appetizers

Read more about Main Dishes

Read more about Desserts

Oatmeal Pancake (Yummy & Heart Healthy) | Made by Meaghan Moineau

Oatmeal Pancake (Yummy & Heart Healthy) | Made by Meaghan Moineau

Title: "Golden Mornings: The Heartwarming Tradition of Oatmeal Pancakes"
Description: Discover the joy of savoring heart-healthy oatmeal pancakes, a dish that's as comforting as a childhood memory. With ingredients like blueberries and agave, this recipe is not only delicious but also packed with nutrients. Perfect for breakfast or brunch, these pancakes will transport you back to cozy family mornings.

---


Golden Mornings: The Heartwarming Tradition of Oatmeal Pancakes

Is there anything quite like waking up to the smell of pancakes sizzling on a Sunday morning? In our family, oatmeal pancakes have always been more than just a breakfast staple; they’re a symbol of warmth, love, and cherished memories. Today, I’m excited to share our special Oatmeal Pancake recipe, a dish that's both delicious and heart-healthy.


Ingredients


- Irish oats
- Fat-free milk
- Egg whites
- Whole wheat multi-purpose flour
- Baking powder
- Agave (or sugar)
- Blueberries
- 100% maple syrup

Instructions


1. Soak the Oats: Start by adding Irish oats to the fat-free milk. Let them soak for 3-4 hours or, for the best results, overnight in the refrigerator. This step ensures the oats are tender and blend seamlessly into the batter.
2. Prepare the Batter: Combine the soaked oats with egg whites, whole wheat multi-purpose flour, baking powder, and agave in a processor or coffee grinder. Blend until smooth and well mixed.
3. Cook the Pancakes: Heat a non-stick pan over medium heat. Pour 5 to 7 spoons of the batter onto the pan, spreading it gently. There’s no need for oil or additional greasing. Flip the pancake after 1 to 2 minutes, once it’s puffy and golden brown.
4. Serve and Enjoy: Top with fresh blueberries and drizzle with 100% maple syrup.

A Nostalgic Note


Growing up, these oatmeal pancakes were a Sunday morning tradition. I remember waking up to the gentle hum of the radio in the kitchen, my mother flipping pancakes with expert precision. The kitchen would be filled with the sweet aroma of maple syrup and the comforting scent of warm oats. My siblings and I would gather around the table, eagerly anticipating the first bite. Those mornings were not just about the food; they were about family, laughter, and the simple joy of being together.


Difficulty: 3/10


This recipe is incredibly easy to make, making it perfect for cooks of all skill levels. With minimal prep and cooking time, you can enjoy a delightful breakfast without the fuss.


Classification: Main Dish


While these pancakes could easily serve as a dessert with the addition of a scoop of vanilla ice cream, we’ve always enjoyed them as a hearty main dish, ideal for starting the day on a healthy and happy note.


This Oatmeal Pancake recipe is more than just a meal; it’s a tradition that brings with it a sense of nostalgia and warmth. Whether you’re making it for yourself or sharing it with loved ones, these pancakes are sure to become a beloved part of your breakfast repertoire. Enjoy the journey of flavors and memories with each bite!

Read more about Appetizers

Read more about Main Dishes

Read more about Desserts

Minted Pea & Spinach Soup | Made by Meaghan Moineau

Minted Pea & Spinach Soup | Made by Meaghan Moineau

Title: A Taste of Nostalgia: Minted Pea & Spinach Soup
Description: Discover the heartwarming flavors of our Minted Pea & Spinach Soup, a dish that marries simplicity with elegance. Infused with the freshness of mint and the earthiness of spinach, this soup is not only a feast for the senses but also a journey down memory lane. Perfect as an appetizer, this recipe is rated a 4 out of 10 in difficulty, making it an accessible yet sophisticated addition to your culinary repertoire.

---


A Taste of Nostalgia: Minted Pea & Spinach Soup


There's something incredibly comforting about a warm bowl of soup, especially when it carries with it the whispers of cherished family memories. Our Minted Pea & Spinach Soup is a dish that does just that—bringing together flavors that are both familiar and refreshing, while evoking a sense of nostalgia for family gatherings and cozy evenings spent by the fire.


Ingredients:

- 1 cup chicken stock

- 1/2 cup cream


- 1 teaspoon canned dried mint


- 1/2 cup milk


- 2 cups frozen peas


- 2 diced potatoes


- Salt & pepper to taste


- 1 cup fresh spinach


- 1 teaspoon sugar


- 1/4 cup water


- 1/4 cup yoghurt


Instructions:


1. Prepare the Potatoes: In a medium-sized pot, place the diced potatoes with a little water and a dash of salt and pepper. Cover with a lid and let them cook for approximately 20 minutes until they are nearly soft.
2. Add the Peas: Introduce the frozen peas to the pot, allowing them to cook for an additional 5 minutes until both the peas and potatoes are tender.
3. Incorporate the Spinach: Gently stir in the fresh spinach and let it cook for 3-5 minutes until it is wilted. Remove the pot from heat and allow it to cool slightly.
4. Blend to Perfection: Use an immersion blender to puree the mixture until smooth. Return the pot to the stovetop.
5. Finish with Creamy Goodness: Add the cream, milk, water, and chicken stock to the pot. Reheat the mixture until it's piping hot.
6. Season and Serve: Stir in the yoghurt, mint, sugar, and adjust the salt and pepper to taste. Serve immediately, garnished with crispy croutons or bacon bits. For a delightful twist, try topping with thinly sliced cheesegrillers fried in sweet chili sauce.

A Family Memory


This soup always takes me back to my grandmother's kitchen, a place where the aromas of home-cooked meals danced through the air. I remember the way she would hum softly while preparing this very dish, her hands deftly working through the motions that seemed like second nature to her. On cold winter nights, my family would gather around the table, bowls of this minted pea and spinach soup steaming before us, warming our hands and hearts alike. The simplicity of the ingredients belied the complexity of flavors, each spoonful a reminder of those precious family moments.


As I prepare this soup today, I am transported back to those evenings, the warmth of the soup a comforting embrace, and the taste a gentle reminder of the love and care that went into every meal.


Difficulty Rating: 4/10


Category: Appetizer

Whether you're looking to create new memories or relive old ones, this Minted Pea & Spinach Soup is sure to become a beloved staple in your home. Its rich, velvety texture and vibrant flavors make it the perfect way to begin any meal, ensuring that every gathering is both delicious and memorable.

Read more about Appetizers

Read more about Main Dishes

Read more about Desserts

Crab Salad Stuffed Pita Pockets | Made by Meaghan Moineau

Crab Salad Stuffed Pita Pockets | Made by Meaghan Moineau

Title: A Taste of Summer: Crab Salad Stuffed Pita Pockets
Description: Dive into a delicious blend of fresh flavors with our Crab Salad Stuffed Pita Pockets. This light and refreshing dish combines the sweetness of apple, the tang of yellow bell pepper, and the savory taste of white crabmeat, all wrapped in a warm, toasted wholewheat pita. Perfect for a summer afternoon, this recipe is quick and easy to prepare, bringing back cherished family memories with every bite.

---


Summer at our family beach house was always a magical time. The sun-drenched days were filled with the laughter of children playing by the shore, the comforting sound of waves crashing, and the enticing aroma of delicious meals being prepared in the kitchen. One dish that always marked the highlight of these summer gatherings was my grandmother's Crab Salad Stuffed Pita Pockets.


I vividly remember the hustle and bustle in the kitchen, where the air was filled with the crisp scent of freshly chopped apples and the vibrant smell of coriander leaves. My grandmother would stand at the counter, her hands deftly mixing the canned white crabmeat with diced apple and yellow bell pepper. She had a way of creating magic with the simplest of ingredients.


As she worked, my siblings and I would eagerly gather around, occasionally sneaking a taste of the sweet, juicy apple or the tangy bell pepper. The anticipation would build as we watched her toast the wholewheat pita breads until they were perfectly puffed and golden brown.


Once the crab salad was seasoned to perfection with just the right amount of salt and pepper, and lovingly folded with light mayonnaise, the real fun began. We would help stuff the warm pita pockets with fresh, peppery watercress and the delicious crab mixture. Each bite was a symphony of flavors—sweet, savory, and herbaceous—all reminding us of those carefree, sunlit days.


Every time I prepare this dish, I am transported back to those cherished family summers, filled with love, laughter, and great food. It's a simple recipe, yet it holds a treasure trove of memories.


Crab Salad Stuffed Pita Pockets Recipe
Ingredients:

- 1 apple, diced


- 1 can white crabmeat, drained


- A handful of fresh coriander leaves, chopped


- 2 tablespoons light mayonnaise


- 4 wholewheat pita breads


- Salt and pepper to taste


- A bunch of fresh watercress


- 1 yellow bell pepper, diced


Instructions:

1. In a large bowl, combine the crabmeat, diced apple, and yellow bell pepper.


2. Season the mixture with salt and pepper to taste, then add the chopped coriander leaves.


3. Gently fold in the light mayonnaise until everything is well combined.


4. Toast the wholewheat pita breads until they are puffed up and golden brown.


5. Carefully cut open the pitas on one side and stuff them with a generous handful of fresh watercress, followed by the crab mixture.


6. Serve immediately and enjoy a taste of summer nostalgia.


Difficulty Rating: 3/10
Classification: Appetizer

This delightful appetizer is not only a breeze to make but also a wonderful way to bring a bit of summer into your home, no matter the season. Enjoy this family favorite and create your own cherished memories with each delicious bite.

Read more about Appetizers

Read more about Main Dishes

Read more about Desserts