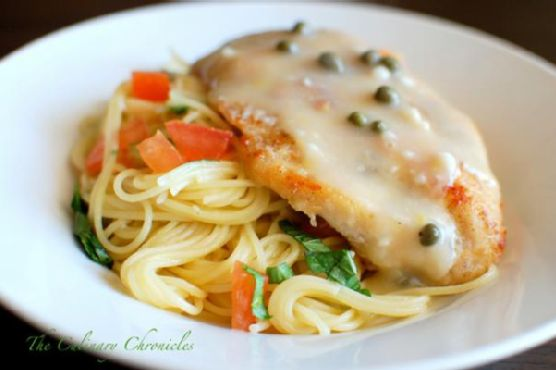
Chicken Piccata With Angel Hair Pasta
Intro
There’s a magic that happens in the kitchen when the tangy zest of lemon meets the briny burst of capers, all wrapped around a perfectly sautéed chicken breast. Chicken Piccata has been a beloved classic in my family for years. I remember my grandmother preparing this dish on Sunday afternoons, her kitchen filled with laughter and the intoxicating aroma of fresh herbs and citrus. The simplicity of the ingredients is what makes this dish shine, creating a harmony of flavors that dance on your taste buds.
Why You’ll Love It
This Chicken Piccata with Angel Hair Pasta is more than just a meal; it’s an experience. The combination of tender chicken, silky pasta, and a rich, lemony sauce is pure comfort food at its best. It’s a dish that feels both indulgent and light, perfect for a cozy family dinner or a special occasion. Plus, it’s quick to prepare, making it ideal for weeknight dinners without sacrificing flavor or elegance.
Ingredients
- All-purpose flour
- Angel hair pasta
- Boneless chicken breast
- Capers
- Chicken broth
- Fresh basil
- Diced garlic cloves
- Black kosher salt and pepper
- Lemon zest
- Lemons
- Olive oil
- Red chili flakes
- Diced roma tomatoes
- Unsalted butter
Instructions
- Place 1/2 cup of flour in a shallow dish. Using a sharp knife, slice the chicken breast in half. Place a piece of wax paper on top of each piece of chicken and pound with a kitchen mallet until it is about 1/4 inch thin. Season the chicken well with salt and pepper.
- Take the chicken and roll it into the flour, using your fingers to assist in adhering it to the meat. Carefully shake off excess flour. Repeat with the second piece of chicken.
- In a large skillet, heat 2 tablespoons of olive oil over medium heat. Slide chicken into the skillet and sauté on each side until it becomes golden brown, about 3-4 minutes each side. Once the chicken is done, transfer to a clean plate and tent with a sheet of aluminum foil.
- Begin boiling the pasta.
- Using the same skillet, add remaining olive oil and sauté garlic until it becomes aromatic but not browned. Add chili flakes, capers, lemon juice, lemon slices, zest, and chicken broth.
- Use a wooden spoon to scrape off the tasty brown bits from the bottom of the skillet. Raise the temperature to medium-high heat and allow the liquid to reduce by almost half.
- While the liquid is reducing, use a fork to mash together remaining 1 tablespoon of flour and butter in a small bowl. Whisk it into the reducing liquid and allow to cook for 1-2 minutes. Be sure to whisk out any lumps of flour. Check for seasonings and adjust with salt/pepper accordingly.
- Drain the cooked pasta. Toss the pasta in the lemon caper sauce, tomatoes, and basil, reserving a few spoonfuls of sauce. Check for seasonings and adjust with salt/pepper accordingly.
- Plate pasta and top each with a piece of chicken. Spoon extra lemon caper sauce over the chicken and pasta. Serve immediately.
Tips
For the best results, use fresh lemons and freshly ground pepper. The quality of these ingredients can greatly enhance the flavor of the final dish. Also, be sure to pound the chicken evenly to ensure even cooking. If you don’t have a kitchen mallet, a rolling pin will work in a pinch. Finally, don’t skip the step of tenting the chicken with foil; it helps keep the chicken moist and warm while you prepare the sauce.
Variations & Substitutions
For a gluten-free version, substitute the all-purpose flour with a gluten-free alternative. If you’re not a fan of capers, you can replace them with sliced green olives for a different kind of briny kick. For a vegetarian twist, replace the chicken with thick slices of portobello mushrooms, and use vegetable broth instead of chicken broth.
Storage
Leftovers can be stored in an airtight container in the refrigerator for up to 3 days. To reheat, warm gently on the stove over low heat, adding a splash of chicken broth or water to keep the pasta from drying out. Avoid reheating in the microwave, as it can make the chicken tough.
FAQ
Can I use a different type of pasta?
Absolutely! While angel hair pasta pairs beautifully with the sauce, feel free to use spaghetti, linguine, or any pasta of your choice. Just keep in mind that thicker pastas may need a little more sauce to coat them well.
What can I serve with Chicken Piccata?
This dish pairs wonderfully with a simple green salad or roasted vegetables. A slice of crusty bread is also perfect for soaking up any extra sauce. If you want to add a touch of indulgence, a glass of crisp white wine complements the lemony flavors elegantly.
Is Chicken Piccata spicy?
The red chili flakes add a subtle heat to the dish, but it’s not overwhelmingly spicy. If you prefer a milder dish, simply reduce or omit the chili flakes. Conversely, if you love a bit of heat, feel free to increase the amount to taste.
Conclusion
Chicken Piccata with Angel Hair Pasta is a delightful blend of flavors that brings a touch of gourmet to any meal. It’s a dish that not only satisfies the palate but also brings back cherished memories of family gatherings and home-cooked meals. Whether you’re a seasoned home cook or just starting out, this recipe is a keeper. I hope this becomes a cherished recipe in your home, as it has in mine. Enjoy every bite!
Related update: Chicken Piccata With Angel Hair Pasta