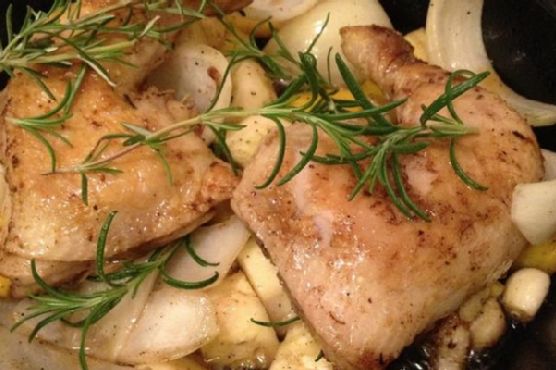
Roast Chicken with Apples and Rosemary | Made by Meaghan Moineau
Title: Aromatic Roast Chicken with Apples and Rosemary: A Taste of Family TraditionDescription: Discover the heartwarming flavors of Roast Chicken with Apples and Rosemary, a dish that brings a touch of tradition and a burst of freshness to your table. This recipe features juicy chicken infused with the aromatic blend of apples, rosemary, and lemon, perfect for a comforting family meal.
---
There’s something about the aroma of roast chicken wafting through the house that instantly transports me back to Sunday dinners at my grandmother’s home. The kitchen was always abuzz with activity, filled with laughter and the rich, inviting scents of family recipes passed down through generations. One dish that particularly stands out is our Roast Chicken with Apples and Rosemary—a recipe that not only warms the stomach but the heart.
This recipe is more than just a meal; it's a family tradition that has graced our table for as long as I can remember. My grandmother always insisted on using the freshest ingredients, and her kitchen was often stocked with the bounty from her own garden. The combination of apples and rosemary was her signature twist, adding a fragrant, slightly sweet, and earthy note to the classic roast chicken.
Ingredients:
- Fresh apples
- Onions
- Garlic
- Fresh rosemary
- Lemons
- Raimondo Sicilian Lemon Balsamic Vinegar
- Seasoning (for rub)
- Roasting chickens
- Canned stock
Instructions:
1. Preheat your oven to 400 degrees Fahrenheit and position a rack in the lower third of the oven.
2. Rinse the chicken thoroughly, then dry it well with paper towels, both inside and out.
3. In a shallow roasting pan, arrange apples, rosemary, lemons, onions, and garlic in a single layer. Season with salt and pepper, toss well, and pour in the balsamic vinegar.
4. Season the chicken generously with the prepared rub. Place it breast-side-up on top of the fruits and vegetables. Stuff the cavity of the chicken with the remaining fruits and veggies.
5. Roast the chicken for 30 minutes until the breast is firm and just beginning to brown. Using tongs, turn the chicken breast-down and continue roasting for another 20 minutes until the skin is lightly browned and an instant-read thermometer registers 175-180°F.
6. Tilt the chicken to drain cavity juices into the pan. Remove the chicken and set it aside on a cutting board.
7. Remove the rack from the pan and spoon off any excess fat. Set the pan over high heat, add the stock, and cook while scraping up any browned bits.
8. Squeeze the last lemon over the sauce to release its juices. Carve the chicken and serve with the chunky jus.
Nostalgic Family Memory:
I remember the first time I was allowed to help with this dish. I was about ten, and my grandmother guided me through each step with patience. We plucked fresh rosemary from her garden, its heady aroma filling the air as we gathered the sprigs. My favorite part was always arranging the apples and onions in the pan—their sweetness mingling with the sharpness of garlic and the zest of lemon. As we worked, she shared stories of her own childhood, of family gatherings filled with love and laughter, of recipes carried over from the old country. Those afternoons spent cooking with her taught me more than just how to prepare a meal; they taught me the importance of family traditions and the joy of sharing them.
Difficulty: 6/10
Classification: Main Dish
This Roast Chicken with Apples and Rosemary is not just a main dish; it’s a culinary journey that celebrates family, tradition, and the simple joys of home-cooked meals. Whether you’re creating new memories or reminiscing about the past, this dish is sure to become a beloved staple in your family’s recipe collection.