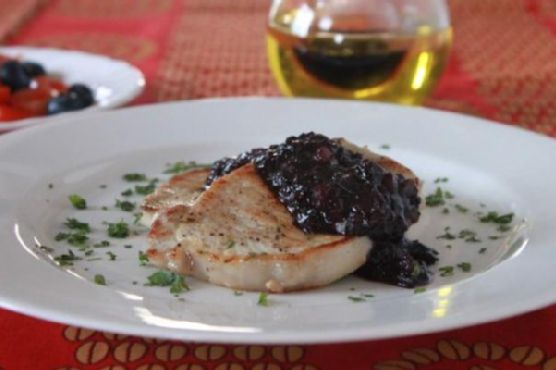
Pork with Blueberry Sauce
Intro
There’s something uniquely satisfying about combining savory flavors with a touch of sweetness. It reminds me of summer evenings spent at my grandmother’s house, where she would always surprise us with her inventive dishes. One of my fondest memories is of her tangy pork chops served with a delightful fruit sauce that seemed to encapsulate the essence of the season. Inspired by those cherished moments, I’ve crafted this recipe for Pork with Blueberry Sauce. It’s a dish that promises to bring a burst of flavor to your dinner table, and I’m excited to share it with you.
Why You’ll Love It
This Pork with Blueberry Sauce is a symphony of flavors. The juicy pork chops are perfectly seasoned and seared to golden perfection, while the blueberry sauce provides a sweet and tangy counterpoint. The balsamic vinegar adds depth, and the lime zest gives it a zesty punch. Whether you’re hosting a dinner party or enjoying a quiet meal at home, this dish is sure to impress. Plus, it’s easy to make and requires just a few simple ingredients!
Ingredients
- Pork chops
- Salt and pepper
- Canola oil
- Fresh pint blueberries
- Brown sugar
- Balsamic vinegar
- Red diced onion
- Lime zest
- Parsley, for garnish
Instructions
- Preheat the oven to 400 degrees Fahrenheit.
- In a nonreactive bowl, mash the blueberries with the brown sugar to your desired consistency and set aside.
- Heat a sauté pan over medium heat. Season the pork chops with salt and pepper on both sides.
- Add canola oil to the sauté pan. Brown the pork chops on both sides until golden and crispy, about 2-3 minutes on each side. Remove from the pan and place on a baking dish to finish cooking in the oven, if necessary. If the pork is thin, keep it warm aside until the sauce is ready.
- In the same pan, add the chopped red onion and sauté until translucent.
- Add the mashed blueberry-sugar mixture and balsamic vinegar. Cook until the sauce thickens, about 2-3 minutes.
- Add the lime zest and juice to the sauce, seasoning with salt and pepper to taste.
- If you placed the pork in the oven, remove it and place on serving plates. Serve the sauce on top and garnish with parsley or cilantro. Enjoy!
Tips
To get the perfect sear on your pork chops, make sure your pan is hot before adding the meat. This will help achieve a crispy exterior while keeping the inside juicy. Additionally, letting the pork rest after cooking allows the juices to redistribute, resulting in tender and flavorful meat.
Variations & Substitutions
If you’re looking to switch things up, you can substitute pork chops with chicken breasts or turkey cutlets. For a vegetarian version, consider using seared tofu or tempeh. You can also experiment with different fruits like raspberries or blackberries for the sauce, adjusting the sugar to taste.
Storage
Leftover pork with blueberry sauce can be stored in an airtight container in the refrigerator for up to 3 days. To reheat, gently warm it in a pan over medium-low heat, adding a splash of water if the sauce has thickened too much during storage.
FAQ
Can I use frozen blueberries for this recipe?
Yes, you can use frozen blueberries if fresh ones are not available. Just make sure to thaw them and drain any excess liquid before mashing them with the sugar.
What can I serve with Pork with Blueberry Sauce?
This dish pairs beautifully with a variety of sides. Consider serving it with creamy mashed potatoes, roasted vegetables, or a simple green salad to complement the flavors.
Nutrition
While the exact nutritional content can vary based on the specific ingredients and portion sizes used, this dish is a good source of protein from the pork and antioxidants from the blueberries. It’s a balanced meal that offers both nutrients and flavor.
Conclusion
This Pork with Blueberry Sauce is more than just a meal; it’s an experience that brings together the best of sweet and savory. Whether you’re cooking for your family or hosting guests, this dish is sure to delight everyone at the table. I hope it becomes a favorite in your home, just as it has in mine. Enjoy the journey of flavors and happy cooking!
Related update: Pork with Blueberry Sauce
Related update: Smoked Salmon and Mascarpone Calzone