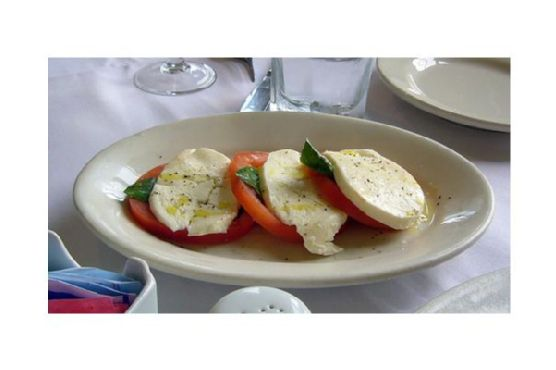
Quick and Easy Caprese Salad
Intro
There’s something magical about the simplicity of a Caprese Salad. This dish takes me back to sunny summer days spent in my grandmother’s garden, where the aroma of fresh basil and ripe tomatoes filled the air. Grandma always had a knack for turning the simplest ingredients into a feast. It was in her kitchen that I learned the art of balancing flavors and the importance of fresh ingredients. Today, I’m sharing this delightful Quick and Easy Caprese Salad recipe that embodies the essence of those cherished moments, perfect for a light lunch or a beautiful appetizer at your next dinner party.
Why You’ll Love It
This Caprese Salad is a celebration of simplicity and freshness. It’s not only quick and easy to prepare but also incredibly delicious. The combination of juicy tomatoes, creamy mozzarella, and fragrant basil, all enhanced by a drizzle of olive oil and balsamic vinegar, creates a harmony of flavors that is both refreshing and satisfying. Whether you’re a busy professional or a home cook looking for a quick dish, this salad is perfect for you. It’s a versatile recipe that can adapt to different tastes and occasions, making it a staple in any kitchen.
Ingredients
- 2 tablespoons balsamic vinegar
- Fresh basil leaves
- 8 ounces fresh mozzarella cheese
- 2 tablespoons olive oil
- 1 bell pepper (optional for added crunch)
- Salt, to taste
- 4 ripe tomatoes
Instructions
- Start by slicing the mozzarella cheese into 1/4 inch thick slices. Try to keep them even for a more uniform presentation.
- Cut the tomatoes into 1/4 inch slices. If your tomatoes are particularly juicy, you might want to drain them slightly on a paper towel.
- Arrange the slices of mozzarella and tomatoes alternately on a large platter, slightly overlapping them for a beautiful display.
- Take fresh basil leaves, and sprinkle them generously over the arranged slices. You can tear them into smaller pieces for a more rustic look.
- Drizzle the olive oil evenly over the salad, followed by the balsamic vinegar. Adjust the quantities if you prefer a more pronounced flavor.
- Season the salad with salt to taste. Freshly ground black pepper can also be added if desired.
- Optional: Thinly slice the bell pepper and add it to the salad for extra color and crunch.
- Serve immediately and enjoy your Quick and Easy Caprese Salad!
Tips
To elevate your Caprese Salad, use the freshest ingredients you can find. Opt for vine-ripened tomatoes and high-quality mozzarella for the best flavor. If you have the time, make your own balsamic reduction by simmering the vinegar until it thickens; this can add a rich, sweet dimension to the salad. Lastly, don’t shy away from experimenting with different types of tomatoes, such as heirloom varieties, to add visual interest and a depth of flavor.
Variations & Substitutions
This Caprese Salad is versatile and can be customized to your liking. If you want a twist on the traditional recipe, consider adding sliced avocados for creaminess or a sprinkle of pine nuts for a nutty crunch. For a different flavor profile, try using flavored olive oils, such as garlic-infused or lemon-infused varieties. If you’re avoiding dairy, substitute the mozzarella with a plant-based cheese alternative. Feel free to mix and match ingredients based on your dietary preferences or what’s in season.
Storage
While this salad is best enjoyed fresh, you can store any leftovers in an airtight container in the refrigerator for up to 1 day. Keep in mind that the tomatoes may release some moisture, which can affect the texture of the salad. To refresh it, you may want to add a little more olive oil and balsamic vinegar before serving.
FAQ
Can I make this salad ahead of time?
Yes, you can prepare the ingredients in advance by slicing the tomatoes and mozzarella and storing them separately. Assemble the salad just before serving to ensure it stays fresh and vibrant.
What type of mozzarella should I use?
For the best results, use fresh mozzarella, often sold in a brine or vacuum-sealed packages. Its creamy texture and mild flavor are perfect for a Caprese Salad.
Is there a way to make this salad more filling?
To make the Caprese Salad more substantial, you can add grilled chicken or shrimp. Serving it alongside crusty bread or over a bed of mixed greens can also turn it into a more complete meal.
Nutrition
This Quick and Easy Caprese Salad is not only delicious but also nutritious. It’s packed with vitamins and minerals from the tomatoes and basil, healthy fats from the olive oil, and protein from the mozzarella. A serving size is approximately 250 calories, making it a light yet satisfying option for any meal.
Conclusion
The Quick and Easy Caprese Salad is a tribute to the beauty of fresh, simple ingredients. It’s a dish that brings people together, evoking memories of shared meals and laughter. Whether you’re enjoying it as a light lunch or as part of a larger spread, this salad is sure to impress with its vibrant flavors and elegant presentation. I hope you find as much joy in making and sharing this recipe as I do. Bon appétit!
Related update: Quick and Easy Caprese Salad
Related update: Roasted red peppers and tomatoes salad