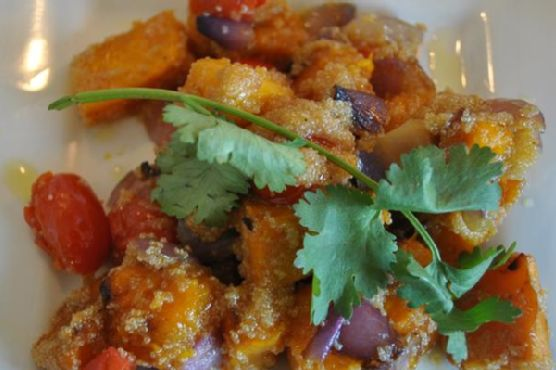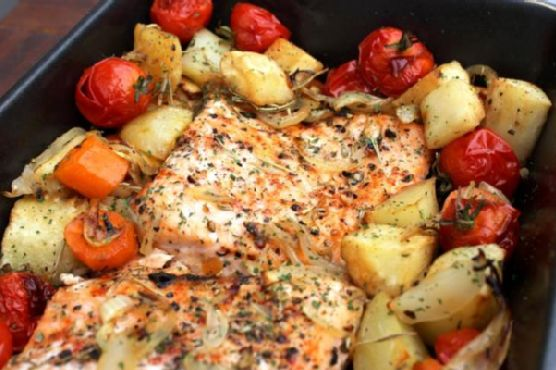
Salmon with Roasted Vegetables
Intro
There’s something magical about the aroma of roasted vegetables mingling with the rich, savory scent of salmon in the oven. It takes me back to my grandmother’s kitchen, where Sunday dinners were a cherished ritual. I remember sitting at the wooden table, my feet barely touching the floor, eagerly waiting for the feast to arrive. The combination of tender salmon and perfectly roasted vegetables was always the highlight of the meal. Today, I’m thrilled to share a recipe that brings those fond memories to life with a modern twist.
Why You’ll Love It
This recipe is a delightful symphony of flavors and textures. The salmon is tender and flaky, while the roasted vegetables offer a satisfying crunch. It’s a wholesome, nutritious meal that’s as easy to prepare as it is delicious to eat. Perfect for busy weeknights or a special weekend dinner, this dish will quickly become a favorite in your household.
Ingredients
- 2 salmon fillets
- 2 medium potatoes, roughly diced
- 2 parsnips, roughly diced
- 2 carrots, roughly diced
- 1 large onion, cut into wedges
- 1 cup cherry tomatoes
- 3 tablespoons olive oil
- Juice of 1 lemon
- Salt
- Freshly ground black pepper
- Pinch of paprika
- 2 sprigs fresh rosemary
- 2 sprigs fresh thyme
Instructions
- Preheat your oven to 200°C (400°F).
- Season the salmon fillets with salt, pepper, and a pinch of paprika. Set aside.
- In a large roasting tray, combine the diced potatoes, parsnips, and carrots.
- Drizzle the olive oil over the vegetables and season with salt and pepper. Toss to coat evenly.
- Roast the vegetables in the oven for 15 minutes.
- Add the onion wedges to the tray and roast for an additional 10-15 minutes.
- Place the salmon fillets and cherry tomatoes between the roasted vegetables in the tray.
- Drizzle the lemon juice over everything and sprinkle with rosemary and thyme.
- Season lightly with salt and pepper.
- Roast for another 10-15 minutes, or until the salmon is cooked through and the vegetables are tender.
- Serve hot, accompanied by a fresh green salad.
Tips
For the best results, ensure that your salmon fillets are of even thickness so they cook evenly. It’s also important to give the vegetables enough space on the tray to roast rather than steam, which helps them become perfectly crispy. Don’t skip the fresh herbs—they add a wonderful aroma and flavor that dried herbs can’t quite replicate.
Variations & Substitutions
Feel free to experiment with different vegetables such as bell peppers or zucchini. If you don’t have fresh rosemary or thyme, you can use dried herbs, but reduce the quantity by half as dried herbs are more concentrated. For a zesty kick, add some lemon zest along with the juice. If you’re looking for a heartier dish, serve it over a bed of quinoa or brown rice.
Storage
Store any leftovers in an airtight container in the refrigerator for up to three days. To reheat, place the salmon and vegetables in a preheated oven at 180°C (350°F) for about 10 minutes, or until warmed through. You can also use a microwave, but be careful not to overcook the salmon.
FAQ
Can I use frozen salmon for this recipe?
Yes, you can use frozen salmon, but make sure to thaw it completely before cooking. This will ensure it cooks evenly with the vegetables.
What can I serve with this dish?
This salmon and roasted vegetable dish pairs wonderfully with a simple green salad, crusty bread, or a light quinoa salad. A glass of chilled white wine also complements the flavors beautifully.
Nutrition
This meal is packed with protein, healthy fats, and a variety of vitamins and minerals from the vegetables. It’s a balanced dish that fits well into a healthy diet. Each serving provides approximately 450 calories, 30g of protein, and a good dose of omega-3 fatty acids.
Conclusion
This Salmon with Roasted Vegetables recipe is a delightful reminder of how comforting and satisfying a home-cooked meal can be. Whether you’re cooking for family, friends, or just yourself, this dish is sure to please and impress. Embrace the simplicity and let the oven do the work, bringing flavors together in a way that only roasting can achieve. Enjoy this taste of nostalgia and make new memories with every bite.
Related update: Salmon with roasted vegetables
Related update: Siew Mai