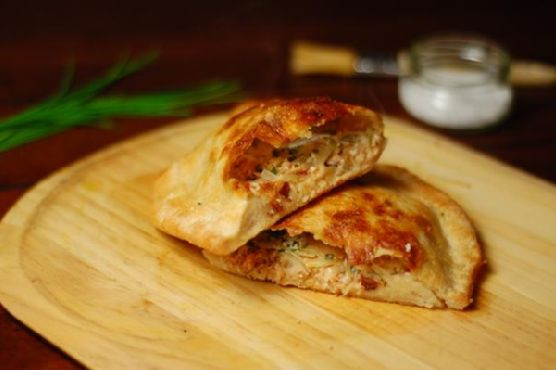
Rosemary Rum Raisin Soda Bread with Pecans | Made by Meaghan Moineau

Rosemary Rum Raisin Soda Bread with Pecans | Made by Meaghan Moineau

A Taste of Home: Rosemary Rum Raisin Soda Bread with Pecans


Introduction


Baking has a magical way of bringing people together, and there's something particularly heartwarming about the aroma of freshly baked bread wafting through the air. Today, I invite you to embark on a culinary journey with my Rosemary Rum Raisin Soda Bread with Pecans—a recipe that beautifully blends bold flavors with nostalgic memories. This delightful bread is not just a treat for the taste buds but a treasured family tradition. Get ready to create your own cherished memories with this recipe that rates a 6 out of 10 in difficulty and is perfect as a comforting dessert or a delightful accompaniment to any meal.


Ingredients


- 1 cup raisins


- ½ cup dark rum


- 2 cups all-purpose flour


- 1 cup whole wheat flour


- 1 ½ teaspoons baking soda


- 1 teaspoon salt


- 1 tablespoon fresh rosemary, finely chopped


- ½ cup pecans, toasted and chopped


- 1 cup plain yogurt (plus more if needed)


- 2 tablespoons honey


- Milk, for brushing


- Anise seeds or oats, for sprinkling


Instructions


1. Prepare the Raisins: Combine the raisins and dark rum in a small saucepan. Bring to a boil, then let simmer for 30 seconds. Remove from heat, cover, and allow the raisins to macerate for at least 4 hours, preferably overnight. This step infuses the raisins with a rich, aromatic flavor that forms the heart of this bread.
2. Preheat and Prepare: When you're ready to bake, preheat your oven to 375°F (190°C). Coat a baking sheet with olive oil and dust it lightly with flour, or line it with parchment paper.
3. Mix Dry Ingredients: In a large mixing bowl, whisk together the all-purpose flour, whole wheat flour, baking soda, salt, and rosemary. Stir in the toasted pecans, ensuring they're evenly distributed throughout the mixture.
4. Combine Wet Ingredients: In a separate bowl, combine the macerated raisins (including any remaining rum), yogurt, and honey. Mix well.
5. Form the Dough: Add the wet ingredients to the dry ingredients. Stir until the mixture becomes too stiff to stir, then use your hands to bring it together into a dough. If the dough is too dry, add additional yogurt, one teaspoon at a time, until you achieve a stiff, slightly tacky ball.
6. Shape the Loaf: Turn the dough onto a lightly floured board and shape it into a round loaf. Be careful not to over-knead the dough to avoid a tough texture.
7. Prepare for Baking: Transfer the loaf to the prepared baking sheet. Use a sharp knife to make 4-6 deep slashes across the top of the loaf, cutting about halfway through. Brush the top with milk and sprinkle with anise seeds or oats if desired.
8. Bake: Bake for 40-45 minutes, or until a toothpick inserted into the center comes out clean. The loaf should sound hollow when tapped. Cool on a wire rack.
9. Serve: Enjoy warm or at room temperature with a generous slather of butter. Each bite is a sumptuous blend of aromatic rosemary, sweet raisins, and crunchy pecans—a true celebration of flavors.

A Nostalgic Family Memory


Every year, as the leaves began to fall and the air turned crisp, my family would gather in my grandmother's cozy kitchen to bake this very bread. The process was a cherished tradition, a time when generations came together to share stories and laughter. My grandmother would recount tales of her own childhood, and how her mother taught her to bake this bread in their small country cottage. The scent of rosemary and rum-filled raisins would permeate the air, wrapping us in a cocoon of warmth and love.


This bread, with its rustic charm and hearty flavors, has always symbolized home for me. It's more than just a recipe; it's a link to my roots and a reminder of the love that has been passed down through generations. Even now, as I bake it in my own kitchen, I feel the presence of my family around me, their spirits alive in every slice.


Conclusion


Rosemary Rum Raisin Soda Bread with Pecans is more than just a delightful dessert or accompaniment—it's a piece of history, a connection to loved ones, and a celebration of flavors that warm the heart and soul. Whether you're sharing it with family or enjoying a quiet moment alone, this bread is sure to create memories that will last a lifetime. So, roll up your sleeves, embrace the art of baking, and let this recipe bring a taste of home to your table.

Read more about Appetizers

Read more about Main Dishes

Read more about Desserts

Rice Stuffed Bell Peppers (Zeytinyagli Biber Dolmasi) | Made by Meaghan Moineau

Rice Stuffed Bell Peppers (Zeytinyagli Biber Dolmasi) | Made by Meaghan Moineau

A Taste of Tradition: Rice Stuffed Bell Peppers (Zeytinyağlı Biber Dolması)


Experience the Heartfelt Flavors of a Timeless Turkish Delicacy


Introduction


There's a certain magic that comes with recreating traditional dishes, especially when they transport you back to cherished family gatherings. One such dish, the Rice Stuffed Bell Peppers, or Zeytinyağlı Biber Dolması, is a testament to the rich culinary heritage of Turkey. This delightful blend of aromatic spices and tender bell peppers filled with a savory rice mixture is both comforting and flavorful, making it a must-try for anyone looking to explore authentic Turkish cuisine.


Difficulty Level: 5/10
Category: Main Dish

Ingredients


- Bell peppers


- Olive oil


- Onions


- Tomatoes


- Tomato paste


- Rice


- Salt


- Sugar


- Allspice


- Cinnamon


- Dried or fresh mint


- Water


Instructions


1. Prepare the Peppers:

Begin by cutting the tops off the bell peppers, removing the seeds, and washing them thoroughly. Set aside to dry.


2. Create the Filling:

In a large pan, lightly sauté the onions in olive oil until they are translucent. Stir in the chopped tomatoes and tomato paste, allowing them to cook for an additional 3 minutes.


3. Cook the Rice:

Add the rice to the onion-tomato mixture and braise it for about 5 minutes. Then, add salt, sugar, allspice, cinnamon, and mint, along with hot water. Allow the mixture to simmer until all the liquid has evaporated. Let it cool for a short while.


4. Stuff the Peppers:

Using a spoon, fill each bell pepper with the rice mixture. Place a slice of tomato on top of each pepper to act as a cap.


5. Cook the Dolmasi:

Arrange the stuffed peppers in a large saucepan or pot. Add enough water to reach halfway up the sides of the peppers. Cover with a lid and cook on low heat for about 15-20 minutes.


6. Serve and Enjoy:

Serve the rice-stuffed bell peppers warm or hot, and enjoy the blend of spices and textures that make this dish so special.


A Nostalgic Family Memory


Growing up, Sunday afternoons at my grandmother's house were filled with the intoxicating aromas of her cooking. Zeytinyağlı Biber Dolması was always a family favorite, and its preparation was a cherished ritual. I can still picture my grandmother, her hands deftly crafting each stuffed pepper with care, while recounting tales of her childhood in the vibrant streets of Istanbul.


The kitchen buzzed with laughter and stories, a symphony of clinking pots and shared memories. We would gather around the table, eager to taste the fruits of her labor. Each bite of the dolmasi was a flavor-packed journey, the spices dancing on our tongues, mingling with the sweetness of the peppers.


These meals were more than just food; they were a connection to our heritage, a bridge linking us to generations past. Every time I prepare this dish, I am transported back to those warm, love-filled Sundays, and I feel a deep sense of gratitude for the culinary legacy passed down to me.


Conclusion


Rice Stuffed Bell Peppers (Zeytinyağlı Biber Dolması) is more than just a meal; it's an experience, a journey into the heart of Turkish culture and family traditions. Whether you're a seasoned cook or a curious beginner, this recipe offers a taste of nostalgia and the opportunity to create lasting memories around the dinner table. So, gather your ingredients, embrace the process, and enjoy the rich, savory flavors of this timeless dish.

Read more about Appetizers

Read more about Main Dishes

Read more about Desserts

Mushroom-Pea Risotto | Made by Meaghan Moineau

Mushroom-Pea Risotto | Made by Meaghan Moineau

Title: A Taste of Home: Crafting the Perfect Mushroom-Pea Risotto
Description: Discover a heartwarming recipe for Mushroom-Pea Risotto that brings family memories to life. This detailed guide provides step-by-step instructions and a nostalgic story, inviting you to recreate a beloved dish that's both delicious and meaningful. Get ready to savor the flavors and memories that this classic main dish offers.

---


There’s something incredibly comforting about the aroma of a simmering risotto, and for me, Mushroom-Pea Risotto is more than just a dish—it's a cherished family tradition. With its creamy texture and rich flavors, this recipe is a delightful blend of tender arborio rice, earthy mushrooms, and sweet green peas, all brought together with the luxurious touch of Parmesan cheese. Rated at a 6 out of 10 in terms of difficulty, this main dish is perfect for a cozy family dinner or a special occasion.


Ingredients:

- 1 ½ cups arborio rice


- 5 cups chicken broth


- 3 cloves garlic, minced


- 2 tablespoons olive oil


- 1 cup diced onions


- 1 cup freshly grated Parmesan cheese


- 1 cup frozen green peas


- Salt and pepper, to taste


- 2 cups sliced white mushrooms


Instructions:

1. Begin by bringing the chicken broth to a gentle simmer, then remove from heat and cover to keep warm.


2. In a large skillet over medium heat, add the olive oil. Once heated, add the diced onions and sauté until tender, about 10 minutes.


3. Stir in the garlic and mushrooms, cooking until the mushrooms become tender and release their savory aroma.


4. Add the arborio rice to the skillet, stirring to coat the grains and sauté until they become translucent.


5. Reduce the heat to medium-low and pour in the vermouth, cooking until the liquid is absorbed.


6. Gradually add the warm broth, one cup at a time, stirring often. Allow each addition of broth to be fully absorbed before adding more. Continue this process until the rice is tender and creamy.


7. Finally, stir in the frozen green peas and freshly grated Parmesan cheese. Season with salt and pepper to taste.


A Nostalgic Family Memory:

Every time I prepare Mushroom-Pea Risotto, I am transported back to my grandmother's cozy kitchen. I remember the warmth of her embrace and the sound of her laughter as she shared stories from her own childhood. Her risotto was more than just a meal; it was a symbol of love and togetherness. She would let me stir the rice, guiding my small hands with hers and explaining the importance of patience in creating the perfect risotto. Those moments were filled with warmth, much like the dish itself, and they instilled in me a love for cooking and family traditions that I cherish to this day.


Conclusion:

Crafting the perfect Mushroom-Pea Risotto is an experience that goes beyond the kitchen. It's about savoring the flavors and the fond memories that accompany them. Whether you're an experienced cook or a beginner looking to explore the world of risotto, this recipe invites you to create a dish that's both delicious and meaningful. Gather your loved ones, share stories, and enjoy the delightful taste of home with every bite.

Read more about Appetizers

Read more about Main Dishes

Read more about Desserts

Banana Creme Brulee | Made by Meaghan Moineau

Banana Creme Brulee | Made by Meaghan Moineau

Banana Creme Brulee: A Sweet Dance of Nostalgia and Decadence


Description


Dive into a world where creamy custard meets caramelized perfection. Our Banana Creme Brulee is not only a delightful dessert but a gateway to cherished family memories. Discover the rich flavors of bananas and vanilla bean, topped with a golden sugar crust that cracks with a satisfying tap. Ideal for those seeking a touch of elegance, this dessert is a symphony of flavors and textures. Rated 6/10 in difficulty, it's a rewarding challenge for any home cook.


---


A Family Legacy in a Spoonful


Every time I whip up a batch of Banana Creme Brulee, I'm transported back to the cozy kitchen of my grandmother's house. The aroma of vanilla and caramelized sugar would envelop the room, a sweet prelude to Sunday dinners with the family. My grandmother, an avid cook, had a knack for turning simple ingredients into magical creations. Her Banana Creme Brulee was legendary, not just for its taste, but for the love and warmth it symbolized.


As a child, I would watch in awe as she carefully sliced the bananas, her hands moving with practiced grace. The way she split the vanilla bean pod and scraped out the seeds was like witnessing a maestro at work. Her secret, she would say with a wink, was in the gentle simmering of the cream, coaxing out every bit of flavor from the vanilla.


The highlight, of course, was the caramelization. My cousins and I would gather around the kitchen island, eyes wide with anticipation, as she expertly wielded the blowtorch, transforming the demerara sugar into a glistening, amber crust. That first crack of the spoon against the hardened top was music to our ears, signaling the start of another sweet memory.


Recipe: Banana Creme Brulee


Ingredients:

- Bananas


- Little demerara sugar


- Egg yolks


- Heavy cream


- Sugar


- Vanilla bean pod


Instructions:
1. Infuse the Cream: In a medium saucepan, combine the cream and vanilla bean pod. Bring slowly to a boil, then remove from heat just before it reaches boiling.
2. Prepare the Bananas: Slice bananas thickly and divide them between 8 small ramekins.
3. Mix the Custard: In a mixing bowl, beat egg yolks, caster sugar, and vanilla seeds until thick and creamy. Pour the hot cream over the egg mixture, stirring continuously.
4. Thicken the Custard: Rinse and dry the saucepan, then pour in the custard mixture. Heat gently, stirring constantly, until the mixture thickens. Be sure to stir right into the corners to prevent curdling. Do not let it boil.
5. Assemble and Chill: Pour the custard through a sieve into the ramekins, filling them to the top. Set aside to cool, then refrigerate overnight.
6. Caramelize the Tops: Dust each custard with a thin layer of demerara sugar. Place under a very hot grill for a few seconds until the sugar melts into a shiny caramel. Leave to cool and harden.
Serves: 8
Difficulty: 6/10
Category: Dessert

Conclusion


In every spoonful of Banana Creme Brulee, there's a story waiting to be told—a tale of family gatherings, shared laughter, and the comforting embrace of a beloved recipe. Whether you're recreating this dessert for the first time or the hundredth, may it bring a touch of nostalgia and sweetness to your table.

Read more about Appetizers

Read more about Main Dishes

Read more about Desserts

Apple-Cheesecake Tart with Salted Caramel Glaze | Made by Meaghan Moineau

Apple-Cheesecake Tart with Salted Caramel Glaze | Made by Meaghan Moineau

Title: "Decadence Unveiled: Apple-Cheesecake Tart with Salted Caramel Glaze"
Description:

Dive into a world of flavors with our Apple-Cheesecake Tart, crowned with a luscious Salted Caramel Glaze. This dessert is a symphony of textures and tastes, perfect for impressing guests or simply indulging in a personal treat. With a difficulty rating of 7 out of 10, this recipe is an exciting culinary adventure for home bakers. Read on for a step-by-step guide and a heartwarming family story that brings this dish to life.


---


A Sweet Journey Down Memory Lane


There's something inherently magical about the aroma of apples and cinnamon wafting through the house. It takes me back to a quaint autumn afternoon at my grandmother's kitchen. Her house was always the gathering place for family celebrations, and the kitchen was its beating heart. I remember sitting on a high stool, eyes wide with anticipation, as she meticulously layered apple slices over her famous cheesecake tart.


Her hands moved with a practiced rhythm, each slice overlapping the last, creating a mesmerizing spiral. She would smile at me, her eyes twinkling with warmth, and hand me a bowl of freshly sliced apples to snack on. That day, she told me stories of her childhood, of apple orchards and family picnics, weaving a rich tapestry of memories that flavored each bite of her tart.


Years later, I find myself in my own kitchen, recreating my grandmother's masterpiece. As the tart bakes, my home fills with that same comforting aroma, and I am transported back to those cherished afternoons. This Apple-Cheesecake Tart with Salted Caramel Glaze is more than just a dessert; it's a tribute to family, love, and the timeless joy of sharing food and stories.


Recipe: Apple-Cheesecake Tart with Salted Caramel Glaze


Ingredients:

- Butter

- Double cream


- Egg


- Flour


- Granny Smith apples


- Ground almonds


- Ground cinnamon


- Lemon (juice)


- Plain full-fat cream cheese


- Raw sugar


- Sea salt


- Sugar


- Vanilla extract


Instructions:


Crust:

1. In a stand mixer or using a handheld electric whisk, cream together the butter, sugar, and vanilla extract until light and fluffy.


2. Gently fold in the flour and ground almonds by hand until combined into a crumbly mixture.


3. Press the mixture into a 25cm loose-bottomed tin or into smaller tins for individual servings.


Custard:

1. Cream together the cream cheese and sugar using your mixer.


2. Add the egg and vanilla extract, mixing until fully combined.


3. Pour the custard into the prepared, uncooked crust.


Apples:

1. Thinly slice the Granny Smith apples, ideally using a mandoline.


2. Toss the apple slices with sugar, ground cinnamon, and lemon juice, allowing them to soften for about 10 minutes.


3. Arrange the slices over the custard in overlapping layers, creating a spiral 'rose' pattern.


4. Cover with tin foil and bake at 190°C for 30 minutes to soften the apples.


5. Remove the foil and bake for an additional 15-25 minutes until the custard is puffed and the apple edges are lightly browned.


Glaze:

1. As the tart bakes, melt sugar in a saucepan over medium-high heat until golden.


2. Stir in butter and sea salt, then add the cream, stirring constantly until smooth.


3. Brush the glaze over the nearly finished tart and return to the oven for a few minutes until it bubbles gently.


4. Allow the tart to cool to room temperature before serving. It can be refrigerated for several days; store in the baking tin and wrap well.


Difficulty Rating: 7/10
Classification: Dessert

---


Whether you're creating new family traditions or reminiscing about cherished memories, this Apple-Cheesecake Tart with Salted Caramel Glaze is sure to become a beloved favorite. Enjoy every bite of this decadent treat, and may it bring warmth and joy to your kitchen.

Read more about Appetizers

Read more about Main Dishes

Read more about Desserts

Basil Tagliatelle with Roasted Red Bell Pepper Salad | Made by Meaghan Moineau

Basil Tagliatelle with Roasted Red Bell Pepper Salad | Made by Meaghan Moineau

**Title: A Taste of Home: Basil Tagliatelle with Roasted Red Bell Pepper Salad**


**Description: Discover the heartwarming flavors of Basil Tagliatelle with Roasted Red Bell Pepper Salad—a dish that brings together the vibrant taste of fresh herbs and the sweet smokiness of roasted peppers. Join me as I recount a cherished family memory linked to this delightful main dish, and learn how to create this comforting recipe in your own kitchen.**


---


### A Nostalgic Family Dinner: Basil Tagliatelle with Roasted Red Bell Pepper Salad


There’s something magical about a recipe that not only delights the taste buds but also stirs fond memories of family gatherings. For me, Basil Tagliatelle with Roasted Red Bell Pepper Salad is one such dish. It transports me back to endless summer evenings spent at my grandmother’s house, where the kitchen was always bustling with activity and laughter.


Growing up, Sunday dinners at Grandma’s were a cherished tradition. Her small, sunlit kitchen seemed to have a life of its own, filled with the enticing aromas of fresh basil and garlic mingling with the earthy scent of roasting red bell peppers. The adults would gather around the table, sharing stories and laughter, while we kids played in the backyard, eagerly awaiting the call to dinner.


This recipe, a main dish that stands out for its simplicity and vibrant flavors, was often the centerpiece of those gatherings. Grandma would toss whole wheat tagliatelle with a generous helping of fresh basil, drizzling it with a fragrant mixture of extra virgin olive oil, lemon juice, and finely chopped garlic cloves. The roasted red bell pepper salad, with its bright colors and tangy notes, provided the perfect accompaniment, balancing the richness of the pasta with a hint of smoky sweetness.


The secret ingredient that made this dish unforgettable was a touch of freshly grated horseradish, adding just the right amount of kick to the ensemble. Topped with finely sliced green onions and a sprinkle of parsley, the dish was a feast for the senses—its vibrant colors mirrored by the lively conversations around the table.


Creating this dish today in my own kitchen, I am reminded of those joyful family dinners. The aroma of the basil mingling with the roasted peppers instantly transports me back to those cherished moments. It's a reminder of the power of food to connect us to our past, and to each other.


### Recipe Highlights


**Ingredients:**


- Whole wheat tagliatelle


- Red bell peppers


- Garlic cloves


- Fresh parsley


- Horseradish


- Green onions


- Lemon juice


- Extra virgin olive oil


- Sea salt


- Ground pepper


For the full instructions on how to prepare this delicious dish, please visit my blog: [Gourmandelle](http://gourmandelle.com/basil-tagliatelle-with-roasted-red-bell-pepper-salad/).


### Recipe Classification and Difficulty


This Basil Tagliatelle with Roasted Red Bell Pepper Salad is classified as a **Main Dish**. With a difficulty rating of **6 out of 10**, it’s accessible for most home cooks who are comfortable with basic pasta and salad preparation techniques. Whether you're hosting a family dinner or simply looking to enjoy a cozy meal at home, this recipe is sure to bring warmth and joy to your table.


Embrace the nostalgia and create new memories with this delightful and flavorful dish. Happy cooking!

Read more about Appetizers

Read more about Main Dishes

Read more about Desserts

Orange Chocolate Cake | Made by Meaghan Moineau

Orange Chocolate Cake | Made by Meaghan Moineau

**Title: Zesty Indulgence: How to Make a Decadent Orange Chocolate Cake**


**Description:** Dive into the rich, citrusy world of Orange Chocolate Cake, a heavenly dessert that marries the tangy zest of oranges with the luscious depth of chocolate. This post not only provides a step-by-step guide to crafting this delightful treat but also shares a heartwarming family memory that makes this cake truly unforgettable.


---


**Orange Chocolate Cake Recipe: A Nostalgic Slice of Heaven**


When it comes to desserts, few combinations are as invigorating and indulgent as orange and chocolate. This Orange Chocolate Cake is a perfect balance of citrusy freshness and creamy, chocolatey goodness. As you embark on this culinary journey, prepare to be carried away by the luscious aroma that fills your kitchen and the heartwarming memories that bubble up with each bite.


**Ingredients:**


- 1 teaspoon baking powder


- 1 teaspoon baking soda


- 1 cup butter, softened


- 4 large eggs


- 2 1/2 cups all-purpose flour


- 1 cup sour plain natural yogurt


- 1/2 cup freshly squeezed orange juice


- 1 tablespoon orange rind, finely grated


- 1/4 teaspoon salt


- 1 cup semi-sweet chocolate, melted


- 2 cups caster sugar


- 1 teaspoon vanilla extract


**Instructions:**


1. Preheat your oven to 175°C (347°F). Grease a 9-inch bundt pan, then dust it with flour or coat it with a non-stick spray.


2. In a large mixing bowl, beat the butter until creamy. Gradually add the caster sugar, continuing to beat the mixture until it becomes light and fluffy.


3. Incorporate the eggs one at a time, ensuring each is well mixed before adding the next.


4. Stir in the orange rind, orange juice, and vanilla extract, beating at a low speed until the mixture is well combined.


5. Divide the flour, baking powder, and baking soda (Ingredient B) into four equal portions. Similarly, divide the sour cream into three portions. Alternately add the flour mixture and sour cream to the batter, beginning and ending with the flour. Beat well after each addition.


6. Separate half of the batter and gently fold it with the melted semi-sweet chocolate, being careful not to overmix.


7. Alternately spoon the plain and chocolate batters into the prepared bundt pan. Once all the batter is in the pan, gently shake it to settle any air pockets.


8. Bake in the preheated oven for 50-60 minutes, or until a skewer inserted into the center comes out clean.


9. Allow the cake to cool in the pan for 20 minutes before unmolding it onto a wire rack to cool completely.


**A Slice of Family Tradition**


Every time I bake this Orange Chocolate Cake, I'm transported back to my grandmother's kitchen, where the scent of oranges and chocolate was synonymous with family gatherings and joyous occasions. Grandma would lovingly prepare this cake for every holiday, its vibrant flavors and rich aroma a testament to her culinary prowess.


I remember one particular summer when the whole family gathered at Grandma's for a reunion. The kitchen was bustling with activity, laughter, and stories shared over cups of tea and warm slices of this cake. The mingling flavors of orange and chocolate symbolized not just a dessert, but a bond shared across generations. Grandma's Orange Chocolate Cake was more than a treat; it was a family heirloom passed down through the years.


**Difficulty Rating:** 6/10


**Classification:** Dessert


This cake, with its nostalgic roots and delightful flavor combination, is sure to be a hit at your next family gathering or special occasion. Whether you're a seasoned baker or a novice in the kitchen, the Orange Chocolate Cake promises a rewarding experience filled with cherished memories and irresistible flavors. Enjoy this journey of taste and tradition!

Read more about Appetizers

Read more about Main Dishes

Read more about Desserts

Soufflé au chocolat | Made by Meaghan Moineau

Soufflé au chocolat | Made by Meaghan Moineau

**Title: Fluffy Decadence: Mastering the Soufflé au Chocolat**


**Description: Dive into the art of creating the perfect Soufflé au Chocolat with this step-by-step guide. Discover a cherished family memory that brings this delightful dessert to life, and learn the secrets to achieving a dessert that will leave everyone in awe.**


---


### Introduction


There’s something undeniably magical about a soufflé—its delicate rise, the way it teases your senses with its rich aroma, and the blissful moment when you dig into its airy depths. Today, we're focusing on a timeless classic, the Soufflé au Chocolat, a dessert that's as much a treat for the eyes as it is for the palate. Rated at a difficulty of 7 out of 10, this dessert is sure to impress and delight.


### Ingredients


- 6 ounces of high-quality chocolate


- 4 large egg whites


- 3 large egg yolks


- 1/3 cup of heavy cream


- 1/4 teaspoon of salt


- 2 tablespoons of sugar


- Butter for greasing the soufflé dishes


- Additional sugar for coating the dishes


### Instructions


1. **Preparation:**


Begin by buttering eight 3/4-cup soufflé dishes. Generously sprinkle sugar inside each dish, tilting to ensure an even coat, and tap out any excess. Arrange these prepared dishes on a large baking sheet.


2. **Chocolate Mixture:**


In a large metal bowl, combine the chocolate and heavy cream. Set the bowl over a saucepan of barely simmering water. Stir continuously until the chocolate is melted and the mixture is smooth. Remove the bowl from heat and stir in the egg yolks and salt.


3. **Egg Whites:**


Using an electric mixer, beat the egg whites in another large bowl until soft peaks form. Gradually add 2 tablespoons of sugar, beating until semi-firm peaks form.


4. **Combine:**


Using a rubber spatula, fold one-quarter of the beaten egg whites into the chocolate mixture to lighten it. Gently fold in the remaining egg whites in two additions.


5. **Fill and Bake:**


Divide the chocolate mixture among the prepared soufflé dishes, filling them completely. Position the oven rack in the center and preheat to 204°C (400°F). Bake the soufflés on the baking sheet until they are puffed and the tops feel firm—approximately 16 minutes for room temperature batter or 18 minutes if chilled.


### A Nostalgic Family Memory


Growing up, the Soufflé au Chocolat was a staple at our family gatherings. My grandmother, a culinary maestro, would orchestrate a symphony of flavors that left every guest in awe. I vividly remember one snowy winter evening when she decided to teach me her secrets. The kitchen was filled with warmth and the rich scent of chocolate. Her gentle guidance and patient hands taught me the art of folding egg whites, an essential technique for this delicate dessert. That night, as we sat around the table, the soufflés rose beautifully, much like the laughter and joy that filled the room. It was in those moments that I learned that cooking is not just about food—it's about creating memories that last a lifetime.


### Conclusion


The Soufflé au Chocolat is more than just a dessert; it’s a celebration of culinary artistry and a testament to the love and care poured into every dish. Whether you’re crafting this for a special occasion or a cozy night in, this recipe promises to transport you and your loved ones to a place of indulgence and nostalgia. So, preheat your oven, gather your ingredients, and prepare to delight in a chocolate cloud that is sure to make hearts flutter.


### Classification


- **Difficulty:** 7/10


- **Type:** Dessert


---


Embrace the challenge, enjoy the process, and savor the sweet rewards of this timeless classic. Bon appétit!

Read more about Appetizers

Read more about Main Dishes

Read more about Desserts

Delicious Rhubarb Custard Pie | Made by Meaghan Moineau

Delicious Rhubarb Custard Pie | Made by Meaghan Moineau

**Title: A Slice of Nostalgia: Crafting the Perfect Rhubarb Custard Pie**


**Description:** Dive into the world of baking with a timeless recipe that blends tradition and taste. Our Delicious Rhubarb Custard Pie combines tangy rhubarb with a creamy custard filling, all nestled in a perfectly baked crust. This dessert not only tantalizes your taste buds but also offers a slice of cherished family memories. Rated 5/10 in difficulty, this dessert is perfect for both novice and seasoned bakers alike.


---


### The Delightful Dance of Rhubarb and Custard


There's something magical about the combination of tangy rhubarb and creamy custard, a pairing that perfectly encapsulates both balance and indulgence. This Delicious Rhubarb Custard Pie is a testament to that harmony. With a hint of nutmeg and the buttery goodness enveloping each bite, it’s a dessert that promises satisfaction and nostalgia.


#### Ingredients:


- Butter


- Eggs


- Flour


- Nutmeg


- Prebaked pie crust


- Raw rhubarb


- Salt


#### Instructions:


1. **Prepare the Filling:** In a large bowl, combine flour, nutmeg, salt, and raw rhubarb. This mixture will become the heart of your pie, infusing every bite with a delightful tartness.


2. **Assemble the Pie:** Pour the rhubarb mixture into a pre-baked pie crust, ensuring it's evenly distributed.


3. **Add the Custard:** Beat the eggs and pour them over the rhubarb mixture, letting the custard seep through the vibrant reds and greens of the rhubarb.


4. **Drizzle with Butter:** Melt the butter and drizzle it over the top of the pie. This final touch ensures a rich, velvety texture.


5. **Baking:** Preheat your oven to 400°F (220°C). Place the pie in the center rack and bake for 50 minutes. To prevent the crust edges from over-browning, tent them with aluminum foil.


#### A Slice of Family Memory


Every time I bake this pie, I’m whisked back to my grandmother’s quaint kitchen. The aroma of rhubarb custard pie wafting through her house was a signal that something special was about to happen. It was a Sunday tradition, a staple at our family gatherings. We’d gather around the table, the pie still warm from the oven, and share stories of the week gone by.


My grandmother, with her kind eyes and gentle smile, always insisted on using fresh rhubarb from her garden. She said it was the secret ingredient, though I suspect it was her love that made each pie so memorable. As kids, my siblings and I would sneak into the garden, plucking rhubarb stalks, pretending to be little chefs. Those moments are etched in my heart, a testament to the power of food in bringing families together.


#### Dessert Rating: 5/10


This recipe, while not overly complicated, requires careful attention to detail to achieve the perfect balance of flavors. It's an intermediate-level dessert, ideal for those ready to expand their baking repertoire.


---


Embrace the tradition, savor the flavors, and let this Delicious Rhubarb Custard Pie become a cherished part of your family gatherings. As you bake, remember the stories that have brought this recipe to life, and perhaps, create new ones of your own.

Read more about Appetizers

Read more about Main Dishes

Read more about Desserts

Sticky Toffee Pudding | Made by Meaghan Moineau

Sticky Toffee Pudding | Made by Meaghan Moineau

**Title: The Sweet Nostalgia of Sticky Toffee Pudding: A Family Tradition**


**Description:** Dive into the delightful warmth of Sticky Toffee Pudding, a classic dessert that bridges generations with its rich flavors and comforting texture. From its simple ingredients to its captivating taste, this recipe is a heartwarming reminder of family gatherings and cherished memories. Discover the story behind this beloved dessert and learn how to make it a staple in your own family traditions.


---


There’s something undeniably magical about Sticky Toffee Pudding. Its rich, gooey texture and sweet, caramelized aroma have the power to transport us back to simpler times. In my family, this dessert has always held a special place, particularly during the festive season.


**A Nostalgic Family Tradition**


Growing up, Sticky Toffee Pudding was the star of our holiday dinners. I remember my grandmother bustling in the kitchen, her apron dusted with flour, as she lovingly prepared this dessert. The moment the cake went into the oven, the house would fill with the heartwarming scent of dates and vanilla, a scent that signaled the start of our family’s festive celebrations.


One particular memory stands out vividly. It was a crisp winter evening, and snowflakes danced outside the window as my siblings and I gathered around the kitchen table, impatiently waiting for our grandmother to finish her culinary masterpiece. As she poured the rich toffee sauce over the freshly baked cake, she shared stories of how her own mother had made this dessert for her as a child. It was more than just a dish; it was a thread connecting our family through generations.


**Ingredients You'll Need:**


- 1 teaspoon plus 1 teaspoon baking powder


- 1 stick of butter (1/2 cup), softened


- 1/4 cup dark corn syrup


- 1 cup chopped dates


- 2 large eggs


- 1 1/2 cups all-purpose flour


- 1 cup heavy cream


- 3/4 cup light brown sugar


- 1/4 teaspoon salt


- 1 cup sugar


- 1 teaspoon vanilla extract


- 1 1/4 cups boiling water


**Instructions:**


1. Preheat your oven to 350 degrees Fahrenheit. Prepare the dates by placing them in a bowl, sprinkling them with 1 teaspoon of baking powder, and pouring boiling water over them. Stir slightly and let them soak until soft and cool.


2. In a separate bowl, combine the flour, the remaining teaspoon of baking powder, and salt. Set aside.


3. In a mixer, cream the butter and sugar until light and fluffy. Add the eggs, one at a time, mixing well after each addition. Beat in the corn syrup and vanilla extract.


4. Incorporate the date mixture and the flour mixture into the batter, mixing until just combined. Spread the batter into a greased 8-inch round or square cake pan, smoothing the top.


5. Bake in the preheated oven for 30-40 minutes, or until a tester inserted in the middle comes out with a few crumbs clinging.


6. While the cake is baking, prepare the toffee sauce. Melt the butter in a saucepan, then stir in the sugar until dissolved. Add the heavy cream and salt, simmering over medium heat until thickened and reduced to about 2 1/2 cups. Stir frequently to prevent overboiling.


7. Once the cake is done, remove it from the oven and invert it onto a plate to loosen it from the pan, then return it to the pan. Poke holes all over the cake with a skewer or fork.


8. Spoon about a cup of the sauce over the cake and leave it to soak for several hours or overnight for the best flavor. Once cooled, cover loosely with foil and refrigerate until ready to serve.


9. To serve, warm the cake gently in a low oven, if desired, but keep an eye on it to prevent burning the sauce. Invert the saucy cake onto a platter, pour about 1/2 cup more sauce over it, and let it soak in for a few minutes. Cut into wedges and serve with additional sauce on each slice.


**Difficulty Rating:** 6/10


**Classification:** Dessert


---


Sticky Toffee Pudding is more than just a dessert; it's a vessel of cherished memories and family bonds. Whether you're making it for the first time or continuing a beloved tradition, this recipe is sure to bring warmth and sweetness to your table. So gather your loved ones, share stories, and indulge in the nostalgic delight of Sticky Toffee Pudding.

Read more about Appetizers

Read more about Main Dishes

Read more about Desserts

Dutch Oven Paella | Made by Meaghan Moineau

Dutch Oven Paella | Made by Meaghan Moineau

# Dutch Oven Paella: A Flavorful Journey to the Heart of Spain


## Description


Indulge in the vibrant flavors of Spain with our Dutch Oven Paella, a dish that brings the rich traditions of Spanish cuisine to your table. This recipe combines succulent shrimp, savory chorizo, and tender chicken with aromatic saffron-infused rice, creating a delightful symphony of taste and texture. Perfect for a family gathering or an intimate dinner, this paella is sure to be a showstopper. With a difficulty rating of 7/10, this main dish is an impressive yet approachable culinary adventure for any home cook.


### Ingredients


- 1 pound shrimp, peeled and deveined


- 1 teaspoon minced garlic


- 1 tablespoon extra virgin olive oil


- Salt and pepper, to taste


- 1 pound lean skinless boneless chicken thighs


- 4 ounces Spanish chorizo sausage, sliced


- 1 red bell pepper, sliced


- 1 onion, chopped


- 1 can (14.5 oz) diced tomatoes


- 1 1/2 cups arborio rice


- 3 cups low sodium chicken broth


- 1/2 cup dry white wine


- 1/2 teaspoon saffron threads


- 1 bay leaf


- 1 cup frozen artichoke hearts


- 1 cup frozen peas


- Fresh flat-leaf parsley, chopped


- Lemon wedges, for serving


### Instructions


1. **Preparation**: Adjust your oven rack to the lower middle position and preheat the oven to 350°F. In a medium bowl, toss the shrimp with 1 teaspoon minced garlic, 1 tablespoon olive oil, 1/4 teaspoon salt, and 1/4 teaspoon pepper. Refrigerate until needed. Season the chicken with salt and pepper and set aside.


2. **Sauté the Vegetables**: Heat 2 teaspoons of olive oil in a large Dutch oven over medium-high heat until the oil shimmers. Add the bell pepper and cook, stirring occasionally until the skins blister and brown, about 3-4 minutes. Remove to a plate and set aside.


3. **Cook the Meats**: Add 1 tablespoon more oil to the pot, add the chicken thighs, and brown well, flipping once, about 3 minutes per side. Remove the chicken to a bowl. Reduce the heat to medium, add the chorizo, and cook for 4-5 minutes, stirring frequently, until browned and the fat starts to render. Add to the bowl with the browned chicken.


4. **Prepare the Base**: At medium heat, add enough oil to the pot to equal 2 tablespoons. Add the onion and cook, stirring frequently, until tender, about 3 minutes. Add the remaining garlic, cook for 1 minute, then add the tomatoes. Cook and stir until the tomatoes thicken and darken slightly, about 3 minutes.


5. **Combine Ingredients**: Add the rice, cook, and stir for about 2 minutes, ensuring everything is evenly mixed. Add the broth, wine, saffron, bay leaf, and 1/2 teaspoon salt. Add the browned chicken and sausage. Increase the heat to medium-high and bring to a boil, stirring often.


6. **Bake the Paella**: Cover the pot and place it in the oven. Bake for 15 minutes until the liquid is mostly absorbed. Remove the pot from the oven, keep the oven door closed to retain heat, and remove the lid.


7. **Finish Cooking**: Nestle the artichoke hearts into the rice. Sprinkle the shrimp over the top, followed by the peas and bell pepper strips. Replace the lid and return to the oven for another 10 minutes or until the shrimp are opaque.


8. **Create the Soccarat**: Turn the stove burner to medium-high heat. Remove the pot from the oven and place it on the stove. Cook for 5 minutes to form the browned portion on the bottom of the rice, rotating the pot 180 degrees halfway through to ensure even browning.


9. **Serve and Enjoy**: Remove the pot from heat and let the paella rest, covered, for 5 minutes. Sprinkle with fresh chopped parsley and serve with lemon wedges.


### A Nostalgic Story


Growing up, paella was more than just a meal; it was a celebration. I vividly remember the annual family reunions at my grandparents' home, where the aroma of saffron and simmering chorizo would fill the air, drawing everyone to the kitchen. My grandfather, with his Spanish roots, would preside over the Dutch oven, sharing tales of his childhood in Valencia. We would gather around the table, each serving a reminder of our shared heritage and the love that bound us together. This Dutch Oven Paella is a tribute to those cherished memories, a dish that continues to bring our family closer with each flavorful bite.


### Difficulty


7/10


### Classification


Main Dish


Prepare this Dutch Oven Paella to experience the warmth and richness of Spanish cuisine, and create lasting memories with your loved ones. Whether you’re a seasoned cook or a passionate beginner, this dish promises a delightful culinary journey. Enjoy!

Read more about Appetizers

Read more about Main Dishes

Read more about Desserts

Roasted Pumpkin and Barley Risotto | Made by Meaghan Moineau

Roasted Pumpkin and Barley Risotto | Made by Meaghan Moineau

# Cozy Autumn Nights: Savoring Roasted Pumpkin and Barley Risotto


## A Hearty Dish That Warms the Soul


### Description:


Experience the flavors of fall with our Roasted Pumpkin and Barley Risotto, a comforting main dish that combines the rich, earthy taste of roasted pumpkin with the nutty texture of barley. This recipe is not only a feast for the taste buds but also a nostalgic journey that brings back fond family memories. Rated 6 out of 10 in difficulty, it’s a rewarding culinary challenge fit for any home chef eager to create something special.


---


### Ingredients:


- 1 cup barley


- 2 tablespoons butter


- 4 cups chicken stock


- 1 teaspoon cumin powder


- 1 teaspoon dried thyme


- Fresh mint leaves for garnish


- 2 cloves of garlic, minced


- 1 small piece of ginger, grated


- 1 diced onion


- 1 teaspoon oregano


- 1 teaspoon pink peppercorns


- 2 cups pumpkin puree


- Salt and pepper to taste


- 1/2 cup sour cream


- 1 tablespoon Worcestershire sauce


### Instructions:


1. **Prepare the Pumpkin:**


- Preheat your oven to 400°F (200°C).


- Cut the pumpkin, removing the seeds and strings.


- Place the pumpkin halves cut side down in a baking dish with 1/4 inch of water.


- Bake for 45 minutes or until the flesh is soft and cooked through.


- Scoop out the cooked flesh and puree it with a splash of milk until smooth.


2. **Sauté and Season:**


- In a large skillet, melt the butter over medium heat.


- Add the diced onions and minced garlic, cooking until translucent.


- Stir in the barley, toasting lightly for about 2 minutes.


- Season with salt, pepper, cumin, thyme, and oregano.


3. **Cook the Risotto:**


- Add 2 cups of chicken stock to the skillet.


- Cook, stirring occasionally, until the liquid is nearly absorbed.


- Stir in the pumpkin puree.


- Gradually add the remaining stock, 1/2 cup at a time, allowing each addition to be absorbed before adding more.


- Continue to cook until the barley becomes creamy and tender.


4. **Finish and Serve:**


- Remove from heat and stir in the sour cream and Worcestershire sauce.


- Serve immediately, garnished with fresh mint leaves and a dollop of pumpkin-sour cream.


### A Trip Down Memory Lane


As the aroma of roasted pumpkin fills the kitchen, I am transported back to my grandmother's cozy house on chilly autumn evenings. She would prepare this comforting risotto with love, her hands skillfully working the ingredients into a symphony of flavors. The warmth of the dish, combined with the laughter and stories shared around the dinner table, made each meal a cherished memory. My grandmother always knew how to turn simple ingredients into a dish that not only nourished our bodies but also our souls. This Roasted Pumpkin and Barley Risotto is more than just a meal; it’s a reminder of family, love, and the beauty of home-cooked food.


---


### Conclusion:


Whether you're looking to impress guests or simply indulge in a cozy night in, this Roasted Pumpkin and Barley Risotto is the perfect main dish. With its blend of spices and creamy texture, it captures the essence of fall while offering a heartwarming nod to family traditions. Enjoy the process of creating this delightful dish and savor the memories it may bring to your table.

Read more about Appetizers

Read more about Main Dishes

Read more about Desserts

Blueberry-Lavender Sauce and Ginger Snap Ice Cream Cups | Made by Meaghan Moineau

Blueberry-Lavender Sauce and Ginger Snap Ice Cream Cups | Made by Meaghan Moineau

### Title: A Symphony of Flavors: Blueberry-Lavender Sauce & Ginger Snap Ice Cream Cups


#### Description:


Dive into the delightful world of culinary nostalgia with this exquisite dessert recipe. Discover how the harmonious blend of blueberry-lavender sauce and ginger snap ice cream cups can transport you to cherished family moments. With a difficulty level of 5 out of 10, this dessert is perfect for those looking to impress without the stress. Ideal for summer gatherings or a cozy evening treat, this dish will surely become a family favorite.


---


#### A Taste of Tradition: Blueberry-Lavender Sauce & Ginger Snap Ice Cream Cups


There's something extraordinarily comforting about the aroma of blueberries simmering on the stove, mingling with the floral notes of lavender. It's a scent that instantly transports me back to summer afternoons spent in my grandmother's kitchen. She had a knack for turning simple ingredients into magical creations, and her Blueberry-Lavender Sauce was no exception. Paired with the crunch of ginger snap ice cream cups, this dessert was a staple at our family gatherings.


##### Ingredients You'll Need:


- **For the Blueberry-Lavender Sauce:**


- Fresh blueberries


- Dried lavender buds


- Sugar


- Cornstarch


- Lemon juice


- Salt


- **For the Ginger Snap Ice Cream Cups:**


- Ginger snap cookies


- Butter


- Sugar


- Salt


- Your choice of ice cream (vanilla bean, lemon curd, or peach work beautifully)


##### Instructions:


1. **Make the Blueberry-Lavender Sauce:**


- In a small saucepan, bring the blueberries, lavender, sugar, and cornstarch to a boil.


- Lower the heat and let it simmer for about 5 minutes until the mixture thickens slightly.


- Remove from heat and stir in the lemon juice and a dash of salt.


- This versatile sauce is not only perfect for this dessert but also pairs wonderfully with pancakes, pound cake, or cheesecake.


2. **Prepare the Ginger Snap Ice Cream Cups:**


- Preheat your oven to 300°F (150°C).


- Grind the ginger snap cookies in a food processor. Alternatively, place them in a zip bag and crush them with a rolling pin.


- Mix the ground cookies with melted butter, sugar, and a pinch of salt.


- Lightly spray a muffin tin with non-stick spray.


- Scoop about 2 tablespoons of the cookie mixture into each muffin cup.


- Press each scoop with a small cup to shape them into mini cups.


- Bake for 12-15 minutes. Allow them to cool completely before gently lifting them out with your fingers or a small knife.


- Makes about 10 cups.


3. **Assemble the Dessert:**


- Place one scoop of your preferred ice cream in each ginger snap cup.


- Generously top with the blueberry-lavender sauce.


##### A Nostalgic Story:


Growing up, summer vacations meant one thing—spending time at my grandmother's house. Her backyard was a treasure trove of wildflowers and berry bushes. I remember running through the garden, my fingers stained with blueberry juice, as Grandma called us back to the kitchen. There, amidst the warmth and chatter, she would teach us the art of making her beloved blueberry-lavender sauce. The sweet, tangy aroma filled the air, making our mouths water in anticipation.


The ginger snap ice cream cups were a later addition, a recipe my mother introduced after discovering it in an old cookbook. Together, they created a symphony of flavors—sweet, spicy, and floral—that became synonymous with family gatherings. Each bite was a journey back in time, a reminder of those carefree days filled with laughter and love.


##### Difficulty Rating: 5/10


This dessert is straightforward to prepare, making it a great choice for both novice and experienced bakers. The key lies in balancing the flavors and not rushing the process.


##### Classification: Dessert


Perfect as a delightful conclusion to any meal, this dessert shines at both casual get-togethers and more formal occasions. Its unique blend of flavors will leave a lasting impression on your guests.


Embrace the nostalgia and create new memories with this delightful dessert. Your family and friends will thank you for it!

Read more about Appetizers

Read more about Main Dishes

Read more about Desserts