Polla alla Parmigiana: Chicken Parmesan | Made by Meaghan Moineau

Polla alla Parmigiana: Chicken Parmesan

Intro

There’s something truly magical about the aroma of a classic Chicken Parmesan wafting through the kitchen. As a child, Sundays at Nonna’s house meant gathering around the table for a meal that always included her famous Polla alla Parmigiana. The sizzle of the chicken frying, the rich, tangy tomato sauce, and the gooey, melted mozzarella all combined to create a dish that was more than just food—it was a symbol of love and family. Today, I’m thrilled to share this recipe with you so that you can bring a piece of that cherished tradition into your own home.

Why You’ll Love It

This recipe for Chicken Parmesan is a true classic, beloved for its crispy exterior and tender, juicy chicken inside. It’s a versatile dish that can be served over pasta, alongside a fresh salad, or even in a hearty sandwich. The combination of flavors from the seasoned breadcrumbs, the herb-infused tomato sauce, and the creamy mozzarella cheese make it a guaranteed crowd-pleaser. Plus, it’s easier to make than you might think, and with a few simple tips, you’ll have a restaurant-quality dish ready in no time.

Ingredients

  • 1 cup dry bread crumbs
  • 2 eggs
  • 1/2 cup flour
  • 1 teaspoon dry marjoram
  • 8 ounces fresh mozzarella, sliced
  • 1/4 cup oil (vegetable or olive oil)
  • 1/2 cup panko breadcrumbs
  • 1/4 cup grated parmesan cheese
  • 1 bell pepper, diced (optional)
  • Salt to taste
  • 4 skinless, boneless chicken breasts
  • 2 cups tomato sauce

Instructions

  1. Preheat your oven to 350°F (175°C).
  2. Pound the chicken breasts until they are even and about 1/2 inch thick.
  3. In a shallow dish, combine the flour, salt, and pepper.
  4. In a second dish, beat the eggs with 1 tablespoon of water.
  5. In a third dish, combine the bread crumbs, panko, marjoram, and parmesan cheese.
  6. Coat the chicken on both sides with the flour mixture, shaking off any excess.
  7. Dip both sides of the chicken into the egg mixture.
  8. Dredge both sides in the bread crumbs mixture, pressing lightly to adhere.
  9. Heat the oil in a large sauté pan over medium-high heat.
  10. Cook the breaded chicken for 2 to 3 minutes on each side, until golden brown.
  11. Remove the chicken and place it on a baking sheet.
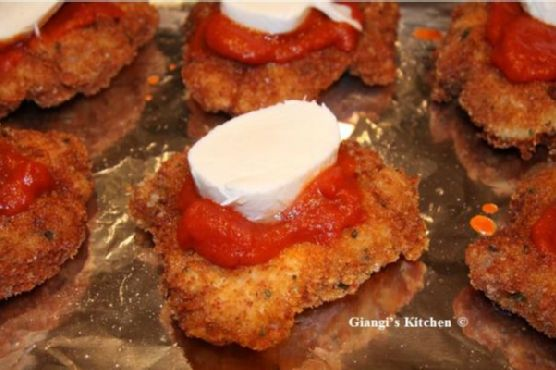
  12. Smear tomato sauce over each piece of chicken and top with a slice of mozzarella.
  13. If using, sprinkle the diced bell pepper over the top for added flavor.
  14. Bake in the oven until the mozzarella has melted, about 10-15 minutes.

Tips

For the crispiest Chicken Parmesan, make sure not to overcrowd the pan while frying. This ensures that the chicken cooks evenly and maintains its crispy coating. When choosing mozzarella, fresh mozzarella will give you the best texture and flavor, but pre-sliced mozzarella can work in a pinch. Don’t forget to let the chicken rest for a few minutes before serving, as this helps retain juices and enhances the overall flavor.

Variations & Substitutions

If you’re looking to switch things up, try adding a layer of sautéed mushrooms or spinach between the chicken and the tomato sauce for added depth. For a gluten-free version, substitute the regular breadcrumbs and panko with gluten-free versions. You can also replace the chicken with eggplant slices for a vegetarian take on this classic dish.

Storage

Leftover Chicken Parmesan can be stored in an airtight container in the refrigerator for up to 3 days. To reheat, place it in a preheated oven until warmed through. Avoid microwaving, as it can cause the breading to become soggy. If you plan to freeze it, it’s best to do so before adding the tomato sauce and cheese. Simply freeze the breaded chicken, and when ready to eat, add the sauce and cheese before baking.

FAQ

Can I use chicken thighs instead of breasts?

Yes, you can use chicken thighs if you prefer. Just make sure they are boneless and pounded to an even thickness for even cooking.

What type of tomato sauce should I use?

Feel free to use your favorite store-bought tomato sauce or make your own if you have time. A sauce with garlic and basil works particularly well with this dish.

How can I make this dish healthier?

For a lighter version, try baking the breaded chicken instead of frying it. You can also use whole wheat breadcrumbs and low-fat mozzarella to reduce calories.

Nutrition

While exact nutritional content can vary based on specific ingredients and portion sizes, a typical serving of Chicken Parmesan (including sauce and cheese) contains approximately 400-500 calories, 30g of protein, 20g of fat, and 30g of carbohydrates. Keep in mind that these values can change based on any variations or substitutions you make.

Conclusion

Polla alla Parmigiana, or Chicken Parmesan, is more than just a meal—it’s a delightful experience that brings people together. Whether you’re cooking for a special occasion or simply enjoying a comforting dinner at home, this recipe is sure to impress with its rich flavors and satisfying textures. I hope this family favorite finds a place at your table and brings as much joy to your home as it has to mine. Buon appetito!

Related update: Polla alla Parmigiana: Chicken Parmesan

Related update: Japanese Mabo Tofu With Eggplant

Barbecued Baby Back Pork Ribs and Bush’s Grillin’ Beans | Made by Meaghan Moineau

Barbecued Baby Back Pork Ribs and Bush’s Grillin’ Beans

Intro

Summertime barbecues hold a special place in my heart, evoking memories of family gatherings filled with laughter, the scent of smoky grills, and the anticipation of delicious food. Growing up, weekends meant one thing: a feast in the backyard. My dad would take charge of the grill, perfecting his signature barbecued baby back pork ribs, while my mom prepared her famous side of Bush’s Grillin’ Beans. These two dishes, when paired together, created a symphony of flavors that left everyone craving more. Today, I’m excited to share this cherished recipe with you, hoping it becomes a staple at your family gatherings as well.

Why You’ll Love It

This recipe for Barbecued Baby Back Pork Ribs and Bush’s Grillin’ Beans is a guaranteed crowd-pleaser. The ribs are marinated to perfection, resulting in a tender, juicy, and flavorful bite every time. The combination of spices and the tangy glaze provides a delightful contrast that complements the sweet and savory beans. Whether you’re hosting a large gathering or enjoying a quiet dinner with loved ones, this dish is sure to impress with its irresistible aroma and mouth-watering taste.

Ingredients

  • Rack of baby back pork ribs
  • Cooked black peppercorns
  • Brown sugar
  • Cider vinegar
  • Dried coriander
  • Garlic
  • Green onions
  • Ketchup
  • Molasses
  • Orange zest
  • Soy sauce

Instructions

  1. Before marinating the ribs, remove the white membrane on the underside of the ribs. Start the removal with a sharp knife, then use a paper towel to grab it and simply pull it off.
  2. In a bowl, combine cooked black peppercorns, brown sugar, cider vinegar, dried coriander, minced garlic, and soy sauce to create the marinade.
  3. Place the ribs in a large dish and pour the marinade over them. Make sure the ribs are thoroughly coated. Cover and refrigerate for at least 4 hours, preferably overnight for maximum flavor.
  4. Preheat your grill to medium heat. Remove the ribs from the marinade and let them come to room temperature while the grill heats.
  5. Place the ribs on the grill and cook for about 30-40 minutes, turning occasionally, until they are tender and have a nice char.
  6. While the ribs are grilling, prepare the glaze by mixing ketchup, molasses, and orange zest in a small saucepan over low heat. Stir until well combined and heated through.
  7. Once the ribs are cooked, brush them generously with the glaze and grill for an additional 5 minutes on each side.
  8. Remove the ribs from the grill and let them rest for a few minutes before slicing.
  9. Serve the ribs hot, garnished with chopped green onions, alongside a warm serving of Bush’s Grillin’ Beans.

Tips

For the best results, marinate the ribs overnight to ensure they absorb all the rich flavors. When grilling, keep a close eye on the ribs to prevent burning, and use a meat thermometer to ensure they reach an internal temperature of 145°F. Letting the ribs rest before slicing will keep them juicy and tender.

Variations & Substitutions

Feel free to experiment with the marinade by adding your favorite spices or herbs, such as smoked paprika or thyme. If you prefer a spicier kick, consider adding a dash of cayenne pepper. For a different side dish, try pairing the ribs with coleslaw or corn on the cob instead of beans.

Storage

Leftover ribs can be stored in an airtight container in the refrigerator for up to 4 days. To reheat, wrap the ribs in aluminum foil and warm them in a preheated oven at 300°F until heated through. The beans can also be stored in the refrigerator for up to 3 days and reheated on the stovetop or in the microwave.

FAQ

How do I remove the membrane from the ribs?

Use a sharp knife to gently lift one end of the white membrane on the underside of the ribs. Once you have a good grip, use a paper towel to grab the membrane and pull it off in one clean motion.

Can I cook these ribs in the oven instead of the grill?

Yes, you can bake the marinated ribs in a preheated oven at 300°F for about 2.5 to 3 hours, or until tender. Apply the glaze during the last 20 minutes of cooking.

What type of beans are best for this recipe?

I recommend using Bush’s Grillin’ Beans, which come in a variety of flavors such as Bourbon and Brown Sugar or Southern Pit Barbecue, to complement the ribs perfectly.

Nutrition

The nutritional information will vary based on portion sizes and specific ingredients used, but a typical serving of ribs with beans is a hearty meal packed with protein and flavor. Be mindful of the sugar content if adjusting the glaze to suit dietary preferences.

Conclusion

Barbecued Baby Back Pork Ribs and Bush’s Grillin’ Beans are more than just a dish; they’re a celebration of flavor and tradition. Whether you’re reminiscing about family gatherings or creating new memories, this recipe is sure to delight and satisfy. Gather your loved ones, fire up the grill, and enjoy the simple pleasures of a meal made with love. Happy grilling!

Related update: Barbecued Baby Back Pork Ribs and Bush’s Grillin’ Beans

Related update: Smoky Chicken Tacos

Cheesy Bacon Burger with Spicy Chipotle Aiolo Sauce | Made by Meaghan Moineau

Cheesy Bacon Burger with Spicy Chipotle Aioli Sauce

Intro

There’s something magical about the smell of burgers grilling on a warm summer evening. It takes me back to those lazy Sunday afternoons at my grandparents’ house, where the whole family gathered around the backyard grill. My grandfather, with his well-worn apron and his signature chef’s hat, was the burger maestro. He always said the secret to a perfect burger was a little “surprise” inside. Inspired by his culinary wisdom and my love for a little heat, I’ve created a burger that combines the creamy goodness of cheese with the smoky allure of turkey bacon, all wrapped up in a spicy, tantalizing aioli. This Cheesy Bacon Burger with Spicy Chipotle Aioli Sauce is my homage to those cherished memories, with a contemporary twist that will make your taste buds dance with delight.

Why You’ll Love It

This burger isn’t just another patty on a bun; it’s a flavor explosion waiting to happen. The juicy beef patty is stuffed with creamy Swiss cheese that melts to perfection as it grills. The turkey bacon adds a savory crunch, while the spicy chipotle aioli brings just the right amount of heat to keep things exciting. Served on a wholesome whole wheat bun, this burger balances indulgence with nutrition. Whether you’re cooking for a backyard barbecue or a cozy family dinner, this recipe is sure to impress.

Ingredients

  • 1 can of chipotle chiles in adobo sauce
  • 1/2 cup fat free mayonnaise
  • 2 cloves garlic, minced
  • 1 teaspoon garlic powder
  • 1/2 cup Greek yogurt
  • 1 green bell pepper, diced
  • 1 teaspoon ground cumin
  • 1 teaspoon black ground pepper
  • 1 pound lean ground beef
  • 1 tablespoon fresh lime juice
  • 1 onion, diced
  • 4 whole wedges of Laughing Cow Swiss cheese
  • 4 slices cooked turkey bacon
  • 4 whole wheat hamburger buns

Instructions

  1. In a pan, cook the turkey bacon according to the directions on the package. Once cooked, remove the bacon and set it aside.
  2. In the same pan, add the diced bell pepper and onion, cooking until tender, about 10 minutes.
  3. In a small bowl, combine the ground beef with garlic powder and black ground pepper. Mix well.
  4. Divide the beef mixture into eight equal pieces, about 2 ounces each. Flatten each piece into a patty.
  5. Place half a wedge of cheese onto four patties, then top with the remaining patties. Press the edges to seal the cheese inside.
  6. Grill the burgers until cooked through, about 5 minutes per side.
  7. To make the spicy chipotle aioli sauce, combine chipotle chiles, mayonnaise, minced garlic, Greek yogurt, ground cumin, and lime juice in a small bowl. Whisk until smooth.
  8. Assemble the burgers by placing each patty on a whole wheat bun. Top with turkey bacon, sautéed peppers and onions, and a generous dollop of the spicy chipotle aioli sauce.

Tips

For the best results, use a meat thermometer to ensure your burgers reach an internal temperature of 160°F. This ensures they’re cooked safely without being overdone. If you prefer a less spicy aioli, reduce the number of chipotle chiles or substitute with smoked paprika for a milder flavor.

Variations & Substitutions

If you’re looking to switch things up, try using ground turkey or chicken instead of beef for a lighter option. You can also swap out Swiss cheese for cheddar or pepper jack for an extra kick. For a gluten-free version, use gluten-free hamburger buns or serve the burgers wrapped in lettuce leaves for a low-carb alternative.

Storage

Store any leftover burgers in an airtight container in the refrigerator for up to three days. The spicy chipotle aioli can be stored separately in a sealed jar for up to a week. For longer storage, consider freezing the cooked patties without the buns or toppings.

FAQ

Can I make the burgers ahead of time?

Yes, you can prepare the patties in advance and store them in the refrigerator for up to 24 hours before grilling. This can help save time during meal prep.

What can I serve with these burgers?

These burgers pair well with a variety of sides, such as sweet potato fries, a fresh green salad, or grilled corn on the cob. For a truly indulgent meal, consider serving them with a creamy coleslaw or homemade potato chips.

Is there a vegetarian version of this recipe?

Absolutely! You can substitute the beef with a plant-based protein like black bean patties or a store-bought vegetarian burger. Use a plant-based cheese alternative and skip the turkey bacon for a delicious vegetarian option.

Nutrition

While this recipe is a flavorful indulgence, it aims to maintain a balance with healthier ingredients. Opting for lean ground beef and whole wheat buns increases the nutritional value, while Greek yogurt in the aioli sauce provides a protein boost with reduced fat content. Adjust portions to suit your dietary needs.

Conclusion

Our Cheesy Bacon Burger with Spicy Chipotle Aioli Sauce is more than just a meal; it’s an experience. With each bite, you’ll savor the melty cheese, the crisp turkey bacon, and the zesty aioli. Whether you’re creating new memories with friends and family or enjoying a quiet dinner for one, this burger promises to deliver satisfaction and joy. So fire up the grill, gather your ingredients, and get ready to enjoy a delightful taste journey!

Related update: Cheesy Bacon Burger with Spicy Chipotle Aiolo Sauce

Pork with Blueberry Sauce | Made by Meaghan Moineau

Pork with Blueberry Sauce

Intro

There’s something uniquely satisfying about combining savory flavors with a touch of sweetness. It reminds me of summer evenings spent at my grandmother’s house, where she would always surprise us with her inventive dishes. One of my fondest memories is of her tangy pork chops served with a delightful fruit sauce that seemed to encapsulate the essence of the season. Inspired by those cherished moments, I’ve crafted this recipe for Pork with Blueberry Sauce. It’s a dish that promises to bring a burst of flavor to your dinner table, and I’m excited to share it with you.

Why You’ll Love It

This Pork with Blueberry Sauce is a symphony of flavors. The juicy pork chops are perfectly seasoned and seared to golden perfection, while the blueberry sauce provides a sweet and tangy counterpoint. The balsamic vinegar adds depth, and the lime zest gives it a zesty punch. Whether you’re hosting a dinner party or enjoying a quiet meal at home, this dish is sure to impress. Plus, it’s easy to make and requires just a few simple ingredients!

Ingredients

  • Pork chops
  • Salt and pepper
  • Canola oil
  • Fresh pint blueberries
  • Brown sugar
  • Balsamic vinegar
  • Red diced onion
  • Lime zest
  • Parsley, for garnish

Instructions

  1. Preheat the oven to 400 degrees Fahrenheit.
  2. In a nonreactive bowl, mash the blueberries with the brown sugar to your desired consistency and set aside.
  3. Heat a sauté pan over medium heat. Season the pork chops with salt and pepper on both sides.
  4. Add canola oil to the sauté pan. Brown the pork chops on both sides until golden and crispy, about 2-3 minutes on each side. Remove from the pan and place on a baking dish to finish cooking in the oven, if necessary. If the pork is thin, keep it warm aside until the sauce is ready.
  5. In the same pan, add the chopped red onion and sauté until translucent.
  6. Add the mashed blueberry-sugar mixture and balsamic vinegar. Cook until the sauce thickens, about 2-3 minutes.
  7. Add the lime zest and juice to the sauce, seasoning with salt and pepper to taste.
  8. If you placed the pork in the oven, remove it and place on serving plates. Serve the sauce on top and garnish with parsley or cilantro. Enjoy!

Tips

To get the perfect sear on your pork chops, make sure your pan is hot before adding the meat. This will help achieve a crispy exterior while keeping the inside juicy. Additionally, letting the pork rest after cooking allows the juices to redistribute, resulting in tender and flavorful meat.

Variations & Substitutions

If you’re looking to switch things up, you can substitute pork chops with chicken breasts or turkey cutlets. For a vegetarian version, consider using seared tofu or tempeh. You can also experiment with different fruits like raspberries or blackberries for the sauce, adjusting the sugar to taste.

Storage

Leftover pork with blueberry sauce can be stored in an airtight container in the refrigerator for up to 3 days. To reheat, gently warm it in a pan over medium-low heat, adding a splash of water if the sauce has thickened too much during storage.

FAQ

Can I use frozen blueberries for this recipe?

Yes, you can use frozen blueberries if fresh ones are not available. Just make sure to thaw them and drain any excess liquid before mashing them with the sugar.

What can I serve with Pork with Blueberry Sauce?

This dish pairs beautifully with a variety of sides. Consider serving it with creamy mashed potatoes, roasted vegetables, or a simple green salad to complement the flavors.

Nutrition

While the exact nutritional content can vary based on the specific ingredients and portion sizes used, this dish is a good source of protein from the pork and antioxidants from the blueberries. It’s a balanced meal that offers both nutrients and flavor.

Conclusion

This Pork with Blueberry Sauce is more than just a meal; it’s an experience that brings together the best of sweet and savory. Whether you’re cooking for your family or hosting guests, this dish is sure to delight everyone at the table. I hope it becomes a favorite in your home, just as it has in mine. Enjoy the journey of flavors and happy cooking!

Related update: Pork with Blueberry Sauce

Related update: Smoked Salmon and Mascarpone Calzone

Cheesy Bacon Burger with Spicy Chipotle Aiolo Sauce | Made by Meaghan Moineau

Cheesy Bacon Burger with Spicy Chipotle Aioli Sauce

Intro

There’s something about the sizzle of a burger on the grill that takes me back to summer evenings spent in my grandmother’s backyard. The air would be filled with the aroma of sizzling meat and the laughter of family members gathering around the picnic table. It was during those cherished gatherings that I learned the art of creating the perfect burger, one that would be etched in our hearts as a family tradition. Today, I am excited to share with you a modern twist on that classic memory – the Cheesy Bacon Burger with Spicy Chipotle Aioli Sauce. This recipe not only brings back those nostalgic moments but also adds a spicy kick that will surely become a new favorite in your home.

Why You’ll Love It

This Cheesy Bacon Burger is a delightful combination of flavors and textures that will make your taste buds dance with joy. The juicy beef patty encasing a creamy Swiss cheese center is topped with crispy turkey bacon, sautéed bell peppers, and onions, all nestled within a soft whole wheat bun. The real star, however, is the Spicy Chipotle Aioli Sauce, which adds a smoky and tangy kick to every bite. Whether you are hosting a backyard barbecue or simply craving a delicious homemade burger, this recipe is sure to impress.

Ingredients

  • Chipotle chiles in adobo
  • Fat-free mayonnaise
  • Garlic
  • Garlic powder
  • Greek yogurt
  • Green bell pepper
  • Ground cumin
  • Black ground pepper
  • Lean ground beef
  • Fresh lime juice
  • Onion
  • Whole wedges of Laughing Cow Swiss cheese
  • Cooked turkey bacon
  • Whole wheat hamburger buns

Instructions

  1. For the burgers: In a pan, cook turkey bacon according to the directions on the package. Once cooked, remove the bacon and set it aside.
  2. In the same pan, add bell pepper and onion and cook until tender, about 10 minutes.
  3. Add ground beef to a small bowl, along with garlic powder and ground pepper, and mix well.
  4. Divide the raw meat into 8 equal pieces (approximately 2oz each). Flatten each piece, place 1/2 a cheese wedge onto each piece of hamburger, and top with another piece of meat. Seal the edges to prevent the cheese from oozing out during cooking.
  5. Place the burgers on the grill and cook until done, about 5 minutes per side.
  6. Place the cooked burgers on buns and top with bacon, peppers & onions, and Spicy Chipotle Aioli Sauce.
  7. For the Spicy Chipotle Aioli Sauce: In a small bowl, whisk together chipotle chiles in adobo, fat-free mayonnaise, garlic, Greek yogurt, ground cumin, and fresh lime juice until combined. This makes 3/4 cup, or 12 tablespoons, of sauce.

Tips

To ensure your burgers are perfectly cooked, use a meat thermometer to check that the internal temperature reaches 160°F (71°C). If you prefer a milder sauce, reduce the amount of chipotle chiles. For an extra layer of flavor, toast your hamburger buns on the grill for a few minutes before assembling your burgers.

Variations & Substitutions

If you prefer a different cheese, cheddar or pepper jack would work wonderfully in this recipe. You can also substitute ground turkey for the beef if you want a leaner option. For a vegetarian twist, try using a plant-based burger patty and coconut bacon.

Storage

Store any leftover cooked burgers in an airtight container in the refrigerator for up to 3 days. The Spicy Chipotle Aioli Sauce can be stored in a separate container in the fridge for up to a week. Reheat the burgers in a pan or microwave before serving.

FAQ

Can I make the Spicy Chipotle Aioli Sauce in advance?

Absolutely! The sauce can be made a day or two in advance and stored in the refrigerator. This will allow the flavors to meld together even more, enhancing its delicious taste.

What is the best way to cook the burgers if I don’t have a grill?

If you don’t have a grill, you can cook the burgers in a skillet on the stovetop. Simply heat a little oil in the pan over medium-high heat and cook the burgers for about 5 minutes on each side, or until they reach the desired doneness.

Can I freeze the burgers?

Yes, you can freeze the uncooked burger patties. Place them on a baking sheet and freeze until solid, then transfer to a freezer-safe bag or container. They can be stored in the freezer for up to 3 months. Thaw in the refrigerator before cooking.

Nutrition

This Cheesy Bacon Burger recipe, when made with lean ground beef and turkey bacon, is a protein-packed meal. The use of Greek yogurt and fat-free mayonnaise in the aioli sauce also helps to keep the calorie count in check. As with any meal, moderation is key to maintaining a balanced diet.

Conclusion

The Cheesy Bacon Burger with Spicy Chipotle Aioli Sauce is more than just a meal; it’s a culinary experience that brings together the comfort of classic flavors with a modern twist. Whether you’re reminiscing about family gatherings or creating new memories, this burger is sure to be a hit with everyone. So fire up the grill, gather your loved ones, and savor the deliciousness of this mouthwatering creation!

Related update: Cheesy Bacon Burger with Spicy Chipotle Aiolo Sauce