Beef Teriyaki Stir Fry | Made by Meaghan Moineau

Beef Teriyaki Stir Fry | Made by Meaghan Moineau

Title: Savoring Memories with Beef Teriyaki Stir Fry: A Nostalgic Family Delight
Description: Dive into the flavors of our Beef Teriyaki Stir Fry—a savory blend of tender beef, vibrant vegetables, and a delectable sauce. This main dish not only tantalizes your taste buds but also brings back cherished memories of family gatherings. Rated a 6/10 on the difficulty scale, this recipe is perfect for both seasoned cooks and culinary novices looking to create a delicious and heartwarming meal.

---


Beef Teriyaki Stir Fry: A Flavorful Journey Through Time

The aroma of soy sauce mingling with ginger and garlic, the sizzle of beef in a hot pan, and the vibrant colors of fresh vegetables—these are the sensations that transport me back to my grandmother's kitchen. It was a place where magic happened, where every meal was a celebration of flavors and family. Today, I want to share a recipe that encapsulates those cherished moments: Beef Teriyaki Stir Fry.


Ingredients:

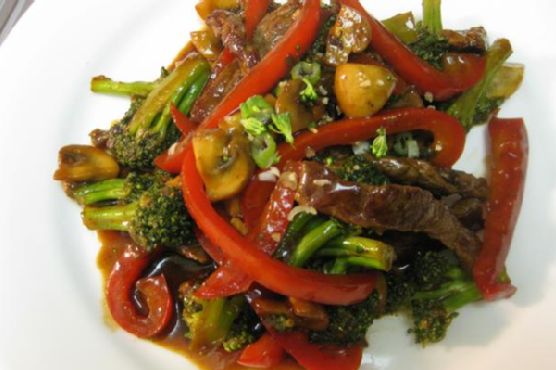
- 1 lb flank steak, thinly sliced


- 2 cups broccoli florets


- 1 red bell pepper, sliced


- 1 cup mushrooms, sliced


- 2 scallions, sliced


- 2 tablespoons soy sauce


- 1 tablespoon brown sugar


- 1 tablespoon dark sesame oil


- 2 cloves garlic, minced


- 1 inch fresh ginger, grated


- 2 tablespoons vegetable oil


- 1 tablespoon cornstarch


- 2 teaspoons cold water


- Sesame seeds for garnish


Instructions:
1. Marinate the Flavors: In a small bowl, whisk together soy sauce, brown sugar, sesame oil, garlic, and ginger. Add the sliced flank steak to the mixture, ensuring each piece is well-coated. Cover and refrigerate for at least 30 minutes, allowing the flavors to meld.
2. Sizzle and Sauté: Heat vegetable oil in a large frying pan over medium heat. Add the marinated beef, cooking for 3-4 minutes to brown it on all sides. Remove the beef from the pan and set it aside.
3. Vegetable Medley: In the same pan, add broccoli, red bell pepper, and mushrooms. Sauté for about 5 minutes, or until the vegetables begin to soften.
4. Saucy Symphony: Stir in the teriyaki sauce and bring the mixture to a simmer. Return the beef to the pan, including any flavorful drippings. Cook for another 5 minutes, stirring occasionally to ensure even flavor distribution.
5. Thickening Touch: In a small bowl, dissolve cornstarch in 2 teaspoons of cold water. Stir this mixture into the pan, allowing the sauce to thicken over 2 minutes. Toss the beef and vegetables to coat them evenly in the rich teriyaki sauce.
6. Serve and Enjoy: Sprinkle with sesame seeds and sliced scallions before serving. Pair it with steamed rice or noodles for a complete meal.
A Nostalgic Family Memory:

Every Sunday afternoon, my family would gather at my grandmother's house. The kitchen was always a hub of activity, filled with laughter, stories, and the enticing scent of her Beef Teriyaki Stir Fry. I remember standing on a stool, watching her expertly whisk the sauce, her hands moving with the grace of years of practice. The sizzling beef and vibrant vegetables were a feast for the senses, and as we sat around the table, each bite was a reminder of the love and care she infused into every dish.


These meals were more than just food; they were a celebration of our heritage and the bonds that held us together. Even now, whenever I make this dish, I'm reminded of those precious Sundays, and I feel a sense of gratitude for the culinary legacy she passed down to us.


Difficulty Rating: 6/10
Dish Classification: Main Dish
Conclusion:

Beef Teriyaki Stir Fry is more than just a recipe; it's an opportunity to recreate memories and share them with loved ones. Whether you're cooking for family or friends, this dish is sure to bring a sense of warmth and nostalgia to your table. Enjoy the symphony of flavors and the stories woven into each bite, and perhaps, create a few new memories of your own.

Read more about Appetizers

Read more about Main Dishes

Read more about Desserts

Bibimbab (Korean Rice w Vegetables & Beef) | Made by Meaghan Moineau

Bibimbab (Korean Rice w Vegetables & Beef) | Made by Meaghan Moineau

Title: Discover the Heartwarming Flavors of Bibimbab: A Korean Classic
Description: Dive into the rich flavors and vibrant colors of Bibimbab, a beloved Korean dish that brings together a medley of fresh vegetables, savory beef, and perfectly cooked rice. Join us as we explore this deliciously customizable meal, perfect for any palate, and share a nostalgic family memory that highlights its place in our hearts.

---


Bibimbab: A Journey Through Flavor and Memory


Bibimbab, a staple in Korean cuisine, is more than just a dish. It's a tapestry of flavors and textures that unite to create a harmonious and satisfying meal. With its roots steeped in tradition and adaptability to suit any lifestyle, Bibimbab is a culinary delight that welcomes everyone to the table.


Ingredients:

- Carrots, julienned

- Cooked white rice


- Eggs


- English cucumber, sliced


- Garlic clove


- Red sprinkle gochugaru (red pepper flakes)


- Red gochujang (red pepper paste)


- Olive oil


- Sesame oil


- Sesame seeds


- Soy sauce


- Fresh spinach


- Sandwich steaks, thinly sliced


Instructions:


1. Prepare the Rice: Cook rice according to package directions and set aside.
2. Prep the Vegetables: Cut the carrots and cucumber into matchstick pieces. Set aside for sautéing.
3. Cook the Spinach: In a large non-stick pan, bring 2 cups of water to a boil. Add spinach and cook until wilted, stirring constantly. Drain and squeeze the spinach dry into a ball.
4. Sauté the Carrots and Garlic: Wipe out the skillet and heat 1 tsp of olive oil over medium-high heat. Add carrots and cook until soft, about 3 minutes. Add garlic and cook until fragrant, about 1 minute. Mix cucumber slices with gochugaru and set aside.
5. Prepare the Spinach Mixture: Combine the spinach with soy sauce and set aside until serving.
6. Cook the Beef: Add thinly sliced beef to the non-stick pan and heat until browned. Wipe down the pan with a napkin.
7. Fry the Eggs: Heat 1 tsp of olive oil in the non-stick pan over medium-high heat. Add eggs and cook until the whites are set, and the yolks remain runny, about 5 minutes.
8. Assemble the Bibimbab: Divide the cooked rice among four bowls. Top with sautéed vegetables, beef, and eggs. Drizzle with sesame oil and sprinkle with sesame seeds. Finish with a dollop of gochujang or Sriracha sauce for a spicy kick.

A Taste of Nostalgia


Growing up, Bibimbab was more than just a meal; it was a family ritual that brought us together on Sunday afternoons. I vividly recall the comforting aroma of sesame oil and the vibrant colors of the vegetables laid out on the kitchen counter. My grandmother, with her gentle hands, would guide us in chopping the vegetables, teaching us the importance of each ingredient and its place in the dish.


As we gathered around the table, each person was given the freedom to craft their perfect bowl, adding a personal touch to the traditional recipe. It was in these moments that I learned the true essence of Bibimbab—its ability to adapt to each individual's taste while still maintaining its core identity. Even today, every bite takes me back to those cherished family gatherings, filled with laughter and stories, binding us together through the simple joy of sharing a meal.


Difficulty Rating: 4/10


Classification: Main Dish


Bibimbab is a dish that invites creativity and personalization, making it a delightful experience for both novice and experienced cooks alike. Its versatility accommodates vegetarians, dieters, health-conscious eaters, and meat-lovers, ensuring that everyone can partake in its deliciousness. So, gather your ingredients, embrace the process, and enjoy the journey of creating your own Bibimbab masterpiece!

Read more about Appetizers

Read more about Main Dishes

Read more about Desserts

Tomato Stack Salad | Made by Meaghan Moineau

Tomato Stack Salad | Made by Meaghan Moineau

Title: "Tomato Stack Salad: A Taste of Summer Nostalgia"
Description: Dive into the freshness of summer with our Tomato Stack Salad, a delightful appetizer that brings together the vibrant flavors of ripe tomatoes, creamy goat cheese, and aromatic herbs. Rated an easy 3 out of 10 on the difficulty scale, this dish is perfect for beginners and seasoned cooks alike. Join us as we explore this simple yet elegant recipe, infused with the warmth of family memories.

---


Tomato Stack Salad: A Taste of Summer Nostalgia


As the sun casts its golden hue over the garden, the vibrant colors of ripe tomatoes become the centerpiece of summer meals. The Tomato Stack Salad, with its simple elegance, is more than just a dish; it's a cherished family tradition that brings back memories of warm gatherings and laughter-filled afternoons.


Ingredients:


- 4 ripe tomatoes


- 4 oz goat cheese


- A handful of fresh herbs (such as basil, parsley, or chives)


- Salt, to taste


- Balsamic vinegar, for drizzling


Instructions:


1. Prepare the Goat Cheese: Begin by mixing the fresh herbs into the goat cheese until well combined. The herbs add a burst of flavor, turning the cheese into a creamy, aromatic spread.
2. Slice the Tomatoes: Carefully slice each tomato into four thick rounds. Choose tomatoes that are firm yet ripe, ensuring they hold their shape when stacked.
3. Season the Tomatoes: Sprinkle each tomato slice lightly with salt to enhance its natural sweetness.
4. Assemble the Salad: Gently slather each tomato round with the herbed goat cheese. Stack the rounds to reassemble each tomato, creating a tower of alternating red and white layers.
5. Finish with Balsamic Vinegar: Drizzle the stacked tomatoes with balsamic vinegar, allowing it to cascade down the layers, adding a tangy contrast to the creamy cheese.

A Nostalgic Family Memory


This Tomato Stack Salad takes me back to my grandmother's kitchen, where the air was always filled with the aroma of fresh herbs. Every summer, my family would gather at her house, a quaint cottage surrounded by a lush garden. My siblings and I would help her pick the ripest tomatoes, our fingers stained with their juicy red hues.


Grandma had a way with simple ingredients, turning them into something magical. As she showed us how to mix the herbs into the goat cheese, her stories of summers past would unfold, each tale woven with laughter and a touch of nostalgia. The kitchen was our haven, a place where time slowed, and the outside world faded away.


The Tomato Stack Salad was always the highlight of our meal, a dish that captured the essence of summer in each bite. Even now, as I recreate this recipe, I can almost hear Grandma's voice, her laughter echoing through the years. This salad is more than just a recipe; it's a bridge to cherished memories and a testament to the power of family traditions.


Conclusion


The Tomato Stack Salad is a delightful appetizer that captures the essence of summer. With a difficulty rating of just 3 out of 10, it's an inviting dish for cooks of all levels. As you savor the flavors of fresh tomatoes, creamy goat cheese, and tangy balsamic vinegar, may you also find a connection to the warmth of family memories and the simple joys of sharing a meal together.


---


Embrace the simplicity and nostalgia of the Tomato Stack Salad, and let it become a cherished part of your summer gatherings.

Read more about Appetizers

Read more about Main Dishes

Read more about Desserts

Chimichurri Skirt Steak with Grilled Asparagus | Made by Meaghan Moineau

Chimichurri Skirt Steak with Grilled Asparagus | Made by Meaghan Moineau

Title: "A Taste of Tradition: Chimichurri Skirt Steak with Grilled Asparagus"
Description: Dive into a culinary journey with our Chimichurri Skirt Steak and Grilled Asparagus recipe. This main dish combines vibrant flavors with a touch of nostalgia, perfect for gatherings and family dinners. Discover the simplicity and elegance of Argentinian-inspired cooking with a personal story that ties it all together.

---


A Taste of Tradition: Chimichurri Skirt Steak with Grilled Asparagus

There's something remarkably comforting about revisiting cherished family recipes. Each dish is a tapestry of flavors intertwined with memories, weaving a story that transcends generations. Today, we delve into the vibrant world of Chimichurri Skirt Steak with Grilled Asparagus—a dish that has not only graced our table but has also become a symbol of togetherness in our family.


A Family Heritage on a Plate

Growing up, Sundays were synonymous with family gatherings at my grandparents' house. The aroma of grilled meats and fresh herbs would fill the air, mingling with the sounds of laughter and storytelling. My grandfather, an avid cook, would always prepare his signature chimichurri sauce—a recipe passed down from his Argentinean grandmother. I remember standing on tiptoe, barely tall enough to peek over the kitchen counter, as he meticulously blended fresh parsley, oregano, and mint leaves, adding just the right amount of garlic and red wine vinegar.


As the adults chatted and caught up on the week's happenings, my cousins and I would run around the garden, waiting for the moment when the grill was finally ready. The sizzle of skirt steaks hitting the hot grill is a sound I can still hear vividly. Paired with the perfectly grilled green and white asparagus, this dish was a staple at our family gatherings, bringing everyone together around the table.


The Recipe: A Symphony of Flavors

Here's how you can recreate this beloved dish, infusing your own gatherings with a touch of tradition and flavor.


Ingredients:

- Green and white asparagus


- 1-2 teaspoons chili pepper flakes


- 1 cup flat-leaf parsley


- 1/2 cup fresh mint leaves


- 3 to 5 garlic cloves


- Kosher salt


- 2 tablespoons lemon juice


- 1 cup olive oil


- 1/2 cup fresh oregano leaves


- Black freshly cracked pepper


- 1/4 cup red wine vinegar


- 1 shallot, diced


- 2-3 skirt steaks


Instructions:
1. Chimichurri Sauce: Place all chimichurri sauce ingredients except for the olive oil in a food processor and pulse until well chopped. While the processor is running, slowly pour in the olive oil until the mixture is blended. Reserve half of the sauce to serve with the meal.
2. Marinate the Steaks: Season the skirt steaks with salt and pepper on both sides. Spoon the remaining chimichurri sauce over the steaks and let them marinate for 30 minutes up to overnight.
3. Prepare the Grill: Preheat your grill to a temperature between 350 to 400°F.
4. Grill the Asparagus: In a plastic resealable bag, combine asparagus, olive oil, garlic, salt, and pepper. Shake to coat and place in a grill basket. Grill asparagus over direct heat, gently tossing for even cooking. Baste with the garlic and olive oil mixture for about 10 minutes.
5. Grill the Steaks: Grill the skirt steaks to your desired temperature, approximately 5 to 8 minutes per side. Once cooked, remove them from the grill and let them rest for 10 minutes before slicing into long strips.
6. Serve: Spoon the reserved chimichurri sauce over the sliced steak and serve with grilled asparagus on the side.
Difficulty: 5/10

As we gather around the table, this dish continues to be a testament to our family's love for food and togetherness. The vibrant flavors of the chimichurri sauce, paired with the smoky goodness of grilled asparagus and tender skirt steak, create a culinary experience that is as joyful as the memories it evokes.


Whether you're creating new traditions or revisiting old ones, may this Chimichurri Skirt Steak with Grilled Asparagus bring a touch of nostalgia and connection to your next meal. Enjoy!

Read more about Appetizers

Read more about Main Dishes

Read more about Desserts

10 Minute Brownies | Made by Meaghan Moineau

10 Minute Brownies | Made by Meaghan Moineau

Title: Whip Up Delight: 10-Minute Brownies That Bring Back Family Memories
Description: Discover the joy of baking with our quick and easy 10-Minute Brownies recipe! This delightful dessert combines rich, chocolaty goodness with a touch of nostalgia. Perfect for any sweet tooth, these brownies are a breeze to make and promise to become a family favorite. Follow our simple steps, and let this dessert bring a smile to your face and warmth to your heart.

---


When it comes to desserts that offer comfort and joy in every bite, brownies often top the list. Our 10-Minute Brownies are not just about convenience; they are about creating memories and savoring the sweet moments that life has to offer. With simple ingredients like semisweet chocolate chips, unsweetened applesauce, and finely-chopped walnuts, these brownies are both delicious and reminiscent of cherished family gatherings.


Ingredients You'll Need


- Baking Powder
- Canola Oil
- Finely-Chopped Walnuts
- Semisweet Chocolate Chips
- Sugar
- Unbleached Flour
- Unsweetened Applesauce
- Vanilla Extract

Instructions


1. Preheat your oven to 350 degrees F. Lightly oil a 6 x 9-inch baking pan and set it aside.


2. In a small saucepan over low heat, combine the canola oil and semisweet chocolate chips. Stir occasionally until the chocolate is melted. Remove from heat and set aside.


3. In a large bowl, add the unsweetened applesauce, sugar, and vanilla extract. Blend well.


4. Stir in the melted chocolate mixture. Whip and blend thoroughly.


5. Add the unbleached flour, baking powder, and finely-chopped walnuts. Mix just until combined.


6. Spoon the batter into the prepared baking pan.


7. Bake for 25 to 30 minutes, or until the top springs back when lightly touched. Be cautious not to overbake, as this will make the brownies dry.


8. Let the brownies cool completely before cutting them into squares. Store in a covered, airtight container in the refrigerator.


A Sweet Family Memory


As I watch the chocolate melt and blend with the rich aroma of vanilla, I am transported back to my grandmother's cozy kitchen. Every Sunday, our family would gather at her house, and the highlight of the day was always her famous brownies. I remember sitting on the counter, my legs swinging as I eagerly waited to lick the batter off the spoon. Grandma would wink at me and say, "The secret ingredient is love." These brownies were more than just a treat; they were the sweet thread that wove our family together, creating a tapestry of laughter and love.


Difficulty Rating: 3/10


Classification: Dessert


These 10-Minute Brownies are a testament to the magic that happens when simple, wholesome ingredients are combined with a sprinkle of nostalgia. Whether you're baking for a family gathering or simply treating yourself, this recipe promises to deliver rich, chocolaty goodness in every bite. So, don your apron, and let these brownies bring a touch of sweetness to your day!

Read more about Appetizers

Read more about Main Dishes

Read more about Desserts

White Chocolate Mocha Cookies | Made by Meaghan Moineau

White Chocolate Mocha Cookies | Made by Meaghan Moineau

Title: Savoring Sweet Memories: White Chocolate Mocha Cookies
Description: Dive into the world of flavor with our White Chocolate Mocha Cookies, a delightful blend of rich cocoa and espresso that takes you back to cherished family gatherings. Discover the story, the recipe, and the irresistible aroma that makes this dessert a timeless treat.

---


When the air turns crisp and the leaves start to blanket the ground in hues of gold and crimson, my heart often drifts back to the warmth of my grandmother's kitchen. It was a place where magic happened, where flour dusted the countertops like fresh snow, and the aroma of freshly baked cookies wrapped around you like a comforting blanket. Among the many recipes passed down through generations, one always stood out—the White Chocolate Mocha Cookies.


This cookie recipe is a family treasure, one that has been lovingly crafted and perfected over countless holiday seasons. The rich combination of cocoa and espresso powder evokes the comforting essence of a cozy café, while the sweet white chocolate chips offer a delightful contrast. Together, they create a symphony of flavors that sing of joy and nostalgia.


Ingredients:

- All-purpose flour


- Baking soda


- Cocoa powder


- Eggs


- Espresso powder


- Salt


- Semi-sweet chocolate chips


- Sugar


- Unsalted butter


- Vanilla extract


- White chocolate chips


Instructions:

1. Preheat your oven to 350°F (175°C). This is the perfect time to let your kitchen fill with the anticipation of what's to come.


2. In a large mixing bowl, cream together the unsalted butter and sugar until the mixture is light and fluffy—a task that, as a child, I watched my grandmother do with effortless grace.


3. Add in the eggs and vanilla extract, mixing until well combined. This was always my favorite part, watching the rich ingredients come together, much like our family did every Sunday afternoon.


4. Slowly incorporate the flour, cocoa powder, espresso powder, baking soda, and salt into the wet ingredients. Mix until just combined, being careful not to overwork the dough.


5. Gently fold in both the semi-sweet and white chocolate chips, ensuring each bite is packed with chocolatey goodness.


6. Roll the dough into balls, coating them with sugar if desired. Place them on a baking sheet lined with parchment paper or a Silpat mat. This step always reminded me of rolling snowballs in the yard with my siblings.


7. Bake in the preheated oven for 8-10 minutes. If your cookies are too rounded, press down lightly with the back of a measuring cup or the bottom of a glass immediately after removing them from the oven.


These cookies, with their perfect blend of chocolate and coffee, are a testament to those cherished moments spent in my grandmother's kitchen, where laughter was abundant, and love was the secret ingredient in every recipe.


Difficulty: 4/10
Classification: Dessert

Perfect for dessert, these White Chocolate Mocha Cookies are not just a treat for the taste buds but also a beautiful way to relive warm family memories. Whether you're baking them for a special occasion or just because, they promise to fill your home with the love and warmth of my grandmother's kitchen.

Read more about Appetizers

Read more about Main Dishes

Read more about Desserts

Bacon & Potato Soup, Gluten & Dairy Free | Made by Meaghan Moineau

Bacon & Potato Soup, Gluten & Dairy Free | Made by Meaghan Moineau

Title: A Bowl of Comfort: Bacon & Potato Soup, Gluten & Dairy Free
Description: Dive into the warmth and nostalgia of a family-favorite recipe, Bacon & Potato Soup. This hearty, gluten and dairy-free dish combines crispy bacon, tender potatoes, and savory cabbage in a rich broth that warms the soul. Join us as we explore the flavors and the cherished family memories that make this soup a beloved household staple.

---


As the leaves begin to turn and the air grows crisp, there's nothing quite like a comforting bowl of soup to chase away the chill. Our Bacon & Potato Soup, gluten and dairy-free, is the perfect remedy. With its rich aroma and hearty ingredients, it’s a dish that brings back fond memories of family gatherings around the dinner table.


Growing up, soup was more than just a meal; it was a tradition. Every autumn, as the first signs of fall appeared, my grandmother would pull out her well-worn stock pot and begin preparing her famous Bacon & Potato Soup. The smell of sizzling bacon mixed with the sweet aroma of onions would fill the kitchen, creating a welcoming atmosphere that drew everyone in.


Ingredients:

- 2 tablespoons olive oil


- 8 ounces lean bacon, chopped


- 1 large yellow onion, diced


- 3 garlic cloves, minced


- 6 cups chicken stock


- 4 large red baking potatoes, diced


- 2 cups shredded savoy cabbage


- 1 tablespoon Worcestershire sauce


- 1 tablespoon Dijon mustard


- Salt and pepper, to taste


- 1/4 cup flat-leaf parsley, chopped


- Lemon wedges and gluten-free garlic croutons, for garnish


Instructions:

1. In a large stock pot, heat the olive oil over medium-high heat. Add the chopped bacon and onions, cooking until the bacon is crisp and the onions are translucent.


2. Add the garlic and cook for one more minute, until fragrant.


3. Pour in the chicken stock, and add the diced potatoes, shredded cabbage, Worcestershire sauce, and Dijon mustard. Mix well, and season with salt and pepper.


4. Bring the soup to a boil, then reduce the heat and simmer for 30 minutes, or until the potatoes are tender but not falling apart.


5. Remove the pot from heat and allow it to cool for 5 minutes. Transfer 2 1/2 cups of the soup to a blender and pulse quickly to achieve a coarse puree.


6. Pour the blended portion back into the stock pot and return to heat. Cook, stirring often, for 5-10 minutes or until heated through.


7. Stir in the chopped parsley before serving.


8. Ladle the soup into serving bowls and garnish with a wedge of lemon and gluten-free garlic croutons.


A Taste of Nostalgia:

I remember one particular autumn evening when the wind howled outside, and the first flurries of snow danced in the air. My family gathered in the cozy warmth of the kitchen, where the soup simmered gently on the stove. We huddled around the table, bowls of steaming soup in hand, as my grandmother recounted stories of her own childhood. The rich flavors of bacon and potato mingled with the comforting memories of family, creating a moment that has stayed with me all these years.


This recipe is more than a meal; it's a connection to the past. Each spoonful brings back the laughter and love shared at that table, and I hope it brings the same warmth and joy to your home.


Difficulty: 4/10
Classification: Main Dish

Embrace the changing seasons with this delicious Bacon & Potato Soup. Whether you're creating new family traditions or simply savoring a cozy night in, this gluten and dairy-free recipe is sure to become a cherished favorite.

Read more about Appetizers

Read more about Main Dishes

Read more about Desserts

Apple Brown Betty | Made by Meaghan Moineau

Apple Brown Betty | Made by Meaghan Moineau

Title: "A Taste of Nostalgia: The Timeless Comfort of Apple Brown Betty"
Description: Dive into the heartwarming world of Apple Brown Betty, a classic dessert that has graced family tables for generations. With its simple yet flavorful ingredients, discover how this dish weaves together memories and tastes that are sure to delight both young and old. Rated 4/10 in difficulty, this dessert is perfect for any occasion that calls for a touch of sweetness and a sprinkle of nostalgia.

---


There’s something undeniably comforting about the aroma of apples and cinnamon wafting through the house, wrapping around you like a warm embrace on a chilly autumn evening. For many, including myself, this comforting aroma is synonymous with Apple Brown Betty, a dessert that has become a cherished family tradition.


The Magic of Apple Brown Betty


Apple Brown Betty is a dessert that celebrates simplicity while delivering robust flavors. The combination of diced apples, bread, and warm spices like cinnamon and nutmeg creates a delightful symphony of taste and texture. The addition of butter and a hint of lemon juice enhances the dish, while the golden-brown crust adds a satisfying crunch.


Ingredients:

- Diced apples


- Bread, cubed


- Butter


- Cinnamon


- Lemon juice


- Nutmeg


- White sugar


Instructions:

1. Preheat your oven to 375°F (190°C).


2. In a buttered 1-1/2 quart souffle dish, start with a layer of cubed bread.


3. Mix the diced apples with sugar, cinnamon, and nutmeg.


4. Cover the bread with a layer of the apple mixture.


5. Dot with butter and drizzle with a little lemon juice and rind.


6. Repeat the layering process, ending with a layer of bread cubes.


7. Cover and bake for 30 minutes.


8. Uncover and bake for an additional 30 minutes, until the apples are tender and the crust is golden brown.


A Journey Down Memory Lane


For me, Apple Brown Betty is more than just a dessert; it’s a portal to cherished memories. I recall the first time my grandmother and I made this delightful dish together. It was a crisp October afternoon, the kind when the leaves danced in the wind and painted the ground in hues of amber and gold. My grandmother, with her apron tied snugly around her waist, guided my small hands through the process of layering the bread and apples.


As the dish baked, we sat by the kitchen table, sipping hot cocoa and sharing stories. She spoke of her childhood, weaving tales of her own mother making the same dessert in a small country kitchen. The anticipation grew with every tick of the clock, and when the timer finally chimed, the kitchen was enveloped in an intoxicating scent that remains etched in my memory.


A Dessert for All Occasions


Rated at 4/10 in terms of difficulty, Apple Brown Betty is an ideal dessert for both novice and seasoned bakers. The straightforward preparation and familiar ingredients make it an accessible choice for any home cook. Whether it’s a cozy family dinner or a festive holiday gathering, this dessert is sure to be a beloved staple on your table.


The Apple Brown Betty is more than just a dish; it’s a treasured part of family history. With every bite, you’re not only savoring a delicious dessert but also indulging in a rich tapestry of memories and love. So why not gather your loved ones, roll up your sleeves, and create your own lasting memories with this timeless treat?

Read more about Appetizers

Read more about Main Dishes

Read more about Desserts

Pasta With Chicken and Broccoli | Made by Meaghan Moineau

Pasta With Chicken and Broccoli | Made by Meaghan Moineau

Savoring Memories: Pasta with Chicken and Broccoli Delight


A Hearty Dish That Brings Families Together


In the hustle and bustle of daily life, it's the comforting aroma of a home-cooked meal that often brings families together. One such dish that has stood the test of time in my family is the classic "Pasta with Chicken and Broccoli." This delightful main dish, with its perfect blend of flavors and textures, is not only a feast for the taste buds but also a heartwarming reminder of cherished family gatherings.


A Nostalgic Whiff of the Past


Growing up, Sunday afternoons were a sacred time in our household. It was the day my grandmother would don her favorite apron, one that seemed as old as time itself, and transform her kitchen into a culinary playground. The centerpiece of her Sunday magic? Her signature Pasta with Chicken and Broccoli.


I remember the sizzling sound of garlic hitting the olive oil, the air soon filled with a tantalizing aroma that beckoned everyone to the kitchen. My cousins and I would sit around the table, our chatter and laughter punctuated by the rhythmic clinking of utensils as my grandmother lovingly prepared the meal. Her secret, she would whisper to us, was a sprinkle of dried basil leaves and a dash of white wine, which transformed the dish from ordinary to extraordinary.


When the meal was finally served, it was more than just food on our plates; it was a slice of our family history. Each bite was a symphony of flavors - the tender chicken, the crisp yet tender broccoli, and the perfectly al dente lasagna noodles, all brought together by a delicate sauce of chicken broth and a hint of red pepper flakes. The crowning glory was a generous sprinkle of freshly grated Parmesan cheese, which melted into the dish, adding a creamy richness that was simply irresistible.


Crafting Your Own Culinary Memory


Creating this dish is a culinary adventure that's worth every minute spent in the kitchen. Here's how you can bring a piece of my family tradition into your home.


Ingredients:

- Olive oil


- Boneless chicken breasts


- Red pepper flakes


- Cooked lasagna noodles


- Garlic cloves


- Broccoli florets


- Dried basil leaves


- White wine


- Chicken broth


- Parmesan cheese


Instructions:

1. In a large skillet, heat olive oil over medium heat. Add garlic and sauté for about one minute, stirring constantly to avoid burning.


2. Add the boneless chicken breasts, cooking them until they're perfectly well-done.


3. Introduce the broccoli florets to the skillet, cooking until they're crisp yet tender.


4. Season the mixture with dried basil leaves and red pepper flakes. Add salt and pepper to taste.


5. Pour in the white wine and chicken broth, allowing the flavors to meld together for about 5 minutes.


6. Add the cooked and drained lasagna noodles to the skillet, tossing to combine all ingredients. Let it heat for an additional 1 to 2 minutes.


7. Serve immediately, topping with freshly grated Parmesan cheese if desired.


Difficulty: 4/10


Creating this dish is a delightful culinary endeavor that is moderately easy, making it perfect for both novice and experienced cooks alike. As a main dish, it promises to be the highlight of any family dinner, offering a taste of nostalgia with every bite.


Conclusion


In the end, Pasta with Chicken and Broccoli is more than just a meal; it's a connection to the past, a reason to gather, and a way to create new memories. Whether you're sharing it with family or friends, this dish is sure to become a beloved tradition in your own home. So, roll up your sleeves, gather your ingredients, and let the magic of this classic recipe bring warmth and joy to your table.

Read more about Appetizers

Read more about Main Dishes

Read more about Desserts

Harvest Moon: Home Sweet Home Special Edition announced for PS5, Xbox Series, Switch, and PC – Gematsu | Analysis by Brian Moineau

Harvest Moon: Home Sweet Home Special Edition announced for PS5, Xbox Series, Switch, and PC - Gematsu | Analysis by Brian Moineau

Harvest Moon: Home Sweet Home Special Edition – Bringing Cozy Nostalgia to Modern Consoles


In a delightful announcement that has left fans of farming simulators buzzing with excitement, Natsume has unveiled the upcoming release of "Harvest Moon: Home Sweet Home Special Edition." This beloved series, which has been a staple for cozy gaming enthusiasts since the mid-'90s, is set to make its grand return on the PlayStation 5, Xbox Series, Switch, and PC (via Steam) in 2025. As we eagerly anticipate the release of this special edition, it's a perfect moment to reflect on how this series has captured the hearts of gamers and how it fits into the broader tapestry of current gaming trends.

A Stroll Down Memory Lane


For those unfamiliar with Harvest Moon, it's a series that lets players step into the boots of a farmer, managing crops, livestock, and relationships in a quaint rural setting. With its roots tracing back to the Super Nintendo Entertainment System (SNES), Harvest Moon has consistently provided a soothing escape from the hustle and bustle of modern life. It's a game that emphasizes the simple joys of tending to a farm, nurturing friendships, and celebrating the changing seasons. This special edition promises to bring that classic charm to our high-definition screens, enhanced with modern graphics and new content.

The Rise of Cozy Gaming


The announcement of "Harvest Moon: Home Sweet Home Special Edition" taps into a growing trend in the gaming world: the rise of cozy gaming. In recent years, titles like "Animal Crossing: New Horizons" and "Stardew Valley" have soared in popularity, offering players a tranquil space to unwind and explore at their own pace. Amid global uncertainty and fast-paced lifestyles, cozy games provide a much-needed respite, allowing players to immerse themselves in worlds that value tranquility and creativity.

Harvest Moon's return to modern consoles is a testament to the enduring appeal of such experiences. It also highlights the gaming industry's recognition of diverse player preferences, with developers catering to audiences seeking both adrenaline-pumping action and serene, contemplative gameplay.

A Nostalgic Connection in a Modern Era


This upcoming release also serves as a nostalgic bridge between generations of gamers. Many players who grew up with the original Harvest Moon games are now introducing their children to the series, fostering a shared appreciation for its timeless charm. It's a reminder of how gaming can be a bonding experience, transcending age and time.

Moreover, Natsume's decision to bring the game to multiple platforms, including next-gen consoles and PC, reflects the industry's broader move towards inclusivity and accessibility. By making the game available on various systems, Natsume ensures that a wide audience can experience the joy of farm life, regardless of their preferred gaming device.

The Broader Picture


In a world that often feels increasingly complex and chaotic, the simple, rewarding loop of planting seeds and watching them grow holds a comforting allure. As we look forward to 2025, the release of "Harvest Moon: Home Sweet Home Special Edition" seems like a promise of calm amidst the storm—a reminder that sometimes, the most fulfilling journey is the one that takes us back to our roots.

In a similar vein, the resurgence of interest in hobbies like gardening, home cooking, and crafting during the pandemic reflects a collective yearning for simplicity and connection with nature. Harvest Moon, with its emphasis on these very themes, is perfectly poised to resonate with a world eager to rediscover the joy of life's little pleasures.

Final Thought


As we await the launch of "Harvest Moon: Home Sweet Home Special Edition," there's a sense of anticipation not just for the game itself, but for what it represents—a return to simplicity, a celebration of nostalgia, and a gentle reminder to cultivate joy in our everyday lives. Whether you're a veteran farmer or a newcomer to the series, this release promises an experience that is both heartwarming and refreshingly serene. Here's to cozy nights spent tending virtual fields and forging friendships, one pixel at a time.

Read more about AI in Business

Read more about Latest Sports Trends

Read more about Technology Innovations

Banana, Cranberry and Apple Bread | Made by Meaghan Moineau

Banana, Cranberry and Apple Bread | Made by Meaghan Moineau

Title: "Wholesome Nostalgia: Banana, Cranberry, and Apple Bread Recipe"
Description: Discover the heartwarming flavors of our Banana, Cranberry, and Apple Bread. This delightful dessert combines the sweetness of ripe bananas, the tartness of green apples, and the chewy texture of dried cranberries. Perfect for family gatherings or a cozy afternoon treat, this bread will surely evoke cherished memories.

---


There's something magical about stepping into a kitchen filled with the comforting aroma of freshly baked bread, especially when that bread is our Banana, Cranberry, and Apple Bread. This delightful dessert is not just a treat for the taste buds; it's a nostalgic journey back to the warm embrace of family traditions.


A Slice of Family History

Growing up, Sunday afternoons were a sacred time in my family. It was a day reserved for rest, laughter, and the comforting rituals that brought us together. My grandmother, the matriarch of our family, had a knack for creating delicious recipes that seemed to weave magic into our lives. One of her most beloved creations was her Banana, Cranberry, and Apple Bread.


I remember sitting on a stool in her cozy kitchen, watching her deftly combine ingredients, sharing stories of her childhood as she worked. Her voice was a melodic blend of wisdom and warmth, and her stories often revolved around her own mother, who had passed down this very recipe. It was a legacy, a thread of love that connected generations.


Ingredients

- 235g skinless bananas, mashed


- 125g dried cranberries


- 200g plain flour


- 140g sugar


- 1 green apple, grated


- 2 eggs


- 100g vegetable oil


- 1/2 cup milk


- 1 tsp vanilla extract


- 1 tsp baking powder


- 1/2 tsp baking soda


- 1/4 tsp salt


Instructions

1. Preheat your oven to 350°F (170°C). Line and grease a loaf pan with cooking spray to ensure easy removal.


2. In a large mixing bowl, combine the flour, baking powder, baking soda, salt, and sugar. Mix well and set aside.


3. In another mixing bowl, whisk together the eggs, milk, vegetable oil, and vanilla extract. Add the grated apple and mashed bananas to this mixture and stir until well combined.


4. Gradually add the dry ingredients to the wet mixture, stirring gently until just combined. Be careful not to overmix.


5. Fold in the dried cranberries, ensuring they are evenly distributed throughout the batter.


6. Pour the batter into the prepared loaf pan, smoothing the top with a spatula.


7. Bake for approximately 70 minutes, or until a skewer inserted into the bread comes out clean.


8. Allow the bread to cool in the pan for 10 minutes before transferring to a wire rack to cool completely.


A Timeless Treat

Every bite of this bread is a tribute to my grandmother's legacy. The sweetness of the bananas, the tartness of the apples, and the chewy texture of the cranberries create a harmonious blend of flavors that never fails to transport me back to those cherished Sunday afternoons.


Difficulty Rating: 4/10

This recipe is simple enough for beginners, yet it carries the elegance of a dessert that can grace any family gathering.


Classification: Dessert

Whether you're looking to recreate fond memories or start new traditions, this Banana, Cranberry, and Apple Bread is sure to delight. Gather your loved ones, share stories, and savor the sweet nostalgia baked into every slice.

Read more about Appetizers

Read more about Main Dishes

Read more about Desserts

Blackberry Peach Betty | Made by Meaghan Moineau

Blackberry Peach Betty | Made by Meaghan Moineau

Title: Nostalgia in Every Bite: The Comforting Delight of Blackberry Peach Betty
Description: Dive into the heartwarming world of Blackberry Peach Betty, a dessert that not only tantalizes the taste buds but also brings cherished family memories to life. This easy-to-make slow cooker recipe combines the sweet and tangy flavors of peaches and blackberries with the comforting crunch of graham cracker crumbs. Perfect for any gathering, this dessert will transport you back to simpler times with each delicious bite.

---


When I think of desserts that evoke a sense of warmth and nostalgia, Blackberry Peach Betty instantly comes to mind. This delightful dish, with its harmonious blend of juicy peaches and tart blackberries, is more than just a sweet treat—it's a thread that ties my family together through shared memories and cherished moments.


Ingredients You'll Need:

- 1 can of peach pie filling


- 2 cups of frozen blackberries


- 1 tablespoon of butter, melted


- 1 cup of graham cracker crumbs


- 1 teaspoon of ground cinnamon


- ¼ cup of sugar


Instructions:

1. Begin by spraying your slow cooker with cooking spray to prevent sticking, then set it aside.


2. In a medium-sized bowl, mix together the peach pie filling, frozen blackberries, sugar, and ground cinnamon. This will be the fragrant fruit base of your Betty.


3. Pour half of the fruit mixture into the bottom of the slow cooker, and top with half of the graham cracker crumbs and a drizzle of melted butter. Repeat with the remaining fruit, crumbs, and butter to create layers of flavor and texture.


4. Cover the slow cooker and let it work its magic on low for 3-4 hours. The slow, gentle heat will meld the ingredients into a warm, bubbling dessert.


5. Once done, serve it hot over a scoop of French vanilla ice cream. The contrast of the warm Betty and the cold ice cream is simply irresistible.


A Trip Down Memory Lane:

Growing up, my family gatherings were often centered around the kitchen, where the aroma of various dishes would fill the air. One summer evening, my grandmother introduced us to Blackberry Peach Betty. I remember her explaining how, during her own childhood, this dessert was her mother's way of making the most of the season's bounty. It quickly became a staple at our family reunions, with my grandmother sharing stories of her youth as we savored each spoonful. The warmth of the dessert mirrored the warmth of our family bonds, creating a tradition that I now share with my own children.


Difficulty: 3/10
Classification: Dessert

Blackberry Peach Betty is a testament to the beauty of simple ingredients coming together to create something extraordinary. It's a dessert that doesn't demand much from the cook, yet offers so much in return. Whether you're making it for a special occasion or just to indulge in a bit of nostalgia, this dish never fails to deliver both comfort and joy.

Read more about Appetizers

Read more about Main Dishes

Read more about Desserts

Spicy Indian-Style Hummus | Made by Meaghan Moineau

Spicy Indian-Style Hummus | Made by Meaghan Moineau

Title: Spicy Indian-Style Hummus: A Flavorful Fusion of Tradition and Taste
Description: Dive into the vibrant world of Indian-inspired cuisine with our Spicy Indian-Style Hummus. This unique take on a classic dip combines traditional hummus ingredients with the robust flavors of Indian spices, creating a dish that's both familiar and exotic. Perfect as an appetizer, this easy-to-make recipe brings a touch of nostalgia to your table, reminiscent of cherished family gatherings. Rated 4 out of 10 on the difficulty scale, this dish promises to be a delightful addition to your culinary repertoire.

---


Spicy Indian-Style Hummus: A Family Favorite with a Twist

There's something inherently comforting about recipes that remind us of home. For me, hummus has always been one of those dishes. Growing up, our kitchen was a melting pot of flavors, with my Indian heritage blending seamlessly with my love for international cuisine. This Spicy Indian-Style Hummus is a testament to that fusion, a dish that brings together the best of both worlds.


Ingredients:

- 1 cup dried chickpeas


- 1 pinch asafetida


- 1/2 teaspoon cayenne


- 2 tablespoons fresh chives, chopped


- 1 tablespoon fresh ginger, minced


- 2 tablespoons fresh parsley, chopped


- 2 cloves garlic, minced


- 1 teaspoon ground coriander


- 1 teaspoon ground cumin


- 1/2 teaspoon black fresh ground pepper


- Juice of 1 lemon


- 1/4 cup olive oil (plus more if needed)


- 1-2 red and green fresh chilies, chopped


- 1 teaspoon sea salt


- 1/4 cup tahini


- 1/2 teaspoon turmeric


Instructions:
1. Prep the Chickpeas: Begin by rinsing the chickpeas thoroughly. Soak them for 8 hours or overnight in several inches of water, adding a bit of yogurt whey or lemon juice to aid in softening them.
2. Cook the Chickpeas: Drain and rinse the soaked chickpeas, then transfer them to a large saucepan. Cover them with fresh water, bring to a boil, and then reduce the heat to medium-low. Cover and simmer for 1 to 1 1/2 hours, or until the beans are buttery soft. Drain them completely.
3. Blend the Ingredients: In a food processor, combine the cooked chickpeas with asafetida, cayenne, chives, ginger, parsley, garlic, coriander, cumin, black pepper, lemon juice, olive oil, chilies, sea salt, tahini, and turmeric. Process until you achieve a thick, smooth paste. For a thinner consistency, add more olive oil or a bit of water.
4. Serve: This recipe makes approximately 3 cups of hummus. Serve it as a delicious appetizer with fresh vegetables, pita bread, or crackers.
Family Memory:

Every summer, our family would gather at my grandparents' house for a weekend filled with laughter, stories, and, of course, food. My grandmother, with her eclectic mix of recipes, would always surprise us with something new. One year, she introduced us to her Spicy Indian-Style Hummus. I remember her bustling around the kitchen, explaining how the spices she used reminded her of her childhood in India. As we sat around the table, dipping warm, crusty bread into the hummus, I realized that food was more than just sustenance. It was a bridge connecting us to our past, a way to share and preserve cherished memories.


Difficulty Rating: 4/10
Classification: Appetizer

This Spicy Indian-Style Hummus is not just a dish; it's a journey through flavors and time, weaving together the threads of tradition and personal history. Whether you're hosting a gathering or simply looking to spice up your snack game, this hummus is sure to be a hit. Enjoy!

Read more about Appetizers

Read more about Main Dishes

Read more about Desserts

Spinach Cheese Tortellini | Made by Meaghan Moineau

Spinach Cheese Tortellini | Made by Meaghan Moineau

Title: Spinach Cheese Tortellini: A Nostalgic Family Feast
Description: Dive into the heartwarming world of homemade comfort food with our Spinach Cheese Tortellini recipe. Packed with rich flavors and a touch of nostalgia, this delightful dish brings together the creamy goodness of cheese tortellini and the fresh vibrancy of spinach in a tomato-infused sauce. Perfect for family gatherings or a cozy night in, this recipe is sure to become a cherished favorite.

---


Spinach Cheese Tortellini: A Nostalgic Family Feast


When I think of family gatherings around our dining table, the comforting aroma of Spinach Cheese Tortellini always springs to mind. It is a dish that has woven itself into the fabric of our family memories, a delicious centerpiece that brings us together time and time again.


Ingredients:


- 1 tablespoon butter
- 1 can of tomatoes (with juice)
- 1 package fresh dried cheese tortellini
- 1 teaspoon cumin
- 1 teaspoon dried basil
- 1 tablespoon flour
- 2 cloves garlic, minced
- 1 teaspoon garlic powder
- 1/2 cup heavy cream
- 1 cup milk
- 2 tablespoons olive oil
- 1 diced onion
- 1 teaspoon onion powder
- 1 teaspoon oregano
- 1/2 cup fresh parmesan cheese, grated
- 1 tablespoon raw sugar
- 1/2 teaspoon red pepper flakes
- Salt and pepper to taste
- 2 cups fresh spinach
- 1 teaspoon thyme

Instructions:


1. Prepare Tortellini: Follow the package instructions to cook the tortellini. Set aside.
2. Sauté Aromatics: In a large stainless steel pan, heat olive oil and butter over medium heat. Add diced onions and cook until soft and translucent, about 3-4 minutes. Stir in minced garlic and cook for an additional minute.
3. Create Tomato Base: Pour in the canned tomatoes, including their juice, and season with salt, pepper, garlic powder, onion powder, red pepper flakes, thyme, oregano, cumin, dried basil, and raw sugar. Simmer for 5 minutes, allowing the flavors to meld.
4. Add Spinach: Introduce the spinach leaves to the pan, cover with a lid, and let them wilt. Stir occasionally and add water 1/4 cup at a time if the mixture becomes too dry.
5. Prepare Cream Sauce: In a small bowl, whisk together flour, milk, and cream until smooth. Pour this mixture into the pan with the tomato and spinach. Stir in the parmesan cheese, combining everything thoroughly.
6. Combine & Serve: Using a slotted spoon, transfer the cooked tortellini into the pan. Gently mix everything with a wooden spoon to prevent tearing the pasta. Heat until everything is warmed through. Serve immediately, garnished with extra parmesan cheese and fresh basil.

A Family Memory


Growing up, I remember my grandmother bustling around the kitchen, her apron dusted with flour and the kitchen alive with the scents of garlic and herbs. Spinach Cheese Tortellini was her signature dish, one that she would prepare for every special occasion. I vividly recall sitting on the countertop, eagerly watching her every move, hoping to absorb her culinary magic.


The clinking of her wooden spoon against the stainless steel pan was a comforting symphony, and the sight of fresh spinach wilting into the bubbling tomato sauce was nothing short of mesmerizing. When it was finally time to eat, the whole family would gather around, laughter and stories flowing as freely as the wine.


This dish, with its rich, creamy texture and vibrant flavors, was more than just a meal; it was a vessel for love and connection, a reminder of the simple joys of family and home.


Difficulty: 5/10


Classification: Main Dish


Whether you're cooking for a crowd or simply indulging in a bit of culinary nostalgia, this Spinach Cheese Tortellini offers a taste of home, wrapped in warmth and memories. Enjoy!

Read more about Appetizers

Read more about Main Dishes

Read more about Desserts

Stuffed zucchini with rice and mushroom | Made by Meaghan Moineau

Stuffed zucchini with rice and mushroom | Made by Meaghan Moineau

Title: Reliving Family Moments with Stuffed Zucchini Delight
Description: Discover the heartwarming story behind our Stuffed Zucchini with Rice and Mushroom recipe. This flavorful main dish combines fresh ingredients and cherished memories, offering a delightful culinary experience that resonates with every bite.

---


In the hustle and bustle of modern life, there’s nothing quite like a dish that transports you back to simpler times. Our Stuffed Zucchini with Rice and Mushroom is more than a recipe; it's a gateway to cherished family memories and the warmth of shared meals. This main dish, with a difficulty rating of 6 out of 10, beautifully marries the earthy flavors of mushrooms and fresh zucchini with the comforting notes of cheese and rice.


A Taste of Nostalgia


Growing up, my grandmother’s kitchen was the heart of our family. It was a place where stories were shared, and laughter echoed over the simmering pots. Every Sunday, the air would fill with the irresistible aroma of her signature stuffed zucchini. As a child, I would eagerly watch her deftly prepare the ingredients, mesmerized by her skill and love for cooking.


The ritual began with her selecting the freshest zucchinis from her garden, a task she deemed sacred. Her hands, though aged, moved with the grace of experience as she hollowed out the zucchinis, creating the perfect vessels for the savory filling. This was no ordinary dish; it was a celebration of flavors, a symphony of textures brought together by the rich tomato sauce that lovingly embraced each stuffed zucchini.


The Ingredients of a Memory


- Fresh Zucchinis: The canvas of our dish, bringing a fresh, garden-fresh taste.
- Rice: The heart of the stuffing, providing a comforting, starchy bite.
- Mushrooms: Offering an earthy depth that complements the zucchinis beautifully.
- Cheese: Melting into the filling, adding a creamy richness.
- Flour & Oil: Essential for binding and creating a light, crispy texture.
- Garlic & Red Onion: Aromatic essentials that infuse the dish with flavor.
- Bell Pepper: A colorful addition that adds a sweet, vibrant crunch.
- Salt & Tomato Sauce: The finishing touches, enhancing and enveloping each stuffed zucchini in a tangy embrace.

Bringing the Dish to Life


Although the full instructions can be found at myzucchinirecipes.com, the essence of this dish lies in its simplicity and the love with which it's made. As you prepare this recipe, let yourself be guided by the aromas and flavors, creating not just a meal, but a memory.


The Legacy Continues


Today, when I prepare Stuffed Zucchini with Rice and Mushroom, I feel my grandmother's presence in every step. It’s not just the taste that brings her back; it’s the act of creating, of sharing, and of remembering where we come from. This dish is more than a family favorite; it’s a legacy passed down through generations, a testament to the enduring power of food to connect us with those we love.


So, gather your ingredients, and embark on this culinary journey. As you savor each bite of this delicious main dish, may you feel the warmth of family and the echoes of laughter from kitchens past.

Read more about Appetizers

Read more about Main Dishes

Read more about Desserts

Princess Peach’s Voice Actor Has Been Replaced After 18 Years – Nintendo Life | Analysis by Brian Moineau

Princess Peach's Voice Actor Has Been Replaced After 18 Years - Nintendo Life | Analysis by Brian Moineau

A New Chapter for Princess Peach: Reflecting on Change in Gaming and Beyond


In a surprising twist of fate, our beloved Princess Peach is getting a new voice after 18 years. The news that Nintendo has decided to replace Jen Taylor, the long-time voice behind both Princess Peach and Toad, has sent ripples through the gaming community, prompting a mix of nostalgia and curiosity about what's next.

Jen Taylor's contribution to the world of Nintendo is nothing short of iconic. For nearly two decades, her voice has been synonymous with the Mushroom Kingdom's most regal resident. From her first appearance as Peach in "Mario Golf: Toadstool Tour" to her endearing portrayal of Toad, Jen's vocal talents have brought these characters to life in ways that have captivated audiences worldwide. Her ability to convey Peach's charm and Toad's endearing quirks has left an indelible mark on the franchise.

In the broader context of entertainment, this change highlights how characters and their portrayals evolve over time. Much like when Daniel Craig hung up his tuxedo as James Bond or when Doctor Who regenerates into a new actor, these transitions are both a challenge and an opportunity. They remind us that while change can be unsettling, it also opens doors to fresh interpretations and new stories.

From Hollywood to Hyrule, the world of entertainment is no stranger to such shifts. Consider the recent announcement of Hugh Jackman reprising his role as Wolverine in the Marvel Cinematic Universe. Fans rejoiced at the familiar face, but it also sparked discussions about the future of the character and the potential for new narratives. Similarly, the casting of a new voice for Princess Peach invites excitement and speculation about how this change might influence future Mario games and the character's development.

Outside the realm of gaming, the concept of change is equally poignant. In a world that's evolving faster than ever, adaptability is key. Whether it's the tech industry rolling out new AI advancements or companies embracing remote work, change remains the only constant. This sentiment resonates with Nintendo's decision to refresh its iconic characters—embracing change while respecting the legacy.

So, who will be the new voice of Princess Peach? While the answer remains a mystery for now, the anticipation is palpable. Will they bring a fresh energy or perhaps a nuanced depth to the character? Only time will tell, but one thing is certain: fans will be listening with open ears and hearts.

In conclusion, the changing of the guard for Princess Peach's voice is a reminder of the fluid nature of storytelling and character development. As we bid farewell to Jen Taylor’s era, we also welcome the potential for new adventures and interpretations. Just like in life, in gaming, it's not the end of the story but merely the beginning of a new chapter. So, let's embrace this change and look forward to the new tales waiting to be told. After all, in the immortal words of Mario himself, "Let's-a go!"

Read more about AI in Business

Read more about Latest Sports Trends

Read more about Technology Innovations

Nintendo Switch 2 sales shatters records, most-sold console in 24-hour period – TweakTown | Analysis by Brian Moineau

Nintendo Switch 2 sales shatters records, most-sold console in 24-hour period - TweakTown | Analysis by Brian Moineau

Title: The Nintendo Switch 2: A New Era of Gaming or Just a Passing Fad?

Ah, the Nintendo Switch 2. It's like the cool kid in school who just moved to town and immediately became the talk of the playground. According to a TweakTown article, the Nintendo Switch 2 has obliterated previous records, becoming the most-sold console within a 24-hour period, and it's on the fast track to setting a new two-month sales record. But what does this mean for the world of gaming, and are we truly witnessing the dawn of a new era, or is this just another fleeting fad?

First, let's rewind a bit. The original Nintendo Switch, released in 2017, was a game-changer, literally. It offered a seamless blend of handheld and home console gaming, capturing the hearts of casual and hardcore gamers alike. Fast forward to today, and its successor, the Switch 2, seems to be building on that legacy, offering enhanced features, improved performance, and an ever-expanding library of games. It’s no surprise that gamers are rushing to get their hands on the latest iteration.

But what makes the Switch 2 stand out in a market saturated with gaming consoles? There's the nostalgia factor, of course. Nintendo has always had a knack for weaving childhood memories into their consoles, and the Switch 2 is no different. From revisiting the Mushroom Kingdom with Mario to embarking on epic adventures with Link, the console offers a comforting familiarity with a fresh twist. It's like meeting an old friend who’s just returned from a world tour—familiar yet excitingly new.

Moreover, the timing of this release couldn't be more perfect. With the world still recovering from the pandemic, people have re-embraced gaming as a way to connect with others and escape reality. The Switch 2 arrives as a beacon of social connectivity, allowing friends to bond over virtual adventures, regardless of physical distance. This aligns with a broader trend of tech becoming a social lifeline, similar to how platforms like Zoom and Discord have thrived.

It's also interesting to note that the Switch 2's success mirrors broader trends in the tech industry. Consider the rise of hybrid workplaces and flexible tech solutions. Much like how companies are blending remote and in-office work, the Switch 2 offers flexibility in gaming—play at home or on the go, solo or with friends. This adaptability is key in today's fast-paced world.

Looking beyond gaming, the Switch 2's launch can be seen as part of a larger shift towards technological innovation and consumer demand for experiences that marry the digital and the physical. This mirrors developments in other sectors, like the automotive industry's pivot towards hybrid and electric vehicles or the increasing popularity of augmented reality (AR) experiences in retail.

Of course, the question remains: Is this sales milestone just a flash in the pan, or does it herald a new era of gaming dominance for Nintendo? While it's too early to predict the long-term impact, the Switch 2's explosive start is certainly a promising sign. However, sustaining this momentum will require Nintendo to continue innovating and addressing the evolving needs of gamers worldwide.

In the end, whether the Nintendo Switch 2 becomes a lasting icon or a momentary triumph depends on its ability to adapt and grow in a rapidly changing tech landscape. For now, though, let’s revel in the joy it brings, reminiscing about simpler times while exploring new worlds. After all, isn’t that what gaming is all about?

Final Thought:
As the gaming landscape continues to evolve, the Nintendo Switch 2 stands as a testament to the power of nostalgia, innovation, and connectivity. Whether it’s a beacon of a new gaming era or just a temporary phenomenon, one thing is clear: the Switch 2 has already made its mark, and it’s up to Nintendo to decide where they go from here. Keep your controllers charged and your imaginations ready—gaming’s future is looking bright.

Read more about AI in Business

Read more about Latest Sports Trends

Read more about Technology Innovations

Cranberry Margarita | Made by Meaghan Moineau

Cranberry Margarita | Made by Meaghan Moineau

Title: Sip Into the Past: The Enchanting Cranberry Margarita
Description: Discover the tantalizing flavors of the Cranberry Margarita, a cocktail that marries the tartness of fresh cranberries with the smooth warmth of tequila. This delightful drink is perfect for holiday gatherings or cozy evenings by the fire. Immerse yourself in a nostalgic family story and learn how to recreate this magical beverage that’s sure to impress your guests.

---


As the leaves begin to carpet the ground in hues of orange and gold, and the crisp autumn air fills our lungs, my mind always drifts back to cherished family gatherings around the holidays. One particular memory stands out from the rest: the Cranberry Margarita, a cocktail that became an unexpected star at a family Thanksgiving many years ago.


The year was 1995, and my grandmother, known for her culinary prowess and love for experimenting with flavors, decided to surprise us with a unique cocktail creation. The Cranberry Margarita was born out of her desire to blend the traditional warmth of the holidays with a refreshing twist. As the family trickled in from the cold, Grandma stood in the kitchen, her apron dusted with sugar, and a glint of excitement in her eye.


The preparation was a ritual in itself. Fresh cranberries bubbled in a saucepan, their tartness tempered by the citrusy sweetness of orange juice. The aroma filled the kitchen, a fragrant reminder of the season. With her trusty blender, Grandma transformed the cooked cranberries into a vibrant puree, the heart of her masterpiece.


The Cranberry Margarita quickly became a family favorite, and as I take my first sip each year, I'm transported back to that cozy kitchen, surrounded by laughter and the comforting chaos of family. This cocktail isn't just a drink; it's a vessel of nostalgia, a reminder of the warmth and love that defined our family gatherings.


Cranberry Margarita Recipe
Ingredients:

- Fresh cranberries


- Grand Marnier


- Orange juice


- Light Karo syrup


- Sugar


- Tequila


Instructions:

1. In a saucepan over medium heat, melt a cup of sugar in the orange juice. Add the cranberries, reserving some for the skewers, and cook over low heat for 10 minutes. Set aside and let it cool.


2. Blend the cooked cranberries in a blender, then strain to make the puree.


3. In a shaker, add crushed ice, 1 1/2 ounces of tequila, 1/2 ounce of Grand Marnier, and 2 ounces of cranberry puree. Shake to mix.


4. Skewer several cranberries onto 10 skewer sticks, leaving enough skewer exposed on one end.


5. Lightly brush each cranberry skewer with Karo syrup and then sprinkle extra sugar over them.


6. Place the cranberry swizzle sticks on wax paper and put them in the freezer to set.


7. Pour the drink into a sugar-rimmed martini glass and add a cranberry swizzle stick for garnish.


(Note: Nutritional information does not include sugar on the rim.)


Difficulty Rating: 4/10
Classification: Appetizer

This Cranberry Margarita is more than just a cocktail; it's a celebration of tradition and innovation. It's the perfect way to kick off a festive gathering, offering a burst of flavor that echoes the joy and warmth of family reunions. So, this holiday season, raise a glass to the past, and create new memories with this delightful concoction. Cheers!

Read more about Appetizers

Read more about Main Dishes

Read more about Desserts

Cajun Potato Wedges | Made by Meaghan Moineau

Cajun Potato Wedges | Made by Meaghan Moineau

Title: Crispy Cajun Potato Wedges: A Hearty Side with a Dash of Nostalgia
Description: Dive into the world of bold flavors with our Cajun Potato Wedges recipe. Perfectly seasoned and oven-baked to crispy perfection, this dish is a delightful journey down memory lane. Whether served as a tempting appetizer or a satisfying side dish, these wedges promise to be a hit at any gathering.

---


When it comes to comfort food, there's something undeniably satisfying about the humble potato. Its versatility and heartiness have made it a staple in kitchens around the globe. Among the myriad ways to prepare potatoes, Cajun Potato Wedges stand out with their robust flavors and crispy texture. But beyond the spices and the crunch, this dish holds a special place in my heart, evoking fond memories of Sunday afternoons at my grandmother's house.


A Walk Down Memory Lane

Every Sunday, our family would gather at Grandma's cozy home, the air thick with the aroma of her delicious cooking. Among the many dishes that graced her table, her Cajun Potato Wedges were always my favorite. As a child, I would watch in awe as she skillfully sliced the russet potatoes into perfect wedges, her hands moving with the practiced ease of someone who had done this a thousand times before.


While the potatoes baked, she'd regale us with stories of her youth, tales rich with laughter and life lessons. The kitchen, warm and inviting, was the heart of our family, where we shared not just meals but also moments of joy and connection. The spicy aroma of cayenne pepper, garlic powder, and paprika would fill the room, mingling with the sound of our chatter and laughter.


The Recipe: Cajun Potato Wedges

*Ingredients:*


- 4 russet potatoes


- 2 tablespoons olive oil


- 1 teaspoon cayenne pepper


- 1 teaspoon garlic powder


- 1 teaspoon onion powder


- 1 teaspoon paprika


- 1 teaspoon Italian seasoning


- 1 teaspoon salt


- 1/2 teaspoon pepper


*Instructions:*


1. Preheat your oven to 425 degrees Fahrenheit.


2. Slice the potatoes into ½-inch thick wedges, ensuring each piece is about half the length of the potato.


3. In a small bowl, create your spice mixture by combining cayenne pepper, garlic powder, onion powder, paprika, Italian seasoning, salt, and pepper.


4. Spray a cookie sheet with olive oil cooking spray. Arrange the potato wedges on the sheet and toss them with olive oil to ensure an even coating.


5. Sprinkle the spice mixture generously over the potatoes and toss them again to distribute the seasoning evenly.


6. Bake the wedges for 25 minutes, then flip them over and bake for an additional 5 minutes to achieve that perfect crispy finish.


Difficulty: 3/10
Category: Appetizer

These Cajun Potato Wedges are more than just a side dish; they are a testament to the power of food to bring people together. Each bite carries the warmth of family gatherings and the joy of shared stories. Whether you're preparing them for a casual get-together or a special occasion, these wedges are sure to be a crowd-pleaser, evoking smiles and perhaps even a sense of nostalgia.


So, next time you're in the mood for something flavorful and comforting, give this recipe a try. Who knows, it might just become a cherished tradition in your family too.

Read more about Appetizers

Read more about Main Dishes

Read more about Desserts

New Videos Show How Fantasy Life i Has Been Beefed Up On Switch 2 – Nintendo Life | Analysis by Brian Moineau

New Videos Show How Fantasy Life i Has Been Beefed Up On Switch 2 - Nintendo Life | Analysis by Brian Moineau

Title: Leveling Up: Fantasy Life i and the Anticipated Power of Switch 2

Ah, Nintendo fans, it’s time to dust off those swords and wands, because Fantasy Life i is making a grand return on the heavily anticipated Switch 2. With a fresh breath of life, this beloved game is set to dazzle us with stronger visuals and faster load times, according to the latest previews. But beyond the pixelated forests and enchanted quests, there’s a broader narrative here about how technology is reshaping our gaming experiences.

The Magic of Enhanced Graphics


Remember the first time you played a game that truly captivated you with its graphics? For many, the original Fantasy Life offered a vibrant, whimsical world that was a cozy escape from reality. Now, with the power of Switch 2, the visuals have been beefed up, promising an even more immersive experience. This leap in graphics is akin to going from watching a play in a charming community theater to seeing a full-blown Broadway production. It's all about the details—the rustling leaves, the shimmering lakes, and the intricate character designs that make Fantasy Life i feel like a living storybook.

Speed: The Unsung Hero


While dazzling visuals often hog the spotlight, let's not overlook the unsung hero of gaming: load times. The Switch 2's ability to reduce these to a mere blink promises to keep players engrossed in their adventures without the jarring wait times. It’s like upgrading from a leisurely Sunday drive to a Formula 1 race—every second counts, and every moment is packed with action.

A Nod to the Broader Gaming Realm


This evolution in gaming technology mirrors broader trends in the tech world. Just as we're seeing AI revolutionize industries, from healthcare to finance, gaming is undergoing its own transformation. The recent advancements in cloud gaming and virtual reality are testament to this shift. Companies like Google and Microsoft are pushing the envelope with Stadia and Xbox Cloud Gaming, respectively, showing that the future of gaming is as much about accessibility and seamless experiences as it is about jaw-dropping graphics.

Beyond the Pixels


Fantasy Life i isn't just about technical upgrades; it's about rekindling the magic that captivated players in its previous iterations. It’s a reminder of Nintendo's knack for blending innovation with nostalgia—a formula that's kept fans loyal for decades. As we anticipate the Switch 2, it’s worth considering how Nintendo has consistently managed to create experiences that resonate across generations. Their focus on family-friendly, engaging content is a refreshing contrast to the sometimes overwhelming intensity of other platforms.

Final Thoughts


In a world that's increasingly fast-paced and sometimes overwhelming, there’s a comforting predictability in Nintendo’s offerings. With Fantasy Life i on the horizon, we’re reminded that sometimes, the best adventures are the ones that let us escape to a world of fantasy and wonder, if only for a little while. So, gear up, gamers, because the next chapter of your pixelated journey awaits!

As we eagerly await more updates, let’s appreciate this moment of excitement and anticipation—a testament to the enduring magic of gaming. Whether you’re a seasoned adventurer or a newbie ready to embark on your first quest, Fantasy Life i on Switch 2 promises to be an adventure worth taking.

Read more about AI in Business

Read more about Latest Sports Trends

Read more about Technology Innovations