Pork Carnitas Tacos | Made by Meaghan Moineau

Pork Carnitas Tacos | Made by Meaghan Moineau

Unforgettable Pork Carnitas Tacos: A Taste of Tradition and Togetherness


A Culinary Journey Down Memory Lane


There's something truly magical about the way food can evoke cherished memories and transport us back to special moments spent with loved ones. In our family, Pork Carnitas Tacos have always held a special place in our hearts. Not only is this dish a tantalizing blend of flavors and textures, but it also serves as a delicious reminder of countless family gatherings, where the kitchen buzzed with laughter and the air was filled with the irresistible aroma of simmering pork and fresh cilantro.


The Recipe: Pork Carnitas Tacos


Difficulty: 6/10
Category: Main Dish

Ingredients:

- 2 cups water

- 3 lbs lean pork butt


- 4 cloves garlic, minced


- Sea salt and ground pepper to taste


- 2 tablespoons olive oil


- 1 cup orange juice


- 1 cup milk


- Corn tortillas


- Salsa fresca


- 2 ripe avocados, sliced


- Fresh cilantro, chopped


- 1 onion, finely chopped


- 2 limes, sliced into wedges


Instructions:

1. Prepare the Pork:

In a large Dutch oven, combine the pork, garlic, sea salt, ground pepper, and water. Bring the mixture to a boil, then reduce the heat, cover, and let it simmer over medium-low heat for 45 minutes to one hour. This slow cooking process ensures the meat becomes tender and infused with the aromatic flavors of garlic and spices.


2. Shred and Brown the Pork:

Once cooked, drain the pork well. Allow it to cool until it's manageable, then shred the meat by hand or with the tines of a fork, discarding any remaining fat. Return the shredded pork to the Dutch oven, heating the olive oil over medium heat. Add the orange juice and milk, cooking until the liquid evaporates and the pork is beautifully browned. Season with additional salt and pepper to taste.


3. Prepare the Toppings:

Chop the onion and cilantro, and slice the avocado and limes. Place each in small individual bowls for an inviting serving presentation.


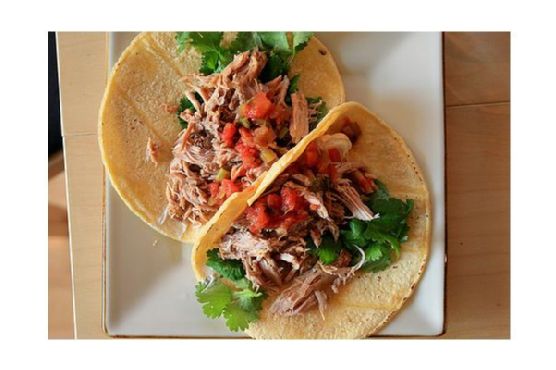
4. Assemble the Tacos:

Heat the corn tortillas in a dry frying pan to keep them warm and pliable. For each taco, stack two tortillas and layer them with warm carnitas. Top with chopped cilantro, onion, avocado slices, and a squeeze of fresh lime juice for that perfect burst of citrusy brightness.


A Nostalgic Family Memory


Growing up, weekends at Grandma's house were synonymous with the sizzle of carnitas on the stove. I remember sitting on a stool by the kitchen counter, watching in awe as she effortlessly transformed simple ingredients into a feast that brought us all together. The highlight of those afternoons was gathering around the table, each of us eagerly assembling our tacos, swapping stories, and savoring the rich, savory flavors that felt like a warm embrace.


Even as I recreate this dish today, I can almost hear the echoes of playful banter and feel the familial warmth that made those gatherings so special. Pork Carnitas Tacos are more than just a meal; they are a bridge to the past, a reminder of the joy that comes from shared moments and the love that binds us together.


Conclusion


Pork Carnitas Tacos are a delightful main dish that combines the heartiness of seasoned pork with the freshness of vibrant toppings. With a difficulty rating of 6/10, it's a recipe that balances simplicity with a touch of culinary finesse. Whether you're creating new memories or reliving cherished ones, these tacos promise to bring a touch of tradition and a whole lot of flavor to your table. So gather your loved ones, roll up your sleeves, and let the delicious journey begin!

Read more about Appetizers

Read more about Main Dishes

Read more about Desserts

Raspberry Cheesecake Bars By Mommie Cooks | Made by Meaghan Moineau

Raspberry Cheesecake Bars By Mommie Cooks | Made by Meaghan Moineau

Title: Savoring Sweet Memories: Raspberry Cheesecake Bars That Transport You Home
Description: Dive into the delightful world of Raspberry Cheesecake Bars by Mommie Cooks. With a perfect blend of creamy cheesecake and tart raspberries atop a buttery shortbread crust, this dessert is a nostalgic journey back to family gatherings filled with laughter and love. Discover the recipe and relive cherished moments in every bite.

---


A Taste of Nostalgia: Raspberry Cheesecake Bars

There's something magical about family recipes. They have the power to transport us back to cherished moments, where the kitchen is filled with laughter, and the air is sweet with the aroma of love and warmth. One such recipe that holds a special place in my heart is the Raspberry Cheesecake Bars by Mommie Cooks. It's a dessert that not only delights the taste buds but also evokes fond memories of family gatherings and shared stories.


The Heartwarming Story Behind the Bars

Growing up, Sundays were reserved for family get-togethers at Grandma's house. The kitchen was a bustling hub of activity, with everyone pitching in to prepare a feast. Among the various dishes that adorned the table, my favorite was always the Raspberry Cheesecake Bars. Grandma would lovingly prepare them, her hands moving with the kind of grace that comes only from years of practice.


I remember sitting on the kitchen counter, eagerly watching as she creamed together butter and sugar, the sweet scent enveloping the room. As she added a hint of almond extract and the vibrant zest of lemon, Grandma would share stories from her childhood, tales of her own mother baking these very bars in a cozy kitchen in the heart of summer.


Crafting the Perfect Raspberry Cheesecake Bars

These bars start with a buttery shortbread crust that is both tender and flavorful. The key ingredients include a combination of butter, brown sugar, and white sugar, creamed together until light and fluffy. A touch of lemon zest and vanilla infuse the dough with a fragrant aroma, while an egg binds it all together.


After a quick chill in the fridge, the dough is pressed into a tart pan and baked until golden brown. The shortbread is then left to cool, creating the perfect foundation for the creamy cheesecake layer.


The cheesecake filling is a luscious blend of cream cheese, sweetened condensed milk, and heavy whipping cream, with a hint of vanilla and almond extract for depth. A swirl of vibrant raspberries, thickened with cornstarch and sweetened with a touch of sugar, adds a burst of tartness that beautifully complements the rich, creamy filling.


Difficulty and Classification

With a difficulty level of 6 out of 10, these Raspberry Cheesecake Bars are an approachable yet impressive dessert. They require some patience and attention to detail, but the end result is well worth the effort. Perfect as a dessert for any occasion, these bars are sure to impress your family and friends.


Conclusion

Every bite of these Raspberry Cheesecake Bars is a sweet reminder of family bonds and cherished moments. Whether you're making them for a special occasion or simply to indulge in a bit of nostalgia, this recipe is sure to become a beloved staple in your home. So gather your ingredients, invite your loved ones into the kitchen, and create new memories with this timeless dessert.

Read more about Appetizers

Read more about Main Dishes

Read more about Desserts

Savory Carrot Souffle | Made by Meaghan Moineau

Savory Carrot Souffle | Made by Meaghan Moineau

Title: A Whisk of Nostalgia: Crafting the Perfect Savory Carrot Soufflé
Description: Dive into the heartwarming tale of a cherished family recipe that transforms humble carrots into an elegant Savory Carrot Soufflé. Discover the step-by-step process of creating this exquisite dish that promises to be the star of your dining table. With a difficulty rating of 7/10, this delightful dish serves as a sophisticated appetizer sure to impress your guests.

---


In the kitchen of my childhood home, the aroma of simmering carrots and the gentle hum of the mixer whisking egg whites is deeply etched into my memory. Every family gathering was an occasion for my grandmother to work her magic with her signature Savory Carrot Soufflé. The dish not only graced our table but also wrapped us in a warm embrace of nostalgia and familial love.


A Whisk Through Time

The recipe for this soufflé was passed down through generations, each adding their own little twist but always preserving its essence. I remember standing on a stool beside my grandmother, watching her skillfully blend the vibrant orange of the carrot puree with the creamy white sauce. Her stories of learning the recipe from her mother would fill the kitchen, much like the rich scent of nutmeg that lingered in the air.


Ingredients:

- 1 lb carrots, peeled and chopped


- 4 tablespoons butter


- 4 large eggs, separated


- 2 tablespoons flour


- 1 cup heavy cream


- 1 cup milk, divided


- 1/4 teaspoon ground nutmeg


- 1/2 cup grated parmesan cheese


- 1/2 teaspoon salt


Instructions:
1. Prepare the Carrots: Begin by cooking the carrots in a pot of salted boiling water until tender. Drain the water and blend the carrots with half a cup of milk until smooth. Set aside this vibrant carrot puree.
2. Craft the Bechamel Sauce: In a small saucepan, combine the remaining milk, heavy cream, flour, salt, butter, parmesan cheese, and nutmeg. Cook over medium heat, stirring continuously until the mixture reaches a thick consistency. Allow it to cool slightly.
3. Preheat and Prepare: Preheat your oven to 350 degrees Fahrenheit. While the oven warms up, whisk the egg whites in a clean, dry bowl until stiff peaks form. This step is crucial for achieving the soufflé's signature airy texture.
4. Combine and Conquer: Mix the carrot puree with the cooled white sauce. Gently add in the egg yolks one at a time, ensuring each is fully incorporated. Carefully fold in the stiff egg whites, using a spatula to maintain the mixture's lightness.
5. Bake to Perfection: Pour the soufflé mixture into pre-greased ramekins, setting them in a bain-marie (water bath) to ensure even cooking. Bake for approximately 1 hour, or until the soufflés have risen and developed a golden-brown crust.
A Dish to Delight

Classified as an appetizer, the Savory Carrot Soufflé is a sophisticated addition to any meal. With a difficulty rating of 7/10, it requires patience and a gentle hand, but the end result is undeniably rewarding.


As I pull the soufflé from the oven, I am transported back to those cherished family gatherings. This dish, with its delicate balance of flavors and textures, is more than a mere culinary delight—it's a testament to the enduring power of family traditions and the joy of sharing a lovingly prepared meal.


Whether you're honoring an old family recipe or starting a new tradition of your own, the Savory Carrot Soufflé is sure to leave a lasting impression. So gather your loved ones, dust off your ramekins, and let the comforting warmth of this dish fill your home and hearts.

Read more about Appetizers

Read more about Main Dishes

Read more about Desserts

Metal Gear Solid Delta: Snake Eater opening movie ‘Delta Version’ – Gematsu | Analysis by Brian Moineau

Metal Gear Solid Delta: Snake Eater opening movie ‘Delta Version’ - Gematsu | Analysis by Brian Moineau

The Return of the Legendary Snake: A New Chapter with Metal Gear Solid Delta

Gamers and nostalgics, rejoice! Konami has once again graced us with a sneak peek into the enigmatic world of Metal Gear with the release of the opening movie for "Metal Gear Solid Delta: Snake Eater." This reimagined version of a classic is brought to life by none other than Kyle Cooper, who previously dazzled fans with his work on "Metal Gear Solid 2: Sons of Liberty" and the original "Snake Eater." But what does this new chapter mean for both seasoned fans and newcomers to the series, amidst a world constantly on the cusp of technological transformation?

Kyle Cooper: The Maestro of Main Titles

First, let's talk about Kyle Cooper, the mastermind behind this cinematic marvel. Cooper is renowned for his ability to craft opening sequences that are more than just intros—they are experiences. His work on films like "Se7en" and "American Horror Story" has set the gold standard in title design. His return to the Metal Gear series is like a reunion with an old friend, promising a blend of nostalgia and innovation.

Cooper's influence extends beyond the gaming world; his artistry has been pivotal in shaping how modern audiences perceive opening sequences. In a time when attention spans are dwindling, his work captivates and pulls viewers into the narrative with an almost magnetic force.

Retrofuturism in Gaming: A Global Phenomenon

"Metal Gear Solid Delta: Snake Eater" taps into a broader trend of retrofuturism, where the past and future collide in a symphony of nostalgia and innovation. This is not just a gaming phenomenon. In film, we see it with the success of franchises like "Blade Runner" and "Stranger Things," which blend past aesthetics with futuristic themes. In fashion, retro styles are making a comeback with a modern twist, echoing the sentimentality yet forward-thinking approach of Cooper's designs.

Global Context: A New Era of Gaming

The release of "Metal Gear Solid Delta" aligns with a significant moment in the gaming industry. With the rise of powerful consoles and virtual reality, game developers are pushing the boundaries of storytelling and immersion. This reimagining of a classic title is not just about nostalgia but also about leveraging contemporary technology to enhance the gaming experience.

As the world grapples with rapid technological advancements, from AI to virtual reality, the gaming industry stands as a beacon of innovation, constantly evolving and setting new standards. The release of this opening movie is a reminder of how far we've come and a glimpse into the future of interactive storytelling.

Final Thoughts: A Journey Worth Taking

As we await the full release of "Metal Gear Solid Delta: Snake Eater," it's clear that this is more than just a game—it's a cultural event. Kyle Cooper's involvement is a testament to the blend of artistry and technology, creating an experience that is both visually stunning and deeply engaging. It's a nod to the past and a step into the future, embodying the very essence of what it means to be a part of the ever-evolving world of gaming.

Whether you're a die-hard fan who has followed Snake's journey from the beginning, or a newcomer ready to dive into this intricate world, "Metal Gear Solid Delta" promises a ride you won't want to miss. So, gear up, gamers, because this is one mission that is bound to leave a lasting mark.

Read more about AI in Business

Read more about Latest Sports Trends

Read more about Technology Innovations

Quick N’ Easy Basil Pesto | Made by Meaghan Moineau

Quick N' Easy Basil Pesto | Made by Meaghan Moineau

Title: Unleashing the Magic of Quick N' Easy Basil Pesto: A Journey Back to Family Traditions
Description: Dive into the world of vibrant flavors with our Quick N' Easy Basil Pesto recipe. Perfect for any meal, this pesto combines simplicity with nostalgia, transporting you to cherished family gatherings. Learn how to whip up this delightful dish in no time, and discover the heartwarming story behind its place in our family tradition.

---


There's something magical about the scent of fresh basil wafting through the kitchen. Its sweet, peppery aroma takes me back to sunlit afternoons spent in my grandmother's garden, where she would hand me a basket and ask me to pick the freshest basil leaves. These moments, filled with laughter and the promise of a delicious meal, laid the foundation for my love of cooking and family gatherings.


Quick N' Easy Basil Pesto Recipe


Ingredients:

- Fresh basil leaves

- Olive oil


- Pine nuts


- Garlic


- Parmesan cheese


Instructions:

1. In a food processor, alternate adding the fresh basil leaves, olive oil, pine nuts, garlic, and parmesan cheese until blended smooth.

2. If the pesto isn't the correct consistency, gradually add more olive oil until you achieve the desired texture.


3. Use the pesto within 24 hours or freeze scoops in plastic wrap-lined muffin cups for later use.


Difficulty: 2/10
Classification: Appetizer

Making pesto was always a family affair. I remember sitting on a high stool, barely able to reach the countertop, as my mother and grandmother orchestrated the creation of this vibrant green sauce. The rhythmic hum of the food processor was like a melody that signaled the beginning of something special. As I added each ingredient, I imagined myself as a chef in a bustling Italian kitchen, crafting a masterpiece that would bring my family together.


Pesto, with its rich history and versatility, has always been a staple in our family meals. Whether tossed with pasta, spread on a warm loaf of bread, or used as a dip with fresh vegetables, it never failed to transform a simple dish into something extraordinary. The secret, as my grandmother would say, is in the balance of flavors—each ingredient playing its part harmoniously.


The beauty of this Quick N' Easy Basil Pesto recipe lies not just in its simplicity, but in the memories it evokes. It's a reminder of the warmth of family, the joy of shared meals, and the timeless tradition of passing down recipes from one generation to the next. Every time I make it, I am transported back to those childhood afternoons, filled with love, laughter, and the irresistible aroma of fresh basil.


So, gather your ingredients, invite your loved ones into the kitchen, and create not just a dish, but a memory. With its ease and versatility, this pesto is sure to become a beloved addition to your family table, just as it has been to ours.

Read more about Appetizers

Read more about Main Dishes

Read more about Desserts

Herb and Cheddar Cordon Bleu | Made by Meaghan Moineau

Herb and Cheddar Cordon Bleu | Made by Meaghan Moineau

Title: Savoring Tradition: Herb and Cheddar Cordon Bleu
Description: Dive into a heartwarming family recipe that brings the comfort of home to your kitchen. Our Herb and Cheddar Cordon Bleu is a savory main dish that combines the richness of cheddar cheese, the smoky tenderness of deli ham, and the aromatic blend of herbs, providing an unforgettable culinary experience. Join us as we explore this dish that has been passed down through generations, complete with a nostalgic family story that adds a pinch of love to every bite.

---


Herb and Cheddar Cordon Bleu: A Taste of Family Legacy

There is something about the combination of herbs and cheddar that speaks directly to the heart. Every time I prepare this Herb and Cheddar Cordon Bleu, I am transported back to Sunday afternoons spent in my grandmother's kitchen, where the air was always filled with the comforting aroma of her culinary creations.


Ingredients You'll Need:

- 4 chicken breasts


- 4 slices of deli ham


- 4 slices of cheddar cheese


- 1 cup of breadcrumbs


- 1 teaspoon of dried marjoram


- 1 teaspoon of dried parsley


- 1 teaspoon of dried rosemary


- 1 egg


- 1/2 cup of flour


- Salt and pepper to taste


Instructions:
1. Preheat and Prep: Preheat your oven to 350°F (about 176°C). Take the chicken breasts and place them between two slices of wax paper. Using a rolling pin or meat mallet, flatten them until they're about a quarter of an inch thick.
2. Layer and Roll: On each flattened chicken breast, place a slice of ham and a slice of cheddar cheese. Roll each chicken breast as tightly as possible, securing with toothpicks or small skewers if needed.
3. The Coating Process: In a shallow baking dish, beat the egg. Prepare two more stations with foil or dishes: one for flour and another for a mixture of dried herbs and breadcrumbs. Coat each rolled chicken breast in flour, dip in the egg mixture, then press into the breadcrumb and herb mixture until fully covered.
4. Bake to Perfection: Place the prepared chicken in an oiled or buttered baking dish. Bake for about 30 minutes, or until the chicken is cooked through and the coating is golden brown.
A Bite of Nostalgia:

Growing up, Sunday dinners were a cherished tradition in our family. My grandmother, the matriarch of our culinary clan, would often prepare this Herb and Cheddar Cordon Bleu, filling her cozy kitchen with its irresistible scent. As a child, I would stand by her side, eagerly watching her every move, hoping to someday recreate her magic. The warmth of her kitchen, the gentle hum of her stories, and the love she infused into every dish were the soul of our family gatherings.


This dish, much like the memories it holds, is simple yet deeply satisfying. The medley of herbs and cheese wrapped in succulent chicken transports me back to those joyful Sundays, surrounded by laughter and love.


Difficulty Rating: 6/10
Category: Main Dish

Our Herb and Cheddar Cordon Bleu is a delightful nod to family traditions, perfect for any gathering that calls for warmth and nostalgia. Whether you're creating new memories or savoring old ones, this dish is sure to become a beloved staple in your home, too.

Read more about Appetizers

Read more about Main Dishes

Read more about Desserts

Hot Charlotte Cocktail | Made by Meaghan Moineau

Hot Charlotte Cocktail | Made by Meaghan Moineau

Title: A Sip of Nostalgia: The Hot Charlotte Cocktail
Description: Discover the perfect blend of flavors in the Hot Charlotte Cocktail, a drink that promises to invigorate your senses while transporting you back to cherished family gatherings. With a hint of spice and a touch of elegance, this cocktail is your new go-to for any occasion.

---


In the world of mixology, there are cocktails that simply quench thirst and then there are those that resonate with the soul, invoking memories of laughter-filled evenings and warm family gatherings. The Hot Charlotte Cocktail is one such creation—a delightful concoction that not only tantalizes your taste buds but also brings a sense of nostalgia with every sip.


The Ingredients: A Symphony of Flavors
To craft the Hot Charlotte Cocktail, you'll need the following ingredients:

- Hendrick's Gin


- St. Germain


- Fresh lemon juice


- Cucumber


- Tobasco sauce


Instructions: Crafting Your Nostalgic Sip

1. Begin by taking a cocktail glass and muddling a few slices of cucumber with a dash of Tobasco sauce.


2. Add Hendrick's Gin, St. Germain, and fresh lemon juice to the mix. Shake well to combine the flavors.


3. Strain the mixture over ice to ensure a perfectly chilled experience.


4. Garnish with a cucumber wheel for an elegant finish.


Difficulty Rating: 4/10

The Hot Charlotte Cocktail is accessible to both novice and seasoned cocktail enthusiasts. Its simplicity in preparation makes it an ideal choice for those looking to impress with minimal effort.


Classification: Appetizer

This drink serves as a perfect appetizer, whetting your palate with its refreshing and subtly spicy profile.


A Family Memory: The Tale Behind the Taste

The story of the Hot Charlotte Cocktail is one interwoven with cherished family memories. I remember the first time I tasted this unique blend at a summer family reunion. It was a sweltering afternoon, and the air was filled with the scent of blooming flowers and freshly cut grass. My uncle, the self-proclaimed family bartender, was manning the makeshift bar set up under the old oak tree in our backyard.


He had a knack for creating drinks that mirrored the essence of our family—vibrant, spirited, and full of surprises. As he handed me a glass of the Hot Charlotte, he recounted tales of our grandmother Charlotte, who loved experimenting with homegrown ingredients. The addition of cucumber and Tobasco was his homage to her penchant for bold flavors and the garden she tended with pride.


With each sip of that cocktail, I was transported back to simpler times, surrounded by family, laughter, and the gentle hum of cicadas in the evening air. It's amazing how a single drink can encapsulate the warmth and love of family, turning an ordinary moment into a cherished memory.


Conclusion: Raise a Glass to Timeless Memories

The Hot Charlotte Cocktail is more than just a drink; it's a celebration of the moments that bring us together. Whether you're reminiscing about family gatherings or creating new memories, this cocktail is sure to add a touch of magic to any occasion. So, gather your loved ones, share stories, and raise a glass to the enduring power of nostalgia. Cheers!

Read more about Appetizers

Read more about Main Dishes

Read more about Desserts

Cheesy Spinach Stuffed Shells | Made by Meaghan Moineau

Cheesy Spinach Stuffed Shells | Made by Meaghan Moineau

Title: A Cheesy Affair: Spinach Stuffed Shells Bringing Families Together
Description: Dive into the delightful world of Cheesy Spinach Stuffed Shells – a comfort dish that's sure to win hearts and taste buds. This blog post not only takes you through a step-by-step guide to creating this delectable main dish but also shares a heartwarming family memory that makes this recipe truly special. With a difficulty level of 5 out of 10, it's perfect for home cooks looking to impress without stress.

---


A Cheesy Affair: Spinach Stuffed Shells Bringing Families Together


There's something undeniably magical about a dish that not only tantalizes your taste buds but also warms your heart with cherished memories. Cheesy Spinach Stuffed Shells is that dish for me. With every bite, I'm transported back to a bustling kitchen filled with laughter and the aroma of melting cheese and fresh basil.


Ingredients List


- Jumbo shells


- Cooked frozen spinach


- Wheat germ


- Shredded Parmesan cheese


- Pecans


- Shredded Mexican cheese


- Diced green onions


- Salt and dried basil


- Eggs


- Water


- Alfredo sauce


- Spaghetti sauce


Nostalgia on a Plate


Growing up, Sunday evenings were a sacred time in our house. It was the one day of the week when my entire family would gather around the table, eager to share stories and, of course, indulge in a delicious meal. One of my favorite dishes during these gatherings was my grandmother's Cheesy Spinach Stuffed Shells. I remember standing on a stool beside her, my small hands eager to help as I watched her create magic with simple ingredients.


Her secret? A sprinkle of nostalgia and a whole lot of love. She would recount tales of her own childhood, where she learned to cook by her mother's side, as we stuffed the shells together. The kitchen would come alive with the sounds of sizzling sauces and bubbling cheese, creating a symphony of flavors that even today, I strive to replicate.


Step-by-Step Instructions


1. Prepare the Shells: Begin by pre-boiling the jumbo shells in a large pot of salted water for about 9 minutes. This ensures they are perfectly al dente, as they will finish cooking in the oven. Once done, drain the shells face down on a paper towel to remove excess water.
2. Create the Filling: While the shells cool, focus on the filling. Cook the frozen spinach in the microwave, following the box instructions, but don't add water. Once cooked, mix the spinach with wheat germ, Parmesan cheese, shredded Mexican cheese, chopped pecans, and diced green onions. Season with salt, pepper, and dried basil. A hint of nutmeg is optional but recommended for an extra layer of warmth.
3. Combine and Stuff: Add two eggs and a splash of water to the spinach mixture, ensuring it's well combined. Stuff each shell generously with the mixture, aiming for about 16-20 shells.
4. Assemble the Dish: Grease an 8x8 pan with cooking spray. Spread a layer of Alfredo sauce on the bottom, followed by spaghetti sauce. Arrange the stuffed shells on top and cover them with the remaining sauce.
5. Bake to Perfection: Preheat your oven to 350 degrees. Bake the shells uncovered for 30-35 minutes, or until the sauce is bubbly. Serve hot and enjoy the cheesy goodness!

A Family Tradition


This main dish, with a difficulty rating of 5 out of 10, is not just a meal – it's a tradition. Every time I prepare Cheesy Spinach Stuffed Shells, I'm reminded of the joy of cooking with family, the laughter echoing in the kitchen, and the love that filled our home. It's a reminder that food can be more than sustenance; it can be a bridge to our past and a way to keep family memories alive.


So, gather your loved ones, roll up your sleeves, and create your own memories with this comforting and delicious recipe. Whether you're a seasoned chef or a beginner, this dish is your ticket to a heartwarming culinary experience.


---


Embrace the nostalgia and enjoy the cheesy delight that is Cheesy Spinach Stuffed Shells. Bon appétit!

Read more about Appetizers

Read more about Main Dishes

Read more about Desserts

Lemon Curd Cheesecake | Made by Meaghan Moineau

Lemon Curd Cheesecake | Made by Meaghan Moineau

Title: Zesty Delight: A Nostalgic Lemon Curd Cheesecake Recipe
Description: This blog post delves into the delightful world of Lemon Curd Cheesecake, a dessert that captures the essence of summer with its refreshing citrus notes. Alongside a step-by-step guide to creating this creamy masterpiece, enjoy a heartwarming family story that adds a touch of nostalgia to every bite.

---


Lemon Curd Cheesecake: A Zesty Journey Through Family Memories

When life gives you lemons, make a Lemon Curd Cheesecake! This luscious dessert is a delightful blend of creamy textures and vibrant citrus flavors. Perfect for those who crave a refreshing treat, this cheesecake will undoubtedly become a staple in your recipe repertoire. Rated a moderate 6 out of 10 on the difficulty scale, this dessert is an achievable challenge for baking enthusiasts.


Ingredients:


- Crust:

- 1 ½ cups digestive biscuit crumbs


- ½ cup unsalted butter, melted


- Lemon Curd:

- ½ cup lemon juice


- Zest of 2 lemons


- ¾ cup sugar


- ½ cup unsalted butter


- 3 large eggs


- Filling:

- 16 oz cream cheese, softened


- ¾ cup sugar


- Zest of 1 lemon


- ½ cup lemon juice


- 1 cup whipping cream


- 1 tbsp gelatin


- ¼ cup water


- ½ cup reserved lemon curd (for topping)


Instructions:


1. Prepare the Crust:

- Combine the digestive biscuit crumbs with melted butter in a bowl.


- Press the crumb mixture into a loose bottom springform pan.


- Chill in the refrigerator.


2. Make the Lemon Curd:

- Set up a double boiler and combine lemon juice, lemon zest, sugar, butter, and eggs over gently simmering water.


- Cook, stirring continuously, until the mixture thickens and coats the back of a spoon.


- Remove from heat and let it cool completely.


3. Prepare the Filling:

- Bloom the gelatin by sprinkling it over water in a small bowl, allowing it to sit and swell.


- Place the bowl over simmering hot water and stir until gelatin dissolves. Cool before using.


- In a large bowl, beat cream cheese with an electric mixer until smooth.


- Gradually add sugar, then incorporate lemon zest, lemon juice, and lemon curd (reserving ½ cup for topping).


- Whip the whipping cream until thickened and set aside.


- Mix the dissolved gelatin into the cream cheese mixture.


- Gently fold in the whipped cream with a spatula until well combined.


- Pour the mixture into the prepared crust and chill in the refrigerator for at least 3 hours, or until set.


4. Decorate and Serve:

- Decorate the cheesecake by piping whipped cream along its edge.


- Spread the reserved lemon curd over the top.


- To serve, cut the cheesecake with a hot knife for clean slices. Enjoy!


A Slice of Nostalgia:


This Lemon Curd Cheesecake is more than just a dessert; it's a bridge to cherished family memories. Growing up, summers at Grandma's house always meant an abundance of lemon treats, thanks to the bountiful lemon tree in her backyard. Every family gathering ended with a slice of her famous Lemon Curd Cheesecake, a recipe passed down through generations. As kids, we would sit around the table, eagerly waiting for Grandma to cut us a slice while sharing stories of her childhood. The tangy lemon curd, combined with the creamy cheesecake, was a taste of sunshine that never failed to bring smiles to our faces. Recreating this recipe now brings back those warm, sunny afternoons and the joy of being surrounded by family.


Conclusion:


Embrace the tangy delight of Lemon Curd Cheesecake and let its refreshing flavors transport you to sunlit days and fond family memories. Whether you're a seasoned baker or a beginner, this dessert promises to be a rewarding and delectable experience. So, next time you're in the mood for something zesty, give this recipe a try and create your own sweet memories.

Read more about Appetizers

Read more about Main Dishes

Read more about Desserts

Doom: The Dark Ages Is Out Today, and Already on Sale for Xbox and PC – IGN | Analysis by Brian Moineau

Doom: The Dark Ages Is Out Today, and Already on Sale for Xbox and PC - IGN | Analysis by Brian Moineau

Blasting Back to the Middle Ages: Doom: The Dark Ages Launches with a Discount

Hello fellow gamers and digital adventurers! Today marks the release of *Doom: The Dark Ages*, a thrilling new chapter in the iconic Doom franchise, and it's already causing a stir with its enticing early discounts. Available on both PC and Xbox, this latest installment promises to transport players from the futuristic hellscapes we're accustomed to, back to a medieval setting filled with new challenges and, of course, the same heart-pounding action.

For those eager to dive into this blend of swords, sorcery, and shotgun shells, you can snag a discount on PC versions at Fanatical and GMG, and if you're an Xbox aficionado, Newegg has you covered with a deal on digital codes. It's a smart move by the publishers, ensuring that even the most frugal gamers have a chance to experience this fresh take on the Doom universe without breaking the bank.

The Doom series, since its inception in 1993, has been a cornerstone of the FPS genre. Its blend of relentless action and atmospheric storytelling set a precedent for what video games could achieve. With *Doom: The Dark Ages*, the developers are not only paying homage to the original games but also tapping into the current trend of medieval-themed entertainment. From the success of series like *Game of Thrones* to the enduring appeal of *The Witcher*, the medieval era has never been more popular in media.

This release also comes at a time when the nostalgia wave is strong in the gaming community. Recent years have seen a resurgence of interest in retro gaming, with classic titles being remastered or reimagined for modern platforms. *Doom: The Dark Ages* cleverly combines this sense of nostalgia with innovative gameplay tweaks, ensuring that both long-time fans and newcomers will find something to enjoy.

In terms of timing, this release couldn't be better. As the world continues to navigate through the complexities of a post-pandemic era, video games have proven to be a vital escape for many. They offer not just entertainment, but a way to connect with others and explore new worlds from the comfort of our homes. The launch of a new Doom title, especially one that offers a fresh setting and narrative direction, is a welcome addition to the gaming landscape.

As we look forward, it's exciting to see how the gaming industry continues to evolve, blending the old with the new. *Doom: The Dark Ages* is a testament to this evolution—a bridge between the classic roots of the franchise and the modern demands of today's gamers.

In conclusion, whether you're a Doom veteran or a newcomer curious about the hype, now's a great time to grab your digital sword and dive into the fray. With a mix of adrenaline-pumping action and a captivating new setting, *Doom: The Dark Ages* offers a unique adventure that promises to be as challenging as it is rewarding. Happy gaming, everyone!

Read more about AI in Business

Read more about Latest Sports Trends

Read more about Technology Innovations

‘Most’ Best Buys will have extra Switch 2s available in-store – The Verge | Analysis by Brian Moineau

‘Most’ Best Buys will have extra Switch 2s available in-store - The Verge | Analysis by Brian Moineau

Nintendo Switch 2: Midnight Madness at Best Buy

Gamers, mark your calendars and set those alarms! Best Buy has announced that “most stores” will have a “limited inventory” of the highly anticipated Nintendo Switch 2 systems available for its midnight launch. Yes, you read that right—there will be additional units in-store! For all of us who have suffered through the nail-biting anxiety of online pre-orders, this news comes as a welcome relief.

Now, let’s take a step back and marvel at the cultural phenomenon that is the Nintendo Switch. Since its launch in 2017, the Switch has become a staple in gaming households around the world, amassing a fan base that includes everyone from casual gamers to hardcore enthusiasts. The hybrid console’s ability to transition seamlessly from a home console to a portable device was a game-changer, and it’s safe to say that we’re all excited to see what the Switch 2 brings to the table.

But it’s not just about the console itself; it’s about the experience. A midnight release adds an extra layer of excitement, turning an ordinary purchase into an event. For those who have never experienced a midnight launch, imagine the energy of a concert line or the camaraderie of a Black Friday crowd, but with a shared love for gaming. It’s an excellent opportunity to meet fellow gamers, swap stories, and maybe even pick up some tips for your favorite games.

This release couldn’t come at a better time, as it taps into the broader zeitgeist of nostalgia and community. In recent months, we’ve seen a resurgence of interest in physical media and in-person events—perhaps a response to the isolation many felt during the pandemic. The Switch 2 midnight launch fits right into this narrative, offering a moment of collective excitement and anticipation.

Elsewhere in the world, we see similar trends of community and nostalgia. Vinyl records have made a significant comeback, with sales hitting record highs in recent years. In sports, events like the Olympics and the World Cup continue to draw global audiences, uniting people in their shared passion and excitement. Even the film industry is seeing a return to theaters, with moviegoers eager to experience the magic of the big screen together.

For Nintendo fans, the Switch 2 midnight launch at Best Buy is not just a chance to snag the latest console; it’s a chance to be part of something bigger—a community of people brought together by their love for gaming. And who knows? Maybe you’ll even make a friend or two while waiting in line.

So, grab your coat, pack a snack, and prepare for an exciting night of anticipation and camaraderie. Whether you’re a seasoned gamer or a newcomer eager to join the ranks, the Switch 2 launch is shaping up to be an unforgettable event.

Final Thought: Technology may be advancing at a rapid pace, but it’s moments like these that remind us of the human connections that make it all worthwhile. Here’s to the Switch 2 and the joy of shared experiences—may the odds be ever in your favor as you hunt for that coveted console. Happy gaming!

Read more about AI in Business

Read more about Latest Sports Trends

Read more about Technology Innovations

Whole Wheat Chocolate Chip Cookies | Made by Meaghan Moineau

Whole Wheat Chocolate Chip Cookies | Made by Meaghan Moineau

Title: Nostalgic Whispers of Warmth: Whole Wheat Chocolate Chip Cookies
Description: Discover the heartwarming joy of baking Whole Wheat Chocolate Chip Cookies with this delightful recipe that marries the rich flavors of dark brown and coconut sugars with the wholesome goodness of whole-wheat flour. These cookies are the epitome of comfort, perfect for a cozy afternoon treat or sharing with loved ones. Alongside the recipe, enjoy a nostalgic tale of family memories that brings a touch of warmth to every bite.

---


Whole Wheat Chocolate Chip Cookies Recipe
Difficulty: 4/10
Category: Dessert
Ingredients:

- 1 teaspoon baking powder


- 1 teaspoon baking soda


- 2 cups chocolate chips


- 1 cup coconut sugar


- 1 cup dark brown sugar


- 2 large eggs


- 1 teaspoon kosher salt


- 1 cup unsalted butter, softened


- 2 teaspoons vanilla extract


- 2 1/2 cups whole-wheat flour


Instructions:
1. Preparation: Begin by placing two racks in the upper and lower thirds of your oven and preheat it to 350°F. Line two baking sheets with parchment paper for easy cleanup.
2. Mix Dry Ingredients: Sift together the baking powder, baking soda, kosher salt, and whole-wheat flour into a large bowl. Pour back any remaining bits into the bowl to ensure no ingredient is left behind.
3. Cream Butter and Sugars: In a standing mixer fitted with a paddle attachment, combine the softened butter, coconut sugar, and dark brown sugar. Beat on low speed until the mixture is smooth and creamy, approximately 2 minutes. Scrape down the sides of the bowl with a spatula.
4. Add Eggs and Vanilla: Incorporate the eggs one at a time, mixing thoroughly after each addition. Stir in the vanilla extract until fully combined.
5. Combine Ingredients: Gradually add the dry ingredient mixture to the wet ingredients. Mix on low speed until just combined, about 30 seconds. Ensure all the flour is incorporated by scraping down the sides and bottom of the bowl.
6. Add Chocolate Chips: Pour in the chocolate chips and mix on low speed until evenly distributed throughout the dough.
7. Shape Cookies: Use a spatula to transfer the dough onto a work surface. Use your hands to fully incorporate all ingredients. Scoop mounds of dough, about 3 tablespoons each, onto the prepared baking sheets, allowing 3 inches of space between each cookie.
8. Bake: Bake the cookies for 16 to 20 minutes, rotating the sheets halfway through for even baking. The cookies should be a beautiful golden brown.
9. Cool and Enjoy: Transfer the cookies, still on the parchment, to a countertop to cool. For an extra touch, sprinkle a pinch of sea salt on top while they are still warm.

These cookies are best enjoyed warm from the oven, but they also freeze well for later indulgence. Simply warm in the microwave for 20-30 seconds to relive the freshly baked experience.


---


A Nostalgic Tale:

Growing up, Saturday afternoons were a sacred time in our family. My grandmother would gather us in her cozy kitchen, the air already fragrant with the anticipation of baking. Her secret to the best chocolate chip cookies was a pinch of love and the patience to let us kids measure out the ingredients with our clumsy hands. As we sifted flour and sneaked chocolate chips when she wasn't looking, stories of her childhood would fill the room, intertwining with our laughter.


These Whole Wheat Chocolate Chip Cookies hold a special place in my heart, as they remind me of those cherished afternoons. The wholesome earthiness of whole-wheat flour combined with the sweetness of chocolate chips is more than just a recipe; it’s a bridge to a simpler time when the world was as warm and inviting as a freshly baked cookie. Every bite takes me back to that kitchen, surrounded by family, where love was the main ingredient in every recipe.


Whether you are creating new memories or revisiting old ones, these cookies are sure to bring a sprinkle of nostalgia and a dollop of comfort to your day.

Read more about Appetizers

Read more about Main Dishes

Read more about Desserts

Homemade Apple Almond Granola Bars | Made by Meaghan Moineau

Homemade Apple Almond Granola Bars | Made by Meaghan Moineau

Title: Crunchy Nostalgia: Homemade Apple Almond Granola Bars
Description: Dive into the comforting embrace of Homemade Apple Almond Granola Bars, a delightful concoction of wholesome ingredients that bring back the warmth of family gatherings. Easy to make and irresistibly tasty, these bars are perfect for breakfast on-the-go or a guilt-free snack.

---


Homemade Apple Almond Granola Bars: A Family Tradition


Growing up, my family always had a knack for turning simple moments into cherished memories. Among these, Saturday mornings were special. The smell of freshly baked goods wafting through the house was our gentle wake-up call, drawing us out of our slumber and into the kitchen where the magic happened.


One of the most beloved recipes that graced our kitchen was the Homemade Apple Almond Granola Bars. These bars were more than just a treat; they were a symbol of togetherness and the perfect embodiment of autumn afternoons spent with family. The combination of rolled oats, sweet honey, and the crunch of almonds brought a comforting warmth that only a homemade recipe could provide.


Ingredients:


- 2 cups rolled oats


- 1/4 cup ground flax seed


- 1/4 cup oat bran


- 1/4 cup wheat bran


- 1/2 teaspoon salt


- 1 teaspoon baking powder


- 1 teaspoon ground cinnamon


- 1/4 cup sugar substitute


- 1/4 cup unsweetened coconut


- 1/2 cup non-fat milk


- 1/4 cup sweet honey


- 1 egg


- 1 teaspoon vanilla extract


- 1 apple, peeled and diced


- 1/2 cup almonds, chopped


Instructions:


1. Preheat your oven to 350°F (175°C) and spray a 9x13 pan with non-stick cooking spray.
2. Combine in a large bowl the oats, flax seed, oat bran, wheat bran, salt, baking powder, cinnamon, sugar substitute, and coconut. Mix until well combined.
3. Add the milk, honey, egg, and vanilla extract to the dry ingredients. Stir until everything is well incorporated.
4. Fold in the diced apple and chopped almonds, ensuring they are evenly distributed throughout the mixture.
5. Press the mixture firmly into the prepared pan, spreading it out evenly.
6. Bake for 15-20 minutes, or until the edges start to brown lightly.
7. Cool for 10 minutes before cutting into bars. Allow to cool completely before serving or storing.

These granola bars are a perfect example of how food can connect us to our roots and to each other. As we savored these bars, my siblings and I would reminisce about the little things that made our weekend mornings special—like the sound of crunching leaves outside or the laughter that filled the room as we enjoyed our breakfast together.


Difficulty: 3/10 - Easy


Classification: Dessert / Snack


Whether you're yearning for a quick snack or a healthy dessert option, these Homemade Apple Almond Granola Bars are sure to satisfy. They're not just a treat; they're a piece of nostalgia, a way to bring a little bit of my family's warmth into your own home.


So, gather your ingredients and invite your loved ones to the kitchen. Create new memories while indulging in the delightful flavors of this cherished family recipe. Enjoy the simple pleasure of homemade goodness, and perhaps, start a new tradition of your own.

Read more about Appetizers

Read more about Main Dishes

Read more about Desserts

Limited Run’s Switch 2 Numbered Releases Will Reportedly Include The “Full Game On The Cartridge” – Nintendo Life | Analysis by Brian Moineau

Limited Run's Switch 2 Numbered Releases Will Reportedly Include The "Full Game On The Cartridge" - Nintendo Life | Analysis by Brian Moineau

Forever Physical, Kind Of: The Nostalgic Appeal of Limited Run's Switch 2 Releases


In a digital age where streaming and downloads reign supreme, there's a certain charm in holding something tangible. Enter Limited Run's latest announcement: their Switch 2 numbered releases will feature the "full game on the cartridge." For many gamers, this feels like a nostalgic nod to the good ol' days when games came complete, without the need for day-one patches or additional downloads. But what does this mean for the gaming world, and how does it reflect broader trends in technology and consumer behavior?

The Retro Revolution


Limited Run Games has built its brand around the idea of "forever physical." In an era where digital downloads are often more convenient and sometimes even cheaper, the company champions physical media. Their latest venture promises that Nintendo Switch 2 games will come fully loaded on cartridges, reminiscent of classic gaming systems like the NES or SNES. This is more than just a marketing gimmick; it's a testament to the enduring appeal of physical media.

This trend isn't isolated to gaming. Vinyl records have seen a resurgence in recent years, with sales hitting record highs. Even in the face of convenient streaming services like Spotify or Apple Music, there's something special about placing a needle on a record and letting the analog sound wash over you. Similarly, the tangible nature of a game cartridge can evoke a sense of nostalgia and authenticity that digital downloads often lack.

The Digital Dilemma


Despite the charm of physical media, the digital transformation continues to reshape industries. From cloud computing to digital currencies, the world is increasingly moving away from the tangible. In gaming, services like Xbox Game Pass and PlayStation Now offer vast libraries of titles available at a click. The convenience and instant access are undeniable, but they come with trade-offs, such as the potential loss of ownership, server dependency, and the ever-dreaded digital rights management (DRM).

Limited Run's initiative is a refreshing counterpoint, suggesting that there is still a market for those who value permanence and completeness. It's a sentiment echoed by many who prefer owning rather than renting, whether it's games, music, or even movies.

A Broader Perspective


This announcement also comes at a time when the tech world is buzzing with discussions about sustainability and the environmental impact of our digital habits. Data centers that power our streaming services consume vast amounts of energy, contributing to carbon emissions. In contrast, producing and distributing physical media, while not without its environmental footprint, offers a different kind of sustainability.

Moreover, this move by Limited Run taps into a broader cultural shift. As technology becomes more immersive and ubiquitous, there's a growing desire to unplug and reconnect with the physical world. Whether it's the tactile pleasure of turning the pages of a book or the satisfying click of inserting a game cartridge, these experiences remind us of a simpler time.

Final Thoughts


In a world that's increasingly digital, Limited Run's commitment to "forever physical" offers a refreshing alternative. It's a reminder that while technology advances, there's value in preserving the past. For gamers, it means enjoying a complete, unaltered experience right out of the box. And for the rest of us, it's a call to appreciate the tangible, even as we embrace the conveniences of the digital age. So, whether you're a gamer, a vinyl collector, or just someone who loves the feel of a real book in your hands, here's to keeping a little bit of nostalgia alive in our modern world.

For more insights on Limited Run's releases, check out [Nintendo Life's article](https://www.nintendolife.com) on the topic.

Read more about AI in Business

Read more about Latest Sports Trends

Read more about Technology Innovations

Cider-Braised Pork Shoulder With Caramelized Onion and Apple Confit | Made by Meaghan Moineau

Cider-Braised Pork Shoulder With Caramelized Onion and Apple Confit | Made by Meaghan Moineau

Title: A Taste of Autumn: Cider-Braised Pork Shoulder with Caramelized Onion and Apple Confit
Description:

Dive into the heartwarming flavors of fall with our Cider-Braised Pork Shoulder with Caramelized Onion and Apple Confit. This main dish, rated 7 out of 10 on the difficulty scale, beautifully marries the rich, savory notes of pork with the sweet, tangy essence of apples and onions. As you savor each bite, you'll be transported back to cherished family gatherings and the cozy warmth of a kitchen filled with laughter and love.


---


The Recipe for Nostalgia and Comfort

When the leaves start to turn and the air crisps with the promise of autumn, there's nothing quite like gathering around a table with loved ones to share a meal that encapsulates the essence of the season. Our Cider-Braised Pork Shoulder with Caramelized Onion and Apple Confit isn't just a dish; it's a journey back to those nostalgic family dinners that marked the change of seasons.


Ingredients:

- 1 tied pork shoulder


- Black salt and pepper, to taste


- Olive oil


- 2 large yellow onions, thinly sliced


- 1/4 cup Calvados brandy


- 2 Granny Smith apples, peeled and sliced


- 4 garlic cloves, minced


- 1 teaspoon fresh dried thyme


- 2 cups apple cider


- 1 cup chicken stock


- 2 tablespoons Dijon mustard


Instructions:
1. Preheat and Prepare:

Begin by preheating your oven to 400°F (200°C). Pat the pork shoulder dry with paper towels and generously season with black salt and pepper.


2. Sear the Pork:

Heat olive oil in a large ovenproof pot or Dutch oven over medium-high heat. Brown the pork on all sides, turning with tongs, for about 6-8 minutes per side to create a rich, savory crust. Transfer the pork to a plate.


3. Caramelize the Onions:

Pour off excess fat from the pot, leaving just enough to coat the bottom. Add the sliced onions and 1 teaspoon of salt. Sauté over medium heat, stirring occasionally, until the onions are soft and deeply golden brown, about 18-20 minutes.


4. Deglaze and Build Flavor:

Stir in the Calvados to deglaze the pan, scraping up any browned bits. Add the apple slices, minced garlic, and thyme, cooking for an additional 30 seconds until fragrant.


5. Braise the Pork:

Nestle the pork shoulder back into the pot, ensuring it's surrounded by the onion mixture. Pour in the apple cider and chicken stock. Cover the pot and place it in the oven, reducing the heat to 325°F (163°C). Braise until the pork is incredibly tender, about 2 1/2 to 3 hours.


6. Finish the Sauce:

Once cooked, transfer the pork to a cutting board and remove the kitchen strings. Boil the onion and apple mixture over high heat until the liquid is slightly reduced and thickened, about 2 minutes. Stir in the Dijon mustard and season to taste with additional salt and pepper.


7. Serve and Enjoy:

Slice the tender pork into serving pieces and arrange them on a platter or individual plates. Generously spoon the caramelized onion and apple confit over and around the meat, allowing the flavors to meld beautifully.


A Family Memory:

This dish always reminds me of the autumn evenings spent at my grandmother's house. The warmth of her kitchen, the aroma of apples and onions slowly caramelizing, and the sound of laughter echoing through the rooms. One particular fall, as the first snowflakes began to dance in the air, she taught me how to prepare this very dish. My small hands struggled to tie the pork, but her gentle guidance and the promise of a comforting meal kept me eager to learn. As we sat down to dinner, wrapped in the cozy embrace of family, I realized that this was more than just a recipe—it was a legacy of love and tradition.


Conclusion:

This Cider-Braised Pork Shoulder with Caramelized Onion and Apple Confit is more than a main dish; it's a celebration of the season and a testament to the power of food to bring us together. As you recreate this dish, may it fill your home with warmth and your heart with cherished memories.

Read more about Appetizers

Read more about Main Dishes

Read more about Desserts

Classic French Mussels | Made by Meaghan Moineau

Classic French Mussels | Made by Meaghan Moineau

Title: Unveiling the Elegance of Classic French Mussels: A Taste of Nostalgia
Description: Dive into the heart of French culinary tradition with our Classic French Mussels recipe. Perfectly blending delicate flavors and cultural richness, this dish offers a taste of nostalgia, transporting you to cherished family gatherings. With simple ingredients like dry white wine, fresh parsley, and garlic, this mussel recipe is a delightful appetizer rated 4 out of 10 in difficulty. Relish the harmony of taste and memory as you savor each bite.

---


There’s something inherently comforting about the ritual of preparing a beloved family dish. For me, Classic French Mussels brings back vivid memories of summer evenings spent at my grandmother’s quaint seaside cottage in Brittany, France. The air was always filled with the briny scent of the ocean, mingling with the aroma of garlic and shallots sizzling in olive oil—a sensory symphony that signaled the beginning of a cherished meal.


Ingredients:

- 2 lbs mussels


- 2 tablespoons olive oil


- 2 shallots, finely chopped


- 4 garlic cloves, minced


- 1 cup dry white wine


- 1/2 cup low-fat buttermilk


- 2 tablespoons unsalted light butter


- 1/4 cup fresh parsley, chopped


- Kosher salt to taste


Instructions:
1. Prepare the Mussels: Begin by scrubbing the mussels under cold water with a stiff brush. Discard any mussels that remain open or have broken shells. Soak them in cool, clean water for at least an hour to allow them to expel any sand.
2. Remove the Beards: Locate the small fibrous "beard" on each mussel and pull it out toward the hinge of the shell to avoid injuring the mussel.
3. Cook the Aromatics: In a large pot, heat the olive oil over medium-high heat. Add the shallots and garlic, cooking until soft and fragrant, approximately 5 minutes.
4. Combine Ingredients: Add the mussels to the pot, followed by the wine, buttermilk, butter, and parsley. Season generously with kosher salt. Stir well to combine all ingredients.
5. Steam the Mussels: Cover the pot and allow the mussels to cook for 10 to 15 minutes, or until they have opened and are cooked through.
6. Serve: Divide the mussels and the flavorful juices between two bowls. Serve immediately with crusty whole-grain bread to soak up the delectable sauce.

This dish, a testament to the simplicity and elegance of French cuisine, is the perfect appetizer for any occasion. It’s rated a 4 out of 10 in difficulty, making it accessible even for those new to cooking mussels.


As I watch the mussels gently open in the pot, I’m reminded of those magical evenings in Brittany, where laughter echoed around the dinner table, and the warmth of family togetherness was as nourishing as the meal itself. Today, I carry on this tradition, serving Classic French Mussels to my own family, creating new memories while honoring the old.


Savor the rich flavors and let this dish transport you to a place of warmth, love, and tradition. Bon appétit!

Read more about Appetizers

Read more about Main Dishes

Read more about Desserts

Roasted Strawberry Coconut Milk Ice Cream | Made by Meaghan Moineau

Roasted Strawberry Coconut Milk Ice Cream | Made by Meaghan Moineau

Title: Indulge in Nostalgia with Roasted Strawberry Coconut Milk Ice Cream
Description: Dive into a scoop of creamy nostalgia with our Roasted Strawberry Coconut Milk Ice Cream. This delightful dessert combines the lusciousness of coconut milk with the warm spice of cardamom and the sweet, tangy burst of roasted strawberries. Easy to make and even easier to enjoy, this ice cream is a perfect treat for any occasion.

---


Roasted Strawberry Coconut Milk Ice Cream


Difficulty: 4/10
Classification: Dessert

Ingredients:


- 1/2 cup raw cane sugar


- 2 cans full-fat coconut milk


- 1 teaspoon ground cardamom


- 1 pound strawberries


- 1 vanilla bean


Instructions:


1. Prepare the Coconut Milk Mixture: In a saucepan over medium heat, combine the coconut milk, 1/2 cup of raw cane sugar, and ground cardamom. Using a small knife, slice the vanilla bean lengthwise and scrape the seeds into the coconut milk mixture. Add the vanilla bean pod as well for extra flavor.
2. Roast the Strawberries: Preheat your oven to 375°F (190°C). Hull and slice the strawberries, then spread them out on a baking sheet lined with parchment paper. Sprinkle a tablespoon of raw cane sugar over the strawberries, and roast in the oven for about 20-25 minutes, or until the strawberries are soft and slightly caramelized.
3. Combine and Chill: Once the coconut milk mixture is warmed and the aroma is inviting, remove the vanilla bean pod. Allow the mixture to cool to room temperature. Once the strawberries have roasted, allow them to cool as well. Blend the roasted strawberries until smooth, then mix them into the coconut milk mixture. Chill the combined mixture in the refrigerator for at least 4 hours or overnight for best results.
4. Churn and Freeze: Pour the chilled mixture into an ice cream maker and churn according to the manufacturer's instructions. Once churned to a soft-serve consistency, transfer the ice cream to a lidded container and freeze for at least 2 hours, or until firm.
5. Serve and Enjoy: Scoop the ice cream into bowls or cones and enjoy the creamy, fruity flavors that bring back cherished memories.

---


A Sweet Memory


Growing up, summers at Grandma's house were synonymous with the delightful aroma of fresh strawberries roasting in the kitchen. Her kitchen was a haven of culinary wonders, but nothing could rival the excitement of homemade ice cream day. Grandma's secret ingredient was always a pinch of cardamom, which she claimed was a little bit of magic passed down from her mother.


The sweet, spicy aroma of cardamom wafting through the air was a signal that something extraordinary was happening. We'd gather around, eager to watch as she blended the roasted strawberries into the creamy coconut milk mixture, her hands deftly working the ice cream maker.


Those moments, spent with family, laughing and sharing stories while waiting for the ice cream to set, were the essence of summer. Each spoonful of ice cream was a taste of nostalgia, a reminder of the warmth and love that filled those sun-drenched days.


Now, as I recreate this recipe for my own family, I hope to pass on not just the flavors, but the cherished memories that come with it. This Roasted Strawberry Coconut Milk Ice Cream is more than just a dessert—it's a celebration of love, tradition, and the simple joys of life.


---


Indulge in this delightful dessert and let the flavors transport you to a place of warmth and nostalgia. Perfect for summer gatherings or a cozy evening treat, this ice cream is a delicious way to create new memories while honoring the old.

Read more about Appetizers

Read more about Main Dishes

Read more about Desserts

Chicken Piccata With Angel Hair Pasta | Made by Meaghan Moineau

Chicken Piccata With Angel Hair Pasta | Made by Meaghan Moineau

Zesty Chicken Piccata With Angel Hair Pasta: A Timeless Family Classic


Description


Discover the tangy and savory delight of Chicken Piccata with Angel Hair Pasta, a dish that balances bright citrus notes with the richness of a buttery sauce, all harmonized with tender chicken and delicate pasta. This main dish not only promises a burst of flavor but also serves as a nostalgic journey back to family gatherings marked by laughter, love, and unforgettable meals. Perfect for a weeknight dinner or a special occasion, this recipe is rated 6/10 in difficulty and will leave your taste buds dancing with joy.


---


A Walk Down Memory Lane


Growing up, Sunday dinners were a cherished tradition in our family. My grandmother would spend the afternoon bustling around the kitchen, her apron dusted with flour and a twinkle in her eye as she orchestrated the meal that would bring us all together. Chicken Piccata with Angel Hair Pasta was a staple, a dish that magically combined her Sicilian roots with a touch of modern flair.


I remember the way the kitchen smelled, the citrusy aroma of fresh lemons mingling with the savory scent of sautéed garlic and olive oil. As children, my cousins and I would gather around the table, eagerly awaiting the moment when she would place the steaming platter before us. Each bite was a revelation—the tangy capers popping against the tender chicken and the delicate strands of pasta soaking up the rich, buttery sauce.


Those evenings were filled with stories and laughter, the kind of moments that linger long after the plates have been cleared. To this day, every time I prepare this dish, I can almost hear my grandmother's gentle laughter and feel the warmth of those family gatherings. It's more than just a meal; it's a connection to the past, a way to keep those precious memories alive.


---


Ingredients


- 1 cup all-purpose flour


- 8 oz angel hair pasta


- 2 boneless chicken breasts


- 2 tablespoons capers


- 1 cup chicken broth


- Fresh basil, chopped


- 2 diced garlic cloves


- Black kosher salt and pepper to taste


- Zest and juice of 2 lemons


- 3 tablespoons olive oil, divided


- 1 teaspoon red chili flakes


- 2 diced Roma tomatoes


- 3 tablespoons unsalted butter


---


Instructions


1. Prepare the Chicken:

Place 1 cup of flour in a shallow dish. Using a sharp knife, slice each chicken breast in half. Cover each piece with wax paper and use a kitchen mallet to pound them to about ½ inch thick. Season the chicken generously with salt and pepper. Coat the chicken pieces in flour, shaking off any excess.


2. Cook the Chicken:

In a large skillet, heat 2 tablespoons of olive oil over medium heat. Add the chicken to the skillet and sauté each side until golden brown, about 3-4 minutes per side. Once cooked, transfer the chicken to a clean plate and cover with aluminum foil.


3. Boil the Pasta:

Begin boiling the angel hair pasta according to package instructions.


4. Make the Sauce:

Using the same skillet, add the remaining olive oil and sauté the garlic until aromatic, avoiding browning. Add red chili flakes, capers, lemon juice, lemon slices, zest, and chicken broth. Use a wooden spoon to scrape up any brown bits from the skillet. Increase heat to medium-high and allow the liquid to reduce by half.


5. Finish the Sauce:

In a small bowl, mash together 1 tablespoon of flour and the butter. Whisk into the reducing liquid, cooking for 1-2 minutes. Ensure the sauce is smooth and adjust seasoning with salt and pepper.


6. Combine Everything:

Drain the cooked pasta and toss it in the lemon caper sauce with tomatoes and basil, reserving a few spoonfuls of sauce. Adjust seasoning if needed.


7. Serve:

Plate the pasta and top each serving with a piece of chicken. Spoon the reserved lemon caper sauce over the chicken and pasta. Serve immediately.


---


Conclusion


Recreate this delicious Chicken Piccata with Angel Hair Pasta and transport yourself to a place where every meal becomes a memory worth savoring. Whether you're sharing it with family or enjoying a quiet evening at home, this dish promises to delight with its robust flavors and heartwarming nostalgia.

Read more about Appetizers

Read more about Main Dishes

Read more about Desserts

“This Might Be A Very Controversial Take”: Oblivion Remastered Players Don’t Miss A Key Mechanic From Skyrim And Want It Changed For The Elder Scrolls 6 – TheGamer | Analysis by Brian Moineau

"This Might Be A Very Controversial Take": Oblivion Remastered Players Don't Miss A Key Mechanic From Skyrim And Want It Changed For The Elder Scrolls 6 - TheGamer | Analysis by Brian Moineau

The Great Elder Scrolls Debate: Is Oblivion Really Better Than Skyrim?


Ah, the age-old debate that keeps Elder Scrolls fans up at night: "Oblivion is better than Skyrim." It's a bold claim that sparks heated discussions across forums, social media, and gaming circles. But before we dive into the nitty-gritty, let's take a step back and appreciate the beauty of this debate. It's not just about which game is better; it's a celebration of what makes each game unique and beloved by its fans.

The Mechanics of Nostalgia


Recently, TheGamer published an article highlighting a controversial take among players of Oblivion Remastered. Some fans don't miss a key mechanic from Skyrim and are advocating for changes in the upcoming Elder Scrolls 6. This sentiment underscores a broader discussion: how nostalgia and evolving gameplay mechanics shape our preferences.

Oblivion, released in 2006, was a marvel of its time, offering an open-world experience that was both groundbreaking and immersive. Its mechanics, while dated by today's standards, are fondly remembered by fans who appreciate the depth and complexity they brought to the game. On the other hand, Skyrim, released in 2011, streamlined many of these mechanics, making the game more accessible to a broader audience.

Evolution of Gameplay


The evolution of gameplay mechanics is not unique to the Elder Scrolls series. Consider how the Legend of Zelda series has evolved. "Breath of the Wild" revolutionized the franchise by introducing a vast, open world with a non-linear approach to gameplay. This shift was both praised for its innovation and critiqued by purists who missed the structured dungeon-crawling of earlier titles.

Similarly, the debate between Oblivion and Skyrim often boils down to a matter of personal preference. Do you prefer the rich, text-heavy quests and intricate skill systems of Oblivion, or do you enjoy the streamlined, visually stunning, and mod-friendly world of Skyrim?

A Reflection of Broader Trends


This debate also mirrors broader trends in the world. Take, for example, the ongoing discussions in the film industry about practical effects versus CGI. Just as some cinephiles long for the tangible effects of classic films, some gamers yearn for the complex mechanics of older games. It's a testament to how technology and art continuously evolve, sparking debates that reflect our diverse tastes and values.

The Future of Elder Scrolls


As we look forward to Elder Scrolls 6, the question remains: which mechanics will Bethesda choose to incorporate? Will they honor the complexity of Oblivion or continue the streamlined approach of Skyrim? Perhaps they'll strike a balance, offering something that pleases both camps.

In the end, the debate between Oblivion and Skyrim is less about finding a definitive answer and more about celebrating the diversity of gaming experiences. It's a reminder that our preferences are as varied as the worlds we explore in these games.

Final Thoughts


As technology continues to push the boundaries of what's possible, it's exciting to think about where the Elder Scrolls series will go next. Whether you're team Oblivion or team Skyrim, one thing is certain: the journey is what truly matters. So, let's keep the discussion going, celebrate the games we love, and look forward to the adventures that await us in Elder Scrolls 6.

Happy gaming!

Read more about AI in Business

Read more about Latest Sports Trends

Read more about Technology Innovations

Sweet Corn Pudding | Made by Meaghan Moineau

Sweet Corn Pudding | Made by Meaghan Moineau

Title: Sweet Corn Pudding: A Cozy Comfort Dish with a Dash of Nostalgia
Description: Indulge in the creamy, savory goodness of Sweet Corn Pudding—a perfect side dish that combines the sweetness of corn with the rich flavors of cheese and jalapeño peppers. Dive into this heartwarming recipe that not only delights the palate but also brings back cherished family memories.

---


Sweet Corn Pudding Recipe


Difficulty Level: 5/10
Category: Side Dish

Ingredients

- 2 tablespoons butter

- 1 small onion, finely chopped


- 2 cloves garlic, minced


- 4 ears of corn, kernels removed


- 2 tablespoons all-purpose flour


- 1 cup heavy cream


- 1 cup cooked grits


- 2 tablespoons canned jalapeño peppers, chopped


- Salt, to taste


- Black pepper, to taste


- 2 large eggs, beaten


- 1 cup white shredded cheddar cheese


Instructions


1. Preheat the Oven: Set your oven to 425°F (218°C).
2. Sauté Aromatics: In a heavy-bottomed pot over medium heat, melt the butter. Add the onion and garlic, cooking until fragrant and translucent, about 3 minutes.
3. Add Corn: Stir in the corn kernels and cook for an additional 3 minutes, allowing the natural sweetness of the corn to develop.
4. Incorporate Flour and Cream: Sprinkle in the flour, stirring constantly for 1 minute, then gradually add the heavy cream. Continue stirring until the mixture comes to a gentle boil.
5. Blend and Season: Add the cooked grits, then remove the pot from heat. Stir in the jalapeño peppers, and season generously with salt and black pepper. Using a hand-held immersion blender, puree the mixture slowly while adding the beaten eggs until fully incorporated.
6. Bake to Perfection: Pour the smooth corn mixture into an ovenproof dish. Generously sprinkle the top with shredded cheddar cheese. Bake for 25-30 minutes, or until the center puffs up and the top turns a delicious golden brown.

---


A Taste of Nostalgia


The aroma of this Sweet Corn Pudding always transports me back to our family gatherings on summer evenings. I remember my grandmother standing by the stove, her apron dusted with flour, humming softly as she stirred the pot. The kitchen would fill with the comforting scent of sautéed onions and garlic, a symphony of familiar smells that signaled something special was about to be served.


We'd gather around the dining table, the centerpiece a bubbling dish of corn pudding, its golden top glistening under the soft light. Each bite was a blend of creamy corn and spicy jalapeño, a perfect harmony that mirrored the laughter and warmth shared among us. This dish wasn't just food; it was a vessel of memories, a reminder of summers spent together, and the love that was woven into each meal.


---


Conclusion


Sweet Corn Pudding is more than just a dish; it’s a culinary embrace that brings together the sweetness of corn, the richness of cream, and a hint of jalapeño heat. Perfect as a side for family dinners or festive occasions, this recipe is sure to become a cherished part of your own family traditions. So, gather your ingredients and create not just a meal, but a memory.

Read more about Appetizers

Read more about Main Dishes

Read more about Desserts