Chicken Porridge | Made by Meaghan Moineau

Chicken Porridge | Made by Meaghan Moineau

Title: "Warm Memories in a Bowl: The Comforting Embrace of Chicken Porridge"
Description: Dive into the heartwarming world of Chicken Porridge, a dish that stirs both the palate and the soul. Uncover its rich flavors with a simple yet profound recipe, and relive cherished family moments that come alive with every spoonful. This main dish is as much about the memories it evokes as it is about the delightful blend of ingredients that make it a timeless comfort food.

---


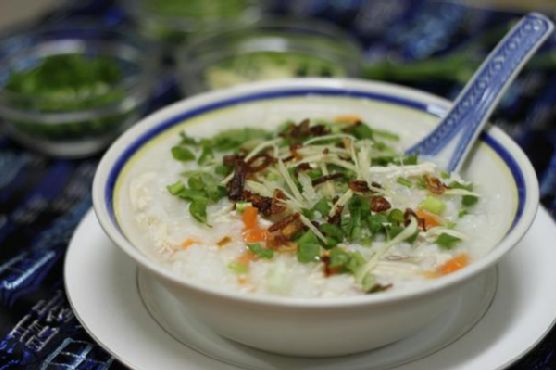
A Bowl of Comfort: Chicken Porridge


There’s something profoundly comforting about a bowl of chicken porridge. It’s not just the warmth that soothes the body on a chilly day, but the way it wraps around the soul, stirring up memories and emotions. For me, this dish is a tapestry of family gatherings and shared stories, of laughter echoing in a warm kitchen.


Ingredients:

- 1 cup rice


- 2 tablespoons vegetable oil


- 1 chicken breast


- 4 cups chicken stock


- 1 diced carrot


- 2 shallots, thinly sliced


- 1 teaspoon julienne young ginger


- 1/2 teaspoon white ground pepper


- Salt to taste


- 2 tablespoons diced spring onion


- 1 tablespoon chopped parsley


Instructions:
1. Fry the Shallots: Begin by deep frying the shallots in vegetable oil until they achieve a golden-brown hue. Drain and set aside the crispy shallots, retaining the oil for later use. This shallot oil will serve as a flavorful foundation for the porridge.
2. Prepare the Rice: Wash the rice thoroughly and then mix it well with the retained shallot oil. This step is crucial for infusing the rice with a subtle, aromatic flavor.
3. Simmer the Porridge: In a large pot, combine the rice, chicken stock, chicken breast, and diced carrots. Bring the mixture to a boil, then reduce the heat to low and let it simmer for about an hour. Stir occasionally to ensure the rice doesn’t stick to the bottom.
4. Shred the Chicken: Once the porridge has thickened, remove the chicken breast and shred it into bite-sized pieces. Return the shredded chicken to the pot, stirring it into the porridge. Warm the dish gently before serving.
5. Garnish and Serve: Ladle the porridge into bowls, garnishing with spring onions, parsley, ginger, and the crispy fried shallots. A few drops of the aromatic shallot oil can be added for an extra layer of flavor. Serve hot, with a sprinkle of white ground pepper and salt to taste.
Nostalgic Story:

I vividly remember the first time I helped my grandmother make this chicken porridge. The kitchen was filled with the aroma of fried shallots, and I was entrusted with the task of mixing the rice with the fragrant oil—a small job, but one that made me feel like an integral part of the cooking process. As the porridge simmered, she would tell stories of her childhood, of how she learned the recipe from her mother, and how it became a staple in our family during gatherings. Each spoonful of porridge was a journey back in time, filled with the warmth of her love and the comfort of family tradition.


Difficulty: 4/10
Classification: Main Dish

As you prepare this dish, may it bring warmth to your home and heart, just as it has done for generations in mine. Enjoy the delicate balance of flavors and the rich tapestry of memories that accompany every bite of this delightful chicken porridge.

Read more about Appetizers

Read more about Main Dishes

Read more about Desserts

Chicken Roll-Ups With Feta Cheese and Arugula | Made by Meaghan Moineau

Chicken Roll-Ups With Feta Cheese and Arugula | Made by Meaghan Moineau

Title: Savoring Simplicity: Chicken Roll-Ups with Feta Cheese and Arugula
Description: Discover an elegant yet simple recipe for Chicken Roll-Ups with Feta Cheese and Arugula. This delightful dish combines tender chicken, peppery arugula, and tangy feta for a meal that's both easy to prepare and sure to impress. Join me as I share a nostalgic family memory tied to this cherished recipe.

---


When it comes to creating memorable meals, simplicity often yields the most satisfying results. One such dish that embodies this philosophy is the Chicken Roll-Ups with Feta Cheese and Arugula. This recipe merges tender chicken breast cutlets with the vibrant flavors of fresh arugula and creamy feta cheese. It’s a dish that has become a family favorite, not just for its taste but also for the cherished memories it evokes.


I vividly recall one summer evening at my grandmother's house, where the aroma of olive oil and sizzling chicken wafted through the air. The kitchen was a flurry of activity as we prepared for our annual family gathering. My grandmother, always the culinary maestro, had a knack for creating dishes that were both simple and extraordinary. It was during these gatherings that she first introduced us to her signature Chicken Roll-Ups.


As a child, I was fascinated by the process. Watching her layer each chicken cutlet with baby arugula and crumble the feta cheese with expert precision was mesmerizing. She would then roll each piece tightly, securing it with a toothpick, a ritual that seemed almost ceremonial. The sizzle of the chicken as it hit the hot olive oil in the skillet was music to my ears—a prelude to the deliciousness that awaited.


The magic continued as the skillet, brimming with these little bundles of joy, was transferred to the oven. The wait, albeit short, was always filled with anticipation and the comforting chatter of family. Once ready, the chicken was sliced crosswise, revealing a beautiful spiral of green and white against the golden-brown exterior. It was a sight to behold and a taste to cherish.


This dish, classified as a Main Dish with a difficulty rating of 4 out of 10, is perfect for any occasion, whether it’s a weeknight dinner or a special family gathering. Its preparation is straightforward, yet the flavors are anything but ordinary. The peppery arugula and tangy feta cheese complement the succulent chicken perfectly, while the olive oil lends a subtle richness that ties everything together.


As I prepare this dish today, I am reminded of those warm summer evenings and the joy of sharing good food with loved ones. It’s a recipe that not only delights the taste buds but also warms the heart with memories of family and home. So, roll up your sleeves and treat yourself and your family to this delightful dish—simple, flavorful, and steeped in love.


---


Ingredients:

- Chicken breast cutlets


- Coarse salt and ground pepper


- Baby arugula


- Feta cheese


- Olive oil


Instructions:

1. Preheat your oven to 375°F (190°C).


2. Season chicken breast cutlets with coarse salt and ground pepper.


3. Layer each cutlet with baby arugula and crumble feta cheese in the center.


4. Starting with the narrow end, roll up the chicken tightly and secure with a toothpick.


5. In a large nonstick ovenproof skillet, heat olive oil over medium-high heat and swirl to coat the bottom.


6. Cook the chicken, seam side down, until golden brown, about 1 to 2 minutes.


7. Turn the chicken over and transfer the skillet to the oven.


8. Cook until the chicken is opaque throughout, approximately 10 to 12 minutes.


9. Remove toothpicks and slice the chicken crosswise before serving, if desired.


This recipe is more than just a meal; it's a journey back to simpler times, where the kitchen was the heart of the home and every dish was a labor of love. Enjoy the flavors, and perhaps create a few new memories of your own.

Read more about Appetizers

Read more about Main Dishes

Read more about Desserts

Crème Fraiche Coconut Bavarians | Made by Meaghan Moineau

Crème Fraiche Coconut Bavarians | Made by Meaghan Moineau

Title: A Taste of Elegance: Crème Fraiche Coconut Bavarians
Description: Dive into the world of exquisite desserts with our Crème Fraiche Coconut Bavarians. This delicate and creamy concoction is not just a treat for the taste buds but a journey down memory lane. Infused with rich coconut flavors and the lushness of crème fraiche, this dessert is a testament to the timeless art of culinary elegance. Perfect for those special occasions where you want to impress, this recipe brings a touch of sophistication to your table.

---


A Taste of Elegance: Crème Fraiche Coconut Bavarians


When it comes to creating a dessert that embodies both simplicity and sophistication, the Crème Fraiche Coconut Bavarians stands out as a top contender. As I whisk together the ingredients, I'm transported back to my grandmother's kitchen, where the aroma of coconut and warm milk intertwined with laughter and stories of old.


Rating: Difficulty 6/10
Category: Dessert

Ingredients:

- Gelatin

- 4 Tbsp. coconut milk (for blooming gelatin)


- 1 can sweetened condensed milk


- Remaining coconut milk


- Sugar


- Egg yolks


- Alouette Cuisine Crème Fraiche


- Shredded coconut


Instructions:

1. Bloom the Gelatin: Begin by combining the gelatin with 4 tablespoons of coconut milk. Set aside to bloom.
2. Heat the Milk Mixture: In a saucepan over medium-high heat, bring the sweetened condensed milk and the remaining coconut milk to a gentle simmer.
3. Temper the Egg Yolks: In a separate bowl, whisk together the sugar and egg yolks until well combined. Gradually add a small amount of the heated milk mixture to the egg yolks, whisking continuously to temper the eggs.
4. Combine: Slowly pour the tempered egg yolk mixture back into the saucepan with the heated milk, continuing to stir. Cook until the mixture thickens enough to coat the back of a spoon, about 5-7 minutes.
5. Add the Gelatin: Remove the saucepan from heat and stir in the bloomed gelatin until fully dissolved.
6. Chill the Mixture: Pour the entire mixture into a bowl and refrigerate until it begins to gel.
7. Whip the Crème Fraiche: In another bowl, whip the Alouette Cuisine Crème Fraiche to a soft peak.
8. Fold Together: Once the refrigerated mixture has started to set, gently fold it together with the whipped crème fraiche. Immediately pour into your desired molds.
9. Refrigerate: Allow the molds to set overnight in the refrigerator.
10. Serve: To serve, carefully remove from the molds and generously cover the Bavarians with shredded coconut.

---


A Nostalgic Note:

Every holiday season, my family would gather in my grandmother's cozy kitchen, where the sweet scent of coconut and sugar filled the air. My grandmother, with her gentle hands and warm heart, would prepare this very dessert, her favorite since her childhood in the coastal town of Cherbourg. She would share stories of her youth, of tropical breezes and sunlit days, as we watched in awe at her culinary magic. Each bite of the Crème Fraiche Coconut Bavarians today brings back those cherished memories, making it more than just a dessert, but a bridge to the past.


Whether you are creating new memories or reminiscing old ones, this dessert is sure to delight and impress. The balance of flavors and the creamy texture make it a perfect ending to any meal, promising to leave a lasting impression on your guests. Enjoy the elegance and nostalgia wrapped in every bite of the Crème Fraiche Coconut Bavarians.

Read more about Appetizers

Read more about Main Dishes

Read more about Desserts

Cherry Jello Poke Cake | Made by Meaghan Moineau

Cherry Jello Poke Cake | Made by Meaghan Moineau

Title: "Cherry Jello Poke Cake: A Sweet Slice of Nostalgia"
Description: Dive into the delightful world of Cherry Jello Poke Cake—a vibrant dessert that's as easy to make as it is to enjoy. This recipe combines the simplicity of a boxed cake mix with the playful flavors of cherry jello, all topped with a creamy layer of cool whip. Perfect for family gatherings or a nostalgic afternoon treat, this cake is sure to become a favorite in your home.

---


Cherry Jello Poke Cake: A Sweet Slice of Nostalgia


In the tapestry of family memories, there are certain dishes that stand out, evoking cherished moments and bringing smiles with every bite. For my family, that dish is the Cherry Jello Poke Cake. This delightful dessert, with its vibrant colors and refreshing taste, takes me back to lazy summer afternoons and bustling family reunions at my grandmother's house.


Ingredients:


- 1 box white cake mix


- 1 package cherry jello


- Cool Whip (enough to generously cover the cake)


Instructions:


1. Bake the Cake: Begin by preparing the boxed cake mix according to the directions on the package. Once baked, allow the cake to cool slightly.
2. Poke the Holes: Using the end of a wooden spoon or a similar tool, gently poke holes across the entire surface of the cake.
3. Prepare the Jello: Follow the instructions on the cherry jello package to prepare it. Immediately pour the liquid jello over the cake, ensuring it seeps into the holes. This will infuse the cake with a burst of cherry flavor.
4. Chill: Place the cake in the refrigerator for a few hours. For best results, let it sit overnight, allowing the flavors to meld beautifully.
5. Top with Cool Whip: Just before serving, spread a generous layer of cool whip over the top of the cake. This creamy topping balances the cake's zesty cherry undertones perfectly.

Nostalgic Family Memory:


As a child, summer meant one thing—family reunions at Grandma's house. Her backyard was a haven of laughter and playful chaos, with cousins running around, grown-ups sharing stories, and a long table laid out with potluck dishes. At the center of it all was Grandma's Cherry Jello Poke Cake.


I remember peering over the kitchen counter, eyes wide with anticipation, as Grandma skillfully poured the cherry jello over the cake. The vibrant red liquid absorbed into the cake, creating a mesmerizing mosaic of color. When it was finally time for dessert, the cool whip topping was like the creamy icing on a summer afternoon well spent.


That first bite was always magical—a perfect blend of moist cake, fruity jello, and velvety cool whip. Even now, each time I make this cake, I'm transported back to those carefree days, surrounded by family and love.


Difficulty Rating: 3/10


This Cherry Jello Poke Cake is delightfully simple to make, making it an ideal dessert for bakers of all skill levels. Its straightforward process and minimal ingredients ensure that anyone can recreate this family favorite with ease.


Classification: Dessert


Whether you're looking to create new memories or revisit old ones, the Cherry Jello Poke Cake is sure to be a hit at your next gathering. Its simplicity and taste make it a timeless classic, ready to be enjoyed by generations to come.

Read more about Appetizers

Read more about Main Dishes

Read more about Desserts

Sun Dried Tomato Stuffed Mushrooms | Made by Meaghan Moineau

Sun Dried Tomato Stuffed Mushrooms | Made by Meaghan Moineau

Savoring Nostalgia: Sun-Dried Tomato Stuffed Mushrooms


A Family Recipe That Transcends Generations


Introduction:

In the heart of every home, there’s a dish that sparks joy, evokes cherished memories, and unites family members around the dining table. For my family, that dish is Sun-Dried Tomato Stuffed Mushrooms. This delectable appetizer, with its rich blend of Mediterranean flavors, has been the centerpiece of our gatherings for as long as I can remember. Whether it's a festive holiday dinner or a casual Sunday brunch, these savory stuffed mushrooms never fail to bring a smile to our faces and warmth to our hearts.


Ingredients:

- White button mushrooms


- Bread crumbs


- Red diced roasted pepper


- Roasted garlic (from one bulb)


- Diced kalamata olives


- Diced onion


- Diced sun-dried tomatoes


- Olive oil


- Cream cheese


- Mozzarella


- Provolone


- Asiago


- Parmesan


- Romano


- Red pepper flakes


- Dried oregano


- Salt and pepper to taste


Instructions:

1. Preheat your oven to 350°F (175°C). Begin by cleaning the mushrooms and removing the stems. Lightly oil the mushroom caps and arrange them on a greased cookie sheet.


2. Finely dice the mushroom stems and set them aside. In a large bowl, combine cream cheese, mozzarella, provolone, asiago, parmesan, romano, half of the dried bread crumbs, red pepper flakes, and dried oregano. Stir until well combined. Season with salt and pepper to taste, then set aside.


3. Over medium heat, sauté the onions in olive oil until they become translucent. Add the diced mushroom stems and continue to sauté for one minute.


4. Stir in the roasted garlic, kalamata olives, roasted red peppers, and sun-dried tomatoes. Cook until the mixture is thoroughly heated.


5. Add the sautéed vegetables to the reserved cream cheese mixture and stir to combine.


6. Scoop one tablespoon of the mixture into each prepared mushroom cap. Sprinkle with the remaining bread crumbs and mozzarella cheese.


7. Bake in the oven for 20-25 minutes until the mushrooms are browned and the cheese is melted. Let them stand for 5 minutes before serving.


Difficulty Rating: 4/10
Classification: Appetizer
A Nostalgic Family Memory:

Every year, as the leaves turned golden and the air grew crisp, my grandmother would prepare her famous Sun-Dried Tomato Stuffed Mushrooms for our Thanksgiving feast. The kitchen would fill with the comforting aroma of garlic and roasted peppers, blending with the warm, creamy cheeses. As a child, I loved helping her mix the ingredients and stuff the mushroom caps, feeling as though I was contributing to our family tradition.


On one particular Thanksgiving, after the meal was devoured and the dishes were cleared, my grandmother shared a story of how she first discovered the recipe. She recounted her travels to the Mediterranean coast, where she fell in love with the vibrant flavors and simple yet exquisite ingredients that inspired her to create this dish. Listening to her tale, I realized that these mushrooms were more than just an appetizer; they were a symbol of her adventurous spirit and her love for family.


To this day, whenever I prepare Sun-Dried Tomato Stuffed Mushrooms, I'm reminded of my grandmother's laughter and the love she infused into every meal. These stuffed mushrooms continue to be a cherished part of our family gatherings, linking the past with the present and creating new memories for future generations to savor.

Read more about Appetizers

Read more about Main Dishes

Read more about Desserts

Avocado Toast With Caramelized Sweet Onion, Grape Tomatoes, Fresh Garden Chives and Chive Blossoms | Made by Meaghan Moineau

Avocado Toast With Caramelized Sweet Onion, Grape Tomatoes, Fresh Garden Chives and Chive Blossoms | Made by Meaghan Moineau

Title: A Nostalgic Bite: Avocado Toast With Caramelized Sweet Onion and Garden Fresh Toppings
Description: Discover the delightful simplicity of Avocado Toast with Caramelized Sweet Onion, Grape Tomatoes, and Fresh Garden Chives—a dish that brings together the perfect blend of flavors and evokes cherished memories. Easy to prepare and bursting with freshness, this recipe is a heartwarming addition to any meal.

---


A Nostalgic Bite: Avocado Toast With Caramelized Sweet Onion and Garden Fresh Toppings


Avocado toast has become a beloved staple in many households, celebrated for its versatility and vibrant flavors. Today, I want to share a version that holds a special place in my heart: Avocado Toast with Caramelized Sweet Onion, Grape Tomatoes, and Fresh Garden Chives. This dish not only tantalizes the taste buds but also carries with it a cherished family memory that makes every bite a nostalgic journey.


Ingredients:


- Olive oil


- 1 yellow sweet onion, thinly sliced


- 1 cup grape tomatoes, halved


- 1 ripe avocado


- 2 slices of quality bread


- A handful of fresh chives, finely chopped


- A few chive blossoms for garnish


- Salt and black ground pepper to taste


Instructions:


1. Caramelize the Onion and Tomatoes: In a skillet, heat a splash of olive oil over medium-high heat. Add the sliced sweet onions and halved grape tomatoes. Sauté for 5-8 minutes, stirring occasionally, until the onions are soft and golden, and the tomatoes are slightly blistered. Season with a pinch of salt and freshly ground black pepper. Set the mixture aside.
2. Prepare the Toast: While the onion and tomatoes are cooking, toast two slices of quality bread to your desired level of crispiness.
3. Assemble the Toast: Once toasted, spread the creamy avocado evenly onto each slice of toast. Sprinkle with a little salt and pepper for added flavor.
4. Top and Garnish: Generously pile the caramelized onion and tomato mixture onto the avocado toast. Finish with a sprinkle of fresh chives and a few delicate chive blossoms for a touch of elegance.

A Taste of Family Tradition


This recipe takes me back to idyllic summer afternoons spent at my grandmother's house. She had a sprawling garden filled with a variety of herbs and vegetables, and every meal seemed to incorporate something freshly picked. The sweet onions and juicy tomatoes were often plucked straight from her garden, their flavors intensified by the sun.


As a child, I loved helping her in the kitchen, watching as she transformed simple ingredients into meals that brought everyone together. Her avocado toast, always adorned with whatever fresh herbs she had on hand, was a favorite. The chive blossoms, with their mild onion flavor and vibrant purple hue, were the crowning touch that made her version truly special.


Each time I prepare this dish, I am reminded of those treasured moments spent in her warm, sunlit kitchen. It's a reminder of the joy found in simplicity and the bonds strengthened over shared meals.


Difficulty: 2/10


This Avocado Toast is remarkably easy to prepare, making it perfect for a quick breakfast, a light lunch, or an elegant appetizer. Its simplicity allows the fresh ingredients to shine, creating a delightful dish that is both nourishing and nostalgic.


---


Whether you're seeking a new way to enjoy avocado toast or longing to create memories that will last a lifetime, this recipe is sure to become a beloved tradition in your home. Enjoy the harmony of flavors and the love that goes into each delicious bite.

Read more about Appetizers

Read more about Main Dishes

Read more about Desserts

Mini Ham Omelets | Made by Meaghan Moineau

Mini Ham Omelets | Made by Meaghan Moineau

Title: "Mini Ham Omelets: A Heartfelt Recipe Packed with Flavor and Memories"
Description: Dive into the delightful world of Mini Ham Omelets, a simple yet flavorful dish that brings a sense of nostalgia and warmth. Perfect as an appetizer, this easy-to-make recipe is bursting with the vibrant flavors of cherry tomatoes, parmesan cheese, and prosciutto, all wrapped in a soft, eggy embrace. Join me as I share a cherished family memory tied to this beloved dish and guide you through creating your very own batch. Rated 3/10 in difficulty, this recipe is a breeze for cooks of all levels.

---


Mini Ham Omelets: A Heartfelt Recipe Packed with Flavor and Memories

Growing up, Sunday mornings were a sacred ritual in our household. The kitchen would awaken with the sizzle of pans and the harmonious chatter of family, all eagerly anticipating a hearty breakfast. Among the many dishes that graced our table, Mini Ham Omelets were a standout favorite. They were more than just a meal; they were a testament to the love and togetherness that Sundays embodied.


A Taste of Tradition

These Mini Ham Omelets are not just a treat for the taste buds; they are a journey back in time. My grandmother, the matriarch of our family, first introduced them to us. Her kitchen was her canvas, and every dish she created was a masterpiece. The smell of prosciutto crisping in the oven, the vibrant colors of fresh cherry tomatoes, and the creamy blend of eggs and parmesan were the defining notes of our Sunday symphony.


The Recipe
Ingredients:

- Cherry tomatoes


- Eggs


- Milk


- Onions


- Parmesan cheese


- Bell pepper


- Prosciutto


Instructions:

1. Begin by washing and chopping the spring onions. Set them aside.


2. In a mixing bowl, whisk the eggs together with the grated Parmesan cheese until well combined.


3. Add the chopped onions, milk, and a sprinkling of pepper to the egg mixture, stirring gently to incorporate.


4. Line six cavities of a silicone muffin mold with slices of prosciutto, creating a delicate, savory nest.


5. Fill each cavity with a couple of tablespoons of the egg mixture.


6. Place a washed and dried cherry tomato in the center of each mold.


7. Bake in a preheated oven at 180°C (356°F) for 12-15 minutes, until the omelets are set and the prosciutto is crisp.


A Nostalgic Twist

As these mini omelets baked, the aroma would fill the air, drawing everyone into the kitchen. We'd gather around the table, each bite a harmonious blend of flavors that told the story of our family. The tangy burst of cherry tomatoes complemented the savory richness of the prosciutto, while the parmesan cheese added a touch of elegance to the soft, fluffy eggs.


These omelets were more than a meal; they were a reminder of the simple joys of life and the importance of family. Every bite was filled with laughter, stories, and the warmth of shared memories.


Difficulty Rating: 3/10

Creating these Mini Ham Omelets is a delightful experience that cooks of all levels can enjoy. With a difficulty rating of just 3 out of 10, this recipe is perfect for anyone looking to recreate a piece of culinary nostalgia with ease.


Classification: Appetizer

Perfect as an appetizer, these Mini Ham Omelets are a versatile dish that can be served at brunch, as a starter for a dinner party, or as a delightful snack during family gatherings.


---


So, gather your ingredients, preheat your oven, and join me in creating these Mini Ham Omelets. Whether you're sharing them with family or enjoying a quiet morning alone, these little bites of nostalgia are sure to bring warmth and joy to your table.

Read more about Appetizers

Read more about Main Dishes

Read more about Desserts

Baked Cinnamon Apple Wedges | Made by Meaghan Moineau

Baked Cinnamon Apple Wedges | Made by Meaghan Moineau

Title: Warm Memories and Sweet Aromas: Baked Cinnamon Apple Wedges
Description: Unveil the heartwarming simplicity of Baked Cinnamon Apple Wedges, a dessert that marries the comforting flavors of fall with cherished family memories. Dive into this easy-to-make recipe that is sure to fill your home with the nostalgic aroma of cinnamon and apples.

---


As the crisp autumn air begins to wrap around us, there's nothing quite like the smell of cinnamon and apples wafting through the house. One bite of these Baked Cinnamon Apple Wedges, and you're instantly transported back to family gatherings where laughter was abundant, and the tables were laden with comfort food. This dessert is not just a treat for the taste buds, but a heartfelt journey back to simpler times.


A Nostalgic Family Memory:

I remember the first time I tasted these delightful apple wedges was at my grandmother's house. It was an annual tradition for the family to gather for Sunday dinners, and as the evening approached, the kitchen would start buzzing with activity. My grandmother had a knack for creating the most delicious desserts with the simplest of ingredients.


One fall evening, as the leaves painted the ground with hues of orange and gold, she decided to make Baked Cinnamon Apple Wedges. The apples, fresh from the orchard, were sliced with loving precision. I watched as she drizzled them with golden maple syrup and dusted them generously with cinnamon and nutmeg, her hands moving deftly, as if conducting an age-old symphony.


As the apples baked, the kitchen was enveloped in a warm, sweet aroma that drew the family together. We gathered around the table, eagerly awaiting the treat. Served warm, the apple wedges were a revelation—soft and tender, with a touch of spice that danced on the palate. It was a moment of pure joy and the perfect end to a cozy family meal.


The Recipe:

*Ingredients:*


- 1 apple


- 2 tablespoons of maple syrup


- 1 teaspoon of cinnamon


- 1/4 teaspoon of nutmeg


*Instructions:*


1. Preheat your oven to 180 degrees Celsius (approximately 350 degrees Fahrenheit).


2. Cut the apple into 10-12 wedges, ensuring they are evenly sized for consistent baking.


3. In a mixing bowl, combine the apple wedges with maple syrup, cinnamon, and nutmeg. Toss them gently to ensure each piece is well-coated.


4. Arrange the apple wedges in a single layer in a small baking dish or on a baking tray.


5. Bake in the preheated oven for about 10 minutes, or until the apples are golden brown and tender.


6. Serve the Baked Cinnamon Apple Wedges while they are warm, either on their own or with a scoop of vanilla ice cream for added indulgence.


Difficulty Rating: 2/10

This recipe is delightfully simple, making it accessible to both novice and experienced cooks.


Classification: Dessert

These Baked Cinnamon Apple Wedges are the perfect dessert for any occasion, embodying the flavors of fall and the warmth of family traditions. Whether you're hosting a large gathering or enjoying a quiet evening at home, this dish is sure to bring a touch of sweetness and nostalgia to your table. Enjoy the taste of cherished memories and the comforting embrace of fall flavors with every bite.

Read more about Appetizers

Read more about Main Dishes

Read more about Desserts

Creamy Lime Pie Square Bites | Made by Meaghan Moineau

Creamy Lime Pie Square Bites | Made by Meaghan Moineau

Creamy Lime Pie Square Bites: A Zesty Delight for Every Occasion


Description: Dive into the refreshing world of citrus with our Creamy Lime Pie Square Bites! Perfectly balanced between tangy and sweet, these bite-sized treats are bound to become your go-to dessert. Whether you're a seasoned baker or a beginner, this recipe is both simple and rewarding. Plus, it's packed with the nostalgic flavors of family gatherings and summer picnics. Let's create some new memories together!

---


Ingredients


- Crust:

- 1 cup all-purpose flour


- 1 cup graham cracker crumbs


- 1 tablespoon lime zest


- 1/4 cup sugar


- 1/2 cup unsalted butter, melted


- Filling:

- The rest of the ingredients as listed above


Instructions


1. Preheat and Prepare:

- Preheat your oven to 350°F (175°C).


- Line an 8x8 glass square dish with foil for easy removal later.


2. Make the Crust:

- In a medium bowl, whisk together all the crust ingredients until you achieve a grainy consistency.


- Firmly press the mixture into the prepared dish, ensuring the bottom and edges are evenly covered.


3. Bake the Crust:

- Place the dish in the oven and bake for 10-15 minutes, or until the crust is golden brown.


- Remove from the oven and allow it to cool for about an hour.


4. Prepare the Filling:

- Combine all filling ingredients in a medium bowl.


- Mix well for about 30 minutes, then reduce speed and mix on low for an additional 3 minutes.


5. Assemble and Bake:

- Pour the filling over the cooled crust, ensuring it reaches all edges.


- Bake in the oven for 5-10 minutes, until the filling is just set.


6. Cool and Chill:

- Place the dish on a cooling rack for 15 minutes.


- Transfer to the refrigerator for 45 minutes to set completely.


7. Serve:

- Carefully lift the foil to remove the pie from the dish.


- Cut into bite-sized squares and serve.


A Taste of Nostalgia


Growing up, every summer my family would gather at my grandmother's house for a weekend of fun, laughter, and of course, food. My grandmother had a sprawling garden filled with citrus trees, and the air was always infused with the fresh scent of limes and lemons. One of my fondest memories is helping her make these Lime Pie Square Bites. I would zest the limes, and she would tell me stories of her own childhood. Those moments in the kitchen taught me more than just cooking; they were lessons in love, patience, and the joy of sharing a meal with family.


Difficulty Rating: 3/10


Category: Dessert

---


Whether you're reliving cherished memories or creating new ones, these Creamy Lime Pie Square Bites are the perfect treat. They offer a delightful balance of creamy and zesty flavors that are sure to impress your guests. Don't forget, if you have lime essential oil on hand, it can add an extra punch of citrus to your dish. Just ensure you're using a high-quality, food-grade oil.


Explore More Lime-Infused Delights:


- Coconut Lime Spritzer


- Blackberry Lime Margaritas


- Strawberry Limeade


Note: Always ensure that any essential oils used in cooking are labeled as food-grade, as not all oils are safe for consumption.

Join our community of over 500,000 subscribers to receive more delicious recipes and exclusive content. Sign up today and start your culinary adventure with us!


---


Thank you for stopping by! If you try these Creamy Lime Pie Square Bites, leave a comment and let us know how they turned out. Happy baking!

Read more about Appetizers

Read more about Main Dishes

Read more about Desserts

Grilled Chicken Hunter Style | Made by Meaghan Moineau

Grilled Chicken Hunter Style | Made by Meaghan Moineau

Title: Savoring Memories: Grilled Chicken Hunter Style
Description: Unlock the secret to a heartwarming dish that brings both flavor and nostalgia to your table. Grilled Chicken Hunter Style is a savory main dish featuring succulent chicken breasts smothered in a rich, zesty sauce with vibrant bell peppers and mushrooms. This recipe is more than just a meal; it's a journey back in time to cherished family gatherings and the comforting aromas of home.

---


Food has a remarkable way of connecting us to our past, stirring memories with every bite. In my family, Grilled Chicken Hunter Style was a beloved staple at Sunday dinners, a dish that brought everyone together. The aroma of sizzling chicken and the vibrant colors of bell peppers and mushrooms would fill the kitchen, creating an atmosphere of warmth and anticipation.


One particular memory stands out. I was ten years old, and it was a crisp autumn evening. The leaves had turned shades of gold and crimson, blanketing our backyard. My grandmother, the heart of our family kitchen, was preparing her renowned Grilled Chicken Hunter Style. She would often allow me to help, teaching me the secrets of her culinary prowess. As we worked side by side, she shared stories of her childhood in Italy, painting vivid pictures of sun-drenched vineyards and bustling markets.


The recipe started with coating boneless chicken breasts in a generous ounce of extra virgin olive oil, setting them aside to absorb the rich, earthy flavor. In a nearby pot, the symphony of sizzling green and red bell peppers with mushrooms was music to our ears. The vibrant colors of the vegetables mirrored the autumn hues outside. Adding Mamma Lombardi's Marinara Sauce, a family favorite, the kitchen was soon enveloped in a comforting aroma. The sauce simmered for twelve minutes, allowing the flavors to meld perfectly.


While the sauce worked its magic, we took the marinated chicken to the grill. My grandfather, ever the grill master, took charge, ensuring the chicken was cooked to perfection – juicy and tender, with just the right amount of char. Once ready, the grilled chicken was placed on a serving tray, the anticipation building as the rich, zesty sauce was ladled over the top. A generous sprinkle of grated romano cheese completed the masterpiece.


As we gathered around the table, laughter and stories filled the air, much like the enticing aroma of our meal. Each bite was a celebration, a reminder of the love and tradition that infused every dish my grandmother prepared.


Grilled Chicken Hunter Style is more than just a main dish; it is a tapestry woven with flavors and memories. Rated a 6 out of 10 in difficulty, this recipe is accessible yet offers enough complexity to impress your dinner guests. Whether you're creating new traditions or savoring nostalgic moments, this dish promises to delight and nourish both body and soul.


---


Ingredients:

- Boneless chicken breasts


- Extra virgin olive oil (3 ounces total)


- 1 Green bell pepper


- 1 Red bell pepper


- Mushrooms


- Mamma Lombardi's Marinara Sauce


- Grated Romano cheese


- Black salt and freshly ground black pepper


Instructions:

1. Coat the chicken breasts with 1 ounce of extra virgin olive oil and set aside.


2. In a 2-quart sauce pot, add 2 ounces of extra virgin olive oil, the green bell pepper, red bell pepper, and mushrooms. Cook over medium heat until the vegetables begin to brown slightly.


3. Add Mamma Lombardi's Marinara Sauce, salt, and freshly ground black pepper. Simmer for approximately 12 minutes.


4. Grill the chicken breasts until thoroughly cooked and juicy.


5. Place the grilled chicken on a serving tray and ladle the sauce over the top.


6. Top with grated Romano cheese and serve.


Relive your own cherished memories or create new ones with Grilled Chicken Hunter Style. This dish is sure to become a favorite at your table, just as it has been at ours for generations.

Read more about Appetizers

Read more about Main Dishes

Read more about Desserts

Lemon Drop Jello Shots | Made by Meaghan Moineau

Lemon Drop Jello Shots | Made by Meaghan Moineau

Title: Nostalgic Citrus Delights: Lemon Drop Jello Shots
Description: Dive into a fun and tangy adventure with Lemon Drop Jello Shots, where nostalgia meets creativity. Perfect as a dessert or party appetizer, these citrusy delights are sure to impress your guests. Learn how to craft this vibrant treat and discover a heartwarming family memory tied to its creation.

---


The Art of Crafting Lemon Drop Jello Shots: A Nostalgic Citrus Delight

There's something incredibly whimsical about Lemon Drop Jello Shots. The vibrant yellow hue, the tangy burst of flavor, and the playful presentation all combine to create a dish that's as much fun to make as it is to eat. This recipe holds a special place in my heart, evoking memories of lively family gatherings and sun-drenched summer afternoons.


A Taste of Nostalgia

Growing up, my family had an annual summer tradition. Every year, we'd gather at my grandparents' house, a charming old home with a sprawling backyard perfect for hosting our large, lively clan. My grandmother, ever the culinary enthusiast, would always prepare a feast. But what everyone looked forward to the most were her Lemon Drop Jello Shots.


I remember her in the kitchen, her hands deftly wielding a knife to transform lemons into delightful vessels for her jello concoction. As children, we'd watch in awe, eager for the moment we could indulge in these citrusy treats. The adults enjoyed them just as much, always praising the refreshing twist that the lemon vodka added to the classic jello shot.


Crafting Your Citrus Masterpiece
Ingredients:

- Lemons (as many as you'd like to make)


- 1 box lemon jello


- 1 cup sugar


- 1 cup water


- 1/2 cup fresh lemon juice


- 1 cup lemon vodka


Instructions:
1. Prepare the Lemons: Begin by slicing the lemons in half and juicing them. This not only makes it easier to remove the pulp but also allows you to reserve the fresh lemon juice for later use.
2. Hollow Out the Lemons: Carefully turn each lemon half inside out and remove the pith and membrane. This creates a perfect citrus cup ready to be filled with jello.
3. Make the Jello Mixture: In a saucepan, combine the lemon jello, sugar, water, reserved lemon juice, and lemon vodka. Stir until the sugar has dissolved and the mixture is well combined.
4. Set the Lemon Cups: Place the hollowed-out lemon halves into the cups of a muffin pan to keep them stable.
5. Pour and Chill: Pour the jello mixture into each lemon half, filling them to the brim. Refrigerate overnight to allow the jello to set firmly.
6. Slice and Serve: Using a sharp, straight-edged knife, cut each lemon half into wedges. Serve and enjoy the refreshing, zesty flavors that bring back those cherished memories of summer.
Difficulty Rating: 5/10
Classification: Dessert/Appetizer
A Final Note:

Creating Lemon Drop Jello Shots is a delightful way to blend culinary creativity with nostalgia. Whether you're preparing them for a festive gathering or simply want to indulge in a bit of summer magic, these citrusy gems are sure to bring smiles and evoke treasured memories. So go ahead, dive into the world of Lemon Drop Jello Shots, and create some new memories of your own!

Read more about Appetizers

Read more about Main Dishes

Read more about Desserts

Beef Pot Pies with Irish Cheddar Crust | Made by Meaghan Moineau

Beef Pot Pies with Irish Cheddar Crust | Made by Meaghan Moineau

Comforting Beef Pot Pies with Irish Cheddar Crust: A Taste of Home


Description: Dive into the heartwarming flavors of our Beef Pot Pies with Irish Cheddar Crust. This savory dish combines tender beef chuck with a rich medley of vegetables and herbs, all enveloped in a buttery, cheesy crust. Perfect for family gatherings or a comforting weeknight meal, these pot pies bring a taste of Ireland to your table. Follow along for a step-by-step guide, infused with a touch of nostalgia and rated for your cooking pleasure.

---


A Culinary Journey: Beef Pot Pies with Irish Cheddar Crust


There’s something undeniably comforting about a pot pie. The flaky, golden crust that gives way to a warm, hearty filling is a culinary hug on a plate. Today, we’re exploring a delicious variation with a nod to Irish flavors—Beef Pot Pies with Irish Cheddar Crust. This dish is not just a main course; it's a journey back to fond family memories and the joy of sharing good food.


Ingredients:


- For the Crust:

- 1 cup unsalted butter, cut into pieces


- 2 cups all-purpose flour


- 1 tablespoon sugar


- 1 teaspoon salt


- 1 teaspoon dry mustard


- 1/4 teaspoon cayenne pepper


- 1 cup shredded sharp cheddar cheese (preferably Irish)


- 1/2 cup ice water


- For the Filling:

- 2 tablespoons vegetable oil, divided


- 1 1/2 pounds beef chuck meat, cut into chunks


- Salt and pepper, to taste


- 1 large onion, diced


- 2 large carrots, diced


- 3 cloves garlic, minced


- 1 teaspoon fresh thyme, chopped


- 1 teaspoon fresh marjoram, chopped


- 1/4 cup all-purpose flour


- 2 cups canned beef broth


- 1 cup water


- 1 tablespoon Dijon mustard


- 2 tablespoons fresh parsley, chopped


- 1 egg, beaten (for egg wash)


Instructions:


1. Prepare the Crust:

- Start by chilling the butter pieces in the freezer for 15 minutes. In a food processor, combine flour, sugar, dry mustard, salt, and cayenne pepper. Pulse to blend.


- Add the chilled butter and cheddar cheese to the flour mixture. Pulse until coarse crumbs form.


- Gradually add ice water, pulsing in between, until the dough starts to come together. Transfer to a bowl, pressing to form a cohesive dough.


- Divide the dough into two portions, shape into disks, wrap in plastic wrap, and refrigerate for at least an hour.


2. Make the Filling:

- Pat beef chunks dry and season with salt and pepper. In a large skillet, heat 1 tablespoon of oil over medium-high heat. Brown the beef on one side without stirring, about 5-10 minutes, then stir and cook until no longer pink. Remove and set aside.


- In the same skillet, reduce heat to medium, and add the remaining oil. Sauté onions and carrots until softened, about 5 minutes. Add garlic, thyme, and marjoram, cooking until fragrant.


- Stir in flour and cook for a minute. Gradually add beef broth and water, stirring constantly. Return beef to the skillet, bring to a simmer, then reduce heat. Cover and cook until beef is tender, about 45 minutes.


- Off heat, stir in Dijon mustard and parsley. Adjust seasoning with salt and pepper. Let the filling cool.


3. Assemble the Pot Pies:

- Preheat oven to 375°F (190°C). Roll out dough disks on a floured surface. Line individual pie pans with one disk, fill with beef mixture, and top with the second disk. Crimp edges to seal.


- Brush the top crust with beaten egg for a golden finish. Cut slits for steam to escape.


- Bake for 30-35 minutes, or until the crust is golden brown. Let cool slightly before serving.


A Family Memory


Growing up, pot pies were a staple on our family table, especially during the chilly months. I vividly remember my grandmother bustling around her cozy kitchen, her hands deftly working the dough while a pot of filling simmered on the stove. The aroma of beef, thyme, and cheddar would fill the air, wrapping us in warmth and anticipation.


Every bite was a reminder of those cherished family gatherings, where stories were shared around the dinner table and laughter echoed through the rooms. These pot pies were more than just a meal—they were a symbol of love, tradition, and the comforting embrace of home.


Difficulty Rating: 6/10


Creating these Beef Pot Pies with Irish Cheddar Crust requires a moderate amount of effort, from preparing the crust to simmering the filling. However, the end result is well worth the time and patience, promising a dish that's rich in flavor and sentiment. Perfect as a Main Dish, this recipe is sure to become a family favorite, evoking memories of togetherness and home-cooked goodness.

Read more about Appetizers

Read more about Main Dishes

Read more about Desserts

Mushroom Tarragon Fish | Made by Meaghan Moineau

Mushroom Tarragon Fish | Made by Meaghan Moineau

Savory Elegance: Mushroom Tarragon Fish Recipe


A Nostalgic Dance of Flavors


In the bustling kitchen of my childhood home, the aroma of fresh herbs and sizzling butter often mingled with laughter and stories from generations past. One dish that holds a special place in my heart is the Mushroom Tarragon Fish—a recipe that captures the essence of simplicity and elegance, yet is rich in flavor and family tradition.


A Family Tradition


I remember my grandmother, with her gentle hands and wise eyes, preparing this dish on special occasions. She would regale us with tales from her youth, where every ingredient had a story, and every meal was a celebration of life. The Mushroom Tarragon Fish was her secret weapon; a dish she claimed could win over the fiercest critic with its delicate balance of flavors.


As a child, I was often tasked with arranging the fish fillets in the baking pan, carefully overlapping the thinner ends as instructed. It was a small but significant role, making me feel part of the culinary magic that unfolded in our family kitchen.


Recipe: Mushroom Tarragon Fish


Ingredients:

- 4 to 6 lean white fish fillets


- 1 cup dry bread crumbs


- 1/4 cup butter, melted


- 1/2 cup green onions, chopped


- 1 cup mushrooms, sliced


- Salt, to taste


- Pepper, to taste


- 2 teaspoons Spice Islands tarragon


- 1/2 cup white wine


Instructions:
1. Preheat Oven: Start by preheating your oven to 400 degrees F.
2. Prepare Fish: Arrange the fish fillets at the bottom of a 13 x 9-inch baking pan. Overlap the thinner ends of the fish to prevent overcooking.
3. Season: Evenly sprinkle the white wine over the fish, followed by tarragon, salt, and pepper to your taste.
4. Add Toppings: Spread the mushrooms and green onions over the seasoned fish. Next, sprinkle with dry bread crumbs for a crunchy texture.
5. Drizzle with Butter: Drizzle melted butter over the top to enhance the flavors and ensure a golden crust.
6. Bake: Place in the oven and bake for 15 to 20 minutes or until the fish flakes easily when tested with a fork.
7. Serve and Enjoy: This dish serves as a delightful main course, perfect for 4 to 6 servings.

Culinary Memories


The beauty of the Mushroom Tarragon Fish lies in its simplicity—it's a quick and stylish entrée that effortlessly impresses. Each bite takes me back to those cherished moments in my grandmother's kitchen, where love was the main ingredient.


This dish is rated 3 out of 10 for difficulty, making it an accessible yet sophisticated choice for any aspiring home chef. Classified as a Main Dish, it pairs beautifully with a side of roasted vegetables or a fresh garden salad.

Conclusion


In a world that often rushes by, the Mushroom Tarragon Fish is a gentle reminder to savor the simple joys of life and the warmth of family traditions. Whether you're preparing it for a cozy dinner at home or a special gathering, this recipe promises to bring a touch of nostalgia and a whole lot of flavor to your table.

Read more about Appetizers

Read more about Main Dishes

Read more about Desserts

Avocado Egg Salad | Made by Meaghan Moineau

Avocado Egg Salad | Made by Meaghan Moineau

Title: Avocado Egg Salad: A Nostalgic Twist on a Classic Recipe
Description: Dive into the creamy, zesty world of Avocado Egg Salad, a delightful dish that combines wholesome ingredients with a touch of nostalgia. Perfect as an appetizer or a light main dish, this recipe is easy to prepare and bursting with flavor. Let's explore this culinary journey that’s not just about taste but also about cherished family memories.

---


When I think of Avocado Egg Salad, I am transported back to sunlit Sunday afternoons at my grandmother's house. The kitchen would be filled with laughter and the tantalizing aroma of freshly toasted whole wheat bread, a scent that promised comfort and warmth. Sundays were special, a day when our family would gather and share stories over meals that were simple yet profound in their ability to bring us all together.


One particular Sunday, when I was about ten years old, stands out vividly. It was the first time I was entrusted with helping make the Avocado Egg Salad, a dish my grandmother had perfected over the years. She believed in the magic of food, how it could evoke memories and strengthen bonds. As she handed me a ripe avocado, she shared stories of her childhood, of how avocados were a luxury during her time and how she would savor every bite.


The preparation began with boiling the eggs, a task I performed with great seriousness, knowing that these eggs would soon be transformed into something delicious. Once boiled, we immersed them in cold water to cool, a step that never failed to intrigue me with its simplicity and effectiveness.


Grandma's hands, though weathered with time, moved with grace and precision as she peeled the avocado and mashed it in a bowl, a task I eagerly took over. She taught me to squirt a bit of lemon over the mashed avocado, explaining that it not only enhanced the flavor but also kept the vibrant green color intact.


Together, we peeled and chopped the cooled eggs, mixing them gently with the avocado until they were well combined. The addition of black pepper, a crumbled seasoning cube, and a finely chopped scotch bonnet pepper added a kick that was both surprising and delightful. It was this unique blend of flavors that made the dish a family favorite.


As I toasted the whole wheat bread, Grandma showed me how to roll it out with a rolling pin, a trick she had learned from her mother. Cutting off the edges, we placed a generous serving of the avocado egg mixture on the bread, creating a simple yet elegant presentation.


These moments, filled with love and togetherness, are what make cooking such a treasured activity. The Avocado Egg Salad was more than just a meal; it was a symbol of our family's bond, a recipe passed down through generations, each with its own story to tell.


Difficulty Rating: 3/10
Classification: Appetizer/Main Dish

With its creamy texture and rich flavors, the Avocado Egg Salad is a dish that can easily transition from a light appetizer to a satisfying main course. It's a breeze to prepare, making it ideal for both novice cooks and seasoned chefs alike. Whether you're looking to recreate a cherished family memory or simply enjoy a nutritious and delicious meal, this recipe is sure to become a beloved staple in your kitchen.

Read more about Appetizers

Read more about Main Dishes

Read more about Desserts

Spicy Seasoned Loaded Guacamole | Made by Meaghan Moineau

Spicy Seasoned Loaded Guacamole | Made by Meaghan Moineau

Title: A Taste of Home: Spicy Seasoned Loaded Guacamole
Description: Dive into the vibrant and flavorful world of Spicy Seasoned Loaded Guacamole. This zesty appetizer, rich in texture and taste, combines fresh ingredients with a touch of nostalgia. Perfect for family gatherings or simply indulging your cravings, this guacamole is sure to be a hit. Discover the recipe that brings back cherished family memories and learn how to create this easy yet unforgettable dish.

---


There's something incredibly magical about the ability of food to transport us back in time. For me, Spicy Seasoned Loaded Guacamole is more than just a delightful appetizer; it's a bridge to countless summers spent in my grandparents' backyard. The mingling scents of fresh cilantro and sizzling peppers would waft through the air as preparations for our family barbecue commenced.


Ingredients:

- 3 ripe avocados


- 2 tablespoons lime juice


- 1 tablespoon white wine vinegar


- 1/4 cup finely chopped red onion


- 1 finely chopped serrano pepper (adjust to taste)


- 1/4 cup chopped fresh cilantro


- 1 diced Roma tomato


- 1 teaspoon salt


- 1/2 teaspoon black pepper


- 1/2 teaspoon cumin


- 1/2 teaspoon garlic powder


Instructions:

1. In a medium bowl, mash the avocados to your desired consistency. I prefer mine a little chunky, just like Grandma used to make them.


2. Mix in the lime juice and white wine vinegar, ensuring the avocado stays vibrant and green.


3. Stir in the salt, black pepper, cumin, and garlic powder. The aroma alone will transport you to a sunny afternoon.


4. Fold in the red onion, serrano pepper, cilantro, and diced Roma tomato. Each ingredient adds a layer of flavor and texture, creating a symphony of taste that dances on your palate.


A Nostalgic Family Memory:

Every family gathering at my grandparents' place was a feast for the senses. As the adults bustled around the grill, we kids would sneak into the kitchen, eager to help—or perhaps just to steal a taste of whatever was being prepared. My grandmother would always set aside the avocados for me, knowing how much I loved mashing them with a fork. Her secret, she claimed, lay in the perfect balance of lime and vinegar, ensuring the guacamole was both refreshing and tangy.


One summer, as the sun dipped below the horizon, I remember sitting on the porch with my grandfather. We shared a bowl of guacamole and tortilla chips while he told me stories of his own childhood in Mexico. Those moments, filled with laughter and familial warmth, have stayed with me. Each scoop of this Spicy Seasoned Loaded Guacamole brings back the joy and love of those evenings, making every bite a nostalgic journey.


Difficulty Rating: 3/10
Classification: Appetizer

Whether you're looking to impress at your next gathering or simply wish to indulge in a flavorful snack, this Spicy Seasoned Loaded Guacamole is your go-to recipe. With its easy preparation and rich taste, it's bound to become a staple in your culinary repertoire. So, grab those avocados and get ready to create a dish that not only delights the taste buds but also warms the heart.

Read more about Appetizers

Read more about Main Dishes

Read more about Desserts

Chicken Farfalle with Low-Fat Alfredo Sauce | Made by Meaghan Moineau

Chicken Farfalle with Low-Fat Alfredo Sauce | Made by Meaghan Moineau

A Taste of Tradition: Chicken Farfalle with Low-Fat Alfredo Sauce


Description

Take a delightful culinary journey with our Chicken Farfalle with Low-Fat Alfredo Sauce, a dish that marries rich flavors and a touch of nostalgia. This main dish is an easy-to-make recipe perfect for family dinners, offering a healthy twist on a classic favorite. With tender chicken breasts and perfectly cooked farfalle pasta enveloped in a creamy, low-fat Alfredo sauce, this dish is sure to become a household staple. Rated at a 5 out of 10 for difficulty, this recipe is ideal for both novice and seasoned cooks looking to create something special.

Ingredients

- 2 boneless chicken breasts

- 8 oz farfalle pasta


- 2 tbsp butter


- 2 tbsp all-purpose flour


- 2 cups skim milk


- 1/4 cup white wine


- 1/4 cup fresh lemon juice


- 1/2 tsp garlic powder


- Salt and black pepper to taste


- 1/2 cup grated Parmesan cheese


- Olive oil (for sautéing chicken)


- Optional: black bell pepper, extra salt, and pepper for seasoning


Instructions

1. Prepare the Chicken: Season the boneless chicken breasts with salt and pepper. In a skillet, heat a small amount of olive oil over medium heat. Sauté the chicken until golden brown and cooked through. Set aside to cool slightly before slicing into strips.
2. Cook the Pasta: While the chicken is cooking, bring a pot of salted water to a boil and cook the farfalle pasta according to package instructions. Drain and set aside.
3. Make the Alfredo Sauce: In a saucepan, melt butter over medium heat. Stir in flour to create a roux, cooking for about 1 minute. Gradually whisk in the skim milk, ensuring there are no lumps. Add salt, black pepper, garlic powder, lemon juice, and white wine. Bring the mixture to a boil, whisking constantly until the sauce begins to thicken. Reduce the heat and let it simmer for an additional 5 minutes.
4. Combine and Serve: In a large sauté pan, combine the cooked pasta and chicken. Pour the Alfredo sauce over the mixture and toss gently to coat. Sprinkle with grated Parmesan cheese and any additional salt and pepper if needed. Serve immediately.

A Nostalgic Family Memory


Growing up, Sunday dinners at my grandmother’s house were a cherished tradition. Her kitchen was always filled with the enticing aromas of her cooking. One of my favorite dishes was her Chicken Farfalle with Alfredo Sauce. I remember the warmth of the kitchen as she stood over the stove, expertly whisking the sauce while sharing stories from her childhood. The laughter and love shared around the dining table made every bite taste even better. Recreating this dish today brings those fond memories to life, blending the past with the present in every savory bite.


Conclusion


This Chicken Farfalle with Low-Fat Alfredo Sauce is more than just a meal; it's a slice of family history and tradition. With its simple preparation and delicious results, it's a dish that's sure to bring joy and nourishment to your family table. Try it out and make your own memories with this comforting and flavorful recipe.

Read more about Appetizers

Read more about Main Dishes

Read more about Desserts

Brown Sugar and Balsamic Glazed Pork Loin | Made by Meaghan Moineau

Brown Sugar and Balsamic Glazed Pork Loin | Made by Meaghan Moineau

A Nostalgic Feast: Brown Sugar and Balsamic Glazed Pork Loin


A Dish That Brings Family Together


There's something truly magical about a dish that not only tantalizes the taste buds but also warms the soul with cherished memories. Our Brown Sugar and Balsamic Glazed Pork Loin is one such recipe, combining succulent flavors with a touch of nostalgia. This main dish, with its perfect blend of sweet and savory, has been a centerpiece of family gatherings for generations. Its simplicity belies the profound impact it has on those who share it, making it a timeless favorite.


The Recipe


Ingredients:

- 1 boneless pork loin

- 1 teaspoon ground sage


- 1 teaspoon salt


- 1/2 teaspoon pepper


- 1 clove garlic, minced


- 1/2 cup water


For the Glaze:

- 1/2 cup brown sugar

- 1 tablespoon cornstarch


- 1/4 cup balsamic vinegar


- 1/2 cup water


- 2 tablespoons soy sauce


Instructions:

1. In a small bowl, combine the ground sage, salt, pepper, and minced garlic. Rub this aromatic mixture evenly over the pork loin.

2. Place the seasoned pork loin in a slow cooker and add 1/2 cup of water. Cook on low for 6 to 8 hours, allowing the flavors to meld and the meat to become tender and juicy.


3. About an hour before the pork loin is done, prepare the glaze. In a small saucepan, combine the brown sugar, cornstarch, balsamic vinegar, water, and soy sauce. Heat over medium heat, stirring constantly until the mixture thickens into a smooth, glossy glaze.


4. Brush the pork loin with the glaze two or three times during the last hour of cooking to infuse it with that irresistible sweet and tangy flavor.


5. Serve the pork loin with the remaining glaze on the side for a dish that is sure to delight.


A Taste of Nostalgia


Every time I prepare this Brown Sugar and Balsamic Glazed Pork Loin, I am transported back to my grandmother's cozy kitchen. The aroma of sage and garlic would fill the air, enticing everyone to gather around the table. My grandmother, with her warm smile and gentle hands, would tell stories of her own childhood while expertly preparing the glaze. It was during these moments that I learned the true value of family and the joy of sharing a meal made with love.


One particular memory stands out—Thanksgiving Day, many years ago. The house was bustling with relatives, laughter echoing through the rooms. As the afternoon sun streamed through the windows, we all sat down to a feast that included this beloved pork loin. The glaze shimmered under the soft light, and the first bite was nothing short of divine. It was a moment of connection, a reminder of the bonds that food can strengthen.


Recipe Difficulty and Classification


Difficulty: 3/10
Classification: Main Dish

This recipe is easy to follow, making it accessible even to novice cooks. The key lies in the slow cooking process, which allows the pork loin to absorb the rich flavors of the glaze. It's the perfect main dish for special occasions or simply for when you want to create a meal that's both delicious and memorable.


Conclusion


Brown Sugar and Balsamic Glazed Pork Loin is more than just a dish—it's a journey through time, a tribute to family traditions, and a celebration of flavors that never fail to impress. Whether you're creating new memories or reminiscing about old ones, this recipe is a surefire way to bring warmth and joy to your table. So gather your loved ones, prepare this delightful dish, and savor the moments that truly matter.

Read more about Appetizers

Read more about Main Dishes

Read more about Desserts

Garlic & Spice Plantain Chips | Made by Meaghan Moineau

Garlic & Spice Plantain Chips | Made by Meaghan Moineau

Title: Crispy and Flavorful: Garlic & Spice Plantain Chips for Every Occasion
Description: Discover the irresistible blend of spices in our Garlic & Spice Plantain Chips recipe. With just a few simple ingredients and steps, you can create a delicious and nostalgic appetizer that brings a taste of home to any gathering.

---


Garlic & Spice Plantain Chips: A Nostalgic Crunch at Your Fingertips


When it comes to comfort food, few things compare to the crisp, aromatic delight of plantain chips. Growing up in a bustling household, plantain chips held a special place in our family gatherings. I vividly remember my grandmother's kitchen, filled with the inviting aroma of spices, as she skillfully prepared these chips with love. This Garlic & Spice Plantain Chips recipe not only brings those cherished memories to life but also adds a modern twist with its bold flavors.


Ingredients:

- 2 large plantains

- 2 tablespoons olive oil


- 1 teaspoon garlic powder


- 1 teaspoon paprika


- 1/2 teaspoon cumin


- 1/4 teaspoon cayenne pepper (adjust to taste)


- 1/2 teaspoon salt


Instructions:

1. Preheat the Oven: Begin by preheating your oven to 400°F (200°C). Line a baking sheet with parchment paper or silicone mats to prevent sticking.
2. Prepare the Plantains: Cut off both ends of the plantains. Make a lengthwise slit along the skin and peel it off. Slice each plantain into thin, even pieces. Don't worry if they aren't perfect; rustic is charming!
3. Season the Slices: In a medium-sized bowl, toss the plantain slices with olive oil, garlic powder, paprika, cumin, cayenne pepper, and salt. Stir well to ensure each slice is coated with the flavorful mix.
4. Bake to Perfection: Arrange the seasoned plantain slices in a single layer on the prepared baking sheets. Bake for 15-20 minutes, flipping them at the 8- or 9-minute mark for even crispiness. For optimal results, swap the baking sheets between the top and bottom racks halfway through the baking time.
5. Golden Goodness: Remove the chips from the oven once the edges turn a lovely golden brown. Allow them to cool slightly before serving.

A Taste of Home


Every bite of these plantain chips transports me back to my grandmother's kitchen, where laughter echoed and stories were shared over bowls of crispy snacks. Her gentle hands would guide mine as we sliced plantains together, teaching me not just a recipe, but a tradition. These moments, filled with warmth and love, are what make food truly special.


Difficulty Rating: 3/10


This recipe is straightforward and ideal for cooks of all skill levels. The hardest part might be peeling and slicing the plantains, but the reward is well worth it.


Perfect for Any Occasion


Classified as an appetizer, these Garlic & Spice Plantain Chips are perfect for any gathering—whether as a side dish at a family dinner or a snack at a lively party. Their nostalgic flavor and crunchy texture make them an irresistible treat that everyone will love.


Explore the magic of simple, flavorful ingredients and create your own cherished memories with this delightful recipe. Enjoy the journey of taste and tradition with every crunch!

Read more about Appetizers

Read more about Main Dishes

Read more about Desserts

Peach & Brown Sugar Pancakes | Made by Meaghan Moineau

Peach & Brown Sugar Pancakes | Made by Meaghan Moineau

Title: Sunday Morning Bliss: The Irresistible Allure of Peach & Brown Sugar Pancakes
Description: Dive into the comforting embrace of Peach & Brown Sugar Pancakes, a delightful twist on a breakfast classic that will transport you back to cherished family weekends. With a hint of nostalgia and a splash of sweetness, this dish is a testament to the timeless joy of sharing a meal with loved ones. Join us as we explore this easy-to-make treat, perfect for creating new memories around the breakfast table.

---


As the sun peeked through the curtains on Sunday mornings, the aroma of breakfast filled our home, heralding the start of a day rich with family warmth and laughter. Those cherished mornings were marked by the sizzle of batter hitting the griddle and the sweet, comforting scent of Peach & Brown Sugar Pancakes. This delightful recipe, passed down through generations, holds the secret to transforming any morning into a special occasion.


Ingredients:

- 1/4 cup brown sugar

- 1 egg


- 3/4 cup milk


- 1 1/2 cups pancake mix


- 1 can of peaches (3/4 can for puree)


- 2 tablespoons shortening


- 2 tablespoons vegetable oil


Instructions:

1. Prepare the Peaches: Begin by pureeing 3/4 of the canned peaches. Place the slices, without the juice, into a blender or food processor. Pulse a couple of times to achieve a chunky, applesauce-like texture.
2. Heat the Griddle: Warm up your skillet or griddle over medium-high heat, adding the shortening to prepare for cooking.
3. Mix the Wet Ingredients: In a small bowl or cup, whisk the egg together with the vegetable oil until well combined.
4. Create the Batter: In a medium mixing bowl, combine the pancake mix, milk, egg and oil mixture, and brown sugar. Whisk the ingredients until the batter is smooth but still slightly lumpy—overmixing can make the pancakes tough. Gently fold in the peach puree to infuse the batter with fruity goodness.
5. Cook the Pancakes: Pour the batter onto the hot skillet, using about 1/4 cup for each pancake to create large puddles of dough. Cook until bubbles form on the surface of the pancakes, then flip once to ensure even browning. Continue cooking until the pancakes are golden brown.
6. Serve and Enjoy: Serve the pancakes hot, topped with butter and syrup if desired, to enhance their flavor.

A Stroll Down Memory Lane


Every bite of these pancakes takes me back to those cozy mornings spent in my grandmother's kitchen, where stories flowed as freely as the maple syrup. I remember sitting on a stool, eagerly watching her skillfully flip each pancake, marveling at how she could turn simple ingredients into something magical. Her laughter filled the room, making those moments unforgettable. Sharing this recipe with my own family now, I see the same joy light up their faces, and it feels like a beautiful continuation of our family's culinary legacy.


Difficulty Rating: 3/10


Classification: Main Dish


These Peach & Brown Sugar Pancakes are not just a treat for the taste buds but a heartfelt reminder of the power of food to bring families together. Easy to prepare and delightful to eat, they are perfect for creating new traditions while honoring old ones. So gather your loved ones, and let the magic of these pancakes make your mornings a little sweeter.

Read more about Appetizers

Read more about Main Dishes

Read more about Desserts

Dried Cranberry Chocolate Cookies | Made by Meaghan Moineau

Dried Cranberry Chocolate Cookies | Made by Meaghan Moineau

Nostalgic Delights: Dried Cranberry Chocolate Cookies


Description

Dive into the warm embrace of nostalgia with our Dried Cranberry Chocolate Cookies recipe. Perfectly nestled between the sweet tang of cranberries and the rich decadence of chocolate, these cookies are the ideal dessert to accompany cherished family moments. Simple to make yet irresistibly delicious, they promise to fill your home with the comforting aroma of love and togetherness.

Ingredients

- 1 cup unsalted butter, softened

- 1 cup granulated sugar


- 1 cup light brown sugar, packed


- 2 large eggs


- 1 egg yolk


- 2 teaspoons vanilla extract


- 3 cups plain flour


- 1 teaspoon baking powder


- 1 teaspoon baking soda


- 1/2 teaspoon kosher salt


- 2 cups old-fashioned rolled oats


- 1 cup semisweet chocolate chips


- 1 cup white chocolate chips


- 1 cup dried cranberries


Instructions

1. Preparation: Preheat your oven to 350°F (175°C). Line two baking sheets with parchment paper.
2. Mix Dry Ingredients: In a medium bowl, whisk together the flour, baking powder, baking soda, and kosher salt.
3. Cream Butter and Sugars: In a standing mixer fitted with the paddle attachment, beat the butter, granulated sugar, and brown sugar on medium speed until creamy and smooth.
4. Incorporate Eggs and Vanilla: Add the eggs one at a time, followed by the egg yolk, beating well between each addition. Mix in the vanilla extract.
5. Combine Ingredients: Gradually add the dry ingredients to the wet mixture, beating until just combined.
6. Add Oats, Chocolate, and Cranberries: Stir in the rolled oats, semisweet chocolate chips, white chocolate chips, and dried cranberries until evenly distributed throughout the dough.
7. Shape Cookies: Spoon heaping teaspoons of dough onto the prepared baking sheets, spacing them about 2 inches apart.
8. Bake: Bake for 12 to 15 minutes, or until the cookies begin to brown at the edges.
9. Cool: Allow the cookies to cool on the baking sheets for a few minutes before transferring them to a wire rack to cool completely.

Family Memory

Growing up, these Dried Cranberry Chocolate Cookies were a staple in our household, especially during the festive seasons. I vividly remember the first time my grandmother taught me how to make them. Her kitchen would transform into a wonderland of scents—sweet, buttery, and slightly tangy, with a hint of chocolate.

On chilly winter afternoons, my siblings and I would huddle around the kitchen table, eagerly awaiting our turn to mix or taste-test the dough. Grandma would always sneak a few extra cranberries and chocolate chips into our mouths, winking conspiratorially as if it were our little secret. Those moments, filled with laughter and the gentle hum of family chatter, are etched in my memory, reminding me of the love and warmth that food can bring to our lives.


Difficulty: 4/10

Classification: Dessert


Indulge in these Dried Cranberry Chocolate Cookies, and may they bring you as much joy and fond memories as they have brought to our family. Whether you're creating new traditions or celebrating old ones, these cookies are sure to become a beloved staple in your home.

Read more about Appetizers

Read more about Main Dishes

Read more about Desserts