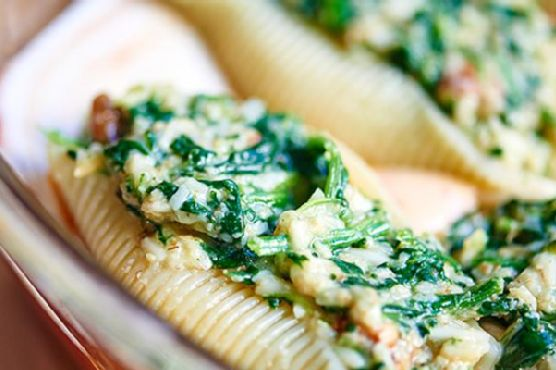
Cheesy Spinach Stuffed Shells
Intro
There’s something about the combination of cheese and pasta that feels like a warm hug on a cold day. I remember family gatherings where this dish was a staple on the dining table. My grandmother would lovingly prepare these Cheesy Spinach Stuffed Shells, and the aroma that filled the house was just as comforting as the dish itself. Those gatherings were filled with laughter, stories, and the savory delight of pasta shells stuffed to the brim with cheesy goodness. Today, I’m excited to share this recipe with you, hoping it brings warmth and joy to your own home.
Why You’ll Love It
This dish is a delightful blend of creamy, cheesy flavors with a hint of fresh greens from the spinach. It’s comforting, filling, and perfect for both family dinners and special occasions. The combination of alfredo and spaghetti sauce creates a rich, savory base that complements the cheesy filling magnificently. Plus, the addition of pecans adds a delightful crunch, making each bite an experience to savor.
Ingredients
- Jumbo pasta shells
- Cooked frozen spinach
- Wheat germ
- Shredded parmesan cheese
- Pecans, chopped
- Shredded Mexican cheese
- Diced green onions
- Salt
- Dried basil
- 2 eggs
- Water
- Alfredo sauce
- Spaghetti sauce
Instructions
- Preheat your oven to 350°F (175°C).
- Start by boiling the jumbo shells in a large pot of salted water for about 9 minutes. They should be al dente as they’ll finish cooking in the oven later. Drain and place them face down on a paper towel to remove excess water.
- While the shells are cooking, prepare the filling. Microwave the frozen spinach until thawed, following the package instructions. Do not add extra water.
- In a mixing bowl, combine the cooked spinach with wheat germ, parmesan cheese, shredded Mexican cheese, chopped pecans, and diced green onions. Mix until well combined.
- Season the mixture with salt, pepper, and dried basil to taste. Optionally, add a pinch of nutmeg for extra flavor. Once seasoned, add in the eggs and water, mixing until fully incorporated.
- Stuff each shell with the spinach mixture. You should have enough filling for approximately 16-20 shells. Set these aside.
- Prepare an 8×8-inch baking pan (or a 9×13-inch pan) by greasing it with cooking spray. Spread a layer of alfredo sauce on the bottom, followed by a layer of spaghetti sauce, using about half a jar of each.
- Arrange the stuffed shells on top of the sauce in the pan. Cover the shells with the remaining sauce.
- Bake in the preheated oven, uncovered, for about 30-35 minutes or until the sauce is bubbly and the top is slightly golden.
- Serve hot and enjoy!
Tips
For best results, make sure to drain the shells thoroughly to prevent a watery dish. You can prepare the filling a day in advance to save time. Just keep it stored in the refrigerator until you’re ready to stuff the shells.
Variations & Substitutions
If you want a lighter version, consider using low-fat cheeses and a lighter alfredo sauce. You can also substitute the pecans with walnuts or omit them altogether if you prefer a nut-free version. For added protein, mix in some cooked chicken or turkey with the filling.
Storage
Leftover stuffed shells can be stored in an airtight container in the refrigerator for up to 3 days. To reheat, cover with foil and bake at 350°F (175°C) until warmed through. You can also freeze the shells for up to 2 months. Allow them to thaw overnight in the fridge before reheating.
FAQ
Can I use fresh spinach instead of frozen?
Yes, you can use fresh spinach. Simply sauté it until wilted, then chop it finely before adding it to the filling mixture.
What can I serve with these stuffed shells?
This dish pairs beautifully with a fresh garden salad and garlic bread. A glass of white wine or your favorite sparkling water would also complement the flavors nicely.
Can I make this dish ahead of time?
Absolutely! You can prepare the stuffed shells up to the baking step and refrigerate them for a day. When ready to serve, bake them as directed, adding a few extra minutes if they are cold from the fridge.
Nutrition
This dish is a hearty, protein-rich meal thanks to the cheese and eggs. The spinach adds a good dose of vitamins and minerals, while the pecans provide healthy fats. Keep in mind that using full-fat cheeses and sauces will increase the calorie content, so adjust according to your dietary needs.
Conclusion
Cheesy Spinach Stuffed Shells are a wonderful way to bring comfort and warmth to your dining table. Whether you’re making them for a special occasion or a cozy family dinner, this dish is sure to become a beloved favorite. Enjoy the cheesy, creamy goodness and the delightful crunch of pecans in every bite. Bon appétit!
Related update: Cheesy Spinach Stuffed Shells
Related update: Chinese Potstickers
Related update: Mashed Potatoes with Garlic, Sage & Goat Cheese