Paneer jalfrezi | Made by Meaghan Moineau

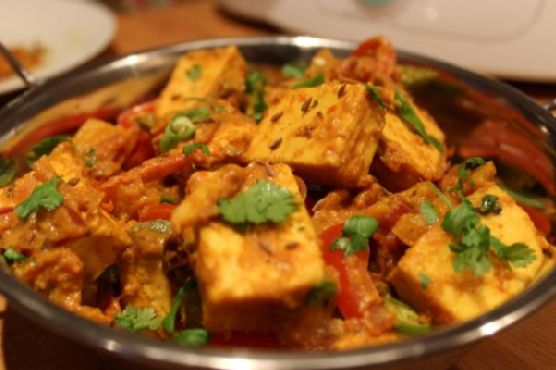
Paneer Jalfrezi: A Flavorful Journey to Spice and Comfort

Intro

Paneer Jalfrezi is more than just a dish; it’s a vibrant tapestry of flavors that brings together the essence of Indian cooking. This dish takes me back to my childhood, where Sunday lunch was a family affair, and the aroma of spices would fill the house. My grandmother would stand at the stove, her hands moving expertly, creating magic in the form of Paneer Jalfrezi. It was the first “grown-up” dish I learned to cook, and every time I make it, I’m transported back to those cozy afternoons filled with laughter and love.

Why You’ll Love It

Paneer Jalfrezi is a delightful combination of fresh vegetables and soft paneer, enveloped in a symphony of spices. Here’s why this dish will win you over:

  • Quick and Easy: Ready in under 30 minutes, it’s perfect for a weeknight dinner.
  • Customizable Heat: Adjust the level of spiciness according to your preference.
  • Vegetarian Delight: A protein-rich meal that satisfies both vegetarians and non-vegetarians alike.
  • Rich in Flavor: The dish boasts a perfect balance of tangy, sweet, and spicy notes.

Ingredients

  • 200g paneer, cubed
  • 2 tbsp oil, divided
  • 1 tsp cumin seeds
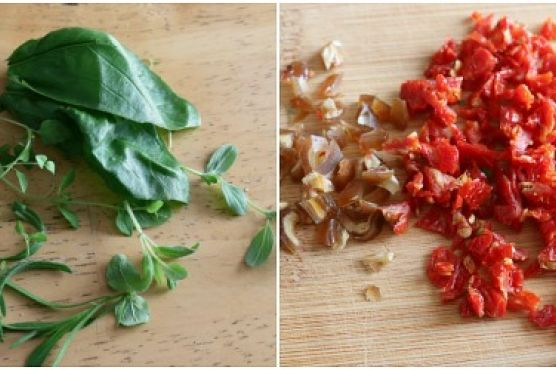
  • 3 medium tomatoes, 2 roughly chopped and 1 cut into strips
  • 1 large onion, half roughly chopped and half sliced
  • 1 red bell pepper, sliced
  • 1 green bell pepper, sliced
  • 1/2 tsp turmeric powder
  • 1 tsp chilli powder
  • 2-3 green chillies, chopped
  • 2-3 Kashmiri red dried chillies
  • 1 inch ginger, finely sliced
  • 1 tsp garam masala
  • 1/2 tsp sugar
  • 1 tsp vinegar
  • Fresh coriander leaves for garnish
  • Salt to taste

Instructions

  1. Roughly chop half an onion and 2 tomatoes.
  2. Heat 1 tbsp oil in a non-stick pan. Add the onions and fry until lightly brown.
  3. Add the tomatoes and cook for 2-3 minutes until soft. Remove from heat, let cool, and blend into a puree.
  4. In the same pan, heat 1 tbsp oil on medium heat. Add cumin seeds and let them sputter.
  5. Add the Kashmiri red chillies and sliced ginger, frying for 30-45 seconds.
  6. Add turmeric powder, sliced onions, bell peppers, chilli powder, salt, and two-thirds of the chopped green chillies. Fry for 3-4 minutes.
  7. Add the paneer cubes and cook on low heat for 5 minutes.
  8. Add the tomato puree, garam masala, and sugar. Simmer for 2 minutes.
  9. Stir in the tomato strips and toss well.
  10. Finish with vinegar and garnish with remaining green chillies and fresh coriander.

Tips

Here are some tips to ensure your Paneer Jalfrezi turns out perfect every time:

  • Use fresh, firm paneer for the best texture.
  • If you prefer a creamier texture, add a splash of cream before serving.
  • For a smokier flavor, lightly char the bell peppers before adding them to the dish.

Variations & Substitutions

Feel free to experiment with this Paneer Jalfrezi recipe:

  • Vegan Option: Substitute paneer with firm tofu for a vegan version.
  • Extra Veggies: Add mushrooms or zucchini for added nutrition and texture.
  • Spice Level: Adjust the number of chillies to increase or decrease the heat.

Storage

Store any leftovers in an airtight container in the refrigerator for up to 3 days. Reheat gently on the stove or in the microwave, adding a splash of water to maintain moisture.

FAQ

Can I make Paneer Jalfrezi ahead of time?

Yes, you can prepare the dish a day in advance. The flavors deepen overnight, making it even more delicious the next day. Just be sure to store it properly in the refrigerator.

What can I serve with Paneer Jalfrezi?

Paneer Jalfrezi pairs beautifully with naan, roti, or steamed basmati rice. A side of yogurt or raita helps balance the heat of the dish.

Is Paneer Jalfrezi spicy?

It can be spicy due to the chillies, but you can easily adjust the spice level to your liking by adding more or fewer chillies.

Nutrition

This dish is a good source of protein, thanks to the paneer, and is rich in vitamins from the fresh vegetables. It’s a wholesome and satisfying meal that fits well into a balanced diet. For those watching their calorie intake, use less oil or opt for low-fat paneer.

Conclusion

Paneer Jalfrezi is a dish that celebrates the vibrant flavors of Indian cuisine. It’s a comforting meal that brings warmth to the table and joy to the heart. Whether you’re a seasoned cook or a beginner, this recipe is a delightful journey into the world of spices and flavors. I hope it becomes as cherished in your home as it is in mine. Enjoy every bite of your delicious creation!

Related update: Paneer jalfrezi

Related update: Mediterranean eggplants

Chicken Parmesan Patty- Eat As A Burger OR On Pasta | Made by Meaghan Moineau

Chicken Parmesan Patty – Eat As A Burger OR On Pasta

Intro

There’s something about the aroma of Italian seasonings and the rich, comforting taste of a classic Chicken Parmesan that brings back fond memories of family gatherings in my grandmother’s cozy kitchen. I remember the sound of laughter echoing through the house and the sight of her expertly preparing meals that would warm our hearts and fill our bellies. This Chicken Parmesan Patty recipe is a tribute to those cherished moments, offering the same delightful flavors in a versatile form. You can enjoy it nestled in a soft burger bun or served atop a bed of pasta for a delicious meal that is as comforting as it is satisfying.

Why You’ll Love It

This Chicken Parmesan Patty is perfect for those busy weeknights when you crave something delicious yet easy to prepare. The patties are packed with flavor, thanks to a mix of Italian seasoning, garlic, and onion, and they are wonderfully juicy thanks to the addition of ground chicken and egg. Plus, whether you decide to savor them as burgers or paired with pasta, these patties are sure to be a hit with the whole family. Their versatility means you can switch up your meal presentation without compromising on taste.

Ingredients

  • 1 cup whole wheat bread crumbs, divided
  • 1 egg
  • 1/2 cup fresh mozzarella, sliced
  • 2 cloves garlic, minced
  • 1 lb ground chicken
  • 2 tablespoons olive oil
  • 1 small onion, chopped and divided
  • 1/2 teaspoon pepper
  • 1 teaspoon sea salt
  • 1 teaspoon Italian seasoning blend

Instructions

  1. Preheat your oven to 400°F (200°C).
  2. In a large mixing bowl, combine the ground chicken, egg, 1/2 cup of the bread crumbs, half of the chopped onion, minced garlic, Italian seasoning, salt, and pepper.
  3. Mix the ingredients thoroughly until well combined.
  4. Shape the mixture into 6-8 patties, depending on your preferred size.
  5. Place the remaining bread crumbs on a plate and coat each patty evenly.
  6. Arrange the breaded patties on a sheet pan and drizzle them with olive oil.
  7. Bake in the preheated oven for about 20 minutes or until cooked through and golden brown.
  8. Top each patty with a slice of fresh mozzarella cheese and return to the oven for an additional 5 minutes, until the cheese is melted and bubbly.

Tips

For the best results, ensure that your patties are of even thickness so they cook uniformly. If you have time, let the patties rest in the refrigerator for about 30 minutes before cooking to help them hold their shape better. When drizzling olive oil, try to distribute it evenly to achieve a nice crispy texture on the outside.

Variations & Substitutions

If you prefer a spicier kick, add a pinch of red pepper flakes to the chicken mixture. To make a gluten-free version, substitute the whole wheat bread crumbs with gluten-free breadcrumbs. You could also experiment by adding some freshly chopped basil or parsley for an aromatic touch. For a creamier texture, mix a tablespoon of ricotta cheese into the chicken mixture before shaping the patties.

Storage

Store any leftover patties in an airtight container in the refrigerator for up to 3 days. To reheat, place them in a preheated oven at 350°F (175°C) for about 10 minutes, or until they are heated through. You can also freeze the patties for up to 2 months; just make sure to wrap them tightly in plastic wrap or aluminum foil before placing them in a freezer-safe bag.

FAQ

Can I use ground turkey instead of ground chicken?

Yes, ground turkey can be a great substitute for ground chicken in this recipe. It will yield a similar texture and flavor, and it’s just as nutritious.

How can I serve these patties as a burger?

To serve these patties as a burger, simply place them in a toasted burger bun. Top with your favorite condiments such as marinara sauce, fresh basil, or sliced tomatoes, and enjoy with a side of your choice.

What type of pasta pairs well with these patties?

These Chicken Parmesan Patties pair beautifully with a variety of pasta types. Consider serving them over spaghetti, penne, or fettuccine, topped with marinara sauce and a sprinkle of Parmesan cheese for a complete meal.

Nutrition

These patties are not only delicious but also packed with protein. Each serving contains approximately 220 calories, 15g of protein, 10g of fat, and 15g of carbohydrates. They’re a nutritious choice that fits well into a balanced diet.

Conclusion

This Chicken Parmesan Patty recipe is a delightful fusion of classic Italian flavors with modern culinary convenience. Whether you’re enjoying them as a hearty burger or a comforting pasta dish, these patties are sure to become a staple in your meal rotation. They bring the warmth and nostalgia of a cherished family recipe straight to your table, offering not just sustenance, but a taste of home. Bon appétit!

Related update: Chicken Parmesan Patty- Eat As A Burger OR On Pasta

Related update: Broccolini Quinoa Pilaf

Mexi-Chicken Roll Ups | Made by Meaghan Moineau

Mexi-Chicken Roll Ups

Intro

Welcome to a journey of flavors that dance right off the plate into your heart. Mexi-Chicken Roll Ups have been a beloved staple in my family for years. I remember the first time I tasted this dish at my grandmother’s house; the warmth of the kitchen, the sizzle of chicken in the oven, and the aromatic scent of cilantro and cumin wafting through the air. It was a chilly Sunday afternoon, and we gathered around the table, eagerly awaiting the feast. From that day on, this recipe has been a cherished family tradition, and I’m thrilled to share it with you today.

Why You’ll Love It

Mexi-Chicken Roll Ups are more than just a meal; they’re an experience. This dish is perfect for any occasion, whether it’s a family dinner, a potluck, or even a casual weeknight meal. Here’s why you’ll fall in love with it:

  • Flavorful and Satisfying: The combination of tender chicken, creamy sauce, and crunchy tortilla topping provides a delightful contrast in textures and flavors.
  • Easy to Make: With simple steps and readily available ingredients, this recipe is straightforward and foolproof.
  • Customizable: You can easily tweak the ingredients to suit your tastes or dietary needs.

Ingredients

  • 8 oz cream cheese
  • 1 cup salsa verde
  • 1 bunch cilantro, chopped
  • 1 tsp cumin
  • 1 tsp garlic powder
  • 4 chicken breasts
  • 1 cup fresh spinach
  • 1 cup shredded pepper jack cheese
  • 1 cup crushed tortilla chips

Instructions

  1. Preheat your oven to 350°F (175°C).
  2. Flatten out the chicken breasts to about 1/4″ thickness using a meat mallet or a rolling pin between sheets of wax paper.
  3. In a blender or food processor, combine cream cheese, salsa verde, chopped cilantro, cumin, and garlic powder to form a smooth sauce.
  4. Spread a generous spoonful of the sauce across each chicken breast.
  5. Top each breast with a layer of fresh spinach leaves and then sprinkle with shredded pepper jack cheese.
  6. Carefully roll each chicken breast closed. Secure with toothpicks if necessary.
  7. Place the crushed tortilla chips in a shallow dish and roll each chicken breast in the chips to coat evenly.
  8. Arrange the roll-ups in a baking dish, cover with foil, and bake for 30 to 35 minutes or until the chicken is cooked through and no longer pink in the center.
  9. Remove the foil for the last 5 minutes of baking to allow the tortilla chips to become crispy.
  10. Let cool slightly before serving. Enjoy!

Tips

  • For easier rolling, ensure your chicken breasts are thin and even. This will also help them cook more uniformly.
  • To save time, use pre-shredded cheese and pre-washed spinach.
  • If you don’t have a meat mallet, you can use a heavy skillet to flatten the chicken.

Variations & Substitutions

This recipe is incredibly versatile. Here are a few ideas to make it your own:

  • Cheese: Substitute pepper jack with cheddar or mozzarella for a different flavor profile.
  • Spiciness: Add chopped jalapeños to the cream cheese mixture for extra heat.
  • Herbs: Swap cilantro with parsley if you’re not a fan of its distinctive taste.

Storage

Leftover Mexi-Chicken Roll Ups can be stored in an airtight container in the refrigerator for up to 3 days. To reheat, place in the oven at 300°F (150°C) until warmed through. You can also freeze the roll-ups before baking. Simply thaw in the refrigerator overnight before cooking.

FAQ

Can I use a different type of meat?

Absolutely! This recipe works well with turkey or pork tenderloin. Adjust the cooking time as needed to ensure the meat is fully cooked.

What can I serve with Mexi-Chicken Roll Ups?

These roll-ups pair wonderfully with a side of Spanish rice, black beans, or a simple green salad. You can also serve them with guacamole or sour cream for dipping.

Is there a vegetarian option?

To make this dish vegetarian, substitute the chicken with large portobello mushrooms or zucchini slices. Adjust the baking time accordingly.

Nutrition

Each serving of Mexi-Chicken Roll Ups is packed with protein and flavor. While exact values depend on portion sizes, a typical serving provides approximately:

  • Calories: 450
  • Protein: 35g
  • Carbohydrates: 15g
  • Fat: 28g
  • Fiber: 3g

Conclusion

Mexi-Chicken Roll Ups are a delightful way to bring a taste of Mexican-inspired cuisine into your home. Whether you’re hosting a dinner party or looking for a comforting family meal, this dish is sure to impress. The combination of creamy, spicy, and crunchy elements will make it a favorite for years to come. I hope you enjoy making and eating this dish as much as my family has throughout the years. Bon appétit!

Related update: Mexi-Chicken Roll Ups

Red Quinoa and Roasted Cauliflower Salad | Made by Meaghan Moineau

Red Quinoa and Roasted Cauliflower Salad

Intro

There’s something magical about the aroma of roasted cauliflower wafting through the kitchen. It transports me back to my grandmother’s cozy home, where the warmth of her cooking would fill every corner. She had a knack for taking simple ingredients and transforming them into something extraordinary. Inspired by her love for hearty, wholesome meals, I’ve created this Red Quinoa and Roasted Cauliflower Salad. It’s a dish that combines textures and flavors beautifully, making it a family favorite.

Why You’ll Love It

This salad is a delightful medley of nutty quinoa, sweet and chewy dried apricots, crunchy walnuts, and tangy feta cheese. The roasted cauliflower adds a savory depth, while the fresh green onions and parsley bring a burst of freshness. It’s a versatile dish that can be served warm or cold, making it perfect for any season. Whether you’re looking for a nutritious lunch, a side dish for dinner, or a potluck star, this salad fits the bill. Plus, it’s packed with protein, fiber, and healthy fats, ensuring you feel satisfied and nourished.

Ingredients

  • 1 head of cauliflower
  • 1 cup red quinoa
  • 1/2 cup walnuts, chopped
  • 1/2 cup dried apricots, chopped
  • 1/2 cup feta cheese, crumbled
  • 4 green onions, sliced
  • 1/4 cup fresh parsley, chopped
  • Salt and pepper to taste
  • Juice of 1/2 a lemon
  • 2 tablespoons olive oil

Instructions

  1. Cook the quinoa according to package directions. Set aside to cool slightly.
  2. Preheat the oven to 400°F (200°C).
  3. Cut the head of cauliflower into florets.
  4. Toss the cauliflower florets with olive oil, salt, and pepper. Arrange them on a baking sheet in a single layer.
  5. Roast the cauliflower in the preheated oven for 20 minutes or until tender and golden brown.
  6. Meanwhile, crumble the feta cheese and prepare the remaining ingredients: chop the walnuts, dried apricots, green onions, and parsley.
  7. In a large bowl, combine the cooked quinoa, roasted cauliflower, walnuts, apricots, feta cheese, green onions, and parsley.
  8. Drizzle with extra virgin olive oil and the juice from half a lemon. Toss to combine.
  9. Season with additional salt and pepper to taste.
  10. Serve immediately warm or chill in the refrigerator and serve cold.

Tips

For the best results, ensure your cauliflower florets are evenly coated in olive oil and spread out on the baking sheet to roast evenly. You can toast the walnuts for an extra layer of flavor. Simply place them in a dry skillet over medium heat, stirring frequently until fragrant. Be careful not to burn them! Finally, if you’re serving the salad cold, allow the flavors to meld by refrigerating it for at least an hour before serving.

Variations & Substitutions

This salad is highly adaptable to your preferences or dietary needs. You can swap the red quinoa for white or black quinoa, or even use farro or barley for a different grain base. If you’re not a fan of walnuts, try using almonds or pecans instead. For a vegan version, omit the feta cheese or replace it with a plant-based alternative. You can also add more veggies, like roasted cherry tomatoes or bell peppers, for extra color and nutrients.

Storage

This salad stores beautifully, making it an excellent option for meal prep. Place the salad in an airtight container and refrigerate for up to 4 days. If you’ve dressed the salad, the flavors will intensify over time, which many find delicious. However, if you prefer a fresher taste, consider storing the dressing separately and mixing it in just before serving.

FAQ

Can I make this salad ahead of time?

Absolutely! This salad is ideal for making ahead. Prepare all the components and combine them just before serving. This will keep the flavors vibrant and the textures perfect.

Is there a way to add more protein to this salad?

Yes, you can add grilled chicken, chickpeas, or tofu for additional protein. These options complement the existing flavors well and make the salad more filling.

What can I serve with this salad?

This salad is quite versatile and pairs well with grilled meats, such as chicken or fish. It’s also a great side dish for a barbecue or a potluck.

Nutrition

This Red Quinoa and Roasted Cauliflower Salad is not only delicious but also nutritious. It’s rich in plant-based protein from quinoa, healthy fats from walnuts and olive oil, and fiber from the cauliflower and dried apricots. It’s a well-rounded meal that will keep you energized and satisfied.

Conclusion

Whether you’re reminiscing about family meals or creating new memories, this Red Quinoa and Roasted Cauliflower Salad is a dish that brings people together. Its harmonious blend of flavors and textures makes it a standout choice for any occasion. I hope this recipe becomes a staple in your kitchen, just as it is in mine. Enjoy the journey of cooking and savor every bite!

Related update: Red Quinoa and Roasted Cauliflower Salad

Related update: Hush Puppies

Related update: Amaranth and Roast Veggie Salad

Asian Salmon Burgers With Tangy Ginger Lime Sauce | Made by Meaghan Moineau

Asian Salmon Burgers With Tangy Ginger Lime Sauce

Intro

There’s something undeniably comforting about sinking your teeth into a well-crafted burger. For me, it brings back fond memories of summer evenings spent with my family in our backyard. My father, the grill master, would whip up his signature dishes, and one day, he introduced us to these delightful Asian Salmon Burgers. The combination of fresh salmon with a tangy ginger lime sauce became an instant favorite. Today, I’m excited to share this family recipe with you all, hoping it brings the same joy and deliciousness to your home as it did to ours.

Why You’ll Love It

These Asian Salmon Burgers are not just another burger recipe. They are a delightful fusion of flavors and textures that will tantalize your taste buds. The fresh salmon, rich with omega-3 fatty acids, brings a tender and juicy bite, while the ginger lime sauce adds a perfect zing that complements the savory burger. Whether you’re looking for a healthy alternative to traditional beef burgers or simply want to try something new, these salmon burgers are a must-try!

Ingredients

  • 4 burger buns
  • 1/4 cup fresh basil, chopped
  • 2 cloves garlic, minced
  • 2 green onions, finely sliced
  • 1 lime, juiced
  • 1/2 cup mayonnaise
  • 2 tablespoons oyster sauce
  • 1 teaspoon powdered ginger
  • 1 pound salmon, skin removed
  • 2 tablespoons sesame oil
  • 1/4 cup sour cream
  • 2 tablespoons soy sauce

Instructions

  1. Cut the salmon into large hunks and run it through a food processor until no large pieces remain.
  2. Add to the salmon the soy sauce, garlic, ginger, oyster sauce, green onion, and basil.
  3. Combine ingredients well and form 4 large patties from the mixture.
  4. Heat up the sesame oil in a large frying pan on medium-high heat and add in the patties.
  5. Cook for about 10 minutes, flipping once halfway through.
  6. To make the sauce, mix the mayonnaise, sour cream, lime juice, and a pinch of ginger until smooth.
  7. Pour a spoonful of sauce over the top of the finished salmon burger and serve inside a toasted bun.

Tips

For the best results, use fresh salmon. It enhances the flavor and texture of the burger. If you don’t have a food processor, you can finely chop the salmon with a sharp knife. Be sure to toast your buns for extra flavor and crunch. Lastly, don’t overcook the salmon patties; they should be juicy and slightly pink in the center.

Variations & Substitutions

If you want to switch things up, consider using shrimp instead of salmon for a different seafood twist. You can also add some heat by including a teaspoon of sriracha or chili flakes to the sauce. For a gluten-free option, serve the patties on lettuce wraps instead of buns. If you prefer a different herb, cilantro works wonderfully in place of basil.

Storage

These salmon burgers are best enjoyed fresh, but if you have leftovers, store the patties in an airtight container in the refrigerator for up to 2 days. The sauce can be refrigerated separately in a small container. To reheat, gently warm the patties in a skillet over low heat until heated through.

FAQ

Can I freeze the salmon patties?

Yes, you can freeze the uncooked salmon patties. Place them on a baking sheet lined with parchment paper and freeze until solid. Once frozen, transfer the patties to a freezer-safe bag or container. They can be stored for up to 3 months. Thaw in the refrigerator before cooking.

What can I serve with these salmon burgers?

These burgers pair wonderfully with a light and fresh salad, sweet potato fries, or a simple coleslaw. You can also serve them with grilled vegetables for a wholesome meal.

Nutrition

This recipe provides a nutritious meal option rich in protein and omega-3 fatty acids, which are beneficial for heart health. Salmon is also a great source of vitamin D and B vitamins. Remember to adjust portion sizes to fit your dietary needs.

Conclusion

These Asian Salmon Burgers with Tangy Ginger Lime Sauce are a delicious way to enjoy a healthy and satisfying meal. With their vibrant flavors and simple preparation, they make an excellent choice for family dinners or entertaining guests. I hope you enjoy making and savoring these burgers as much as my family has over the years. Bon appétit!

Related update: Asian Salmon Burgers With Tangy Ginger Lime Sauce

Related update: Avocado Nests