Chive and dill muffins | Made by Meaghan Moineau

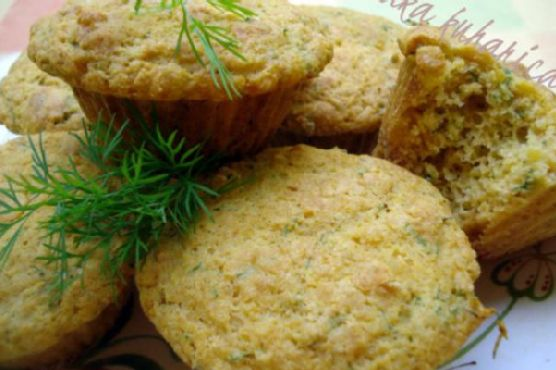
Chive and Dill Muffins Recipe

Intro

There’s something magical about the aroma of freshly baked muffins wafting through the kitchen. It transports me back to my grandmother’s cozy kitchen, where every Sunday morning was dedicated to baking something delicious. One of my fondest memories is of sitting at the wooden table, swinging my feet as I eagerly awaited her latest creation. Today, I’m excited to share a recipe that brings back that cherished nostalgia: Chive and Dill Muffins. These savory muffins are a delightful twist on the classic, with a hint of spice and the fresh flavors of chives and dill. Perfect for breakfast, brunch, or a savory snack, these muffins are sure to become a family favorite.

Why You’ll Love It

These Chive and Dill Muffins are more than just your average muffin. Here’s why you’ll fall in love with them:

  • Flavor Packed: The combination of chives and dill brings a fresh and herby taste that pairs perfectly with the subtle sweetness of the muffin base.
  • Quick and Easy: With simple ingredients and straightforward instructions, you can have these muffins ready in no time.
  • Versatile: Whether you’re looking for a savory breakfast option or a flavorful side for your soup or salad, these muffins fit the bill.
  • Family-Friendly: Even the pickiest eaters will enjoy the mild spice and rich flavors packed into each muffin.

Ingredients

  • 1 cup all-purpose flour
  • 1 cup yellow cornmeal
  • 1 tablespoon sugar
  • 1 tablespoon baking powder
  • 1/2 teaspoon salt
  • 1/4 teaspoon baking soda
  • 1/4 teaspoon cayenne pepper
  • 2 tablespoons fresh chives, chopped
  • 2 tablespoons fresh dill, chopped
  • 1 cup plain yogurt
  • 2 large eggs
  • 6 tablespoons unsalted butter, melted

Instructions

  1. Preheat your oven to 220°C (425°F). Grease a standard muffin tin or line with silicone muffin cups.
  2. In a medium bowl, whisk together the all-purpose flour, yellow cornmeal, sugar, baking powder, salt, baking soda, and cayenne pepper.
  3. Stir in the chopped chives and dill, ensuring they are evenly distributed throughout the dry ingredients.
  4. In another medium bowl, whisk together the plain yogurt, eggs, and melted butter until well combined.
  5. Add the yogurt mixture to the dry ingredients and stir just until everything is blended. Be careful not to overmix, as this can make the muffins dense.
  6. Divide the batter evenly among the prepared muffin cups, using about 1/3 cup of batter for each.
  7. Bake in the preheated oven for 20 minutes, or until the muffins are puffed and golden brown. To check for doneness, insert a toothpick into the center of a muffin; if it comes out clean, they are ready.
  8. Allow the muffins to cool in the muffin tin for a few minutes before removing them. Serve warm and enjoy!

Tips

Here are a few tips to ensure your Chive and Dill Muffins turn out perfectly:

  • Use Fresh Herbs: Fresh chives and dill provide the best flavor. If you must use dried herbs, reduce the quantity by half.
  • Don’t Overmix: When combining wet and dry ingredients, stir just until moistened for light and fluffy muffins.
  • Check Oven Temperature: Ensure your oven is at the correct temperature before baking. An oven thermometer can help with accuracy.

Variations & Substitutions

This muffin recipe is versatile, and you can easily customize it to suit your taste:

  • Cheesy Addition: Add 1/2 cup of shredded cheddar cheese to the batter for a cheesy twist.
  • Spice It Up: Increase the cayenne pepper to 1/2 teaspoon for a spicier kick.
  • Whole Wheat Option: Replace half of the all-purpose flour with whole wheat flour for added fiber.
  • Dairy-Free: Substitute the yogurt with a plant-based yogurt and use a non-dairy butter alternative.

Storage

Store any leftover muffins in an airtight container at room temperature for up to two days. For longer storage, keep them in the refrigerator for up to a week. These muffins also freeze well; simply wrap them individually in plastic wrap and place them in a freezer-safe bag for up to three months. To reheat, thaw at room temperature and warm in the oven for a few minutes before serving.

FAQ

Can I use dried herbs instead of fresh?

Yes, you can use dried herbs, but the flavor won’t be as vibrant. If using dried herbs, reduce the quantity by half, as they are more concentrated than fresh herbs.

Are these muffins suitable for vegetarians?

Absolutely! These Chive and Dill Muffins are vegetarian-friendly, as they do not contain any meat products. Ensure your yogurt and butter are vegetarian if this is a concern for you.

Can I make these muffins gluten-free?

To make these muffins gluten-free, substitute the all-purpose flour with a 1-to-1 gluten-free baking flour. Ensure the cornmeal and other ingredients are certified gluten-free as well.

Nutrition

Each muffin is approximately 150 calories, with 7 grams of fat, 15 grams of carbohydrates, and 4 grams of protein. These values are estimates and can vary based on ingredient brands and modifications.

Conclusion

These Chive and Dill Muffins are a delightful addition to any meal. Their savory flavor, accented by the freshness of herbs, makes them a versatile and beloved choice. Whether you’re savoring them as a quick breakfast, a side dish, or a snack, they promise to bring a touch of the homemade warmth and nostalgia that only freshly baked goods can offer. So, gather your ingredients and enjoy baking these delicious muffins with your loved ones. Here’s to creating new memories and enjoying every bite!

Related update: Chive and dill muffins

Related update: Mashed Sweet Potatoes

Related update: Watching What I Eat: Peanut Butter Banana Oat Breakfast Cookies with Carob / Chocolate Chips

Baked Lemon~Lime Chicken Wings | Made by Meaghan Moineau

Baked Lemon~Lime Chicken Wings

Intro

There’s something incredibly comforting about a tray of freshly baked chicken wings, their aroma wafting through the kitchen, evoking memories of family gatherings and festive celebrations. I remember my grandmother’s kitchen, where she would prepare her signature lemon-lime chicken wings for every family gathering. The citrusy zing combined with the savory seasoning made it impossible to resist grabbing just one more wing. Inspired by her recipe, I’ve added my own twist to create these delightful Baked Lemon~Lime Chicken Wings. Perfect for a cozy night in or a festive get-together, these wings promise to be a hit with everyone at the table.

Why You’ll Love It

These Baked Lemon~Lime Chicken Wings are a delightful combination of tangy and savory flavors that dance on your taste buds. The recipe is simple enough for a weeknight dinner yet sophisticated enough to serve at a party. The marinade, bursting with fresh citrus juices, garlic, and a touch of sweetness, ensures that each wing is infused with flavor. Plus, baking the wings makes them a healthier alternative to fried wings, without compromising on that irresistible crispy texture.

Ingredients

  • 2 lbs chicken wings
  • Juice of 1 lemon
  • Juice of 1 lime
  • 4 cloves garlic, minced
  • 2 tablespoons honey
  • 1 tablespoon sugar
  • 1/4 cup red wine
  • 1/4 cup chicken broth
  • 2 tablespoons vegetable oil
  • 2 tablespoons Italian fresh parsley, chopped
  • 2 tablespoons fresh cilantro, chopped
  • Salt to taste
  • Freshly ground black pepper to taste

Instructions

  1. In a large mixing bowl, combine the lemon juice, lime juice, minced garlic, honey, sugar, red wine, chicken broth, vegetable oil, parsley, cilantro, salt, and freshly ground black pepper. Stir until the sugar is dissolved and the mixture is well combined.
  2. Add the chicken wings to the marinade, ensuring each wing is well coated. Cover the bowl with plastic wrap and refrigerate for at least 1 hour, allowing the flavors to penetrate the wings. For best results, marinate for a few hours.
  3. Preheat your oven to 400°F (200°C). Line a baking sheet with aluminum foil and place a wire rack on top to allow for even cooking.
  4. Arrange the marinated chicken wings on the wire rack, reserving the marinade for basting.
  5. Bake the wings in the preheated oven for 30 minutes. Then, remove them from the oven, baste with the reserved marinade, and return to the oven for another 10-15 minutes, or until the wings are golden brown and crispy.
  6. Remove from the oven and let them cool slightly before serving. Garnish with additional chopped parsley and cilantro if desired.

Tips

  • For extra crispy wings, turn on the broiler for the last 2-3 minutes of baking, but watch them closely to prevent burning.
  • Pat the wings dry with paper towels before marinating to help the skin crisp up better.

Variations & Substitutions

If you’re looking to switch things up, here are a few variations and substitutions you can try:

  • Sweet and Spicy: Add a teaspoon of chili flakes or a dash of hot sauce to the marinade for a spicy kick.
  • Herb Infusion: Swap the parsley and cilantro with fresh basil or thyme for a different herbaceous flavor.
  • Grilled Option: Instead of baking, grill the wings over medium heat to impart a smoky flavor.

Storage

Store any leftover wings in an airtight container in the refrigerator for up to 3 days. To reheat, place them in a preheated oven at 350°F (175°C) for about 10 minutes, or until warmed through. Avoid microwaving as it can make the skin soggy.

FAQ

Can I use chicken drumsticks instead of wings?

Yes, you can substitute chicken drumsticks for wings in this recipe. Just be sure to adjust the cooking time, as drumsticks may require a longer baking time to cook through.

How can I make these wings gluten-free?

To make this recipe gluten-free, ensure that the chicken broth and any other ingredients you use are labeled gluten-free. Most of the ingredients listed are naturally gluten-free, but it’s always best to check labels.

Nutrition

While the exact nutritional content will vary depending on portion sizes and specific brands used, these Baked Lemon~Lime Chicken Wings are generally lower in calories and fat compared to their fried counterparts, making them a healthier choice for wing lovers.

Conclusion

These Baked Lemon~Lime Chicken Wings are a delightful addition to any meal or gathering, bringing a burst of fresh flavors with every bite. Whether you’re reminiscing about family traditions or creating new memories at your own table, these wings are sure to become a cherished favorite. Serve them as an appetizer, party snack, or even a main dish alongside your favorite sides. Enjoy the vibrant taste and the satisfaction of sharing a homemade treat with your loved ones.

Related update: Baked Lemon~Lime Chicken Wings

Related update: Cream Cheese Stuffed Baby Bell Pepper Appetizer

Crab Wontons | Made by Meaghan Moineau

Delicious Crab Wontons: A Fusion of Flavor and Elegance

Intro

There’s something magical about the aroma of crab wontons wafting through the kitchen. As a child, I would watch my grandmother expertly fold wonton wrappers, her fingers moving deftly with years of practiced ease. Each fold was a promise of deliciousness to come. Today, I’m excited to share a modern twist on this classic recipe, bringing back fond memories while creating new ones. Whether enjoyed as an appetizer or a delightful snack, these crab wontons are sure to become a favorite in your household.

Why You’ll Love It

Crab wontons are not just a treat for the taste buds but also a feast for the senses. Here are a few reasons why you’ll fall in love with this recipe:

  • Easy to Make: With simple ingredients and straightforward instructions, this recipe is accessible even for novice cooks.
  • Healthy Twist: By using fat-free cream cheese and reduced-fat mayonnaise, you can enjoy these wontons guilt-free.
  • Flavorful Fusion: The combination of crab, cream cheese, and savory seasonings creates a rich, satisfying taste.
  • Perfect for Any Occasion: Whether you’re hosting a dinner party or enjoying a quiet night in, these wontons are versatile enough to suit any event.

Ingredients

  • 1 can of white crabmeat, drained
  • 4 oz fat-free cream cheese, softened
  • 2 tablespoons reduced-fat mayonnaise
  • 1 tablespoon soy sauce
  • 1 clove garlic, minced
  • 1/2 teaspoon onion powder
  • Fresh ground pepper, to taste
  • 12 wonton wrappers

Instructions

  1. Preheat your oven to 350°F (175°C).
  2. Spray a mini muffin tin with nonstick cooking spray to prevent sticking.
  3. In a medium bowl, combine the crab meat, cream cheese, mayonnaise, soy sauce, garlic, onion powder, and fresh ground pepper. Mix until all ingredients are well incorporated.
  4. Place one wonton wrapper in each of the 12 mini muffin cups. The edges of the wonton wrappers will extend beyond the cups and may need to be folded slightly to fit.
  5. Spoon the crab mixture into the center of each wonton cup, filling generously.
  6. Bake for 15 to 20 minutes, or until the edges of the wonton cups are golden brown and the filling is heated through.
  7. Remove from oven and let cool slightly before serving. Enjoy your delicious crab wontons!

Tips

To ensure the best results, consider these helpful tips:

  • Room Temperature Ingredients: Make sure the cream cheese is softened to room temperature for easier mixing.
  • Even Filling: Use a small cookie scoop or spoon to evenly distribute the crab mixture into the wonton cups.
  • Watch the Baking Time: Keep an eye on the wontons as they bake to avoid over-browning.

Variations & Substitutions

Feel free to customize your crab wontons with these variations:

  • Spicy Kick: Add a dash of hot sauce or a pinch of red pepper flakes to the crab mixture for some heat.
  • Cheesy Delight: Sprinkle a little grated Parmesan or mozzarella cheese on top of the crab mixture before baking.
  • Vegetarian Option: Substitute crab with finely chopped mushrooms or tofu for a vegetarian version.

Storage

If you have leftovers (which is rare!), store them in an airtight container in the refrigerator for up to 3 days. To reheat, place the wontons in a preheated oven at 350°F for about 5-7 minutes or until warmed through.

FAQ

Can I freeze crab wontons?

Yes, you can freeze them before baking. Arrange the filled wonton cups on a baking sheet, freeze until solid, then transfer to a freezer-safe bag. When ready to bake, add a few extra minutes to the baking time.

What can I serve with crab wontons?

Crab wontons pair well with a sweet chili sauce or soy sauce for dipping. They also complement a fresh side salad or a bowl of soup for a more substantial meal.

Nutrition

Each serving of crab wontons (2 pieces) contains approximately:

  • Calories: 120
  • Protein: 6g
  • Carbohydrates: 10g
  • Fat: 5g

Nutritional values are estimates and may vary based on specific products used.

Conclusion

These crab wontons are a delightful blend of savory flavors wrapped in a crispy wonton shell. Whether you’re reminiscing about family gatherings or creating new traditions, this recipe is sure to bring joy to your table. Easy to prepare and customize, crab wontons offer a touch of elegance to any occasion. Gather your loved ones, roll up your sleeves, and enjoy this delicious journey down memory lane. Happy cooking!

Related update: Crab Wontons

Related update: Baked Lemon~Lime Chicken Wings

Easy and Delicious Taco Soup | Made by Meaghan Moineau

Easy and Delicious Taco Soup

Intro

Growing up, family gatherings were never complete without a large pot of my grandmother’s famous taco soup simmering on the stove. The aroma would fill the house, drawing everyone into the kitchen for a taste even before it was ready. This recipe, inspired by her classic version, is not only easy to make but also incredibly delicious. Whether you’re looking to please a crowd or just want a comforting bowl for yourself, this taco soup is the answer.

Why You’ll Love It

This taco soup is a perfect blend of savory, spicy, and hearty flavors that will warm you from the inside out. It’s a one-pot wonder, meaning less cleanup and more time to enjoy with your loved ones. Its simple ingredients make it accessible, yet it’s packed with flavor that feels like a labor of love. Plus, it’s adaptable for various dietary needs, making it a versatile dish for any occasion.

Ingredients

  • 1 lb cooked ground turkey
  • 1 onion, diced
  • 1 can pinto beans, drained and rinsed
  • 1 can kidney beans, drained and rinsed
  • 1 can regular corn, drained
  • 1 can tomato sauce
  • 1 can diced tomatoes
  • 1 can green chiles
  • 1 can olives, sliced
  • 1 packet gluten free taco seasoning
  • 1/4 teaspoon cayenne pepper (optional)
  • Fresh cilantro, for topping
  • Cheese, for topping
  • Tortilla chips, for serving
  • Sour cream, for serving

Instructions

  1. In a large pot, combine the cooked ground turkey, onion, pinto beans, kidney beans, corn, tomato sauce, diced tomatoes, green chiles, olives, taco seasoning, and cayenne pepper.
  2. Stir the ingredients together, and heat the mixture to a full boil.
  3. Once boiling, reduce the heat and let it simmer for 30 minutes, stirring occasionally.
  4. To serve, ladle the soup into bowls and top with fresh cilantro, cheese, tortilla chips, and a dollop of sour cream.

Tips

For the best flavor, allow the soup to simmer a bit longer if you have the time. This will let the spices meld beautifully. If you prefer a thicker soup, consider adding a bit more beans or reducing the amount of liquid by draining the diced tomatoes.

Variations & Substitutions

Feel free to experiment with this recipe. You can substitute ground turkey with ground beef or chicken if you prefer. If you like it spicier, add chopped jalapeños or a dash of hot sauce. For a vegetarian version, simply omit the meat and add more beans or tofu. You can also swap out the cheese and sour cream with dairy-free alternatives for a vegan option.

Storage

Leftover taco soup can be stored in an airtight container in the refrigerator for up to 3 days. It also freezes well for up to 3 months. To reheat, simply thaw overnight in the fridge if frozen, and warm on the stove over medium heat.

FAQ

Can I make this soup in a slow cooker?

Yes, you can prepare this taco soup in a slow cooker. Simply add all ingredients to the slow cooker, except for the toppings. Cook on low for 6-8 hours or high for 3-4 hours. Serve with your favorite toppings.

Is taco soup spicy?

This recipe has a mild spice level, which can be adjusted to your preference. If you prefer a milder soup, omit the cayenne pepper. For more heat, increase the amount of cayenne or add other spicy ingredients like jalapeños.

Nutrition

While the exact nutritional content can vary based on the specific brands and quantities used, taco soup generally offers a balanced mix of protein from the ground turkey, fiber from the beans, and essential vitamins and minerals from the vegetables. It’s a hearty and satisfying meal that can fit into a variety of dietary plans.

Conclusion

There you have it—an easy and delicious taco soup that brings warmth and joy to the table, just like my grandmother’s did. This recipe is not only a nod to tradition but also a versatile dish that you can make your own. Whether you’re serving it at a family gathering or savoring a quiet night in, it’s sure to become a favorite in your household. Enjoy!

Related update: Easy and Delicious Taco Soup

Related update: Moosewood Lentil Soup

Pork Carnitas Tacos | Made by Meaghan Moineau

Pork Carnitas Tacos: A Deliciously Savory Mexican Delight

Intro

There’s something uniquely comforting about a warm, freshly made taco filled with tender, flavorful pork carnitas. It takes me back to my childhood, where every Sunday, my family would gather at my grandmother’s house. The aroma of sizzling pork and freshly made tortillas would fill the air, creating an atmosphere of warmth and togetherness. These pork carnitas tacos are a tribute to those cherished family gatherings, and I’m excited to share this recipe with you.

Why You’ll Love It

This pork carnitas taco recipe is a game-changer for your weeknight dinners or festive gatherings. Here are a few reasons why you’ll fall in love with it:

  • Flavorful and Tender: The combination of citrusy notes from the orange juice and the creamy richness of the milk ensures that the pork is both tender and bursting with flavor.
  • Simple Ingredients: You probably already have most of these ingredients in your pantry or fridge, making it a convenient dish to prepare.
  • Versatile: These tacos are perfect for any occasion, whether it’s a quick family dinner or a lively fiesta with friends.
  • Customizable: You can easily adjust the toppings to suit your taste, making it a dish everyone will enjoy.

Ingredients

  • Water
  • Lean pork butt
  • Garlic
  • Sea salt and ground pepper
  • Olive oil
  • Orange juice
  • Milk
  • Corn tortillas
  • Salsa fresca
  • Avocado
  • Cilantro
  • Onion
  • Limes

Instructions

  1. In a large Dutch oven, add the pork, garlic, salt, pepper, and water. Bring to a boil, then reduce heat, cover, and simmer over medium-low for 45 minutes to one hour.
  2. Drain the pork well. When cool enough to handle, shred the meat by hand or with the tines of a fork. Remove and discard any remaining fat.
  3. Transfer the shredded pork back to the Dutch oven and heat the olive oil.
  4. Add the orange juice and milk and cook until the liquid has evaporated and the pork has browned, stirring occasionally. Season with salt and pepper to taste.
  5. Chop the onions and cilantro, and slice the avocado and limes. Place each in small individual bowls for serving.
  6. Heat the tortillas in a dry frying pan and keep them warm.
  7. For each taco, stack two tortillas and layer with warm carnitas, chopped cilantro, onion, and avocado slices. Give it a good squeeze of lime juice.

Tips

  • Choose Quality Pork: Opt for a lean pork butt to ensure your carnitas are tender and juicy.
  • Shredding: Shredding the pork while it’s still warm makes the process much easier.
  • Heating Tortillas: Heating the tortillas on a dry pan gives them the perfect texture and flavor.

Variations & Substitutions

This recipe is versatile, so feel free to experiment:

  • Spicy Kick: Add jalapeños or chili powder to the carnitas for some heat.
  • Different Protein: Try using chicken or beef as an alternative to pork.
  • Vegetarian Option: Substitute the pork with jackfruit for a plant-based version.

Storage

Store any leftover carnitas in an airtight container in the refrigerator for up to 3 days. To reheat, simply warm them in a skillet with a little olive oil. You can also freeze the carnitas for up to 2 months; just thaw them in the refrigerator overnight before reheating.

FAQ

Can I use flour tortillas instead of corn tortillas?

Absolutely! While corn tortillas are traditional for carnitas, flour tortillas work just as well if you prefer their softer texture.

Is there a way to make this recipe more budget-friendly?

You can make this recipe more budget-friendly by purchasing pork in bulk or on sale and freezing portions for future use. Additionally, using canned salsa instead of fresh salsa fresca can reduce costs.

Nutrition

While this dish is rich and savory, you can control portion sizes and toppings to fit your dietary needs. The key ingredients—pork, avocado, and tortillas—provide a good balance of protein, healthy fats, and carbohydrates.

Conclusion

These pork carnitas tacos are more than just a meal; they’re an experience. From the tantalizing aroma to the burst of flavors in every bite, they bring a taste of Mexico to your home. Whether you’re enjoying them with family or sharing them with friends, these tacos are sure to become a beloved staple in your culinary repertoire. So gather your ingredients and get ready to create some delicious memories!

Related update: Pork Carnitas Tacos

Related update: Kunna (A Delicious Chinioti Dish, Punjab, Pakistan)

Cheese and Leek Strata | Made by Meaghan Moineau

Cheese and Leek Strata: A Comforting Classic

Intro

Growing up, Sunday brunches were a cherished ritual in our household. My mother would wake up early, filling the kitchen with the comforting aroma of freshly baked goods. One of my all-time favorites was her cheese and leek strata, a dish that effortlessly combined savory flavors with a hint of nostalgia. I would sit at the kitchen counter, eagerly watching her layer the ingredients, each step building anticipation for the delicious meal to come. Today, I’m excited to share this beloved recipe with you, so you too can create new memories around your family table.

Why You’ll Love It

This cheese and leek strata is a perfect blend of rich flavors and creamy textures that will make any brunch special. Here’s why you’ll love it:

  • Make-ahead convenience: Prepare it the night before and bake it fresh in the morning.
  • Versatile: Easily customize the ingredients based on your preferences or what you have on hand.
  • Comforting and delicious: The combination of cheese, leeks, and tender bread is both satisfying and heartwarming.

Ingredients

  • 6 large eggs
  • 2 cups milk
  • 1/2 cup porter (dark beer)
  • 1 garlic clove, minced
  • 1/2 teaspoon salt
  • 1/4 teaspoon black pepper
  • 5 cups cubed sourdough bread
  • 1 large leek, cleaned and sliced
  • 1 red bell pepper, diced
  • 1 cup shredded cheddar cheese
  • 1 cup shredded Swiss cheese
  • Additional salt and pepper to season

Instructions

  1. Preheat your oven to 350°F (175°C).
  2. In a large bowl, combine the eggs, milk, porter, minced garlic, salt, and pepper. Beat well until the mixture is fully blended.
  3. Grease a 2.5-quart round baking dish and place half of the cubed sourdough bread on the bottom.
  4. Sprinkle half of the sliced leeks and diced red bell pepper over the bread pieces.
  5. Top with half of the shredded Swiss cheese and half of the cheddar cheese.
  6. Repeat the layers with the remaining ingredients, ending with a layer of cheddar cheese on top.
  7. Pour the egg mixture evenly over the top of the strata.
  8. Cover the dish tightly with foil or plastic wrap and weigh down the top of the strata with a slightly smaller baking dish.
  9. Refrigerate the strata for at least 2 hours or overnight to allow the flavors to meld.
  10. When ready to bake, remove the weight and cover, and bake the strata uncovered for 40 minutes or until the center is set.
  11. Serve warm and enjoy the delightful blend of flavors.

Tips

To make sure your strata is a success, consider these tips:

  • Use day-old bread: Slightly stale bread will absorb the egg mixture better, giving you a richer texture.
  • Don’t rush the soaking time: Allowing the strata to sit in the refrigerator ensures the bread fully absorbs the flavors.
  • Check for doneness: The center should be set and not jiggly when done. A knife inserted should come out clean.

Variations & Substitutions

This recipe is versatile, so feel free to experiment and make it your own:

  • Cheese: Swap out cheddar and Swiss for Gruyere, mozzarella, or your favorite cheese blend.
  • Vegetables: Add mushrooms, spinach, or tomatoes for additional flavor and nutrients.
  • Meat lovers: Incorporate cooked bacon, sausage, or ham for a heartier dish.
  • Gluten-free: Use gluten-free bread to accommodate dietary needs.

Storage

Leftover strata can be stored in an airtight container in the refrigerator for up to 3 days. To reheat, cover with foil and warm in the oven at 350°F (175°C) until heated through. Individual portions can also be microwaved for quick reheating.

FAQ

Can I freeze the strata before baking?

Yes, you can freeze the strata before baking. Assemble it as directed, then cover tightly with plastic wrap and foil. Freeze for up to 1 month. Thaw in the refrigerator overnight before baking.

What can I use instead of porter?

If you prefer not to use beer, substitute with vegetable or chicken broth for a different flavor profile while maintaining moisture.

Nutrition

This dish is rich in protein from the eggs and cheese, while the vegetables add fiber and nutrients. Keep in mind the nutritional content will vary based on specific ingredient brands and substitutions.

Conclusion

Cheese and leek strata is more than just a dish; it’s a way to bring loved ones together and create cherished memories. Whether it’s for a holiday brunch or a simple weekend gathering, this comforting recipe will surely become a family favorite, just as it has in mine. I hope you enjoy making and sharing it as much as I have over the years.

Related update: Cheese and Leek Strata

Related update: Watching What I Eat: Peanut Butter Banana Oat Breakfast Cookies with Carob / Chocolate Chips

Tomato and Bacon Pizza With Rice Crust | Made by Meaghan Moineau

Tomato and Bacon Pizza With Rice Crust

Intro

There’s something undeniably comforting about the aroma of fresh pizza wafting through the kitchen. It takes me back to my childhood, when my grandmother would let me help her prepare her signature pizzas every Sunday. As I stood on tiptoes to reach the counter, she would gently guide my hands as I sprinkled cheese and laid out the toppings. Her secret ingredient was always love, and it’s a lesson I’ve carried with me into my own kitchen. Today, I’m excited to share a unique twist on a classic favorite: Tomato and Bacon Pizza with Rice Crust. This recipe combines savory flavors with a satisfying crunch, offering a delightful spin on the traditional pizza experience.

Why You’ll Love It

This Tomato and Bacon Pizza with Rice Crust brings together the flavors of crispy turkey bacon, juicy tomatoes, and melty mozzarella cheese on a distinctive rice crust. The rice crust is not only a fun alternative to traditional pizza dough, but it’s also naturally gluten-free, making it a great option for those with dietary restrictions. The addition of Italian seasoning adds an aromatic touch that complements the savory toppings perfectly. Whether you’re looking for a new family favorite or a crowd-pleaser for your next gathering, this pizza is sure to impress.

Ingredients

  • 1 bell pepper, sliced
  • 2 cups cooked rice
  • 1 large egg
  • 1 teaspoon Italian seasoning
  • 1 cup shredded mozzarella cheese
  • 2 medium tomatoes, sliced
  • 6 slices of turkey bacon, cooked and crumbled

Instructions

  1. Preheat your oven to 400°F (200°C).
  2. In a large bowl, combine the cooked rice, egg, and Italian seasoning. Mix well until the ingredients are fully incorporated.
  3. Grease a 10-inch pizza pan lightly with oil or non-stick spray. Press the rice mixture onto the pan evenly to form the crust.
  4. Spread the crumbled turkey bacon over the rice crust, followed by the sliced tomatoes and bell pepper.
  5. Sprinkle the shredded mozzarella cheese evenly over the toppings.
  6. Bake in the preheated oven for about 20 minutes, or until the cheese is melted and bubbly.
  7. Once baked, remove from the oven, allow to cool slightly, slice, and serve warm.

Tips

For the best results, make sure your rice is well-cooked and slightly sticky, which helps the crust hold together better. If you find the rice mixture too loose, you can add a tablespoon of flour or gluten-free flour blend to help bind it. Additionally, consider using a pizza stone if you have one, as it can help achieve a crispier crust.

Variations & Substitutions

If you’re looking to switch things up, there are plenty of variations you can try with this recipe. For a vegetarian option, skip the turkey bacon and add more vegetables like mushrooms or spinach. You can also substitute the mozzarella cheese for dairy-free cheese if you’re catering to a dairy-free diet. Experiment with different herbs and spices in the crust for a unique flavor twist, such as adding a pinch of garlic powder or dried basil.

Storage

Leftover pizza can be stored in an airtight container in the refrigerator for up to 3 days. To reheat, place slices in a preheated oven at 350°F (175°C) for about 10 minutes or until warmed through. For a quick option, you can also use the microwave, though the crust will be less crispy.

FAQ

Can I use brown rice instead of white rice for the crust?

Absolutely! Brown rice is a great alternative and will add a nuttier flavor and extra nutrients to your pizza crust. Just ensure it’s cooked thoroughly before mixing it into the crust.

How can I make this recipe vegetarian or vegan?

To make a vegetarian version, simply omit the turkey bacon and consider adding extra veggies. For a vegan option, use a flax egg (1 tablespoon ground flaxseed mixed with 2.5 tablespoons water) in place of the egg and substitute a plant-based cheese for the mozzarella.

Nutrition

This recipe is packed with flavor yet mindful of nutritional needs. While specific values can vary based on the exact ingredients used, a slice of this pizza offers a good balance of protein from the turkey bacon and egg, healthy fats from the cheese, and fiber from the rice and vegetables. It’s a delicious way to enjoy a meal that’s both satisfying and nourishing.

Conclusion

This Tomato and Bacon Pizza with Rice Crust is a wonderful fusion of flavors and textures that pays homage to the comforting tradition of homemade pizza while offering a fresh, modern twist. Whether you’re enjoying it with family on a cozy night in or sharing it with friends at a lively gathering, this pizza is sure to become a beloved staple in your recipe collection. Remember, the best ingredient in any dish is love—so sprinkle it generously as you create this delightful meal. Enjoy!

Related update: Tomato and Bacon Pizza With Rice Crust

Related update: Mango Fried Rice

Japanese Gyoza Pot Stickers | Made by Meaghan Moineau

Japanese Gyoza Pot Stickers

Intro

There’s something incredibly comforting about a plate of perfectly cooked gyoza, or Japanese pot stickers, their crispy bottoms contrasting with a tender, juicy filling. I remember visiting my grandmother’s house on weekends, the kitchen filled with the aromatic scent of sizzling gyoza. She would always let me assist, my small hands struggling to pleat the delicate wrappers just right. It was in those moments that I learned the art of cooking and the love that goes into each fold. Today, I’m excited to share this cherished recipe with you, bringing a piece of my childhood into your home.

Why You’ll Love It

This Japanese Gyoza recipe is a delightful blend of savory, spicy, and aromatic flavors. The combination of ground beef, cabbage, and spices wrapped in a delicate shell is truly irresistible. Whether you’re a seasoned cook or a beginner, these pot stickers are easy to make and perfect for any occasion. Plus, you can customize them with ingredients you love or have on hand!

Ingredients

  • 1/2 teaspoon black pepper
  • 2 cups finely chopped cabbage
  • 1 teaspoon chili sesame oil
  • 1/2 cup dried mushrooms, soaked in warm water and chopped
  • 2 teaspoons grated ginger root
  • 3 to 4 green onions, chopped
  • 1/2 pound ground beef
  • 2 tablespoons salad oil
  • 1 tablespoon sesame oil
  • 2 tablespoons Kikkoman soy sauce
  • 1 tablespoon cooking wine
  • Gyoza wrappers

Instructions

  1. Chop the cabbage finely, place it in a colander, and pour boiling water over it. Allow it to cool to the touch, then squeeze the cabbage well to remove excess water.
  2. In a large bowl, mix the cabbage, chopped green onions, chopped mushrooms, and grated ginger.
  3. In a separate bowl, combine the ground beef, cooking wine, soy sauce, sesame oil, and black pepper. Add this mixture to the bowl of vegetables and mix well.
  4. Place about 1 teaspoon of filling in the center of a gyoza wrapper. Fold the wrapper in half and pleat the edges to seal. If the edges don’t stick, dampen the inside edge with a little water, then pleat.
  5. Heat 2 tablespoons of salad oil in a large skillet over medium heat. Place the gyoza into the skillet, flat side down, and cook until the bottoms are golden brown.
  6. At the edge of the pan, carefully pour in a little water, up to 1/4 of the depth of the pot stickers. Cover the skillet, turn the heat to low, and simmer until the water has evaporated.

Tips

For best results, make sure to squeeze out as much water from the cabbage as possible to prevent the filling from becoming too wet. Also, when pleating the gyoza, try to make small, even pleats to ensure they cook uniformly and look appealing.

Variations & Substitutions

If you’re looking to switch things up, consider these variations:

  • Vegetarian: Replace the ground beef with finely chopped tofu or tempeh.
  • Spicy: Add a dash of chili flakes or a bit more chili sesame oil for an extra kick.
  • Different Proteins: Try ground pork or chicken instead of beef for a different flavor profile.

Storage

Leftover gyoza can be stored in an airtight container in the refrigerator for up to 3 days. To reheat, simply pan-fry them again to regain their crispy texture. You can also freeze uncooked gyoza for up to a month; just be sure to place them in a single layer on a baking sheet to freeze initially before transferring to a freezer bag.

FAQ

Can I use store-bought gyoza wrappers?

Absolutely! Store-bought gyoza wrappers are a convenient option and work perfectly for this recipe. Just be sure to keep them covered with a damp cloth to prevent them from drying out while you work.

How do I prevent the gyoza from sticking to the pan?

Make sure your pan is well-oiled and preheated before adding the gyoza. Adding water to the pan and covering it helps to steam the gyoza, which also prevents sticking. If they still stick, let them sit for a moment after cooking to allow them to release naturally.

Nutrition

While exact nutritional values can vary, each gyoza pot sticker typically contains around 70-80 calories, with a good balance of protein from the beef and vegetables. This makes them a tasty yet relatively light appetizer or main dish. For those watching their sodium intake, be mindful of the soy sauce content, or opt for a low-sodium version.

Conclusion

Japanese Gyoza Pot Stickers are a delightful treat that brings warmth and joy to any meal. Whether you’re making them for a family gathering, a dinner party, or simply to enjoy a taste of Japan at home, these pot stickers promise to be a hit. I hope this recipe brings the same joy to your kitchen as it has to mine. Happy cooking!

Related update: Japanese Gyoza Pot Stickers

Related update: Vegetarian Ratatouille

Brussel Sprouts in Bacon and Garlic Sauce | Made by Meaghan Moineau

Brussel Sprouts in Bacon and Garlic Sauce

Intro

When I think of family gatherings during the festive season, one particular dish always stands out in my memory: Brussel Sprouts in Bacon and Garlic Sauce. This recipe was a staple at our holiday table, lovingly prepared by my grandmother. I remember sitting in her cozy kitchen, stealing crispy bacon bits while she wasn’t looking, and watching in awe as she transformed humble ingredients into a dish that even the pickiest eater couldn’t resist. Today, I’m delighted to share this beloved recipe with you, hoping it brings as much warmth and joy to your table as it did to ours.

Why You’ll Love It

This dish is a perfect blend of savory and tangy flavors that complement the natural taste of brussel sprouts. The bacon and garlic sauce add richness, while a hint of lemon juice brightens the dish. It’s quick and easy to prepare, making it an excellent side dish for busy weeknights or special occasions. Plus, the crispy bacon bits add a delightful texture that even those who usually shy away from green vegetables will enjoy.

Ingredients

  • 250g whole brussel sprouts
  • 1/2 teaspoon salt
  • 4 cups water
  • 1 tablespoon salted butter
  • 1 tablespoon minced garlic
  • 1 tablespoon bacon bits
  • Salt and pepper to taste
  • 1 teaspoon lemon juice

Instructions

  1. Wash the brussel sprouts thoroughly and remove any old, hard outer leaves.
  2. Bring 4 cups of water to a boil in a saucepan and add 1/2 teaspoon of salt.
  3. Add the brussel sprouts to the boiling water and cook at medium heat for 4 minutes, or until they are tender but still slightly crunchy.
  4. Drain the brussel sprouts and set them aside.
  5. Return the saucepan to the hot stove and add 1 tablespoon of butter.
  6. While the butter is melting, cut the brussel sprouts in half.
  7. Add 1 tablespoon of minced garlic to the melted butter and sauté for a few seconds until the garlic is fragrant but not brown.
  8. Return the cut brussel sprouts to the saucepan and toss them lightly in the garlic-butter sauce.
  9. Add 1 tablespoon of bacon bits and toss to combine. For convenience, I always keep a jar of ready-to-use bacon bits in the fridge, but freshly pan-fried and crumbled bacon works just as well.
  10. Season to taste with salt and pepper. I personally love using Masterfoods Garlic Pepper for an extra flavor kick.
  11. Add a squeeze of fresh lemon juice (about 1 teaspoon) for a tangy finish.
  12. Toss everything together once more and serve. For an extra touch, garnish with toasted almond flakes or serve with fresh lemon wedges on the side.

Tips

To ensure your brussel sprouts are perfectly cooked, check them after 4 minutes of boiling. They should be tender but still retain a bit of crunch. Overcooking can lead to mushy sprouts, which we want to avoid. If you prefer a smokier flavor, try using smoked bacon bits. Remember, fresh lemon juice is key; it brightens the dish and balances the savory elements beautifully.

Variations & Substitutions

If you’re vegetarian or looking to reduce your meat intake, you can substitute the bacon bits with smoked paprika or sun-dried tomatoes for a similar depth of flavor. For a nutty crunch, consider adding toasted pine nuts or walnuts instead of almond flakes. If garlic isn’t your favorite, shallots or onions can also complement the sprouts nicely. Feel free to experiment with different herbs like thyme or rosemary for an aromatic twist.

Storage

Store any leftovers in an airtight container in the refrigerator for up to 3 days. To reheat, simply warm them in a skillet over medium heat until heated through. You can also use a microwave, though the skillet method will help retain their texture better. Unfortunately, this dish doesn’t freeze well, as the texture of the brussel sprouts can become unappealing when thawed.

FAQ

Can I use frozen brussel sprouts for this recipe?

Yes, you can use frozen brussel sprouts, but the texture might differ slightly. Make sure to thaw them thoroughly and pat them dry before cooking to remove excess moisture. Adjust the boiling time as needed since frozen sprouts might cook faster.

How do I make this dish vegan?

To make this dish vegan, simply replace the butter with a plant-based alternative and omit the bacon bits. You can use smoked paprika or nutritional yeast to add depth of flavor.

Can I prepare this dish ahead of time?

Yes, you can prepare the brussel sprouts and the garlic sauce a day in advance. Store them separately in the fridge. When ready to serve, reheat the sauce, toss in the brussel sprouts, and add the bacon bits and lemon juice for a fresh finish.

Nutrition

This dish is a great source of fiber, vitamins C and K, and antioxidants from the brussel sprouts. The bacon and butter add a dose of healthy fats, while garlic is known for its immune-boosting properties. Keep in mind that the nutritional content will vary based on the specific brands and quantities used.

Conclusion

Brussel Sprouts in Bacon and Garlic Sauce is a dish that has stood the test of time in my family, bringing smiles and satisfied sighs from everyone around the table. I hope this recipe becomes a cherished favorite in your home as well. Its simplicity and delightful flavors make it a winner for any occasion. So, gather your loved ones, share a meal, and create new memories with this heartwarming dish. Enjoy!

Related update: Brussel Sprouts in Bacon and Garlic Sauce

Candied Spiced Pecans | Made by Meaghan Moineau

Candied Spiced Pecans: A Sweet and Savory Delight

Intro

There’s something magical about the aroma of spiced pecans wafting through the house, especially during the holiday season. As a child, I remember my grandmother making batches of these delightful treats for family gatherings. The warmth of the spices combined with the sweetness of the sugar created an irresistible snack that had everyone reaching for more. Today, I’m excited to share this cherished recipe with you, hoping it brings as much joy to your home as it has to ours.

Why You’ll Love It

These Candied Spiced Pecans are a perfect blend of sweet and spicy, offering a crunchy texture that is as satisfying as it is delicious. Whether you’re looking for a quick snack, a topping for salads, or a thoughtful homemade gift, these pecans fit the bill. The combination of spices like cinnamon, cloves, and nutmeg, along with a hint of maple, makes them an irresistible treat that captures the essence of comfort and warmth.

Ingredients

  • 1 tsp allspice
  • 1/2 cup brown sugar
  • 2 tbsp butter
  • 1 tsp cinnamon
  • 1/2 cup granulated sugar
  • 1/4 tsp ground cloves
  • 1 tsp maple extract
  • 1/4 tsp nutmeg
  • 2 cups pecans
  • 1/4 cup water

Instructions

  1. Preheat your oven to 300°F (150°C). Line a cookie sheet with tin foil and coat it with cooking spray. Set aside.
  2. In a shallow bowl, sift together the granulated sugar, cinnamon, allspice, cloves, and nutmeg. Set aside.
  3. In a small bowl, whisk together the maple extract, brown sugar, and water.
  4. Over medium heat, melt the butter in a skillet. Slowly whisk in the brown sugar mixture and bring it to a boil.
  5. Add the pecans to the skillet and stir to coat them thoroughly. Simmer for about 1-2 minutes until well-coated.
  6. Using a slotted spoon, transfer the pecans to the reserved sugar and spice bowl. Coat the pecans evenly with the sugar mixture.
  7. Place the pecans evenly on the prepared cookie sheet and bake for 15 minutes. Stir the pecans and bake for an additional 15 minutes.
  8. Let the pecans cool completely before serving or storing.

Tips

For the best results, make sure to use fresh pecans. Older nuts can lose their natural oils and flavor. Be sure to stir the pecans halfway through the baking process to ensure even coating and roasting. Lastly, allow them to cool completely before storing to maintain their crispiness.

Variations & Substitutions

If you’re looking to switch things up, you can easily substitute walnuts or almonds for the pecans. For a spicier kick, consider adding a pinch of cayenne pepper to the spice mix. If maple extract isn’t available, vanilla extract works as a great alternative, providing a subtly different flavor profile.

Storage

Store your candied spiced pecans in an airtight container at room temperature. They should stay fresh for up to two weeks. You can also freeze them for longer storage, just be sure to let them thaw completely before serving to retain their crisp texture.

FAQ

Can I use salted butter for this recipe?

Yes, you can use salted butter, but it will slightly alter the flavor profile by adding a hint of saltiness. If you prefer to keep the recipe sweet, stick with unsalted butter.

How do I prevent the pecans from sticking together?

Ensure that the pecans are spread out evenly on the baking sheet and stirred halfway through the baking process. This will help prevent clumping and ensure each nut is evenly coated and roasted.

Can I make these pecans in advance?

Absolutely! These candied spiced pecans are perfect for making ahead of time. Just store them in an airtight container as mentioned, and they’ll be ready for any occasion.

Nutrition

While these candied spiced pecans are a treat, they’re also packed with nutrients. Pecans are a great source of healthy fats, fiber, and protein. However, due to the sugar content, it’s best to enjoy them in moderation as part of a balanced diet.

Conclusion

These Candied Spiced Pecans are not just a treat; they’re a tradition that brings warmth and joy to any occasion. Easy to make and incredibly versatile, they’re sure to become a favorite in your home, just as they have in ours. I hope this recipe inspires you to create delicious memories with your loved ones. Enjoy!

Related update: Candied Spiced Pecans

Related update: Medenjaci – Croatian Honey Spice Cookies

Related update: Japanese Gyoza Pot Stickers

Blackberry Balsamic Drumsticks | Made by Meaghan Moineau

Blackberry Balsamic Drumsticks

Intro

There’s something magical about the combination of sweet and savory that brings back memories of family gatherings and warm summer nights. Growing up, Sundays were reserved for family dinners at my grandmother’s house. She was a culinary wizard who could transform any simple ingredient into a feast fit for royalty. Her secret? A garden brimming with fresh produce and an innate sense for pairing unusual flavors. One summer evening, she introduced us to a dish that would become a family favorite: Blackberry Balsamic Drumsticks. These succulent pieces of chicken, infused with the essence of ripe blackberries and aromatic balsamic vinegar, were a revelation. It’s a dish that not only tantalizes your taste buds but also carries the warmth of those cherished family moments. Today, I’m excited to share this special recipe with you, hoping it brings as much joy to your table as it has to mine.

Why You’ll Love It

Blackberry Balsamic Drumsticks are a delightful blend of sweet, tangy, and savory flavors that will have your taste buds dancing with joy. The unique combination of fresh blackberries and balsamic vinegar creates a mouthwatering glaze that elevates ordinary chicken drumsticks to a gourmet level. Not only is this dish incredibly tasty, but it’s also easy to prepare, making it perfect for both weeknight dinners and special occasions. The marinade, enriched with rosemary and mustard, infuses the chicken with a depth of flavor that is both comforting and sophisticated. Plus, who doesn’t love a dish that can be prepped in advance and left to marinate while you enjoy your day?

Ingredients

  • 8 skin-on chicken drumsticks
  • 1 cup fresh blackberries
  • 1/4 cup balsamic vinegar
  • 1/4 cup demerara sugar
  • 1 tablespoon fresh rosemary, chopped
  • 2 tablespoons butter
  • 2 tablespoons whole grain mustard
  • Salt and pepper to taste

Instructions

  1. Place blackberries, butter, 1/4 cup water, rosemary, sugar, and vinegar in a small saucepan.
  2. Cook over medium-high heat, stirring occasionally, until the mixture is slightly reduced, about 10-15 minutes.
  3. Remove from heat and stir in mustard, salt, and pepper. Allow the marinade to cool.
  4. Place the drumsticks in a large ziplock bag. Pour the cooled marinade over the top and seal the bag.
  5. Toss to coat the drumsticks evenly with the marinade.
  6. Refrigerate and marinate for 24 hours, allowing the flavors to infuse.
  7. When ready to cook, preheat the oven to 375°F (190°C).
  8. Arrange drumsticks on a cookie sheet lined with tin foil.
  9. Bake for 25 minutes, turning once halfway through the cooking time.
  10. Serve hot with your preferred side dish.

Tips

For the best results, use fresh blackberries when in season. They impart a natural sweetness and vibrant color to the dish. If fresh rosemary isn’t available, dried rosemary can be used, but use only half the amount as dried herbs are more potent. When cooking the marinade, keep an eye on it to prevent it from reducing too much, as it should remain syrupy and flavorful.

Variations & Substitutions

If you’re looking to switch things up, consider these variations:
Spicy Kick: Add a pinch of red pepper flakes to the marinade for a spicy twist.
Herbal Infusion: Substitute thyme or sage for rosemary for a different herbal note.
Sweetness Swap: Honey or maple syrup can be used in place of demerara sugar for a different sweetness profile.
Chicken Cuts: If drumsticks aren’t your preference, this marinade works wonderfully with chicken thighs or wings as well.

Storage

Leftover drumsticks can be stored in an airtight container in the refrigerator for up to 3 days. To reheat, place them in an ovenproof dish and warm at 350°F (175°C) until heated through. For a quick option, you can also microwave them on medium power. The flavors deepen over time, making leftovers equally enjoyable.

FAQ

Can I use frozen blackberries?

Yes, frozen blackberries can be used if fresh ones are unavailable. Ensure they are fully thawed and drained before adding to the marinade to avoid excess liquid.

Is it necessary to marinate the drumsticks for 24 hours?

While marinating for 24 hours yields the best flavor, if you’re short on time, even a few hours will still impart a delicious taste. Aim for at least 4 hours if possible.

Can I grill the drumsticks instead of baking them?

Absolutely! Grilling adds a smoky flavor that complements the sweet and tangy glaze. Grill the drumsticks over medium heat, turning frequently, until cooked through.

Nutrition

While exact nutritional values can vary based on portion size and specific brands of ingredients used, each serving of Blackberry Balsamic Drumsticks is approximately 250 calories. This includes a good amount of protein and some natural sugars from the blackberries and demerara sugar.

Conclusion

Blackberry Balsamic Drumsticks are more than just a meal; they’re a culinary experience that combines the richness of tradition with the excitement of bold flavors. Whether you’re gathering with family or hosting friends, this dish is sure to impress and become a staple in your recipe repertoire. Give it a try, and let the flavors transport you to a place of comfort, warmth, and delightful nostalgia. Happy cooking!

Related update: Blackberry Balsamic Drumsticks

Related update: chettinad egg curry

Lamb & Sweet Potato Pot Pie | Made by Meaghan Moineau

Lamb & Sweet Potato Pot Pie

Intro

There’s something uniquely comforting about a homemade pot pie, with its flaky crust and savory filling. Growing up, my grandmother’s kitchen was filled with the aroma of her famous lamb pot pie, a dish she lovingly prepared every Sunday. The laughter of family mingling with the smell of sweet potatoes and fresh herbs was the highlight of my childhood weekends. Today, I’m thrilled to share my own version of this classic recipe, adding a sweet twist with sweet potatoes and a fragrant blend of spices. Whether you’re a seasoned cook or new to the kitchen, this Lamb & Sweet Potato Pot Pie is sure to become a family favorite.

Why You’ll Love It

This pot pie brings together tender lamb, sweet potatoes, and a medley of herbs and spices, all wrapped in a buttery, flaky crust. It’s a complete meal in itself, offering a delightful mix of textures and flavors. The sweet potatoes add a unique sweetness that balances the savory richness of the lamb, while the herbs and spices provide a fragrant depth. Perfect for a cozy family dinner or a special occasion, this pot pie is both heartwarming and satisfying.

Ingredients

  • 1 bay leaf
  • Black pepper, to taste
  • 1/2 cup butter, chilled
  • 1 teaspoon caraway seeds
  • 2 celery stalks, chopped
  • 2 tablespoons cornstarch
  • 1/2 cup demi glace
  • 2 1/2 cups flour
  • 1 tablespoon fresh rosemary, chopped
  • 1 tablespoon fresh thyme, chopped
  • 3 cloves garlic, minced
  • 1/4 cup ice water
  • 1 teaspoon kosher salt
  • 1 1/2 pounds lamb, cut into cubes
  • 1 teaspoon lemon zest
  • 1/4 cup milk
  • Olive oil, as needed
  • 1 teaspoon orange zest
  • 1 cup frozen peas
  • Prepared pie crust (bottom and top)
  • 1 red onion, diced
  • 1/2 cup red wine
  • Salt, to taste
  • 1/4 cup shortening
  • 1 tablespoon sugar
  • 2 sweet potatoes, peeled and diced
  • 1/2 cup water

Instructions

  1. Start with the crust. In a large bowl, combine flour, sugar, rosemary, thyme, and salt. Add chilled butter and use a pastry blender to mix until the mixture resembles coarse cornmeal.
  2. Add shortening and continue to combine until evenly distributed. Slowly add ice water by tablespoons, mixing well after each addition until the dough begins to stick together.
  3. Place the dough on a flat surface and divide into two even pieces. Roll into balls, dust lightly with flour, and wrap in plastic. Refrigerate for at least an hour.
  4. Toss lamb with salt, pepper, caraway seeds, garlic, and flour. Set aside.
  5. As the dough chills, heat olive oil in a wide, deep pan. When sizzling, add lamb pieces and cook on medium heat until just browned. Scoop onto a separate plate.
  6. If necessary, add more olive oil to the same pan. Scrape up all the drippings, then add onion and celery, cooking until they soften and become translucent.
  7. Pour in wine and demi glace, stirring well. Return lamb to the pan, followed by peas and the bay leaf. Cover, reduce to a simmer, and cook for about 15 minutes.
  8. Combine water and cornstarch, then pour into the lamb and vegetables. Mix well. Add sweet potatoes and cook for another 5-7 minutes. Remove from heat and allow to cool completely. Remove bay leaf.
  9. Once the filling has cooled, roll one ball of chilled dough on a floured surface for the bottom crust layer. Fit into a 9-inch pie dish and trim edges.
  10. Place in the fridge and roll the second piece of dough for the top. Remove the bottom crust layer from the fridge, pour in the filling, and top with the second layer. Trim edges if necessary, and roll the top crust edge over the bottom crust.
  11. Chill in the fridge or freezer for a quick chill (2-4 minutes) if the dough feels soft.
  12. Before baking, brush milk over the top crust. Bake in a preheated oven at 375°F for 45-50 minutes or until golden brown.
  13. For advance preparation, let the filling cool completely in the fridge before assembling the pie. Chill the assembled pie until ready to bake. This continuous chilling method ensures a flaky crust.

Tips

To ensure the perfect crust, always keep your ingredients cold. If the dough starts to warm up, give it a quick chill in the fridge or freezer. When rolling out the dough, use a light touch to avoid overworking it, which can lead to a tough crust. Pre-chill your pie dish to help the bottom crust bake evenly and avoid sogginess.

Variations & Substitutions

Feel free to experiment with different vegetables based on the season or your preferences. Carrots, parsnips, or mushrooms can be delightful additions. If you prefer a different protein, beef or chicken can be used in place of lamb. For a vegetarian version, omit the meat and add more vegetables, adjusting the seasoning as needed.

Storage

Store any leftovers in an airtight container in the refrigerator for up to 3 days. To reheat, cover with aluminum foil and warm in a preheated oven at 350°F until heated through. You can also freeze the unbaked pie after assembling. Wrap tightly in plastic wrap and aluminum foil, and freeze for up to 3 months. When ready to bake, add an extra 10-15 minutes to the cooking time.

FAQ

Can I make the crust ahead of time?

Yes, you can prepare the crust up to 2 days in advance. Keep it wrapped in plastic in the refrigerator until you’re ready to assemble the pie.

What if I don’t have demi glace?

If you don’t have demi glace, you can use beef or chicken stock as a substitute. Just reduce the quantity slightly to account for the liquid difference.

Can I use a store-bought crust?

Absolutely! A store-bought crust can save time and still deliver delicious results. Just make sure to keep it chilled until you’re ready to use it.

Nutrition

This pot pie is a hearty dish rich in protein from the lamb and packed with vitamins from the sweet potatoes and other vegetables. It’s a wholesome meal that provides a balance of carbohydrates, fats, and protein. For a lighter version, consider reducing the amount of butter or using a lower-fat milk for the crust.

Conclusion

Our Lamb & Sweet Potato Pot Pie is more than just a meal; it’s a comforting embrace that brings warmth and joy to any table. With its rich flavors and delightful textures, it’s perfect for gatherings or a satisfying family dinner. I hope this recipe becomes a cherished part of your culinary repertoire, just as it has been in my family. Enjoy every bite and the memories it brings!

Related update: Lamb & Sweet Potato Pot Pie

Related update: Breakfast Biscuits and Gravy

Lamb Tagine Stew | Made by Meaghan Moineau

Lamb Tagine Stew: A Warm Embrace in a Bowl

Intro

There’s something uniquely comforting about a pot of stew simmering away on the stove, filling the house with warmth and mouthwatering aromas. For me, Lamb Tagine Stew is more than just a dish; it’s a cherished memory of childhood Sundays spent in my grandmother’s kitchen. The rich, savory fragrance of lamb mixed with warm spices would drift through her home, promising a meal that was both nourishing and deeply satisfying. Today, I’m sharing this beloved family recipe with you, hoping it brings as much joy and comfort to your table as it has to mine.

Why You’ll Love It

This Lamb Tagine Stew is a delightful mix of tender lamb, vibrant vegetables, and fragrant spices, all cooked to perfection in a single pot. The combination of savory and sweet spices creates a depth of flavor that is both exotic and familiar. It’s a dish that not only warms the belly but also the soul. Perfect for a cozy night in or impressing guests, this stew is versatile, easy to prepare, and even better the next day.

Ingredients

  • 2 teaspoons black pepper
  • 2 large carrots, sliced
  • 1 teaspoon cinnamon
  • 1 cup green peas
  • Juice of 1 lemon
  • 1 kg lamb, cut into chunks
  • 2 cups lamb stock
  • 200g mushrooms, sliced
  • 4 teaspoons olive oil, divided
  • 1 large onion, chopped
  • 1 teaspoon oregano
  • 1/4 cup fresh parsley, chopped
  • Salt to taste

Instructions

  1. Heat 2 teaspoons of olive oil in a large pan over medium-high heat. Add the lamb chunks and sauté until they are browned on all sides. Remove from the pan and set aside.
  2. In the same pan, add the remaining 2 teaspoons of olive oil. Once hot, add the onions and carrots. Season with salt, black pepper, and oregano. Cook until the onions are translucent and the carrots are slightly tender.
  3. Add the lamb back into the pan, along with the mushrooms and green peas. Pour in the lamb stock, bringing everything to a gentle simmer. Cover and let cook for about 45 minutes, or until the lamb is tender and the flavors have melded together.
  4. While the stew is simmering, mix the chopped parsley, lemon juice, and cinnamon in a small bowl.
  5. Once the stew is ready, stir in the parsley mixture, allowing the fresh and vibrant flavors to infuse the stew.
  6. Serve hot with a side of fluffy couscous to soak up the delicious sauce.

Tips

For the best flavor, let the stew sit for a few hours or overnight in the refrigerator. This allows the spices and flavors to deepen and meld beautifully. When reheating, do so gently over low heat to maintain the integrity of the ingredients.

Variations & Substitutions

If lamb isn’t your preference, beef or chicken can be excellent substitutes. For a vegetarian version, consider adding chickpeas or lentils instead of meat. You can also play with spices, adding a bit of cumin or coriander for a different flavor profile. Feel free to use vegetable stock instead of lamb stock to keep it vegetarian-friendly.

Storage

Store any leftover Lamb Tagine Stew in an airtight container in the refrigerator for up to three days. This stew also freezes well; simply place it in a freezer-safe container and store it for up to three months. Thaw in the refrigerator overnight before reheating.

FAQ

What is a tagine?

A tagine is a North African dish named after the earthenware pot in which it is traditionally cooked. The pot has a conical lid that helps to circulate steam, keeping the dish moist and flavorful. However, you can successfully make a tagine in any heavy, lidded pot.

Can I make this dish in advance?

Absolutely! In fact, Lamb Tagine Stew often tastes even better the next day as the flavors have more time to meld. Simply prepare the stew as directed, let it cool, and store it in the refrigerator until you’re ready to serve.

What should I serve with Lamb Tagine Stew?

This stew pairs beautifully with couscous, which soaks up the rich sauce. You can also serve it with crusty bread or over a bed of fluffy basmati rice.

Nutrition

This Lamb Tagine Stew is not just delicious but also packed with nutrients. Lamb is a great source of protein and essential vitamins like B12 and zinc. The vegetables add fiber and a range of vitamins, while spices like cinnamon offer antioxidant properties. Enjoy this dish as part of a balanced meal.

Conclusion

Lamb Tagine Stew is a dish that brings warmth, comfort, and a touch of exotic flair to your dining table. Whether you’re savoring it as a cozy family meal or serving it to impress guests, this stew is sure to become a favorite in your recipe collection. I hope this recipe brings as much joy to your home as it has to mine, and that it becomes a cherished part of your culinary traditions. Enjoy every comforting spoonful!

Related update: Lamb Tagine Stew

Related update: Japanese Mabo Tofu With Eggplant

Siew Mai | Made by Meaghan Moineau

Siew Mai: A Delightful Dim Sum Classic

Intro

Growing up, dim sum Sundays were a cherished tradition in my family. We would gather around a bustling table, eagerly anticipating the arrival of steaming bamboo baskets filled with an assortment of dumplings. Among my favorites was siew mai, a delectable pork and shrimp dumpling that quickly won my heart with its savory filling and delightful textures. Today, I’m excited to share my family’s recipe for siew mai, a dish that brings back fond memories and continues to be a beloved part of our dining experience.

Why You’ll Love It

Siew mai is a timeless dish that has captivated taste buds for generations. Here’s why you’ll love making and eating these delicious dumplings:

  • Flavorful Filling: The combination of pork, shrimp, and Chinese sausages creates a savory and satisfying flavor profile.
  • Texture Delight: The tender pork is complemented by the crunch of water chestnuts and the chewy texture of glutinous rice.
  • Customizable: Easily adapt the recipe to suit your taste preferences with variations and substitutions.
  • Perfect for Sharing: These bite-sized delights are perfect for gatherings and will surely impress your guests.

Ingredients

  • Wonton wrappers
  • 700g fatty pork
  • 2 tablespoons corn starch
  • 1 teaspoon salt
  • 1 teaspoon white ground pepper
  • 1/2 teaspoon sugar
  • 1 teaspoon Worcestershire sauce or Maggie Seasoning Sauce
  • 2 tablespoons Shaoxing Huatiao wine
  • 2 tablespoons sesame oil
  • 80g canned water chestnuts
  • 4 large Chinese mushrooms
  • Cooked whole shrimp
  • Carrot
  • 2 lap cheongs (Chinese sausages)
  • Raw glutinous rice
  • Shallots
  • Ginger
  • Cooking oil
  • Dried shrimps
  • Cooked dried scallops
  • Light soy sauce
  • Oyster sauce

Instructions

  1. To prepare the pork filling, mince 700g of pork and place it in a large mixing bowl.
  2. Add 2 tablespoons of corn starch, 1 teaspoon of salt, 1 teaspoon of ground white pepper, 1/2 teaspoon of sugar, 1 teaspoon of Worcestershire sauce, 2 tablespoons of Shaoxing Huatiao wine, and 2 tablespoons of sesame oil. Mix well.
  3. Roughly chop 80g of canned water chestnuts and 4 large Chinese mushrooms into fine pieces. Add to the pork mixture and combine thoroughly.
  4. Finely dice a small carrot to garnish the siew mai later. Set aside.
  5. For the glutinous rice filling, soak 2 lap cheongs in boiling water until the skin separates. Remove the skin and dice the sausages.
  6. In a large saucepan over medium-high heat, pan fry the diced lap cheong until they are golden. Follow the instructions for glutinous rice preparation and stir-fry until fragrant. Add the fried lap cheong pieces and set aside to cool.
  7. Prepare the wonton wrappers by placing a sheet on a flat surface. Place a teaspoon of filling in the center of each wrapper.
  8. Dampen your finger with water and wet the edges of the wonton wrapper. Gather the wrapper around the filling and squeeze gently to seal.
  9. Top each pork siew mai with a shrimp and garnish with chopped carrot.
  10. Place the dumplings in a steamer lined with perforated baking paper. Steam over boiling water for 14-15 minutes or until cooked through.
  11. Serve hot, or freeze uncooked dumplings for later use.

Tips

To ensure the best results when making siew mai, keep these tips in mind:

  • Keep it Tight: Make sure the dumplings are tightly wrapped to prevent them from falling apart while steaming.
  • Use Fresh Ingredients: Fresh shrimp and quality pork make a significant difference in taste.
  • Steam Properly: Ensure steam can circulate by cutting holes in the baking paper lining the steamer.

Variations & Substitutions

Feel free to experiment with these variations to suit your preferences:

  • Vegetarian Siew Mai: Replace meat with chopped vegetables such as mushrooms, carrots, and bamboo shoots.
  • Spicy Twist: Add a dash of chili oil or finely chopped fresh chili for a spicy kick.
  • Flavor Enhancers: Add a touch of grated ginger or garlic for additional depth of flavor.

Storage

Siew mai is best enjoyed fresh, but if you have leftovers, store them in an airtight container in the refrigerator for up to 2 days. To freeze uncooked siew mai, place them on a baking sheet lined with parchment paper, freeze until solid, and then transfer to a freezer-safe container. They can be steamed directly from frozen.

FAQ

Can I make siew mai without shrimp?

Yes, you can omit the shrimp if desired. The pork filling is flavorful enough on its own, or you could increase the amount of pork or add other ingredients like mushrooms for added texture and taste.

What can I use instead of wonton wrappers?

If you don’t have wonton wrappers, you can use dumpling wrappers or even make your own from scratch using flour and water. The texture may vary slightly, but they’ll still be delicious.

Nutrition

While exact nutritional values can vary, siew mai is a protein-rich dish thanks to the pork and shrimp. The inclusion of vegetables like mushrooms and water chestnuts adds fiber and vitamins. Opt for leaner pork cuts to reduce fat content if desired.

Conclusion

Siew mai is more than just a dish; it’s a culinary tradition that brings people together. Whether you’re enjoying it as part of a dim sum spread or making it the star of your meal, siew mai is sure to delight with its savory flavors and satisfying textures. I hope this recipe brings joy to your kitchen and adds a touch of nostalgia to your dining table. Happy cooking!

Related update: Siew Mai

Related update: Red, White, and Blue Fruit Salsa

Related update: Lamb Tagine Stew

Beef, Poblano & Cheese Tamales | Made by Meaghan Moineau

Beef, Poblano & Cheese Tamales

Intro

There’s something incredibly comforting about the process of making tamales. I remember watching my grandmother in her cozy kitchen, the sun filtering through the lace curtains, as she expertly spread masa on corn husks. I would sit on a stool, mesmerized by her swift, skilled hands and the fragrant aroma that filled the room. Now, every time I make tamales, I feel her warmth guiding me, bringing a piece of my childhood into my home.

Why You’ll Love It

This recipe for Beef, Poblano & Cheese Tamales is a beautiful blend of rich flavors and comforting textures. The tender beef combined with the smoky poblano peppers and creamy cheese creates a savory filling that is simply irresistible. Making tamales at home allows you to control the ingredients, and this combination is sure to become a family favorite.

Ingredients

  • Dried corn husks
  • Dried California chili pods
  • Ground beef
  • Shredded mozzarella cheese
  • Diced poblano pepper
  • Garlic
  • Olive oil
  • Goya seasoning
  • Salt
  • Chili powder

Instructions

  1. In a large bowl, soak the corn husks in hot water until they are pliable.
  2. In a large saucepan, bring 4 cups of water to a boil. Remove any string-like particles from the chili pods before adding them to the boiling water along with half a packet of Goya seasoning. Cover and boil for about 20 minutes.
  3. After boiling, blend the chili pods with 2 cups of the stock to create a chili sauce.
  4. Drain the remaining stock from the saucepan and return it to the stovetop over medium heat. Once the stock evaporates, add olive oil, onion, and beef, breaking apart the meat as it cooks.
  5. Add 1 packet of Goya seasoning and chili powder, cooking for 5 more minutes before adding the chili sauce. Cook for an additional 5 minutes.
  6. Add garlic and 2 teaspoons of salt. Stir in the poblano pepper if you haven’t already, then reduce heat to medium-low and cook for one hour, partially covering the pan for the last twenty minutes to reduce the sauce.
  7. In a large bowl, combine instant corn masa mix, water, baking powder, salt, and olive oil to create a spongy masa mix.
  8. To assemble the tamales, spread the masa thinly on the corn husks, leaving about 2 inches on the left-hand side. Add 2 tablespoons of meat mixture and a sparse amount of cheese before rolling the tamale.
  9. Use a double boiler or a metal colander placed in a large pot to cook the tamales. Ensure they are snug but not too tight to prevent unraveling.
  10. Boil 2 cups of water in the pot or enough to reach 1 inch in height. Once boiling, reduce the heat, add the tamales, cover with a towel, and cook for 30 minutes.

Tips

Be sure to soak the corn husks long enough to make them pliable. This will make it much easier to spread the masa and roll the tamales. Also, don’t overfill the tamales as this can cause them to burst during cooking.

Variations & Substitutions

If you prefer a spicier tamale, consider adding jalapeños or serrano peppers. For a vegetarian option, substitute the beef with sautéed mushrooms or beans, and use vegetable stock instead of beef stock. Feel free to experiment with different types of cheese for a unique flavor profile.

Storage

Once cooked, tamales can be stored in the refrigerator for up to 5 days. To freeze, wrap each tamale in foil and place them in a zip-top bag. They can be frozen for up to 3 months. To reheat, steam them again or microwave them wrapped in a damp paper towel.

FAQ

Can I prepare the tamale filling in advance?

Yes, the filling can be prepared a day or two in advance. Store it in an airtight container in the refrigerator until you’re ready to assemble the tamales.

Do I need a special pot to cook tamales?

While a tamale steamer is ideal, you can improvise with a metal colander placed inside a large pot. Just make sure to create enough steam by adding water to the pot and keep the lid covered tightly.

Nutrition

While nutritional content may vary based on specific ingredients and portions, each tamale typically contains around 250-300 calories, 12g of fat, 20g of carbohydrates, and 15g of protein.

Conclusion

Making Beef, Poblano & Cheese Tamales is more than just a culinary project; it’s an opportunity to connect with tradition and create memories with family and friends. Whether you’re an experienced cook or trying tamales for the first time, this recipe offers a delicious and rewarding experience. Enjoy the process and savor the flavors of this classic dish.

Related update: Beef, Poblano & Cheese Tamales

Related update: Chicken Farfalle with Low-Fat Alfredo Sauce

Chili and Garlic Spiced Beef and Broccoli Stir Fry | Made by Meaghan Moineau

Chili and Garlic Spiced Beef and Broccoli Stir Fry

Intro

There’s something magical about the aroma of sizzling beef and vibrant broccoli dancing together in a pan. It takes me back to my childhood kitchen, where my grandmother would whip up the most delicious stir fry dishes. Her secret? A perfect balance of spices and a lot of love. This Chili and Garlic Spiced Beef and Broccoli Stir Fry is a nod to those cherished memories, combining the warmth of nostalgia with the excitement of bold flavors. Whether you’re looking for a quick weeknight dinner or a dish to impress your guests, this recipe is sure to become a favorite in your home too.

Why You’ll Love It

This stir fry is the perfect blend of spicy, savory, and slightly sweet flavors, making it a delightful dish for any palate. It’s quick to prepare, making it an ideal choice for busy evenings. Plus, it’s packed with nutrients, thanks to the broccoli, and offers a satisfying protein boost from the beef. The sauce, with its combination of soy sauce, rice vinegar, and Asian chili sauce, gives the dish a depth of flavor that’s both comforting and exciting. You’ll love how versatile it is, allowing for easy substitutions and variations to suit your tastes and dietary needs.

Ingredients

  • Beef steak, thinly sliced
  • Broccoli florets
  • Coconut oil
  • Low fat chicken broth
  • Cornstarch
  • Soy sauce
  • Rice vinegar
  • Mirin
  • Sesame oil
  • Sugar
  • Asian chili sauce
  • Cooked brown rice

Instructions

  1. In a small bowl, combine the chicken broth, cornstarch, soy sauce, rice vinegar, mirin, sesame oil, sugar, and Asian chili sauce. Stir until well mixed and set aside.
  2. Preheat a non-stick skillet over medium-high heat with 1/2 tablespoon of coconut oil.
  3. Add the beef slices to the skillet and stir fry until the beef is cooked through, about 3 to 4 minutes. Remove the beef from the pan and set aside.
  4. Add the remaining coconut oil to the skillet and sauté the broccoli for 3 to 4 minutes, until it is crisp-tender. Add a splash of chicken broth or water if needed to prevent the pan from drying out.
  5. Return the beef to the pan and pour the prepared sauce over the beef and broccoli.
  6. Stir continuously until the sauce thickens and coats the beef and broccoli, about 4 to 5 minutes.
  7. Serve the stir fry over a bed of cooked brown rice.

Tips

For the best results, ensure that your beef is thinly sliced. This will help it cook quickly and evenly. You can freeze the beef for about 20 minutes before slicing to make it easier to cut thinly. Adjust the level of chili sauce to suit your spice tolerance. If you prefer a milder dish, start with half the amount and adjust to taste. To keep the broccoli vibrant and crisp-tender, avoid overcooking it. A quick sauté is all it needs to maintain its texture and nutrients.

Variations & Substitutions

This stir fry is incredibly versatile. You can substitute the beef with chicken or tofu for a different protein option. Feel free to add other vegetables like bell peppers, carrots, or snap peas for added color and nutrition. If you’re gluten-free, swap the soy sauce for tamari. For a low-carb version, serve the stir fry over cauliflower rice instead of brown rice.

Storage

Store any leftovers in an airtight container in the refrigerator for up to 3 days. To reheat, add a splash of water or broth to the pan and gently warm the stir fry over medium heat until heated through. This will help maintain the sauce’s consistency and the broccoli’s texture.

FAQ

Can I make this stir fry in advance?

Yes, you can prepare the sauce and slice the beef and vegetables a day ahead. Store them separately in the refrigerator until you’re ready to cook. This can save you time on busy nights and make meal preparation a breeze.

What can I serve with this stir fry?

While it’s delicious on its own or with brown rice, you can serve this stir fry alongside a simple cucumber salad or some steamed dumplings for a complete meal. It also pairs well with a hot and sour soup if you’re in the mood for a multi-course dinner.

Nutrition

This dish is a great source of protein and fiber, thanks to the beef and broccoli. While the exact nutritional content will vary based on portion sizes and specific ingredient brands, you can expect a balanced meal that’s rich in essential vitamins and minerals. The use of coconut oil adds a healthy fat component, while the brown rice provides whole grains to keep you feeling full and satisfied.

Conclusion

This Chili and Garlic Spiced Beef and Broccoli Stir Fry is more than just a meal—it’s a warm embrace of flavors that brings comfort and joy to the table. With its perfect blend of spices and textures, it’s sure to become a staple in your culinary repertoire. So, gather your ingredients, channel your inner chef, and let this delightful dish transport you to a world of delicious nostalgia and culinary satisfaction.

Related update: Chili and Garlic Spiced Beef and Broccoli Stir Fry

Related update: Grilled Garlicky-Herbed Shrimp

Pittata – Pizza Frittata | Made by Meaghan Moineau

Pittata – Pizza Frittata: A Delicious Twist on Classic Breakfast

Intro

Growing up, Sunday mornings were a sacred time in our household. The aroma of freshly brewed coffee mingled with the sounds of sizzling bacon, creating a comforting symphony that signaled the start of a leisurely day. My mother, with her extraordinary culinary skills, would whisk together the most delightful dishes, but there was one that always stood out – the pittata. A clever blend of pizza and frittata, this dish was the embodiment of indulgence and creativity. Today, I’m thrilled to share this cherished recipe with you, bringing a piece of my family tradition to your kitchen.

Why You’ll Love It

The pittata is a versatile dish that combines the best of two worlds: the savory satisfaction of pizza and the fluffy, protein-packed delight of a frittata. It’s perfect for breakfast, brunch, or even a light dinner, offering a filling meal that’s both quick to prepare and utterly delicious. Whether you’re hosting a gathering or simply looking to treat yourself, this dish is sure to impress with its simple ingredients and depth of flavor.

Ingredients

  • 6 large eggs
  • 1/4 cup fresh basil, chopped
  • 1/4 cup milk (optional)
  • 1/2 cup grated parmesan cheese
  • 1/4 cup sliced pepperoni
  • 1/2 cup shredded mozzarella cheese
  • Salt and pepper to taste
  • Cooking fat (e.g., olive oil, butter)

Instructions

  1. Preheat your oven to ~450°F (230°C), using the top heat setting only.
  2. On the stove, heat your choice of cooking fat in a large oven-safe skillet over medium heat.
  3. In a bowl, beat the eggs with milk, salt, pepper, and any herbs or spices you desire.
  4. Add any additional ingredients (except cheese) to the skillet. For this recipe, we keep it simple, but feel free to include cooked or quick-cooking vegetables like bell peppers.
  5. Pour the egg mixture into the skillet, tilting it to evenly distribute around any add-ins.
  6. Distribute the shredded mozzarella cheese and pepperoni slices over the egg mixture.
  7. Allow the eggs to cook on the stove until the edges are set, leaving the center slightly jiggly.
  8. Generously top with parmesan cheese.
  9. Transfer the skillet to the preheated oven and bake until the eggs are puffed, browned, and the center is firm.
  10. Remove from the oven and let the pittata cool for a couple of minutes before slicing into wedges.

Tips

For the best results, ensure that your skillet is well-greased to prevent sticking. Keep an eye on the pittata as it bakes; it can go from perfectly puffed to overcooked quickly. Use a toothpick to check that the center is set if you’re unsure. Lastly, let it rest slightly before serving; this makes cutting it into neat wedges much easier.

Variations & Substitutions

One of the joys of a pittata is its adaptability. Feel free to experiment with different herbs, spices, or cheeses. Swap pepperoni for sausage, or go vegetarian with mushrooms and spinach. For a dairy-free option, skip the milk and use a plant-based cheese alternative. The possibilities are endless, ensuring every pittata is a unique creation.

Storage

Store any leftover pittata in an airtight container in the refrigerator for up to three days. To reheat, warm it in the oven or a skillet over low heat until heated through, or microwave individual slices for about 30 seconds. For longer storage, freeze individual portions and reheat directly from frozen for a quick and easy meal.

FAQ

Can I make the pittata ahead of time?

Yes, you can prepare the pittata a day in advance. Simply follow the instructions until baking, then cover and refrigerate the skillet. When ready to bake, allow it to come to room temperature before placing it in the oven.

What can I serve with pittata?

Pittata pairs beautifully with a simple green salad, fresh fruit, or crusty bread. For a heartier meal, consider serving it with roasted potatoes or a side of bacon or sausage.

Is there a way to make it spicier?

For a spicier kick, add crushed red pepper flakes, diced jalapeños, or a splash of your favorite hot sauce to the egg mixture before cooking.

Nutrition

While the exact nutritional content will vary with portion sizes and specific ingredients used, a typical slice of pittata (1/6 of the whole) provides approximately 200 calories, 15g of protein, and 15g of fat, making it a hearty, satisfying dish that’s also relatively low in carbohydrates.

Conclusion

The pittata is more than just a meal; it’s a nod to creativity and the joy of cooking. Whether you’re reliving cherished memories or creating new ones, this dish is sure to become a staple in your recipe repertoire. I hope you find as much comfort and joy in making and sharing this dish as I have over the years. Bon appétit!

Related update: Pittata – Pizza Frittata

Related update: Mixed Berry Yogurt with Almonds

Japanese Gyoza Pot Stickers | Made by Meaghan Moineau

Japanese Gyoza Pot Stickers

Intro

There’s something truly magical about gathering around the kitchen table with loved ones, folding gyoza wrappers, and sharing stories. I remember as a child, watching my grandmother skillfully pleat the edges of these delightful Japanese pot stickers, her hands moving with a rhythm that spoke of years of practice. The savory aroma of sizzling gyoza would fill the room, creating an atmosphere of warmth and anticipation. Today, I share with you a recipe that brings back those cherished memories and allows you to create your own.

Why You’ll Love It

This Japanese Gyoza Pot Stickers recipe is a perfect blend of savory and umami flavors wrapped in a tender yet crispy shell. Not only are they incredibly delicious, but they’re also versatile and can be served as appetizers, snacks, or even a main course. The combination of seasoned ground beef with aromatic vegetables and the unique touch of chili sesame oil makes each bite an explosion of flavor. Plus, making them from scratch is a fun and rewarding experience that allows you to create a connection with this beloved Japanese tradition.

Ingredients

  • Black pepper, to taste
  • 1 cup cabbage, finely chopped
  • 1 teaspoon chili sesame oil
  • 1/4 cup dried mushrooms, soaked in warm water and chopped
  • 2 teaspoons grated ginger root
  • 3 to 4 green onions, finely chopped
  • 1 pound ground beef
  • 2 tablespoons salad oil
  • 1 teaspoon sesame oil
  • 2 tablespoons Kikkoman soy sauce
  • 1 tablespoon cooking wine
  • Gyoza wrappers

Instructions

  1. Chop the cabbage finely and place it in a colander. Pour boiling water over the cabbage, then let it cool until it’s comfortable to touch. Squeeze the cabbage well to remove excess water.
  2. In a large bowl, combine the cabbage, chopped green onions, chopped mushrooms, and grated ginger.
  3. In a separate bowl, mix the ground beef with cooking wine, soy sauce, sesame oil, and black pepper. Add the vegetable mixture to the beef and mix well.
  4. Place about 1 teaspoon of filling in the center of a gyoza wrapper. Fold the wrapper in half and pleat the edges to seal. If the edges do not stick, dampen the inside edge with a little water before pleating.
  5. Heat 2 tablespoons of salad oil in a pan over medium heat. Place the gyoza in the pan, flat side down.
  6. At the edge of the pan, carefully pour in a little water, up to 1/4 of the depth of the pot stickers. Cover the pan, reduce the heat to low, and let the gyoza simmer until all the water has evaporated.

Tips

For the best results, make sure not to overfill the gyoza wrappers as this can make sealing difficult and lead to bursting during cooking. When pleating the edges, use a firm but gentle touch to ensure they are securely sealed. Additionally, using a non-stick pan can help prevent sticking during the cooking process.

Variations & Substitutions

If you prefer a vegetarian version, simply replace the ground beef with finely chopped tofu or a plant-based meat substitute. You can also experiment with different vegetables such as carrots or bell peppers to add a unique twist. For a spicier kick, increase the amount of chili sesame oil or add a dash of hot sauce to the filling mixture.

Storage

To store leftover gyoza, let them cool to room temperature before placing them in an airtight container. They can be refrigerated for up to 3 days. For longer storage, consider freezing them in a single layer on a baking sheet before transferring to a freezer bag. Frozen gyoza can be cooked directly from the freezer, just increase the cooking time slightly.

FAQ

Can I make the gyoza filling in advance?

Absolutely! You can prepare the filling up to a day in advance and store it in the refrigerator. This can actually help the flavors meld together, resulting in a more flavorful filling.

What if I can’t find gyoza wrappers?

If gyoza wrappers are unavailable, you can use wonton wrappers as a substitute. They may be slightly thinner, so handle them with care when pleating and sealing.

How do I prevent the gyoza from sticking to the pan?

Ensure your pan is well-oiled and preheated before adding the gyoza. A non-stick pan can also help. If they do stick, allow them to cool briefly before gently loosening with a spatula.

Nutrition

This gyoza recipe offers a balanced combination of protein, vegetables, and healthy fats. Each serving (4-5 pot stickers) contains approximately 250 calories, 14g of protein, 20g of carbohydrates, and 12g of fat. Adjust the portion size based on your dietary needs and preferences.

Conclusion

Making Japanese Gyoza Pot Stickers at home is a delightful experience that brings the authentic flavors of Japan into your kitchen. Whether you’re recreating cherished family memories or starting new traditions, these pot stickers are sure to become a favorite. Enjoy the process of crafting each gyoza, savor the rich and complex flavors, and share them with those you love. Happy cooking!

Related update: Japanese Gyoza Pot Stickers

Related update: Spicy Black-Eyed Pea Curry with Swiss Chard and Roasted Eggplant

Related update: Curry Leaves Potato Chips

Slow Cooker Kahlua Pork with Sweet Chili Pineapple Sauce | Made by Meaghan Moineau

Slow Cooker Kahlua Pork with Sweet Chili Pineapple Sauce

Intro

There’s something magical about the aroma of a slow-cooked meal wafting through the house, especially when it’s a dish that has been a family favorite for generations. I can still vividly recall the Sunday afternoons at my grandmother’s house, where family gatherings were synonymous with her signature Kahlua Pork. As kids, we would eagerly await the moment when the tender, flavorful pork would be served, accompanied by the sweet and tangy pineapple sauce. This recipe is my homage to those cherished memories, with a modern twist that brings the flavors to life in a convenient slow-cooker format.

Why You’ll Love It

This Slow Cooker Kahlua Pork with Sweet Chili Pineapple Sauce is the perfect blend of savory and sweet, with a hint of smokiness that makes it irresistible. It’s incredibly easy to prepare, requiring minimal effort but delivering maximum flavor. The slow cooker does all the hard work, breaking down the pork until it’s melt-in-your-mouth tender. The sweet chili pineapple sauce adds a zesty kick that perfectly complements the richness of the pork. Whether you’re hosting a gathering or just want a comforting meal for the family, this dish is sure to become a staple in your home.

Ingredients

  • 4 lbs pork butt
  • 2 tablespoons liquid smoke
  • 1 tablespoon regular sea salt
  • 1 cup pineapple juice
  • 1/4 cup rice vinegar
  • 1/4 cup honey
  • 2 tablespoons garlic chili sauce
  • 2 tablespoons hoisin sauce

Instructions

  1. Place the pork, fat side up, in the slow cooker.
  2. Using a fork, pierce the roast all over and pour the liquid smoke over it to coat.
  3. Sprinkle the sea salt evenly over the roast and cover.
  4. Cook on low for 10 hours, until the meat begins to fall apart when shredded with a fork.
  5. In a small saucepan, whisk together the pineapple juice, rice vinegar, honey, chili sauce, and hoisin sauce.
  6. Bring the mixture to a boil and cook the sauce until reduced by half, stirring frequently with a heat-resistant spatula.
  7. Set aside the sauce once reduced.
  8. When the roast is done, transfer to a cutting board and shred the meat using two forks.
  9. Return the shredded meat back to the slow cooker and serve immediately with the sauce.

Tips

For best results, choose a pork butt with good marbling, as the fat will render down during cooking, keeping the meat juicy and flavorful. If you prefer a bit of spice, feel free to adjust the amount of garlic chili sauce to your liking. Keep an eye on the sauce as it reduces to ensure it doesn’t burn, and remember to stir frequently.

Variations & Substitutions

If you’re looking for a different flavor profile, you can substitute the hoisin sauce with soy sauce for a less sweet, more savory sauce. For a tropical twist, try adding crushed pineapples to the sauce during the reduction process. Vegetarians can swap the pork for jackfruit, which mimics the texture of shredded meat and absorbs flavors beautifully.

Storage

Leftovers can be stored in an airtight container in the refrigerator for up to 4 days. Reheat gently on the stovetop or in the microwave, adding a splash of water or pineapple juice to keep the meat moist. You can also freeze the pork and sauce in separate containers for up to 3 months. Thaw in the refrigerator overnight before reheating.

FAQ

Can I use a different cut of pork?

Yes, you can use pork shoulder or pork loin as alternatives. However, keep in mind that pork loin is leaner and may not be as tender as pork butt or shoulder. Adjust the cooking time accordingly and monitor the tenderness of the meat.

What can I serve with this dish?

This Kahlua Pork pairs wonderfully with steamed rice or a side of roasted vegetables. For a complete Hawaiian-inspired meal, consider serving it with macaroni salad and coleslaw.

Is there a way to make it in the oven?

Absolutely! Preheat your oven to 325°F (165°C). Follow the preparation steps and place the pork in a roasting pan. Cover tightly with foil and bake for 5-6 hours, until the pork is tender and easily shredded.

Nutrition

This dish is a source of protein and offers a delightful balance of sweet and savory flavors. The sauce contains natural sweetness from honey and pineapple juice, making it more nutrient-dense than sugar-laden alternatives. If you’re watching your sodium intake, consider using a reduced-sodium soy sauce in place of hoisin sauce.

Conclusion

This Slow Cooker Kahlua Pork with Sweet Chili Pineapple Sauce is a testament to the power of simple ingredients and traditional cooking methods. It’s a dish that brings people together, creating a sense of warmth and nostalgia with every bite. Whether it’s for a special occasion or a cozy family dinner, this recipe is sure to become a beloved fixture in your culinary repertoire. Enjoy the flavors, and may it bring as much joy to your table as it has to mine!

Related update: Slow Cooker Kahlua Pork with Sweet Chili Pineapple Sauce

Related update: Creamy White Chili

Spinach and Gorgonzola Stuffed Flank Steak | Made by Meaghan Moineau

Spinach and Gorgonzola Stuffed Flank Steak

Intro

There’s something incredibly comforting about a stuffed flank steak. As a child, I remember watching my grandmother prepare a similar dish on Sunday afternoons. The aroma of sizzling steak mingled with the earthy scent of sautéed spinach would waft through the house, signaling to everyone that a special meal was about to be served. It was a time for family, laughter, and the anticipation of a delicious dinner. Now, I carry on that tradition with my version of Spinach and Gorgonzola Stuffed Flank Steak, a dish that combines savory flavors and tender textures, perfect for gatherings or a cozy night in.

Why You’ll Love It

This Spinach and Gorgonzola Stuffed Flank Steak is a true crowd-pleaser. It’s a stunning centerpiece for any dinner table yet surprisingly easy to prepare. The combination of rich blue gorgonzola and nutrient-packed spinach creates a flavorful filling that elevates the lean flank steak to new heights. The dish offers a perfect balance of flavors with the creamy cheese complementing the robust steak, while the spinach adds a touch of freshness. Whether you’re cooking for family or entertaining guests, this recipe is sure to impress.

Ingredients

  • 1 lean flank steak
  • 3 tablespoons olive oil, divided
  • 1 shallot, finely chopped
  • 2 cups fresh spinach, roughly chopped
  • 1/2 cup fresh bread crumbs
  • 1/2 cup blue gorgonzola, crumbled
  • Salt and pepper, to taste

Instructions

  1. Preheat your oven to 375°F (190°C).
  2. Butterfly the steak by using a long sharp knife. Hold the knife parallel to the work surface and cut through the long side of the steak, stopping about 1/2 inch from the opposite side. If the steak is already thin, pound it with a mallet to 1/2 inch thick.
  3. In a large skillet over medium heat, add 1 tablespoon of olive oil. Sauté the shallots until soft, about 2 minutes.
  4. Add the spinach to the skillet and cook until just wilted, about 2 to 3 minutes. Transfer the spinach to a colander.
  5. Once the spinach is cool enough to handle, squeeze out all the moisture and transfer it to a medium bowl. Stir in the bread crumbs and gorgonzola. Season with salt and pepper.
  6. Place the steak on a sheet of plastic wrap. Evenly smear the spinach mixture over the steak, leaving about a 1-inch border along the side edge.
  7. Beginning with the side nearest you, use the plastic wrap as an aid to roll up the steak, gently pressing on the filling. Tie the rolled steak with twine at 2-3 inch intervals.
  8. Season the outside of the steak with salt and pepper.
  9. Heat the remaining 2 tablespoons of olive oil in a large ovenproof skillet over medium-high heat. Sear the roast on all sides, about 2 minutes per side.
  10. Place the skillet in the oven and roast for 20 to 25 minutes.
  11. Transfer the steak to a cutting board, tent with aluminum foil, and allow it to rest for 10 minutes.
  12. To serve, remove the twine from the roast and cut into 1/2 inch to 1 inch thick slices.

Tips

For best results, make sure your steak is evenly pounded to the correct thickness before filling and rolling. This helps ensure even cooking. When searing the steak, make sure your skillet is hot enough to create a good crust, which will seal in the juices. Letting the meat rest after roasting is crucial to maintaining its juiciness, so resist the temptation to cut into it too soon!

Variations & Substitutions

If blue gorgonzola isn’t to your taste, feel free to substitute it with feta or goat cheese for a milder flavor. For a spicier kick, add a pinch of red pepper flakes to the spinach mixture. You can also experiment with adding other herbs like thyme or rosemary for additional aroma and depth.

Storage

Leftover stuffed flank steak can be stored in an airtight container in the refrigerator for up to 3 days. To reheat, place slices in a covered dish and warm in a low oven or microwave until heated through. For longer storage, consider freezing individual slices wrapped in foil and stored in a freezer-safe bag for up to 3 months.

FAQ

Can I prepare the stuffed flank steak in advance?

Yes, you can prepare the stuffed flank steak up to a day in advance. Simply follow the instructions up to the point of searing the steak. Once rolled and tied, store it in the refrigerator, wrapped in plastic wrap. When ready to cook, remove it from the fridge, let it sit at room temperature for about 30 minutes, and continue with the recipe.

What side dishes pair well with this dish?

This dish pairs beautifully with a variety of sides. Consider serving it with garlic mashed potatoes, roasted vegetables, or a fresh garden salad. A side of crusty bread is perfect for soaking up the delicious juices.

Nutrition

This dish is rich in protein and iron, provided by the flank steak and spinach. Blue gorgonzola adds calcium and a unique flavor profile, while the olive oil contributes healthy fats. Remember to enjoy in moderation as part of a balanced diet.

Conclusion

Spinach and Gorgonzola Stuffed Flank Steak is a delightful dish that combines the best of both worlds: flavor and elegance. It’s a recipe that harkens back to cherished family traditions while providing a fresh and modern twist. Whether you’re hosting a dinner party or simply enjoying a special meal with loved ones, this dish is sure to leave a lasting impression. Happy cooking, and may your kitchen be filled with warmth and delicious aromas!

Related update: Spinach and Gorgonzola Stuffed Flank Steak

Related update: Coconut Israeli Couscous Studded With Pomegranate