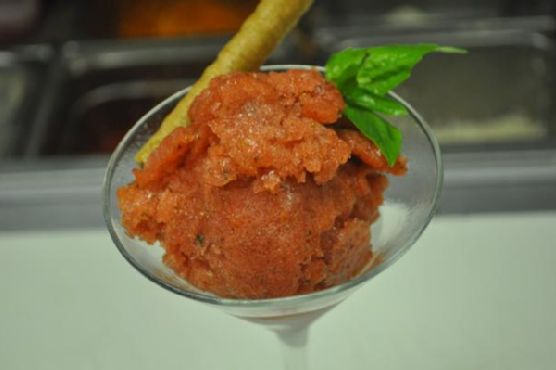
Strawberry Basil Italian Ice
Intro
There’s something magical about the first taste of summer. For me, that taste has always been a mouthful of frosty, refreshing Italian ice. Growing up, my family would often visit a quaint little stand at the end of our street where the owner, an Italian immigrant named Giuseppe, crafted the most delightful ices in a rainbow of flavors. My favorite was always the strawberry basil—a combination so unexpected yet wonderfully refreshing. Today, I’m thrilled to share my own take on this classic summer treat, blending the sweetness of ripe strawberries with the aromatic hint of basil. It’s a nostalgic nod to those sun-drenched afternoons of my childhood.
Why You’ll Love It
This Strawberry Basil Italian Ice is not just a treat for your taste buds, but a delightful experience for all your senses. Here’s why you’ll fall in love with this recipe:
- Refreshing and Light: Perfect for hot summer days when you crave something cool and invigorating.
- Simple Ingredients: You’ll only need four basic ingredients, making it as easy as it is delicious.
- Natural and Homemade: Free from artificial flavors and colors, this recipe is all about pure, fresh flavors.
- Versatile: Can be served as a palate cleanser or a sweet treat at the end of a meal.
Ingredients
- 1 cup fresh basil leaves
- Juice of 1 lemon
- 1 cup simple syrup (recipe below)
- 2 cups fresh strawberries, hulled and halved
Instructions
- To make the simple syrup, combine one cup of water and one cup of sugar in a small saucepan or microwave-safe bowl. Heat until the sugar has completely dissolved. Allow it to cool slightly before using.
- Place the basil leaves, lemon juice, simple syrup, and strawberries in a blender.
- Puree the mixture until smooth and fully combined.
- Pour the mixture into 1 large container, or divide it evenly among 6 small dishes.
- Freeze for several hours or until fully set.
- When ready to serve, remove the container from the freezer and let it sit for about 10 minutes.
- Use a spoon to shave away the ice, creating a fluffy, snow-like texture. Enjoy!
Tips
- For Best Flavor: Use ripe, in-season strawberries for the sweetest, most flavorful ice.
- Blending: If your blender struggles with the mixture, add a splash of water to help it along.
- Serving: Use chilled bowls or cups to keep your Italian ice frozen longer while serving.
Variations & Substitutions
Feel free to get creative with this recipe:
- Different Herbs: Swap basil with mint for a more classic combination, or try adding a hint of rosemary for an earthy flavor.
- Fruity Twists: Add a handful of raspberries or blueberries for an extra layer of flavor.
- Sugar Alternatives: Use honey or agave syrup in place of the simple syrup for a different sweetness profile.
Storage
Store any leftover Italian ice in the freezer for up to one week. Be sure to cover it tightly with plastic wrap or a lid to prevent ice crystals from forming. When ready to enjoy again, let it thaw for a few minutes and then shave it with a spoon as before.
FAQ
Can I use frozen strawberries instead of fresh?
Yes, you can use frozen strawberries if fresh ones are not available. Just allow them to thaw slightly before blending to make it easier on your blender.
What if I don’t have a blender?
If you don’t have a blender, you can use a food processor instead. The key is to ensure the mixture is smooth and well blended to achieve the perfect texture.
Nutrition
Each serving of Strawberry Basil Italian Ice is approximately 100 calories, with most of the energy coming from the natural sugars in the strawberries and the simple syrup. It is a fat-free and gluten-free treat, perfect for those looking for a light and refreshing dessert.
Conclusion
This Strawberry Basil Italian Ice is a beautifully simple yet sophisticated treat that captures the essence of summer. Whether you’re reminiscing about childhood adventures or creating new memories, this recipe is sure to bring a smile to your face. Gather your ingredients, fire up that blender, and let this delightful dessert transport you to a sunlit afternoon, no matter where you are. Enjoy every refreshing spoonful!
Related update: Strawberry Basil Italian Ice