Grilled Lemon Garlic Artichokes | Made by Meaghan Moineau

Grilled Lemon Garlic Artichokes | Made by Meaghan Moineau

Title: Savoring Summer: Grilled Lemon Garlic Artichokes that Transport You Home
Description: Dive into the flavors of summer with our Grilled Lemon Garlic Artichokes recipe. Perfect for a family gathering, this dish blends the zest of lemon, the warmth of garlic, and the earthy aroma of thyme to create an unforgettable appetizer. Rated 6/10 in difficulty, this dish is ideal for those seeking a new culinary challenge that promises to evoke cherished family memories.

---


Savoring Summer: Grilled Lemon Garlic Artichokes that Transport You Home


As the summer sun begins to set, casting a golden hue across the backyard, there's a familiar scent in the air that draws family members to the kitchen. It's the aroma of my grandmother's Grilled Lemon Garlic Artichokes—a dish that has graced our family table for generations, turning ordinary summer nights into memorable gatherings.


Ingredients:


- 4 fresh artichokes


- Fresh thyme leaves


- 4 cloves of garlic, minced


- Fresh ground black pepper


- A handful of fresh herbs such as rosemary


- Kosher salt


- 1 lemon, juiced and zested


- Olive oil


Instructions:


1. Infuse the Oil: In a glass bowl, mix chopped thyme, lemon juice and zest, and minced garlic. Microwave on high heat for 30 seconds. Allow the herbs to seep in the warm olive oil while you prepare the artichokes.
2. Prepare the Artichokes: Set up a large pot with an inch of water at the bottom and a steamer rack. Prepare lemon wedges for rubbing. For a refined look, use scissors to snip away the pointy tips of the artichoke leaves. Rub the cut areas with lemon juice to prevent browning. Use a vegetable peeler to remove the thick outer layer from the stems, trimming them to 2 inches from the base. Cut off and discard the top 1/2 inch of the artichokes, then halve them. Scoop out the fuzzy chokes and small inner leaves with a strong metal spoon. Coat the exposed areas with lemon juice.
3. Steam the Artichokes: Bring the water in the pot to a boil, then reduce to medium-high. Place the artichoke halves cut-side down on the steamer rack. Cover and steam for 20 minutes, or until the outer leaves pull off easily and the heart is tender when pierced with a knife. The artichokes should be slightly undercooked as they will finish cooking on the grill.
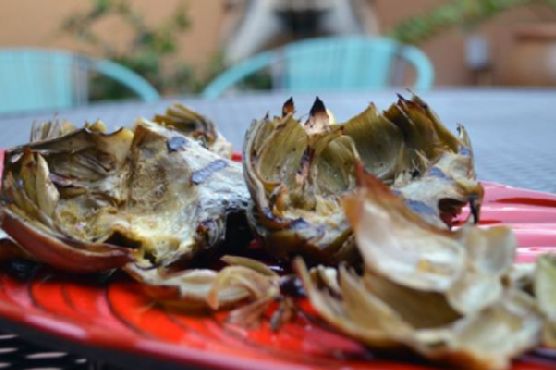
4. Grill to Perfection: Preheat your grill for direct, high heat. Toss the steamed artichokes in the infused oil, coating them generously. Sprinkle with salt and pepper. Place cut-side down on the grill grates, cover, and grill for 5 to 10 minutes until grill marks appear.

---


The process of preparing these artichokes always takes me back to my childhood when my grandmother would invite us to her sun-drenched patio. As kids, we were tasked with snipping the artichoke leaves and rubbing them with lemon wedges—a small but significant ritual that made us feel part of the culinary adventure.


There was magic in watching the artichokes transform on the grill, the heat creating beautiful char marks that hinted at the smoky flavors within. As we sat around the table, passing the artichokes and sharing stories, the dish became more than just food; it was a vessel for connection, laughter, and the creation of new memories.


Whether you're looking to recreate a piece of family tradition or simply explore new flavors, these Grilled Lemon Garlic Artichokes promise to deliver a taste of nostalgia and a touch of elegance to your summer gatherings. As an appetizer, they set the stage for a meal filled with warmth and joy—a reminder that the best moments in life are often shared around the table.


Difficulty: 6/10
Classification: Appetizer

Read more about Appetizers

Read more about Main Dishes

Read more about Desserts

Couscous Salad With Roasted Vegetables | Made by Meaghan Moineau

Couscous Salad With Roasted Vegetables | Made by Meaghan Moineau

Title: "Savoring Summer: Couscous Salad with Roasted Vegetables"
Description: Dive into a vibrant and wholesome dish that captures the essence of summer with every bite. Our Couscous Salad with Roasted Vegetables is not only a feast for the senses but also a cherished family tradition. Perfect as a main dish, this recipe is bursting with flavors and memories, rated at an easy 5 out of 10 on the difficulty scale.

---


A Taste of Tradition: Couscous Salad with Roasted Vegetables


As the sun begins to dip into the horizon, casting a golden hue over our backyard, I am reminded of the countless summer evenings spent gathered around the family table. The aroma of roasted vegetables mingling with the fragrant notes of basil pesto would waft through the air, a prelude to the delicious meal ahead. My grandmother, the culinary artist of our family, would orchestrate these gatherings with a dish that has since become a treasured family tradition: Couscous Salad with Roasted Vegetables.


Ingredients:


- 1 cup regular couscous


- 2 cups chicken stock


- 3 tablespoons olive oil


- 1/4 cup sun-dried tomatoes, chopped


- 2 tablespoons basil pesto


- 2 tablespoons balsamic vinegar


- Salt and pepper, to taste


- 1/2 cup feta cheese, crumbled


- 2 medium-sized zucchinis


- 3 yellow squashes


- 1 red bell pepper


- 1 cup brown mushrooms, sliced


- 3 garlic cloves, minced


- 1 small butternut squash, cubed


- 2 red onions, sliced


- 1 bunch asparagus, trimmed


Instructions:


1. Prepare the Couscous: In a pot, add the couscous and pour over the hot chicken stock. Simmer for 15 to 20 minutes until the stock is fully absorbed. This step infuses the couscous with a savory depth, a secret my grandmother swore by.
2. Roast the Vegetables: Preheat your oven to 400°F. Grease an ovenproof dish with non-stick spray. Arrange zucchinis, yellow squash, red bell pepper, mushrooms, garlic, butternut squash, and red onions in a single layer. Drizzle with olive oil and roast for about 20 to 25 minutes. Add the asparagus after the first 10 minutes and gently stir. Once done, drizzle with a touch of balsamic vinegar.
3. Mix the Salad: Stir in the extra-virgin olive oil, sun-dried tomatoes, and basil pesto into the cooked couscous, making it moist and fragrant. Season with balsamic vinegar, salt, and pepper. Add the roasted vegetables and mix well. Finally, sprinkle with feta cheese and gently fold everything together.
4. Serve: This salad can be enjoyed warm or cooled to room temperature. It pairs beautifully with grilled beef or chicken, making it a versatile addition to any meal.

A Nostalgic Touch:


Every bite of this salad takes me back to those balmy evenings in my grandmother's garden, where laughter was as abundant as the food on our plates. She would tell stories of her childhood, where the simple joys of life were celebrated with food that nourished both body and soul. The Couscous Salad with Roasted Vegetables was her way of bringing us together, a dish that transcended generations and became a staple at our family gatherings.


So, the next time you’re looking for a dish that is both nourishing and heartwarming, try this Couscous Salad with Roasted Vegetables. Let it be more than just a meal; let it be a bridge to cherished memories and the creation of new ones.


Difficulty: 5/10
Classification: Main Dish

---


Whether it's a family reunion or a quiet dinner at home, this Couscous Salad with Roasted Vegetables is sure to become a beloved part of your culinary repertoire. Enjoy the vibrant flavors and the warm memories it brings to your table.

Read more about Appetizers

Read more about Main Dishes

Read more about Desserts

Tomato Stack Salad | Made by Meaghan Moineau

Tomato Stack Salad | Made by Meaghan Moineau

Title: "Tomato Stack Salad: A Taste of Summer Nostalgia"
Description: Dive into the freshness of summer with our Tomato Stack Salad, a delightful appetizer that brings together the vibrant flavors of ripe tomatoes, creamy goat cheese, and aromatic herbs. Rated an easy 3 out of 10 on the difficulty scale, this dish is perfect for beginners and seasoned cooks alike. Join us as we explore this simple yet elegant recipe, infused with the warmth of family memories.

---


Tomato Stack Salad: A Taste of Summer Nostalgia


As the sun casts its golden hue over the garden, the vibrant colors of ripe tomatoes become the centerpiece of summer meals. The Tomato Stack Salad, with its simple elegance, is more than just a dish; it's a cherished family tradition that brings back memories of warm gatherings and laughter-filled afternoons.


Ingredients:


- 4 ripe tomatoes


- 4 oz goat cheese


- A handful of fresh herbs (such as basil, parsley, or chives)


- Salt, to taste


- Balsamic vinegar, for drizzling


Instructions:


1. Prepare the Goat Cheese: Begin by mixing the fresh herbs into the goat cheese until well combined. The herbs add a burst of flavor, turning the cheese into a creamy, aromatic spread.
2. Slice the Tomatoes: Carefully slice each tomato into four thick rounds. Choose tomatoes that are firm yet ripe, ensuring they hold their shape when stacked.
3. Season the Tomatoes: Sprinkle each tomato slice lightly with salt to enhance its natural sweetness.
4. Assemble the Salad: Gently slather each tomato round with the herbed goat cheese. Stack the rounds to reassemble each tomato, creating a tower of alternating red and white layers.
5. Finish with Balsamic Vinegar: Drizzle the stacked tomatoes with balsamic vinegar, allowing it to cascade down the layers, adding a tangy contrast to the creamy cheese.

A Nostalgic Family Memory


This Tomato Stack Salad takes me back to my grandmother's kitchen, where the air was always filled with the aroma of fresh herbs. Every summer, my family would gather at her house, a quaint cottage surrounded by a lush garden. My siblings and I would help her pick the ripest tomatoes, our fingers stained with their juicy red hues.


Grandma had a way with simple ingredients, turning them into something magical. As she showed us how to mix the herbs into the goat cheese, her stories of summers past would unfold, each tale woven with laughter and a touch of nostalgia. The kitchen was our haven, a place where time slowed, and the outside world faded away.


The Tomato Stack Salad was always the highlight of our meal, a dish that captured the essence of summer in each bite. Even now, as I recreate this recipe, I can almost hear Grandma's voice, her laughter echoing through the years. This salad is more than just a recipe; it's a bridge to cherished memories and a testament to the power of family traditions.


Conclusion


The Tomato Stack Salad is a delightful appetizer that captures the essence of summer. With a difficulty rating of just 3 out of 10, it's an inviting dish for cooks of all levels. As you savor the flavors of fresh tomatoes, creamy goat cheese, and tangy balsamic vinegar, may you also find a connection to the warmth of family memories and the simple joys of sharing a meal together.


---


Embrace the simplicity and nostalgia of the Tomato Stack Salad, and let it become a cherished part of your summer gatherings.

Read more about Appetizers

Read more about Main Dishes

Read more about Desserts

Cherry Lime Mojito | Made by Meaghan Moineau

Cherry Lime Mojito | Made by Meaghan Moineau

A Sip of Summer: The Cherry Lime Mojito


Description:

Escape to a tropical paradise with every sip of the Cherry Lime Mojito. This refreshing cocktail combines the tartness of lime, the sweetness of cherries, and the cooling freshness of mint to create a symphony of flavors that dance on your palate. Perfect for summer gatherings or a quiet evening on the porch, this mojito is a delightful escape in a glass. Rated at a 4 out of 10 for difficulty, this cocktail is as accessible as it is delicious. Pour yourself a glass and dive into a nostalgic tale of family memories tied to this drink.

---


Ingredients:

- Fresh cherries

- Mint leaves


- Lime


- Demerara sugar


- White rum


- Carbonated water


Instructions:

1. Muddle the Magic: In a tall glass, combine cherries, mint leaves, demerara sugar, and slices of lime. Gently muddle the ingredients to release their flavors.
2. Ice, Ice Baby: Add a few ice cubes to the glass, providing a chilled base for your drink.
3. Rum Away: Pour in a generous splash of white rum, letting it mingle with the muddled mixture.
4. Bubbly Finish: Top off the glass with carbonated water, giving your mojito a refreshing fizz. Stir gently and serve immediately.

Nostalgic Family Memory:


The Cherry Lime Mojito holds a special place in my heart, not just for its refreshing taste, but for the cherished family memories it evokes. Growing up, summer afternoons at my grandparents' house were a cherished tradition. Their sprawling backyard was a haven of lush greenery and vibrant flowers, a testament to my grandfather's green thumb.


Every summer, our family would gather for a weekend barbecue, a celebration of togetherness filled with laughter, games, and delicious food. As the adults chatted and the children played, my grandmother would prepare her signature Cherry Lime Mojitos. She believed that a good mojito was the secret ingredient to a perfect summer day.


I can still picture her in the kitchen, her hands deftly muddling cherries and mint, her face adorned with a warm smile. She'd let me help, guiding my eager hands as I pressed the ingredients together, releasing their aromatic symphony. Her garden provided the freshest mint, which she picked just moments before crafting each drink.


The first sip of that mojito was like stepping into a world where time slowed down, where the sun shone a little brighter, and laughter echoed a little longer. It was a drink that brought us together, a shared experience that transcended generations.


Even now, as I prepare my own Cherry Lime Mojito, I can't help but feel a wave of nostalgia wash over me. With each sip, I'm transported back to those sun-drenched afternoons, surrounded by family, love, and the simple joy of being together.


Difficulty: 4/10

Classification: Beverage

Whether you're crafting this mojito for a family gathering or a solo indulgence, it's a drink that promises to refresh and delight. Cheers to the memories it creates and the ones it brings back to life.

Read more about Appetizers

Read more about Main Dishes

Read more about Desserts

Chipotle Cheese Stuffed Black Bean Burgers with Avocado Creme | Made by Meaghan Moineau

Chipotle Cheese Stuffed Black Bean Burgers with Avocado Creme | Made by Meaghan Moineau

Title: Savor the Spice: Chipotle Cheese Stuffed Black Bean Burgers with Avocado Crème


Description:

Dive into a world of zesty flavors and creamy textures with our Chipotle Cheese Stuffed Black Bean Burgers with Avocado Crème. This satisfying vegetarian dish combines the earthiness of black beans, the smoky heat of chipotle, and the lusciousness of cream cheese. Topped with a refreshing avocado crème, these burgers promise a taste adventure in every bite.

The Recipe: A Culinary Adventure


Ingredients:

- 1 can black beans, drained

- 1 small yellow onion, diced


- 1 cup diced mushrooms


- 1 egg


- 1/2 cup panko bread crumbs


- 1 tsp cumin


- 1 tsp chipotle chili powder


- Salt and pepper to taste


- Olive oil


- 1/4 cup cream cheese spread


- Hamburger buns


- Sliced cheese (optional)


- Fresh spinach and tomato slices


Avocado Crème:

- 1 ripe avocado


- 1/2 cup sour cream


- 1 tbsp lime juice


- Sea salt to taste


Instructions:

1. Prepare the Veggies: Heat a swirl of olive oil in a skillet over medium heat. Add the diced onions and mushrooms. Sauté until softened, seasoning with salt and pepper. Remove from heat and set aside.
2. Create the Burger Mix: In a medium bowl, mash the drained black beans with a fork. Stir in the sautéed onions and mushrooms, followed by the egg and panko bread crumbs. Mix in the cumin and chipotle chili powder until well combined.
3. Form the Patties: Divide the mixture into equal portions, shaping them into patties. Make a small indent in the center of each patty and add a spoonful of cream cheese spread. Carefully mold the patty around the cream cheese, ensuring it's sealed.
4. Cook the Patties: Heat a skillet over medium heat with a swirl of olive oil. Cook the patties in batches, about 4 minutes per side, until browned and cooked through. If desired, add sliced cheese on top during the last minute of cooking and cover the skillet to melt the cheese.
5. Prepare the Avocado Crème: In a food processor or blender, combine the avocado, sour cream, lime juice, and sea salt. Blend until smooth and creamy. Adjust seasoning to taste.
6. Assemble the Burgers: Place each hot cooked burger on an open toasted bun. Top with fresh spinach and tomato slices, and a generous scoop of avocado crème. Finish with the top bun and serve immediately.

A Nostalgic Family Memory:


Growing up, summer barbecues were more than just meals; they were family reunions where laughter filled the air and stories were shared over the grill's sizzling symphony. My grandmother, with her knack for inventive cooking, introduced these chipotle cheese-stuffed black bean burgers as a vegetarian twist to our traditional meat-heavy lineup. I remember her explaining how she discovered the idea while experimenting with her garden's harvest. The smoky aroma mingled with the scent of fresh-cut grass, as she deftly assembled each burger with love and precision. The addition of her special avocado crème was a revelation, a creamy, tangy topping that brought everything together. These burgers became a family favorite, a reminder of those warm summer days spent in the backyard, creating memories that would last a lifetime.


Difficulty Rating:

5/10 - Perfect for a home cook looking to impress without the stress.

Classification:

Main Dish

This recipe is not just a meal; it's an experience—a homage to flavors that bring people together and create lasting memories. Enjoy the adventure of cooking and savor every bite!

Read more about Appetizers

Read more about Main Dishes

Read more about Desserts

Berry Frozen Yogurt Popsicles | Made by Meaghan Moineau

Berry Frozen Yogurt Popsicles | Made by Meaghan Moineau

Title: Beat the Heat with Berry Frozen Yogurt Popsicles: A Sweet Trip Down Memory Lane


Description: Dive into the refreshing world of homemade Berry Frozen Yogurt Popsicles. Discover an easy-to-follow recipe that brings together the tangy delight of fresh berries and creamy frozen yogurt, all while evoking cherished family memories. Perfect for a summer dessert, these popsicles are not only a treat for the taste buds but also a simple pleasure that brings generations together.


---


As the summer sun blazed in my childhood backyard, the air filled with the laughter of cousins playing tag, I remember my grandmother emerging from the kitchen with a tray of homemade popsicles. These weren't just any popsicles; they were her famous Berry Frozen Yogurt Popsicles, a treat that became synonymous with our family gatherings.


The tradition began with a simple yet delightful recipe that she swore by, using just three ingredients: frozen vanilla yogurt, fresh raspberries, and fresh blueberries. The magic began with a whirring food processor, as we eagerly watched the vibrant berries blend into the creamy yogurt, creating a luscious mixture that made our mouths water in anticipation.


Ingredients:

- Frozen vanilla yogurt


- Fresh raspberries


- Fresh blueberries


Instructions:
1. Blend It Up: Add the vanilla frozen yogurt, 3 oz of raspberries, and 3 oz of blueberries into a food processor or blender. Pulse about 20 times until the fruit is broken up and the mixture is smooth.
2. Layer the Love: Scoop 1 tablespoon of the fro-yo mixture into each of your popsicle molds. Drop a couple of blueberries in each mold. Add another tablespoon of the fro-yo mixture to each mold. Now add a couple of raspberries. Then add another tablespoon of the fro-yo mixture to each mold and repeat with the blueberries and then again with the raspberries (if you have room).
3. Freeze and Enjoy: Freeze the pops until solid, at least 4 hours. To release the popsicles, just run the molds under really warm water for 10-15 seconds. Jiggle and pull out!

This recipe, rated at a 3 out of 10 in difficulty, falls under the dessert category, making it a perfect culinary project for budding chefs or a fun activity with kids. These popsicles are more than just a way to cool down on a hot day—they are a testament to the simple joys of life and the memories that flavors can evoke.


I remember the look on my grandmother's face as we took our first bites—satisfaction mixed with a touch of nostalgia. For her, these popsicles were a bridge between generations, a sweet reminder of her own childhood and the traditions passed down through her mother.


So, as you savor these Berry Frozen Yogurt Popsicles, know that you're not just indulging in a delicious dessert. You're partaking in a story, a slice of family history that celebrates the joy of shared moments and the bonds that tie us together. Enjoy every bite, and perhaps these popsicles will become a beloved tradition in your family too.

Read more about Appetizers

Read more about Main Dishes

Read more about Desserts

Four-Berry Blast Fruit Smoothie | Made by Meaghan Moineau

Four-Berry Blast Fruit Smoothie | Made by Meaghan Moineau

Title: A Sip of Summer: The Four-Berry Blast Fruit Smoothie
Description: Dive into the vibrant world of berries with our delightful Four-Berry Blast Fruit Smoothie, a refreshing treat bursting with flavor and nostalgia. Perfect as a dessert or a revitalizing snack, this smoothie is an easy and delicious way to enjoy the bounty of summer all year round.

---


As the sun dipped below the horizon, casting a golden hue over our backyard, my family would gather on the porch, laughter mingling with the scent of blooming flowers. These were the moments I cherished most—a time when the simple joys of life resonated most deeply. My grandmother, a culinary magician in her own right, always had a way of bringing us together with her culinary creations, and one such masterpiece was her Four-Berry Blast Fruit Smoothie.


This recipe was a family favorite, crafted and perfected over the years. The first time I tasted it, I was a child, eagerly watching as my grandmother's hands moved deftly, tossing frozen blackberries, blueberries, raspberries, and strawberries into the blender. The air was filled with the sweet, tangy aroma of berries—a scent that still transports me back to those cherished evenings.


What made this smoothie truly special was the addition of lemonade concentrate, a secret ingredient that my grandmother insisted was the key to its refreshing zing. As she blended in the whole milk, sugar, and a hint of vanilla extract, I would stand by her side, mesmerized by the whirring sounds of the blender as it transformed the ingredients into a vibrant, purple elixir.


Once the smoothie was ready, my grandmother would pour it into tall glasses, the rich color contrasting beautifully against the glass. We'd each take a sip, smiles spreading across our faces as the flavors burst forth—a harmonious blend of sweet and tart, creamy and smooth. The Four-Berry Blast Fruit Smoothie wasn't just a drink; it was a sip of summer, a reminder of sun-drenched days and warm family gatherings.


Now, as an adult, I've carried on the tradition, whipping up this delightful smoothie whenever I crave a taste of those nostalgic days. It's incredibly easy to make, with a difficulty rating of just 2 out of 10, making it a perfect choice for a quick and satisfying dessert. Each sip is a gateway to fond memories, a testament to the enduring power of food to connect us to our past.


Four-Berry Blast Fruit Smoothie Recipe

*Ingredients:*


- 1 cup frozen blackberries


- 1 cup frozen blueberries


- 1/2 cup lemonade concentrate


- 1 cup frozen unsweetened raspberries


- 1 cup frozen unsweetened strawberries


- 2 tablespoons sugar


- 1 teaspoon vanilla extract


- 1 cup whole milk


*Instructions:*


1. Place the frozen blackberries, blueberries, and lemonade concentrate into a blender. Pulse a few times to combine.


2. Add the frozen raspberries and pulse 2-3 times.


3. Add the frozen strawberries and pulse again.


4. Once all berries are added, blend on high until smooth.


5. Serve immediately and enjoy a taste of summer nostalgia.


Whether you're savoring it on a sunny porch or in the comfort of your home, the Four-Berry Blast Fruit Smoothie is a delicious reminder that the best recipes are those that come with a story—a legacy of love and laughter that transcends time.

Read more about Appetizers

Read more about Main Dishes

Read more about Desserts

Honey Ginger Lemon Iced Tea | Made by Meaghan Moineau

Honey Ginger Lemon Iced Tea | Made by Meaghan Moineau

Title: Refreshing Nostalgia: Honey Ginger Lemon Iced Tea
Description: Dive into a world of flavors with our Honey Ginger Lemon Iced Tea, a refreshing beverage that bridges past and present. Infused with the warmth of ginger, the zest of lemon, and the sweetness of honey, this drink is perfect for hot summer days or cozy afternoons. Discover the simple pleasures of this delightful recipe and a heartwarming family memory that makes it even more special.

---


A Sip of Summer Memories: Honey Ginger Lemon Iced Tea

As the golden rays of the sun linger longer and the days grow warmer, there's nothing quite like a refreshing iced tea to quench your thirst and refresh your spirit. Our Honey Ginger Lemon Iced Tea is not just a drink; it's a journey through time, evoking cherished memories of sun-soaked days and family gatherings.


Ingredients:

- Fresh ginger


- One green tea bag


- Canned honey


- Freshly squeezed lemon juice


- Fresh mint leaves


Instructions:

1. Begin by bringing 1-2 cups of water to a gentle boil. Once ready, steep your green tea bag and let the rich flavors infuse. Once brewed, place the tea in the fridge to cool.


2. While the tea is chilling, take fresh ginger and blend it smoothly. Run the blended ginger through a sieve to extract just the juice, capturing its bold, spicy essence.


3. In a jug filled with ice, combine the cooled tea, ginger juice, a generous splash of lemon juice, and a drizzle of canned honey. Stir well to blend these vibrant flavors.


4. Add fresh mint leaves for an aromatic touch. Serve cold, and enjoy a sip of refreshing nostalgia.


Difficulty Rating: 3/10
Classification: Appetizer
A Nostalgic Family Memory:

Growing up, summers at my grandmother's house were a tapestry of vibrant colors and comforting aromas. Each afternoon, as the sun began its slow descent, she would prepare her signature iced tea—a concoction that seemed to capture the very essence of summer.


I remember sitting on the porch, a gentle breeze rustling through the trees, as Grandma served her Honey Ginger Lemon Iced Tea. Its taste was a delightful balance of sweetness and spice, with a hint of tartness from the lemons she handpicked from her garden. The mint leaves, freshly plucked, added an invigorating fragrance that lingered in the warm air.


Grandma would tell stories of her own childhood, of summers spent in the countryside, where time moved slower and life was simpler. As we listened, sipping our tea, it felt as though we were connected across generations, sharing more than just a family recipe but a slice of our heritage.


To this day, each time I prepare this iced tea, I am transported back to those sunny afternoons, enveloped in the warmth of family and the joy of simple pleasures. May this Honey Ginger Lemon Iced Tea bring you the same delight and nostalgia it has given me.


---


Conclusion:

Whether you're hosting a summer gathering or simply enjoying a quiet moment on your own, our Honey Ginger Lemon Iced Tea is sure to delight your taste buds and warm your heart. Its simple preparation and delightful flavors make it a perfect addition to any occasion. So, gather your ingredients, brew a batch, and take a sip down memory lane.

Read more about Appetizers

Read more about Main Dishes

Read more about Desserts

Spicy Lump Crab and Avocado Salad | Made by Meaghan Moineau

Spicy Lump Crab and Avocado Salad | Made by Meaghan Moineau

Title: A Taste of Nostalgia: Spicy Lump Crab and Avocado Salad
Description: Dive into a flavorful fusion of tender lump crabmeat and creamy avocados with our Spicy Lump Crab and Avocado Salad. This dish, enriched with the zest of fresh lemon juice and a kick of sriracha, is a perfect blend of spice and freshness. Ideal for both a sophisticated appetizer and a light main dish, this recipe holds a special place in my heart, evoking cherished family gatherings by the sea.

---


A Taste of Nostalgia: Spicy Lump Crab and Avocado Salad

As the warm breeze carried the scent of the ocean, our family would gather at the seaside cottage every summer. The sound of waves crashing against the shore was the perfect backdrop for our family tradition—an indulgent feast featuring the Spicy Lump Crab and Avocado Salad. This dish, with its vibrant colors and tantalizing flavors, became a staple at our gatherings, etching unforgettable memories into our hearts.


The Essence of the Dish

Our Spicy Lump Crab and Avocado Salad is a delightful combination of succulent lump crabmeat, creamy avocados, and a spicy dressing that tantalizes the taste buds. The dish is a symphony of textures, with the smoothness of the avocado complementing the delicate sweetness of the crab. The addition of sriracha chile sauce adds a fiery kick, balanced by the tangy freshness of lemon juice.


Ingredients:

- 2 ripe avocados


- 1 red bell pepper, finely chopped


- Fresh parsley, chopped


- 1 tablespoon fresh lemon juice


- 1 pound lump crabmeat


- 2 tablespoons mayonnaise


- Salt and pepper, to taste


- 2 scallions, finely sliced


- 1 tablespoon sriracha chile sauce


- 1 teaspoon Worcestershire sauce


Instructions:
1. Prepare the Spicy Sauce: In a small bowl, combine the mayonnaise, sriracha chile sauce, Worcestershire sauce, lemon juice, salt, and pepper. Stir until well blended, and set aside to let the flavors meld.
2. Mix the Crab Salad: In a medium bowl, gently toss together the crabmeat, scallions, red bell pepper, and fresh parsley. Be careful to maintain the integrity of the crab lumps. Lightly fold in the spicy sauce, ensuring an even coating without breaking the crabmeat.
3. Prepare the Avocados: Slice the avocados in half and remove the pit. Trim a small section from the bottom of each half so they sit flat on a plate. Brush or pour lemon juice over the cut surfaces to prevent browning.
4. Assemble and Serve: Place the avocado halves on a serving plate and generously fill each center with the crab salad. Serve immediately for the freshest flavor.
A Family Memory

Every year, as we prepared this dish, my grandmother would recount the story of how she first learned the recipe from a local fisherman during her honeymoon. She spoke of the joy of discovering new flavors and the warmth of sharing food with loved ones. As we savored each bite, it felt like a tribute to her adventurous spirit and love for family gatherings.


The Spicy Lump Crab and Avocado Salad is more than just a dish; it's a bridge to cherished memories and a reminder of the simple joys in life.


Difficulty Rating: 4/10
Classification: Appetizer or Light Main Dish

This recipe is relatively easy to prepare, making it accessible even for novice cooks. Whether you serve it as an appetizer or a light main dish, it's guaranteed to be a hit, resonating with the warmth of familial love and the excitement of summer days by the sea.

Read more about Appetizers

Read more about Main Dishes

Read more about Desserts

Pink Grapefruit Slaw | Made by Meaghan Moineau

Pink Grapefruit Slaw | Made by Meaghan Moineau

Title: Refreshing Memories: The Joy of Pink Grapefruit Slaw
Description: Discover the vibrant flavors of Pink Grapefruit Slaw, a delightful mix of tangy and sweet that will transport you back to cherished family gatherings. This easy-to-make appetizer is perfect for adding a splash of color and nostalgia to your dining table.

---


A Nostalgic Journey with Pink Grapefruit Slaw

There’s something undeniably soothing about the familiar aroma of a dish that takes you back to simpler times—like the Pink Grapefruit Slaw my grandmother used to make during those long, sun-drenched summer afternoons. As a child, I remember eagerly watching her in the kitchen, marveling at how effortlessly she combined ingredients to create something magical.


The recipe was always a highlight at our family picnics, a beacon of freshness amidst the array of hearty dishes. My grandmother had a knack for infusing love into her cooking, and her Pink Grapefruit Slaw was no exception. The tangy sweetness of the grapefruit paired with the crunch of fresh cabbage and the subtle bite of red onion created a symphony of flavors that danced on our taste buds.


As the adults chatted and the children played, I would sneak into the kitchen to watch her skillfully zest the grapefruit, her hands moving with practiced precision. She would smile at me, her eyes twinkling with a secret only we shared—the joy of creating something beautiful together.


Recipe: Pink Grapefruit Slaw
Ingredients:

- Black pepper


- 1 pink grapefruit


- 2 cups green shredded cabbage


- 2 tablespoons light mayonnaise


- 1 small red onion, thinly sliced


- Salt


- 1-2 teaspoons sugar (to taste)


Instructions:

1. In a small bowl or measuring cup, combine 2 tablespoons of light mayonnaise, 3 tablespoons of fresh grapefruit juice (from just a segment or two), 1-2 teaspoons of sugar, 1 teaspoon of grapefruit zest, salt, and black pepper. Whisk the mixture until it's well blended.


2. In a large bowl, combine 2 cups of shredded green cabbage, the remaining sections of the pink grapefruit, and the thinly sliced red onion.


3. Pour the dressing over the cabbage mixture and toss everything together until it’s well coated.


4. Garnish with parsley if desired, and serve immediately to enjoy the flavors at their peak freshness.


Difficulty: 3/10
Classification: Appetizer

This Pink Grapefruit Slaw is a testament to the beauty of simple, fresh ingredients coming together to create a dish that’s both delicious and nostalgic. Whether you’re preparing it for a family gathering or a solo lunch, this slaw is sure to evoke fond memories and perhaps inspire new traditions for years to come.

Read more about Appetizers

Read more about Main Dishes

Read more about Desserts

Corn Avocado Salsa | Made by Meaghan Moineau

Corn Avocado Salsa | Made by Meaghan Moineau

Title: A Taste of Summer: Corn Avocado Salsa with a Nostalgic Twist
Description: Dive into a vibrant blend of flavors with our Corn Avocado Salsa recipe. This appetizer is not only a feast for the senses but also a trip down memory lane, filled with family gatherings and summer nostalgia.

---


As the summer sun casts its golden glow over lush gardens and bustling farmers' markets, there's one dish that never fails to capture the essence of the season for me: Corn Avocado Salsa. This vibrant, flavorful appetizer is more than just a recipe; it's a cherished family tradition that brings back fond memories of sun-drenched days and laughter-filled evenings.


Ingredients:

- 1 ripe avocado


- 1 tablespoon balsamic vinegar


- 1 teaspoon cumin


- 1 can of frozen corn, drained


- 1 clove garlic, finely chopped


- 1 red bell pepper, finely chopped


- Olive oil spray


Instructions:

1. Preheat your oven to 375 degrees Fahrenheit.


2. Spread the drained corn evenly on a baking sheet and lightly spray with olive oil.


3. Roast the corn in the oven for about 8-10 minutes, ensuring it doesn't brown too much or burn. Once done, remove from heat and allow it to cool.


4. In a large bowl, combine the finely chopped red pepper and garlic.


5. Peel, coarsely chop the avocado, and add it to the bowl along with the cooled corn.


6. Sprinkle in the cumin and drizzle the balsamic vinegar over the mixture, blending well to ensure all ingredients are evenly coated.


Difficulty Rating: 3/10
Classification: Appetizer

---


The true magic of Corn Avocado Salsa lies not only in its exquisite taste but also in the memories it evokes. Every time I prepare this dish, I'm transported back to my grandmother's kitchen, where the aroma of roasting corn mingled with the laughter of cousins gathered around the table. Grandma always insisted on using the freshest ingredients, and her secret was roasting the corn just to the right point where it retained its sweetness without losing its crispness.


Our family would often gather in the backyard, surrounded by towering sunflowers and the melodious chirping of crickets. Grandma would bring out a large bowl of her famous salsa, and we'd snack on it with tortilla chips, savoring each bite as the sun dipped below the horizon. It was during these moments that I learned the importance of good food and even better company.


Today, I continue this tradition with my own family, and with every bite of Corn Avocado Salsa, I'm reminded of those warm, joyful gatherings. This recipe is more than just a culinary delight; it's an invitation to pause, savor, and create lasting memories with loved ones. So, as you prepare this dish, I hope it brings as much warmth and happiness to your table as it has to mine.


Whether you're hosting a summer barbecue or simply looking to indulge in a refreshing appetizer, Corn Avocado Salsa is sure to impress. Enjoy the blend of creamy avocado, sweet roasted corn, and the subtle kick of cumin, and let it transport you to your own cherished memories.

Read more about Appetizers

Read more about Main Dishes

Read more about Desserts

Roasted Strawberry Coconut Milk Ice Cream | Made by Meaghan Moineau

Roasted Strawberry Coconut Milk Ice Cream | Made by Meaghan Moineau

Title: Indulge in Nostalgia with Roasted Strawberry Coconut Milk Ice Cream
Description: Dive into a scoop of creamy nostalgia with our Roasted Strawberry Coconut Milk Ice Cream. This delightful dessert combines the lusciousness of coconut milk with the warm spice of cardamom and the sweet, tangy burst of roasted strawberries. Easy to make and even easier to enjoy, this ice cream is a perfect treat for any occasion.

---


Roasted Strawberry Coconut Milk Ice Cream


Difficulty: 4/10
Classification: Dessert

Ingredients:


- 1/2 cup raw cane sugar


- 2 cans full-fat coconut milk


- 1 teaspoon ground cardamom


- 1 pound strawberries


- 1 vanilla bean


Instructions:


1. Prepare the Coconut Milk Mixture: In a saucepan over medium heat, combine the coconut milk, 1/2 cup of raw cane sugar, and ground cardamom. Using a small knife, slice the vanilla bean lengthwise and scrape the seeds into the coconut milk mixture. Add the vanilla bean pod as well for extra flavor.
2. Roast the Strawberries: Preheat your oven to 375°F (190°C). Hull and slice the strawberries, then spread them out on a baking sheet lined with parchment paper. Sprinkle a tablespoon of raw cane sugar over the strawberries, and roast in the oven for about 20-25 minutes, or until the strawberries are soft and slightly caramelized.
3. Combine and Chill: Once the coconut milk mixture is warmed and the aroma is inviting, remove the vanilla bean pod. Allow the mixture to cool to room temperature. Once the strawberries have roasted, allow them to cool as well. Blend the roasted strawberries until smooth, then mix them into the coconut milk mixture. Chill the combined mixture in the refrigerator for at least 4 hours or overnight for best results.
4. Churn and Freeze: Pour the chilled mixture into an ice cream maker and churn according to the manufacturer's instructions. Once churned to a soft-serve consistency, transfer the ice cream to a lidded container and freeze for at least 2 hours, or until firm.
5. Serve and Enjoy: Scoop the ice cream into bowls or cones and enjoy the creamy, fruity flavors that bring back cherished memories.

---


A Sweet Memory


Growing up, summers at Grandma's house were synonymous with the delightful aroma of fresh strawberries roasting in the kitchen. Her kitchen was a haven of culinary wonders, but nothing could rival the excitement of homemade ice cream day. Grandma's secret ingredient was always a pinch of cardamom, which she claimed was a little bit of magic passed down from her mother.


The sweet, spicy aroma of cardamom wafting through the air was a signal that something extraordinary was happening. We'd gather around, eager to watch as she blended the roasted strawberries into the creamy coconut milk mixture, her hands deftly working the ice cream maker.


Those moments, spent with family, laughing and sharing stories while waiting for the ice cream to set, were the essence of summer. Each spoonful of ice cream was a taste of nostalgia, a reminder of the warmth and love that filled those sun-drenched days.


Now, as I recreate this recipe for my own family, I hope to pass on not just the flavors, but the cherished memories that come with it. This Roasted Strawberry Coconut Milk Ice Cream is more than just a dessert—it's a celebration of love, tradition, and the simple joys of life.


---


Indulge in this delightful dessert and let the flavors transport you to a place of warmth and nostalgia. Perfect for summer gatherings or a cozy evening treat, this ice cream is a delicious way to create new memories while honoring the old.

Read more about Appetizers

Read more about Main Dishes

Read more about Desserts

Spiked Watermelon lemonade | Made by Meaghan Moineau

Spiked Watermelon lemonade | Made by Meaghan Moineau

Title: A Refreshing Twist on Tradition: Spiked Watermelon Lemonade
Description: Dive into the nostalgic flavors of summer with our Spiked Watermelon Lemonade. This refreshing cocktail combines the sweetness of ripe watermelon, the zing of fresh lemon juice, and the aromatic touch of mint-infused simple syrup, all topped off with a splash of gin. Perfect for backyard gatherings or a quiet evening on the porch, this drink is a modern twist on a family favorite.

---


A Refreshing Twist on Tradition: Spiked Watermelon Lemonade

As the summer sun blazes down, there's nothing quite like the joy of gathering with family and friends, sharing stories, laughter, and, of course, delicious food and drinks. One of my fondest memories of these summer get-togethers is the creation of a family-favorite drink that has been lovingly passed down through generations: the classic lemonade. But as with any tradition, there comes a time for a refreshing twist that rejuvenates and delights the senses.


Nostalgia in Every Sip

The story begins in the backyard of my grandparents' house, a place where the line between childhood adventures and culinary experiments blurred seamlessly. My grandmother had a knack for turning simple ingredients into something magical, and her lemonade was no exception. I remember her bustling about the kitchen, her apron dusted with sugar, as she squeezed lemons with a precision only years of practice could perfect. The air would be filled with the citrusy aroma, blending beautifully with the fresh scent of mint from her garden.


It was during one of these sun-drenched afternoons that my uncle, with his playful spirit and penchant for innovation, decided to add a grown-up touch to the beloved lemonade. With a mischievous grin, he reached for a plump watermelon and a bottle of gin. The result was nothing short of spectacular—a drink that was as much about creation as it was about celebration.


Crafting the Perfect Spiked Watermelon Lemonade
For those eager to recreate this refreshing cocktail, here's a simple guide that captures the essence of those cherished family moments:
Ingredients:

- 1 cup of sugar


- 2 cups of water (divided)


- Fresh mint leaves


- Freshly squeezed lemon juice


- Cubed watermelon


- Gin


Instructions:

1. Begin by making a mint-infused simple syrup. In a small saucepan, combine the sugar and 1 cup of water. Add a handful of mint leaves, and cook over medium heat, stirring until the sugar dissolves completely. Once dissolved, remove from heat, cover, and let the mixture sit for at least an hour to infuse.


2. Meanwhile, in a blender, combine the freshly squeezed lemon juice with cubed watermelon. Blend until smooth.


3. Strain the mint simple syrup and add it to the watermelon mixture, 1/4 cup at a time, until the desired sweetness is achieved (about a cup).


4. Pour the mixture into a large pitcher. Add 1 cup of cold water and 1 cup of gin. Fill the pitcher with the watermelon mixture and stir to combine.


5. Serve over ice, garnished with a sprig of mint or a slice of lemon, and savor the taste of summer.


A Delightful Challenge

Rated at a 4 out of 10 on the difficulty scale, this Spiked Watermelon Lemonade is a breeze to prepare, ensuring more time spent enjoying the company of loved ones. While it straddles the line between a delightful appetizer and a refreshing dessert, it’s ultimately a drink that complements any occasion.


In the end, this Spiked Watermelon Lemonade is more than just a cocktail; it's a sip of nostalgia, a reminder of the simple joys of summer and the power of family traditions, reinvented with a twist. Raise your glass to cherished memories and the creation of new ones, as you enjoy this refreshing treat under the warm embrace of the sun. Cheers!

Read more about Appetizers

Read more about Main Dishes

Read more about Desserts

Strip steak with roasted cherry tomatoes and vegetable mash | Made by Meaghan Moineau

Strip steak with roasted cherry tomatoes and vegetable mash | Made by Meaghan Moineau

Title: Savoring Memories: Strip Steak with Roasted Cherry Tomatoes and Vegetable Mash
Description: Dive into the rich flavors of a classic steak dish with a nostalgic twist. Our Strip Steak with Roasted Cherry Tomatoes and Vegetable Mash combines the juicy tenderness of beef with the vibrant notes of fresh vegetables, creating a memorable main dish that's perfect for family gatherings. With a difficulty rating of 7 out of 10, this recipe offers an engaging culinary experience, bringing together a symphony of flavors and cherished family memories.
Body:

There’s something inherently comforting about a well-prepared steak. For me, strip steak isn't just a meal; it's a gateway to cherished family memories that have stood the test of time. I recall summer evenings at my grandparents’ countryside home, where the air was filled with laughter and the irresistible aroma of a sizzling grill.


My grandmother, with her apron dusted with flour and her smile as warm as the July sun, would prepare the marinade with such care. Balsamic vinegar, fresh rosemary, and a touch of garlic infused each strip steak with a depth of flavor that was nothing short of magical. She would let the steaks bathe in this aromatic blend overnight, allowing the flavors to meld perfectly, a testament to her patience and culinary wisdom.


As the steaks marinated, we would gather around the garden, picking fresh cherry tomatoes and herbs, their vibrant colors a promise of the delicious meal to come. The anticipation was palpable, and it was in these moments that I learned the importance of using fresh, quality ingredients - a lesson that resonates in every dish I prepare today.


Instructions:
1. Marinade Preparation: In a bowl, mix balsamic vinegar, olive oil, minced garlic, salt, and pepper. Add a sprig of fresh rosemary to infuse aromatic notes. Pour this marinade over the beef strip steaks, ensuring they are well-coated. Allow them to stand for at least an hour, preferably overnight for the best flavors.
2. Roasting Cherry Tomatoes: Heat a grill pan over medium heat. Toss the cherry tomatoes with a drizzle of olive oil and season with salt and pepper. Grill until they begin to char and burst, then set aside to cool slightly.
3. Cooking the Strip Steaks: Remove the steaks from the marinade. Heat olive oil in a skillet over high heat. Sear the steaks for 2 minutes on each side. Reduce the heat, add unsalted butter, and cook for another 2-4 minutes, turning once, depending on your preferred doneness. Transfer the steaks to a plate and let them rest in a warm place.
4. Preparing the Vegetable Mash: Cook the green beans and fresh peas in boiling water for 8-10 minutes until tender. Drain and cool them under cold water. In a food processor, combine the beans, peas, ricotta cheese, a tablespoon of olive oil, salt, and pepper. Blend until you achieve a rough puree.
5. Final Touches: In the skillet where the steaks were cooked, gently heat the vegetable mash for 1 minute, allowing it to absorb the steak's residual flavors.
6. Serving: On warmed plates, divide the vegetable mash and arrange the steaks on top. Garnish with roasted cherry tomatoes, a drizzle of olive oil, and a sprinkle of fresh chives. For an added touch of nostalgia, serve with steamed new potatoes on the side.

Every bite of this dish transports me back to those cherished family gatherings, where love was the secret ingredient in every meal. Rated at a 7 out of 10 for difficulty, this main dish offers a rewarding cooking experience, perfect for those who enjoy a blend of tradition and flavor. Whether you're making it for a special occasion or simply to savor a moment of nostalgia, this recipe is sure to create new memories while honoring the old. Enjoy every bite!

Read more about Appetizers

Read more about Main Dishes

Read more about Desserts

Green Tea Fruit Medley Smoothie | Made by Meaghan Moineau

Green Tea Fruit Medley Smoothie | Made by Meaghan Moineau

Title: A Sip of Nostalgia: The Green Tea Fruit Medley Smoothie
Description: Dive into a refreshing blend of vibrant fruits and soothing green tea with our Green Tea Fruit Medley Smoothie. Perfect for a light dessert or a rejuvenating snack, this smoothie is a breeze to make and promises a burst of flavors that will transport you to cherished family memories.

---


In the heart of summer, when the sun blazed high and the days stretched long, my family would gather in the backyard for a tradition that was as sweet as it was refreshing. Among the laughter and playful splashes of the garden hose, the highlight was always the unveiling of my grandmother’s secret summer delight: the Green Tea Fruit Medley Smoothie.


This wasn’t just any smoothie. It was a concoction that brought together the earthy aroma of green tea with the tangy sweetness of fresh berries and the tropical hint of pineapple juice. The creamy texture of vanilla yogurt smoothed out the flavors, while the ice cubes added that perfect chill, making it an ideal remedy for the summer heat.


Ingredients:

- 1 cup water


- 3 Bigelow Green tea bags


- 1 cup fresh berries (your choice of strawberries, blueberries, or raspberries)


- 1 cup pineapple juice


- 1 cup vanilla yogurt


- 1 cup ice cubes


Instructions:

1. Begin by bringing 1 cup of water to a boil. Steep 3 Bigelow Green tea bags in the boiling water for 5 minutes.


2. Carefully squeeze out the tea bags to extract all the rich flavor, then discard the bags.


3. In a blender, combine the brewed tea, fresh berries, pineapple juice, vanilla yogurt, and ice cubes.


4. Blend the ingredients until you have a smooth, creamy texture.


5. Pour into tall glasses, garnish with a few berries if desired, and serve immediately.


Difficulty Rating: 2/10
Classification: Dessert

As a child, I marveled at how my grandmother seemed to effortlessly create this miraculous potion. In truth, it was simple—a mere 2 out of 10 on the difficulty scale—but her secret ingredient was the love and care she poured into every blend. The ritual of preparing the Green Tea Fruit Medley Smoothie was more than just a recipe; it was a bridge between generations, a symbol of summer’s joy and the warmth of family bonds.


Now, each time I sip on this vibrant smoothie, I am transported back to those sun-drenched afternoons, surrounded by family, where every sip was a taste of happiness and nostalgia. Whether you enjoy it as a light dessert or a refreshing snack, this smoothie is more than just a drink; it’s a nostalgic journey that promises to create new memories while honoring the old. So, gather your ingredients, blend with joy, and create your own family tradition with this delightful Green Tea Fruit Medley Smoothie.

Read more about Appetizers

Read more about Main Dishes

Read more about Desserts

Cherry Lime Mojito | Made by Meaghan Moineau

Cherry Lime Mojito | Made by Meaghan Moineau

Title: "Sip into Nostalgia with a Refreshing Cherry Lime Mojito"
Description: Dive into the delightful world of the Cherry Lime Mojito, a cocktail that brings together the vibrant flavors of cherries, mint, and lime. This refreshing drink is perfect for any gathering and is sure to evoke fond family memories. With a difficulty rating of 4 out of 10, it's an easy-to-make dessert-like drink that will transport you to a simpler time.

---


As the warm breeze of summer makes its way through the porch screens, I can't help but reminisce about the long, lazy afternoons spent at my grandmother’s house. Her backyard was a haven, brimming with lush greenery and the sweet scent of blooming flowers. But more than anything, it was the laughter and love that permeated the air during our family gatherings that made those days unforgettable.


One particular memory that stands out is when Grandma introduced us to the Cherry Lime Mojito, a drink that quickly became a family favorite. It was a hot July afternoon, and the elders were gathered around the patio table, chatting animatedly as we kids played tag under the shade of the old oak tree. Grandma emerged from the kitchen with a tray of vibrant, colorful glasses filled with her signature mojito.


The Cherry Lime Mojito is a delightful concoction that combines the tartness of cherries with the refreshing zest of lime and the aromatic touch of mint leaves. Here's how to recreate this nostalgic drink that will surely bring a splash of joy and a hint of nostalgia to your gatherings.


Ingredients:

- Fresh cherries


- A handful of mint leaves


- 1 lime, sliced


- 2 teaspoons demerara sugar


- 2 ounces of white rum


- Carbonated water


Instructions:
1. Muddle for Memories: Begin by placing the cherries, mint leaves, demerara sugar, and lime slices in a tall glass. Use a muddler or the back of a spoon to gently crush the ingredients together. This process releases the juices and oils, creating a fragrant and flavorful base for your mojito.
2. Ice it Up: Add a few ice cubes to the glass, providing the perfect chill for your refreshing drink.
3. The Spirit of Celebration: Pour in the white rum, letting it mingle with the muddled mixture.
4. Fizz and Finish: Fill the glass the rest of the way with carbonated water, giving your mojito that delightful effervescence. Stir gently to combine all the flavors.
5. Serve and Savor: Garnish with a sprig of mint and a cherry on top. Serve immediately and let the nostalgia wash over you with every sip.

This Cherry Lime Mojito isn't just a drink; it's a bridge to cherished memories, a testament to the joy of family gatherings, and a celebration of the simple pleasures in life. Classified as a dessert-like drink, it’s the perfect sweet ending to a day filled with laughter and love.


With a difficulty rating of 4 out of 10, this mojito is accessible to even the novice mixologist. Its simplicity and flavor make it a go-to choice for any occasion. So, next time you’re looking to add a touch of nostalgia to your gathering, shake up a Cherry Lime Mojito and toast to the memories that bind us all. Cheers!

Read more about Appetizers

Read more about Main Dishes

Read more about Desserts

Mangoes with Rum and Ice Cream | Made by Meaghan Moineau

Mangoes with Rum and Ice Cream | Made by Meaghan Moineau

Title: Tropical Bliss: Mangoes with Rum and Ice Cream


Description:

Dive into a tropical paradise with our delectable Mangoes with Rum and Ice Cream recipe. This exquisite dessert, brimming with vibrant flavors and a hint of nostalgia, will transport you to sun-kissed beaches and carefree summer days. Easy to prepare yet impressively indulgent, this dish is a must-try for fruit and dessert lovers alike.

---


A Nostalgic Journey with a Tropical Twist


As the summer sun began to set, casting a golden hue over the horizon, our family would gather on the porch, eagerly anticipating the sweet treat that had become a cherished tradition. Mangoes with Rum and Ice Cream was more than just a dessert; it was a celebration of the season and a gentle reminder of cherished moments shared with loved ones.


I vividly remember my grandmother, her hands deftly peeling the ripe mangoes, ensuring every slice was free of the green flesh that might mar the golden perfection. She had a knack for transforming simple ingredients into culinary masterpieces, and this dish was no exception. The scent of fresh lime and dark rum would waft through the air, mingling with the laughter and stories that filled the evening.


The secret to her Mangoes with Rum and Ice Cream was in the marinade—a tantalizing blend of sugar, dark rum, freshly squeezed lime juice, and the zest of lime rind. The mango pieces would soak up this flavorful concoction, chilling to perfection while we shared stories and memories on those warm summer nights.


When served, the dessert was a feast for the senses. The vibrant mango slices, glistening with their rum-infused marinade, nestled atop velvety scoops of vanilla ice cream, creating a symphony of flavors with every bite. Each spoonful was a tropical escape, a small indulgence that captured the essence of summer.


This recipe is not just about the flavors; it's about the memories that accompany each serving. It's about the joy of sharing a lovingly prepared dessert with those closest to you, and the simple pleasure of savoring a dish that transcends the ordinary.


Recipe: Mangoes with Rum and Ice Cream


Ingredients:

- Fresh mangoes


- 1/4 cup sugar


- 1/4 cup dark rum


- 2 tablespoons fresh lime juice


- 1 teaspoon grated lime rind


- Vanilla ice cream


Instructions:

1. Peel the mangoes, ensuring all green-colored flesh is removed. Carefully slice the mango around the pit into 1/2-inch thick pieces, discarding the pit.


2. In a bowl, combine the sugar, dark rum, grated lime rind, and fresh lime juice. Mix well until the sugar is dissolved.


3. Add the mango slices to the bowl, gently mixing to ensure each piece is coated with the marinade.


4. Chill the mixture in the refrigerator for a couple of hours, allowing the flavors to meld beautifully.


5. Serve the mangoes alone in chilled glasses or over generous scoops of vanilla ice cream for an indulgent treat.


Difficulty Rating: 3/10
Classification: Dessert

Embrace the nostalgia and share this tropical delight with your loved ones, creating new memories that will be cherished for years to come. Whether enjoyed on a balmy evening or as a refreshing end to a meal, Mangoes with Rum and Ice Cream is a testament to the simple joys of life.

Read more about Appetizers

Read more about Main Dishes

Read more about Desserts

Fusilli With Zucchini Flowers, Ricotta and Saffron | Made by Meaghan Moineau

Fusilli With Zucchini Flowers, Ricotta and Saffron | Made by Meaghan Moineau

A Taste of Nostalgia: Fusilli With Zucchini Flowers, Ricotta, and Saffron


A Delightful Culinary Journey


In the heart of Italian cuisine, simplicity meets elegance in a dish that encapsulates the vibrant flavors of summer: Fusilli with Zucchini Flowers, Ricotta, and Saffron. This delightful recipe not only brings together the rich and creamy textures of ricotta and the aromatic warmth of saffron but also weaves a tapestry of memories that will transport you back to cherished family gatherings.


Ingredients That Dance on Your Palate


- 1 red onion, finely chopped


- 2 tablespoons of extra virgin olive oil (EVO)


- 1/4 cup sliced almonds


- A pinch of salt


- 8 zucchini flowers, stems and pistils removed, cut into strips


- 200g Fusilloro Verrigni or Fusilloni


- 1/2 cup ricotta cheese


- A generous pinch of saffron


- Salt and pepper to taste


Instructions: Crafting a Memory


1. Sauté with Love: Begin by washing and finely chopping the red onion. In a pan, gently dry the onion with a drizzle of extra virgin olive oil and a pinch of salt. Add the sliced almonds, allowing them to toast lightly, enhancing their nutty aroma.
2. A Floral Touch: Discard the stem and pistil of the zucchini flowers, slicing them into delicate strips. Add these to the pan, stirring briefly before turning off the heat. The flowers will imbue the mixture with a subtle sweetness.
3. Perfect Pasta: In a pot of boiling salted water, drop the Fusilloro Verrigni or Fusilloni. Cook for 9 minutes until al dente, ensuring the pasta retains a satisfying bite.
4. Creamy Dream: In a bowl, mix the ricotta cheese with saffron, adding a spoonful of pasta cooking water to achieve a smooth, creamy consistency. Season with salt and pepper.
5. Bringing It All Together: Drain the pasta and add it to the pan with the sautéed zucchini flowers. Pour in the saffron cream, mixing gently to coat the fusilli in the luscious sauce.
6. Serve and Savor: Plate your creation immediately, savoring each bite as the flavors meld together harmoniously.

Difficulty Rating: 4/10


This dish is approachable for most home cooks and promises an impressive result with minimal effort. It makes for a beautiful Main Dish that celebrates the season's bounty.

A Walk Down Memory Lane


Growing up, summer Sundays were synonymous with family lunches at Nonna's house. Her kitchen, filled with laughter and the aroma of fresh ingredients, was a sanctuary where time seemed to stand still. One of my fondest memories was watching her prepare this very dish, Fusilli with Zucchini Flowers, Ricotta, and Saffron. She would enlist my help to carefully pick zucchini flowers from the garden, teaching me to appreciate the beauty of nature's gifts.


As we cooked side by side, Nonna would share stories of her childhood, painting vivid pictures of bustling Italian markets and sun-drenched fields. Each ingredient held a story, a tradition passed down through generations. Sitting around the table, surrounded by loved ones, the dish was more than just a meal; it was a testament to our heritage, a reminder of the simple joys that bind us together.


This recipe is a homage to those precious moments, an invitation to create your own memories and savor the timeless flavors that connect us all. So, gather your loved ones, and let the magic of Italian cuisine bring a piece of my family's story into your home. Buon appetito!

Read more about Appetizers

Read more about Main Dishes

Read more about Desserts

Crab Salad Stuffed Pita Pockets | Made by Meaghan Moineau

Crab Salad Stuffed Pita Pockets | Made by Meaghan Moineau

Title: A Taste of Summer: Crab Salad Stuffed Pita Pockets
Description: Dive into a delicious blend of fresh flavors with our Crab Salad Stuffed Pita Pockets. This light and refreshing dish combines the sweetness of apple, the tang of yellow bell pepper, and the savory taste of white crabmeat, all wrapped in a warm, toasted wholewheat pita. Perfect for a summer afternoon, this recipe is quick and easy to prepare, bringing back cherished family memories with every bite.

---


Summer at our family beach house was always a magical time. The sun-drenched days were filled with the laughter of children playing by the shore, the comforting sound of waves crashing, and the enticing aroma of delicious meals being prepared in the kitchen. One dish that always marked the highlight of these summer gatherings was my grandmother's Crab Salad Stuffed Pita Pockets.


I vividly remember the hustle and bustle in the kitchen, where the air was filled with the crisp scent of freshly chopped apples and the vibrant smell of coriander leaves. My grandmother would stand at the counter, her hands deftly mixing the canned white crabmeat with diced apple and yellow bell pepper. She had a way of creating magic with the simplest of ingredients.


As she worked, my siblings and I would eagerly gather around, occasionally sneaking a taste of the sweet, juicy apple or the tangy bell pepper. The anticipation would build as we watched her toast the wholewheat pita breads until they were perfectly puffed and golden brown.


Once the crab salad was seasoned to perfection with just the right amount of salt and pepper, and lovingly folded with light mayonnaise, the real fun began. We would help stuff the warm pita pockets with fresh, peppery watercress and the delicious crab mixture. Each bite was a symphony of flavors—sweet, savory, and herbaceous—all reminding us of those carefree, sunlit days.


Every time I prepare this dish, I am transported back to those cherished family summers, filled with love, laughter, and great food. It's a simple recipe, yet it holds a treasure trove of memories.


Crab Salad Stuffed Pita Pockets Recipe
Ingredients:

- 1 apple, diced


- 1 can white crabmeat, drained


- A handful of fresh coriander leaves, chopped


- 2 tablespoons light mayonnaise


- 4 wholewheat pita breads


- Salt and pepper to taste


- A bunch of fresh watercress


- 1 yellow bell pepper, diced


Instructions:

1. In a large bowl, combine the crabmeat, diced apple, and yellow bell pepper.


2. Season the mixture with salt and pepper to taste, then add the chopped coriander leaves.


3. Gently fold in the light mayonnaise until everything is well combined.


4. Toast the wholewheat pita breads until they are puffed up and golden brown.


5. Carefully cut open the pitas on one side and stuff them with a generous handful of fresh watercress, followed by the crab mixture.


6. Serve immediately and enjoy a taste of summer nostalgia.


Difficulty Rating: 3/10
Classification: Appetizer

This delightful appetizer is not only a breeze to make but also a wonderful way to bring a bit of summer into your home, no matter the season. Enjoy this family favorite and create your own cherished memories with each delicious bite.

Read more about Appetizers

Read more about Main Dishes

Read more about Desserts

Tequila Lime Shrimp | Made by Meaghan Moineau

Tequila Lime Shrimp | Made by Meaghan Moineau

Title: Savoring Summer: Tequila Lime Shrimp with a Dash of Nostalgia
Description: Dive into the vibrant flavors of Tequila Lime Shrimp, a dish that brings together zesty lime, smooth tequila, and succulent shrimp. Perfect as a main dish, this recipe not only tantalizes your taste buds but also stirs up cherished family memories. Experience a taste of summer with this easy-to-follow, flavorful recipe. Difficulty: 4/10.

---


Savoring Summer: Tequila Lime Shrimp with a Dash of Nostalgia


As the warm breeze of summer fades into the crisp air of autumn, I often find myself reminiscing about sun-drenched family gatherings and the laughter that echoed through our backyard. One dish that always stood out during these summer feasts was Tequila Lime Shrimp—a recipe that not only satisfied our taste buds but also became a cherished family tradition.


Ingredients:


- Shrimp: A pound of large, juicy shrimp, peeled and deveined.
- Tequila: The star of the show, adding a smooth, rich flavor.
- Lime Juice: Freshly squeezed for that zesty punch.
- Honey: Just a touch to balance the acidity with sweetness.
- Garlic: A couple of cloves, minced to perfection.
- Fresh Cilantro: Chopped, for a burst of freshness.
- Kosher Salt: To taste.
- Black Fresh Ground Pepper: For a subtle kick.

Instructions:


1. Prepare the Shrimp: Start by peeling and deveining the shrimp, ensuring they are clean and ready to absorb all the delicious flavors.
2. Create the Marinade: In a large mixing bowl, whisk together the tequila, lime juice, honey, garlic, salt, pepper, and cilantro. The aroma itself is enough to make your mouth water.
3. Marinate the Shrimp: Add the shrimp to the bowl, making sure each piece is well-coated. Let them marinate for about 15 minutes, allowing the flavors to meld.
4. Reduce the Marinade: Remove the shrimp from the marinade and set them aside. Transfer the marinade to a saucepot and place it over medium-high heat. Bring it to a boil, then reduce the heat and let it simmer until it reduces by half, intensifying the flavors.
5. Grill the Shrimp: Fire up the grill and place the shrimp over direct-high heat. Grill for about 2 minutes on each side, ensuring they are perfectly cooked with a slight char.
6. Serve and Enjoy: Drizzle the reduced marinade over the shrimp just before serving. This not only enhances the flavor but also adds a beautiful glaze.

A Taste of Nostalgia


Every time I prepare this dish, I am transported back to those lazy summer afternoons. I can almost hear the sizzle of the grill and my grandfather's voice, as he recounted stories of his youth. It was his idea to infuse the traditional shrimp dish with tequila and lime—a nod to his Mexican heritage, and a twist that became a family favorite.


As we gathered around the table, each bite of the Tequila Lime Shrimp was a celebration of flavors and memories. It was more than just a meal; it was a reminder of the love and laughter that bound us together.


Conclusion


Tequila Lime Shrimp is more than just a main dish; it's a journey back to those joyful summer days. With a difficulty rating of 4/10, it’s an accessible recipe that brings gourmet flavors to your home kitchen. So, gather your loved ones, fire up the grill, and create your own lasting memories with this delightful dish.


---


Whether you're a seasoned chef or a home cook, this Tequila Lime Shrimp recipe offers a simple yet flavorful way to bring a taste of summer to your table. Enjoy the blend of tangy lime, sweet honey, and the subtle warmth of tequila, and let it become a tradition in your home too.

Read more about Appetizers

Read more about Main Dishes

Read more about Desserts