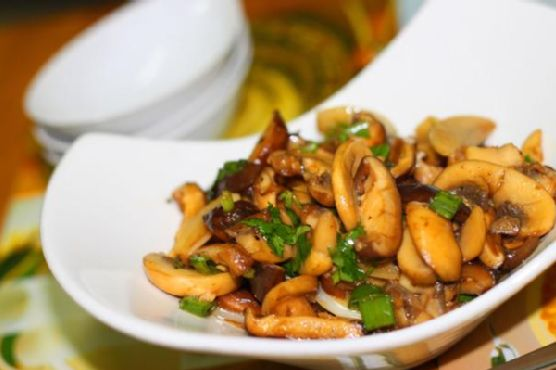
Spicy Salad with Kidney Beans, Cheddar, and Nuts | Made by Meaghan Moineau

Spicy Salad with Kidney Beans, Cheddar, and Nuts | Made by Meaghan Moineau

**Title: Zesty Delight: Spicy Salad with Kidney Beans, Cheddar, and Nuts**


**Description:** Dive into a symphony of flavors with our Spicy Salad featuring kidney beans, cheddar, and a medley of nuts. This vibrant dish is not just a treat for your taste buds but also a wholesome meal that can be whipped up in record time. Perfect for a quick lunch or a light dinner, this salad is both nutritious and satisfying, boasting a tantalizing mix of creamy, crunchy, and spicy elements. Join me as I share a cherished family memory that this delightful salad brings to mind.


---


**The Art of Quick and Healthy: Spicy Salad with Kidney Beans, Cheddar, and Nuts**


When it comes to preparing a meal that's both quick and nourishing, salads often take the spotlight. This Spicy Salad with Kidney Beans, Cheddar, and Nuts is a testament to how simple ingredients can come together to create a dish that's delicious and deeply satisfying. As a bonus, it's a meal that carries with it a personal story from my childhood that makes it even more special.


**Ingredients:**


- 1 cup cooked kidney beans, rinsed and drained


- 1/4 cup almonds


- 1 ripe avocado, sliced


- 2 tablespoons balsamic vinegar


- 1/2 cup cheddar cheese, torn into small pieces


- 4 cups mixed greens


- 2 tablespoons olive oil


- 1/4 cup salted roasted cashews


- 1/4 cup sundried tomatoes, cut into strips


- A dash of Tabasco


**Instructions:**


1. Begin by preparing your ingredients: Rinse and drain the kidney beans, cut the sundried tomatoes into strips, and tear the cheddar cheese into small, bite-sized pieces.


2. In a large salad bowl, lay down a bed of mixed greens. Top the greens with kidney beans, sundried tomatoes, cheddar cheese, almonds, and cashews.


3. In a small mixing bowl, combine olive oil, balsamic vinegar, and a dash of Tabasco sauce. Stir well to create a zesty dressing.


4. Drizzle the dressing over the salad, ensuring every ingredient gets a touch of that spicy, tangy goodness.


5. Give it a gentle toss, ensuring all the flavors meld together beautifully.


This salad is not just a wonderful mix of textures and flavors but also a slice of my family's culinary history. Growing up, Sundays were reserved for family picnics in our local park. My mother would pack a wicker basket with freshly prepared dishes, and this spicy salad was always a staple. I remember the vivid flavors of the kidney beans and cheddar mixing with the crunch of the nuts and the tangy kick from the Tabasco-laced dressing. It was the perfect meal to enjoy on a sunny afternoon, surrounded by laughter and the rustling of leaves.


**Difficulty:** 3/10


**Classification:** Main Dish


With its simple preparation and vibrant flavors, this salad is an excellent choice for anyone looking to enjoy a quick, healthy meal that's rich in protein and fiber. Whether you're reminiscing about family picnics or simply seeking a nutritious lunch option, this Spicy Salad with Kidney Beans, Cheddar, and Nuts is sure to become a favorite. Enjoy the journey of flavors and memories with every bite!

Read more about Appetizers

Read more about Main Dishes

Read more about Desserts

Mixed Berry Yogurt with Almonds | Made by Meaghan Moineau

Mixed Berry Yogurt with Almonds | Made by Meaghan Moineau

**Title: "A Symphony of Flavors: Mixed Berry Yogurt with Almonds"**


**Description:**


Discover the delightful fusion of flavors in our Mixed Berry Yogurt with Almonds recipe. This versatile dish, perfect for breakfast or dessert, combines the tangy sweetness of berries with the creamy richness of Greek yogurt and the satisfying crunch of almonds. Join us as we explore the endless variations this recipe offers and share a nostalgic family memory that makes this dish truly special.


---


**A Symphony of Flavors: Mixed Berry Yogurt with Almonds**


In the realm of culinary delights, there are few combinations as harmoniously balanced as our Mixed Berry Yogurt with Almonds. This dish, with its vibrant colors and tantalizing textures, transcends the boundaries of a typical breakfast or dessert. It invites you to indulge in its simplicity while offering endless opportunities for creative variations.


**Ingredients:**


- Frozen mixed berries


- Whole oats


- Plain Greek yogurt


- Whole almonds


**Instructions:**


This recipe is as flexible as it is delicious, allowing you to assemble it in a variety of ways. For an aesthetically pleasing presentation, layer the ingredients in a glass cup or bowl. Start with a layer of Greek yogurt, followed by a sprinkle of whole oats, a generous scoop of mixed berries, and a handful of whole almonds. Repeat the layers as desired.


**Variations:**


The beauty of this recipe lies in its adaptability. For a more indulgent dessert, consider using a creamier vanilla yogurt or drizzling a touch of maple syrup over the yogurt layer. Feel free to experiment with different kinds of nuts—toast them for an added depth of flavor and crunch. If you find yourself without berries, fear not; this dish works wonderfully with almost any fruit you have on hand.


**A Nostalgic Family Memory:**


As I prepare this dish, I'm transported back to lazy summer mornings at my grandmother's house. Her kitchen was always filled with the comforting aroma of freshly toasted nuts and the sweet tang of ripe berries. I remember sitting at her wooden table, watching as she effortlessly assembled this dish with whatever fruits she had picked from her garden that morning.


Each spoonful was a burst of flavor, a harmony of textures that seemed to capture the essence of those sunlit days. My grandmother would share stories of her childhood, tales of family gatherings and the joy of creating something delicious with simple, wholesome ingredients. This dish, for me, is a connection to those cherished moments—a reminder that the simplest recipes often hold the most profound memories.


**Difficulty Rating: 2/10**


**Classification: Breakfast/Dessert**


With its minimal preparation and endless customization options, this Mixed Berry Yogurt with Almonds is a delightful dish that anyone can create. Whether you're enjoying it as a nourishing breakfast or a satisfying dessert, may it bring warmth to your table and create memories that last a lifetime.

Read more about Appetizers

Read more about Main Dishes

Read more about Desserts

Lentil Mango Salad | Made by Meaghan Moineau

Lentil Mango Salad | Made by Meaghan Moineau

**Title: A Taste of Summer: Refreshing Lentil Mango Salad**


**Description:** Dive into the vibrant flavors of our Lentil Mango Salad, a delightful fusion of fresh ingredients that evoke the warmth of summer. Perfect as a standalone dish or a complement to your favorite meat and poultry, this salad combines sweet, savory, and tangy notes in a refreshing symphony. Join us as we share a nostalgic family memory intertwined with this recipe, making it more than just a meal—it's an experience.


---


### A Taste of Summer: Refreshing Lentil Mango Salad


As the sun casts its golden glow and the air fills with the laughter of family gatherings, few dishes capture the essence of summer quite like our Lentil Mango Salad. This vibrant medley of fresh ingredients is a celebration of flavor, color, and nostalgia, bringing together the sweet aroma of ripe mangoes and the earthy richness of lentils.


#### Ingredients:


- 1 cup cooked lentils


- 1 ripe mango, peeled and chopped


- 1 red bell pepper, cleaned and chopped


- 1/2 red onion, cleaned and chopped


- 2 cloves garlic, minced


- A handful of cilantro, chopped


- 3 tablespoons olive oil


- 2 tablespoons white wine vinegar


- Salt to taste


#### Instructions:


1. Begin by cleaning and chopping the onion, red bell pepper, and garlic. Finely chop the cilantro and peel and chop the mango.


2. In a large bowl, combine the cooked lentils, mango, red bell pepper, red onion, garlic, and cilantro.


3. Drizzle the olive oil and white wine vinegar over the salad. Season with salt to taste.


4. Toss the salad thoroughly to ensure all ingredients are well mixed.


5. Refrigerate for at least 30 minutes to allow the flavors to meld beautifully.


6. Serve chilled as a refreshing appetizer or a vibrant side dish accompanying your favorite meat or poultry.


#### A Nostalgic Family Memory


Every summer, my family would gather at my grandmother's house for a weekend filled with love, laughter, and food. The highlight of these gatherings was always the Sunday brunch, where my grandmother would bring out her famous Lentil Mango Salad. The vivid colors of the salad mirrored the blooming flowers in her garden, and its refreshing taste was the perfect antidote to the summer heat.


I vividly remember sitting at the patio table, the warm breeze rustling through the trees as my grandmother recounted stories from her childhood. She always emphasized how the salad was more than just a dish; it was a blend of cultures, a nod to her Caribbean roots with the mango and the traditional lentils from her mother's kitchen. Each bite was a sentimental journey, a connection to a past I felt deeply despite not having lived it myself.


Now, whenever I prepare this salad, I am transported back to those sunlit mornings, surrounded by family, feeling the love and heritage passed down through generations. It’s a reminder that food has the power not only to nourish the body but also to create enduring memories.


#### Difficulty Rating: 3/10


**Classification: Appetizer**


This Lentil Mango Salad is a breeze to prepare, with minimal cooking involved, making it an ideal choice for an easy yet impressive appetizer. Whether you're hosting a summer soirée or looking to add a splash of color to your meal, this dish is sure to delight.


---


Embrace the taste of summer with our Lentil Mango Salad, and may it become a cherished part of your family's culinary memories, just as it is in mine. Enjoy this delightful blend of flavors and the stories that come with it, creating new memories with each serving.

Read more about Appetizers

Read more about Main Dishes

Read more about Desserts

Roasted Beet Hummus | Made by Meaghan Moineau

Roasted Beet Hummus | Made by Meaghan Moineau

**Title: Rediscovering Tradition with a Modern Twist: Roasted Beet Hummus**


**Description:** Dive into the vibrant world of roasted beet hummus, a delightful twist on the classic Middle Eastern dish. Perfect as an appetizer, this recipe combines the earthy sweetness of roasted beets with the creamy richness of tahini and chickpeas. Inspired by fond family memories, this dish is not just about flavors but also about creating new traditions around the dining table.


---


**Rediscovering Tradition with a Modern Twist: Roasted Beet Hummus**


There's something magical about the vibrant hue of roasted beet hummus. It beckons you to the table, not just with its bright, alluring color but with the promise of flavors that are both familiar and refreshingly new. This recipe, an appetizer that rates a 4 out of 10 on the difficulty scale, is a testament to how food can bridge past and present, creating a tapestry of memories and new experiences.


**Ingredients:**


- Red roasted beets


- Cooked chickpeas


- Garlic


- Ground cumin


- Lemon juice


- Olive oil


- Salt


- Tahini sesame seed paste


**Instructions:**


1. Begin by placing all ingredients except for the chickpeas and olive oil in a food processor or blender. Pulse until well blended.


2. Add the chickpeas and olive oil and pulse until just incorporated.


3. If needed, add more olive oil to help blend the chickpeas into a paste or to adjust the hummus to your desired consistency.


4. Serve with warm pita or flatbread for a delicious appetizer.


As I prepare this dish, I'm transported back to my grandmother's kitchen—a place filled with warmth, laughter, and the irresistible aroma of freshly baked bread. Every Sunday, our family would gather around her large oak table, sharing stories and savoring her culinary creations. Grandma had a knack for taking traditional recipes and infusing them with her own unique flair, much like this roasted beet hummus.


The beets, often harvested from her own garden, were roasted to perfection, their earthy sweetness a perfect complement to the creamy chickpeas. She'd regale us with tales from her childhood, stories that seemed to come alive with every bite we took. Her hands, though weathered with age, moved with practiced ease as she blended ingredients, creating a hummus that was not just food, but a memory in the making.


Today, as I share this recipe with you, it's more than just a delightful appetizer; it's a piece of my heritage, passed down through generations. The roasted beet hummus is a reminder of simpler times, of family gatherings filled with love and laughter, and of the timeless tradition of sharing a meal with those we hold dear.


Whether you're looking to recreate a beloved family memory or simply seeking a new addition to your culinary repertoire, this roasted beet hummus offers a burst of flavor that promises to delight and inspire. So, gather your loved ones, serve up this beautiful dish, and create your own stories to cherish for years to come.

Read more about Appetizers

Read more about Main Dishes

Read more about Desserts

Apple Persimmon Sauce | Made by Meaghan Moineau

Apple Persimmon Sauce | Made by Meaghan Moineau

**Title: A Taste of Autumn: Apple Persimmon Sauce for Cozy Gatherings**


**Description:** Dive into the comforting flavors of fall with our delightful Apple Persimmon Sauce. This easy-to-make recipe combines the rich sweetness of persimmons with the crisp, bright flavor of apples, creating a perfect accompaniment to your autumnal meals. Whether served as a dessert topping or a festive side dish, this sauce is sure to evoke warm memories of family gatherings. Join us as we explore the simple steps to creating this nostalgic treat and share a cherished family story that makes this dish truly special.


---


As the cool breeze of autumn begins to weave through the trees, there's nothing quite like the comforting aroma of simmering spices wafting through the kitchen. The scent of cinnamon and nutmeg mingling with sweet apples and ripe persimmons instantly transports me back to my grandmother's cozy kitchen. It was a place where every family member would eventually wander, drawn by the irresistible allure of her signature Apple Persimmon Sauce.


**The Recipe: Apple Persimmon Sauce**


**Ingredients:**


- 3 ripe persimmons, peeled and chopped


- 3 medium apples, peeled, cored, and chopped


- 1 teaspoon ground cinnamon


- 1/2 teaspoon nutmeg


- 1/2 cup water


- 1/4 cup dark brown sugar


- 2 tablespoons fresh lemon juice


**Instructions:**


1. **Combine Ingredients:** In a medium pot, combine the chopped persimmons, apples, cinnamon, nutmeg, water, dark brown sugar, and fresh lemon juice.


2. **Bring to a Boil:** Over medium-high heat, bring the mixture to a boil, stirring occasionally to ensure the sugar dissolves evenly.


3. **Simmer:** Once boiling, cover the pot and reduce the heat to medium-low. Allow the sauce to simmer for 25-30 minutes, stirring occasionally, until the fruit is soft and the flavors have melded beautifully.


4. **Mash:** Remove the pot from the heat and mash the mixture with a potato masher until it reaches your desired consistency. I always loved mine a bit chunky, reminding me of the rustic texture my grandmother favored.


5. **Store:** Transfer the sauce to an airtight container. It will keep in the fridge for up to two weeks or can be frozen for up to a year, preserving the essence of autumn for whenever you need a taste.


**A Nostalgic Family Memory**


Growing up, autumn was a magical time for our family. We would gather at my grandmother's home every Sunday afternoon for a hearty meal that always ended with her famous Apple Persimmon Sauce. I remember sitting at the kitchen table, watching her expertly peel and chop the fruits, her hands moving with a rhythm honed by years of practice. She would tell us stories of her own childhood, of apple-picking adventures and family traditions, as the sauce simmered gently on the stove.


One particular memory stands out: a chilly October day when the first snowflakes of the season danced through the air. As we sat around the table, wrapped in the warmth of family and the comforting aroma of the sauce, my grandmother shared tales of winters past. Her stories, much like her sauce, were a blend of sweet and spicy, warming us from the inside out.


**Difficulty Rating: 2/10**


This recipe is delightfully simple to make, with minimal preparation and cooking skills required. It’s a perfect project for a cozy afternoon at home, suitable even for beginner cooks.


**Classification: Dessert**


While this sauce pairs beautifully with roasted meats and can be served as a side dish, its sweet and spiced flavor profile makes it an ideal companion for desserts. Try it as a topping for vanilla ice cream, pancakes, or even as a filling for pies and pastries.


With every spoonful of this Apple Persimmon Sauce, you're not just tasting a delightful combination of autumn flavors; you're savoring a piece of family history, a nostalgic reminder of the love and warmth shared around the kitchen table. Whether you're creating new memories or reminiscing about old ones, this simple yet flavorful sauce is sure to become a cherished part of your seasonal gatherings.

Read more about Appetizers

Read more about Main Dishes

Read more about Desserts

Spanakopita Cups | Made by Meaghan Moineau

Spanakopita Cups | Made by Meaghan Moineau

**Title: Spanakopita Cups: A Bite-Sized Greek Delight**


**Description:** Dive into the delightful world of Greek cuisine with our Spanakopita Cups! These bite-sized treasures bring together the rich flavors of spinach, feta, and dill enclosed in a crispy phyllo shell. Ideal as an appetizer, they are perfect for any gathering. Let the aroma of nostalgia and family warmth fill your kitchen as you recreate this cherished recipe.


---


Spanakopita Cups are not just a recipe; they are a journey. Imagine the scent of olive oil warming over a gentle flame, the sizzle of scallions dancing in the pan, and the vibrant green of spinach blending with the creamy tang of feta. These elements come together to create a harmonious symphony of flavors, all nestled in a perfectly crisp phyllo cup.


### Ingredients:


- 2 tablespoons olive oil


- 4 green white scallions, finely chopped


- 1 package frozen spinach, thawed and squeezed dry


- 2 tablespoons fresh dill, chopped


- 2 large eggs, beaten


- 1 cup crumbled feta cheese


- 1 teaspoon kosher salt


- 1/2 teaspoon black pepper


- 1 package frozen phyllo dough, thawed


- 1/2 cup unsalted butter, melted


- 1/4 cup dry plain breadcrumbs


### Instructions:


1. **Preheat the Oven:** Set your oven to 400°F (200°C) and let it warm up as you prepare the ingredients.


2. **Prepare the Filling:** Heat olive oil in a pan over medium heat. Add the chopped scallions and sauté for about 5 minutes until fragrant and tender. In a large bowl, combine the cooked scallions, squeezed spinach, dill, eggs, and feta cheese. Season with kosher salt and black pepper. Mix well to ensure all ingredients are evenly distributed.


3. **Prepare the Phyllo Dough:** Keep the phyllo dough sheets covered with a damp kitchen towel to prevent them from drying out. Unfold one sheet and brush with melted butter. Sprinkle lightly with breadcrumbs. Layer a second sheet on top, brush with butter, and sprinkle with breadcrumbs. Repeat this process until you have four sheets stacked.


4. **Form the Cups:** Using a round cutter, cut circles from the layered phyllo dough. These circles should fit perfectly into the molds of a mini muffin pan. Gently press each circle into the pan to form a cup.


5. **Fill and Bake:** Spoon the spinach and feta mixture into each phyllo cup. Continue until all the mixture is used. Bake in the preheated oven for 17 minutes, or until the phyllo is golden brown and crispy.


6. **Serve and Enjoy:** Allow the Spanakopita Cups to cool slightly before serving. Enjoy these cups as a delightful appetizer, or share them at your next family gathering.


### A Family Memory


Every time I make Spanakopita Cups, I am transported back to my grandmother's cozy kitchen, a place filled with laughter and the comforting aroma of home-cooked meals. During family gatherings, my grandmother would set out trays of her famous spanakopita. The sound of crispy phyllo breaking was a signal that the feast had begun. I remember sitting on the kitchen counter, my legs swinging as I watched her work her magic, her hands deftly layering phyllo, never rushing, always smiling. It was in those moments that I learned that cooking is an expression of love, a tradition I carry on with my own family today.


### Difficulty Rating: 5/10


**Classification:** Appetizer


Spanakopita Cups are a testament to the beauty of simplicity. With a few ingredients and some care, you can create an appetizer that not only pleases the palate but also serves as a bridge to cherished memories and traditions. Whether you're serving them at a party or enjoying them as a snack, their rich flavors and satisfying crunch are sure to leave a lasting impression.

Read more about Appetizers

Read more about Main Dishes

Read more about Desserts

Broccolini Quinoa Pilaf | Made by Meaghan Moineau

Broccolini Quinoa Pilaf | Made by Meaghan Moineau

**Title: "Savor the Simplicity: Nostalgic Broccolini Quinoa Pilaf"**


**Description: Discover the delightful harmony of broccolini and quinoa in a wholesome pilaf that evokes cherished family memories. This nutritious dish is a perfect blend of flavors and textures, ideal as a main dish for any meal.**


---


There's something uniquely satisfying about a dish that not only fills your belly but also warms your heart with memories. Our Broccolini Quinoa Pilaf is one such creation, a delightful main dish that effortlessly combines the earthy notes of quinoa with the bright, slightly bitter touch of broccolini. This recipe not only tantalizes your taste buds but also nurtures your soul with its comfort and simplicity.


### Ingredients:


- 1 bunch of broccolini, trimmed


- 1 garlic clove, minced


- 2 tablespoons olive oil


- 1 medium onion, finely chopped


- 1 cup quinoa


- 2 cups vegetable broth


- ½ cup walnuts, toasted and roughly chopped


- Salt and pepper to taste


### Instructions:


1. In a large pan with a lid, heat olive oil over medium-high heat. Add onions and cook for 1 minute.


2. Add garlic and cook until onions are translucent and garlic is fragrant.


3. Stir in quinoa, ensuring it’s well mixed with the onions and garlic.


4. Gradually pour in the vegetable broth, bringing the mixture to a boil.


5. Cover the pan and reduce the heat to low. Let it simmer for 15 minutes.


6. In the last 2-3 minutes of cooking, place the broccolini on top of the quinoa without stirring, then cover again.


7. After cooking, uncover and gently toss the broccolini with the quinoa.


8. Season with salt and pepper to taste, sprinkle with toasted walnuts, and serve hot.


### A Nostalgic Family Memory:


Growing up, Sunday lunches were a time-honored tradition in our family. My grandmother, the matriarch of our culinary experiences, would often prepare her signature Broccolini Quinoa Pilaf. The aroma of sautéed onions and garlic would waft through the house, signaling the beginning of a meal that brought us all together.


This dish was more than just a meal; it was a vessel of stories and laughter shared around the dining table. As a child, I remember being tasked with the important job of trimming the broccolini, standing on tiptoes to reach the counter. My grandmother would watch over me with a gentle smile, recounting tales of her childhood and how she learned to cook from her own mother.


The simplicity of the pilaf, adorned with the crunch of walnuts, was a testament to the beauty of uncomplicated cooking. Each bite was a reminder of those precious family moments, where food was love and laughter was abundant.


### Difficulty Rating: 3/10


This Broccolini Quinoa Pilaf is not only a testament to uncomplicated cooking but also a delightful main dish that anyone can master with ease. Perfect for a nutritious meal, it brings a touch of nostalgia to your table, making it a cherished addition to any family gathering.

Read more about Appetizers

Read more about Main Dishes

Read more about Desserts

Oven-Baked Feta Cheese Dip | Made by Meaghan Moineau

Oven-Baked Feta Cheese Dip | Made by Meaghan Moineau

**Title: Dive into Comfort: The Irresistible Oven-Baked Feta Cheese Dip**


**Description:** Discover the heartwarming flavors of our Oven-Baked Feta Cheese Dip, a dish that not only delights your taste buds but also warms your soul with cherished family memories. Perfect as an appetizer, this easy-to-make dip combines the tangy creaminess of feta cheese with the savory goodness of tomato sauce and a cheesy blend of mozzarella and cheddar. Simple yet delectable, it's a recipe that brings everyone together.


---


**Oven-Baked Feta Cheese Dip: A Family Tradition**


When I think of comfort food, my mind instantly drifts back to my grandmother's kitchen. The aroma of fresh garlic mingling with melted cheese and tomato sauce was always there to greet us, like a warm hug on a chilly day. This Oven-Baked Feta Cheese Dip was more than just a dish; it was a centerpiece of our family gatherings, a symbol of love and togetherness.


**Ingredients:**


- 200g feta cheese, crumbled


- 2 cloves garlic, minced


- 1 cup tomato sauce


- 1 cup shredded part-skim mozzarella cheese


- 1 cup shredded mild cheddar cheese


**Instructions:**


1. Preheat your oven to 400°F (200°C).


2. In a small oven-safe baking dish or clay pot, layer the crumbled feta cheese, ensuring it covers the entire bottom.


3. Evenly sprinkle the minced garlic over the layer of feta cheese.


4. Gently spoon the tomato sauce, spreading it to cover the cheese and garlic mixture completely.


5. In a small bowl, mix together the shredded mozzarella and cheddar cheese. Layer this cheese blend on top of the tomato sauce.


6. Bake in the preheated oven for 15 minutes, or until the cheese melts and turns golden and bubbly.


7. Serve warm with a side of flatbread or tortilla chips.


**A Nostalgic Family Memory:**


Growing up, Sundays were our special family time, a day dedicated to relaxation and togetherness. My grandmother would call us into her cozy kitchen, where we’d gather around the table, ready to savor her culinary creations. The Oven-Baked Feta Cheese Dip was always a highlight. The sight of bubbling cheese emerging from the oven was enough to make our mouths water.


I fondly remember helping her crumble the feta cheese, a task she entrusted only to me. As we layered each ingredient, she’d share stories of her childhood, tales of her mother teaching her the same recipe. It was a ritual that connected generations, folding memories into each layer of cheese and sauce.


This dish, simple yet rich in flavors, became synonymous with laughter, warmth, and family. It's amazing how a few ingredients can bring people together, bridging gaps and creating lasting bonds.


**Difficulty Rating:** 3 out of 10


**Classification:** Appetizer


This Oven-Baked Feta Cheese Dip remains a cherished part of our family tradition, a recipe passed down through generations that continues to bring us joy and comfort. Whether you're preparing it for a family gathering or a cozy night in, this dish is sure to create its own set of warm memories for you and your loved ones. Enjoy!

Read more about Appetizers

Read more about Main Dishes

Read more about Desserts

Chavrie Caramelized Red Onion Tarts | Made by Meaghan Moineau

Chavrie Caramelized Red Onion Tarts | Made by Meaghan Moineau

**Title: Nostalgic Bites: Chavrie Caramelized Red Onion Tarts That Delight**


**Description:** Delight your taste buds with our Chavrie Caramelized Red Onion Tarts. A symphony of flavors crafted with goat cheese, red grape jelly, and succulent red onions, this appetizer is perfect for those seeking a touch of gourmet nostalgia. Dive into an easy-to-follow recipe that combines rich ingredients with a cherished family memory, making each bite a trip down memory lane.


---


### Chavrie Caramelized Red Onion Tarts


#### Ingredients:


- 4 oz Chavrie goat cheese


- 1 cup red grape jelly


- 3 large red onions, finely minced


- 3 tablespoons red wine vinegar


- 2 tablespoons sugar


- 2 tablespoons unsalted butter


- 1 tablespoon vegetable oil


- Ready-made tart shells (12 small or 6 large)


#### Instructions:


1. **Prepare the Onions:**


- Heat the vegetable oil and unsalted butter over medium heat in a heavy-gauge skillet.


- Add the minced red onions and cook until translucent, approximately 10 minutes.


2. **Caramelize:**


- Stir in the sugar, red grape jelly, and red wine vinegar.


- Cook the mixture until it reaches a syrupy consistency, stirring occasionally for about 15 minutes.


3. **Cool Down:**


- Remove from heat and allow the mixture to cool to room temperature.


4. **Assemble the Tarts:**


- Preheat your oven to 350°F (175°C).


- Place the tart shells on a baking tray.


- Spoon 1 tablespoon of the caramelized onion mixture into each tart shell, then top with a dollop of Chavrie goat cheese.


5. **Bake and Serve:**


- Bake the tarts in the preheated oven for 8-10 minutes, until the goat cheese is slightly melted and the tart shells are warm.


- Serve warm and enjoy the fusion of sweet and savory flavors.


#### Difficulty: 4/10


#### Classification: Appetizer


---


### A Taste of Nostalgia


Growing up, Sunday afternoons at my grandmother's house were a culinary adventure. Her kitchen was a haven of rich aromas and comforting warmth. Among her many specialties, the Chavrie Caramelized Red Onion Tarts were a family favorite. These tarts were more than just appetizers; they were a testament to her love and creativity.


I remember watching her gracefully maneuver around the kitchen, her hands a flurry of movements as she chopped onions and stirred pots. The kitchen would fill with the tantalizing scent of onions caramelizing with sugar and grape jelly, a scent that felt like a warm embrace.


Grandma had a knack for turning simple ingredients into extraordinary dishes, and these tarts were no exception. They were often the highlight of our gatherings, a dish that brought our family together in shared delight. As we savored each bite, stories were exchanged, laughter echoed, and memories were made.


To this day, every time I make these tarts, I am transported back to those cherished afternoons. The sweet, tangy flavor of the red onions mingling with the creamy goat cheese is like a spoonful of nostalgia, a reminder of family bonds and the love that transcends generations.


---


Relive this nostalgic experience in your own home with these delightful Chavrie Caramelized Red Onion Tarts. Perfect as a sophisticated appetizer or a comforting treat, they're a delicious reminder of the power of food to bring us closer together.

Read more about Appetizers

Read more about Main Dishes

Read more about Desserts

Maple & Curry Acorn Squash | Made by Meaghan Moineau

Maple & Curry Acorn Squash | Made by Meaghan Moineau

**Title: Savory Nostalgia: The Warm Embrace of Maple & Curry Acorn Squash**


**Description:** Dive into the comforting embrace of fall with our Maple & Curry Acorn Squash recipe. This delightful dish captures the essence of autumn with its fragrant spices and sweet maple undertones, making it a perfect addition to your seasonal menu. Rated 3/10 in difficulty, this dish is an ideal appetizer to start your culinary journey into the heart of cozy family gatherings.


---


As the leaves began to turn and the air took on a crisp edge, my family would often gather in the kitchen, enveloped by the aroma of spices and the promise of a meal that hinted at the changing seasons. One such dish that holds a special place in my heart is our Maple & Curry Acorn Squash. This recipe is not just a delightful blend of flavors but also a tapestry of cherished memories, woven together by the laughter and love of those family gatherings.


**Ingredients:**


- 1 acorn squash


- 1 tablespoon curry powder


- 2 tablespoons maple syrup


- 2 tablespoons olive oil


- 1 teaspoon salt


**Instructions:**


1. Preheat your oven to 400°F (200°C). Line a baking sheet with parchment paper or a silicone mat to prevent sticking.


2. Rinse the outside of the acorn squash thoroughly. Carefully chop it in half and remove the seeds, discarding them or saving them for roasting later. Trim off the stem and slice the squash into one-inch wedges, using the natural grooves as a guide for even thickness.


3. In a medium-sized bowl, combine the sliced acorn squash with curry powder, maple syrup, olive oil, and salt. Stir until the squash is well-coated with the mixture, ensuring every slice is infused with the flavorful blend.


4. Arrange the squash wedges in a single layer on the prepared baking sheet, cut side down. Bake in the preheated oven for about 15 minutes.


5. Flip the squash slices over to ensure both sides achieve a beautiful, caramelized brown. Continue baking for another 10 to 15 minutes, or until the squash is tender and can be easily pierced with a fork.


**A Family Memory:**


Every year, as autumn painted our little town in hues of gold and crimson, my grandmother would invite us over for what we affectionately called 'Squash Sundays'. The kitchen was her domain, a place where magic happened. I remember sitting on the high stool, watching her deft hands work through the ingredients, explaining each step with a twinkle in her eye.


The Maple & Curry Acorn Squash was always a centerpiece, its rich aroma wafting through the house, mingling with laughter and stories from days gone by. As we gathered around the table, this simple yet flavorful dish became a symbol of togetherness, a reminder that food has the power to not only nourish our bodies but also our souls.


**Difficulty Rating: 3/10**


**Classification: Appetizer**


This recipe, with its straightforward steps and minimal ingredients, is a testament to the beauty of simplicity. Whether you're a seasoned cook or a novice in the kitchen, the Maple & Curry Acorn Squash is sure to bring warmth and nostalgia to your table, inviting everyone to pause, savor, and reminisce.

Read more about Appetizers

Read more about Main Dishes

Read more about Desserts

Quinoa, Tomato, Green Onion Side Salad

Growing up, my grandma always made the most delicious side salads to accompany our family dinners. One of my absolute favorites was her Quinoa, Tomato, Green Onion Side Salad. Every time she made it, the fresh flavors of the ingredients would come together perfectly, creating a light and refreshing dish that everyone at the table loved.

I remember watching her effortlessly put this salad together in the kitchen, chopping the green onions and tomatoes with precision and squeezing the lemon juice with ease. It was a dish that seemed simple, yet it always managed to impress everyone with its vibrant colors and flavors.

The Quinoa, Tomato, Green Onion Side Salad holds a special place in my heart because it reminds me of those family dinners where we would all gather around the table, sharing stories and enjoying each other's company. It's a dish that brings back fond memories of my grandma's cooking and the love she put into every meal she made for us.

Difficulty: 4/10

This recipe is fairly easy to make, with simple ingredients and straightforward instructions. It would be best served as an appetizer or a side dish, perfect for accompanying any main course. Give it a try and let the flavors of this Quinoa, Tomato, Green Onion Side Salad transport you back to those nostalgic family dinners of the past.