
It was one of those mornings where I woke up, looked in the fridge, and realized I was running late for everything. My mind was a blur, but my stomach was loud and clear: it needed something quick, filling, and delicious. Enter the Protein Strawberry Smoothie. It’s like a breakfast hug in a glass, bursting with fruity freshness and a protein punch to keep you going. Plus, it comes together in minutes — perfect for the days when your to-do list is longer than your patience.
Jump to Recipe
What You’ll Need
I bet you already have most of these ingredients in your kitchen, which means you’re just minutes away from sipping on this creamy delight. Here’s what you’ll need:
- 1 cup almond milk
- 1 banana
- 1/2 cup fat-free Greek yogurt
- 1 tablespoon honey
- 1 cup ice
- 1 cup fresh strawberries
How to Make Protein Strawberry Smoothie
- Start by grabbing your blender and pouring in the almond milk. This will be the liquid base that helps everything blend smoothly.
- Peel the banana and break it into chunks, tossing them into the blender. Bananas add natural sweetness and a creamy texture.
- Add the fat-free Greek yogurt next. This is where the protein magic happens, making your smoothie satisfying and rich.
- Drizzle in the honey. Adjust the sweetness to your taste, but remember, the strawberries will add their own sweetness too.
- Throw in the ice to make it nice and frosty. No one likes a warm smoothie!
- Top it all off with the fresh strawberries. They bring a bright, berry flavor that’s completely irresistible.
- Blend on high until everything is smooth and the color is a lovely pink. It should only take about a minute. Taste and adjust if needed — maybe a bit more honey or a splash of almond milk if it’s too thick.
- Pour into your favorite glass and enjoy immediately. It’s best when fresh and frothy!
Cook’s Notes
So, a few quick things to make sure your smoothie game is on point. If your smoothie ends up too thick, just add a bit more almond milk to loosen it up. Too thin? A few more ice cubes will do the trick. I love using fresh strawberries when they’re in season, but frozen will work in a pinch and will make your smoothie even thicker — just reduce the ice a bit. As for storing it, well, this smoothie is really best made fresh. If you do have leftovers, pop them in the fridge for a few hours, but know they might separate a bit (just give it a good shake or stir before drinking).
Make It Your Own
Here are a few fun ways to switch things up:
- Swap the almond milk for coconut milk for a tropical twist.
- Replace the banana with a ripe avocado for a lower-sugar, extra creamy version.
- Add a tablespoon of chia seeds before blending for an extra boost of fiber and omega-3s.
- Throw in a handful of spinach to sneak in some greens — you won’t even taste it!
If you try this, I’d love to hear how it turns out — drop a comment or tag me! Whether you’re sipping this on a bustling morning or a lazy afternoon, I hope it adds a bit of joy to your day. Cheers to easy, tasty nutrition!
Related update: Protein Strawberry Smoothie
Related update: TROPICAL BANANA GREEN SMOOTHIE
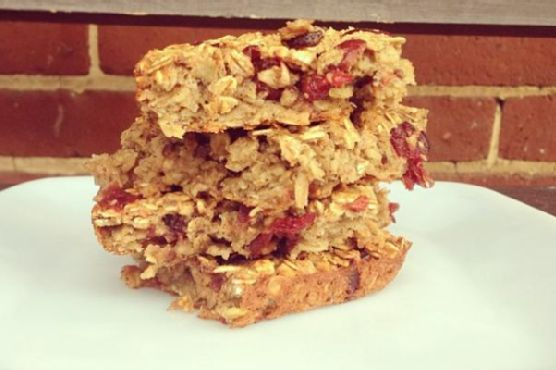
It was one of those chilly mornings where you can feel the crisp air sneaking through the cracks of your window, coaxing you to stay under the covers just a little longer. But I was determined to start my day with something as cozy as my fluffy duvet, so I headed to the kitchen and decided to whip up my favorite baked oatmeal with dried cranberries. This dish is a lifesaver on mornings like this because it warms you up from the inside out, and it’s the kind of comfort food that feels indulgent but is actually packed with goodness. Plus, it’s the perfect dish to make ahead for the week. I promise, once you try this, you’ll look forward to getting out of bed just for breakfast!
Jump to Recipe
What You’ll Need
I love this recipe because it uses a lot of pantry staples, so you’re likely to have everything you need on hand. Plus, the dried cranberries add that tart sweetness that makes every bite exciting.
- 2 cups dry oats
- 1 teaspoon baking powder
- 1/2 teaspoon cinnamon
- 1/4 teaspoon salt
- 1/4 cup flaxseeds
- 2 cups unsweetened almond milk
- 2 bananas, mashed
- 2 eggs
- 1 teaspoon vanilla extract
- 1/2 cup dried cranberries
How to Make Baked Oatmeal with Dried Cranberries
- Preheat your oven to 350°F (175°C). The warmth will soon fill your kitchen, hinting at the deliciousness to come.
- In a large bowl, mix the dry ingredients: oats, baking powder, cinnamon, salt, and flaxseeds. Stir until everything is well combined — you want the flaxseeds to be evenly distributed like little gems throughout the mixture.
- In a separate bowl, whisk together the liquid ingredients: almond milk, mashed bananas, eggs, and vanilla extract. Whisk until the mix is smooth and the bananas are well incorporated, giving off that lovely, sweet aroma.
- Pour the liquid mixture into the bowl of dry ingredients. Mix well until the oats are thoroughly soaked and the liquid is evenly distributed. It’ll look like a big, soupy mess, but don’t worry, it will transform in the oven!
- Spray a baking pan with non-stick spray. The size of the pan will determine the thickness of your oatmeal bars, so choose according to your preference. I like using a smaller pan to get thicker, chewier bars.
- Pour the oatmeal mixture into the prepared pan, spreading it out evenly. Sprinkle the dried cranberries on top, letting them fall where they may, like little jewels peeking out.
- Bake in the preheated oven for about 45 minutes. Your kitchen will be filled with the warm, inviting scent of cinnamon and baked bananas. The top should be slightly golden and the center set.
- Once done, let it cool for a few minutes before slicing. This is the hardest part, but trust me, it’s worth the wait!
- Enjoy a slice warm, perhaps with a drizzle of maple syrup or a dollop of yogurt. It’s the breakfast that feels like a hug!
Cook’s Notes
Baked oatmeal is incredibly forgiving, but here are a few tips to ensure success. If you prefer a sweeter dish, add a bit of honey or maple syrup to the wet ingredients. You can store leftovers in the fridge for up to a week, making it perfect for meal prep. Just reheat a slice in the microwave or enjoy it cold — both ways are delicious. If you find your oatmeal drying out in the fridge, a splash of almond milk during reheating will do the trick.
Make It Your Own
Here’s where you can let your creativity shine! Try these variations to keep things exciting:
- Swap the dried cranberries for chopped nuts like almonds or walnuts for a bit of crunch.
- If you’re a chocolate lover, sprinkle in some dark chocolate chips for a decadent twist.
- Trade the almond milk for coconut milk for a tropical flair.
- Mix in some fresh berries like blueberries or raspberries before baking for a burst of freshness in every bite.
If you try this, I’d love to hear how it turns out — drop a comment or tag me! I’m always excited to see how you make these recipes your own. Enjoy every cozy, delicious bite!
Related update: Baked Oatmeal with Dried Cranberries
Related update: Broccoli Rabe and Breaded Veal Scallopini

I recently found myself staring at a half-head of cauliflower and some broccoli florets, both on the brink of overstaying their welcome in my crisper drawer. It was one of those evenings, you know? When the day has been a bit too long, and you need comfort but don’t want to weigh yourself down with a heavy meal. Enter this Cauliflower and Broccoli Gratin with Camembert Cheese. It’s the kind of dish that feels a little fancy — thanks to the gooey, rich camembert — yet it’s simple enough to whip up on a busy weeknight. Plus, it transforms those neglected veggies into something fabulous and satisfying. Let’s not forget, it’s a great way to sneak in some greens under all that cheesy goodness.
Jump to Recipe
What You’ll Need
For this dish, the ingredients are delightfully simple, and you might already have most of them chilling in your kitchen. Here’s what’s going into our cozy gratin:
- 1 head of cauliflower
- 1 bunch of broccoli
- 2 tablespoons of butter
- 2 tablespoons of flour
- 1 cup of milk
- Salt and pepper to taste
- 200g camembert cheese, cut into cubes, plus extra to put on top
- 1 cup of breadcrumbs
How to Make Cauliflower and Broccoli Gratin With Camembert Cheese
- First, preheat your oven to 180 degrees C (or 350 degrees F). It’s always nice to have it ready and waiting.
- In a large pot of boiling water, parboil the broccoli and cauliflower. You’re looking for tender-crisp veggies here — about 10-15 minutes should do the trick.
- Once your veggies are done, drain them well and set them aside. They’ll be ready to soak up that cheesy sauce.
- In a saucepan, melt the butter over medium heat. When it’s completely melted and starts to bubble, sprinkle in the flour. Stir constantly until it forms a smooth paste, which takes about a minute.
- Slowly whisk in the milk. Keep stirring until the mixture thickens to a nice, creamy consistency.
- Now, add in the camembert cubes. Stir until the cheese is fully melted and the sauce is smooth. Season with salt and pepper to your liking.
- Combine your cheese sauce with the parboiled veggies, ensuring they’re well coated.
- Transfer everything into a baking dish. Top with extra camembert chunks and breadcrumbs for that crispy, golden finish.
- Pop it in the oven for about 20 minutes or until it’s golden and bubbling on top. Your kitchen will smell heavenly!
Cook’s Notes
Let’s talk about some little tips that will make this dish even better. If you’re short on time, you can parboil the veggies in advance and keep them in the fridge until you’re ready to assemble the gratin. For storage, this dish keeps well in the fridge for up to three days — just reheat it in the oven to keep the top crispy. One common mistake is overcooking the veggies during parboiling. You want them to maintain some bite since they’ll continue cooking in the oven.
Make It Your Own
Here are some fun variations to shake things up if you feel like experimenting:
- Swap the camembert for a sharp cheddar if you prefer a stronger cheese flavor.
- Throw in some crispy bacon bits for an extra savory kick.
- Use panko breadcrumbs instead of regular ones for an even crunchier topping.
- Add a pinch of nutmeg to the cheese sauce for a warm, aromatic twist.
If you try this, I’d love to hear how it turns out — drop a comment or tag me! It’s always so fun to see your creations and variations. Enjoy the cheesy goodness!
Related update: Cauliflower and Broccoli Gratin With Camembert Cheese
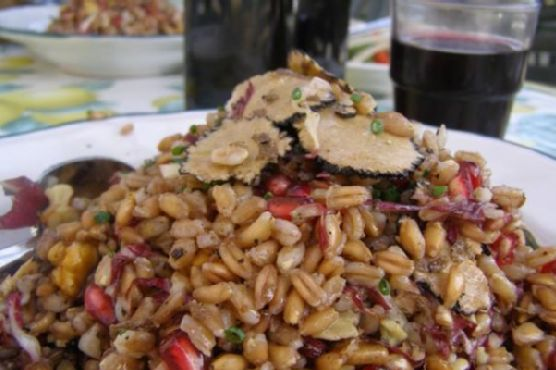
It was one of those evenings when the crisp air makes you crave something grounded yet bright—think cozy sweater vibes but on a plate. I had just returned from the farmers market, pomegranates in hand, and a desire for something different but not overly complicated. That’s how this Fall Farro Salad with Pomegranate, Walnut & Truffles was born. It’s the kind of dish that combines hearty farro with the tangy pop of pomegranate seeds, and the rich aroma of truffles—a little bit of everything deliciously fall. It’s a perfect weeknight meal that’s just as impressive for a weekend get-together, and the best part is how ridiculously easy it is to put together. I mean, we’re talking about strong flavors that do all the heavy lifting for you. Jump to Recipe
What You’ll Need
This salad’s ingredient list is refreshingly straightforward, yet it packs a punch with gourmet vibes. Chances are you already have most of these at home, except maybe the truffle mushroom, but trust me, it’s worth the small trip.
- Extra virgin olive oil
- Farro
- Parmesan (shaved into ribbons)
- Pomegranate (seeds)
- Radicchio (thinly sliced)
- Salt and pepper
- Truffle mushroom
- Vinegar
- Walnuts
How to Make Fall Farro Salad with Pomegranate, Walnut & Truffles
- Begin by rinsing the farro under cold water. In a large pot, bring plenty of cold water to a boil. Add a good pinch of salt along with the farro. If you have any vegetable scraps handy, toss them in for extra flavor. Cook until al dente, about 20-35 minutes. Taste a grain—it should be tender with a slight chew.
- While the farro cooks, prep the other ingredients. Shave the parmesan into delicate ribbons, thinly slice the radicchio, and remove the pomegranate seeds. You know you’re doing it right when your cutting board looks like a painter’s palette.
- In a small skillet, toast the walnuts over medium-low heat until they’re golden and fragrant. Keep an eye on them—they can go from toasty to burnt in a blink.
- Once the farro is ready, drain and let it cool slightly. Toss it into a big bowl with the radicchio, pomegranate seeds, walnuts, and parmesan ribbons.
- Drizzle with extra virgin olive oil, a splash of good vinegar, and season with salt and pepper. Mix gently, ensuring everything is well coated but not bruised.
- Finally, thinly slice the truffle mushroom and gently fold it into the salad. The aroma should start to bloom, lacing through the entire dish.
Cook’s Notes
Farro can be cooked ahead of time, making this salad a great option for meal prep. Just cool it completely before storing it in an airtight container in the fridge. When ready to assemble, allow it to return to room temperature for the best texture.
Watch out for overcooking the farro—it should retain some chewiness to balance the other textures of the salad. And remember, a little truffle goes a long way. You want it to complement, not overpower.
If you have leftovers, store the salad and dressing separately for up to two days to keep everything fresh and crunchy.
Make It Your Own
- Swap the truffle mushroom for a sprinkle of truffle oil if you’re in a pinch—it gives a similar aroma boost.
- Use feta cheese instead of parmesan for a tangier bite.
- Not a fan of radicchio? Substitute with baby kale or arugula.
- For a heartier version, add roasted butternut squash or sweet potato cubes.
If you give this recipe a whirl, I’d love to hear how it turned out—or any fun twists you added! Drop a comment or tag me on your food adventures. Happy cooking!
Related update: Fall Farro Salad with Pomegranate, Walnut & Truffles
Related update: Cauliflower and Broccoli Gratin With Camembert Cheese

So, picture this: It’s a Tuesday evening, and I’m standing in my kitchen feeling utterly uninspired. You know those days when you’ve got a fridge full of nothing and everything? Yeah, that was me. The weather hinted at the first signs of fall, and my lazy bones craved something cozy yet bright—something that would wrap me up like a warm blanket but not put me in a food coma. Enter this Lemon Chickpea & Tomato Stew. It’s the kind of dish that checks all the boxes: fast (you’ll have it on the table in under an hour), flavorful (hello, lemon zest), and so satisfying you’d think it took all day. Trust me, once you make it, your taste buds will thank you, and you might just find a new weeknight staple.
Jump to Recipe
What You’ll Need
This stew is a pantry hero—you probably have most of the ingredients hiding in your kitchen already.
- 2 tablespoons of olive oil
- 1 large shallot, chopped
- 3 garlic cloves, minced
- 2 cans of chickpeas, drained and rinsed
- 1 jalapeno chili, sliced
- 1 teaspoon of dried oregano
- 2 bay leaves, broken
- 1/2 teaspoon of crushed red pepper
- Salt & pepper to taste
- 4 cups of chicken broth
- Zest and juice of 1 fresh lemon
- 1 cup of dried oven tomatoes
- 2 cups of fresh spinach, loosely packed
How to Make Lemon Chickpea & Tomato Stew
- In a large saucepan, heat the olive oil over medium heat. You’ll know it’s ready when the oil starts shimmering like a mirage.
- Add the shallot and garlic, stirring them into the warm oil until they soften and become fragrant, about 5 minutes.
- Toss in the chickpeas, jalapeno, oregano, bay leaves, and crushed red pepper. Season with salt and pepper. Stir frequently, letting those chickpeas get a little crispy and golden, about 5-7 minutes. Keep an eye out—they might try to escape the pan!
- Pour in the chicken broth, lemon zest, and lemon juice. Bring everything to a happy boil, then reduce the heat and let it simmer until the broth is reduced by half, around 20 minutes.
- Stir in the oven-dried tomatoes, garlic, and spinach. Simmer for another 5 minutes, just until the spinach wilts into the stew. Goodbye, bay leaves—you’ve done your job, so remove them.
- Give it one last taste for seasoning, adjust if necessary, and serve hot with warm crusty bread to soak up every last drop.
Cook’s Notes
First things first, don’t rush the browning of your chickpeas. That’s where a lot of the flavor magic happens. If you can, make sure the broth you’re using is low-sodium so you can control the salt levels. This stew is even better the next day, so feel free to make it ahead and store it in the fridge for up to 3 days. Just reheat it gently on the stovetop. If it’s a bit too thick, splash in a little extra broth or water.
Make It Your Own
- Vegetarian version: Swap the chicken broth for vegetable broth, and you’re good to go.
- Spicy kick: Double the jalapeno if you’re feeling bold. You can also add a dash of cayenne.
- Protein boost: Stir in some cooked shredded chicken or crispy tofu just before serving.
- Herbal twist: Add fresh basil or cilantro at the end for an extra layer of flavor.
And there you have it! If you try this, I’d love to hear how it turns out—drop a comment or tag me. Enjoy your cozy bowl of goodness!
Related update: Lemon Chickpea & Tomato Stew
Related update: Enchiladas Verdes (Green Enchiladas)
Related update: Carrot and Coriander Soup
Related update: Cauliflower Chickpea Stew

It was one of those rainy Tuesday afternoons where the chilly wind made its way through every crack in my window, and all I could think about was something warm and cozy to fill my kitchen with delicious smells. I found myself rummaging through my pantry, pulling out half-used bags of dried fruits and a forgotten jar of candied ginger. Instantly, the idea of scones popped into my head—specifically, Dried Fruit and Ginger Scones. This recipe is perfect for those moments when you crave a little treat that’s impressively tasty but doesn’t demand hours in the kitchen. The best part? I promise you, they’re so easy to make, you’ll almost feel like you’re cheating.
Jump to Recipe
What You’ll Need
The ingredient list is delightfully simple. Chances are, you already have most of these items tucked away in your kitchen.
- Flour
- Cake flour
- Baking powder
- Butter
- Heavy cream
- Whole milk
- Salt
- Turbinado sugar
- Dried apples
- Dried cranberries
- Candied ginger
How to Make Dried Fruit and Ginger Scones
- Position a rack in the middle of your oven and preheat to 425°F. If you’re feeling fancy and using a pizza stone, pop it in the oven to preheat too. Otherwise, line a cookie sheet with parchment paper—you’re ready to go.
- In a medium bowl, whisk together the flours, baking powder, 3 tablespoons of the sugar, and salt. It should look like a soft, powdery snow drift.
- Cut in the butter using a pastry blender, two knives, or your fingers, until you have pea-sized butter pieces that make the mixture look a bit like coarse sand with pebbles. Don’t worry if it looks a bit odd; this is what you want!
- Pour in the cream and milk (or go all in with just cream if you’re feeling decadent) and stir with a fork. You’re aiming for a sticky, shaggy dough that’s evenly moist.
- Add in the fruits and ginger. Work the mixture just enough to spread the goodies evenly, breaking up any ginger clumps. Expect your hands to get a little messy.
- Turn the sticky dough onto a floured surface, sprinkling a bit more flour on top. Pat it into a circle about 1-inch thick. Resist the urge to over-flour; we don’t want tough scones.
- Flour a pizza cutter or a sharp knife and slice the dough circle into 8 equal wedges. Flour in between cuts if things get sticky.
- With a bench scraper, spatula, or your brave hands, transfer the scones to your baking vessel. Leave a half-inch space between them so they can sashay their way to deliciousness.
- Sprinkle the tops with the remaining tablespoon of sugar. Bake for 13-15 minutes, until the tops are a lovely light golden and the scones smell irresistible.
- Let them cool on the baking sheet for at least 10 minutes—it’s tempting, but worth the wait. Enjoy them warm or after they’ve cooled. Both ways are pure bliss.
Cook’s Notes
These scones are pretty forgiving. The key is not to overwork the dough, which keeps them tender and fluffy. If you don’t have cake flour, all-purpose flour works too—just be a bit gentler when mixing. They’re best the day they’re made, but you can store them in an airtight container for a day or two. Reheat them in a warm oven if you want to revive that fresh-from-the-oven vibe. If you’re prepping ahead, you can freeze the unbaked scones; just add a couple of extra minutes to the baking time.
Make It Your Own
- Nutty Twist: Swap half of the dried fruits for chopped toasted almonds or walnuts for a crunchy surprise.
- Chocolate Indulgence: Substitute the candied ginger with dark chocolate chips for a sweet, rich variation.
- Zesty Citrus: Add finely grated orange or lemon zest to the dough for a refreshing aromatic lift.
- Herbal Infusion: Replace dried cranberries with dried cherries and throw in a teaspoon of dried rosemary for a sweet-herbaceous combo.
If you try this, I’d love to hear how it turns out—drop a comment or tag me! Your kitchen adventures make this foodie journey so much more fun. Happy baking!
Related update: Dried Fruit and Ginger Scones
Related update: Chouquettes

Last Tuesday, I found myself in one of those delightful culinary conundrums: a craving for something comforting yet uncomplicated, something that would warm the soul without demanding too much time or attention. The answer came to me as I stood in front of my pantry: Soft Croatian corn bread, or proja. This gem of a recipe is perfect for those moments when you want something special but don’t want to spend hours in the kitchen. It’s rich with the rustic flavors of corn and cheese, and the best part? You probably already have most of the ingredients on hand. Plus, it pairs wonderfully with soups and stews, making it a great choice for the changing seasons.
Jump to Recipe
What You’ll Need
In this recipe, the magic happens with just a few pantry staples and a couple of fresh items. Chances are, you already have most of this lying around:
- 1 cup all-purpose flour
- 1 teaspoon baking powder
- 1 cup corn grits
- 1 cup cornmeal
- 1 cup cottage cheese
- 3 large eggs
- 1 cup natural yogurt
- 1/4 cup olive oil
- 1 teaspoon salt
- 1 cup mineral water
How to Make Soft Croatian corn bread – proja
- Preheat your oven to 220°C (or about 430°F). Time to get that kitchen nice and toasty.
- In a large mixing bowl, crack in the eggs and sprinkle the salt. Whisk until the mixture becomes slightly frothy.
- Add the all-purpose flour, corn grits, cornmeal, and baking powder. Stir until everything is just combined.
- Pour in the olive oil and yogurt, mixing until you have a smooth batter that glistens with promise.
- Gradually add the mineral water, stirring consistently to achieve a thin, pourable batter. Don’t rush — let the batter tell you when it’s ready.
- Gently fold in the cottage cheese, ensuring it’s evenly distributed. The batter should be light and slightly lumpy.
- Lightly grease a baking pan with butter, then pour in the batter. Smooth the top with a spatula, giving it a little jiggle to settle.
- Bake in the preheated oven for about 30 minutes. You’ll know it’s done when the top is golden, and a toothpick inserted in the center comes out clean.
Cook’s Notes
Proja is forgiving, but here are a few tips to keep in mind. Make sure your batter is on the thinner side before baking; this ensures a tender crumb. If the top is browning too quickly in the oven, cover it with foil halfway through. Leftovers can be wrapped tightly and stored in the refrigerator for up to three days. To reheat, just pop a slice in the oven or toaster, and it comes back to life like magic.
Make It Your Own
Looking to add your own twist to this lovely loaf? Here are some fun variations:
- Swap the cottage cheese for feta for a tangier kick.
- Add a handful of chopped olives for a Mediterranean vibe.
- Mix in some sun-dried tomatoes for a pop of color and flavor.
- Replace the mineral water with beer for a richer, deeper flavor.
If you try this, I’d love to hear how it turns out — drop a comment or tag me! Your kitchen stories are always my favorite part. Happy baking, and remember: the best recipes are the ones that make you smile.
Related update: Soft Croatian corn bread – proja
Related update: Cavatappi pasta with salmon crab surimi

It was one of those fall evenings where the air turned crisp just a little too early for my liking. I found myself staring at a lonely pair of pears on my countertop, wondering how they’d somehow escaped the lunchbox routine all week. Inspired by the chill, a craving for something both comforting and refreshing struck me. This pear salad with walnuts and blue cheese was the answer — a perfect transitional dish that’s light yet satisfying. It’s what happens when you want to feel like you’re eating something fancy, minus the hassle. It’s filling enough for a lunch, or could be a lovely start to a cozy dinner.
Jump to Recipe
What You’ll Need
This salad is the definition of simple elegance, and chances are you already have most of these ingredients at home.
- Pears – ripe but firm enough to hold their shape
- Mixed salad leaves – I’m partial to using a mix that includes curly endive for that extra crunch
- Walnuts – toasted lightly to bring out their nuttiness
- Blue cheese – creamy and tangy, the star of the show
- Lemon juice – for a zesty dressing that cuts through the richness
- Safflower oil – mild and light, perfect for dressings
- Walnut oil – adds a subtle nutty depth
- Chives – delicate oniony flavor
How to Make Pear Salad With Walnuts and Blue Cheese
- Start by prepping your pears. Trim the base of each pear so they can stand upright like little soldiers on your cutting board. This will make slicing them easier and more stable.
- In individual salad bowls, arrange a generous handful of mixed salad leaves. Place one of your sliced pears on top of the greens in each bowl, making sure to fan them out for a bit of flair.
- Now, sprinkle a small handful of celery pieces into each bowl. The celery adds a delightful crunch and freshness to the salad.
- In a small bowl, combine the safflower oil, walnut oil, lemon juice, and a sprinkle of freshly chopped chives. Whisk together until the dressing is emulsified — you’ll know it’s ready when it’s slightly thick and all combined.
- Drizzle the dressing over each salad evenly. You want just enough to coat everything lightly without drowning it.
- Finish by scattering a healthy amount of crumbled blue cheese and toasted walnuts over each salad. These are your flavor bombs, so be generous!
Cook’s Notes
When it comes to choosing your pears, I recommend a variety like Bosc or Anjou for their firmness and sweetness. If your pears are too ripe, they’ll turn mushy in the salad. As for the blue cheese, any creamy variety works, but I find that a strong Roquefort can elevate the dish beautifully. To toast walnuts, simply spread them on a baking sheet and pop them in a 350°F (175°C) oven for about 5-7 minutes, or until they are golden and fragrant. Watch them closely because they can go from perfectly toasted to burnt in seconds! The salad is best served fresh, but you can store leftovers in an airtight container in the fridge for up to a day — just keep the dressing separate to avoid soggy greens.
Make It Your Own
- Swap out the blue cheese for goat cheese if you’re not a fan of strong flavors. It adds a milder creaminess that is just as delightful.
- Use pecans instead of walnuts for a slightly sweeter nutty touch.
- If you’re looking for a bit more protein, add some grilled chicken or crispy tofu to make it a complete meal.
- Drizzle a little balsamic glaze over the top for an added tangy sweetness that complements the pears beautifully.
If you try this, I’d love to hear how it turns out — drop a comment or tag me on Instagram! Your kitchen adventures make my day. Happy cooking!
Related update: Pear Salad With Walnuts and Blue Cheese
Related update: Fall Farro Salad with Pomegranate, Walnut & Truffles

Last Tuesday, I found myself staring into the fridge, the usual weeknight dilemma playing out: what to make that’s quick, refreshing, yet still feels like a treat? I’d been craving something that had all the comforting notes of fall but was light enough to not weigh me down. Enter the pear salad with walnuts and blue cheese, a concoction that seemed to tick every box. This salad is all about contrasts — the creaminess of the blue cheese against the crisp pears, the bitterness of endive softened by the sweet, nutty warmth of walnuts. It’s a symphony of flavors that feels like indulging without the next-day guilt. Ready to dive in? Trust me, it’s a keeper.
Jump to Recipe
What You’ll Need
This recipe doesn’t require a trip to a gourmet store. Odds are you already have most of these ingredients hanging out in your kitchen.
- Pears – Choose ripe, but firm ones.
- Mixed salad leaves – A blend with some curly endive adds a nice bitter touch.
- Lemon juice – For a bright, tangy kick.
- Blue cheese – Go for your fave, the funkier, the better.
- Chives – Finely chopped for a fresh oniony hint.
- Safflower oil – For a neutral base.
- Walnut oil – Adds a toasty depth.
- Walnuts – Toast these for that extra crunch.
How to Make Pear Salad With Walnuts and Blue Cheese
- Start by prepping the pears. Slice a thin piece off their bases so they can stand upright without toppling over. Trust me, this makes the plating look extra fancy.
- In individual bowls, artistically arrange the pears amidst the mixed salad leaves. Think of this as your blank canvas.
- Sprinkle the chopped chives over the leaves, letting them fall where they may — no need for precision here.
- In a small bowl, whisk together the lemon juice, safflower oil, and walnut oil. Aim for a smooth emulsion that coats the back of a spoon.
- Drizzle this dressing lovingly over your salads. You’ll want a nice, even coverage without drowning the ingredients.
- Finish by scattering a generous handful of blue cheese crumbles and toasted walnuts over each salad, letting them nestle into the greens.
Cook’s Notes
Okay, let’s talk about some things to keep in mind. Firstly, when choosing pears, Bartletts or Anjous are my go-to for their texture and sweet flavor. If they’re too ripe, they might collapse under the pressure of the salad fork, so aim for that sweet spot of just ripe.
Toasting the walnuts is a game-changer. Just a few minutes in a dry skillet until they’re golden and fragrant will make a world of difference. Store any leftovers in a sealed container in the fridge, but honestly, this salad is best enjoyed fresh.
If you’re prepping ahead, keep the dressing separate until you’re ready to serve. This keeps the greens from wilting and maintains that fresh, crisp bite.
Make It Your Own
- Don’t love blue cheese? Swap it out for crumbled feta or goat cheese for a milder taste.
- For a protein boost, add some grilled chicken or crispy tofu on top. It turns this salad into a complete meal.
- Try swapping walnuts with pecans for a sweeter, softer crunch.
- If you can’t find curly endive, arugula offers a peppery alternative that pairs wonderfully with the pears and cheese.
If you try this, I’d love to hear how it turns out — drop a comment or tag me! Whether you stick to the script or put your own twist on it, I hope it becomes a staple in your kitchen like it has in mine. Happy cooking!
Related update: Pear Salad With Walnuts and Blue Cheese
Related update: Pear Salad With Walnuts and Blue Cheese

Last Wednesday, I found myself staring into the depths of my fridge, contemplating a lonely eggplant and a couple of sad zucchinis. It was one of those evenings when inspiration was as low as my vegetable crisper’s contents. But then, a little spark hit me—why not whip up a colorful and cozy Vegetarian Ratatouille? It’s one of those dishes that feels like a warm hug after a long day. Plus, it’s a melody of summer veggies that’s simple to throw together, making it a perfect midweek hero. Loaded with fresh flavors, it’s hearty without being heavy, and best of all, it can transform fridge odds and ends into something spectacular. So, if you’re ready to turn that produce drawer into a work of art, keep reading. Or, if you’re raring to get started—Jump to Recipe
What You’ll Need
This ingredient list is refreshingly straightforward. Chances are you already have most of these in your kitchen. Here’s what you’ll need for this vibrant veggie medley:
- Eggplant
- Zucchini
- Yellow squash
- Tomato
- Red bell pepper
- Orange bell pepper
- Onion
- Garlic
- Fresh basil
- Thyme
- Dried oregano
- Extra virgin olive oil
- Sea salt
How to Make Vegetarian Ratatouille
- Start by heating a good glug of extra virgin olive oil in a large saucepan over medium-low heat. Toss in the diced onion and minced garlic. Stir them around until the onions are translucent and the whole kitchen smells like a dream.
- Next, add in the chopped tomatoes. Give them a gentle stir and let them mingle with the onions and garlic until the flavors start to blend together.
- Now, it’s time to add the rest of the gang. Introduce the chopped eggplant, zucchini, yellow squash, red and orange bell peppers to the party. Sprinkle in some sea salt, a few sprigs of thyme, and a pinch of dried oregano.
- Lower the heat and let everything simmer gently for about 30 minutes. Stir occasionally, keeping an eye on the eggplant. You’ll know it’s done when it’s tender and the edges of the vegetables are starting to caramelize a bit.
- Before serving, toss in some freshly torn basil leaves for a burst of freshness. Give everything one last stir and get ready to dig in!
Cook’s Notes
Here’s the deal: Ratatouille is incredibly forgiving. If you have extra veggies on hand, like mushrooms or carrots, feel free to toss them in. Just keep an eye on the cooking time; firmer veggies might need a bit more time to tenderize.
- Worried about mushy vegetables? Make sure your heat is low enough to allow them to cook slowly and evenly.
- This dish can easily be made ahead of time. Store it in an airtight container in the fridge for up to three days. The flavors only deepen as it sits, making it an excellent leftover choice.
- If you’re serving this to guests, you can prepare it in advance and simply reheat gently on the stove before serving.
Make It Your Own
- For a protein boost, add in some chickpeas or white beans during the last 10 minutes of cooking.
- Swap the fresh basil for a handful of chopped parsley if that’s what you have on hand.
- Spice things up with a pinch of red pepper flakes for some heat.
- Transform it into a heartier meal by serving it over a bed of fluffy quinoa or couscous.
If you try this, I’d love to hear how it turns out — drop a comment or tag me! Your feedback means the world to me and keeps the inspiration flowing.
Related update: Vegetarian Ratatouille
Related update: Wildwood Ovens Bourbon Apple Glazed Cedar Plank Salmon

It was one of those mornings when I wanted something warm and filling but couldn’t face another bowl of cereal. I peeked into the fridge and found a half-used bag of broccoli and a carton of eggs. Inspiration struck, and soon my kitchen was filled with the comforting smell of baking oats and the savory tang of broccoli. This Broccoli Oatmeal Breakfast Casserole is exactly what you need when you want something nutritious and satisfying without spending your entire morning in the kitchen. Plus, it’s surprisingly easy to make, so you can enjoy a leisurely breakfast even on a busy day.
Jump to Recipe
What You’ll Need
This recipe is beautifully simple and calls for ingredients you likely have sitting in your pantry. You know I love a recipe where a quick rummage through the cupboard delivers everything you need.
- Broccoli florets
- Dry oats
- Eggs
- Low-fat milk
- Olive oil
- Baking powder
- Salt
- Cayenne pepper
How to Make Broccoli Oatmeal Breakfast Casserole
- Start by preheating your oven to 350°F (175°C). While it warms up, grab your trusty 8-inch square baking dish and give it a light misting of cooking spray to prevent sticking.
- Chop the broccoli florets roughly and blitz them in a food processor until they resemble coarse crumbs. The earthy smell of fresh broccoli will fill the air.
- In a large mixing bowl, combine the ground broccoli, dry oats, a pinch of baking powder, a sprinkle of salt, and a dash of cayenne pepper. Give it a good mix — this is the foundation of your casserole.
- In a separate bowl, whisk together the eggs, low-fat milk, and a generous tablespoon of olive oil. The mixture should be smooth and slightly frothy.
- Pour the wet ingredients into the bowl of dry ingredients. Stir everything together until the oats are fully coated and the broccoli is evenly distributed.
- Spoon the mixture into your prepared baking dish, smoothing the top with a spatula. Slide it into the oven and bake for 25-30 minutes, or until the edges are golden and a fork inserted into the center comes out clean.
- Let it cool slightly before cutting into your desired size and serving it warm. The casserole will be firm yet tender, with a delicious crust formed by the oats.
Cook’s Notes
This casserole is forgiving, so don’t stress if you’re missing an ingredient. If you’re prepping in advance, you can assemble the night before and bake it fresh in the morning—just cover and store in the fridge. Leftovers? Refrigerate them, and they’ll keep for up to three days. Reheat portions in the microwave or the oven. Watch out for over-baking; once it’s golden and a fork comes out clean, it’s ready. The texture should be moist but not soggy.
Make It Your Own
- Cheese Lover’s Twist: Add a handful of grated cheddar or parmesan to the dry ingredients for a cheesy kick.
- Protein Boost: Toss in some cooked, crumbled sausage or crispy bacon bits to the batter for extra protein.
- Veggie Variety: Swap half the broccoli for finely chopped spinach or kale for an extra green boost.
- Spice It Up: Substitute cayenne pepper with smoked paprika or add a pinch of chili flakes for a different heat profile.
If you try this Broccoli Oatmeal Breakfast Casserole, I’d love to hear how it turns out for you. Drop a comment below or tag me in your breakfast creations! Here’s to starting the day with something nutritious and delicious. 🥦✨
Related update: Broccoli Oatmeal Breakfast Casserole

Picture this: it’s a chilly Tuesday evening, and I’m staring into my fridge, which is looking kind of bare except for a few odds and ends. Ever been there? Yeah, me too. But then, I spot a half-used can of pumpkin puree and some cheese. Suddenly, the idea hits me like a ton of bricks—Pizza Bites with Pumpkin! It’s the ultimate weeknight wonder, combining the cozy vibes of fall with the all-time favorite comfort food: pizza. These little bites are quick, comforting, and yes, they are bound to impress even the pickiest of eaters without much fuss. Plus, they’re made in a muffin tin, which automatically makes them adorable and somehow more delicious. Ready to give it a whirl? Grab your apron!
Jump to Recipe
What You’ll Need
The best part? You probably have most of these in your pantry already.
- 1 cup of pumpkin
- 2 tablespoons of olive oil
- 1/2 cup of feta cheese
- 1/2 cup of mozzarella
- 2 eggs
- 1 teaspoon of dried oregano
- Fresh parsley, chopped, for garnish
- 1 clove of garlic, minced
- Your favorite pizza dough
How to Make Pizza Bites with Pumpkin
- Start by chopping the pumpkin into rice-sized bits using a food processor. This gives you the right texture for the bites.
- Heat up the olive oil in a pan over medium heat. Sauté the pumpkin for about 3 minutes, just until it starts to soften and turns a lovely golden hue. Set it aside to let it cool.
- In a mixing bowl, combine the feta and mozzarella cheeses. Crack in the eggs, one at a time, stirring after each addition until you have a smooth mixture.
- Add the cooled pumpkin and the minced garlic, along with the oregano and parsley. Mix everything until well combined. Your kitchen should start to smell amazing right about now!
- Grease a muffin tin and evenly spoon the mixture into each mold.
- Now, press the pizza dough down evenly and firmly into each mold. This step is crucial to ensure the bites stick together nicely.
- Bake in a preheated oven at 200°C (about 400°F) for 30 minutes, or until the tops are golden brown and the edges are slightly crisp.
- Once done, remove from the oven and let them cool in the pan for 5 to 10 minutes. Trust me, this waiting game is critical so they hold their shape when you take them out.
Cook’s Notes
Okay, let’s talk details. First, make sure to squeeze the pumpkin mixture firmly into the muffin tin. This ensures they hold their cute little bite shape once baked. And seriously, resist the urge to pop them out of the tin too soon. Letting them cool for about 5 to 10 minutes is like letting them gather their strength to hold together.
As for storage, these bites are best enjoyed fresh, but if you have leftovers (unlikely!), pop them in an airtight container in the fridge. Reheat them in the oven to retain that crisp factor.
Make It Your Own
- Swap feta for goat cheese if you’re feeling fancy and want a tangy kick.
- Looking for a veggie boost? Add some finely chopped spinach or kale to the mix.
- For a meatier option, toss in some cooked bacon bits or pepperoni.
- If you’re not a fan of pumpkin, butternut squash is a fantastic alternative.
If you try this, I’d love to hear how it turns out — drop a comment or tag me! Can’t wait to see your pumpkin pizza bite creations. Enjoy every cheesy, pumpkin-y bite!
Related update: Pizza bites with pumpkin
Related update: Bing's Mango Salsa

I was standing in my kitchen one chilly October morning, staring at a basket of apples and pears I’d picked up from the farmer’s market the day before. You know those mornings when the air is crisp, and everything feels just a little bit cozier? That’s when it hit me: a warm, spiced fruit compote that could double as a breakfast topping or a dessert treat was exactly what I needed. This Fall Fruit Compote is the kind of recipe that fills your kitchen with the scent of cinnamon and makes you feel like you’re swaddled in a warm blanket. It’s quick to whip up, requires only a few staple ingredients, and the result is pure comfort.
Jump to Recipe
What You’ll Need
The beauty of this recipe is its simplicity — you probably have most of these items on hand already. Here’s what you’ll need to get that cozy feeling wafting through your kitchen:
- 2 tablespoons butter
- 2 cups diced honeycrisp apples
- 2 cups diced pears
- 1/2 cup dried cherries
- 1/4 cup apple cider vinegar
- 1/2 cup apple juice, plus more as needed
- 1/3 cup brown sugar
- 1 cinnamon stick
How to Make Fall Fruit Compote
- Melt the butter in a medium saucepan over high heat. As it melts, breathe in that nutty aroma — that’s your first sign of deliciousness to come.
- Add the diced honeycrisp apples, diced pears, dried cherries, apple cider vinegar, apple juice, brown sugar, and the cinnamon stick. Your kitchen will start smelling like a fall wonderland. Stir everything well.
- Cook for about 5 minutes, letting the fruit soften slightly and the flavors mingle together. You want the liquid to begin bubbling up around the edges.
- Lower the heat to medium and continue to cook for a few more minutes. Keep stirring occasionally until the fruit is tender and the liquid has mostly evaporated. If it seems like the fruit might stick, add a little more apple juice to keep everything cozy and moist.
Cook’s Notes
Let’s talk about a few things that can make or break your compote. First, the type of apple matters — honeycrisps are perfect here for their sweet-tart flavor and firm texture. If you don’t have dried cherries, dried cranberries can step in as a worthy substitute. Remember, the compote will thicken as it cools, so don’t fret if it seems a bit saucy when you take it off the heat. If you’re planning ahead, you can make this compote up to a week in advance and just store it in an airtight container in the fridge. When you’re ready to serve, a gentle reheat on the stove will do the trick. And hey, it’s not just for potato latkes; try it over pancakes, waffles, or even vanilla ice cream!
Make It Your Own
Here are some fun ways to tweak this compote and make it yours:
- Swap the dried cherries for golden raisins for a different layer of sweetness.
- Substitute the apple cider vinegar with balsamic vinegar for a deeper, richer flavor profile.
- Add a splash of bourbon or rum just before serving for a boozy warmth.
- Throw in a handful of chopped walnuts or pecans for a bit of crunch and nutty warmth.
If you try this, I’d love to hear how it turns out — drop a comment or tag me! Your kitchen is about to smell amazing, and I can’t wait for you to experience it. Enjoy every warm, sweet, and spicy bite!
Related update: Fall Fruit Compote
Related update: Broccoli Oatmeal Breakfast Casserole
Related update: Easy Homemade Apple Fritters
Related update: Béarnaise Sauce
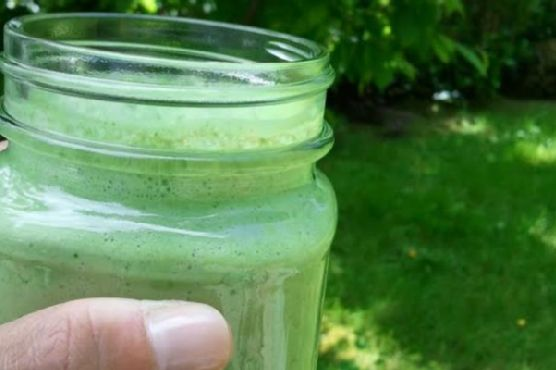
It was one of those mornings where hitting the snooze button was more tempting than ever. The kind of morning where a little pick-me-up is not just a want but a necessity. As I shuffled into the kitchen, I thought about something quick, healthy, and invigorating. Enter the Skinny Green Monster Smoothie. It’s like a jolt of energy in a glass, and it comes together in minutes. Trust me, this smoothie is both a morning lifesaver and a delightful way to sneak in those greens without sacrificing flavor. Just one sip, and you’ll be hooked—it’s the kind of recipe that keeps you coming back, not just for the taste, but for how it makes you feel: ready to tackle anything the day throws at you.
Jump to Recipe
What You’ll Need
I’ve gathered a list of ingredients that are both simple and likely already in your kitchen, so you can whip this up without a special trip to the grocery store. Here’s what you need:
- Frozen banana – it makes the smoothie creamy and naturally sweet.
- Baby spinach – don’t worry, you won’t even taste it!
- Peanut butter – adds a delicious richness and nutty flavor.
- Unsweetened vanilla almond milk – keeps it light and dairy-free.
- Fat-free plain Greek yogurt – for that extra creaminess and a protein boost.
How to Make Skinny Green Monster Smoothie
- Start by placing the frozen banana in your blender. It’s best to break it into chunks so it blends smoothly.
- Add a generous handful of baby spinach. Don’t worry—it’ll blend in seamlessly, giving you all the green goodness without overpowering the taste.
- Spoon in the peanut butter. This is where the magic happens as it brings richness and a subtle sweetness to the mix.
- Pour in the unsweetened vanilla almond milk. This will help everything blend together and give the smoothie a lovely vanilla hint.
- Add the fat-free plain Greek yogurt for an extra creamy texture. This also ups the protein quotient, making the smoothie more filling.
- Blend everything on high until it’s completely smooth and creamy. You should see a beautiful green hue and a velvety texture. If needed, scrape down the sides and blend again.
- Taste and adjust if necessary. Need it a bit sweeter? Add a touch more banana or a splash of honey. Too thick? A little more almond milk will do the trick.
Cook’s Notes
There’s not much that can go wrong with this smoothie, but here are a few pointers to keep it perfect every time. If your blender is having trouble with the frozen banana, let it thaw for a few minutes before blending. This smoothie is best enjoyed fresh, but you can refrigerate leftovers for up to a day. Just give it a good shake or stir before drinking. If you prefer it colder, throw in a few ice cubes before blending, but keep in mind this might dilute the flavors slightly.
Make It Your Own
There are plenty of ways to tweak this smoothie to suit your taste:
- Swap the peanut butter for almond or cashew butter if you’re feeling adventurous.
- Use coconut milk instead of almond milk for a tropical twist.
- Add a scoop of your favorite protein powder to make it a post-workout powerhouse.
- For a berry boost, toss in a handful of frozen blueberries or strawberries.
If you try this, I’d love to hear how it turns out—drop a comment or tag me! Whether you’re rushing out the door or lounging with a good book, this smoothie is a perfect companion. Enjoy and embrace your inner green monster! 🥤💚
Related update: Skinny Green Monster Smoothie
Related update: Easy Cheesy Pizza Casserole
Related update: Banana Milo Milkshake

Picture this: It’s a chilly fall evening, and my kitchen still smells like the remnants of the apple pie I baked last weekend. I’m standing in front of the pantry, craving something that’s both cozy and a little unexpected. Ever had those moments where you stare at the ingredients you have and think, “This could either be a disaster or magic”? That was me a few weeks ago, reaching for an acorn squash, some curry powder, and a bottle of maple syrup that I had been saving for pancake Sundays. What came out of that experimental whirlwind was a dish that’s not only delicious but also has become my go-to when I need to impress with minimal effort. It’s sweet, spicy, and roasted to perfection—ideal for spicing up a weeknight or wowing guests without breaking a sweat.
Jump to Recipe
What You’ll Need
This recipe is delightfully simple, and chances are you already have most of these on hand. Here’s what you’ll need:
- Acorn squash – pick one that’s firm and heavy for its size.
- Curry powder – this is where the magic happens, so use your favorite blend.
- Maple syrup – pure, not the pancake kind, for that rich, caramelized finish.
- Olive oil – for that perfect roast.
- Salt – to taste and to enhance all those flavors.
How to Make Maple & Curry Acorn Squash
- Preheat your oven to 400°F (200°C) and line a baking sheet with parchment paper or a silicone mat. This makes cleanup a breeze and prevents any sticky situations.
- Give the acorn squash a good rinse, especially if you plan to eat the skin (which, trust me, you’ll want to after it’s all roasted and crispy).
- Carefully, chop the squash in half and scoop out the seeds. You can use a spoon or an ice cream scoop for this—whichever feels less like wrestling and more like a gentle sweep.
- Slice the squash into one-inch wedges, using the natural grooves as your guide. Not only does this make the pieces look pretty, but it also ensures even cooking.
- In a medium bowl, toss the squash wedges with curry powder, maple syrup, olive oil, and salt. Stir until each piece is glistening with the mixture, and you’re tempted to lick your fingers.
- Arrange the wedges on the prepared baking sheet, cut side down. This helps them get that beautiful golden-brown finish on the edges.
- Bake for 15 minutes, then flip them over with a spatula so both sides get equal love and attention. Bake for another 10 to 15 minutes until they’re tender and can be easily pierced with a fork.
Cook’s Notes
When it comes to choosing the right acorn squash, look for one that feels heavy for its size and has a deep green skin. A few orange patches are okay and can even be a sign of ripeness. If you’re prepping ahead, you can slice the squash a day in advance and keep it in the fridge. Once roasted, these wedges keep well covered in the fridge for up to three days. Just pop them in the oven to reheat and crisp them back up. Be cautious not to over-bake; the squash should be tender but not mushy, and the edges should be caramelized but not burnt.
Make It Your Own
- Switch up the squash: Don’t have acorn squash? Butternut or delicata squash work beautifully too.
- Spice it up: Add a pinch of cayenne pepper to the mix for a spicy kick.
- Play with herbs: Sprinkle some fresh rosemary or thyme over the top before baking for an aromatic twist.
- Sweeten the deal: Drizzle a bit more maple syrup on top right before serving for an extra glossy finish.
If you try this, I’d love to hear how it turns out — drop a comment or tag me! Seriously, nothing makes my day more than seeing someone else enjoy something I whipped up in my kitchen. Happy cooking, and remember, kitchen experiments are just recipes in disguise!
Related update: Maple & Curry Acorn Squash
Related update: Pizza bites with pumpkin

So, there I was last Tuesday, staring into the fridge, wondering what to make for dinner that wouldn’t take an eternity. You know those days when all you want is something delicious but quick enough that you won’t be stuck in the kitchen all night? Enter: Eggplant pizzette. It’s that magical intersection of pizza cravings and veggie goodness. Plus, it’s one of those recipes that looks fancy enough to impress but is secretly super simple to throw together. Trust me, once you smell that cheese bubbling away, you’re going to thank yourself for making these little guys.
Jump to Recipe
What You’ll Need
Let’s talk about the ingredient list — it’s mercifully short and sweet. Chances are, you already have most of this at home, especially if you’re a basil hoarder like me.
- Round eggplant – the base for our pizzette
- Tomatoes – fresh or canned, your choice!
- Swiss cheese – for that perfect melty goodness
- Fresh basil leaves
- Oregano leaves
- Olive oil
How to Make Eggplant pizzette
- Preheat your oven to 230°C. Trust me, getting this right from the start saves you from impatiently watching the oven later.
- Grab your round eggplant and slice it into rounds, about half an inch thick. You want them thin enough to cook quickly but thick enough to hold all that topping.
- Place the eggplant rounds on a non-stick pan greased with olive oil. A light coating will do; no one wants oily pizzette.
- Bake the eggplant in the oven for about 10 minutes. You’ll know it’s ready for the next step when the edges start looking golden and slightly crispy.
- Carefully remove the pan from the oven — the eggplant stays, so it keeps warm and toasty.
- Spoon a generous amount of chopped tomatoes onto each eggplant round. If you’re using canned, make sure they’re well-drained to avoid sogginess.
- Sprinkle fresh basil and oregano leaves over the tomatoes. The aroma will start to hit you about now, and it’s divine.
- Top everything with grated Swiss cheese. Go ahead and be generous here; a good layer ensures that melty, bubbly finish.
- Pop the pan back in the oven for another 5 minutes. Keep an eye out — you want that cheese to turn a lovely golden brown.
- Remove from the oven and let them cool for a minute or two. These are fab served warm or even cooled down a bit as a snack.
Cook’s Notes
Alright, a few things to keep in mind. First, if you slice the eggplant too thin, it might turn into a mushy mess, so aim for that half-inch thickness. If you’re worried about bitterness, sprinkle a bit of salt on the eggplant slices and let them sit for 10 minutes before rinsing and patting dry. Also, feel free to adjust the herbs based on what you have—dried oregano works if fresh isn’t available. These pizzette can be stored in the fridge for up to two days, though they’re best enjoyed fresh.
Make It Your Own
Want to switch things up? Here are some ideas:
- Swap the Swiss cheese for mozzarella for a more classic pizza flavor.
- Add a layer of pesto under the tomatoes for an herbaceous kick.
- Use zucchini slices instead of eggplant if you prefer a different base.
- Try adding thin slices of pepperoni or mushrooms for extra toppings.
If you try this, I’d love to hear how it turns out — drop a comment or tag me! Happy cooking, and may your kitchen adventures be as tasty as they are fun!
Related update: Eggplant pizzette
Related update: Maple & Curry Acorn Squash

Last Tuesday was one of those days. You know the kind—when work drags, the laundry pile is a mountain, and the fridge looks like a post-apocalyptic wasteland. I needed something quick, fresh, and healthy, but my brain was too fried to concoct anything elaborate. As I rummaged through the crisper drawer, I found some vibrant swiss chard and an orange cauliflower that had somehow survived the week. With a handful of other ingredients, I whipped up some Swiss Chard Wraps. They were the perfect antidote to a hectic day: simple, fresh, and surprisingly satisfying. Plus, they look as good as they taste, which is always a bonus when you’re trying to convince your family (or yourself) to eat more greens.
Jump to Recipe
What You’ll Need
Chances are you already have most of this, but there are a few stars that make all the difference.
- Dried swiss chard leaves
- Orange cauliflower (it’s just a bit sweeter and cuter)
- Olive oil
- Garlic
- Salt
- Fresh basil
- Zucchini
- Red bell pepper
- Avocado
- Trader Joe’s spicy peanut vinaigrette
How to Make Swiss Chard Wraps
- Begin by chopping off the stems of the swiss chard right where they meet the leaf. I like to leave a bit of stem for extra crunch and structure, but feel free to stem them entirely if that’s your jam.
- Chop the cauliflower into small bits and toss them into a food processor. Give it a few pulses until it resembles rice. Yes, even the stalks!
- Heat up some olive oil in a sauté pan over medium-high heat. Once it’s shimmering, add the garlic and let it sizzle for a minute or two, until you can smell its toasty aroma.
- Add the cauliflower rice to the pan. Cook it for about 2-3 minutes until it turns a bright, cheerful orange. Stir in a pinch of salt and some chopped basil, letting the flavors mingle.
- Spiralize the zucchini using Blade B to make noodles. No spiralizer? No problem—use a vegetable peeler to create ribbons.
- To assemble, lay a swiss chard leaf flat. Pile on a bit of the sautéd cauliflower, zucchini noodles, slices of red bell pepper, and creamy avocado along the stalk.
- Drizzle some spicy peanut vinaigrette over everything (don’t be shy!) and wrap it all up snugly.
Cook’s Notes
Here’s the thing with these wraps: they really shine fresh. The swiss chard will wilt if you let it sit too long, so try to make just what you’ll eat in one go. However, if you find yourself with leftovers, pop them in an airtight container and store them in the fridge. They’ll last a day or two, but the flavors will meld and mellow a bit.
- Make the cauliflower rice a day ahead if you’re in a time crunch!
- If you’re not into raw red bell peppers, give them a quick sauté with the cauliflower rice to soften them up.
- Be generous with the vinaigrette; it’s the secret sauce that ties everything together.
Make It Your Own
- Swap the avocado: If you’re not an avocado fan, try hummus or a dollop of Greek yogurt for creaminess.
- Spice it up: Add some sliced jalapeños or a sprinkle of chili flakes to give your wraps a kick.
- Change up the greens: If you can’t find swiss chard, collard greens or large kale leaves work as excellent substitutes.
- Protein punch: Add grilled chicken, tofu, or shrimp for a more filling meal.
If you try this, I’d love to hear how it turns out—drop a comment or tag me on social media! Your kitchen adventures always brighten my day, and who knows? You might inspire the next variation. Enjoy your leafy, crunchy bites of happiness!
Related update: Southern 7 Layer Salad in a Mason Jar

It was one of those sticky summer afternoons when the air conditioner just couldn’t keep up, and I found myself craving something cool and refreshing. I’d been eyeing the basil plants on my kitchen windowsill, their leaves lush and inviting, and it hit me — basil coconut ice cream. It’s a little unusual, sure, but that’s part of its charm. This recipe is perfect when you’re in the mood for something a bit different yet incredibly easy to whip up. If you’re ready for a creamy, herby delight that tastes like a tropical breeze, you’re in the right place.
Jump to Recipe
What You’ll Need
The best part? You probably already have most of these ingredients in your kitchen. Just a few stars of the show to gather up, and you’re all set for a culinary adventure.
- Fresh basil leaves
- Canned full-fat coconut milk
- Honey
- Half & half
- Salt
How to Make Basil Coconut Ice Cream
- Start by heating the coconut milk and half & half in a saucepan over medium-high heat until it’s hot and just beginning to bubble gently. You’ll want to catch it right before a full boil.
- Add in the honey and a pinch of salt, stirring until they dissolve completely, giving the mixture a lovely sweet-salty balance.
- Drop in the fresh basil leaves and stir them through until they wilt down, infusing the liquid with their aromatic goodness. Remove the saucepan from heat.
- Pour the mixture into a blender, and blend until it’s silky smooth and no chunks of basil remain. If your blender leaves bits, strain the mixture through a fine sieve.
- Let the basil-infused cream cool for about 20 minutes, allowing the flavors to deepen.
- Transfer the mixture to a large container, cover, and chill it in the fridge for a few hours until completely cool.
- If you have an ice cream maker, follow your machine’s instructions to churn the mixture. If not, pour it into a freezer-safe container, and stir it every hour for about 8-10 hours to achieve the best texture possible.
Cook’s Notes
Making ice cream at home is as much about patience as it is about flavor. If you can, use fresh basil for the most vibrant taste. You can make the base a day ahead and chill it overnight, which can deepen the flavors even more. When it comes to leftovers, freeze them in a tightly sealed container. Just remember, the ice cream will harden significantly, so let it sit out for 10 minutes before scooping.
- If you don’t have an ice cream maker, don’t fret! While the texture won’t be as smooth, frequent stirring during the freezing phase will help prevent too many ice crystals from forming.
Make It Your Own
- Swap out the basil for mint leaves if you’re craving a more classic flavor combo.
- For a richer taste, replace half of the half & half with heavy cream.
- Substitute honey with maple syrup for a deeper, earthier sweetness.
- If you’re feeling adventurous, toss in a handful of dark chocolate chips during the churning process for a hint of bitterness against the sweetness.
If you try this, I’d love to hear how it turns out — drop a comment or tag me! Whether you’re enjoying it in the heat of summer or dreaming of warmer days, this basil coconut ice cream is sure to be a hit. Enjoy every refreshing scoop!
Related update: Basil Coconut Ice Cream

I was knee-deep in a midwinter slump, the kind where you just crave a burst of sunshine, when I stumbled upon this idea: Braid sweet citrus-flavored licorice. It’s a bit of a departure from your typical licorice, and honestly, it’s more of a pastry with a playful twist. Picture this: a light, flaky puff pastry with a zesty citrus glaze that dances on your taste buds. Perfect for those days when you need a little joy but aren’t in the mood for anything too fussy or time-consuming.
One of the best things about this recipe is its versatility. It’s a delightful treat that can play the part of a breakfast snack, a tea-time companion, or the unexpected star of a dessert platter. The secret weapon here is the citrus glaze, which brings this pastry to life with a sweet-tart zing. If you’ve got some puff pastry lingering in the freezer and a stash of citrus in the fruit bowl, you’re basically halfway there.
Jump to Recipe
What You’ll Need
Chances are you already have most of this sitting in your kitchen. Let’s keep it simple, shall we?
- Puff pastry Buitoni – the flaky base of our braids
- Fresh cream – to add richness to the glaze
- Grand cru muscovado sugar – for that deep, molasses-like sweetness
- Lemon – zest and juice will do wonders here
- Lime – for that extra citrus punch
- Orange – more zest, more flavor
How to Make Braid Sweet Citrus Flavored Licorice
- Roll out the puff pastry and use a sharp knife to etch designs of strips about 10 cm high and 1 cm wide. Precision isn’t key here, just have fun with it.
- Gently twist each strip on itself. It doesn’t have to be perfect; the twists will bake into beautiful, rustic braids.
- Place the twisted strips spaced apart on a sheet of parchment paper. This prevents them from sticking together as they bake.
- Bake in a preheated oven at 200°C for about 12 minutes, or until they’re golden brown and your kitchen smells like heaven.
- While the braids cool on a wire rack, zest your citrus fruits, and set the zest aside.
- Juice the lime, half of the orange, and half of the lemon. Boil the juices until you reduce it down to about two tablespoons of liquid.
- Remove from heat and stir in the cream and brown sugar until it’s well mixed and dreamy.
- Let the glaze cool until it thickens, then brush it generously over the cooled braids.
- Sprinkle the reserved citrus zest over the glazed braids while they’re still a bit wet to ensure it sticks well.
- Allow the glaze to dry on the wire rack until it hardens slightly. Then, go ahead and devour them!
Cook’s Notes
Don’t stress if your twists aren’t perfect—imperfections add character! Make sure to space them well on the parchment paper to allow for expansion. If your glaze seems too runny, let it cool a bit more; it thickens as it cools. Want to save time? You can make the glaze ahead of time and refrigerate it for up to two days. Just warm it slightly before using. Leftovers can be stored in an airtight container for a couple of days, but honestly, they probably won’t last that long.
Make It Your Own
- Try using blood orange instead of the regular orange for a more intense flavor and color.
- Add a splash of vanilla extract to the glaze for a warm, comforting undertone.
- For a spiced twist, sprinkle a little ground cardamom in with your citrus zest.
- If you’re feeling adventurous, drizzle a bit of melted white chocolate over the top once the glaze has set.
If you try this, I’d love to hear how it turns out—drop a comment or tag me! Enjoy the bright and citrusy vibes these braids bring, no matter what the weather outside is doing. Happy baking!
Related update: Braid sweet citrus flavored licorice
Related update: Basil Coconut Ice Cream
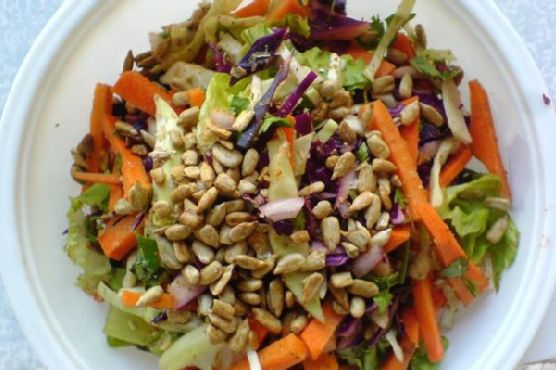
So there I was, standing in the kitchen, mid-week with a craving for something fresh yet satisfying. I’d just finished a long day of work, and the idea of a heavy meal felt like too much. My fridge had the usual suspects: a couple of carrots and half a cabbage from my last attempt at being super healthy. That’s when I remembered this Carrot and Cabbage Salad With Coriander+cumin Dry Rub. It’s one of those recipes that’s surprisingly easy and hits that magical spot between simplicity and flavor explosion. The combination of earthy spices and crunchy vegetables makes it refreshing and comforting at the same time. And the best part? It’s perfect for when you need to throw something together quickly but still feel like a kitchen wizard.
Jump to Recipe
What You’ll Need
You’re in luck because this ingredient list is all about basics that pack a punch. Chances are you already have most of this hanging out in your pantry and fridge.
- Carrots
- Green cabbage
- Red cabbage
- Cumin seed powder
- Ground coriander
- Fresh coriander
- Lime juice
- Olive oil
- Sunflower seeds
How to Make Carrot and Cabbage Salad With Coriander+cumin Dry Rub
- Start by chopping up the carrots and both the green and red cabbage into thin slivers. Aim for uniformity here so every bite is a perfect mix.
- In a large bowl, add the chopped veggies, then sprinkle in the ground coriander and cumin seed powder.
- Pour in the lime juice and olive oil. Now, roll up your sleeves and massage the spices into the veggies. You’ll know you’re done when everything’s lightly coated and you can smell the spices waking up.
- Finish by tossing in the fresh coriander and sunflower seeds. Give it a final stir to distribute these goodies evenly.
- Let the salad sit for a couple of hours. This waiting game is crucial for the spices to seep into the veggies, enriching the flavors.
Cook’s Notes
Don’t skip the resting period. This gives the spices a chance to penetrate the veggies, making them more flavorful. If you’re planning ahead, you can even prepare this salad the day before and let it sit in the fridge overnight. Just give it a quick toss before serving. Leftovers hold up surprisingly well too, so pack some for lunch the next day!
- Be sure to chop the vegetables evenly to ensure each bite is well-balanced.
- Feel free to adjust the lime juice to taste. More lime will give it a zestier kick!
Make It Your Own
- Switch out the sunflower seeds for pumpkin seeds for a different crunch.
- Add thinly sliced red onion or scallions for an extra layer of flavor.
- Replace the olive oil with avocado oil for a different, slightly nuttier taste.
- If you prefer a bit of heat, toss in some thinly sliced chili or a pinch of chili flakes.
If you try this, I’d love to hear how it turns out — drop a comment or tag me! Your variations and tweaks are always inspiring, and who knows, you might come up with the next favorite twist on this dish! 🌿🥕
Related update: Carrot and Cabbage Salad With Coriander+cumin Dry Rub