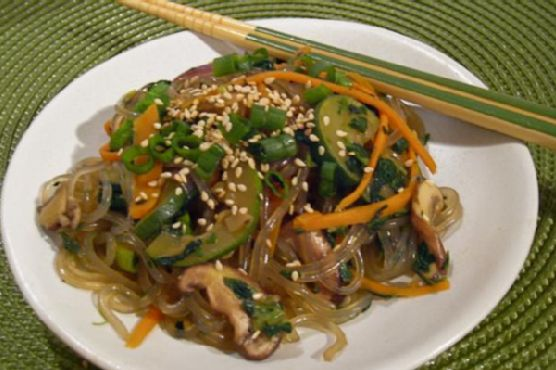
Chapchae (Korean Stir-Fried Noodles)
Intro
Chapchae, or Korean stir-fried noodles, has always been a beloved dish in our family. I remember as a child, watching my grandmother expertly toss the noodles with colorful vegetables in her large wok, the aroma of sesame oil and soy sauce filling the kitchen. It was a dish we often enjoyed during family gatherings and special occasions, a symbol of celebration and togetherness. The combination of sweet potato vermicelli noodles, fresh vegetables, and savory flavors makes it a comforting and satisfying meal. Whether you’re new to Korean cuisine or a seasoned enthusiast, Chapchae is sure to become a favorite in your household as well.
Why You’ll Love It
This Chapchae recipe is not only delicious but also incredibly versatile. It’s a perfect balance of sweet and savory, with a delightful mix of textures from the chewy noodles and crisp-tender vegetables. You’ll love how easy it is to customize with your favorite vegetables or protein, making it adaptable to your taste preferences and dietary needs. Plus, it’s a fantastic make-ahead dish that tastes even better the next day as the flavors meld together.
Ingredients
- 200g sweet potato vermicelli noodles
- 1 sweet onion, thinly sliced
- 2 cloves garlic, minced
- 2 cups baby spinach
- 1 carrot, julienned
- 2 scallions, sliced
- 1 cup mushrooms, sliced
- 1 zucchini, julienned
- 2 tablespoons olive oil
- 2 tablespoons sesame oil, divided
- 3 tablespoons soy sauce
- 1 tablespoon sugar
- Salt, to taste
Instructions
- Cook the sweet potato vermicelli noodles according to the package directions. Drain and set aside.
- In a large pan or wok over medium heat, heat the olive oil and 1 tablespoon of sesame oil.
- Add the onion slices and minced garlic, sautéing for about 1 minute until fragrant.
- Add the rest of the vegetables: spinach, carrots, scallions, mushrooms, and zucchini. Cook for 4-5 minutes, until the vegetables are half-cooked and still a bit crispy.
- Turn the heat to low and add the cooked noodles, soy sauce, sugar, and the remaining sesame oil to the pan.
- Mix everything to combine and cook for another 2 minutes, allowing the flavors to meld.
- Season with salt or more soy sauce if needed. If you prefer a slightly sweeter taste, add a touch more sugar.
- If using sesame seeds, sprinkle them on top just before serving.
Tips
To ensure your Chapchae is a success, here are a few tips:
- Use high-quality sesame oil and soy sauce for the best flavor.
- Don’t overcook the vegetables; they should remain slightly crisp for the best texture.
- If you’re adding protein, such as beef or chicken, cook it separately before adding it to the noodles.
- For an authentic touch, garnish with sesame seeds and a sprinkle of sliced red chili for a bit of heat.
Variations & Substitutions
Chapchae is highly adaptable, so feel free to make it your own:
- Vegetables: Use any vegetables you have on hand, such as bell peppers, broccoli, or bok choy.
- Protein: Add beef, chicken, or tofu for extra protein. Simply cook it separately before mixing it with the noodles.
- Sauce: For a gluten-free version, use tamari instead of soy sauce. You can also add a splash of rice vinegar for a tangy twist.
Storage
Chapchae can be stored in an airtight container in the refrigerator for up to 3 days. To reheat, simply warm it in a pan over medium heat, adding a splash of water or soy sauce if needed to prevent sticking. It’s an excellent option for meal prep, as the flavors continue to develop over time.
FAQ
Can I make Chapchae ahead of time?
Absolutely! Chapchae is a fantastic make-ahead dish. Prepare it up to a day in advance and store it in the refrigerator. Reheat gently before serving, and enjoy the enhanced flavors.
What can I serve with Chapchae?
Chapchae can be a standalone dish, but it also pairs well with other Korean dishes like kimchi, Korean BBQ, or a simple side salad. It’s versatile enough to complement a variety of meals.
Nutrition
Chapchae is a nutritious dish rich in fiber from the vegetables and sweet potato noodles. It’s naturally gluten-free when using gluten-free soy sauce and can be easily adapted to be vegan or vegetarian. The sesame and olive oils provide healthy fats, making it a well-rounded meal.
Conclusion
Chapchae is a delightful dish that brings a taste of Korean cuisine to your table. With its colorful array of vegetables and the unique texture of sweet potato noodles, it’s sure to impress family and friends alike. Whether you’re making it for a special occasion or a simple weeknight dinner, Chapchae is a versatile and delicious option. Give this recipe a try, and let it become a cherished part of your culinary repertoire, just as it has in mine.
Related update: Chapchae (Korean Stir-Fried Noodles)
Related update: A Post Thanksgiving “sopa De Tortilla”
Related update: Flemish Style Asparagus Side Dish