
Picture this: it’s a lazy Sunday morning, and the sunlight is peeking through the kitchen window just enough to gently nudge me from my cozy corner on the couch. That’s when the craving hits—something vibrant and refreshing yet comforting to kickstart the day. Enter Lemon Scented Polenta Pancakes with Blueberry Thyme Syrup. This whimsical twist on the classic pancake is my answer to those mornings where you need a dish that feels special but isn’t a hassle to whip up. With the zing of lemon and the earthy sweetness of blueberry thyme syrup, this dish is an absolute keeper. It’s just fancy enough to impress anyone who stumbles into your kitchen but easy enough to make you wonder why you don’t do this every weekend.
Jump to Recipe
What You’ll Need
This recipe is one of those magical ones where you probably have most of the stuff lounging in your pantry, waiting to be turned into something fabulous. Here’s what you’ll need:
- All-purpose flour
- Baking powder
- Fresh blueberries
- Butter
- Cornmeal
- Egg
- Fresh thyme
- Honey
- Lemon zest
- Maple syrup
- Milk
- Salt
- Vanilla extract
- Water
How to Make Lemon Scented Polenta Pancakes with Blueberry Thyme Syrup
- Start by making the syrup. Combine the syrup ingredients: blueberries, maple syrup, and thyme sprigs in a small saucepan. Bring this mixture to a gentle boil. Once boiling, reduce the heat and let it simmer. The blueberries will soften and the thyme will infuse its earthy aroma. Remember to remove the thyme sprigs just before serving.
- For the pancakes, grab a medium saucepan and combine the cornmeal with cold water. Bring this to a boil, whisking constantly so it’s smooth and not lumpy. Reduce the heat and let it simmer until thickened, about 4 to 5 minutes. It should have the consistency of a thick porridge.
- In a small bowl, whisk together the milk, egg, honey, and a splash of vanilla extract. Add this to the thickened cornmeal, transforming it into a creamy polenta custard.
- In your largest mixing bowl, whisk together the all-purpose flour, baking powder, salt, and lemon zest. Make a well in the center of the dry ingredients and pour your polenta custard into the middle. Stir until everything is just combined; over-mixing is a no-go!
- Heat up a large griddle or non-stick pan and give it a good brush of butter. Ladle enough batter onto the griddle for 4-inch pancakes. If the batter seems too thick, a splash more milk will help it along.
- Cook the pancakes over moderate heat until bubbles form on the surface and the edges look a touch dry. This is your cue to flip them. Cook until the other side is beautifully golden and the pancakes have a little puff to them, about 2 minutes more.
- Transfer these golden beauties to warm plates and repeat with the remaining batter. Drench them in the warm blueberry syrup, and you’re set for a morning of deliciousness.
Cook’s Notes
Let’s talk about a few things to keep in mind as you embark on this pancake adventure. First, the syrup is the star—don’t skimp on the thyme unless you’re not a fan of its unique flavor! This syrup can be stored in an airtight container in the fridge for up to a week and reheated gently on the stove. As for the pancakes, if you’ve got leftovers (which is doubtful), they freeze well. Layer parchment paper between them and pop them in a zip-top bag for freezer storage. Defrost in the toaster on a low setting for a quick breakfast. Also, if you’re making these ahead of time, keep them warm in a low oven while you finish up the batch.
Make It Your Own
This recipe is wonderful as is, but who doesn’t love a little culinary improvisation? Here are a few ideas to make these pancakes truly yours:
- Swap the blueberries for raspberries or blackberries if that’s what you have on hand or prefer.
- Add a tablespoon of poppy seeds to the pancake batter for a delightful crunch that complements the lemon zest.
- If you’re dairy-free, use almond milk and vegan butter without sacrificing any of the flavor.
- For a nutty twist, replace half of the cornmeal with almond flour.
If you try this, I’d love to hear how it turns out—drop a comment or tag me! There’s nothing quite like seeing your creations and hearing how these pancakes brightened your day. Enjoy, my friends!
Related update: Lemon Scented Polenta Pancakes with Blueberry Thyme Syrup
Related update: Superbowl Chili
Related update: Baked Apple Pancake

Last Tuesday, I found myself staring at a lonely cabbage and some tomatoes in my fridge, wondering how I was going to transform these humble ingredients into something more exciting than their usual salad gig. I was craving something warm, comforting, and surprisingly quick because, you know, not all weeknight dinners should feel like a marathon. That’s when I remembered my fail-safe stir fry trick. This Stir Fried Cabbage and Tomatoes dish is like a warm hug on a chilly day — it’s savory, a touch sweet, and comes together faster than you can decide what to watch on Netflix. Trust me, this is the kind of dish that makes you look like you’ve got your life together, even if it’s just dinner.
Jump to Recipe
What You’ll Need
Gathering ingredients for this recipe is almost as easy as making it. Most of them are probably sitting quietly in your kitchen, waiting for their moment to shine.
- Beijing cabbage – coarsely shredded
- Diced tomatoes – as fresh as you can get
- Gloves garlic – because garlic is life
- Salt
- Sugar
- Ketchup – yes, the condiment extraordinaire
- Water
How to Make Stir Fried Cabbage and Tomatoes
- Start by giving your cabbage a good rinse and then coarsely shred it. You want the pieces to be bite-sized but not too tiny, allowing them to retain a slight crunch.
- Dice your tomatoes. The juicier, the better, as they’ll add a wonderful freshness to the dish.
- Heat a wok over medium-high heat, adding a splash of oil. When the oil shimmers, toss in the garlic. Sauté until golden and fragrant, about 30 seconds. Your kitchen should smell amazing already!
- Throw in the shredded cabbage. Stir-fry until it begins to soften. If it looks a bit dry, don’t hesitate to add a tablespoon or two of water to help it along.
- Now, add your diced tomatoes along with a pinch of salt, a dash of sugar, and a nice squirt of ketchup for that umami-rich depth. Pour in 2-3 tablespoons of water to create a light sauce.
- Stir everything together until well combined. The mixture should be juicy but not soupy. Cook until the tomatoes have broken down slightly and everything is melded together. This is when you taste and adjust seasoning if needed.
- Serve immediately. Your stir fry should be vibrant and steaming hot.
Cook’s Notes
This dish is all about balance. The sugar helps offset the acidity of the tomatoes and ketchup, so don’t skip it. If your cabbage feels too crunchy, just add a touch more water and give it a few more minutes — patience is key.
- This stir fry doesn’t hold up beautifully as leftovers, so try to enjoy it fresh. But if you do have some left, store it in an airtight container in the fridge and reheat gently.
- If you’re planning a dinner party, you can prep the cabbage and tomatoes ahead of time. Just keep them in separate containers in the fridge until you’re ready to cook.
Make It Your Own
- Add protein: Toss in some sliced chicken or crispy tofu for a heartier version.
- Switch up the veggies: Bell peppers or shredded carrots would be a lovely addition for some color and sweetness.
- Spice it up: Introduce a bit of heat with a sliced chili or a dash of hot sauce if you like things spicy.
- Herb it up: Finish with fresh cilantro or basil for an aromatic lift.
If you try this, I’d love to hear how it turns out — drop a comment or tag me! Cooking is all about experimenting and having fun, so make this stir fry your own and enjoy every bite.
Related update: Stir Fried Cabbage and Tomatoes
Related update: Tomato Cutlets
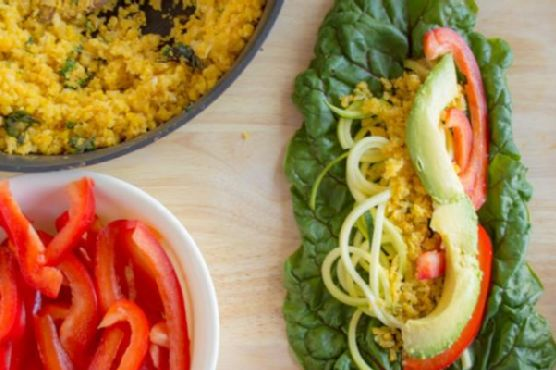
So, the other day, I found myself staring at a lonely bunch of swiss chard in my fridge. You know that moment when you think, “I really should use up those greens before they wilt and vanish into the abyss”? Well, that was me. I wanted something fresh, colorful, and honestly, something quick because who has time on a Tuesday night? Enter, my Swiss Chard Wraps. They’re light, vibrant, and let’s be real, they’re just so satisfying to munch on. These wraps are perfect for those nights when you’re craving something fresh but comforting. Plus, they can totally impress your dinner guests without you breaking a sweat.
Jump to Recipe
What You’ll Need
Most of these ingredients are probably chilling in your kitchen right now — no wild goose chase required. Here’s what you need:
- Dried swiss chard leaves
- Orange cauliflower
- Olive oil
- Garlic
- Salt
- Fresh basil
- Zucchini
- Red bell pepper
- Avocado
- Trader Joe’s spicy peanut vinaigrette
How to Make Swiss Chard Wraps
- First things first, chop off the stems of the swiss chard where they meet the leaf. If you’re feeling adventurous, leave a bit of stem for that extra crunch and structure.
- Take your orange cauliflower, chop it up into small pieces and pulse in a food processor until it resembles rice. Trust me, this orange beauty gives the wraps a gorgeous color and subtle sweetness.
- Heat some olive oil in a sauté pan over medium-high heat. When the oil is shimmering, toss in the garlic. Let it sizzle for a minute or two, releasing that heavenly aroma, until it starts to brown.
- Add the cauliflower rice to the pan. Stir for about 2-3 minutes until it softens and takes on an even more vibrant yellow-orange hue. Season it with a pinch of salt and some fresh basil. Stir it around a bit more so all those flavors mingle.
- Now, spiralize the zucchini using Blade B to make noodles. Don’t worry if you don’t have a spiralizer. Just use a vegetable peeler to create ribbon-like strips.
- To assemble, lay a swiss chard leaf flat. Layer with the sautéed cauliflower, zucchini noodles, red bell pepper slices, and avocado. Drizzle a bit of that spicy peanut vinaigrette over the top.
- Roll it up snugly, and voila! Your wraps are ready to be devoured. Serve them with your favorite protein or just enjoy as is.
Cook’s Notes
These wraps are best when fresh, but if you’ve got leftovers, just pop them in an airtight container and refrigerate them. I’d recommend consuming them within a day to keep the veggies crisp. If you want to prep ahead, you can make the cauliflower rice and spiralize the zucchini a day in advance. Just keep them separated in the fridge and assemble when ready to eat.
Make It Your Own
- Swap the orange cauliflower with purple or white cauliflower for a different hue and flavor profile.
- Try replacing the Trader Joe’s spicy peanut vinaigrette with a tangy balsamic glaze for a sweeter note.
- If you’re feeling like a protein boost, toss in some shredded chicken or crispy tofu.
- For an extra crunch, sprinkle some toasted sesame seeds or chopped nuts over the veggies before wrapping.
Alrighty, that’s all from me! If you give these wraps a whirl, I’d love to hear how they turn out. Drop me a comment or tag me in your wrap-tastic creations! Enjoy every bite, my friends!
Related update: Swiss Chard Wraps

It was a typical Tuesday evening, and I found myself staring into the depths of my fridge, hoping for inspiration to magically appear. You know those days when you just want something cozy and satisfying without embarking on a full-blown culinary adventure? That’s when I stumbled across a lonely head of cauliflower. With a little bit of cheese and some pantry staples, I knew I could transform it into something special. My Cheesy Cauliflower recipe is the perfect blend of comfort and simplicity. It’s one of those dishes that feels indulgent but won’t have you spending hours in the kitchen. Curious yet? Trust me, one bite of this creamy, cheesy goodness and you’ll be hooked.
Jump to Recipe
What You’ll Need
This recipe is super forgiving, and chances are, you already have most of these ingredients hanging out in your kitchen:
- Cauliflower – a medium head, about 2 pounds
- 2 tablespoons unsalted butter
- 2 tablespoons all-purpose flour
- 1 teaspoon mustard powder
- A pinch of cayenne pepper
- 2 cups whole milk
- Cheese – 1 ½ cups shredded, plus 2 tablespoons for topping (cheddar works great!)
- Salt and black pepper to taste
How to Make Cheesy Cauliflower
- Preheat your oven to 400°F (200°C). This gives you the perfect time to prep everything else.
- Trim the cauliflower florets from the stalk and discard the stalk. Aim to cut the florets into 1-2 inch pieces so they cook evenly.
- Steam the cauliflower for about 10 minutes. You want them firm but tender — think al dente if cauliflower could be pasta.
- Spread the steamed florets out onto a paper towel. This ensures they’re not waterlogged when the cheese sauce coats them.
- In a medium saucepan, melt the butter over medium-high heat. Add the flour and whisk to combine, cooking for 1-2 minutes to get rid of that raw flour taste.
- Stir in the mustard powder, a pinch of cayenne (or more if you like a kick), and black pepper. Feel that aroma dancing around?
- Gradually drizzle in the milk, whisking continuously to keep things smooth and creamy. Bring this mixture to a simmer while stirring; it should thicken beautifully.
- Once thickened, add the cheese one handful at a time. Let each addition melt fully before the next. Taste and adjust with salt and pepper if needed.
- Spread the cauliflower into a 2-quart baking dish or an iron skillet, then spoon the rich cheese sauce over the top. Oh, yes!
- Sprinkle the reserve 2 tablespoons of cheese over everything, then bake for about 30 minutes or until it’s browned and bubbly.
- Garnish with fresh herbs if you fancy, and enjoy every cheesy, comforting bite!
Cook’s Notes
Don’t rush the sauce; taking your time to whisk it ensures a creamy consistency without lumps. If you’re making this ahead of time, you can assemble everything and then pop it in the fridge. Just extend the baking time slightly if you’re starting from cold. Leftovers (if there are any!) keep well in the fridge for up to three days. Reheat them gently in the oven to keep the texture lovely.
Make It Your Own
- Swap out the cauliflower for broccoli or do a mix of both for a bit of variety.
- If you’re in the mood for something heartier, add cooked chicken pieces before pouring over the cheese sauce.
- Want more kick? Replace the cayenne with smoked paprika for a smoky twist.
- Try sprinkling in some crisped bacon bits before baking for a savory boost.
If you try this, I’d love to hear how it turns out — drop a comment or tag me! This Cheesy Cauliflower is a little slice of happiness, and I hope it brings some warmth to your table. Enjoy!
Related update: Cheesy Cauliflower

Last Tuesday, I found myself staring into the depths of my pantry, desperately seeking inspiration for dinner. It was one of those weeks where time slipped through my fingers, and suddenly, it was 6 PM, and my stomach was growling loud enough to scare the cat. That’s when I stumbled upon my trusty bag of brown rice and a can of mushrooms. With a bit of onion, a splash of oil, and a pinch of this and that, I transformed these humble staples into a warm, fragrant Brown Rice Mushroom Pilaf. It’s the kind of dish that feels cozy and effortless, yet tastes like you put in way more effort than you actually did. Perfect for those busy nights when you need something quick but also crave-worthy.
Jump to Recipe
What You’ll Need
This dish relies on a few simple ingredients, and chances are you already have most of them lurking in your kitchen.
- 1 tablespoon unrefined sunflower oil
- 1 medium onion, chopped
- 1 can (about 12 oz) of fresh mushrooms, drained and sliced
- 1 cup brown rice
- 2 cups water
- Sea salt to taste
- Ground pepper to taste
How to Make Brown Rice Mushroom Pilaf
- Start by heating the sunflower oil in a large saucepan over medium heat. You want the oil to be shimmering but not smoking.
- Add the chopped onion and sliced mushrooms. Sauté for about 5 minutes, stirring occasionally, until the onion is translucent and the mushrooms are golden and fragrant.
- Stir in the brown rice, ensuring every grain is coated with the oil and mingling with the onions and mushrooms.
- Pour in the water, then sprinkle with sea salt and ground pepper. Give it a gentle stir to combine.
- Bring the mixture to a boil. Once it’s bubbling, reduce the heat to low, cover the pan, and let it simmer for 30 minutes.
- After 30 minutes, remove the pan from the heat but keep it covered. Let it rest for about 10 minutes, allowing the rice to absorb any remaining liquid.
- Fluff the pilaf with a fork before serving. Taste and adjust the seasoning if needed.
Cook’s Notes
If you find that the rice hasn’t absorbed all the water after resting, simply return it to the heat for a few more minutes. This dish can be made ahead of time and stored in the fridge for up to four days. Just reheat it gently on the stove or in the microwave, adding a splash of water to prevent it from drying out. Avoid using high heat when reheating, as it might make the rice too tough.
Make It Your Own
- Swap the canned mushrooms for fresh ones, like cremini or shiitake, for a richer flavor.
- Stir in a handful of frozen peas during the last few minutes of cooking for a pop of color and sweetness.
- For a protein boost, add cooked shredded chicken or crispy tofu just before serving.
- Mix in some chopped fresh herbs like parsley or thyme to brighten the dish.
If you try this, I’d love to hear how it turns out — drop a comment or tag me! Cooking is all about experimenting and making a dish your own, so don’t be shy to tweak it to your taste. Enjoy every bite!
Related update: Brown Rice Mushroom Pilaf

Last Tuesday, I found myself staring at a bag of carrots in my fridge. There they were, looking slightly disheveled and in need of a purpose. It was one of those days when I craved something sweet yet healthy, something that didn’t scream “I’m trying too hard.” Enter my raw carrot cake. It’s a little slice of indulgence that’s as wholesome as it is easy to make. No oven, no fuss, just pure deliciousness. The magic of this recipe lies in the simplicity and the satisfying blend of warm spices mingling with the natural sweetness of fruits. Trust me; this cake is your ticket to dessert heaven on a weeknight hustle.
Jump to Recipe
What You’ll Need
Ah, the ingredient list that’s as generous as your pantry. Chances are, you already have most of these lying around.
- Carrots
- Raisins
- Dried apricots
- Mixed peel
- Date purée
- Almond flour
- Desiccated coconut
- Ginger powder
- Cinnamon powder
- Cloves
How to Make Raw Carrot Cake
- Start by pulsing the carrots, raisins, date purée, and spices in a blender. You want a rough blend, where the carrots still have some texture. The aroma of ginger and cinnamon will instantly hit you, setting the vibe just right.
- Next, drop in the chopped apricots and mixed peel. Pulse a couple of times until they are well incorporated but not fully obliterated — those little bursts of flavor are the hidden gems of this cake.
- Transfer the mixture into a large bowl. Add the almond flour and desiccated coconut, and mix well. You’ll notice the mixture coming together, thick and cohesive, almost begging to be molded.
- Press the mixture into a large cake pan. Ensure it’s even and smooth out the top with a spatula. Refrigerate uncovered until it sets, which should take about an hour.
- Once set, cut the cake into bite-sized squares. You have the option to frost them with whipped cream or roll them into balls and dust with desiccated coconut for an added flair.
Cook’s Notes
A few things to keep in mind while embarking on this carrot cake journey. The trickiest part is pulsing the mixture just right. You don’t want a puree; the goal is a chunky texture. As for storing, these delightful squares can be kept in the fridge for up to a week. If you’re planning ahead, you can make the mixture a day before and let it sit in the fridge, setting aside those frosting duties for the last minute. Just remember, if you opt for whipped cream, apply it just before serving to retain its fresh appeal.
Make It Your Own
This recipe is your canvas, and a few tweaks can lead to new masterpieces.
- Swap the raisins for dried cranberries to add a tart twist.
- Use walnut or pecan flour instead of almond flour for a different nutty flavor.
- For a tropical vibe, add some crushed pineapple (well-drained) into the mix.
- If you’re a fan of spice, add a pinch of nutmeg to the mixture for an extra kick.
If you try this, I’d love to hear how it turns out — drop a comment or tag me! I can’t wait to see your take on this raw carrot cake delight.
Related update: Raw Carrot Cake
Related update: Cheesy Pasta in a Pot

One chilly autumn evening, I found myself staring into the pantry, craving something hearty and nourishing. There it was, hidden behind cans of beans and tomatoes—a lone can of pumpkin puree. It was like finding a forgotten treasure, and suddenly, the idea of Vegetarian Bean and Pumpkin Chili was born. This dish is perfect for those evenings when you want warmth and comfort without spending hours in the kitchen. The best part? It fills your home with an aroma that makes it feel like you’ve been simmering magic all day. Imagine a chili that’s rich, smoky, with a hint of sweetness from the pumpkin and the perfect amount of spice. It’s like a cozy sweater for your taste buds. Trust me, once you try this, it’ll become one of your weeknight go-tos.
Jump to Recipe
What You’ll Need
You might be surprised to find that you already have most of these ingredients hanging out in your pantry and fridge, just waiting to be turned into something fabulous.
- Canned tomatoes
- Canned pumpkin puree
- 2 serrano chiles
- 2 chipotle chiles in adobo
- Vegetable stock – the unsung hero in making all the flavors meld together
- Water
- 1 onion, chopped
- 3 cloves garlic, minced
- 1 tsp cumin
- 1 cinnamon stick
- 1 tsp ground coriander
- Salt to taste
- 1 tbsp chili powder
- Several dashes of Tabasco (or to your liking)
- Your choice of beans, rinsed and soaked overnight
- Optional garnishes: shredded cheese, cilantro, sour cream
How to Make Vegetarian Bean and Pumpkin Chili
- Start by giving your beans a good rinse and soak them in water overnight. This not only softens them but also makes them easier to digest.
- After soaking, rinse the beans once more and place them in your trusty slow cooker. This is where the magic happens with minimal effort.
- Add the canned tomatoes and pumpkin puree to the slow cooker, coating the beans in that vibrant, sunset-orange color.
- Stir in the chopped onion, minced garlic, serrano chiles, and chipotle chiles in adobo. These layers of flavor will start to build as they cook.
- Add the vegetable stock and a bit of water to ensure everything is comfortably covered and ready to soak up all those spices.
- Now for the spices: toss in cumin, the cinnamon stick, ground coriander, chili powder, and a pinch of salt. Stir gently until all ingredients are well mixed.
- Set the slow cooker on low and let it do its thing for about 8 hours. You’ll know it’s ready when the beans are tender and the kitchen smells warm and inviting.
- Before serving, give it a taste and adjust the seasonings as needed. A little more salt or a few more dashes of Tabasco might be just the kick it needs.
- Ladle the chili into bowls and top with your favorite garnishes. I love a sprinkle of shredded cheese, fresh cilantro, and a dollop of sour cream.
Cook’s Notes
When making this chili, the slow cooker is your best friend. You can put everything together in the morning and let it simmer all day. For a more intense flavor, roast the chiles beforehand or sauté the onions and garlic in a little olive oil before adding them to the slow cooker. If you’ve got leftovers, they’ll keep in the fridge for about 5 days and freeze beautifully for up to 3 months. Just reheat slowly on the stove to maintain that rich flavor. And hey, this chili actually tastes better the next day as the flavors have more time to mingle.
Make It Your Own
If you’re feeling adventurous or just want to switch things up, here are a few ideas to make this chili truly your own:
- Swap the serrano chiles for jalapeños if you want a milder spice level.
- Add a cup of corn kernels for a touch of sweetness and extra texture.
- Replace the vegetable stock with mushroom broth for an earthy twist.
- For a smoky kick, add a teaspoon of smoked paprika.
If you give this chili a try, I’d love to hear how it turns out! Drop a comment below or tag me in your cozy bowl photos. Enjoy every spoonful of this autumn-inspired goodness!
Related update: Vegetarian Bean and Pumpkin Chili
Related update: Wisconsin Beer Cheese Soup
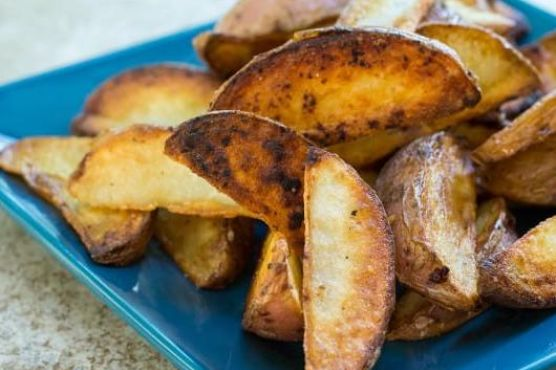
The other night, I was in one of those classic “stare into the fridge and hope something inspiring jumps out” moments. You know the ones — it’s midweek, the craving for takeout battles with my desire to not change out of my sweatpants. That’s when my eyes landed on a bag of red potatoes sitting unassumingly on the shelf. A lightbulb went off, and I remembered the simple joy of pan-fried potato wedges. They’re the perfect mix of indulgent and straightforward, and they come together faster than you’d expect. Crispy on the outside, soft on the inside, these are the kind of potatoes that make you feel like you’ve done something miraculous with very little effort. They’re comforting, and you always have the ingredients on hand. Plus, they make your kitchen smell like a dream.
Jump to Recipe
What You’ll Need
Not to brag, but chances are you already have most of this in your pantry or fridge, which makes this recipe a real lifesaver when you need something quick and satisfying.
- Red potatoes – The star of the show. Their texture is perfect for that crispy outside and soft inside.
- Seasoning salt – A bit of savory magic that levels up the flavor.
- Garlic powder – Adds a hint of earthy aroma.
- Onion powder – Because who can say no to a touch of oniony goodness?
- Black pepper – Just a pinch for a subtle heat.
- Canola oil – For frying to that perfect golden brown.
How to Make Pan Fried Potato Wedges
- Start by preheating your canola oil in a good-quality nonstick pan over medium heat. You want the oil to shimmer but not smoke — that’s when you know it’s ready.
- While the oil is heating, slice your red potatoes into wedges. Think thick enough to hold their shape, but thin enough to cook through.
- In a bowl, season those wedges with seasoning salt, garlic powder, onion powder, and black pepper. Toss them until they’re well-coated and you can smell the spices mixing together.
- Carefully place the potatoes in a single layer in the pan. This is key — crowding the pan will steam them instead of giving them that sought-after crispiness.
- Let them cook on one side without turning until they’re golden brown and crispy. You’ll know they’re ready to flip when they release easily from the pan.
- Flip the wedges and repeat on the other side. Your kitchen will smell amazing at this point, and your patience will be rewarded!
- Once both sides are perfectly crispy, remove the wedges from the pan and serve them hot. Trust me, they lose their magic if left to cool for too long.
Cook’s Notes
These potato wedges are pretty forgiving, but here are a few things to keep in mind. Make sure not to rush the cooking time; the key is to let them get really crispy on that first side before you flip them. If you don’t have red potatoes, Yukon Golds are a solid alternative. Store any leftovers in an airtight container in the fridge and reheat them in a hot oven to bring back some of their initial crispiness. But honestly, leftovers are rare because they tend to disappear the moment they hit the table.
Make It Your Own
Feeling adventurous? Here are some fun ideas to make these wedges uniquely yours:
- Spicy Kick: Mix some cayenne pepper in with the seasoning for a spicy version that’ll warm you up from the inside out.
- Herb Infusion: Sprinkle some dried rosemary or thyme over the wedges before frying for an aromatic twist.
- Cheesy Delight: After frying, toss the hot wedges with freshly grated Parmesan for an irresistible cheesy layer.
- Sweet & Savory: Swap garlic powder for cinnamon and add a sprinkle of sugar for a sweet and savory take.
If you give these pan-fried potato wedges a whirl, I’d love to hear how they turned out! Drop me a comment below or tag me in your crispy potato pics. Let’s make weeknight dinners a little more delicious together!
Related update: Pan Fried Potato Wedges
Related update: Homemade Animal Crackers

One rainy Tuesday night, I found myself staring at an almost-empty fridge, pondering what kind of magic I could muster up. You know those evenings when you’re craving something sweet but don’t want to fuss around with a dozen ingredients? Enter: Baked Caramel Custard. It’s that classy, melt-in-your-mouth treat that feels like a hug after a long day. The best part? You probably have most of what you need in your pantry already. Plus, it’s secretly impressive — looks like a million bucks, but simple enough for a weeknight adventure. Trust me, this is one of those desserts you’ll keep coming back to whenever you need a little pick-me-up.
Jump to Recipe
What You’ll Need
This recipe is all about simplicity with a touch of elegance. No need to run to a fancy gourmet store, just grab these from your kitchen:
- Egg substitute
- 1 egg yolk
- 1 can of evaporated skim milk
- Sugar (plus a little extra for that rich caramel)
- 1 cup skim milk
- 2 tablespoons port wine
- 1 teaspoon vanilla extract
How to Make Baked Caramel Custard
- Preheat your oven to 350 degrees. Get it nice and toasty for the custards.
- In a heavy saucepan, scald the evaporated skim milk and skim milk together. You’ll know it’s ready when tiny bubbles start forming around the edges—don’t let it boil!
- Meanwhile, in a skillet over medium heat, caramelize the sugar. Watch closely as it melts and transforms into a golden brown liquid; don’t let it burn.
- Carefully pour the warm milk into the caramelized sugar, stirring constantly. Keep stirring until the sugar is completely dissolved into the milky mixture.
- In a medium bowl, beat the egg substitute and yolk together. Aim for that dreamy lemon color.
- Slowly add the sugary milk mixture to the eggs, whisking constantly to avoid scrambling. Add in the port and vanilla, and give it a good stir.
- Divide the mixture evenly into 6 custard cups. Place them in a baking dish.
- Pour boiling water into the baking dish until it reaches halfway up the sides of the cups. This water bath will ensure the custards cook gently and evenly.
- Bake for 35 to 40 minutes until the custards are set. You’ll know they’re done when a gentle jiggle in the center is all that remains.
- Once out of the oven, let them cool completely in the refrigerator. When chilled, invert each onto a dessert plate and serve immediately.
Cook’s Notes
Don’t rush the caramelizing process! It’s a bit of a dance and takes patience, but it’s worth every second. If your caramel starts to smell burnt, toss it and start again. Trust me, burnt sugar is not what you want here.
- Make these ahead of time and store them in the fridge – they’ll keep beautifully for up to three days. Perfect for a make-ahead dessert when entertaining.
- For leftovers (if you have any!), keep them covered in the fridge, but let’s be honest, you’ll be sneaking spoonfuls until they’re gone.
Make It Your Own
- Swap the port wine for a splash of your favorite rum or bourbon for an adult-only twist.
- Add a pinch of cinnamon or nutmeg to the milk mixture for a warm, spiced note.
- For a dairy-free option, use coconut milk instead of skim milk and evaporated milk. Bonus: It’ll add a lovely tropical flavor.
- If you like your custard with a bit of crunch, sprinkle some crushed pistachios or almonds on top before serving.
If you try this, I’d love to hear how it turns out — drop a comment or tag me! Enjoy the creamy, caramel goodness, friends!
Related update: Baked Caramel Custard
Related update: Raw Carrot Cake

It was one of those evenings where autumn seemed to have secretly slipped into the neighborhood overnight. The air felt crisp, and the leaves were giving their best dance moves, swirling to the ground with every gust of wind. I found myself craving something warm and reassuring, a cozy bowl of soup that would wrap around me like my favorite blanket. That’s when I remembered this Roasted Garlic & Butternut Parmesan Soup — a velvety concoction that feels fancy enough for any dinner party but is as easy as pie to whip up on a weekday. Not to mention, the house smells absolutely divine with the heady scent of roasted garlic and caramelized squash wafting from the kitchen. It’s like giving your taste buds a great big hug.
Jump to Recipe
What You’ll Need
Funny thing about this soup is its simplicity; you probably have most of these ingredients lounging in your kitchen already. Let’s get to it:
- Butternut squash – the star of our show
- Sweet onion – for that subtle, sweet depth
- An entire head of garlic – because nobody ever said no to roasted garlic
- Olive oil – a generous drizzle makes everything better
- Sea salt – enhances all the flavors
- Chicken stock – or vegetable for a vegetarian twist
- Shredded romano cheese – for that salty, nutty finish
- Whole milk – adds creaminess without overpowering
How to Make Roasted Garlic & Butternut Parmesan Soup
- Preheat your oven to 400°F (200°C). This is the perfect time to pour yourself a glass of wine, if you’re into that!
- In a large roasting pan, toss together the butternut squash and onion slices. Drizzle them generously with olive oil and a good sprinkle of sea salt. Trust me, the caramelization is what makes it magical.
- Take about 12 inches of parchment paper and place the whole head of garlic right in the center. Drizzle it with olive oil and sea salt, then wrap it tightly. Pop this little package in foil for a cozy wrap — think of it as a garlic spa treatment.
- Place the garlic package beside your roasting pan in the oven. Bake for about 45 minutes, or until the squash is tender and garlic is mushy. The aroma will be your timer.
- Once roasted to perfection, add the squash and onion (and all those lovely pan juices!) to a glass blender. Pour in chicken stock until you reach the desired consistency, and blend until smooth.
- Squeeze the mushy garlic from its skin directly into the blender, along with all the olive oil from its package. Blend again until everything is luxuriously smooth.
- Pour the mixture into a large saucepan. Stir in the shredded romano cheese and whole milk. Heat gently to a simmer — don’t rush this step; it’s where flavors meld.
- Let it simmer for about 10 minutes, allowing the flavors to deepen. Serve it up with an extra drizzle of olive oil and a sprinkle of romano cheese. Voilà, dinner is served!
Cook’s Notes
So here’s the thing — make sure your butternut squash is cubed evenly. It’ll roast better that way, and we want each piece to soak up that olive oil magic. You can prep the squash and onion the night before if you’re tight on time. As for storage, this soup keeps beautifully in the fridge for up to 3 days and freezes like a charm. Just be sure to reheat gently, stirring often to maintain that creamy texture. Oh, and if you don’t have a glass blender, a good immersion blender will do the trick just fine.
Make It Your Own
This soup is pretty versatile; here are a few fun twists:
- Swap the chicken stock for vegetable stock to keep it vegetarian but still flavorful.
- Replace romano cheese with aged cheddar for a sharper tang.
- For a vegan version, substitute milk with coconut milk and the cheese with nutritional yeast.
- Add a pinch of nutmeg or cinnamon for a warm, spicy note that complements the squash.
If you try this, I’d love to hear how it turns out — drop a comment or tag me! Happy cooking, and may your kitchen be filled with laughter and delicious aromas.
Related update: Roasted Garlic & Butternut Parmesan Soup
Related update: Vegetarian Bean and Pumpkin Chili

Picture this: it’s a late Tuesday night, and I’ve got a serious craving for something sweet. The kind of craving that whispers, “bake something now, or forever hold your peace.” But who has the energy for an elaborate dessert after a long day? I need something quick, comforting, and chocolatey. Enter: my 10 Minute Brownies. This recipe is the superhero of the sweet-tooth world. It’s so simple, you could practically make it with your eyes closed. Plus, it’s got this lush, fudgy texture thanks to a surprising ingredient — unsweetened applesauce. So, if you find yourself in need of a quick chocolate fix that feels both indulgent and guilt-free, these brownies are your answer.
Jump to Recipe
What You’ll Need
You might be surprised at how basic the ingredient list is. Spoiler: you likely have most of these on hand. Here’s what you’ll need to get started:
- Canola oil – for that perfect moist texture.
- Semisweet chocolate chips – because what’s a brownie without chocolate?
- Unsweetened applesauce – our secret for keeping it moist without extra fat.
- Sugar – for that classic brownie sweetness.
- Vanilla extract – for a hint of flavor depth.
- Unbleached flour – a staple!
- Baking powder – gives it that slight lift, so they aren’t bricks.
- Finely-chopped walnuts – optional, but they add a nice crunch.
How to Make 10 Minute Brownies
- Preheat your oven to 350 degrees F. Grab a 6 x 9 inch baking pan, lightly oil it, and set it aside for later.
- In a small saucepan over low heat, combine the canola oil and semisweet chocolate chips. Stir occasionally until the chocolate melts into a silky, smooth mixture. Remove from heat and let it cool slightly.
- In a large bowl, mix the unsweetened applesauce, sugar, and vanilla extract until everything is well blended. You should smell that sweet, vanilla aroma.
- Pour the cooled chocolate mixture into your applesauce blend. Whip it up until it’s smooth and shiny.
- Add in the unbleached flour, baking powder, and finely-chopped walnuts. Stir just until everything is combined; you don’t want to overmix and end up with tough brownies.
- Spoon the batter into your prepared baking pan, smoothing the top with a spatula.
- Bake in the oven for 25 to 30 minutes. You’ll know they’re done when the top springs back gently upon touch. The kitchen will smell like chocolate heaven by now!
- Allow the brownies to cool completely before cutting them into luscious squares. This waiting game is tough, but so worth it.
Cook’s Notes
Let’s be real, these brownies are pretty forgiving. But here are a few tips to ensure you get the best results every time. First, be careful not to overbake them. You’re going for fudgy, not crumbly. They might look a little underdone when you first pull them out, but they’ll firm up as they cool. For storing, keep them in an airtight container in the fridge, and they’ll stay fresh for up to a week — not that they’ll last that long!
Make It Your Own
The beauty of this recipe is its flexibility. Here are some delicious variations you can try:
- Nut-free: Skip the walnuts if you’re not a fan or have allergies. Consider adding a handful of chocolate chips instead for extra gooeyness.
- Gluten-free: Swap the unbleached flour for a gluten-free blend. No one will even know the difference.
- Peanut butter swirls: Dollop some peanut butter over the batter before baking and swirl it in with a knife for a nutty twist.
- Raspberry delight: Throw in a handful of fresh or frozen raspberries for a fruity surprise that pairs beautifully with the chocolate.
If you try this, I’d love to hear how it turns out — drop a comment or tag me! Happy baking, friends. 🍫✨
Related update: 10 Minute Brownies
Related update: OREO Cookie Balls – Snowman
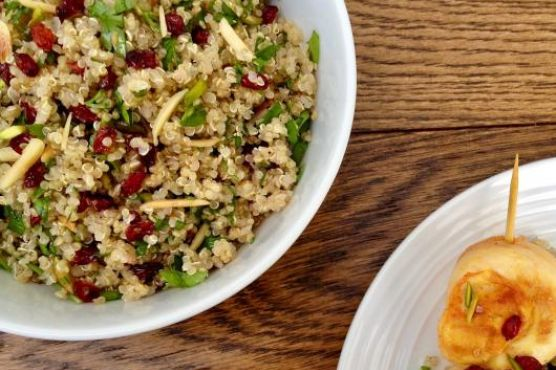
On a chilly Tuesday evening, I found myself rummaging through my pantry, desperate for something that felt like a hug in a bowl but wouldn’t keep me hostage in the kitchen. I wanted something earthy yet vibrant, complex but not fussy. That’s when a bag of quinoa caught my eye, nestled behind a family of lentils. With a little inspiration from the tangy barberries I’d recently discovered at the market and a stash of nuts that begged to be toasted to life, this Quinoa Salad with Barberries & Nuts was born. It’s the kind of dish that fills the kitchen with warm, toasty aromas and feels fancy enough to impress, but is simple enough to whip up on a weeknight.
Jump to Recipe
What You’ll Need
There’s a good chance you already have most of these ingredients hanging around, just waiting for a chance to shine. Here’s what you’ll gather:
- Quinoa – the blank canvas for all the flavor.
- Water – to cook the quinoa to fluffy perfection.
- Salt – always the unsung hero.
- Olive oil – for toasting and dressing.
- Barberries – those tangy pops of flavor.
- Slivered almonds – for that nutty crunch.
- Slivered pistachios – because why not double down on nuts?
- Coriander – a fresh, herby kick.
- Mint – because everything deserves a little minty brightness.
How to Make Quinoa Salad with Barberries & Nuts
- Start by rinsing the quinoa under cool running water using a sieve. This little bath removes any bitterness. Once rinsed, drain thoroughly.
- In a medium saucepan, pour boiling water over the quinoa. Add a generous pinch of salt, stir, and cook over medium-low heat. You’re looking for the quinoa to be tender yet retain a slight bite. Drain again in a sieve if needed.
- While the quinoa is doing its thing, turn your attention to the barberries. Pick them over, rinse them clean in a sieve, and let them dry a bit on some kitchen paper.
- In another saucepan, heat 1 tablespoon of olive oil over medium heat. Toss in the slivered almonds and toast them lightly. When they’re golden and fragrant, add the pistachios. Keep an eye on them; nuts can burn quickly!
- Add the rest of the olive oil and the rinsed barberries to the pan with the nuts. Cook briefly until the barberries are shiny and slightly puffed. Remove from heat.
- Save a tablespoon of the nut and barberry mixture for garnish later. Combine the remaining nut-barberry mixture with the cooked quinoa along with the chopped coriander and mint.
- Return the quinoa mixture to the pot. Cover with a lid and let it sit over low heat for about ten minutes until everything is well heated and steam is rising. The aroma will make it hard to wait!
- Fluff the quinoa with a fork, drizzle a little extra olive oil, give it a twist of black pepper if you’re feeling it, and then sprinkle over the reserved nut-barberry mix and herbs.
- Serve this beauty as a star on its own or let it play the perfect sidekick to any main dish.
Cook’s Notes
I won’t lie, this dish is forgiving. Quinoa can be prepped a day ahead and kept in the fridge, making this a great make-ahead option. If you end up with leftovers (lucky you!), it holds up well in the fridge for up to 3 days. Just give it a gentle reheat on the stove or enjoy it cold—it’s pretty versatile. Be mindful when toasting the nuts; they love to go from golden to charred in a heartbeat.
Make It Your Own
- Swap the barberries for dried cranberries if they’re more readily available. The sweetness will complement the nuts beautifully.
- Not a fan of pistachios? Use toasted hazelnuts instead for an equally delicious crunch.
- For a protein boost, toss in some shredded cooked chicken or crispy tofu cubes.
- If coriander and mint aren’t your jam, try parsley and basil for a different herby note.
If you try this, I’d love to hear how it turns out—drop a comment or tag me on social media! It’s always a joy to see your creations and hear your twists on the recipe. Enjoy the journey from pantry to plate!
Related update: Quinoa Salad with Barberries & Nuts
Related update: Garlic Lime Grilled Chicken Salad
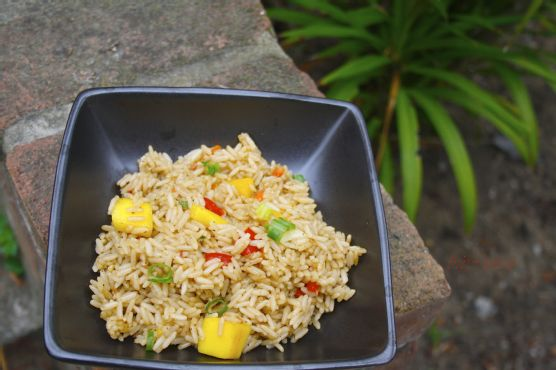
I had one of those days where the sun just wouldn’t quit, blazing through my kitchen window, taunting me while I was craving something light but satisfying. The usual suspects in my pantry were looking tired, and I wanted something that just screamed “refreshing.” Enter Mango Fried Rice, my answer to a summer evening where you want a meal that’s as breezy and colorful as you’d imagine a tropical getaway to be. This dish is one of those delightful concoctions that’s both a little fancy and incredibly simple to pull off. The sweetness of the mango mixed with the savory notes of the fried rice is the comfort you didn’t know you needed. Trust me, it’ll impress your taste buds—and maybe anyone else lucky enough to share it with you.
Jump to Recipe
What You’ll Need
I love this ingredient list because it feels like a scavenger hunt in your own kitchen. Chances are you’re already halfway there.
- 1 cup rice
- 1 1/2 cups chicken stock
- 1 large mango, cubed
- Mixed vegetables (like carrots, peas, and bell peppers)
- 1 scotch bonnet pepper, chopped
- 1-2 seasoning cubes
How to Make Mango Fried Rice
- First, wash your rice thoroughly. You want those grains shining like little pearls.
- Bring it to a gentle boil on medium heat with just a splash of water. No need to drown it; we’re going minimalist here since the chicken stock’s coming in hot later.
- As soon as the rice turns slightly soft and absorbs that initial water, it’s time to reduce the heat. Pour in the chicken stock and let it work its magic. Cook until all that flavorful stock is absorbed and the rice is dry.
- Now, crank up the heat a bit and stir in the chopped vegetables and that fiery scotch bonnet pepper. It’s like a spa day for your rice, soaking up all those vibrant colors and flavors.
- Crumble in your seasoning cube. Oh, the savory goodness! Give it a gentle toss so it’s evenly distributed.
- Finally, gently fold in your cubed mango. You’re aiming for a harmonious blend of sweet and savory. Serve it warm with any protein you fancy. Chicken is my go-to, but hey, follow your heart!
Cook’s Notes
Let’s chat about how to keep this masterpiece at its peak. First off, if your chicken stock is homemade and has a bit of oil, you’re golden—no need for additional oil. Store leftovers in the fridge for up to three days, but good luck having any left over! If you’re meal prepping, cook everything except the mango and add it fresh when you’re ready to eat. Nobody wants mushy mango, trust me. Common misstep: rushing the rice. Give it the time it needs to soak up those flavors!
Make It Your Own
Feeling adventurous? Here are some ideas to switch things up:
- Go vegetarian by swapping the chicken stock for vegetable broth and adding some crispy tofu.
- Kick up the heat with an extra scotch bonnet. Fire lovers, this one’s for you!
- Try pineapple instead of mango for a tangier twist.
- Add a handful of roasted cashews for some crunch and extra protein.
If you give this Mango Fried Rice a whirl, I’d love to hear how it turns out—drop a comment or tag me in your culinary adventures! Enjoy the sweet and savory carnival in your mouth! 🌟
Related update: Mango Fried Rice
Related update: The Blarney Burger
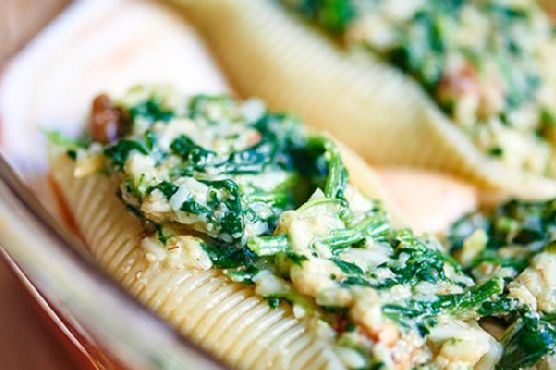
Picture this: it’s a chilly Tuesday evening, and you’re staring into the depths of your fridge, hoping for dinner inspiration to leap out at you. That’s when you remember those jumbo pasta shells you bought on impulse, sitting in the pantry like a promise of comfort. Enter the magic of Cheesy Spinach Stuffed Shells — a dish that ticks all the boxes when you want something warm, cheesy, and convincingly fancy without the fuss. This recipe is the kind of thing you can whip up with stuff you’ve probably already got lying around. It’s got the creamy, melty goodness of cheese, the nutritious punch of spinach, and the satisfying bite of perfectly cooked pasta — all drenched in a dreamy layer of sauce. Whether you’re feeding the family or impressing a date, these stuffed shells are your ticket to a happy, full belly.
Jump to Recipe
What You’ll Need
The beauty of this recipe is in its simplicity — we’re talking ingredients you likely have on hand, with a few star players you can grab on your next grocery run. Here’s what you’ll need:
- Jumbo shells
- Cooked frozen spinach
- Wheat germ
- Shredded parmesan cheese
- Chopped pecans
- Shredded Mexican cheese blend
- Diced green onions
- Salt and dried basil
- Eggs
- Water
- Alfredo sauce
- Spaghetti sauce
How to Make Cheesy Spinach Stuffed Shells
Ready for the good stuff? Let’s dive in!
- Start by bringing a large pot of salted water to a boil. Add in the jumbo shells and cook them for about 9 minutes — they should be al dente, as they’ll finish cooking in the oven. Drain them and let them sit face down on a paper towel to get rid of excess water.
- While those shells are having their moment, pop your frozen spinach in the microwave, following the box instructions, but skip adding water. Once cooked, squeeze out as much water as you can.
- In a large mixing bowl, combine the cooked spinach with wheat germ, parmesan cheese, Mexican cheese blend, chopped pecans, and finely diced green onions. Toss in some salt, a dash of pepper, and about a teaspoon of dried basil — feel free to adjust this to taste, and if you’re adventurous, a pinch of nutmeg could be interesting!
- Crack in two eggs and add a splash of water to the mixture. Stir until everything is well combined — the eggs should be incorporated smoothly into the mix.
- Stuff each shell generously with the spinach mixture. You’ll have enough filling for about 16 to 20 shells.
- Preheat your oven to 350 degrees. Grab an 8×8 or a 9×11 inch baking dish and give it a good spray with cooking spray.
- Spread a thin layer of Alfredo sauce on the bottom of the dish, followed by a layer of spaghetti sauce. This double-sauce base is what dreams are made of!
- Arrange the stuffed shells over the sauce base, then drape them with the remaining sauce. Make sure each shell gets some sauce love!
- Bake in the preheated oven for 30-35 minutes, or until the sauces are bubbly and make your kitchen smell like a cozy Italian bistro.
Cook’s Notes
Here’s the scoop: this dish is forgiving, so don’t stress if your shells aren’t perfectly stuffed or your sauce layers are a bit uneven. If you’re making it ahead, you can assemble everything, cover, and stash it in the fridge for a day or two. When you’re ready, just pop it in the oven and extend the baking time by about 10-15 minutes. Leftovers? Lucky you! They reheat beautifully in the microwave or oven. Just sprinkle a splash of water if you’re microwaving to keep things nice and saucy.
Make It Your Own
Here’s where you can get creative:
- Go nut-free: If pecans aren’t your thing, swap them out for sunflower seeds for that crunch.
- Protein punch: Mix in some cooked chicken sausage into the filling for a meatier bite.
- Gluten-free option: Use gluten-free pasta shells and ensure your sauces are gluten-free too.
- Spicier spin: Add a pinch of chili flakes into the filling or use a spicy Mexican cheese blend.
If you try this, I’d love to hear how it turns out — drop a comment or tag me! Cooking should be fun and delicious, so play with it and make it yours. Happy cooking, friend!
Related update: Cheesy Spinach Stuffed Shells
Related update: Mango Fried Rice

The other day, I found myself staring into the depths of my fridge, battling that familiar weeknight dilemma: what to make for dinner that feels both comforting and a little bit special. The answer came subtly as I caught sight of a lone pie shell resting on the bottom shelf. Voilà — Caramelised Onion and Mushroom Quiche! It’s the kind of dish that fills your kitchen with the most irresistible aroma, promising warmth and satisfaction in every bite. Plus, it’s a breeze to pull together with ingredients you probably already have lounging in your pantry and fridge. Let me tell you, this quiche is your new best friend for those hectic days when you crave something homemade but without the fuss.
Jump to Recipe
What You’ll Need
This ingredient list is delightfully straightforward, and chances are you already have most of these at home. Here’s what you’ll need to whip up this delicious quiche:
- A pre-made nine-inch pie shell
- 2 tablespoons of olive oil
- 2 large white onions, thinly sliced
- 2 cloves of garlic, minced
- 1/2 teaspoon of dried chilli flakes
- 8 ounces of mushrooms, sliced
- 1 teaspoon of dried thyme
- 3 eggs
- 1 cup of half and half cream
- 1 cup of grated havarti cheese
- Salt and pepper, to taste
How to Make Caramelised Onion and Mushroom Quiche
- Preheat your oven to 400°F. Take your nine-inch pie shell and dock it with a fork to prevent it from puffing up. Slide it into the oven and let it bake for 10 to 15 minutes until it’s lightly golden.
- While the pie shell is crisping up, heat the olive oil in a large skillet over medium-high heat. Add the onions, garlic, and chilli flakes. Stir occasionally and let them cook until the onions are rich, brown, and caramelised, about 10 minutes.
- Next, toss the mushrooms into the skillet. Keep the heat on high and let the mushrooms caramelise as well, which should take around 5 minutes. The mushrooms will soak up all those lovely flavors. Once they’re ready, remove the skillet from the heat and stir in the thyme, salt, and pepper.
- In a large mixing bowl, beat the eggs together with the half and half cream. Stir in half of the grated havarti cheese. Combine this mixture with the onion-mushroom blend, mixing thoroughly until everything is well integrated.
- Place the pre-baked pie shell on a cookie tray — this is your shield against any unexpected spills. Pour the filling into the pie shell, spreading it evenly. Sprinkle the remaining cheese over the top.
- Reduce the oven temperature to 375°F. Bake the quiche until the filling is set — it will be firm to the touch and have a gorgeous golden hue. This should take about 25 to 30 minutes. Serve warm and get ready for those taste buds to rejoice!
Cook’s Notes
Cooking can sometimes be a bit unpredictable, so here are a few tips to ensure your quiche turns out perfect every time. First, make sure those onions are well caramelised; they should be a deep golden brown. This adds depth and sweetness to the quiche. Don’t rush the process — good things take time! Also, remember to taste your filling before adding it to the shell to adjust the seasoning. If you want to make this ahead, you can prepare the filling and bake the pie shell a day before; just assemble and bake right before serving. Leftovers (if any!) can be stored in the fridge and reheated gently in the oven.
Make It Your Own
This quiche is wonderfully versatile. Here’s how you can mix it up:
- Swap the mushrooms for crispy tofu if you’re looking for a vegetarian protein boost.
- Use Swiss cheese or even cheddar if you prefer a sharper flavor profile.
- Throw in some baby spinach with the mushrooms for extra greens.
- Substitute the dried thyme with fresh basil for a different herbal note.
If you try this, I’d love to hear how it turns out — drop a comment or tag me on social media! Cooking is all about experimenting and most importantly, enjoying every step of the way. Can’t wait to hear from you!
Related update: Caramelised Onion and Mushroom Quiche

It was one of those rainy Tuesday evenings when the thought of another takeout meal just didn’t appeal. You know those nights, right? When you crave something warm and comforting that feels like a hug on a plate? That’s when this Hard-Boiled Egg Gratin in a Béchamel Sauce came to life in my kitchen. It’s the kind of dish that’s deceptively simple yet incredibly satisfying, with a creamy sauce and a crispy, cheesy top. It’s perfect for when you want something a bit special but don’t want to spend hours in the kitchen. Plus, chances are, you already have most of the ingredients lurking in your pantry or fridge.
Jump to Recipe
What You’ll Need
Imagine pulling together a dish without a last-minute grocery run. That’s the beauty of this recipe. Here’s what you’ll need:
- Eggs – the stars of the show, of course!
- Butter – for that rich, comforting flavor.
- Flour – to thicken up our luscious sauce.
- Gruyère cheese – because what’s a gratin without a cheesy top?
- Milk – to create the creamy béchamel.
- Nutmeg – just a dash for warmth.
- Onion – adds a subtle sweetness.
- White salt and pepper – to season everything just right.
How to Make Hard-Boiled Egg Gratin In A Bechamel Sauce
Ready to dive in? Here’s how to bring this cozy dish to life:
- Start by hard-boiling the eggs. Bring a saucepan of salted water to a rolling boil, then gently add the eggs. Lower the heat and let them simmer for 10 minutes.
- Once the eggs are done, place them into cold water until they’re just cool enough to handle. Here’s a little trick: roll them with your palm on a hard surface to crack the shell, then peel under a slow stream of running water. It works like a charm!
- In a small frying pan, melt some butter over low heat. Add the onion and cook, stirring frequently, until they’re tender but not browned. Set aside.
- Next, let’s make the béchamel sauce. In a medium heavy-bottomed saucepan, melt more butter over low heat. Stir in the flour and whisk for around 2 minutes without letting it color.
- Whisk in the milk, bringing it to a boil while whisking constantly to avoid lumps. Season with nutmeg, salt, and pepper, then reduce the heat and let it simmer for 10 minutes. Keep whisking and scraping the pan to ensure nothing sticks.
- Stir the cooked onions into the béchamel and let it all cook together for an additional 5 minutes.
- Preheat your grill. Slice the eggs into 1 cm (0.4 inch) slices and start assembling. Spread a thin layer of the béchamel sauce at the bottom of your gratin dish.
- Layer the egg slices over this sauce, covering them with the remaining béchamel. Sprinkle generously with grated Gruyère cheese.
- Place the dish under the grill. Keep an eye on it and turn the dish if necessary to ensure an evenly golden, bubbly top. Serve immediately and enjoy the deliciousness!
Cook’s Notes
Let’s talk practical tips. First, don’t rush the béchamel sauce; whisk it patiently to avoid lumps. If you find the bechamel is too thick, a splash more milk can help loosen it up. This dish is best served right away when the cheese is melty and gooey, but if you do have leftovers, they can be stored in an airtight container in the fridge for up to two days. Reheat gently in the oven or microwave until warmed through.
Make It Your Own
This recipe is delicious as is, but here are a few ways to make it your own:
- Swap the Gruyère cheese for sharp cheddar for a more pronounced flavor.
- Add a layer of sautéed spinach between the eggs and the sauce for some greens.
- Substitute half of the milk with cream for an even richer béchamel.
- Sprinkle some crispy bacon bits on top before grilling for a smoky kick.
If you try this, I’d love to hear how it turns out — drop a comment or tag me! Whether it’s your first time making a gratin or you’re an old pro, I hope this becomes a comforting staple in your kitchen. Happy cooking!
Related update: Hard-Boiled Egg Gratin In A Bechamel Sauce
Related update: Caramelised Onion and Mushroom Quiche

It was one of those drizzly, stay-inside afternoons when a sudden craving hit me — something sweet but tangy, with a satisfying crunch. My pantry didn’t offer much in the way of excitement, but there was rhubarb in the fridge and an untouched packet of phyllo dough languishing in the freezer. That’s when the idea for Crispy Rhubarb Pockets was born. Trust me, this dish is worth making not just because it’s the perfect balance of tart and sweet, but also because it’s beautifully rustic and so very satisfying. It’s the kind of dessert that looks like you’ve put in a lot of effort when really, it’s just a clever little trick. Plus, who doesn’t love a crispy bite-sized treat?
Jump to Recipe
What You’ll Need
Honestly, you probably have most of these ingredients at home. It’s a grab-and-go situation, making it perfect for those spontaneous baking whims.
- Diced rhubarb – the heart of our pockets, bringing the tangy goodness
- Granulated sugar – to sweeten the deal
- Cornstarch – our trusty thickener
- Salt – just a pinch to balance flavors
- Vanilla extract – a splash for that warm, comforting aroma
- Phyllo sheets – the secret to crispy, flaky pockets
- Melted butter – for brushing, because butter makes everything better
- Water – to help seal those delicious pockets
How to Make Crispy Rhubarb Pockets
- In a medium saucepan, toss in the diced rhubarb, sugar, cornstarch, and salt. Set it over medium-low heat. As it warms up, stir occasionally. You’ll know it’s ready when the rhubarb releases its liquid and starts breaking down into a thick, chunky sauce — give it about 10 minutes.
- Take the pan off the heat and stir in the vanilla extract. Let this mixture cool to room temperature. The vanilla will mingle with the rhubarb, creating a divine aroma that fills the kitchen.
- Grab your phyllo sheets and layer four of them, brushing each layer with melted butter. Phyllo is delicate, so handle with care, and don’t skimp on the butter — it’s key to that golden crunch.
- Preheat your oven to 350 degrees F. While it warms up, cut four 4-inch squares from your buttered phyllo stack. Precision isn’t necessary; rustic is charming.
- Spoon 2 teaspoons of the rhubarb filling into the center of each square. Now, brush from the edge of the filling to each point of the square lightly with water. This is the part where you channel your inner artist.
- Gather the points of the square and pinch them together just above the filling, forming a little pouch. Brush it all over with more butter. Repeat this artistic process for all four pouches.
- Arrange the pouches on an ungreased cookie sheet or baking pan, spacing them at least an inch apart. Into the preheated oven they go for 12 to 15 minutes, or until they’re golden brown and begging to be devoured.
- Remove the pouches from the oven and let them cool on a wire rack for about 5 minutes. They’re equally delightful warm or at room temperature, so serve according to your patience level!
Cook’s Notes
So, a few things to keep in mind: first, don’t rush the rhubarb cooking process; it needs time to release its magic. Phyllo can be a bit tricky since it dries out quickly, so keep it covered with a damp cloth while you work. If you make these ahead of time, you can store them in an airtight container for up to two days. Just pop them back in a warmed oven to re-crisp them. Leftovers (if there are any) are wonderful with a dollop of vanilla ice cream.
Make It Your Own
There’s plenty of room to play around with this recipe:
- Swap the rhubarb for diced apples and add a sprinkle of cinnamon for a fall vibe.
- If you’re a fan of berries, mix in some strawberries with the rhubarb for a sweeter, juicier filling.
- Try adding a handful of chopped nuts to the filling for some extra crunch and depth.
- If vanilla isn’t your thing, lemon zest can add a zesty twist to the filling.
If you try this, I’d love to hear how it turns out — drop a comment or tag me! Whether you stick to the original recipe or venture into variations, these little pockets are sure to delight. Happy baking!
Related update: Crispy Rhubarb Pockets
Related update: 10 Minute Brownies
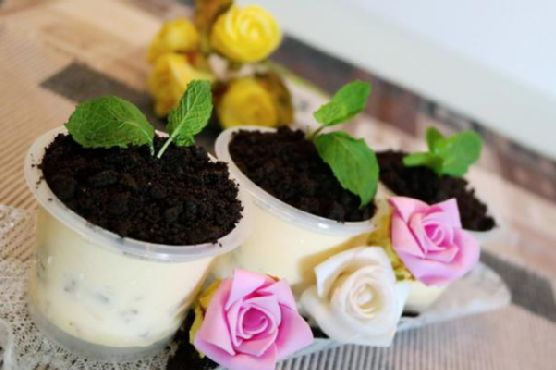
It was a seemingly ordinary Tuesday evening, and I found myself staring at the contents of my freezer, feeling a bit uninspired. A pint of vanilla bean ice cream caught my eye, and suddenly, I was reminded of a cute dessert idea I’d seen earlier — those adorable potted plant ice cream treats. I mean, who wouldn’t want to dig their spoon into what looks like a tiny pot of dirt, only to find a luscious, creamy surprise underneath? Perfect for Valentine’s Day or just because, these desserts are delightfully simple to make and never fail to impress with their whimsical presentation. They come together quickly and are the kind of thing you can whip up on a whim, which, as a busy home cook, is exactly the kind of recipe I adore.
Jump to Recipe
What You’ll Need
Chances are you already have most of this hanging around, but the way these flavors and textures come together is just magical.
- Vanilla bean ice-cream
- Diced palm seeds
- Mixed nuts
- Blueberries
- Oreo cookies
- Parsley
How to Make Valentine’s Day Potted Plant Ice-Cream Desserts
- Start by separating the Oreo cookies; remove the cream filling and set it aside (or snack on it, no judgment here!). Pound the cookies until they transform into fine crumbs that resemble rich, dark soil.
- In a mixing bowl, combine the vanilla bean ice-cream with the diced palm seeds, mixed nuts, and a handful of blueberries. The idea is to get a balanced mix of creaminess, crunch, and bursts of fruity freshness.
- Divide this heavenly mixture into your serving cups. It doesn’t have to be perfect — a little messiness adds to the charm. Place these in the freezer for a good chill.
- Once your ice-cream cups are well-frozen, generously top each one with the Oreo cookie crumbs to create that authentic “soil” look.
- Just before serving, insert a sprig of parsley into each cup. Voilà! You’ve got yourself some delightful potted plant ice-cream desserts that are sure to wow anyone lucky enough to dig in.
Cook’s Notes
Making these desserts is almost as fun as eating them. Remember, the less perfect they look, the better — we’re aiming for a natural, earthy vibe. If you’re prepping ahead, keep the ice-cream mix in the freezer until just before serving, then add the cookie crumbs and parsley. Leftovers (if you have any!) can stay in the freezer for a few days, but be sure to add fresh parsley right before serving again to keep that vibrant green pop.
Make It Your Own
- Swap the vanilla bean ice-cream for chocolate if you want that extra chocolatey punch — it’s a game-changer!
- Try using mint leaves instead of parsley for a refreshing twist and a subtle hint of minty fragrance.
- For a tropical vibe, substitute the blueberries with chunks of pineapple or mango.
- If you’re nuts about nuts, add a sprinkle of crushed pistachios on top of the “soil” for extra crunch and color.
If you try this, I’d love to hear how it turns out — drop a comment or tag me in your potted plant creations! Trust me, these little delightful desserts will grow on you just as they have on me. Happy cooking!
Related update: Valentine’s Day Potted Plant Ice-Cream Desserts
Related update: Banana Pudding Cake
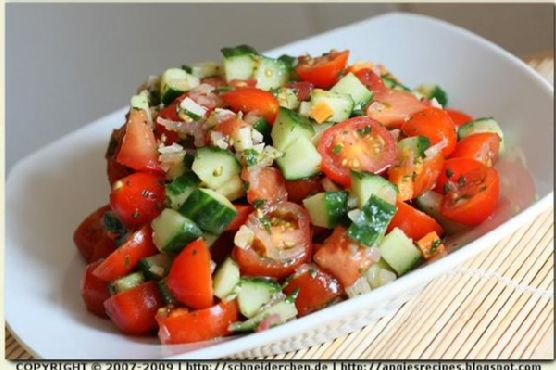
It was one of those hectic Tuesday evenings, you know the kind where the laundry is beckoning, emails are piling up, and yet your stomach still somehow wants to be fed. There I was, standing in front of my refrigerator, hoping for some culinary inspiration to jump out and save me from splurging on takeout for the third night in a row. My eyes landed on that lonely basket of cherry tomatoes and a half-used cucumber. Suddenly, a memory of a zesty Tomato Cucumber Salad from a sunlit café popped into my head. The beauty of this dish is its simplicity and the fact that it’s much more than the sum of its parts: refreshing yet satisfying, quick yet elegantly reminiscent of summer picnics. It’s the kind of dish that comes together with a handful of pantry staples, a little bit of chopping, and a splash of creativity. Easy enough to whip up in under 30 minutes, and impressive enough to make you feel like a culinary genius.
Jump to Recipe
What You’ll Need
This Tomato Cucumber Salad is all about letting simple ingredients shine. Chances are you already have most of this hanging around in your kitchen.
- Cherry tomatoes – the sweeter, the better!
- Diced cucumber – refreshing crunch is a must.
- Sliced garlic
- Lemon juice
- Olive oil – go for the good stuff if you can.
- Black salt and pepper
- Shallot – for a hint of sweet oniony goodness.
- Fresh parsley
How to Make Tomato Cucumber Salad
- Start by heating a splash of olive oil in a skillet over medium heat. When the oil shimmers, toss in the chopped shallot and sliced garlic. Stir-fry gently, keeping an eye out for a lightly golden hue. The kitchen should start smelling divine right about now.
- Remove the skillet from the heat and introduce a bright splash of lemon juice to the mix. The sizzle will tell you the dressing is coming together beautifully. Season with a sprinkle of black salt and a few cracks of pepper to taste.
- As the dressing takes a moment to cool, cut your cherry tomatoes into halves and dice the cucumber into cheerful 1cm cubes. Toss them both into a salad bowl, ready to soak up all the goodness.
- Pour the warm dressing over the tomato and cucumber combo, and toss gently. The fresh parsley should be added last, offering a vibrant pop of color and flavor.
- Cover the bowl and let the salad chill in the fridge for about an hour. This helps the flavors to meld into a harmonious chorus of tangy, sweet, and savory.
Cook’s Notes
This salad is as forgiving as it is delicious. If you’re running short on time, you can skip the chilling, but letting it sit in the fridge does wonders for flavor mingling. If you’ve got leftovers, they’ll keep in an airtight container in the fridge for a day or two, though the tomatoes may soften slightly. Avoid over-stirring after refrigeration if you prefer your salad to stay crisp.
Make It Your Own
- Swap the cucumber for crisp, thinly sliced fennel for an aromatic twist.
- Add a handful of crumbled feta for a creamy contrast.
- Throw in some roasted chickpeas for extra protein and crunch.
- Use fresh basil leaves instead of parsley for a fragrant, pesto-esque vibe.
If you try this, I’d love to hear how it turns out — drop a comment or tag me! This salad is a little taste of sunshine on your plate, and I hope it brings a bright spot to your day, just like it did for mine. Enjoy!
Related update: Tomato Cucumber Salad
Related update: Quinoa Salad with Barberries & Nuts
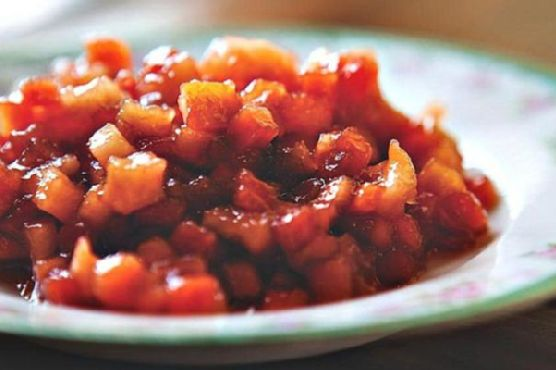
I recently found myself staring at a couple of Honeycrisp apples on my kitchen counter, feeling the first whispers of autumn in the air. You know the days when you can finally break out your sweaters but you still need sunglasses? That’s when my mind started tiptoeing towards something warm and cozy. I mean, what could be better than making a quick, delightful fall fruit compote that ties together all the best flavors of the season? The best part? You don’t need a culinary degree to whip this up. It’s a simple, heart-warming recipe that gives you that “kitchen hero” feeling without the sweat. Plus, it pairs perfectly with so many things, like crispy potato latkes or a dollop of ice cream.
Jump to Recipe
What You’ll Need
Trust me, chances are you already have most of this in your pantry or fridge. The real stars here are the cozy, autumnal ingredients that just sing when they’re together.
- 2 tablespoons of butter
- 2 cups of diced honeycrisp apples
- 1 cup of diced pears
- 1/2 cup of dried cherries
- 1/4 cup of brown sugar
- 1 tablespoon of apple cider vinegar
- 1 cup of apple juice
- 1 cinnamon stick
How to Make Fall Fruit Compote
- Start by melting the butter in a medium-sized saucepan over high heat. You’ll know it’s ready when it starts to smell nutty and divine.
- Once the butter is melted, toss in those diced apples, pears, dried cherries, vinegar, apple juice, brown sugar, and the cinnamon stick. Give it a good stir to coat everything in buttery goodness.
- Let it cook for about 5 minutes. You want the mixture to start bubbling, and the smell will be pure fall magic.
- Turn the heat down to medium and let it simmer for a few more minutes, just until the fruit is tender and the syrupy liquid has mostly reduced. If things start to stick, splash in a little more apple juice to keep it all juicy and lush.
- Once it’s all tender and gorgeous, you’re done! Serve warm and enjoy the fruit-laden spoonfuls of autumn joy.
Cook’s Notes
Let’s chat about some practical tidbits to make your compote experience as smooth as butter. First off, don’t forget that compote thickens as it cools, so don’t worry if it looks a little saucy at first. If you’re planning to serve it later, just warm it up slightly before serving to get back that perfect consistency. If you find yourself with leftovers, pop them in a sealed container in the fridge, and it will stay happy for about a week. This compote is perfect to make ahead of time, especially if you’re planning to dazzle some guests a day or two later.
Make It Your Own
Let’s play around with this compote base because, trust me, versatility is its middle name.
- Swap out the apples for ripe peaches if they’re still in season. They add a lovely, juicy dimension.
- Try cranberries instead of dried cherries for a tarter twist. A little zing never hurt anyone!
- For a boozy touch, replace half the apple juice with a splash of bourbon or rum. It makes things just a little more grown-up.
- Add a pinch of ground ginger or nutmeg for extra warmth and spice. Your taste buds will thank you.
If you give this autumnal delight a go, I’d love to hear how it turns out — drop a comment or tag me in your fall feasting pics! Happy cooking, friend!
Related update: Fall Fruit Compote
Related update: Chocolate Chip Peanut Butter Mallow Dessert Bars