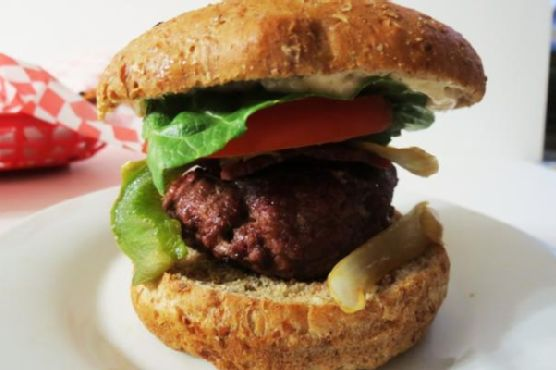
Cheesy Bacon Burger with Spicy Chipotle Aioli Sauce
Intro
There’s something magical about the smell of burgers grilling on a warm summer evening. It takes me back to those lazy Sunday afternoons at my grandparents’ house, where the whole family gathered around the backyard grill. My grandfather, with his well-worn apron and his signature chef’s hat, was the burger maestro. He always said the secret to a perfect burger was a little “surprise” inside. Inspired by his culinary wisdom and my love for a little heat, I’ve created a burger that combines the creamy goodness of cheese with the smoky allure of turkey bacon, all wrapped up in a spicy, tantalizing aioli. This Cheesy Bacon Burger with Spicy Chipotle Aioli Sauce is my homage to those cherished memories, with a contemporary twist that will make your taste buds dance with delight.
Why You’ll Love It
This burger isn’t just another patty on a bun; it’s a flavor explosion waiting to happen. The juicy beef patty is stuffed with creamy Swiss cheese that melts to perfection as it grills. The turkey bacon adds a savory crunch, while the spicy chipotle aioli brings just the right amount of heat to keep things exciting. Served on a wholesome whole wheat bun, this burger balances indulgence with nutrition. Whether you’re cooking for a backyard barbecue or a cozy family dinner, this recipe is sure to impress.
Ingredients
- 1 can of chipotle chiles in adobo sauce
- 1/2 cup fat free mayonnaise
- 2 cloves garlic, minced
- 1 teaspoon garlic powder
- 1/2 cup Greek yogurt
- 1 green bell pepper, diced
- 1 teaspoon ground cumin
- 1 teaspoon black ground pepper
- 1 pound lean ground beef
- 1 tablespoon fresh lime juice
- 1 onion, diced
- 4 whole wedges of Laughing Cow Swiss cheese
- 4 slices cooked turkey bacon
- 4 whole wheat hamburger buns
Instructions
- In a pan, cook the turkey bacon according to the directions on the package. Once cooked, remove the bacon and set it aside.
- In the same pan, add the diced bell pepper and onion, cooking until tender, about 10 minutes.
- In a small bowl, combine the ground beef with garlic powder and black ground pepper. Mix well.
- Divide the beef mixture into eight equal pieces, about 2 ounces each. Flatten each piece into a patty.
- Place half a wedge of cheese onto four patties, then top with the remaining patties. Press the edges to seal the cheese inside.
- Grill the burgers until cooked through, about 5 minutes per side.
- To make the spicy chipotle aioli sauce, combine chipotle chiles, mayonnaise, minced garlic, Greek yogurt, ground cumin, and lime juice in a small bowl. Whisk until smooth.
- Assemble the burgers by placing each patty on a whole wheat bun. Top with turkey bacon, sautéed peppers and onions, and a generous dollop of the spicy chipotle aioli sauce.
Tips
For the best results, use a meat thermometer to ensure your burgers reach an internal temperature of 160°F. This ensures they’re cooked safely without being overdone. If you prefer a less spicy aioli, reduce the number of chipotle chiles or substitute with smoked paprika for a milder flavor.
Variations & Substitutions
If you’re looking to switch things up, try using ground turkey or chicken instead of beef for a lighter option. You can also swap out Swiss cheese for cheddar or pepper jack for an extra kick. For a gluten-free version, use gluten-free hamburger buns or serve the burgers wrapped in lettuce leaves for a low-carb alternative.
Storage
Store any leftover burgers in an airtight container in the refrigerator for up to three days. The spicy chipotle aioli can be stored separately in a sealed jar for up to a week. For longer storage, consider freezing the cooked patties without the buns or toppings.
FAQ
Can I make the burgers ahead of time?
Yes, you can prepare the patties in advance and store them in the refrigerator for up to 24 hours before grilling. This can help save time during meal prep.
What can I serve with these burgers?
These burgers pair well with a variety of sides, such as sweet potato fries, a fresh green salad, or grilled corn on the cob. For a truly indulgent meal, consider serving them with a creamy coleslaw or homemade potato chips.
Is there a vegetarian version of this recipe?
Absolutely! You can substitute the beef with a plant-based protein like black bean patties or a store-bought vegetarian burger. Use a plant-based cheese alternative and skip the turkey bacon for a delicious vegetarian option.
Nutrition
While this recipe is a flavorful indulgence, it aims to maintain a balance with healthier ingredients. Opting for lean ground beef and whole wheat buns increases the nutritional value, while Greek yogurt in the aioli sauce provides a protein boost with reduced fat content. Adjust portions to suit your dietary needs.
Conclusion
Our Cheesy Bacon Burger with Spicy Chipotle Aioli Sauce is more than just a meal; it’s an experience. With each bite, you’ll savor the melty cheese, the crisp turkey bacon, and the zesty aioli. Whether you’re creating new memories with friends and family or enjoying a quiet dinner for one, this burger promises to deliver satisfaction and joy. So fire up the grill, gather your ingredients, and get ready to enjoy a delightful taste journey!
Related update: Cheesy Bacon Burger with Spicy Chipotle Aiolo Sauce