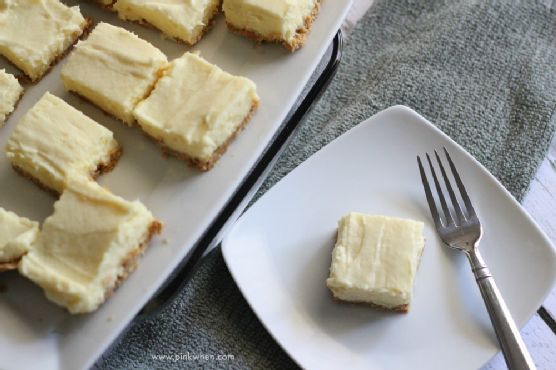
Creamy Lime Pie Square Bites | Made by Meaghan Moineau
Creamy Lime Pie Square Bites: A Zesty Delight for Every Occasion
Description: Dive into the refreshing world of citrus with our Creamy Lime Pie Square Bites! Perfectly balanced between tangy and sweet, these bite-sized treats are bound to become your go-to dessert. Whether you're a seasoned baker or a beginner, this recipe is both simple and rewarding. Plus, it's packed with the nostalgic flavors of family gatherings and summer picnics. Let's create some new memories together!
---
Ingredients
- Crust:
- 1 cup all-purpose flour
- 1 cup graham cracker crumbs
- 1 tablespoon lime zest
- 1/4 cup sugar
- 1/2 cup unsalted butter, melted
- Filling:
- The rest of the ingredients as listed above
Instructions
1. Preheat and Prepare:
- Preheat your oven to 350°F (175°C).
- Line an 8x8 glass square dish with foil for easy removal later.
2. Make the Crust:
- In a medium bowl, whisk together all the crust ingredients until you achieve a grainy consistency.
- Firmly press the mixture into the prepared dish, ensuring the bottom and edges are evenly covered.
3. Bake the Crust:
- Place the dish in the oven and bake for 10-15 minutes, or until the crust is golden brown.
- Remove from the oven and allow it to cool for about an hour.
4. Prepare the Filling:
- Combine all filling ingredients in a medium bowl.
- Mix well for about 30 minutes, then reduce speed and mix on low for an additional 3 minutes.
5. Assemble and Bake:
- Pour the filling over the cooled crust, ensuring it reaches all edges.
- Bake in the oven for 5-10 minutes, until the filling is just set.
6. Cool and Chill:
- Place the dish on a cooling rack for 15 minutes.
- Transfer to the refrigerator for 45 minutes to set completely.
7. Serve:
- Carefully lift the foil to remove the pie from the dish.
- Cut into bite-sized squares and serve.
A Taste of Nostalgia
Growing up, every summer my family would gather at my grandmother's house for a weekend of fun, laughter, and of course, food. My grandmother had a sprawling garden filled with citrus trees, and the air was always infused with the fresh scent of limes and lemons. One of my fondest memories is helping her make these Lime Pie Square Bites. I would zest the limes, and she would tell me stories of her own childhood. Those moments in the kitchen taught me more than just cooking; they were lessons in love, patience, and the joy of sharing a meal with family.
Difficulty Rating: 3/10
Category: Dessert
---
Whether you're reliving cherished memories or creating new ones, these Creamy Lime Pie Square Bites are the perfect treat. They offer a delightful balance of creamy and zesty flavors that are sure to impress your guests. Don't forget, if you have lime essential oil on hand, it can add an extra punch of citrus to your dish. Just ensure you're using a high-quality, food-grade oil.
Explore More Lime-Infused Delights:
- Coconut Lime Spritzer
- Blackberry Lime Margaritas
- Strawberry Limeade
Note: Always ensure that any essential oils used in cooking are labeled as food-grade, as not all oils are safe for consumption.
Join our community of over 500,000 subscribers to receive more delicious recipes and exclusive content. Sign up today and start your culinary adventure with us!
---
Thank you for stopping by! If you try these Creamy Lime Pie Square Bites, leave a comment and let us know how they turned out. Happy baking!