Stuffed Salmon With Tomato-Olive Tapenade | Made by Meaghan Moineau

Stuffed Salmon With Tomato-Olive Tapenade | Made by Meaghan Moineau

A Taste of Home: Stuffed Salmon with Tomato-Olive Tapenade


Description: Dive into a delightful culinary experience with our Stuffed Salmon with Tomato-Olive Tapenade. This recipe combines the rich flavors of brie cheese and fresh dill with a vibrant tomato-olive tapenade, creating a meal that's not just delicious but also holds a special place in our family's heart. Perfect as a main dish, this recipe is rated 6 out of 10 in difficulty, making it an achievable yet impressive addition to your dining table.

The Nostalgic Story Behind the Dish


Growing up, Sunday dinners were a cherished tradition in our household. My grandmother, who hailed from the coastal town of Astoria, Oregon, would often regale us with tales of her childhood spent by the sea. She'd talk about how fresh seafood was a staple in their family meals, and how she learned to cook salmon from her own mother, using recipes passed down through generations.


One particular Sunday stands out in my memory. I must have been around ten years old, eagerly watching as Grandma prepared her signature stuffed salmon. The kitchen was filled with the comforting aroma of olive oil and garlic simmering on the stove. I remember her gentle hands as she carefully rolled the salmon fillets, her eyes twinkling as she shared stories of her youthful adventures along the rugged Oregon coast.


That evening, as we sat around the table, the stuffed salmon was the star of the show. The combination of creamy brie and aromatic dill, paired with the tangy tomato-olive tapenade, was simply divine. We all savored every bite, the flavors mingling perfectly, evoking a sense of togetherness and warmth that only a family meal can bring.


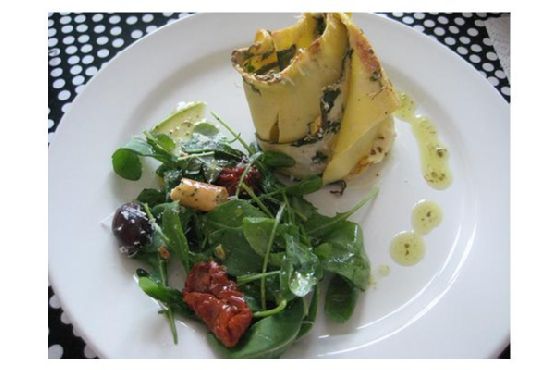
Recipe: Stuffed Salmon with Tomato-Olive Tapenade


Ingredients:

- 4 salmon filets

- 4 oz brie cheese, sliced


- 1 tablespoon dill weed


- 2 cloves garlic, minced


- 2 tablespoons olive oil


- 1/2 cup olives, chopped


- 1/2 cup onion, chopped


- Salt and pepper to taste


- 1 cup fresh spinach, chopped


- 2 tomatoes, chopped


Instructions:

1. Preheat Oven: Set your oven to 350°F (175°C).
2. Prepare Salmon: Pound the salmon fillets gently to flatten them slightly. Rub each fillet with olive oil and sprinkle with dill weed.
3. Spinach Mixture: In a bowl, combine the chopped spinach, onions, and garlic. Season the mixture with a pinch of salt to enhance the flavors.
4. Stuff and Roll: Lay out each salmon fillet and spread a generous amount of the spinach mixture on top. Place slices of brie cheese over the spinach. Carefully roll the salmon fillets and secure them with kitchen string.
5. Bake: Place the rolled salmon on a baking sheet and bake in the preheated oven for approximately 15-18 minutes, or until the salmon is cooked through and the cheese is melted.
6. Prepare Tapenade: Meanwhile, use a food processor to chop the olives and tomatoes together until well-blended. This will serve as your flavorful tapenade.
7. Serve: Once the salmon is ready, remove it from the oven and let it rest for a minute. Spread the tomato-olive tapenade over each salmon roll before serving.

Conclusion


Stuffed Salmon with Tomato-Olive Tapenade is not just a dish; it's a journey back to simpler times, a reminder of family gatherings and the joy of sharing a meal with loved ones. The combination of fresh ingredients and rich flavors makes it a standout main dish, perfect for both special occasions and everyday dining. Give this recipe a try and create your own family memories around the dinner table.

Read more about Appetizers

Read more about Main Dishes

Read more about Desserts

Eggplant Curry | Made by Meaghan Moineau

Eggplant Curry | Made by Meaghan Moineau

Title: A Heartwarming Bowl: Eggplant Curry with a Family Twist
Description: Dive into the rich, aromatic world of Eggplant Curry, a dish that marries bold spices with creamy coconut milk for a comforting meal reminiscent of family gatherings. This main dish is not just a feast for the senses but a journey down memory lane, capturing the essence of familial warmth and tradition. Rated 6/10 in difficulty, this recipe is perfect for those looking to create a delicious, heartwarming meal with a touch of nostalgia.

---


A Family Tradition: The Story Behind the Eggplant Curry


There's something magical about the way certain dishes can transport you back to cherished family moments. For me, Eggplant Curry is one such dish. Every time I prepare it, I'm instantly reminded of the bustling kitchen in my grandmother's house, where the air was always thick with the scent of spices and laughter.


My grandmother was a culinary wizard in her own right, and her Eggplant Curry was legendary within our family. She would spend hours meticulously preparing the ingredients, her hands expertly working with the eggplants, onions, and spices. Her kitchen was a symphony of sizzling sounds and vibrant colors, with diced heirloom tomatoes and golden turmeric setting the stage for a meal that was as beautiful as it was delicious.


As a child, I would sit at the kitchen table, watching her every move with eager anticipation. She would often let me stir the spices together—a task I took very seriously. The highlight was always the moment she would let me taste the rich, coconut-infused sauce, a tradition that has stayed with me to this day.


This Eggplant Curry recipe, adapted from my grandmother's version, captures the essence of those family gatherings. With every bite, I'm reminded of the warmth and love that filled those days, and it's my hope that it brings a similar joy to your table.


Ingredients:


- 1 cup coconut milk (divided)


- 2 yellow onions, diced


- 3 cloves garlic, minced


- 2 eggplants, cubed


- 4 cups diced heirloom tomatoes


- 1 tablespoon ground cumin


- 1 tablespoon ground coriander


- 1 teaspoon cayenne pepper


- 1 teaspoon turmeric


- 1 teaspoon crushed red pepper flakes


- 1 tablespoon fresh ginger, grated


- Salt to taste


- 1 cup Greek yogurt (plus more for serving)


Instructions:


1. Sauté the Aromatics: In a large skillet, heat ½ cup of coconut milk over medium heat. Add the diced onions and minced garlic, sautéing until they become soft and golden brown, about 12 minutes.
2. Prepare the Crockpot: Place the cubed eggplants and diced heirloom tomatoes into a 6-quart or larger crockpot.
3. Mix the Spices: In a small bowl, combine the ground cumin, ground coriander, cayenne pepper, turmeric, crushed red pepper flakes, and salt. Stir them together until well blended.
4. Assemble the Curry: Pour the remaining coconut milk, spice mixture, and grated ginger into the crockpot. Once the onion and garlic are finished sautéing, add them to the crockpot and mix everything together until well combined.
5. Cook the Curry: Set the crockpot to high and allow the curry to cook for 6 to 8 hours, stirring periodically to ensure even cooking.
6. Add the Yogurt: About 30 minutes before serving, stir in the Greek yogurt, mixing it well into the curry. Allow it to cook for an additional 30 minutes.
7. Prepare the Quinoa: Follow the directions on the back of your quinoa package. Typically, a 2:1 water to quinoa ratio works well. Simmer for about 30 minutes until the quinoa is fluffy and tender.
8. Serve: Serve the curry over a bed of quinoa, garnishing each bowl with a dollop of Greek yogurt for added creaminess.

Bringing It All Together


This Eggplant Curry is more than just a meal—it's a connection to the past and a celebration of the present. Whether you're sharing it with family or enjoying it on your own, may it bring warmth to your heart and deliciousness to your table.

Read more about Appetizers

Read more about Main Dishes

Read more about Desserts

Salmon Confit with Lemongrass Sauce | Made by Meaghan Moineau

Salmon Confit with Lemongrass Sauce | Made by Meaghan Moineau

Title: A Taste of Home: Savory Salmon Confit with Zesty Lemongrass Sauce
Description: Dive into the delightful world of flavors with our Salmon Confit with Lemongrass Sauce. This dish combines the rich taste of salmon with the aromatic allure of lemongrass, creating a harmony of textures and tastes that is sure to impress. Perfect for a special family dinner or an elegant evening meal, this recipe holds a special place in my heart, evoking fond memories of gatherings that were filled with laughter and love.
The Story Behind the Dish

Growing up, Sunday evenings were a cherished time in our home. It was the one day of the week when everyone gathered around the dining table for a family meal, free from the distractions of busy schedules. My mother, an avid cook with a knack for experimenting, introduced us to a myriad of flavors and dishes. Among them, the Salmon Confit with Lemongrass Sauce was a favorite.


I remember the first time my mother prepared this dish. The kitchen was filled with the fragrance of fresh lemons and the distinct aroma of lemongrass. As she carefully laid the salmon fillets over the lemon slices, she shared stories of her childhood, recounting how her own mother would create magic in the kitchen with just a few simple ingredients. It was in those moments that I realized food was more than just sustenance; it was a bridge to our past and a canvas for creating new memories.


As the salmon slowly cooked in the oven, we would set the table with our best plates, a ritual that always made the meal feel extra special. The dish was served with a medley of vibrant vegetables—carrots and spinach, their colors as bright as the laughter that filled the room. The first bite was always an explosion of flavors, the richness of the salmon perfectly complemented by the creamy, tangy lemongrass sauce. It was a meal that brought us together, one that we eagerly anticipated each week.


Recipe: Salmon Confit with Lemongrass Sauce

*Ingredients:*


- Skinless salmon fillets


- 2 tablespoons extra virgin olive oil


- Salt and pepper (Masterfoods Garlic Pepper recommended)


- 2 lemons


- 1 large carrot


- 150g baby spinach leaves


- 2 tablespoons cooking oil


- 2 tablespoons butter


- 1 tablespoon minced garlic


- 2 stalks lemongrass


- 150ml fresh cream


- 1 teaspoon liquid chicken stock concentrate


- 1 tablespoon lemon juice


- Chives for garnish


*Instructions:*


1. Preheat the Oven: Set your oven to 120°C. Adjust according to your oven's tendencies.
2. Prepare the Salmon: Coat salmon fillets with olive oil, salt, and pepper. Lay lemon slices on a lined baking tray, place fillets atop.
3. Bake: Cook in the oven for 25-30 minutes depending on thickness.
4. Vegetable Medley: Stir fry sliced carrots in oil and butter for a minute. Set aside. In the same pan, cook garlic and spinach until wilted. Add seasonings and set aside.
5. Lemongrass Sauce: In a saucepan, cook lemongrass in butter. Add cream and chicken stock, boiling until thickened. Finish with lemon juice.
6. Assemble the Dish: On a plate, lay the spinach and carrots, top with salmon, drizzle sauce, and garnish with chives.
Difficulty Rating: 7/10
Classification: Main Dish

Creating this Salmon Confit with Lemongrass Sauce is more than just cooking; it's an experience that brings warmth and nostalgia to the dining table. Perfect for those who love to explore new flavors while honoring cherished memories, this dish is a testament to the power of food in connecting us to our past and each other.

Read more about Appetizers

Read more about Main Dishes

Read more about Desserts

Aromatic perch fillets | Made by Meaghan Moineau

Aromatic perch fillets | Made by Meaghan Moineau

Title: "Aromatic Perch Fillets: A Nostalgic Journey Through Flavor"
Description: Dive into a culinary experience with our Aromatic Perch Fillets, a recipe that not only tantalizes your taste buds with its rich flavors but also evokes heartwarming family memories. This main dish, rated a 6 out of 10 in difficulty, is perfect for those who appreciate the art of cooking with spices. With its delightful combination of aromatic spices and crispy texture, it's sure to become a cherished favorite in your own kitchen.

---


Aromatic Perch Fillets: A Nostalgic Journey Through Flavor


There’s something incredibly comforting about a dish that brings back fond memories, and for me, Aromatic Perch Fillets do just that. This delightful main dish, infused with the warm and inviting spices of bay leaves, cardamom, and cinnamon, takes me back to countless family gatherings by the lake where laughter, love, and the smell of freshly fried fish filled the air.


Ingredients:


- Fresh perch fillets


- 1 cup flour


- ½ cup corn flour


- Sea salt


- Ground pepper


- 1 tablespoon seasoning mix (bay leaves, black peppercorn, cardamom, cinnamon, ground nutmeg, sweet ground paprika)


- 1 cup light beer


- Peanut oil for frying


- Garlic


- Black peppercorn


- Potato salad for serving


Instructions:


1. Prepare the Flour Mixture: In a large bowl, combine the flour, corn flour, sea salt, and freshly ground pepper.
2. Craft the Seasoning Mix: Finely grind bay leaves, black peppercorn, cardamom, cinnamon, nutmeg, and sweet paprika. Store any excess in an airtight glass bottle in the refrigerator for future culinary adventures.
3. Create the Batter: Add the seasoning mix to the flour mixture and stir well. Gradually pour in light beer, whisking constantly until you achieve a smooth batter consistency.
4. Fry the Fillets: Heat peanut oil in a frying pan over medium-high heat. Coat the perch fillets in the batter, then fry each side for about 3 minutes or until they reach a golden brown perfection. Transfer the fillets to a warm place to keep them hot and crispy.
5. Bonus Pancakes: With any remaining batter, form small pancakes and fry in the same oil. These make a delightful accompaniment to the perch fillets.
6. Serve: Pair the fillets with a refreshing potato salad and enjoy immediately.

A Taste of Nostalgia


As a child, my summers were spent at our family cabin by the lake. The highlight of each day was when my grandfather and I would head out early in the morning to fish. The joy of reeling in a fresh perch was only surpassed by the excitement of knowing what delicious dish awaited us later. Back at the cabin, my grandmother would work her magic, transforming our catch into the most aromatic, golden fillets. The house would fill with the warm scent of spices, mingling with laughter and stories shared around the dining table.


This dish is more than just a meal; it's a portal to those cherished memories. Cooking it now, in my own kitchen, I find myself transported back to those sunny days by the lake, surrounded by family and filled with the simple joys of life.


Difficulty & Classification:


- Difficulty: 6/10 - This recipe requires some precision with the batter and frying but is manageable for most home cooks.
- Classification: Main Dish

This aromatic perch fillet recipe not only satisfies your palate but also warms your heart, proving that the best recipes are those that connect us to our past while creating new memories for the future. Enjoy this dish with loved ones and let it become a staple in your family's culinary traditions.

Read more about Appetizers

Read more about Main Dishes

Read more about Desserts

Turkish Chicken Salad with Home-made Cacik Yogurt Sauce | Made by Meaghan Moineau

Turkish Chicken Salad with Home-made Cacik Yogurt Sauce | Made by Meaghan Moineau

Title: Savoring Tradition: Turkish Chicken Salad with Homemade Cacik Yogurt Sauce
Description:

Dive into a world of vibrant flavors with our Turkish Chicken Salad, paired with a refreshing homemade Cacik Yogurt Sauce. This dish not only tantalizes the taste buds but also carries a rich family tradition, weaving nostalgia into every bite. Perfect for a delightful main dish, this recipe is your gateway to savoring a unique culinary heritage.


---


Introduction


In the heart of our family kitchen, the aroma of freshly roasted chicken mingling with the zing of lemon juice and herbs would announce a much-anticipated gathering. Our Turkish Chicken Salad with Homemade Cacik Yogurt Sauce was more than just a meal; it was a tapestry of memories, woven with laughter, stories, and the comforting hum of togetherness.


Ingredients


- 1 whole roast chicken


- 1 carrot, grated


- 1 Lebanese cucumber, chopped


- 1 cucumber, finely chopped for Cacik


- 2 pickled cucumbers / gherkins, sliced


- 1 red onion, thinly sliced


- 1 red cabbage, thinly sliced


- 2 tomatoes, chopped


- 1 green i gem lettuce, torn


- 2 jalapeno peppers, charred


- 2 cloves of garlic, minced


- Juice of 2 lemons


- 1 cup plain yoghurt


- Olive oil


- Handful of fresh parsley, finely chopped


- Salt & pepper to taste


Instructions


Step 1: Prepare the Cacik Yogurt Sauce

Chop the cucumber into tiny pieces and place them in a bowl. Sprinkle with salt and set aside for 30 minutes. This allows the cucumbers to release their juices, infusing the yogurt with a rich flavor. After 30 minutes, mix the cucumbers with plain yogurt and minced garlic. Stir well and set aside.


Step 2: Char the Peppers

On a medium-high heat griddle pan, coat the jalapeno peppers with olive oil and char them until they develop a smoky aroma and a nice charred appearance.


Step 3: Create the Tomato Salsa

In a bowl, combine chopped tomatoes, Lebanese cucumber, thinly sliced red onion, and finely chopped parsley. Drizzle with the juice of one lemon, season with salt and pepper, and refrigerate for 30 minutes to an hour, stirring occasionally.


Step 4: Assemble the Salad

In a large bowl, mix together the torn lettuce, sliced red cabbage, and grated carrot. Tear the roasted chicken into large pieces and add to the mix. Drain the tomato salsa, reserving the juice, and combine it with the salad along with the sliced gherkins.


Step 5: Serve

Arrange the salad on a large plate or board. Serve with charred jalapeno peppers, Cacik yogurt sauce, the reserved salsa vinaigrette, and a dash of chili sauce for an extra kick.


Family Memory


Every summer, my grandmother would prepare this dish as the centerpiece for our family reunion. As kids, my siblings and I would gather around the table, eager to sneak bites of the crispy chicken and tangy Cacik while she wasn’t looking. The sound of my grandmother's laughter as she caught us in the act is a melody that still lingers in my heart. This dish isn't just food; it's a cherished reminder of those sunlit days filled with love, stories, and the unspoken bond of family.


Difficulty Rating


- Difficulty: 5/10
- Category: Main Dish

---


This Turkish Chicken Salad with Homemade Cacik Yogurt Sauce is a delightful dance of flavors and textures, bringing the vibrant spirit of Turkish cuisine to your table. Whether you're reliving family memories or creating new ones, this dish is sure to be a memorable addition to your culinary repertoire. Enjoy!

Read more about Appetizers

Read more about Main Dishes

Read more about Desserts

Lasagne Roll Ups | Made by Meaghan Moineau

Lasagne Roll Ups | Made by Meaghan Moineau

Title: Rolling with Tradition: Delightful Lasagne Roll Ups for Family Gatherings
Description: Discover a heartwarming twist on a classic Italian favorite with our Lasagne Roll Ups. Packed with vibrant flavors and a touch of nostalgia, this dish is perfect for bringing families together. Dive into this main dish recipe that’s rich in taste and memories, rated 6/10 on the difficulty scale.

---


Ah, lasagne! A dish that has graced many tables, bringing warmth and comfort to countless gatherings. But have you ever tried Lasagne Roll Ups? This delightful variation not only elevates the classic flavors but also adds a touch of elegance to your dining experience.


Ingredients:

- Fresh finely-chopped basil leaves


- Red thinly-sliced bell peppers


- Black pepper


- Chicken broth


- Dried thyme


- 2 garlic cloves, minced


- Fresh lemon juice


- A pinch of nutmeg


- Olive oil


- 1 finely-chopped onion


- Parmesan cheese


- Dry lasagne pasta sheets


- Red dried pepper flakes


- Ricotta cheese


- Salt


- Shredded mozzarella cheese


- 1 packet frozen spinach, thawed and drained


- Unsalted butter


Instructions:
1. Prepare the Sauce: In a skillet, heat olive oil over moderately-low heat. Add garlic, onion, red pepper flakes, thyme, and salt and pepper to taste. Stir until the onion softens. Reserve 3 tablespoons of this mixture in a bowl.
2. Cook the Peppers: Add bell peppers and chicken broth to the skillet. Cover and simmer for about 10 minutes until the peppers are very soft. Puree the mixture in a blender until smooth, then return it to the skillet. Swirl in unsalted butter and stir in basil and lemon juice.
3. Cook the Noodles: Cook the lasagne noodles according to package directions. Rinse with cold water and drain.
4. Preheat the Oven: Set your oven to 375°F (190°C).
5. Make the Filling: In a bowl, combine the reserved onion mixture, 1/4 cup Parmesan cheese, mozzarella, ricotta, nutmeg, spinach, and salt and pepper. Mix well.
6. Assemble the Roll Ups: Spread 1 cup of sauce in a 9x9x2-inch baking pan. Spread 3 tablespoons of filling on each noodle, roll up like a jelly roll, and place seam-side down in the pan. Repeat with remaining noodles.
7. Bake: Top with remaining sauce, cover with foil, and bake for 25 minutes. Uncover, sprinkle with remaining Parmesan cheese, and bake uncovered until golden, about 5 more minutes.

This recipe yields 6 servings of pure joy.


Nostalgic Story:

Growing up, Sunday family dinners were a sacred tradition in our household. Grandma would always whip up her legendary lasagne, the recipe passed down from her mother, who brought it over from the old country. But it wasn't until one chilly autumn afternoon that she decided to give the classic a twist.


I remember the warmth of the kitchen, the aroma of garlic and basil wafting through the air, blending with the laughter of my cousins and the gentle hum of the radio. Grandma, with her ever-present apron, decided to surprise us with Lasagne Roll Ups. It was her way of honoring tradition while embracing creativity.


As I helped her spread the filling and roll the noodles, she shared stories of her childhood, the challenges and joys of adapting to a new world while preserving her heritage. Those roll ups were more than just a meal; they were a testament to resilience and love. Every bite was a journey back to simpler times, a reminder of the strength found in family bonds.


To this day, whenever I prepare Lasagne Roll Ups, I am transported back to that cozy kitchen, surrounded by love and laughter, reminded of the power of food to connect us across generations.


Difficulty: 6/10
Classification: Main Dish

Whether you’re creating new memories or honoring old traditions, Lasagne Roll Ups are a delightful way to bring everyone together. Enjoy!

Read more about Appetizers

Read more about Main Dishes

Read more about Desserts

Rocky Road Rice Krispie Treats | Made by Meaghan Moineau

Rocky Road Rice Krispie Treats | Made by Meaghan Moineau

Title: Nostalgic Indulgence: Rocky Road Rice Krispie Treats
Description: Dive into the sweet, crunchy, and nostalgic world of Rocky Road Rice Krispie Treats. This delightful dessert combines the comfort of childhood favorites with a sophisticated twist, perfect for gatherings or a cozy night in. Discover a treasured family memory woven into this recipe and learn how to make this easy yet irresistible treat.

---


Nostalgic Indulgence: Rocky Road Rice Krispie Treats

There's something inherently comforting about a treat that takes you back to cherished moments of childhood. Rocky Road Rice Krispie Treats do just that, blending the simplicity of a well-loved snack with the decadent flavors of bittersweet chocolate and almonds. These treats are more than just a dessert; they are a bridge to the past, a reminder of family gatherings, and the laughter that filled the air.


A Family Memory

Growing up, my family had a tradition of gathering every Sunday afternoon for a potluck-style feast. Each family member brought their signature dish, but my grandmother's Rocky Road Rice Krispie Treats were always the highlight. She had a knack for turning simple ingredients into something magical, and these treats were no exception.


I remember standing on tiptoe to peer over the kitchen counter, watching her expertly melt the butter and marshmallows in her well-worn soup pot. The aroma of almond extract and vanilla filled the air, wrapping us in a warm, sweet embrace. She would let me stir in the rice cereal and almonds, my small hands guided by hers, as she shared stories from her childhood. Those afternoons, filled with stories and laughter, are memories I hold dear.


Recipe: Rocky Road Rice Krispie Treats
Ingredients:

- 4 tablespoons butter


- 1 bag (10 oz) chocolate vanilla swirl marshmallows


- 1 teaspoon almond extract


- 1 teaspoon vanilla extract


- 6 cups rice krispies


- 1 cup + 1/3 cup almonds, chopped


- 6 oz bittersweet chocolate, melted


- 1/2 teaspoon kosher salt


Instructions:

1. In a large soup pot, melt the butter and chocolate vanilla swirl marshmallows over medium heat, stirring until smooth.


2. Add the almond and vanilla extracts, stirring to incorporate their fragrant flavors into the marshmallow mixture.


3. Remove from heat and gently fold in the rice krispies and 1 cup of chopped almonds, ensuring each piece is well-coated.


4. Spread the mixture into a 9x13-inch dish sprayed with baking spray. Use a spatula to flatten and smooth the top.


5. Drizzle the melted bittersweet chocolate over the top, then sprinkle the remaining 1/3 cup of almonds evenly.


6. Finish with a sprinkle of kosher salt to enhance the flavors.


7. Allow to cool completely before cutting into squares. For best results, let them sit in the refrigerator for about an hour once they've reached room temperature.


Difficulty: 3/10
Category: Dessert

These Rocky Road Rice Krispie Treats are a delightful blend of crunch and sweetness, with a touch of nostalgia in every bite. Perfect for a family gathering or as a comforting indulgence after a long day, this recipe is a testament to the simple joys of life and the lasting memories of family traditions. Whether you're making them for the first time or the fiftieth, these treats are sure to bring a smile to your face and warmth to your heart.

Read more about Appetizers

Read more about Main Dishes

Read more about Desserts

Cajun Seafood and Andouille Sausage Gumbo | Made by Meaghan Moineau

Cajun Seafood and Andouille Sausage Gumbo | Made by Meaghan Moineau

Title: A Hearty Bowl of Tradition: Cajun Seafood and Andouille Sausage Gumbo
Description: Dive into the rich and spicy world of Cajun cuisine with our delectable Seafood and Andouille Sausage Gumbo. This main dish combines the fiery flavors of the South with a heartwarming family story. Perfect for those seeking a culinary adventure, this gumbo rates an 8 out of 10 on the difficulty scale, making it a rewarding challenge for any home chef.

---


Cajun Seafood and Andouille Sausage Gumbo: A Taste of Home

There’s something magical about a dish that can transport you to another time and place with just one taste. For me, Cajun Seafood and Andouille Sausage Gumbo is more than just a meal; it’s a gateway to cherished family memories. As I prepare this dish, the kitchen fills with the tantalizing aroma of spices, instantly reminding me of the lively Sunday afternoons spent at my grandmother’s house.


Ingredients:

- Andouille sausage


- Whole bay leaves


- White pepper


- Black pepper


- Cayenne pepper


- Celery


- Clam juice


- Cooked white rice


- Canned fresh crab meat


- Dried thyme


- Garlic


- Jalapeno pepper


- Red orange bell pepper


- Dried oregano


- Oysters


- Peanut oil


- Shrimp


- White flour


Instructions:
1. Prepare the Seasoning Mix: In a small bowl, combine the seasoning ingredients and set aside. This blend is the heart of the dish, giving it the authentic Cajun kick.
2. Vegetable Medley: In a medium bowl, combine the onions, peppers, and celery, then set aside. This "holy trinity" is a staple in Cajun cooking, providing a flavorful base.
3. Sauté the Sausage: In a lightly oiled 5-quart Dutch oven, brown the sausage rounds over medium-high heat and set aside. The sausage adds a smoky depth to the gumbo.
4. Create the Roux: Add the peanut oil to the Dutch oven. When it starts to smoke, slowly combine the flour, whisking continuously until the roux reaches a dark reddish-brown color. This process requires patience but is essential for the rich, nutty flavor of the gumbo.
5. Add the Vegetables: Immediately add half of the vegetable medley to the roux, stirring for 1 minute. Then, add the remaining vegetables, mix thoroughly, and cook for 2 more minutes.
6. Spice It Up: Add the seasoning mix, stir well, and cook for about 2 minutes. Then add the garlic, stirring for another minute to release its aroma.
7. Simmer the Stock: Add the fish stock or clam juice, mixing well. Bring the mixture to a boil, then reduce to a simmer and cover. Let it simmer for about 30 minutes, allowing the flavors to meld together.
8. Combine the Seafood and Sausage: Add the reserved browned sausage rounds, crab, shrimps, and oysters with their liquid. Cook over medium heat for about 10 minutes, stirring occasionally.
Serving Suggestion:

Serve the gumbo over cooked white rice, allowing the rice to absorb the flavors of the broth. Each spoonful is a delightful blend of spice and seafood, reminiscent of the vibrant culture from which it originates.


A Nostalgic Memory:

As a child, I often sat on a high stool, watching my grandmother expertly prepare her famous gumbo. Her hands moved with a rhythm that spoke of years of practice, and she’d always wink at me when she added a little extra cayenne, just for that extra kick. The kitchen was her domain, and I was her eager apprentice. Family would gather around her large dining table, bowls steaming, laughter echoing off the walls. To this day, the taste of gumbo is intertwined with memories of warmth, love, and laughter.


Difficulty Rating: 8/10

While not for the faint-hearted, the process of creating this gumbo is as rewarding as it is complex, making it a perfect main dish for special occasions or when you’re longing for a taste of home.


---


Whether you're a seasoned chef or an enthusiastic novice, this Cajun Seafood and Andouille Sausage Gumbo promises a culinary journey like no other, steeped in tradition and bursting with flavor. So grab your apron, and let the magic of Cajun cooking envelop your senses.

Read more about Appetizers

Read more about Main Dishes

Read more about Desserts

Polish Rugelach | Made by Meaghan Moineau

Polish Rugelach | Made by Meaghan Moineau

Title: A Taste of Tradition: Crafting Polish Rugelach with Love and Legacy
Description: Dive into the heartwarming world of Polish Rugelach, a delightful dessert that brings together family, tradition, and the comforting aromas of cinnamon and nutmeg. Discover a cherished family memory that makes this dessert a beloved staple at our family gatherings. With a difficulty rating of 6/10, this treat is perfect for those looking to add a little sweetness and nostalgia to their dessert repertoire.

---


A Taste of Tradition: Crafting Polish Rugelach with Love and Legacy

In the world of desserts, few can rival the charm and history of Polish Rugelach. This scrumptious pastry, with its rich blend of flavors and textures, is not just a dessert; it’s a slice of heritage that has been lovingly passed down through generations. Whether served at a festive gathering or enjoyed as a quiet afternoon indulgence, Rugelach holds a special place in many hearts and kitchens. Today, I invite you to join me on a journey through time and taste as we explore the making of this beloved confection.


The Rugelach Recipe: A Symphony of Flavors
To create the perfect Polish Rugelach, you'll need the following ingredients:

- 2 cups all-purpose flour


- 2 tablespoons cocoa powder


- 8 ounces cream cheese, softened


- 1/2 cup dried cranberries


- 1/2 cup dried raisins


- 1 teaspoon ground cinnamon


- 1/4 teaspoon nutmeg


- 1 cup sugar


- 1 cup unsalted butter, softened


- 1/2 cup finely chopped walnuts


Instructions:
1. Prepare the Dough: In a large mixing bowl, beat the unsalted butter and cream cheese together until light and creamy. Gradually add sugar and continue to beat until the mixture is fluffy. Slowly incorporate the all-purpose flour and cocoa powder, mixing until a soft dough forms. Divide the dough into two equal portions, wrap them in plastic wrap, and refrigerate for at least 30 minutes.
2. Filling and Assembly: Preheat your oven to 350°F (175°C). Roll out one portion of dough on a floured surface into a 1/8-inch-thick circle. Sprinkle half of the ground cinnamon, nutmeg, chopped walnuts, dried cranberries, and raisins evenly over the dough.
3. Shape the Rugelach: Using a sharp knife, cut the dough into 12-16 wedges, like a pizza. Starting from the wide edge, roll each wedge towards the point, forming a crescent shape. Repeat with the second portion of dough.
4. Baking: Arrange the Rugelach on a parchment-lined baking sheet. Bake for 15-20 minutes or until golden brown. Allow them to cool slightly before serving.
A Nostalgic Family Story

Every time I bake Rugelach, I’m instantly transported back to my grandmother's cozy kitchen. The air would be filled with the warm, spicy scents of cinnamon and nutmeg, mingling with the rich, buttery aroma of freshly baked pastries. Rugelach was a staple at our family gatherings, especially during the holidays.


I vividly remember one snowy Christmas Eve when my grandmother, with her gentle hands and loving smile, taught me the art of rolling the dough just right. As we worked side by side, she shared stories of her own childhood in Poland, where Rugelach was a cherished treat that brought families together. The kitchen was a place of laughter and love, and the simple act of baking turned into an unforgettable bonding experience. Now, each time I make Rugelach, I feel her presence, and the spirit of those cherished family moments comes alive.


Conclusion:

Polish Rugelach is more than just a dessert; it's a bridge connecting us to our past and a delicious way to create new memories. With a difficulty rating of 6/10, this dessert offers a perfect balance between challenge and reward. Whether you're a seasoned baker or a curious novice, making Rugelach is an opportunity to savor both the flavors and the stories that make this pastry so special.


So, gather your ingredients, clear your counter, and take a moment to indulge in the warmth and nostalgia of Polish Rugelach. As you savor each bite, remember that you’re not just enjoying a dessert—you’re partaking in a time-honored tradition that celebrates the love and joy of family.

Read more about Appetizers

Read more about Main Dishes

Read more about Desserts

Couscous Salad With Roasted Vegetables | Made by Meaghan Moineau

Couscous Salad With Roasted Vegetables | Made by Meaghan Moineau

Title: "Savoring Summer: Couscous Salad with Roasted Vegetables"
Description: Dive into a vibrant and wholesome dish that captures the essence of summer with every bite. Our Couscous Salad with Roasted Vegetables is not only a feast for the senses but also a cherished family tradition. Perfect as a main dish, this recipe is bursting with flavors and memories, rated at an easy 5 out of 10 on the difficulty scale.

---


A Taste of Tradition: Couscous Salad with Roasted Vegetables


As the sun begins to dip into the horizon, casting a golden hue over our backyard, I am reminded of the countless summer evenings spent gathered around the family table. The aroma of roasted vegetables mingling with the fragrant notes of basil pesto would waft through the air, a prelude to the delicious meal ahead. My grandmother, the culinary artist of our family, would orchestrate these gatherings with a dish that has since become a treasured family tradition: Couscous Salad with Roasted Vegetables.


Ingredients:


- 1 cup regular couscous


- 2 cups chicken stock


- 3 tablespoons olive oil


- 1/4 cup sun-dried tomatoes, chopped


- 2 tablespoons basil pesto


- 2 tablespoons balsamic vinegar


- Salt and pepper, to taste


- 1/2 cup feta cheese, crumbled


- 2 medium-sized zucchinis


- 3 yellow squashes


- 1 red bell pepper


- 1 cup brown mushrooms, sliced


- 3 garlic cloves, minced


- 1 small butternut squash, cubed


- 2 red onions, sliced


- 1 bunch asparagus, trimmed


Instructions:


1. Prepare the Couscous: In a pot, add the couscous and pour over the hot chicken stock. Simmer for 15 to 20 minutes until the stock is fully absorbed. This step infuses the couscous with a savory depth, a secret my grandmother swore by.
2. Roast the Vegetables: Preheat your oven to 400°F. Grease an ovenproof dish with non-stick spray. Arrange zucchinis, yellow squash, red bell pepper, mushrooms, garlic, butternut squash, and red onions in a single layer. Drizzle with olive oil and roast for about 20 to 25 minutes. Add the asparagus after the first 10 minutes and gently stir. Once done, drizzle with a touch of balsamic vinegar.
3. Mix the Salad: Stir in the extra-virgin olive oil, sun-dried tomatoes, and basil pesto into the cooked couscous, making it moist and fragrant. Season with balsamic vinegar, salt, and pepper. Add the roasted vegetables and mix well. Finally, sprinkle with feta cheese and gently fold everything together.
4. Serve: This salad can be enjoyed warm or cooled to room temperature. It pairs beautifully with grilled beef or chicken, making it a versatile addition to any meal.

A Nostalgic Touch:


Every bite of this salad takes me back to those balmy evenings in my grandmother's garden, where laughter was as abundant as the food on our plates. She would tell stories of her childhood, where the simple joys of life were celebrated with food that nourished both body and soul. The Couscous Salad with Roasted Vegetables was her way of bringing us together, a dish that transcended generations and became a staple at our family gatherings.


So, the next time you’re looking for a dish that is both nourishing and heartwarming, try this Couscous Salad with Roasted Vegetables. Let it be more than just a meal; let it be a bridge to cherished memories and the creation of new ones.


Difficulty: 5/10
Classification: Main Dish

---


Whether it's a family reunion or a quiet dinner at home, this Couscous Salad with Roasted Vegetables is sure to become a beloved part of your culinary repertoire. Enjoy the vibrant flavors and the warm memories it brings to your table.

Read more about Appetizers

Read more about Main Dishes

Read more about Desserts

Siew Mai | Made by Meaghan Moineau

Siew Mai | Made by Meaghan Moineau

Title: "Savor the Tradition: Crafting Authentic Siew Mai at Home"
Description:

Journey into the heart of Asian cuisine with our detailed guide to making authentic Siew Mai. Discover the blend of succulent pork, fragrant glutinous rice, and traditional Chinese flavors that make this dish a cherished family favorite. Infused with a personal story and rated for difficulty, this recipe will guide you in creating an appetizer that’s sure to impress.


---


Savor the Tradition: Crafting Authentic Siew Mai at Home

In the world of dim sum, Siew Mai holds a special place. These delicate dumplings, with their tender pork filling and aromatic glutinous rice, are a staple in Cantonese cuisine and beloved by many. Today, I invite you to dive into the art of making Siew Mai from scratch — a journey filled with rich flavors and nostalgic family memories.


Ingredients:

*For the Pork Filling:*


- Wonton wrappers


- 700g minced fatty pork


- 2 tablespoons corn starch


- 1 teaspoon salt


- 1 teaspoon white ground pepper


- 1/2 teaspoon sugar


- 1 teaspoon Worcestershire sauce or Maggie Seasoning Sauce


- 2 tablespoons Shaoxing Huatiao wine


- 2 tablespoons sesame oil


- 80g canned water chestnuts, finely chopped


- 4 large Chinese mushrooms, finely chopped


- Carrot, finely diced for garnish


- Cooked whole shrimp


*For the Glutinous Rice Filling:*


- Raw glutinous rice, prepared as per instructions (see link to Glutinous Rice in Lotus Leaf)


- 2 lap cheongs (Chinese sausages)


- Shallots


- Ginger


- Cooking oil


- Dried shrimps


- Cooked dried scallops


- Mushrooms


- Water


- Light soy sauce


- Oyster sauce


- White ground pepper


Instructions:
1. Preparing the Pork Filling:

Start by mincing 700g of fatty pork and place it in a large mixing bowl. Add corn starch, salt, white ground pepper, sugar, Worcestershire sauce, Shaoxing Huatiao wine, and sesame oil.


Next, roughly chop the water chestnuts and Chinese mushrooms before adding them to the pork mixture. Mix all ingredients well to combine. Set aside the mixture along with the finely diced carrot for garnish.


2. Preparing the Glutinous Rice Filling:

Soak the lap cheongs in boiling water until the skin separates. Remove the skin, dice the sausages, and pan fry until golden. Prepare the glutinous rice as per the instructions detailed in the Glutinous Rice in Lotus Leaf recipe. Once ready, combine with the fried lap cheong pieces and set aside to cool.


3. Assembling the Dumplings:

Lay a wonton wrapper flat and place a teaspoon of the pork or glutinous rice filling in the center. Wet the edges of the wrapper and gather it around the filling, squeezing gently to form a tight dumpling. Top each pork Siew Mai with a whole shrimp and some carrot for a pop of color. For the glutinous rice Siew Mai, add extra lap cheong pieces on top if desired.


Arrange the dumplings in a steamer lined with baking paper, ensuring steam can circulate through small holes. Steam over boiling water for 14-15 minutes until cooked through.


4. Serving and Storage:

Serve the dumplings hot. Uncooked dumplings can be frozen for future enjoyment. Simply dust them with flour to prevent sticking before storage.


A Family Memory:

Every Sunday morning, my family would gather at my grandmother’s house, the air filled with the aroma of steaming Siew Mai. My grandmother, with her deft hands, would teach us the art of folding dumplings, her stories interwoven with each precise fold. It was more than just cooking; it was a lesson in tradition and love. These moments, rich with laughter and shared stories, are forever etched in my mind, making Siew Mai more than a dish, but a cherished family tradition.


Difficulty Level: 7/10
Classification: Appetizer

Creating Siew Mai is a rewarding endeavor that brings both flavor and tradition to your table. Whether you're a novice or a seasoned cook, this dish will challenge your culinary skills while offering a taste of cherished Asian heritage. Enjoy crafting these delicious dumplings and creating memories of your own.

Read more about Appetizers

Read more about Main Dishes

Read more about Desserts

Peanut Butter Sriracha Cookies | Made by Meaghan Moineau

Peanut Butter Sriracha Cookies | Made by Meaghan Moineau

Spice Up Your Sweet Tooth: Peanut Butter Sriracha Cookies


A Nostalgic Twist on a Family Favorite


When it comes to baking, few things evoke nostalgia like the comforting aroma of cookies wafting through the house. Growing up, cookies were a staple in our household, each batch a different adventure, each bite a fond memory. Among the myriad of recipes my family experimented with, one always stood out for its unique blend of flavors: Peanut Butter Sriracha Cookies. As unconventional as it sounds, this daring combination became a beloved treat, sparking laughter and curiosity every time we shared them with friends and family.


The Story Behind the Spice


My earliest memory of these cookies dates back to a rainy Sunday afternoon. My mom, ever the culinary adventurer, decided to put a twist on the traditional peanut butter cookie recipe by adding a hint of sriracha. The result was nothing short of magical—a perfect blend of sweet, salty, and spicy, topped with a classic Hershey's chocolate kiss. I remember the initial skepticism turning into surprise and delight as we all took our first bites. The cookies became a family staple, often requested at gatherings and cherished as a symbol of our family's love for creativity and adventure in the kitchen.


The Recipe: A Perfect Blend of Sweet and Heat


Ingredients:

- 1 cup unsalted butter, softened


- 1 cup crunchy peanut butter


- 1 cup sugar


- 1 cup brown sugar


- 1 tablespoon sriracha


- 2 large eggs


- 1 teaspoon vanilla extract


- 2 1/2 cups all-purpose flour


- 1 teaspoon baking powder


- 1/2 teaspoon salt


- 1 teaspoon baking soda


- Granulated sugar for rolling


- Hershey's chocolate kisses for topping


Instructions:

1. In a large mixing bowl, cream together the unsalted butter, crunchy peanut butter, sugar, and brown sugar until smooth and fluffy.


2. Gradually add in the sriracha, eggs, and vanilla extract. Beat the mixture until everything is well combined.


3. In a separate bowl, whisk together the flour, baking powder, baking soda, and salt.


4. Slowly incorporate the dry ingredients into the peanut butter mixture, stirring until fully combined.


5. Chill the dough in the refrigerator for 1 hour.


6. Preheat your oven to 375 degrees Fahrenheit.


7. Roll the dough into approximately 1-inch balls, or use a medium-sized cookie scoop for uniformity.


8. Dip the top of each dough ball into granulated sugar, then place them onto a cookie sheet.


9. Flatten each ball with a fork, creating a criss-cross pattern.


10. Bake for 8-10 minutes, ensuring not to over-bake them. The cookies should just begin to brown.


11. Once out of the oven, immediately press a Hershey's chocolate kiss into the center of each cookie.


12. Allow the cookies to cool on wire racks before indulging.


The Verdict


Difficulty Rating: 4/10
Classification: Dessert

These Peanut Butter Sriracha Cookies are more than just a dessert; they're a conversation starter. Easy enough for a novice baker yet intriguing enough for a seasoned one, they offer a delightful surprise with every bite. Whether you're looking to impress at a potluck or just craving something different, these cookies promise a unique experience that's sure to leave a lasting impression on anyone who tries them. So, why not spice up your sweet tooth and create some new, heartwarming memories along the way?

Read more about Appetizers

Read more about Main Dishes

Read more about Desserts

Baked Scallops With Parma Ham | Made by Meaghan Moineau

Baked Scallops With Parma Ham | Made by Meaghan Moineau

Title: Savoring Memories: Baked Scallops with Parma Ham
Description: Dive into a delectable culinary journey with our Baked Scallops with Parma Ham recipe. This exquisite appetizer, blending the rich flavors of tender scallops and savory Parma ham, will transport your taste buds to the coastal kitchens of Italy. Easy to prepare and perfect for any occasion, this dish is a delightful starter that promises to enchant your guests. Discover the nostalgia behind this family favorite and bring a touch of elegance to your dining table.

---


Baked Scallops with Parma Ham: A Taste of Nostalgia


There’s something magical about the aroma of freshly baked scallops mingling with the earthy scent of Parma ham and garlic. It instantly transports me back to my grandmother's cozy kitchen, where every dish was infused with love and tradition. This Baked Scallops with Parma Ham recipe is more than just a delightful appetizer; it’s a cherished family memory that I’m thrilled to share with you.


Ingredients:

- Fresh big scallops

- Parma ham


- 1 garlic clove


- Dried breadcrumbs


- Fresh parsley


- Olive oil


- Bell pepper (optional for garnish)


Instructions:

1. Preheat the Oven: Begin by preheating your oven to 410°F (210°C / T 7). This ensures a perfect, even bake for your scallops.
2. Prepare the Topping: In a food processor, combine the dried breadcrumbs, Parma ham, garlic, parsley, and 1 teaspoon of olive oil. Blitz until you achieve a coarse, crumbly mixture. This topping will add a delightful crunch and flavor to your scallops.
3. Grease the Oven Rack: Fold a piece of kitchen paper and pour 1 teaspoon of olive oil onto it. Use this to grease an oven rack, preventing the scallops from sticking and ensuring an easy cleanup.
4. Assemble the Dish: Place the fresh scallops on the greased rack. Generously top each scallop with the Parma ham mixture, ensuring an even distribution.
5. Bake to Perfection: Drizzle a dash of olive oil over the scallops and slide the rack into the preheated oven. Let them bake for approximately 8 minutes, or until the tops are golden brown and the scallops are cooked through.
6. Serve and Enjoy: For an elegant presentation, serve the scallops as a starter with a few leaves of lamb's lettuce or rocket. A sprinkle of finely chopped bell pepper adds a vibrant touch and a hint of sweetness, perfectly complementing the savory flavors.

A Family Tradition


Every time I prepare this dish, I’m reminded of a particular summer evening at my grandmother's seaside cottage. The salty breeze from the ocean mingled with the mouthwatering scent of baking scallops, creating an atmosphere of warmth and togetherness. My grandmother, with her gentle hands and warm smile, guided me through the steps as we prepared this family favorite together. Sharing stories and laughter made the experience unforgettable, and now, every bite of these baked scallops brings back those cherished memories.


Difficulty Rating: 3/10


This recipe is wonderfully straightforward, making it accessible even for novice cooks. With minimal preparation and a quick bake time, it’s the perfect choice for those looking to impress without the stress.


Classification: Appetizer


Baked Scallops with Parma Ham is an elegant appetizer that sets the tone for a gourmet dining experience. Its rich flavors and sophisticated presentation make it an ideal start to any meal.


---


Embrace the flavors and memories with this Baked Scallops with Parma Ham recipe. Whether you’re cooking for a special occasion or simply indulging in a bit of culinary nostalgia, this dish promises to delight and inspire. Enjoy the taste of tradition with every bite!

Read more about Appetizers

Read more about Main Dishes

Read more about Desserts

Beef Teriyaki Stir Fry | Made by Meaghan Moineau

Beef Teriyaki Stir Fry | Made by Meaghan Moineau

Title: Savoring Memories with Beef Teriyaki Stir Fry: A Nostalgic Family Delight
Description: Dive into the flavors of our Beef Teriyaki Stir Fry—a savory blend of tender beef, vibrant vegetables, and a delectable sauce. This main dish not only tantalizes your taste buds but also brings back cherished memories of family gatherings. Rated a 6/10 on the difficulty scale, this recipe is perfect for both seasoned cooks and culinary novices looking to create a delicious and heartwarming meal.

---


Beef Teriyaki Stir Fry: A Flavorful Journey Through Time

The aroma of soy sauce mingling with ginger and garlic, the sizzle of beef in a hot pan, and the vibrant colors of fresh vegetables—these are the sensations that transport me back to my grandmother's kitchen. It was a place where magic happened, where every meal was a celebration of flavors and family. Today, I want to share a recipe that encapsulates those cherished moments: Beef Teriyaki Stir Fry.


Ingredients:

- 1 lb flank steak, thinly sliced


- 2 cups broccoli florets


- 1 red bell pepper, sliced


- 1 cup mushrooms, sliced


- 2 scallions, sliced


- 2 tablespoons soy sauce


- 1 tablespoon brown sugar


- 1 tablespoon dark sesame oil


- 2 cloves garlic, minced


- 1 inch fresh ginger, grated


- 2 tablespoons vegetable oil


- 1 tablespoon cornstarch


- 2 teaspoons cold water


- Sesame seeds for garnish


Instructions:
1. Marinate the Flavors: In a small bowl, whisk together soy sauce, brown sugar, sesame oil, garlic, and ginger. Add the sliced flank steak to the mixture, ensuring each piece is well-coated. Cover and refrigerate for at least 30 minutes, allowing the flavors to meld.
2. Sizzle and Sauté: Heat vegetable oil in a large frying pan over medium heat. Add the marinated beef, cooking for 3-4 minutes to brown it on all sides. Remove the beef from the pan and set it aside.
3. Vegetable Medley: In the same pan, add broccoli, red bell pepper, and mushrooms. Sauté for about 5 minutes, or until the vegetables begin to soften.
4. Saucy Symphony: Stir in the teriyaki sauce and bring the mixture to a simmer. Return the beef to the pan, including any flavorful drippings. Cook for another 5 minutes, stirring occasionally to ensure even flavor distribution.
5. Thickening Touch: In a small bowl, dissolve cornstarch in 2 teaspoons of cold water. Stir this mixture into the pan, allowing the sauce to thicken over 2 minutes. Toss the beef and vegetables to coat them evenly in the rich teriyaki sauce.
6. Serve and Enjoy: Sprinkle with sesame seeds and sliced scallions before serving. Pair it with steamed rice or noodles for a complete meal.
A Nostalgic Family Memory:

Every Sunday afternoon, my family would gather at my grandmother's house. The kitchen was always a hub of activity, filled with laughter, stories, and the enticing scent of her Beef Teriyaki Stir Fry. I remember standing on a stool, watching her expertly whisk the sauce, her hands moving with the grace of years of practice. The sizzling beef and vibrant vegetables were a feast for the senses, and as we sat around the table, each bite was a reminder of the love and care she infused into every dish.


These meals were more than just food; they were a celebration of our heritage and the bonds that held us together. Even now, whenever I make this dish, I'm reminded of those precious Sundays, and I feel a sense of gratitude for the culinary legacy she passed down to us.


Difficulty Rating: 6/10
Dish Classification: Main Dish
Conclusion:

Beef Teriyaki Stir Fry is more than just a recipe; it's an opportunity to recreate memories and share them with loved ones. Whether you're cooking for family or friends, this dish is sure to bring a sense of warmth and nostalgia to your table. Enjoy the symphony of flavors and the stories woven into each bite, and perhaps, create a few new memories of your own.

Read more about Appetizers

Read more about Main Dishes

Read more about Desserts

Drunken Turkey Chili | Made by Meaghan Moineau

Drunken Turkey Chili | Made by Meaghan Moineau

Title: Unveiling the Flavors of Fall: Drunken Turkey Chili Recipe
Description: Dive into the comforting warmth of Drunken Turkey Chili, a dish that not only fills your home with irresistible aromas but also brings back cherished memories of family gatherings. This hearty main dish, with a difficulty rating of 6 out of 10, is perfect for cozy evenings. Packed with lean turkey, vibrant veggies, and the subtle kick of light beer, this chili will quickly become a household favorite.

---


As the leaves begin to turn and the air takes on a crisp bite, there's nothing quite like a steaming bowl of chili to bring comfort and warmth to your home. Our Drunken Turkey Chili is the perfect companion for those cozy autumn nights, blending the rich flavors of lean turkey, fresh vegetables, and a hint of light beer to create a dish that's as nourishing as it is flavorful.


Ingredients:

- 2 tablespoons extra virgin olive oil


- 1 large white onion, diced


- 1 red bell pepper, chopped


- 3 cloves garlic, minced


- 2 jalapeno peppers, seeded and chopped


- 1 teaspoon smoked paprika


- 1 tablespoon chili powder


- 1 teaspoon ground cumin


- ½ teaspoon black pepper


- 1 tablespoon unsweetened cocoa powder


- 1 pound lean ground turkey meat


- 1 can (28 ounces) peeled tomatoes


- 1 can (15 ounces) black beans, drained and rinsed


- 1 cup light beer


- 2 tablespoons low sodium soy sauce


- Fresh cilantro, chopped


Instructions:

1. In a large pot, gently heat the extra virgin olive oil over medium heat. Ensure the oil doesn’t smoke.


2. Add the diced onion, chopped red bell pepper, minced garlic, and jalapenos. Sauté for about 5 minutes, until the vegetables are soft and fragrant.


3. Stir in the smoked paprika, chili powder, ground cumin, black pepper, and unsweetened cocoa powder, coating the vegetables thoroughly.


4. Add the ground turkey, sautéing for 3 to 4 minutes until it's just cooked through. Break up the turkey with your spoon or spatula as it cooks.


5. Drain the juice from the canned tomatoes into the pot, then finely chop the tomatoes and add them in. Stir well.


6. Introduce the black beans, light beer, and low sodium soy sauce to the mixture. Stir to combine all ingredients.


7. Add the chopped fresh cilantro and stir again to incorporate.


8. Cover the pot and allow the chili to simmer over low heat for 5 to 10 minutes.


9. Turn off the heat and let the chili rest for about 15 minutes before serving.


Optional Garnishes: Top with low-fat sour cream, grated cheese, avocado slices, or chopped green onions. Serve with tortilla chips for added crunch and flavor.
Nostalgic Family Memory:

Every year, as the first chill of autumn settled in, my family would gather in the kitchen to prepare our beloved Drunken Turkey Chili. The kitchen, filled with the symphony of chopping, sizzling, and stirring, became the heart of our home. I remember my grandmother, stirring the pot with a knowing smile, regaling us with stories of her childhood. Her tales, much like the chili, were rich and full of flavor.


The light beer added a playful twist to the recipe, a nod to the jovial spirit of our family gatherings. As the chili simmered, we'd huddle around the pot, tasting and tweaking, each family member adding their own special touch. Once ready, we'd ladle generous portions into bowls, topping them with our favorite garnishes, and gather around the table.


Today, each spoonful transports me back to those cherished moments, surrounded by laughter, love, and the delicious aroma of our family’s Drunken Turkey Chili. It's more than just a meal; it's a tradition that warms both the heart and soul.


---


This fall, embrace the season and create your own family memories with this delightful Drunken Turkey Chili. It's a dish that promises not only to satisfy your taste buds but also to bring a nostalgic warmth to your home.

Read more about Appetizers

Read more about Main Dishes

Read more about Desserts

Bibimbab (Korean Rice w Vegetables & Beef) | Made by Meaghan Moineau

Bibimbab (Korean Rice w Vegetables & Beef) | Made by Meaghan Moineau

Title: Discover the Heartwarming Flavors of Bibimbab: A Korean Classic
Description: Dive into the rich flavors and vibrant colors of Bibimbab, a beloved Korean dish that brings together a medley of fresh vegetables, savory beef, and perfectly cooked rice. Join us as we explore this deliciously customizable meal, perfect for any palate, and share a nostalgic family memory that highlights its place in our hearts.

---


Bibimbab: A Journey Through Flavor and Memory


Bibimbab, a staple in Korean cuisine, is more than just a dish. It's a tapestry of flavors and textures that unite to create a harmonious and satisfying meal. With its roots steeped in tradition and adaptability to suit any lifestyle, Bibimbab is a culinary delight that welcomes everyone to the table.


Ingredients:

- Carrots, julienned

- Cooked white rice


- Eggs


- English cucumber, sliced


- Garlic clove


- Red sprinkle gochugaru (red pepper flakes)


- Red gochujang (red pepper paste)


- Olive oil


- Sesame oil


- Sesame seeds


- Soy sauce


- Fresh spinach


- Sandwich steaks, thinly sliced


Instructions:


1. Prepare the Rice: Cook rice according to package directions and set aside.
2. Prep the Vegetables: Cut the carrots and cucumber into matchstick pieces. Set aside for sautéing.
3. Cook the Spinach: In a large non-stick pan, bring 2 cups of water to a boil. Add spinach and cook until wilted, stirring constantly. Drain and squeeze the spinach dry into a ball.
4. Sauté the Carrots and Garlic: Wipe out the skillet and heat 1 tsp of olive oil over medium-high heat. Add carrots and cook until soft, about 3 minutes. Add garlic and cook until fragrant, about 1 minute. Mix cucumber slices with gochugaru and set aside.
5. Prepare the Spinach Mixture: Combine the spinach with soy sauce and set aside until serving.
6. Cook the Beef: Add thinly sliced beef to the non-stick pan and heat until browned. Wipe down the pan with a napkin.
7. Fry the Eggs: Heat 1 tsp of olive oil in the non-stick pan over medium-high heat. Add eggs and cook until the whites are set, and the yolks remain runny, about 5 minutes.
8. Assemble the Bibimbab: Divide the cooked rice among four bowls. Top with sautéed vegetables, beef, and eggs. Drizzle with sesame oil and sprinkle with sesame seeds. Finish with a dollop of gochujang or Sriracha sauce for a spicy kick.

A Taste of Nostalgia


Growing up, Bibimbab was more than just a meal; it was a family ritual that brought us together on Sunday afternoons. I vividly recall the comforting aroma of sesame oil and the vibrant colors of the vegetables laid out on the kitchen counter. My grandmother, with her gentle hands, would guide us in chopping the vegetables, teaching us the importance of each ingredient and its place in the dish.


As we gathered around the table, each person was given the freedom to craft their perfect bowl, adding a personal touch to the traditional recipe. It was in these moments that I learned the true essence of Bibimbab—its ability to adapt to each individual's taste while still maintaining its core identity. Even today, every bite takes me back to those cherished family gatherings, filled with laughter and stories, binding us together through the simple joy of sharing a meal.


Difficulty Rating: 4/10


Classification: Main Dish


Bibimbab is a dish that invites creativity and personalization, making it a delightful experience for both novice and experienced cooks alike. Its versatility accommodates vegetarians, dieters, health-conscious eaters, and meat-lovers, ensuring that everyone can partake in its deliciousness. So, gather your ingredients, embrace the process, and enjoy the journey of creating your own Bibimbab masterpiece!

Read more about Appetizers

Read more about Main Dishes

Read more about Desserts

Roasted Beet Hummus | Made by Meaghan Moineau

Roasted Beet Hummus | Made by Meaghan Moineau

Title: A Vibrant Twist on Tradition: Roasted Beet Hummus
Description: Dive into the colorful world of Roasted Beet Hummus, a delightful fusion of earthy beets and creamy chickpeas. Discover a nostalgic family story that brings this dish to life, while learning how to create this flavorful appetizer in your own kitchen.

---


A Vibrant Twist on Tradition: Roasted Beet Hummus


In the heart of many family gatherings, food often takes center stage, binding loved ones together with its warmth and flavors. One dish that has become a beloved staple in my family is Roasted Beet Hummus. This vibrant, flavorful dip is more than just a treat for the taste buds—it's a journey down memory lane, rich with the colors and textures that make every get-together special.


A Family Memory: The Beetroot Legacy


Growing up, the sweet and earthy aroma of roasted beets often wafted through my grandmother's kitchen. She had an affinity for adding a pop of color to her dishes, and beets were her secret weapon. I remember sitting on a stool, watching her expertly peel and slice the beets, her hands stained a vivid magenta—a testament to her culinary expertise and love for vibrant, natural ingredients.


One summer, she decided to blend her love for traditional hummus with her beetroot obsession. The result was a stunning Roasted Beet Hummus that became an instant family favorite. I vividly recall the excitement and curiosity as she unveiled the bright pink dip, its color as bold as its flavor. We gathered around the table, dipping warm pita bread into the hummus, each bite a harmonious blend of earthy beets and creamy chickpeas, with a hint of lemon and garlic.


This dish quickly became a family tradition, gracing every gathering with its presence and reminding us of those joyful summer days. Even now, making Roasted Beet Hummus brings back memories of laughter, love, and the vibrant spirit of my grandmother.


The Recipe: Roasted Beet Hummus


Ingredients:

- 2 medium red roasted beets, peeled and chopped


- 1 can (15 oz) cooked chickpeas, drained and rinsed


- 2 cloves garlic, minced


- 1 teaspoon ground cumin


- Juice of 1 lemon


- 2 tablespoons tahini sesame seed paste


- 3 tablespoons olive oil (plus more for consistency)


- Salt to taste


Instructions:

1. In a food processor or blender, combine the roasted beets, garlic, cumin, lemon juice, tahini, and salt. Pulse until well blended.


2. Add the chickpeas and olive oil to the mixture. Pulse until just incorporated.


3. If the hummus is too thick, gradually add more olive oil, blending until you reach the desired consistency.


4. Serve with warm pita or flatbread, and enjoy a taste of tradition with a colorful twist.


Difficulty Rating: 3/10


This recipe is delightfully simple, making it accessible for even novice cooks while promising a delicious and visually stunning result. It's the perfect appetizer for any occasion, offering a unique twist on a classic favorite.


---


Roasted Beet Hummus is more than just a dish; it's a celebration of tradition, family, and the joy of sharing something beautiful and delicious with those you love. Whether you're creating new memories or reliving cherished ones, this vibrant hummus is sure to be a hit at your next gathering.

Read more about Appetizers

Read more about Main Dishes

Read more about Desserts

Tomato Stack Salad | Made by Meaghan Moineau

Tomato Stack Salad | Made by Meaghan Moineau

Title: "Tomato Stack Salad: A Taste of Summer Nostalgia"
Description: Dive into the freshness of summer with our Tomato Stack Salad, a delightful appetizer that brings together the vibrant flavors of ripe tomatoes, creamy goat cheese, and aromatic herbs. Rated an easy 3 out of 10 on the difficulty scale, this dish is perfect for beginners and seasoned cooks alike. Join us as we explore this simple yet elegant recipe, infused with the warmth of family memories.

---


Tomato Stack Salad: A Taste of Summer Nostalgia


As the sun casts its golden hue over the garden, the vibrant colors of ripe tomatoes become the centerpiece of summer meals. The Tomato Stack Salad, with its simple elegance, is more than just a dish; it's a cherished family tradition that brings back memories of warm gatherings and laughter-filled afternoons.


Ingredients:


- 4 ripe tomatoes


- 4 oz goat cheese


- A handful of fresh herbs (such as basil, parsley, or chives)


- Salt, to taste


- Balsamic vinegar, for drizzling


Instructions:


1. Prepare the Goat Cheese: Begin by mixing the fresh herbs into the goat cheese until well combined. The herbs add a burst of flavor, turning the cheese into a creamy, aromatic spread.
2. Slice the Tomatoes: Carefully slice each tomato into four thick rounds. Choose tomatoes that are firm yet ripe, ensuring they hold their shape when stacked.
3. Season the Tomatoes: Sprinkle each tomato slice lightly with salt to enhance its natural sweetness.
4. Assemble the Salad: Gently slather each tomato round with the herbed goat cheese. Stack the rounds to reassemble each tomato, creating a tower of alternating red and white layers.
5. Finish with Balsamic Vinegar: Drizzle the stacked tomatoes with balsamic vinegar, allowing it to cascade down the layers, adding a tangy contrast to the creamy cheese.

A Nostalgic Family Memory


This Tomato Stack Salad takes me back to my grandmother's kitchen, where the air was always filled with the aroma of fresh herbs. Every summer, my family would gather at her house, a quaint cottage surrounded by a lush garden. My siblings and I would help her pick the ripest tomatoes, our fingers stained with their juicy red hues.


Grandma had a way with simple ingredients, turning them into something magical. As she showed us how to mix the herbs into the goat cheese, her stories of summers past would unfold, each tale woven with laughter and a touch of nostalgia. The kitchen was our haven, a place where time slowed, and the outside world faded away.


The Tomato Stack Salad was always the highlight of our meal, a dish that captured the essence of summer in each bite. Even now, as I recreate this recipe, I can almost hear Grandma's voice, her laughter echoing through the years. This salad is more than just a recipe; it's a bridge to cherished memories and a testament to the power of family traditions.


Conclusion


The Tomato Stack Salad is a delightful appetizer that captures the essence of summer. With a difficulty rating of just 3 out of 10, it's an inviting dish for cooks of all levels. As you savor the flavors of fresh tomatoes, creamy goat cheese, and tangy balsamic vinegar, may you also find a connection to the warmth of family memories and the simple joys of sharing a meal together.


---


Embrace the simplicity and nostalgia of the Tomato Stack Salad, and let it become a cherished part of your summer gatherings.

Read more about Appetizers

Read more about Main Dishes

Read more about Desserts

Peanut Butter and Apple Oatmeal Breakfast Bars | Made by Meaghan Moineau

Peanut Butter and Apple Oatmeal Breakfast Bars | Made by Meaghan Moineau

Morning Bliss: Peanut Butter and Apple Oatmeal Breakfast Bars


A Delicious Morning Routine


There's something magical about the aroma of freshly baked oatmeal bars wafting through the house in the morning. Today, we will dive into a delightful recipe that will not only tantalize your taste buds but also fill your kitchen with the comforting scent of cinnamon and apples. Introducing our Peanut Butter and Apple Oatmeal Breakfast Bars—a perfect blend of wholesome ingredients and nostalgic flavors that are sure to make your mornings special.


Ingredients


- 2 cups Quaker oats


- 1/2 cup smooth peanut butter


- 1/4 cup butter


- 2 tablespoons vegetable oil


- 1/2 cup whole wheat flour


- 1/4 cup honey


- 1/3 cup brown sugar


- 1 teaspoon vanilla extract


- 1 teaspoon cinnamon


- 1 large apple, peeled and diced into small pieces


Instructions


1. Preparation: Preheat your oven to 350°F (175°C). Grease an 11x7 inch baking pan, or use an 8x8, 9x9, or 11x13 inch pan if necessary.
2. Mixing: Place the peanut butter and butter in a microwave-safe dish. Heat in the microwave for 30-45 seconds or until the butter is melted. Stir until smooth.
3. Combining Ingredients: In a large bowl, combine the oats, peanut butter mixture, vegetable oil, whole wheat flour, honey, brown sugar, vanilla extract, and cinnamon. Use an electric beater or KitchenAid mixer to blend the ingredients for approximately one minute.
4. Adding Apples: Carefully peel and dice the apple into small pieces, about the size of a pinky nail. Gently fold the diced apple into the oatmeal mixture.
5. Baking: Pour the mixture into the prepared pan and press down firmly with your fingers to ensure an even layer. Place the pan in the oven and bake for 25 minutes, or until the edges are golden brown. If using an 11x13 pan, check a bit earlier as the mixture will be thinner and cook faster.
6. Cooling and Serving: Let the bars cool for 10 minutes before slicing into strips. Allow the remaining bars to cool completely before storing them in a Tupperware container or wrapping them in foil.

A Nostalgic Family Memory


Growing up, Saturday mornings were a cherished family tradition in our household. The kitchen would come alive with the sound of laughter and the gentle clatter of mixing bowls. My mother, with her well-worn apron and a twinkle in her eye, would lead the culinary charge, and these Peanut Butter and Apple Oatmeal Breakfast Bars were always the star of the show.


I remember the excitement of peeling the apples with my little hands, the anticipation building as the sweet and nutty aroma filled the air. Once baked, the bars were a symphony of flavors—warm, comforting, and with just the right hint of cinnamon. After breakfast, our family would gather around the table, savoring each bite and sharing stories of the week gone by. These cherished moments are etched in my memory, a testament to the power of food in bringing people together.


Difficulty and Classification


- Difficulty: 3/10
- Classification: Main Dish

These Peanut Butter and Apple Oatmeal Breakfast Bars are not just a recipe; they are a gateway to creating beautiful memories with loved ones. Simple to make, yet profoundly satisfying, these bars are the perfect way to start your day with a touch of nostalgia and a whole lot of flavor. Enjoy baking, indulging, and making your mornings just a bit sweeter!

Read more about Appetizers

Read more about Main Dishes

Read more about Desserts

Rigatoni With Sweet Sausages In Creamy Tomato Sauce | Made by Meaghan Moineau

Rigatoni With Sweet Sausages In Creamy Tomato Sauce | Made by Meaghan Moineau

Title: "Nostalgic Comfort: Rigatoni with Sweet Sausages in Creamy Tomato Sauce"


Description: Dive into the heartwarming flavors of Italy with our Rigatoni with Sweet Sausages in Creamy Tomato Sauce. This recipe combines the savory essence of sweet sausages with the aromatic richness of fresh sage and leeks, all enveloped in a luscious, creamy tomato sauce. Join us as we share a cherished family memory that's bound to make this dish even more special. With a difficulty rating of 4/10, this main dish is perfect for a cozy family dinner or a nostalgic culinary journey.


---


Rigatoni with Sweet Sausages in Creamy Tomato Sauce: A Taste of Home


There's something undeniably comforting about a bowl of pasta, especially when it's infused with the rich flavors of sweet sausages and a creamy tomato sauce. This dish not only tantalizes the taste buds but also carries a legacy of family gatherings and nostalgic memories.


Ingredients You’ll Need:


- Sweet sausages


- 1 leek (cut in half lengthwise and rinsed thoroughly)


- Fresh sage


- 3 garlic cloves


- 1 onion


- Canned tomatoes


- Rigatoni pasta


- Milk


- Dried thyme


- Cayenne pepper


- Butter


- Extra virgin olive oil


- Sugar


- Salt & pepper


Cooking Instructions:


1. Prepare Your Ingredients: Begin by bringing a large pot of salted water to a boil. Chop the onion and garlic, setting them aside. Slice the leek in half lengthwise, rinse thoroughly, and chop. Chop the fresh sage and set it aside separately.
2. Cook the Sausages: To easily remove the casings, lightly slice each sausage lengthwise and peel them off with your fingers. In a large pan over medium-high heat, cook the sausages until they turn a beautiful golden brown, breaking them apart until they resemble ground meat. Remove the meat from the pan and set it aside in a bowl.
3. Sauté the Aromatics: Add 2 tablespoons of olive oil to the same pan and toss in the fresh sage. Cook for about a minute before adding the leeks and a pinch of cayenne pepper. Cook for an additional 2 to 3 minutes until the leeks soften. Return the sausage mixture to the pan, turn off the heat, and let the flavors meld.
4. Create the Sauce: In a separate pot, combine canned tomatoes, a splash of milk, and a sprinkle of dried thyme. Add a pinch of sugar to balance the acidity of the tomatoes. Season with salt and pepper to taste. Simmer the sauce for 10 minutes until it thickens.
5. Combine and Serve: Add the cooked rigatoni to the sausage and leek mixture, pouring the creamy tomato sauce over everything. Toss gently to combine and serve hot.

A Nostalgic Family Memory


Every time I prepare this dish, I'm transported back to my grandmother's cozy kitchen. The smell of sweet sausages sizzling in the pan and the sight of her expertly chopping leeks with the precision of years of practice. Sunday dinners were sacred in our family, with three generations gathered around the dining table, sharing stories and laughter. This rigatoni dish was always a staple, making an appearance at every family gathering. It was my grandmother's way of bringing us all together, each bite infused with love and tradition. Now, as I cook it for my family, I hope to pass on that same feeling of warmth and togetherness.


Difficulty Rating: 4/10


This main dish is perfect for home cooks looking to create something special without the stress of a complex recipe. The steps are simple and straightforward, ensuring a delightful meal that's sure to become a family favorite.


Conclusion


Rigatoni with Sweet Sausages in Creamy Tomato Sauce is more than just a meal; it's a connection to cherished memories and traditions. Whether you're cooking for your family or seeking comfort in a bowl, this dish promises to deliver warmth and satisfaction. Enjoy every bite and the stories that come with it.

Read more about Appetizers

Read more about Main Dishes

Read more about Desserts