Falafels With Tahini Sauce | Made by Meaghan Moineau

Falafels With Tahini Sauce | Made by Meaghan Moineau

Title: “Crispy Falafels with Creamy Tahini Sauce: A Journey Back to Family Gatherings”
Description: Dive into the heartwarming world of homemade falafels, a cherished Middle Eastern delight, paired with a lusciously smooth tahini sauce. This recipe, brimming with vibrant flavors and texture, will transport you to a lively family gathering where each bite is a nostalgic reminder of shared laughter and stories. Easy to make and delightful to taste, this appetizer is a perfect way to bring loved ones together around the table.

Falafels with Tahini Sauce: A Taste of Home and Nostalgia

Introduction

The aroma of falafels sizzling in the kitchen always takes me back to my grandmother’s house. Her tiny kitchen, filled with the chatter of family members, was the center of our universe. Every family gathering was incomplete without her signature falafels, crispy on the outside and soft on the inside, paired with a creamy, tangy tahini sauce.

Ingredients

For the Falafels:

– 1 cup garbanzo beans, soaked overnight and drained

– 1 medium onion, finely chopped

– 2 cloves garlic, minced

– 1/4 cup fresh cilantro, chopped

– 1/4 cup fresh parsley, chopped

– 1 teaspoon ground cumin

– 1 teaspoon sea salt

– 1/2 teaspoon red dried pepper flakes

– 1 teaspoon baking powder

– Flour, as needed

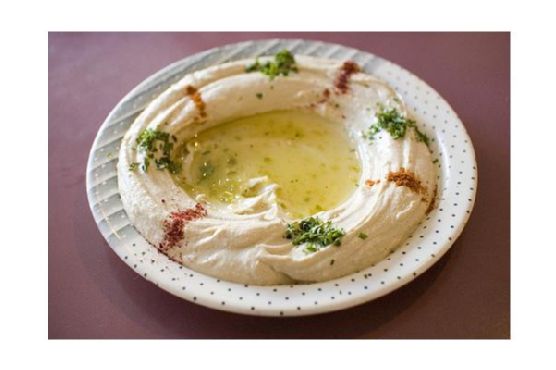
For the Tahini Sauce:

– 1/2 cup tahini paste

– 1/4 cup water

– Juice of 2 lemons

– 1 clove garlic, minced

– 1/2 teaspoon sea salt

Instructions

Falafels:

1. Begin by soaking the garbanzo beans overnight. Drain and set aside.

2. In a food processor, combine the garbanzo beans, onion, garlic, cilantro, parsley, cumin, sea salt, and red pepper flakes. Process until the mixture is crumbly.

3. Transfer the mixture to a large bowl. Gradually add the flour, one tablespoon at a time, mixing well until the mixture can easily be formed into balls or patties.

4. Shape the mixture into balls or patties. Place them in the refrigerator to chill while preparing the tahini sauce.

Tahini Sauce:

1. In the food processor, combine the tahini paste, water, lemon juice, garlic, and sea salt.

2. Process until smooth. Adjust the consistency by adding more water if the sauce is too thick, or more lemon juice for extra tang.

A Nostalgic Family Memory

One summer evening, as the sun dipped below the horizon, casting a golden glow over our backyard, my grandmother and I were in the kitchen, preparing her famous falafels. Despite the heat of the day, the kitchen was cool, and the scent of fresh herbs filled the air. As we formed the falafel mixture into balls, she shared stories of her childhood, how her mother would make falafels as a treat for special occasions.

I watched in awe as she effortlessly flipped the falafels in the pan, each one perfectly golden brown. We gathered around the table, the adults with their stories and laughter, the children eager to devour the delicious spread. The falafels were always the highlight, their crispy exterior giving way to a burst of flavors inside. The tahini sauce, with its creamy texture and hint of garlic, was the perfect accompaniment.

That evening, with the sound of cicadas in the background and the warmth of family around, I realized that food is more than just sustenance—it’s a vessel for memories and love.

Difficulty Rating

Difficulty: 5/10

Classification

This dish is a versatile appetizer, perfect for starting a meal with its rich flavors and delightful textures.

Falafels with tahini sauce are more than just a dish; they are a celebration of family, tradition, and the stories that bind us. As you savor each bite, may it bring warmth to your heart and a smile to your face, reminiscent of cherished family gatherings.

Read more about Appetizers

Read more about Main Dishes

Read more about Desserts

Related update: Lemon and Strawberry Loaf

Spicy Lemongrass Soup | Made by Meaghan Moineau

Spicy Lemongrass Soup | Made by Meaghan Moineau

Title: A Taste of Home: Crafting Spicy Lemongrass Soup
Description: Dive into the heartwarming world of Spicy Lemongrass Soup, a delightful blend of vibrant flavors and family memories. This recipe, bursting with fresh lemongrass, coconut milk, and aromatic spices, promises to transport you to a cozy kitchen filled with laughter and love. Perfect as a main dish, this soup is a testament to the simple joys of home-cooked meals.

---


There’s something uniquely comforting about a bowl of soup simmering on the stove, filling the kitchen with its fragrant aroma. For me, Spicy Lemongrass Soup is more than just a dish—it's a cherished family ritual, steeped in nostalgia and warmth.


Ingredients You'll Need:

- Fresh lemongrass


- Red dried peppers


- Ginger


- Garlic


- Vegetable broth


- Canned fresh coconut milk (if you can find it)


- Tofu cubes


- Snow peas


- Mushrooms


- Rice noodles


- Lime (juice)


Instructions:
1. Prepare the Broth: Start by chopping the lemongrass into 2-inch pieces and slicing them down the center. Add these to your soup pot along with vegetable broth, coconut milk, garlic, and ginger. Bring the mixture to a boil, then reduce the heat to a gentle simmer for about 30 minutes.
2. Strain the Broth: Once your broth has simmered to perfection, strain it through some cheesecloth to remove the lemongrass stalks—trust me, they’re not edible. This step is crucial for achieving a smooth, flavorful base.
3. Simmer the Ingredients: Return the broth to a simmer and introduce tofu cubes, mushrooms, snow peas, and rice noodles. The lime juice can be added at any point; I like to add some at the beginning and a little more just before serving for an extra zing.
4. Finishing Touches: Simmer until the rice noodles are soft and ready to eat. For garnish, consider adding some grated ginger or fresh scallions to enhance the flavor profile.
A Family Memory:

Every time I prepare Spicy Lemongrass Soup, I'm transported back to my grandmother's cozy kitchen. As a child, I would sit perched on a stool, watching her deftly chop lemongrass and ginger, her hands moving with the practiced ease of years spent cooking for loved ones. The kitchen was always filled with laughter, stories, and the comforting smell of this very soup simmering on the stove.


My grandmother's secret ingredient was always love, wrapped warmly in each spoonful. She would serve the soup with a knowing smile, watching as our family gathered around the table, sharing stories and savoring each bite. Those evenings were filled with warmth, not just from the soup, but from the bond we shared as a family.


Difficulty Rating: 6/10
Classification: Main Dish

Spicy Lemongrass Soup is more than just a meal; it’s a journey back to simpler times, a reminder of the love and laughter that make life truly delicious. Whether you're making it for the first time or the hundredth, I hope this recipe brings as much joy to your table as it has to mine. Enjoy!

Read more about Appetizers

Read more about Main Dishes

Read more about Desserts

Banana in brown sugar ice cream | Made by Meaghan Moineau

Banana in brown sugar ice cream | Made by Meaghan Moineau

Title: Sweet Nostalgia: Crafting Banana in Brown Sugar Ice Cream
Description: Dive into a delicious journey of flavors with our Banana in Brown Sugar Ice Cream recipe. This dessert, infused with dark rum and vanilla, is a delightful blend of creamy textures and rich tastes. Join us as we share a cherished family memory linked to this delightful treat and guide you through creating this indulgence in your own kitchen.

---


There's something magical about the fusion of ripe bananas and the caramel notes of brown sugar. As the days grow warmer, I find myself reminiscing about summer evenings spent at my grandmother’s house, where the kitchen always smelled of sweet bananas and sugary delights. Her Banana in Brown Sugar Ice Cream was the highlight of those visits—a recipe that not only satisfied our sweet tooth but also wrapped us in the comfort of family tradition.


Ingredients:

- Bananas


- Dark rum


- Sour full-fat cream


- Lemon juice


- Light brown sugar


- Pinch of sea salt


- Vanilla extract


Instructions:

1. In a wide skillet or saucepan, heat the brown sugar with one-quarter of the sour cream, stirring until smooth and bubbly.


2. Add the bananas and salt, and continue to cook for 5 minutes, stirring occasionally, until the bananas are soft and completely cooked through.


3. Remove from heat and stir in the remaining sour cream, rum, and vanilla. If it tastes too sweet, add a few drops of fresh lemon juice.


4. Puree the mixture in a blender or food processor until completely smooth.


5. Chill thoroughly for 1 hour or overnight, then pour into the ice cream maker and proceed according to the manufacturer's instructions.


6. Before serving, take it out for 5-10 minutes to reach the right scooping temperature. For the perfect presentation, serve in chilled glass or porcelain bowls. Use a hot, dry ice-cream spoon for easy scooping.


A Family Memory:

Every summer, our family gathered in my grandmother's backyard, where laughter echoed through the air as the sun dipped below the horizon. My grandmother, with her apron dusted with flour and sugar, would bring out her signature banana ice cream. We watched in awe as she transformed simple ingredients into a creamy masterpiece. As children, we eagerly helped scoop the ice cream into bowls, each serving topped with a sprinkle of sea salt to enhance the flavors.


The first bite was always magical—the velvety texture, the subtle hint of rum, and the comforting sweetness of bananas melted into a perfect harmony. It wasn't just ice cream; it was a slice of happiness that brought us all together. Even now, miles away from that kitchen, every scoop of Banana in Brown Sugar Ice Cream brings me back to those cherished family gatherings.


Difficulty Rating: 4/10
Classification: Dessert

Creating this delightful dessert is a breeze, thanks to its straightforward preparation and the use of readily available ingredients. Whether you're an experienced cook or a novice in the kitchen, this recipe is sure to impress your family and friends with its rich, nostalgic flavors.

Read more about Appetizers

Read more about Main Dishes

Read more about Desserts

Classic French Mussels | Made by Meaghan Moineau

Classic French Mussels | Made by Meaghan Moineau

Title: Savoring Tradition: How Classic French Mussels Became Our Family’s Culinary Heirloom
Description: Dive into the delicate, aromatic world of Classic French Mussels with this step-by-step guide. Discover how this savory dish became a cherished family tradition, and learn to recreate it in your own kitchen. Rated 5/10 in difficulty, this main dish is perfect for a cozy evening or a special occasion.

A Taste of Elegance: The Classic French Mussels

When it comes to classic French cuisine, nothing quite captures the essence of coastal France like a steaming bowl of mussels infused with aromatic herbs and a splash of dry white wine. This dish, known for its simplicity and elegance, has been a mainstay in my family for generations, bringing us together over its enticing aroma and rich flavors.

The Ingredients of Tradition
To recreate this cherished family dish, you’ll need:

– 2 pounds of fresh mussels

– 1 cup of dry white wine

– A handful of fresh parsley, chopped

– 3 garlic cloves, minced

– Kosher salt to taste

– 1 cup of low-fat buttermilk

– 2 tablespoons of olive oil

– 2 shallots, finely chopped

– 2 tablespoons of unsalted light butter

The Journey Begins: Prepping the Mussels

Before diving into the cooking process, prepare the mussels. Scrub them with a stiff brush, discarding those that remain open or have broken shells. Soak them in cool, clean water for at least an hour, allowing them to expel any sand they’ve accumulated. Don’t forget to remove the small fibrous “beard” from each mussel, pulling it towards the hinge to protect the delicate creature inside.

A Symphony of Flavors: Cooking the Mussels

1. Heat the olive oil in a large pot over medium-high heat.

2. Add the shallots and garlic, cooking until soft, about 5 minutes.

3. Introduce the mussels, wine, buttermilk, butter, and parsley to the pot, seasoning generously with kosher salt.

4. Stir well, cover the pot, and cook until the mussels open and are cooked through, about 10 to 15 minutes.

Divide the mussels and their delectable juices between two bowls. Serve with crusty whole-grain bread to soak up the flavorful sauce.

A Nostalgic Taste of Home

Growing up, the scent of mussels simmering in white wine would fill our home, signalling that a special meal was about to be shared. My earliest memory of this dish is from a summer evening at my grandmother’s seaside cottage. The salty sea breeze mingled with the aroma of the mussels, creating an unforgettable sensory experience. As we gathered around the table, my grandmother shared stories of her own childhood in Brittany, where mussels were a staple and symbolized the abundance of the sea.

Each bite transported me to the rugged French coast, where generations before me had savored the same flavors. Now, as I prepare this dish for my own family, I am reminded of those cherished moments and the enduring legacy of love and togetherness embodied in every bowl.

A Culinary Legacy

With a difficulty rating of just 5/10, Classic French Mussels is a main dish that’s accessible to home cooks yet sophisticated enough to impress. Whether you’re celebrating a special occasion or simply craving a taste of tradition, this recipe is sure to become a beloved staple in your culinary repertoire. So gather your loved ones, uncork a bottle of wine, and let the flavors of France transport you to a place where time-honored traditions live on.

Read more about Appetizers

Read more about Main Dishes

Read more about Desserts

Also try: Blast Of Color Mexican Stuffed Bell Peppers

Chicken Roll-Ups With Feta Cheese and Arugula | Made by Meaghan Moineau

Chicken Roll-Ups With Feta Cheese and Arugula | Made by Meaghan Moineau

Title: Savoring Simplicity: Chicken Roll-Ups with Feta Cheese and Arugula
Description: Discover an elegant yet simple recipe for Chicken Roll-Ups with Feta Cheese and Arugula. This delightful dish combines tender chicken, peppery arugula, and tangy feta for a meal that's both easy to prepare and sure to impress. Join me as I share a nostalgic family memory tied to this cherished recipe.

---


When it comes to creating memorable meals, simplicity often yields the most satisfying results. One such dish that embodies this philosophy is the Chicken Roll-Ups with Feta Cheese and Arugula. This recipe merges tender chicken breast cutlets with the vibrant flavors of fresh arugula and creamy feta cheese. It’s a dish that has become a family favorite, not just for its taste but also for the cherished memories it evokes.


I vividly recall one summer evening at my grandmother's house, where the aroma of olive oil and sizzling chicken wafted through the air. The kitchen was a flurry of activity as we prepared for our annual family gathering. My grandmother, always the culinary maestro, had a knack for creating dishes that were both simple and extraordinary. It was during these gatherings that she first introduced us to her signature Chicken Roll-Ups.


As a child, I was fascinated by the process. Watching her layer each chicken cutlet with baby arugula and crumble the feta cheese with expert precision was mesmerizing. She would then roll each piece tightly, securing it with a toothpick, a ritual that seemed almost ceremonial. The sizzle of the chicken as it hit the hot olive oil in the skillet was music to my ears—a prelude to the deliciousness that awaited.


The magic continued as the skillet, brimming with these little bundles of joy, was transferred to the oven. The wait, albeit short, was always filled with anticipation and the comforting chatter of family. Once ready, the chicken was sliced crosswise, revealing a beautiful spiral of green and white against the golden-brown exterior. It was a sight to behold and a taste to cherish.


This dish, classified as a Main Dish with a difficulty rating of 4 out of 10, is perfect for any occasion, whether it’s a weeknight dinner or a special family gathering. Its preparation is straightforward, yet the flavors are anything but ordinary. The peppery arugula and tangy feta cheese complement the succulent chicken perfectly, while the olive oil lends a subtle richness that ties everything together.


As I prepare this dish today, I am reminded of those warm summer evenings and the joy of sharing good food with loved ones. It’s a recipe that not only delights the taste buds but also warms the heart with memories of family and home. So, roll up your sleeves and treat yourself and your family to this delightful dish—simple, flavorful, and steeped in love.


---


Ingredients:

- Chicken breast cutlets


- Coarse salt and ground pepper


- Baby arugula


- Feta cheese


- Olive oil


Instructions:

1. Preheat your oven to 375°F (190°C).


2. Season chicken breast cutlets with coarse salt and ground pepper.


3. Layer each cutlet with baby arugula and crumble feta cheese in the center.


4. Starting with the narrow end, roll up the chicken tightly and secure with a toothpick.


5. In a large nonstick ovenproof skillet, heat olive oil over medium-high heat and swirl to coat the bottom.


6. Cook the chicken, seam side down, until golden brown, about 1 to 2 minutes.


7. Turn the chicken over and transfer the skillet to the oven.


8. Cook until the chicken is opaque throughout, approximately 10 to 12 minutes.


9. Remove toothpicks and slice the chicken crosswise before serving, if desired.


This recipe is more than just a meal; it's a journey back to simpler times, where the kitchen was the heart of the home and every dish was a labor of love. Enjoy the flavors, and perhaps create a few new memories of your own.

Read more about Appetizers

Read more about Main Dishes

Read more about Desserts

Roasted Beet Hummus | Made by Meaghan Moineau

Roasted Beet Hummus | Made by Meaghan Moineau

A Vibrant Twist on Tradition: Roasted Beet Hummus


A Taste of Home: The Story Behind the Dish


There are few dishes that capture the essence of nostalgia quite like hummus. For me, the aroma of roasted beets mingling with garlic and cumin instantly transports me back to my grandmother's cozy kitchen. Her home was always filled with the comforting scent of freshly baked bread, and her table was a testament to her love for vibrant, soul-warming foods. I remember her teaching me the art of making hummus, our hands stained pink from the beets, as we laughed and shared stories of our family's culinary roots. It was in her kitchen that I learned the magic of simplicity—how a handful of ingredients could come together to create something truly extraordinary.


A Splash of Color: Roasted Beet Hummus Recipe


Ingredients:

- 2 medium-sized red roasted beets

- 1 can of cooked chickpeas (about 1.5 cups)


- 2 cloves of garlic


- 1 teaspoon ground cumin


- Juice of 1 lemon


- 3 tablespoons olive oil (plus more as needed)


- Salt to taste


- 3 tablespoons tahini sesame seed paste


Instructions:

1. Prepare the Beets: If you haven't done so already, roast your beets until tender. Once cool, peel and chop them into manageable pieces.
2. Blend the Base: In a food processor or blender, add the roasted beets, garlic, ground cumin, lemon juice, salt, and tahini. Pulse until the mixture is well blended and smooth.
3. Incorporate Chickpeas: Add the cooked chickpeas and olive oil to the mixture. Pulse until the chickpeas are just incorporated, achieving a smooth texture. If the hummus is too thick, gradually add more olive oil until you reach your desired consistency.
4. Serve and Enjoy: Transfer your vibrant beet hummus to a serving bowl. This dish pairs perfectly with warm pita or flatbread, making it an enticing appetizer for any gathering.

Difficulty Rating: 3/10


Roasted Beet Hummus is a delightful appetizer that’s as easy to make as it is to enjoy. With a difficulty rating of just 3 out of 10, it's accessible to chefs of all skill levels, offering a quick and satisfying splash of color and flavor to your table.


A Dish to Remember


Every time I make this Roasted Beet Hummus, I'm reminded of those cherished times spent with my grandmother. The vibrant color and earthy flavors are a testament to the beauty of simplicity and the joy of sharing meals with loved ones. Whether you're introducing this dish to your family for the first time or incorporating it into your regular culinary repertoire, Roasted Beet Hummus is sure to become a beloved staple, creating new memories and stories to be passed down through generations.


Keywords: Roasted Beet Hummus, Easy Appetizer, Family Recipe, Nostalgic Cooking, Vibrant Flavors, Mediterranean Cuisine

Read more about Appetizers

Read more about Main Dishes

Read more about Desserts

Sun Dried Tomato Stuffed Mushrooms | Made by Meaghan Moineau

Sun Dried Tomato Stuffed Mushrooms | Made by Meaghan Moineau

Savoring Nostalgia: Sun-Dried Tomato Stuffed Mushrooms


A Family Recipe That Transcends Generations


Introduction:

In the heart of every home, there’s a dish that sparks joy, evokes cherished memories, and unites family members around the dining table. For my family, that dish is Sun-Dried Tomato Stuffed Mushrooms. This delectable appetizer, with its rich blend of Mediterranean flavors, has been the centerpiece of our gatherings for as long as I can remember. Whether it's a festive holiday dinner or a casual Sunday brunch, these savory stuffed mushrooms never fail to bring a smile to our faces and warmth to our hearts.


Ingredients:

- White button mushrooms


- Bread crumbs


- Red diced roasted pepper


- Roasted garlic (from one bulb)


- Diced kalamata olives


- Diced onion


- Diced sun-dried tomatoes


- Olive oil


- Cream cheese


- Mozzarella


- Provolone


- Asiago


- Parmesan


- Romano


- Red pepper flakes


- Dried oregano


- Salt and pepper to taste


Instructions:

1. Preheat your oven to 350°F (175°C). Begin by cleaning the mushrooms and removing the stems. Lightly oil the mushroom caps and arrange them on a greased cookie sheet.


2. Finely dice the mushroom stems and set them aside. In a large bowl, combine cream cheese, mozzarella, provolone, asiago, parmesan, romano, half of the dried bread crumbs, red pepper flakes, and dried oregano. Stir until well combined. Season with salt and pepper to taste, then set aside.


3. Over medium heat, sauté the onions in olive oil until they become translucent. Add the diced mushroom stems and continue to sauté for one minute.


4. Stir in the roasted garlic, kalamata olives, roasted red peppers, and sun-dried tomatoes. Cook until the mixture is thoroughly heated.


5. Add the sautéed vegetables to the reserved cream cheese mixture and stir to combine.


6. Scoop one tablespoon of the mixture into each prepared mushroom cap. Sprinkle with the remaining bread crumbs and mozzarella cheese.


7. Bake in the oven for 20-25 minutes until the mushrooms are browned and the cheese is melted. Let them stand for 5 minutes before serving.


Difficulty Rating: 4/10
Classification: Appetizer
A Nostalgic Family Memory:

Every year, as the leaves turned golden and the air grew crisp, my grandmother would prepare her famous Sun-Dried Tomato Stuffed Mushrooms for our Thanksgiving feast. The kitchen would fill with the comforting aroma of garlic and roasted peppers, blending with the warm, creamy cheeses. As a child, I loved helping her mix the ingredients and stuff the mushroom caps, feeling as though I was contributing to our family tradition.


On one particular Thanksgiving, after the meal was devoured and the dishes were cleared, my grandmother shared a story of how she first discovered the recipe. She recounted her travels to the Mediterranean coast, where she fell in love with the vibrant flavors and simple yet exquisite ingredients that inspired her to create this dish. Listening to her tale, I realized that these mushrooms were more than just an appetizer; they were a symbol of her adventurous spirit and her love for family.


To this day, whenever I prepare Sun-Dried Tomato Stuffed Mushrooms, I'm reminded of my grandmother's laughter and the love she infused into every meal. These stuffed mushrooms continue to be a cherished part of our family gatherings, linking the past with the present and creating new memories for future generations to savor.

Read more about Appetizers

Read more about Main Dishes

Read more about Desserts

Mini Ham Omelets | Made by Meaghan Moineau

Mini Ham Omelets | Made by Meaghan Moineau

Title: "Mini Ham Omelets: A Heartfelt Recipe Packed with Flavor and Memories"
Description: Dive into the delightful world of Mini Ham Omelets, a simple yet flavorful dish that brings a sense of nostalgia and warmth. Perfect as an appetizer, this easy-to-make recipe is bursting with the vibrant flavors of cherry tomatoes, parmesan cheese, and prosciutto, all wrapped in a soft, eggy embrace. Join me as I share a cherished family memory tied to this beloved dish and guide you through creating your very own batch. Rated 3/10 in difficulty, this recipe is a breeze for cooks of all levels.

---


Mini Ham Omelets: A Heartfelt Recipe Packed with Flavor and Memories

Growing up, Sunday mornings were a sacred ritual in our household. The kitchen would awaken with the sizzle of pans and the harmonious chatter of family, all eagerly anticipating a hearty breakfast. Among the many dishes that graced our table, Mini Ham Omelets were a standout favorite. They were more than just a meal; they were a testament to the love and togetherness that Sundays embodied.


A Taste of Tradition

These Mini Ham Omelets are not just a treat for the taste buds; they are a journey back in time. My grandmother, the matriarch of our family, first introduced them to us. Her kitchen was her canvas, and every dish she created was a masterpiece. The smell of prosciutto crisping in the oven, the vibrant colors of fresh cherry tomatoes, and the creamy blend of eggs and parmesan were the defining notes of our Sunday symphony.


The Recipe
Ingredients:

- Cherry tomatoes


- Eggs


- Milk


- Onions


- Parmesan cheese


- Bell pepper


- Prosciutto


Instructions:

1. Begin by washing and chopping the spring onions. Set them aside.


2. In a mixing bowl, whisk the eggs together with the grated Parmesan cheese until well combined.


3. Add the chopped onions, milk, and a sprinkling of pepper to the egg mixture, stirring gently to incorporate.


4. Line six cavities of a silicone muffin mold with slices of prosciutto, creating a delicate, savory nest.


5. Fill each cavity with a couple of tablespoons of the egg mixture.


6. Place a washed and dried cherry tomato in the center of each mold.


7. Bake in a preheated oven at 180°C (356°F) for 12-15 minutes, until the omelets are set and the prosciutto is crisp.


A Nostalgic Twist

As these mini omelets baked, the aroma would fill the air, drawing everyone into the kitchen. We'd gather around the table, each bite a harmonious blend of flavors that told the story of our family. The tangy burst of cherry tomatoes complemented the savory richness of the prosciutto, while the parmesan cheese added a touch of elegance to the soft, fluffy eggs.


These omelets were more than a meal; they were a reminder of the simple joys of life and the importance of family. Every bite was filled with laughter, stories, and the warmth of shared memories.


Difficulty Rating: 3/10

Creating these Mini Ham Omelets is a delightful experience that cooks of all levels can enjoy. With a difficulty rating of just 3 out of 10, this recipe is perfect for anyone looking to recreate a piece of culinary nostalgia with ease.


Classification: Appetizer

Perfect as an appetizer, these Mini Ham Omelets are a versatile dish that can be served at brunch, as a starter for a dinner party, or as a delightful snack during family gatherings.


---


So, gather your ingredients, preheat your oven, and join me in creating these Mini Ham Omelets. Whether you're sharing them with family or enjoying a quiet morning alone, these little bites of nostalgia are sure to bring warmth and joy to your table.

Read more about Appetizers

Read more about Main Dishes

Read more about Desserts

avarakkai paruppu curry recipe | Made by Meaghan Moineau

avarakkai paruppu curry recipe | Made by Meaghan Moineau

Title: A Nostalgic Journey Through Flavor: Avarakkai Paruppu Curry Recipe
Description: Dive into the aromatic world of South Indian cuisine with our Avarakkai Paruppu Curry recipe. This flavorful main dish, enriched with memories and tradition, promises to bring warmth and comfort to your dining table.

---


Growing up in a bustling South Indian household, weekends were a celebration of food, family, and laughter. Every Saturday morning, the kitchen would transform into a symphony of sizzling spices and bubbling broths. Among the myriad of dishes that graced our dining table, Avarakkai Paruppu Curry held a special place in my heart. This dish, with its harmonious blend of avarakkai (broad beans) and toor dal, was not just a meal; it was a reminder of home and the comforting embrace of family traditions.


Ingredients:


- 250g avarakkai (broad beans)


- 2 green chillies


- 1 tbsp coriander seeds


- 1 tsp cumin seeds


- 1 tsp jaggery


- Tamarind - lemon size


- 1 tsp mustard seeds


- 2 tbsp oil


- 1 tsp peppercorns


- Salt to taste


- 2 tomatoes, chopped


- 1 cup toor dal


- 1/2 tsp turmeric powder


Instructions:


1. Prepare the Avarakkai: Begin by washing the avarakkai thoroughly. Remove the strings on both sides and cut them into medium-length pieces. Cook the avarakkai either on a stovetop or pressure cook for three whistles. Once cooked, drain the water and set the avarakkai aside. Reserve the water for later use.
2. Cook the Dal: Pressure cook the toor dal until soft and keep aside.
3. Roast and Grind: Heat a pan and add 1 tsp of oil. Roast the coriander seeds, cumin seeds, peppercorns, and green chillies. Allow the tomatoes to cook completely in the mixture. Once cooled, grind the roasted ingredients into a fine paste using a mixer, adding enough water to achieve a smooth consistency.
4. Prepare the Curry: In a large pan, heat the remaining oil. Add mustard seeds and let them splutter. Add the tamarind water (prepared by soaking tamarind in the reserved avarakkai water). Once it starts boiling, add the cooked dal, jaggery, salt, turmeric powder, and the ground masala paste. Let this mixture simmer on a medium-low flame for about 5 minutes.
5. Combine and Cook: Add the cooked avarakkai to the pan. Allow the curry to boil for an additional 4 minutes. Turn off the flame and garnish with chopped coriander leaves.

A Taste of Nostalgia:


Every spoonful of this curry transports me back to my grandmother's cozy kitchen. I still remember her standing by the stove, narrating tales of her childhood while expertly preparing this dish. The aroma of roasted spices would fill the air, mingling with the laughter and chatter of family members gathered around the dining table. This dish was her love language, a way of weaving stories into the fabric of our family history.


Difficulty Rating:


5/10 - This dish is moderately easy, perfect for those who have a basic understanding of Indian cooking techniques. The key is in the preparation and balance of spices.

Classification:


Main Dish - Avarakkai Paruppu Curry is a hearty and fulfilling main course, best enjoyed with steamed rice or chapati.

Embark on a culinary journey with this Avarakkai Paruppu Curry, and create memories that will linger long after the last bite. Whether you are revisiting a cherished tradition or discovering this dish for the first time, let its flavors bring warmth and happiness to your home.

Read more about Appetizers

Read more about Main Dishes

Read more about Desserts

Spicy Seasoned Loaded Guacamole | Made by Meaghan Moineau

Spicy Seasoned Loaded Guacamole | Made by Meaghan Moineau

Title: A Taste of Home: Spicy Seasoned Loaded Guacamole
Description: Dive into the vibrant and flavorful world of Spicy Seasoned Loaded Guacamole. This zesty appetizer, rich in texture and taste, combines fresh ingredients with a touch of nostalgia. Perfect for family gatherings or simply indulging your cravings, this guacamole is sure to be a hit. Discover the recipe that brings back cherished family memories and learn how to create this easy yet unforgettable dish.

---


There's something incredibly magical about the ability of food to transport us back in time. For me, Spicy Seasoned Loaded Guacamole is more than just a delightful appetizer; it's a bridge to countless summers spent in my grandparents' backyard. The mingling scents of fresh cilantro and sizzling peppers would waft through the air as preparations for our family barbecue commenced.


Ingredients:

- 3 ripe avocados


- 2 tablespoons lime juice


- 1 tablespoon white wine vinegar


- 1/4 cup finely chopped red onion


- 1 finely chopped serrano pepper (adjust to taste)


- 1/4 cup chopped fresh cilantro


- 1 diced Roma tomato


- 1 teaspoon salt


- 1/2 teaspoon black pepper


- 1/2 teaspoon cumin


- 1/2 teaspoon garlic powder


Instructions:

1. In a medium bowl, mash the avocados to your desired consistency. I prefer mine a little chunky, just like Grandma used to make them.


2. Mix in the lime juice and white wine vinegar, ensuring the avocado stays vibrant and green.


3. Stir in the salt, black pepper, cumin, and garlic powder. The aroma alone will transport you to a sunny afternoon.


4. Fold in the red onion, serrano pepper, cilantro, and diced Roma tomato. Each ingredient adds a layer of flavor and texture, creating a symphony of taste that dances on your palate.


A Nostalgic Family Memory:

Every family gathering at my grandparents' place was a feast for the senses. As the adults bustled around the grill, we kids would sneak into the kitchen, eager to help—or perhaps just to steal a taste of whatever was being prepared. My grandmother would always set aside the avocados for me, knowing how much I loved mashing them with a fork. Her secret, she claimed, lay in the perfect balance of lime and vinegar, ensuring the guacamole was both refreshing and tangy.


One summer, as the sun dipped below the horizon, I remember sitting on the porch with my grandfather. We shared a bowl of guacamole and tortilla chips while he told me stories of his own childhood in Mexico. Those moments, filled with laughter and familial warmth, have stayed with me. Each scoop of this Spicy Seasoned Loaded Guacamole brings back the joy and love of those evenings, making every bite a nostalgic journey.


Difficulty Rating: 3/10
Classification: Appetizer

Whether you're looking to impress at your next gathering or simply wish to indulge in a flavorful snack, this Spicy Seasoned Loaded Guacamole is your go-to recipe. With its easy preparation and rich taste, it's bound to become a staple in your culinary repertoire. So, grab those avocados and get ready to create a dish that not only delights the taste buds but also warms the heart.

Read more about Appetizers

Read more about Main Dishes

Read more about Desserts

Guacamole | Made by Meaghan Moineau

Guacamole | Made by Meaghan Moineau

Title: Savoring Family Moments: Crafting the Perfect Guacamole
Description: Dive into the delightful world of guacamole with this easy-to-follow recipe that combines traditional flavors with a nostalgic twist. Discover how this simple dish can serve as a bridge to cherished family memories, all while tantalizing your taste buds.

---


Guacamole has always been more than just a delicious appetizer in my family; it's a symbol of togetherness and cherished memories. As I share this recipe with you, I am taken back to countless summer gatherings at my grandmother's house, where the aroma of fresh avocados and herbs filled the air. This guacamole recipe captures those nostalgic moments with each creamy bite.


Ingredients:

- 3 ripe Haas avocados

- 1 small onion, finely chopped


- 1 jalapeño pepper, seeded and minced


- A handful of fresh cilantro, chopped


- 1 teaspoon salt


- 1/2 teaspoon black pepper


- Juice of 1 fresh lime


- Fresh basil, chopped (about 1 tablespoon)


- Fresh oregano, chopped (about 1 tablespoon)


Instructions:


1. Prepare the Avocados: Begin by cutting the avocados in half lengthwise. Carefully drive a chef's knife into the large pit and twist to remove it. Scoop the avocado flesh out from the skin into a mixing bowl.
2. Mash and Mix: Using a fork, gently mash the avocados to your desired consistency. I prefer my guacamole with a bit of texture rather than completely smooth. Add the finely chopped onion, jalapeño, cilantro, basil, and oregano into the bowl. Mix thoroughly to incorporate all the flavors.
3. Season to Perfection: Season the mixture to taste with salt, black pepper, and freshly squeezed lime juice. The lime juice not only adds a tangy zest but also helps to keep the guacamole vibrant green.
4. Serve or Store: For the best flavor, serve the guacamole immediately with your favorite tortilla chips or as a topping for tacos. If you need to store it, press a piece of plastic film wrap directly onto the surface of the guacamole to prevent browning, and refrigerate.

A Taste of Nostalgia


Every time I make this guacamole, I'm reminded of those warm summer days at grandma's house. The kitchen was always filled with laughter and the sounds of family catching up. My grandmother would show us how to carefully remove the avocado pit, a trick passed down through generations. We would gather around the table, each contributing to the guacamole-making process, and share stories of our day.


This guacamole recipe is rated a 3 out of 10 in difficulty, making it an easy yet rewarding appetizer that anyone can enjoy crafting. It's not just about the taste—although that's undeniably delicious—but about the joy of creating something together, a tradition I proudly pass on to the next generation.


Conclusion


Crafting the perfect guacamole is more than just mixing ingredients; it's about connecting with loved ones and reliving cherished memories. Whether you're a seasoned cook or a kitchen novice, this simple dish invites you to enjoy the flavors of tradition while creating new moments to remember. Enjoy your guacamole, and may it bring your family as much joy as it has brought mine.

Read more about Appetizers

Read more about Main Dishes

Read more about Desserts

Crispy Tiger Prawns With Honey and Garlic Sauce | Made by Meaghan Moineau

Crispy Tiger Prawns With Honey and Garlic Sauce | Made by Meaghan Moineau

Title: Crispy Tiger Prawns with Honey and Garlic Sauce: A Savory Journey Down Memory Lane
Description:

Dive into the irresistible flavors of our Crispy Tiger Prawns with Honey and Garlic Sauce—an exquisite dish that marries sweetness with savory undertones. Perfectly crisped to golden perfection, these prawns are a delightful treat that promises to transport you back to cherished family gatherings. Rated 5/10 on the difficulty scale, this dish serves as a stellar appetizer that will leave your guests clamoring for more. Follow along as we share a nostalgic story that makes this recipe a family favorite!


---


Crispy Tiger Prawns with Honey and Garlic Sauce

*Ingredients:*


- 500g tiger prawns, peeled and deveined


- 2 tablespoons cornflour


- 1/4 cup water


- 2 tablespoons light soy sauce


- 1 egg yolk


- 1 teaspoon sesame oil


- Vegetable oil, for frying


- 1 spring onion, finely chopped (for garnish)


*For the Honey & Garlic Sauce:*


- 3 tablespoons honey


- 2 tablespoons dry shao hsing wine


- 4 diced garlic cloves


- 2 tablespoons light soy sauce


---


Instructions:
1. Prepare the Prawns: In a large bowl, blend the cornflour and water until dissolved. Add the prawns, soy sauce, egg yolk, and sesame oil, mixing well to ensure the prawns are evenly coated.
2. Make the Honey & Garlic Sauce: In a separate bowl, combine all the sauce ingredients and set aside.
3. Fry the Prawns: Heat vegetable oil in a wok over high heat until the surface shimmers. Carefully deep-fry half of the prawns for about 1 minute, or until they turn golden brown. Remove with a slotted spoon and drain on kitchen paper. Repeat with the remaining prawns.
4. Prepare the Sauce: Drain the oil from the wok, saving it for future use if desired. Wipe the wok clean with kitchen paper. Heat the wok over moderate heat and add the honey & garlic sauce mixture. Simmer for about 1 minute.
5. Combine and Serve: Add the prawns to the sauce, stirring until they are hot and just cooked through. Garnish with finely chopped spring onion and serve immediately.

---


A Nostalgic Family Memory:

The first time I made this dish was for a family reunion at my grandmother's house. I vividly remember the kitchen filled with the aroma of sizzling garlic and the sweet hint of honey. As a child, I watched in awe as my grandmother skillfully tossed tiger prawns in her cherished wok, her hands moving with the grace and confidence that only years of practice can bestow.


The dish was always the centerpiece of our gatherings, a testament to its ability to bring people together. The laughter and stories shared around the table, the clinking of glasses, and the satisfied sighs after each bite are memories I cherish dearly. Recreating this dish always takes me back to those warm, laughter-filled evenings, reminding me of the joy of family and the power of a good meal to create lasting bonds.


Difficulty: 5/10
Classification: Appetizer

---


This recipe for Crispy Tiger Prawns with Honey and Garlic Sauce is sure to become a favorite in your household as well, bringing a touch of nostalgia and a burst of flavor to your dining table. Enjoy!

Read more about Appetizers

Read more about Main Dishes

Read more about Desserts

Basic Hummus | Made by Meaghan Moineau

Basic Hummus | Made by Meaghan Moineau

Title: "A Taste of Tradition: Mastering the Art of Basic Hummus"
Description: Discover the simplicity and flavor of homemade hummus with our easy-to-follow recipe. This classic dish, rich in Middle Eastern tradition, is perfect for gatherings or a cozy night in. Learn how to create a creamy, flavorful hummus and enjoy a nostalgic family story that brings this recipe to life. Rated at a 3/10 for difficulty, this appetizer will become a staple in your kitchen.

---


A Taste of Tradition: Mastering the Art of Basic Hummus

Hummus is more than just a dip; it's a journey back to the comforting embrace of family gatherings and the warmth of shared meals. This simple yet flavorful dish has been a staple in my family for generations, bringing us together around the table, sharing stories and laughter.


Ingredients:

- 1 can of chickpeas, drained and rinsed


- 2 tablespoons of olive oil, plus extra for garnish


- Juice of 1 lemon


- 2 cloves of garlic, peeled


- ¼ cup of tahini


- 2-4 tablespoons of water


- 1 teaspoon of ground cumin


- Salt to taste


- Paprika for garnish


- Whole chickpeas and extra virgin olive oil for topping


Instructions:
1. Begin with the Tahini: Start by pureeing the tahini in a food processor for about a minute until it transforms into a smooth paste. This step is crucial for achieving that creamy texture hummus is known for.
2. Incorporate the Flavors: Add olive oil, garlic, lemon juice, cumin, and salt. Pulse until the ingredients are well incorporated, forming a smooth base.
3. Chickpeas in Stages: Add the chickpeas in two batches. Wait until the first batch is completely smooth before adding the second. This ensures a creamy consistency and allows each chickpea to blend seamlessly.
4. Adjust to Taste: If you prefer a smoother hummus, feel free to add more lemon juice or water until you reach your desired consistency. Taste and adjust the seasoning as needed.
5. Presentation: Pour the hummus into a serving bowl. Garnish with a few whole chickpeas in the center, sprinkle with paprika, and drizzle your best extra virgin olive oil on top. Serve with warm, whole wheat pita bread for an authentic touch.
A Family Memory:

Every summer, my family would gather at my grandmother's house for a reunion. The air was always filled with the scent of blooming jasmine and the sound of children playing. However, the highlight was the long table laden with dishes that told stories of our heritage. Among them, a bowl of hummus always stood out.


I remember watching my grandmother in the kitchen, her hands skillfully combining ingredients, turning simple chickpeas into a velvety hummus that everyone adored. She would let me taste it, asking if it needed more lemon or salt—a secret way of teaching me the art of cooking by feel rather than measurement. The hummus was always a hit, disappearing quickly as we scooped it up with pieces of warm pita.


Those memories are etched in my mind, a reminder of the love and tradition that food brings to our lives. Making hummus today is like revisiting those cherished moments, connecting with my roots through the flavors and aromas that once filled my grandmother's kitchen.


Difficulty Rating: 3/10
Classification: Appetizer

This basic hummus recipe is a delightful way to bring a taste of tradition to your table. Whether you're a seasoned cook or a kitchen novice, this dish offers a simple yet satisfying culinary experience. Enjoy crafting this classic recipe, and let it become a part of your own family story.

Read more about Appetizers

Read more about Main Dishes

Read more about Desserts

Sweet & Spicy White Cheddar Cheese Ball with apples & Bacon | Made by Meaghan Moineau

Sweet & Spicy White Cheddar Cheese Ball with apples & Bacon | Made by Meaghan Moineau

Title: Unforgettable Flavors: Sweet & Spicy White Cheddar Cheese Ball with Apples & Bacon
Description: Dive into a world of flavors with our Sweet & Spicy White Cheddar Cheese Ball, perfectly paired with apples and bacon. This appetizer brings a delightful blend of tangy, sweet, and spicy notes that will leave your taste buds craving more. Plus, enjoy a heartwarming family memory that makes this dish even more special.

---


A Nostalgic Family Gathering: The Cheese Ball That Brought Us Closer

Every autumn, as the leaves turned and the air grew crisp, my family would gather at my grandmother's house for our annual fall feast. It was a tradition that brought warmth to our hearts and joy to our souls. The centerpiece of our appetizer table was always the Sweet & Spicy White Cheddar Cheese Ball. This dish, with its intriguing blend of flavors, became a symbol of our family's togetherness.


I remember the first time my grandmother introduced us to this cheese ball. She had just returned from a trip to upstate New York, where she discovered Adams Reserve New York Extra Sharp Cheddar. Inspired by the cheese’s bold flavor, she decided to create something special. The kitchen was filled with the comforting aromas of sizzling bacon and the sweet scent of maple syrup, signaling the start of our cherished gathering.


As we sat around the table, my grandmother shared stories of her childhood, weaving tales of family traditions and the importance of coming together. With each bite of the cheese ball, the zing of cayenne pepper danced on our tongues, perfectly complemented by the sweetness of dried apples and the smoky crispiness of bacon. The combination was magical, much like the moments we shared.


This cheese ball has since become a staple in our family’s autumn celebrations. It's a recipe that's passed down through generations, each one adding its own personal touch. For me, it’s not just an appetizer; it’s a reminder of those precious moments spent with loved ones, and the flavors of love and family that never fade.


---


Ingredients:

- 1 cup dried apple, finely chopped


- 2 tablespoons applejack brandy


- 1 tablespoon maple syrup


- 6 slices bacon, cooked and crumbled


- 8 ounces lowfat cream cheese, softened


- 2 cups shredded Adams Reserve New York Extra Sharp Cheddar Cheese


- 1/4 teaspoon cayenne pepper


- 2 tablespoons dark brown sugar


- 1 cup sweet and spicy pecans, finely chopped


Instructions:

1. Place the dried apple slices in a small dish and sprinkle with applejack brandy and maple syrup. Let them soak while you prep the rest of the recipe.


2. In a large skillet, fry the bacon until crisp, turning frequently. Set aside on a paper towel-lined plate to cool.


3. Finely chop the apples. In a food processor, combine the cream cheese, shredded cheddar, cayenne pepper, and chopped apples. Pulse until thoroughly mixed.


4. In a mini food processor (or a cleaned and dried regular processor), combine the pecans, brown sugar, and crumbled bacon. Process until finely chopped.


5. Use a spatula to transfer the cheese mixture to a cutting board. Lightly wet your hands and roll the mixture into a ball.


6. Roll the cheese ball in the bacon pecan mixture, patting gently to coat.


7. Arrange the cheese ball on a serving platter with crackers and apple slices dipped in lemon juice/water to prevent browning. Enjoy!


Difficulty: 4/10
Classification: Appetizer

With its rich tapestry of flavors and a story woven from love and history, this Sweet & Spicy White Cheddar Cheese Ball is more than just a dish—it's a celebration of family, memories, and the joy of coming together. Enjoy making it, sharing it, and savoring every moment with those you love.

Read more about Appetizers

Read more about Main Dishes

Read more about Desserts

Candy Cane Chocolate Marshmallows | Made by Meaghan Moineau

Candy Cane Chocolate Marshmallows | Made by Meaghan Moineau

A Sweet Holiday Treat: Candy Cane Chocolate Marshmallows


Description

Step into the holiday season with a delicious twist on a classic treat: Candy Cane Chocolate Marshmallows. This delightful dessert marries the rich flavors of dark and milk chocolate with the festive crunch of candy canes. Perfect for satisfying sweet cravings or adding a touch of magic to your holiday gatherings, these marshmallows are sure to become a cherished tradition. Easy to make and even easier to enjoy, they are a wonderful way to celebrate the season with family and friends.

Ingredients

- Candy canes

- Dark chocolate


- Marshmallows


- Milk chocolate


Instructions

1. Crush the Candy Canes: Begin by crushing the candy canes into small pieces using the bottom of a glass, a mallet, or any other tool at your disposal. The goal is to create a festive, crunchy topping for your marshmallows.
2. Melt the Chocolate: Set up a double boiler or another method to melt your chocolate without letting it touch the water. Melt together the dark and milk chocolate until smooth and silky.
3. Dip the Marshmallows: Carefully dip each marshmallow into the melted chocolate, ensuring it's well-coated. Immediately roll the chocolate-covered marshmallow in the crushed candy canes, pressing gently so the pieces adhere.
4. Set and Chill: Place each coated marshmallow on wax paper and let them chill in the refrigerator for at least an hour, or until the chocolate hardens completely.
5. Store and Enjoy: Once hardened, store your Candy Cane Chocolate Marshmallows in an airtight container. Enjoy them on their own or dunk them into a steaming mug of hot chocolate for an extra indulgent treat.

A Nostalgic Family Memory


Every holiday season, my family gathered at my grandmother’s cozy kitchen, a place filled with warmth and the aroma of holiday spices. One year, my little sister, in her eagerness to help, accidentally dropped a whole bag of candy canes on the floor. Instead of getting upset, my grandmother saw an opportunity. She took out a rolling pin and showed us how to crush the candy canes into a fine, colorful dust.


We spent the afternoon dipping marshmallows into rich, melted chocolate and rolling them in the crushed candy canes. The kitchen echoed with laughter and the occasional Christmas carol as we created these delightful treats. That day, what could have been a small disaster turned into a cherished family tradition. Every time I make Candy Cane Chocolate Marshmallows, I'm reminded of that cozy kitchen, the laughter, and the sweet spirit of the holidays.


Difficulty: 3/10

This recipe is simple and straightforward, perfect for novice and seasoned cooks alike, making it an ideal project for family bonding.

Classification: Dessert


Candy Cane Chocolate Marshmallows are a delectable dessert, perfect for holiday parties, cozy nights by the fire, or as a sweet homemade gift for loved ones. Enjoy creating this festive treat and making memories that will last a lifetime.

Read more about Appetizers

Read more about Main Dishes

Read more about Desserts

Naturally Sweet Apple Turnovers | Made by Meaghan Moineau

Naturally Sweet Apple Turnovers | Made by Meaghan Moineau

Title: Nostalgic Delights: Naturally Sweet Apple Turnovers
Description: Dive into the world of warm, flaky pastries with our Naturally Sweet Apple Turnovers. Perfect as a comforting dessert, these turnovers combine the classic flavors of apple and spice, enveloped in a tender, buttery crust. This recipe not only offers a delicious treat but also stirs up cherished memories of family gatherings and shared moments. Rated 6 out of 10 for difficulty, these apple turnovers are an achievable delight for any home baker.

---


Naturally Sweet Apple Turnovers: A Recipe Steeped in Family Tradition


There's something about the aroma of apples and spices wafting through the house that instantly transports me back to my childhood. Growing up, autumn was a time for family and feasting. The highlight of the season was always my grandmother's naturally sweet apple turnovers, a recipe passed down through generations.


Ingredients You'll Need:


- Dough:

- 2 cups all-purpose flour


- 1/4 teaspoon kosher salt


- 1/4 teaspoon ground cardamom


- 1/4 teaspoon ground allspice


- 1/4 teaspoon ground cinnamon


- 1/4 teaspoon ground ginger


- 1/2 cup unsalted butter, chilled and diced


- 1/2 cup cream cheese, softened


- 1 egg yolk


- Filling:

- 2 cups diced apples


- 1 tablespoon lemon juice


- 2 tablespoons maple syrup


- 1/4 cup brown sugar


- 1 tablespoon Frangelico


- Topping:

- 1 tablespoon milk


- 2 tablespoons sugar


- Powdered sugar for dusting


Instructions:


1. Prepare the Dough:

- In a medium-sized bowl, whisk together the flour, salt, ground cardamom, allspice, cinnamon, and ginger.


- Add the diced butter and use a pastry blender to incorporate until coarse crumbs form.


- Mix in the cream cheese until well incorporated.


- Add the egg yolk and stir with a fork until the dough comes together into a ball.


- Transfer the dough onto a floured surface, roll it into a uniform ball, slightly flatten with your hand, and wrap in plastic wrap. Chill for at least one hour.


2. Prepare the Filling:

- In a separate bowl, combine the diced apples, lemon juice, maple syrup, spices, and brown sugar. Toss until all apple pieces are well coated.


3. Assemble the Turnovers:

- Once the dough has chilled, place it on a floured surface and roll it out to a 10 x 10-inch square.


- Cut the dough into sixteen even squares and lay them on a parchment paper-covered baking sheet. Set in the freezer to chill briefly.


- Remove the squares from the freezer and place about 1 tablespoon of apple filling in the center of each square.


- Fold each square into a triangle, crimping the edges with a fork to seal.


- Brush the tops with milk and sprinkle with extra sugar if desired. Chill briefly if the dough softens.


4. Bake:

- Preheat your oven to 400°F (200°C).


- Bake the turnovers for 20 minutes or until golden brown.


- Once cooled, sprinkle with powdered sugar before serving.


A Family Memory:


Every year, as the leaves began to turn, my family would gather at my grandmother's house for the annual apple picking adventure. The day would end in her cozy kitchen, where we'd all take turns peeling and dicing apples, sharing stories and laughter. The kitchen would fill with the irresistible aroma of spices and baking dough. Those apple turnovers weren't just a treat; they were a symbol of togetherness and love. Each bite reminded us of those cherished moments, making them more than just a dessert—they were a family tradition.


Difficulty Level: 6/10


Classification: Dessert

These Naturally Sweet Apple Turnovers are a delightful way to bring the warmth of familial love and the joy of baking into your home. Whether you're making them for a special occasion or a cozy night in, they promise to deliver both taste and nostalgia in every bite.

Read more about Appetizers

Read more about Main Dishes

Read more about Desserts

Mussels & Clams in White Wine {Cozze e Vongole} | Made by Meaghan Moineau

Mussels & Clams in White Wine {Cozze e Vongole} | Made by Meaghan Moineau

Title: A Taste of the Sea: Mussels & Clams in White Wine {Cozze e Vongole}
Description: Dive into the flavors of the sea with our Mussels & Clams in White Wine recipe, also known as Cozze e Vongole. This delightful dish is a perfect blend of savory and spicy, enhanced by the freshness of garlic, cherry tomatoes, and a dash of white wine. Whether you're looking for a light appetizer or a satisfying main dish, this recipe brings a taste of the Mediterranean to your table. Plus, discover a heartwarming family memory that makes this dish even more special. Difficulty: 5/10.

---


There’s something magical about the aroma of garlic sizzling in olive oil. It’s the kind of scent that wafts through the air, inviting everyone to gather around the kitchen, eager to see what delicious creation is underway. For me, the magic is in preparing Cozze e Vongole, or Mussels & Clams in White Wine, a dish that embodies the essence of the sea and brings back cherished family memories.


Growing up, summer weekends were synonymous with family gatherings at our beach house. The sun would dip below the horizon, painting the sky with hues of orange and pink, as we gathered around the large wooden table on the porch. My grandfather, a seasoned fisherman, would return from a day at sea, his catch of fresh mussels and clams brimming with the promise of a delightful dinner.


The preparation was a family affair. My grandmother would arm herself with a large frying pan, her weathered hands pouring a generous glug of golden olive oil. The garlic would hit the pan with a sizzle, its aroma mingling with the salty sea breeze. I remember the twinkle in her eyes as she tossed in chili flakes, giving the dish a gentle kick that mirrored her fiery spirit.


Once the clams and mussels were added, the kitchen would fill with the symphony of clattering shells and bubbling wine. As the white wine reduced, its steam carried with it the essence of the sea. Cherry tomatoes and fresh parsley added a burst of color, while the final touch—a glug of olive oil—brought everything together.


As we sat down to eat, the dish was more than just a meal; it was a celebration of family, of traditions passed down through generations. The mussels and clams, tender and juicy, were perfect for soaking up the tangy broth with crusty bread. Each bite was a reminder of those sun-kissed days and the love that went into every pot.


Today, I share this recipe with you, hoping it brings as much joy to your table as it has to ours. Mussels & Clams in White Wine is a dish that’s both simple and sophisticated, earning a difficulty rating of 5/10. Whether served as an appetizer or a main dish, it’s best enjoyed with a good company and a glass of crisp white wine.


Recipe: Mussels & Clams in White Wine {Cozze e Vongole}
Ingredients:

- Cherry tomatoes


- Chili flakes


- Fresh parsley


- Garlic


- Olive oil


- Salt


- White wine


Instructions:

1. In a large frying pan on low heat, add 3-4 glugs of olive oil and slowly cook the garlic until brown all over. Remove and discard the garlic (or leave it in if you like).


2. Turn the heat up, add in chili flakes and clams, and cook for about 30 seconds to 1 minute.


3. Add in the mussels. Turn up the heat and toss in the cherry tomatoes, sautéing for a moment or two.


4. Add a half glass of white wine and cover. Allow to sit covered for 1-2 minutes at most until the shells open.


5. Shut off the heat, add in your parsley. Finish with a bit of butter or a good glug of olive oil.


6. Top with arugula if you like. Serve immediately with plenty of good crunchy bread to dip and a glass of white wine.


May this dish transport you to the seaside, and may your kitchen be filled with laughter and love, just as mine was all those years ago. Bon appétit!

Read more about Appetizers

Read more about Main Dishes

Read more about Desserts

Creamy Tomato Soup | Made by Meaghan Moineau

Creamy Tomato Soup | Made by Meaghan Moineau

A Taste of Comfort: Creamy Tomato Soup Recipe

A Heartwarming Journey to Family Gatherings

---


Introduction


When the air turns crisp and the leaves begin to paint the landscape in hues of amber and gold, there's nothing more comforting than a bowl of warm, creamy tomato soup. This classic dish, with its velvety texture and rich flavors, has been a staple in my family for generations. Join me as I take you on a nostalgic journey back to my grandmother's kitchen, where this beloved soup was often the centerpiece of our cozy gatherings.


Ingredients


- 2 tablespoons olive oil


- 1 diced onion


- 1 teaspoon fresh dried basil


- 1 teaspoon fresh dried thyme


- 1/2 teaspoon salt


- 1/4 teaspoon black pepper


- 2 cans (14.5 oz each) diced fresh tomatoes


- 2 tablespoons tomato paste


- 2 tablespoons flour


- 3 cups chicken broth, divided


- 1 tablespoon Splenda


- 1 cup evaporated milk


Instructions


1. In a large saucepan, heat the olive oil over medium heat.


2. Add the diced onion, basil, thyme, salt, and black pepper. Cook, stirring occasionally, until the onion is tender and golden.


3. Stir in the diced tomatoes and tomato paste. Simmer for 10 minutes.


4. In a small bowl, whisk together the flour and 1/4 cup of the chicken broth until smooth.


5. Stir the flour mixture into the tomato mixture until well blended.


6. Add the remaining chicken broth and simmer for 30 minutes, stirring frequently.


7. Use an immersion blender to puree the soup until smooth.


8. Stir in the Splenda and evaporated milk. Heat through and serve.


A Nostalgic Story


Every autumn, as soon as the first chill of fall descended upon our town, my family would gather at my grandmother's house for a weekend of stories, laughter, and of course, her famous creamy tomato soup. The aroma of onions and herbs simmering on the stove was an olfactory invitation, guiding us to her warm kitchen where love was the main ingredient.


I remember sitting at the kitchen table, watching my grandmother as she meticulously prepared the soup, her hands moving with the grace and precision of a seasoned chef. She always told us that the secret ingredient wasn't the tomatoes, or the herbs, or even the broth—it was the love she poured into each pot that made it special.


As we sat around the table, bowls of steaming soup in hand, the room would fill with the comforting hum of conversation. Each spoonful was a reminder of the love and warmth that defined our family gatherings. Even now, as I prepare this dish for my own family, I feel connected to those cherished moments of my childhood.


Difficulty and Classification


- Difficulty: 3/10
- Classification: Appetizer

This creamy tomato soup is not only a breeze to prepare, but it also serves as a delightful appetizer to any meal. With its simple ingredients and straightforward instructions, it's a perfect dish for both novice and seasoned cooks. Whether you're looking to recreate cherished family memories or start new traditions, this recipe promises to be a heartwarming addition to your culinary repertoire.


Conclusion


There’s an undeniable magic in recipes that are passed down through generations. This creamy tomato soup is more than just a comforting dish; it's a vessel of nostalgia, bringing with it memories of love, laughter, and family togetherness. As the cooler months approach, I invite you to gather your loved ones and share in a bowl of warmth and history.

Read more about Appetizers

Read more about Main Dishes

Read more about Desserts

Shrimp and Lemongrass Soup | Made by Meaghan Moineau

Shrimp and Lemongrass Soup | Made by Meaghan Moineau

Title: Savoring Memories: How to Make Delicious Shrimp and Lemongrass Soup
Description: Dive into the aromatic world of Shrimp and Lemongrass Soup, a delightful blend of flavors that transports you back to cherished family gatherings. Discover the perfect balance of ingredients, coupled with a heartwarming personal story that makes this dish a cherished family favorite. Perfect as an appetizer, this recipe is easy to make and scores a 4 out of 10 on the difficulty scale.

---


A Journey Through Flavor: Crafting the Perfect Shrimp and Lemongrass Soup

There’s something magical about a bowl of steaming Shrimp and Lemongrass Soup. It’s a dish that effortlessly combines the vibrant flavors of Southeast Asia with the joy of shared family moments. Today, I invite you on a culinary journey to recreate this soul-warming soup, and I’ll share a little family nostalgia to go with it.


Ingredients You'll Need:

- Raw shrimp


- Lemongrass stems


- Scallion


- Bean sprouts


- Lime (juice)


- Carrot


- Daikon


- Chicken stock


- Fresh mint


Instructions:
1. Prepare the Lemongrass: Begin by cutting off the white parts of the lemongrass stems, keeping the tops aside. Slice these white sections into inch-long pieces and flatten them gently with your knife.
2. Infuse the Stock: In a large stockpot, bring your chicken stock to a rolling boil. Add the flattened lemongrass stems and the shrimp shells. Allow them to simmer for about two minutes to infuse their flavors into the stock. Once done, set it aside to steep for a few more minutes.
3. Strain and Enhance the Stock: Strain the stock to remove the shells and lemongrass pieces, then return it to the stockpot. Slice the remaining lemongrass tops and finely chop them. Add these, along with the raw shrimp, to the stock. Simmer gently for 3-4 minutes until the shrimp turns a delightful pink.
4. Add Fresh Ingredients: Next, add lime juice, scallions, bean sprouts, carrots, and daikon to the pot. Stir the contents well, allowing all the flavors to meld together seamlessly. Season according to your taste preferences.
5. Finish with a Minty Garnish: Ladle the soup into bowls and finish each serving with a fresh mint garnish. The mint not only enhances the aroma but also adds a refreshing touch to each spoonful.
A Nostalgic Glimpse:

As a child, I vividly remember visiting my grandmother’s house during the holidays. Her kitchen was always bustling with activity, and the air was filled with the comforting scents of her cooking. Of all the dishes she prepared, her Shrimp and Lemongrass Soup was a family favorite.


Gathered around the dining table, we'd eagerly wait as she ladled the fragrant soup into our bowls. The first sip was always magical, a harmonious blend of tangy lime, aromatic lemongrass, and sweet shrimp. It was a dish that brought us together, sparking laughter and stories that would be cherished for years to come.


Creating this soup today is more than just following a recipe; it’s reliving those precious moments of togetherness. As you prepare this dish, I hope it brings you the same warmth and joy it has brought to my family.


Difficulty and Classification:

This Shrimp and Lemongrass Soup is an ideal starter, perfect for whetting the appetite without being overly filling. On a scale of difficulty, I’d rate it a 4 out of 10. With a little preparation and attention to timing, you’ll have a delicious appetizer ready to impress your guests.


Incorporate this delightful soup into your culinary repertoire and create your own cherished memories around the table. Enjoy!

Read more about Appetizers

Read more about Main Dishes

Read more about Desserts

Chinese Potstickers | Made by Meaghan Moineau

Chinese Potstickers | Made by Meaghan Moineau

Title: Unveiling the Art of Chinese Potstickers: A Delicious Journey from My Family's Kitchen
Description: Dive into the captivating world of Chinese Potstickers with our authentic recipe, bursting with flavors of lean ground pork, water chestnuts, and aromatic spices. This dish is a culinary bridge between past and present, enriched with a nostalgic family tale that warms the heart. Perfect as an appetizer, this recipe is rated 6/10 in difficulty, making it an exciting kitchen adventure for culinary enthusiasts.

---


A Culinary Bridge to My Heritage: Chinese Potstickers


Chinese Potstickers are more than just a delightful treat; they are a culinary emblem that brings my family together, echoing stories of laughter and tradition that span generations. This dish, known for its crisp, golden exterior and juicy, flavorful interior, embodies the essence of Chinese cuisine in every bite.


Ingredients


- 200g lean ground pork (or substitute with ground chicken)


- 1 teaspoon sea salt


- 1 teaspoon fine sugar


- 1/2 teaspoon ground black pepper


- 2 teaspoons light soy sauce


- 2 teaspoons sesame oil


- 1 tablespoon Shaoxing Huatiao wine


- 100g canned water chestnuts (or substitute with spinach or cabbage)


- 2-3 tablespoons finely chopped scallions


- Dumpling wrappers


- Plain flour (for dusting)


- 2-3 tablespoons vegetable oil


- 1/3 cup water


Instructions


1. Prepare the Filling: In a large mixing bowl, combine 200g of lean ground pork with sea salt, sugar, black pepper, light soy sauce, sesame oil, and Shaoxing Huatiao wine. Chop the water chestnuts into small pieces and add them to the mixture along with finely chopped scallions. Mix thoroughly.
2. Prepare the Wrappers: Thaw dumpling wrappers if frozen. Dust a dish and your working surface with flour. Carefully separate the dumpling wrappers and lay them out.
3. Assemble the Potstickers: Place 1.5 teaspoons of filling in the center of each wrapper. Lightly wet the rims with water, fold, and pleat as instructed, ensuring a tight seal. Arrange the prepared dumplings on a floured dish.
4. Cook the Potstickers: Heat vegetable oil in a frying pan. Place the potstickers flat-side down and fry until golden brown. Add water, cover the pan, and steam for 4-5 minutes. Remove the lid to let the base crisp up again.
5. Serve: Transfer to a plate and serve immediately with a vinegar dip made of balsamic or black Chinese vinegar and thinly sliced ginger. Enhance with soy sauce, chili oil, or sesame oil as desired.

A Family's Culinary Tale


As I prepare these delicious potstickers, I am transported back to my grandmother's kitchen—a warm haven filled with the intoxicating aroma of sizzling dumplings and her gentle laughter. Each pleat I form echoes the patient hands of my grandmother teaching me the art of dumpling-making, an experience woven with stories of her childhood in China. The kitchen was our storytelling stage, where tales of resilience and joy unfolded with every fold of dough.


These potstickers were the highlight of our family gatherings, a dish that symbolized unity and love. The crispy potstickers served with a tangy vinegar dip were not just an appetizer; they were a ceremonial opening to an evening filled with laughter and cherished memories.


Difficulty and Classification


Difficulty: 6/10
Classification: Appetizer

Whether you're a seasoned cook or a culinary novice, this recipe offers a delightful challenge that promises rewarding results. Share this dish with loved ones and create your own stories, adding to the rich tapestry of traditions that Chinese Potstickers bring to the table.

Read more about Appetizers

Read more about Main Dishes

Read more about Desserts