
Picture this: it’s the day after Thanksgiving. Your fridge is packed, your belly is full, and you’re wondering what on earth to do with that leftover turkey. We’ve all been there, right? Well, let me introduce you to my Post Thanksgiving “sopa De Tortilla.” It’s cozy and rejuvenating, transforming those leftovers into something flavorful and comforting. You’ll find that this soup is a delightful escape from the rich heaviness of yesterday’s feast, turning simplicity into something vibrant and irresistible. So let’s get creative and make room for this warm, spiced wonder on your post-holiday menu. Jump to Recipe
What You’ll Need
This ingredient list is a blend of basics and a little something special. Chances are you already have most of this hanging around, especially after Thanksgiving, and that’s what makes it so perfect.
- Whole turkey breast
- Fried tortilla strips or good quality store bought tortilla chips
- Poblano pepper
- 1 avocado
- 2 carrots
- 4 stalks of celery
- 1 bunch of cilantro
- 1 pinch of cumin
- 2 cloves of garlic
- 2 tablespoons of olive oil, plus extra for blending
- 1 onion, quartered
- 1 8 oz. can of organic stewed tomatoes
- Salt, to taste
How to Make A Post Thanksgiving “sopa De Tortilla”
- Drizzle 2 tablespoons of olive oil into the bottom of a large stock pot. Add the quartered onion, garlic, and 2 stalks of celery along with the whole turkey breast.
- Peel two carrots and toss the peels in the stock pot. Add 2 carrots and 2 more celery stalks, saving the others for later.
- Cut the stems off your bunch of cilantro, reserving the leaves for the garnish, and add the stems to the pot.
- Fill the pot with water until it’s 3/4 full. Cover and bring to a boil, letting it simmer for at least 1 hour, though 2 hours is ideal for flavor depth.
- After boiling, remove the turkey from the bone, reserve the meat, and discard the bone. Strain the soup using a colander over another pot, discarding the cooked veggies.
- Set aside 1 to 2 cups of the stock per guest for the soup, and freeze the rest in ice cube trays for future culinary adventures.
- For the soup base, blend the stewed tomatoes, a pinch of salt, and a bit of olive oil with your roasted poblano pepper* until smooth, then set aside.
- Add the remaining cubed carrots and chopped celery to the stock. Cover and boil for 30 minutes until tender.
- Gradually add the pureed pepper-tomato mixture into the broth in 1/4 cup increments.
- Stir in 1/3 cup of turkey meat per cup of stock and allow to simmer gently.
- Adjust salt to your preference and finish with a pinch of ground cumin for that warm, earthy aroma.
- Ladle the soup into bowls, adding extra turkey meat if desired. Top with fried tortilla strips, fresh cilantro leaves, and cubes of avocado for that final flourish.
- *To roast the poblano pepper, simply char it over an open flame or in your oven until the skin blackens and peels away easily. Devein it before blending.
Cook’s Notes
When making this soup, patience is your best friend. Give the stock plenty of time to simmer so all those flavors can really shine. Don’t rush the roasting of the poblano either. A good char is key to adding depth to your soup. If you’re planning ahead, you can make the stock a day in advance and chill it, which makes skimming any excess fat a breeze. Leftovers should be stored in airtight containers in the fridge and can last up to 3 days. If you’ve made extra stock, those ice cubes are perfect for enhancing rice dishes or sauces later on.
Make It Your Own
- Swap the turkey for crispy tofu to make this a vegetarian delight.
- Use a mix of different peppers, like jalapeños or anaheims, for varied heat levels.
- Add black beans or corn to the broth for a heartier texture.
- Consider topping with crumbled cheese like queso fresco or feta for a tangy twist.
If you try this, I’d love to hear how it turns out — drop a comment or tag me! Can’t wait to see your delicious takes on this post-Thanksgiving favorite.
Goes Well With
If you want to round out the meal, here’s what I’d pair it with over on meaghanmoineau.com:
Related update: A Post Thanksgiving “sopa De Tortilla”

Thanksgiving at my place is never complete without a little bit of chaos and a lot of laughter. One year, I thought I’d try my hand at a new dessert after we had a bit of a mishap with the pumpkin pie (don’t ask!). In the spirit of whimsy and fun, I concocted these adorable little OREO Turkeys that not only saved the day but also became a family favorite. These treats are deceptively simple to make and a delightful project to get kids involved in. Plus, who can resist the combination of OREO cookies and chocolate? Trust me, once you try them, they’ll be a staple at every Thanksgiving feast. Jump to Recipe
What You’ll Need
This ingredient list is a breeze, and chances are you’re already stocked up on most of it, especially if you’ve got a sweet tooth like me!
- OREO cookies (3 cups, crushed)
- Cream cheese (softened)
- Sweet semi baking chocolate (melted)
- Candy corn
- Candy eyes
- Icing (as glue)
How to Make OREO Turkeys for Thanksgiving
- First up, grab a package of OREO cookies and crush them up finely. We’re talking almost powdery, so they mix well.
- Mix the crushed OREO cookies with softened cream cheese until you have a smooth, pliable dough. It should feel like a rich, chocolatey clay.
- Roll this mixture into one-inch balls. They should be small enough to handle easily but big enough to hold their own as a turkey body.
- Pop those balls into the freezer for a quick chill — about 10 minutes should do the trick. This helps them firm up for the chocolate dip.
- Dip each ball into the melted chocolate, making sure it’s completely coated, and place them on a cookie sheet lined with wax paper. The chocolate should be smooth and glossy.
- Refrigerate the chocolate-coated balls for 15 minutes to an hour. This gives them a nice, firm shell.
- Now the fun part: decorating! Stick 5 candy corn pieces into the back of each ball to create colorful tail feathers.
- Use icing as glue to attach candy eyes towards the front top of the ball. We want those eyes peering out cutely!
- For the finishing touch, take a candy corn and cut it into pieces. Use the white tip for a nose and stick it under the eyes, then use the orange pieces as feet. Your turkey should look absolutely adorable!
Cook’s Notes
If your cookie balls are too sticky to roll, try chilling the mixture for a bit longer. It should be firm yet pliable. Don’t worry if your OREO Turkeys aren’t perfect; their charm is in their handmade look! You can make these a day ahead and store them in the refrigerator to keep the chocolate nice and solid. Leftovers (if there are any) can be kept in an airtight container for up to a week.
Make It Your Own
- Swap the candy eyes with mini chocolate chips. They’re just as cute and give a different texture.
- Use white chocolate instead of semi-sweet for a sweeter, more vibrant look.
- Try using different flavored OREOs, like mint or peanut butter, for a twist on the classic flavor.
- Add a dash of cinnamon to the cream cheese mixture for a subtle, warm hint of spice.
If you try this recipe, I’d love to hear how it turns out — drop a comment or tag me on social media! Your feedback and creativity always make my day. Happy Thanksgiving, and may your kitchen be filled with delightful chaos!
Related update: How to Make OREO Turkeys for Thanksgiving
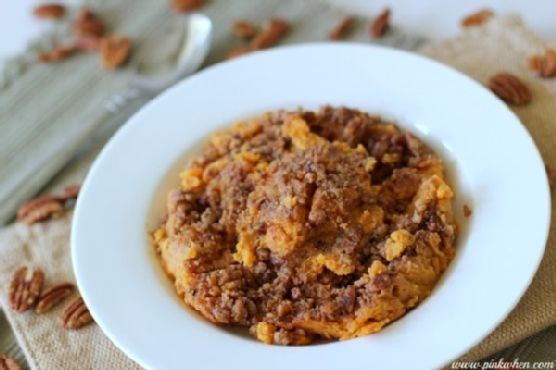
It was one of those chilly fall afternoons when the idea of a cozy dinner just felt right. I had spent the morning raking leaves, my nose cold, my fingers tingling, and all I could think about was something warm and comforting for dinner. My mind wandered to sweet potatoes, with their vibrant orange hue and naturally sweet flavor. And that’s how this Sweet Potato Casserole came to be. It’s the perfect blend of creamy, sweet, and crunchy, thanks to a delightful pecan topping that just makes it irresistible. Whether you’re preparing for a family gathering or simply want to treat yourself to a homemade delight, this casserole is bound to bring warmth and smiles to the table.
Jump to Recipe
What You’ll Need
This dish is a breeze to make, and chances are you already have most of these ingredients tucked away in your pantry or fridge. Here’s what you’ll need:
- 5 sweet potatoes (or you can use cooked yams)
- 2 eggs
- 1 teaspoon ground cinnamon
- 1 cup heavy cream
- Sugared pecans (make these the day before for best results)
- 1/2 teaspoon salt
- 1/2 cup unsalted butter
- 2 teaspoons vanilla extract
- 1 cup white sugar
How to Make The BEST Sweet Potato Casserole
- Preheat your oven to 350°F (175°C). Prepare a 9 x 13 glass baking dish with a light coat of butter or cooking spray.
- In a medium-sized mixing bowl, place your cooked sweet potatoes. Add the salt, butter, eggs, vanilla extract, ground cinnamon, white sugar, and heavy cream. Mix thoroughly for about a minute until smooth and well-combined.
- Take your sugared pecans and place them in a blender or food processor. Chop them until they’re small and easy to sprinkle, but be careful not to turn them into dust!
- Spoon the sweet potato mixture into the prepared baking dish, spreading it out evenly. Then, cover the top with your finely chopped sugared pecans, making sure every inch is covered.
- Bake in the preheated oven for 30 minutes or until the topping is lightly browned and the edges start to bubble slightly. Let it cool for a few minutes before serving to allow the casserole to set.
Cook’s Notes
Here’s a little secret: if you boil your sweet potatoes rather than bake them, they become super easy to mash, and the flavor remains delightfully sweet. If you’re running short on time, you can even prep the sweet potatoes and pecans a day ahead. Just keep them in airtight containers in the fridge. When it comes to leftovers, they can be stored in the fridge for up to three days and reheated in the oven at 325°F (160°C) for about 15 minutes. Avoid the microwave, as it tends to make the topping less crunchy.
Make It Your Own
- Nut swap: If pecans aren’t your thing, try using chopped walnuts or almonds for a slightly different texture and flavor.
- Spice it up: Add a pinch of nutmeg or cloves to the sweet potato mixture for an extra layer of warmth and spice.
- Go dairy-free: Swap the heavy cream with coconut milk and use a plant-based butter alternative. Still totally delicious!
- Add a twist: Mix in a handful of shredded coconut to the pecan topping for a tropical touch.
If you try this, I’d love to hear how it turns out — drop a comment or tag me on social media! Let your kitchen adventures begin!
Related update: The BEST Sweet Potato Casserole
Related update: Curried Cauliflower Gratin