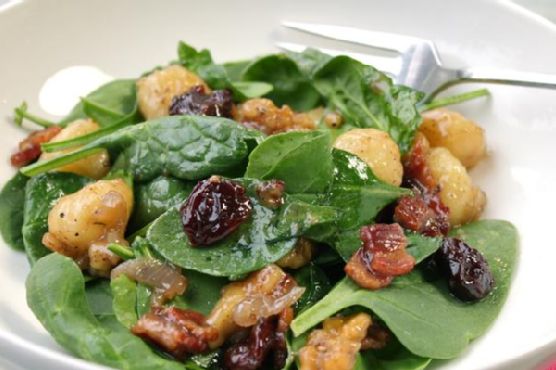
Gnocchi and Wilted Spinach Salad | Made by Meaghan Moineau
Title: A Culinary Symphony: Gnocchi and Wilted Spinach SaladDescription: Dive into a delightful fusion of flavors with our Gnocchi and Wilted Spinach Salad. This dish combines the rustic charm of gnocchi, the freshness of baby spinach, and the savory touch of crispy bacon. Accompanied by a hint of nutmeg and the sweetness of dried cherries, this salad is a flavorful masterpiece that's perfect for any occasion. Whether you're looking to impress at a dinner party or simply want to treat yourself to a gourmet meal, this recipe is your ticket to culinary bliss.
---
A Nostalgic Journey: Gnocchi and Wilted Spinach Salad
Cooking has always been more than just a task in our family—it's a journey through time, filled with cherished memories and the warmth of shared experiences. One dish that holds a special place in my heart is the Gnocchi and Wilted Spinach Salad. It takes me back to sun-drenched afternoons in my grandmother's kitchen, where love was the secret ingredient in every meal.
As a child, I vividly remember the Sundays spent at Grandma's house. The air would be filled with the comforting aromas of her cooking, and the kitchen was always buzzing with activity. One particular Sunday, I was entrusted with the task of preparing gnocchi for the first time. My grandmother guided me with her gentle patience, showing me how to roll the dough just right. Her hands moved with the grace of a seasoned artist, transforming simple ingredients into something extraordinary.
The sizzling sound of bacon in the skillet was music to my ears, a prelude to the symphony of flavors that would soon unfold. We sautéed shallots until they were fragrant, adding walnuts and a touch of nutmeg for depth. Meanwhile, the gnocchi danced in boiling water, signaling its readiness with a float to the surface.
As we combined the ingredients, the kitchen was filled with laughter and stories of yesteryear. My grandmother shared tales of her own childhood, weaving a tapestry of family history that I hold dear to this day. We finished the dish with a splash of lemon juice and the sweetness of honey, creating a harmonious balance that was as satisfying as it was delicious.
Finally, we poured the hot gnocchi mixture over a bed of fresh baby spinach. The heat wilted the leaves just enough, melding them perfectly with the rich flavors of the dish. It was a meal that transcended the ordinary, a testament to the magic that happens when love and tradition come together in the kitchen.
Recipe: Gnocchi and Wilted Spinach Salad
Ingredients:
- 1 package of gnocchi
- 6 cups baby spinach leaves
- 6 slices bacon
- 2 shallots, thinly sliced
- 1/2 cup walnut pieces
- 1 teaspoon nutmeg
- 1/2 cup dried cherries
- Juice of 1 lemon
- 1 tablespoon honey
- Salt and pepper to taste
Instructions:
1. Bring a large pot of salted water to a boil.
2. Place a large skillet over medium heat. Add the bacon and cook until crispy.
3. Add the shallots to the bacon and sauté for 1-2 minutes. Incorporate the walnuts and nutmeg.
4. Meanwhile, drop the gnocchi into the boiling water. Cook until the gnocchi float to the surface (about 3-4 minutes).
5. Use a slotted spoon to transfer the gnocchi to the skillet. Add the dried cherries and stir.
6. Add the lemon juice, honey, and 2-3 tablespoons of pasta water. Season with salt and pepper to taste.
7. Place the spinach in a large bowl. Pour the hot gnocchi mixture over the spinach and toss.
8. Serve immediately and enjoy!
Difficulty: 5/10
Classification: Main Dish
This Gnocchi and Wilted Spinach Salad is more than just a meal—it's a celebration of family, tradition, and the joy of cooking together. Whether you're creating new memories or reliving cherished ones, this dish is sure to become a beloved favorite in your culinary repertoire. Enjoy!