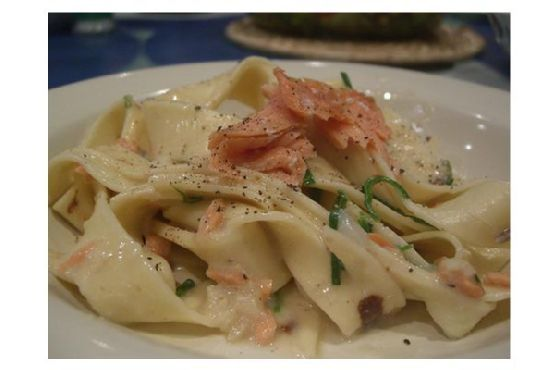
Pasta With Salmon Cream Sauce
Intro
There’s something truly comforting about a warm, creamy pasta dish, especially when it brings back fond memories of family gatherings. I remember my grandmother preparing her famous Pasta with Salmon Cream Sauce every Sunday. The aroma would fill her cozy kitchen, and we would eagerly wait at the dining table, ready to dive into a meal that felt like a warm hug on a plate. This dish combines the rich flavors of salmon with a velvety cream sauce, creating a meal that’s both satisfying and elegant. Whether you’re cooking for a family dinner or a romantic evening, this recipe is sure to impress.
Why You’ll Love It
This Pasta with Salmon Cream Sauce is a delightful blend of creamy, savory, and fresh flavors. Here’s why you’ll love making and eating it:
- Quick and Easy: This recipe is perfect for busy nights, taking under 30 minutes from start to finish.
- Rich and Flavorful: The creamy sauce is perfectly balanced with the saltiness of the salmon and the freshness of the herbs.
- Family-Friendly: It’s a hit with both kids and adults, making it a great choice for family meals.
- Customizable: You can easily tweak the ingredients to suit your dietary preferences or what you have on hand.
Ingredients
- 2 tablespoons butter
- 2 tablespoons flour
- 2 cups milk
- 1 onion, finely chopped
- 1/2 cup grated parmesan cheese
- 2 tablespoons chopped fresh parsley
- 1 cup peas
- 12 ounces penne pasta
- 1/4 teaspoon pepper
- 1 can (about 7.5 ounces) red salmon, drained and broken into chunks
Instructions
- In a large pot of boiling water, cook the penne pasta until al dente, about 10-12 minutes. Drain and return to the pot.
- In a saucepan, melt butter over medium heat. Add the chopped onion and cook until tender.
- Stir in the flour and cook for a few seconds to form a roux.
- Gradually whisk in the milk and bring to a simmer, stirring constantly until the sauce thickens.
- Add the peas, broken salmon chunks with juices, parsley, parmesan cheese, and pepper. Stir to combine.
- Pour the salmon cream sauce over the cooked pasta and stir gently until well mixed.
- Serve immediately and enjoy!
Tips
- Don’t Overcook the Pasta: Make sure to cook the pasta just until al dente. It will continue to cook slightly when mixed with the sauce.
- Use Fresh Ingredients: Fresh parsley and good-quality parmesan cheese make a big difference in flavor.
- Adjust Consistency: If the sauce is too thick, add a splash of milk to reach your desired consistency.
Variations & Substitutions
- Vegetarian Option: Substitute the salmon with sautéed mushrooms for a vegetarian twist.
- Gluten-Free: Use gluten-free pasta and flour to make this dish suitable for a gluten-free diet.
- Add More Veggies: Feel free to add spinach or broccoli for extra nutrients and color.
Storage
If you have leftovers, store them in an airtight container in the refrigerator for up to 3 days. Reheat gently on the stove or in the microwave, adding a little milk to loosen the sauce if necessary.
FAQ
Can I use fresh salmon instead of canned?
Absolutely! Fresh salmon will add a luxurious touch to this dish. Simply cook the salmon separately, flake it, and add it to the sauce in place of the canned salmon.
Can I make the sauce ahead of time?
Yes, you can prepare the sauce in advance and store it in the refrigerator for up to 2 days. Reheat it gently on the stove, stirring constantly, before mixing with the pasta.
Nutrition
This dish is approximately 300 calories per serving, making it a satisfying meal that won’t weigh you down. Pair it with a side salad for a balanced dinner.
Conclusion
Pasta with Salmon Cream Sauce is more than just a meal; it’s a culinary experience that brings warmth and joy to the table. Whether you’re recreating treasured family memories or creating new ones, this recipe is sure to become a favorite in your home. Enjoy the creamy textures, the vibrant flavors, and the satisfaction of a dish made with love. Happy cooking!
Related update: Pasta With Salmon Cream Sauce
Related update: Glazed pork chops