Huli-Huli Chicken | Made by Meaghan Moineau

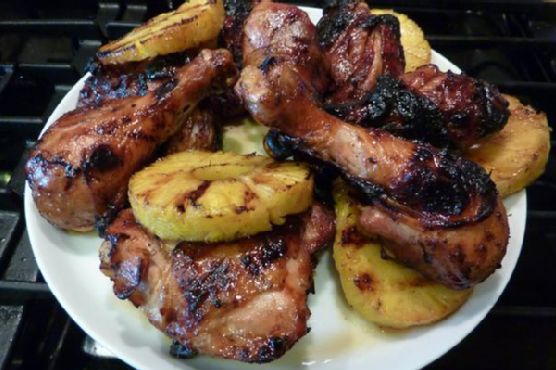
Huli-Huli Chicken Recipe: A Taste of Aloha

Intro

There’s something magical about the aroma of Huli-Huli Chicken wafting through the air. This Hawaiian classic takes me back to sun-drenched days on the island of Maui, where I first savored its sweet and savory flavors. On a family vacation, we stumbled upon a small roadside stand, drawn in by the tantalizing smell. With a warm smile, the vendor served us this succulent chicken, grilled to perfection, alongside juicy pineapple slices. This moment, filled with laughter and delicious food, is etched in my memory and has inspired me to recreate this beloved dish at home. Now, I’d love to share this recipe with you, bringing a bit of that island magic to your kitchen.

Why You’ll Love It

Huli-Huli Chicken is a dish that captures the essence of Hawaiian cuisine: vibrant, flavorful, and perfect for sharing. You will love this recipe because:

  • It’s easy to make and requires simple, fresh ingredients.
  • The marinade infuses the chicken with incredible flavor, making each bite a delightful experience.
  • Grilling adds a smoky char that enhances the sweetness of the sauce and pineapple.
  • It’s a crowd-pleaser, perfect for family dinners or summer cookouts.

Ingredients

  • 4 chicken drumsticks
  • 4 chicken thighs
  • 4 cloves garlic, smashed
  • 1 piece of ginger root, smashed
  • 1 tablespoon kosher salt
  • 1 fresh pineapple, sliced

Instructions

  1. Mix together the brine: water, sugar, salt, garlic, ginger, and thyme.
  2. Place the brine in a large resealable bag and add the chicken.
  3. Refrigerate for at least an hour, but not more than four hours.
  4. Put the sauce ingredients into a saucepan, stir, and simmer until the sauce thickens.
  5. Strain off the sauce and place it in a bowl.
  6. Remove the chicken from the brine and grill until medium brown and cooked through to the bone.
  7. Place the pineapple on the grill and lightly baste the chicken and pineapple with the sauce.
  8. Turn and baste 2-3 times every 2-3 minutes.
  9. Remove from grill and serve.

Tips

  • For the best flavor, don’t rush the marinating process. Allow the chicken to soak up the brine fully.
  • Use a meat thermometer to ensure the chicken is cooked through to a safe internal temperature of 165°F (74°C).
  • Keep the grill lid closed while cooking to maintain a consistent temperature.

Variations & Substitutions

Feel free to adapt this recipe to suit your taste:

  • Swap chicken thighs and drumsticks for boneless chicken breasts if you prefer leaner meat.
  • Add a dash of chili flakes to the sauce for a spicy kick.
  • If fresh pineapple isn’t available, canned pineapple rings can be used as a substitute.

Storage

Leftover Huli-Huli Chicken can be stored in an airtight container in the refrigerator for up to 3 days. To reheat, place the chicken in a preheated oven at 350°F (175°C) until warmed through. The grilled pineapple is best eaten fresh but can also be stored for a short period and reheated.

FAQ

Can I make Huli-Huli Chicken without a grill?

Absolutely! If you don’t have a grill, you can use a grill pan or an oven broiler. Cook the chicken in a preheated oven at 400°F (200°C) for about 25-30 minutes, turning and basting occasionally until cooked through.

What can I serve with Huli-Huli Chicken?

Huli-Huli Chicken pairs wonderfully with steamed rice, a side of coleslaw, or a fresh green salad. For a true Hawaiian experience, try serving it with macaroni salad and a slice of chilled watermelon.

Nutrition

While nutritional values can vary based on specific ingredients used, a serving of Huli-Huli Chicken (including a piece of pineapple) typically contains:

  • Calories: 250
  • Protein: 20g
  • Carbohydrates: 15g
  • Fat: 10g
  • Sodium: 400mg

Conclusion

Whether you’re reminiscing about a Hawaiian vacation or simply seeking a new recipe to delight your taste buds, Huli-Huli Chicken is sure to become a favorite. Its blend of sweet, savory, and smoky flavors captures the spirit of the islands and brings a touch of aloha to your table. I hope you enjoy making and sharing this dish as much as I do. Mahalo!

Related update: Huli-Huli Chicken

Related update: Chicken Stew For The Soul

Related update: Parmesan Mashed Potatoes

Crisp Winter Salad with Maple Gorgonzola Dressing | Made by Meaghan Moineau

Crisp Winter Salad with Maple Gorgonzola Dressing

Intro

As the leaves begin to fall and the air turns crisp, I’m reminded of cozy family gatherings in my childhood home. My mother would always prepare a fresh, vibrant salad that seemed to mirror the beauty of the winter landscape outside. Her secret? A delightful blend of crunchy vegetables and a rich, creamy dressing that brought warmth to our hearts and smiles to our faces. This Crisp Winter Salad with Maple Gorgonzola Dressing is an homage to those cherished memories and a testament to the joy of sharing simple yet luxurious meals with loved ones.

Why You’ll Love It

This salad is a symphony of flavors and textures, perfect for those chilly months when you crave something fresh yet comforting. The crunchy vegetables provide a satisfying bite, while the maple gorgonzola dressing offers a creamy and tangy contrast. It’s a versatile dish that can be served as a starter, a side, or even a light main course. Whether you’re hosting a festive gathering or enjoying a quiet meal at home, this salad is sure to impress.

Ingredients

  • Broccoli stems, thinly sliced
  • Celery, thinly sliced
  • Cider vinegar
  • Dijon mustard
  • Gorgonzola cheese, crumbled
  • Jicama, julienned
  • Kosher salt
  • Low fat sour cream
  • Maple syrup
  • Olive oil
  • Radishes, thinly sliced
  • Red green apple, thinly sliced
  • Romaine lettuce, chopped
  • Savoy cabbage, shredded
  • Walnuts, toasted
  • White pepper

Instructions

  1. In a large bowl, combine the broccoli stems, celery, jicama, radishes, apple, romaine lettuce, and savoy cabbage. Toss gently to mix.
  2. In a medium bowl, whisk together the low fat sour cream, olive oil, cider vinegar, dijon mustard, maple syrup, kosher salt, and white pepper until smooth.
  3. Gently stir in the gorgonzola cheese, using a fork to combine without mashing the cheese—ensure there are visible chunks in the dressing.
  4. Add the toasted walnuts to the salad mixture, then pour the dressing over the top. Toss everything together until well coated.
  5. Serve immediately or refrigerate for up to an hour to allow the flavors to meld.

Tips

For the best results, use fresh, high-quality ingredients. Ensure your vegetables are crisp and your gorgonzola is flavorful and creamy. Toasting the walnuts enhances their flavor and adds a delightful crunch to the salad. Feel free to adjust the amount of maple syrup in the dressing to suit your taste for sweetness.

Variations & Substitutions

If gorgonzola isn’t your favorite, try substituting it with feta or blue cheese for a different flavor profile. For a vegan version, swap the sour cream with a plant-based alternative and omit the cheese altogether. Add some grilled chicken or roasted chickpeas for extra protein, making this salad a more substantial meal.

Storage

This salad is best enjoyed fresh, but you can store leftovers in an airtight container in the refrigerator for up to two days. If you plan to store the salad, keep the dressing separate and toss it just before serving to maintain the crunchiness of the vegetables.

FAQ

Can I make the dressing ahead of time?

Yes, you can prepare the dressing up to two days in advance. Store it in a sealed container in the refrigerator and give it a good stir before using.

What can I serve with this salad?

This salad pairs beautifully with roasted meats or grilled seafood. It also works well alongside hearty soups or stews, adding a fresh contrast to warm, rich dishes.

Can I use a different type of lettuce?

Absolutely! While romaine offers a nice crunch, you can use mixed greens, arugula, or even spinach for a different texture and flavor.

Nutrition

This salad is packed with nutritious ingredients. The array of vegetables provides fiber, vitamins, and minerals, while the walnuts add healthy fats. The dressing, although creamy, is made with low fat sour cream and olive oil, making it a healthier choice compared to traditional creamy dressings.

Conclusion

Our Crisp Winter Salad with Maple Gorgonzola Dressing is a delightful addition to any meal, bringing together the best of winter’s bounty. It’s a dish that not only nourishes the body but also warms the soul, reminding us of the simple joys of good food and cherished company. Whether you’re gathering around the table with family or treating yourself to a solo feast, this salad promises to deliver comfort and joy with every bite. Enjoy!

Related update: Crisp Winter Salad with Maple Gorgonzola Dressing

Guinness and Brats | Made by Meaghan Moineau

Guinness and Brats: A Delicious Grilled Delight

Intro

There’s something magical about the smell of bratwurst sizzling on a grill, mingling with the rich aroma of Guinness Stout. It takes me back to summer evenings spent in my grandparents’ backyard. Grandpa would fire up the grill, the scent of the brats and onions wafting through the air, while Grandma would hum an old tune, setting the table with mismatched plates and cutlery. Those moments, filled with laughter and stories under the setting sun, are forever etched in my memory. Today, I want to share this cherished family recipe with you, bringing a piece of my past to your table.

Why You’ll Love It

This recipe is a true crowd-pleaser, perfect for gatherings or a simple family meal. Here’s why you’ll love it:

  • Simplicity: With just a few ingredients, it’s easy to prepare and even easier to enjoy.
  • Flavor: The combination of Guinness Stout and bratwurst creates a rich, savory dish that’s hard to resist.
  • Versatility: While grilling is our favorite method, you can adapt this recipe for the oven or stovetop.
  • Nostalgia: It’s the perfect way to create lasting memories with family and friends.

Ingredients

  • Bratwurst
  • Hotdog buns
  • Onions, quartered
  • Guinness Stout beer

Instructions

  1. Preheat your grill to about 400°F.
  2. In a large cast iron skillet, place the bratwurst links and quartered onions.
  3. Pour a bottle of Guinness Stout over the bratwurst and onions.
  4. Place the skillet on the grill and close the lid.
  5. Every 5-10 minutes, lift the lid and toss the onions and brats in the Guinness to ensure even cooking.
  6. After about 45 minutes to an hour, the bratwurst should be fully cooked and the onions caramelized.
  7. Remove from the grill and place a bratwurst and some caramelized onions onto a hotdog bun.
  8. Serve immediately and enjoy!

Tips

  • Preheat Properly: Always ensure your grill is preheated to the right temperature for the best results.
  • Use a Cast Iron Skillet: This retains heat well and provides even cooking.
  • Regular Tossing: Toss the brats and onions regularly to ensure even cooking and prevent sticking.

Variations & Substitutions

Feel free to get creative with this recipe:

  • Beer Variations: While Guinness Stout is my personal favorite, you can use any stout or dark beer you prefer.
  • Onion Choices: Try using different types of onions, such as red or sweet onions, for a slightly different flavor profile.
  • Bun Options: Swap out hotdog buns for pretzel buns or whole wheat buns for a different texture and flavor.

Storage

If you have leftovers, store the bratwurst and onions in an airtight container in the refrigerator for up to 3 days. To reheat, place them in a skillet over medium heat until warmed through. Avoid storing the brats in the buns as they may become soggy.

FAQ

Can I make this recipe without a grill?

Yes, you can make this recipe on the stovetop or in the oven. Simply follow the same instructions using a stovetop burner or preheated oven at 400°F. The cooking time may vary, so keep an eye on the brats and onions to ensure they are cooked through.

What should I serve with Guinness and Brats?

This dish pairs wonderfully with classic sides like potato salad, coleslaw, or grilled vegetables. For a more traditional touch, serve with a side of German-style potato pancakes or soft pretzels.

Can I use a different type of sausage?

Absolutely! While bratwurst is traditional, you can experiment with other sausages like Italian or Polish sausages. Keep in mind that different sausages may have varying cooking times.

Nutrition

While I don’t have the exact nutritional breakdown, it’s good to note that bratwurst and beer-based recipes are typically higher in calories and fat. If you’re looking for a lighter version, consider using a leaner sausage and opting for whole grain buns.

Conclusion

Guinness and Brats is more than just a recipe; it’s a journey down memory lane, a celebration of flavors, and a testament to the joy of sharing a meal with loved ones. Whether you’re hosting a barbecue, celebrating a special occasion, or simply enjoying a quiet evening at home, this dish is sure to bring warmth and happiness to your table. I hope you enjoy making and eating it as much as we do. Cheers to good food, great memories, and cherished traditions!

Related update: Guinness and Brats

Related update: Beef Pot Pies with Irish Cheddar Crust

Strawberry Pretzel Salad | Made by Meaghan Moineau

Strawberry Pretzel Salad: A Delightful Fusion of Flavors

Intro

Strawberry Pretzel Salad is a dish that takes me back to summer picnics at my grandmother’s house. I remember the warm, sunny afternoons where the air was filled with laughter and the scent of fresh strawberries. My grandmother would always prepare her signature Strawberry Pretzel Salad, a perfect blend of sweet and savory, crunchy and creamy. As kids, we would eagerly wait for the moment when we could finally dig in. This recipe is a modern twist on her classic salad, combining the vibrant taste of strawberries with the savory crunch of pretzels, all while incorporating fresh greens and a rich, tangy dressing.

Why You’ll Love It

This Strawberry Pretzel Salad is not only delicious but also incredibly versatile. It combines the freshness of spring greens and arugula with the juicy sweetness of strawberries, the creaminess of avocado, and the salty crunch of bacon and pretzels. The dressing, made with flax seed oil, balsamic vinegar, and whole grain mustard, adds a tangy and slightly nutty flavor that ties everything together. It’s a salad that satisfies a variety of tastes and textures, making it a hit at any gathering or as a standalone meal.

Ingredients

  • 1 cup arugula
  • 1 avocado, sliced
  • 4 slices bacon
  • 2 tablespoons balsamic vinegar
  • 1 cucumber, sliced
  • 2 tablespoons flax seed oil
  • 2 cups mixed spring greens
  • 1 bell pepper, sliced
  • 1 cup crushed pretzels
  • Salt and pepper to taste
  • 2 cups strawberries, hulled and sliced
  • 1 tablespoon whole grain mustard

Instructions

  1. Preheat your oven to 300°F (150°C).
  2. Arrange the bacon slices on a baking sheet lined with tin foil. Bake for 30 minutes, turning once halfway through. Once cooked, set aside to cool.
  3. In a small bowl, combine the flax seed oil, balsamic vinegar, whole grain mustard, and a pinch of salt and pepper. Whisk until well combined, then set aside.
  4. In a large salad bowl, combine the strawberries, cucumber, mixed greens, arugula, bell pepper, and bacon. Toss lightly to mix the ingredients.
  5. Add the dressing to the salad and toss until the ingredients are evenly coated.
  6. Divide the salad among four plates. Top each serving with slices of avocado and a generous sprinkle of crushed pretzels.
  7. Serve immediately and enjoy the delightful combination of flavors and textures!

Tips

For the best results, use fresh, ripe strawberries and avocados. The sweetness of the strawberries and the creaminess of the avocado are key to balancing the flavors in this salad. Additionally, when crushing the pretzels, try to keep some pieces larger for added texture, while allowing some to be finely crushed to mix with the dressing.

Variations & Substitutions

If you’re looking to switch things up, consider these variations:

  • Cheese Addition: Add crumbled feta or goat cheese for a tangy, creamy element.
  • Nuts: Substitute pretzels with toasted nuts like almonds or pecans for a different crunch.
  • Vegan Version: Omit the bacon and use tempeh bacon or roasted chickpeas for a plant-based protein.
  • Gluten-Free: Use gluten-free pretzels to make this dish suitable for those with gluten sensitivities.

Storage

This salad is best enjoyed fresh, but if you need to store leftovers, keep the dressing separate from the salad to prevent sogginess. Store the salad in an airtight container in the refrigerator for up to 2 days. When ready to serve, toss with the dressing and add fresh avocado and pretzels.

FAQ

Can I make this salad ahead of time?

Yes, you can prepare the components of this salad in advance. Keep the salad ingredients and dressing separate until you’re ready to serve to maintain freshness and texture.

What can I use instead of flax seed oil?

If you don’t have flax seed oil, you can substitute it with olive oil or any other neutral oil you prefer. This will slightly alter the flavor but still provide a delicious dressing.

Is this salad suitable for a main course?

Absolutely! The combination of greens, bacon, and avocado makes it a hearty choice for a main dish. You can also add grilled chicken or shrimp for extra protein if desired.

Nutrition

This Strawberry Pretzel Salad is not just a treat for your taste buds but also nutritious. The mixed greens and arugula provide a good source of vitamins A and C, while the avocado offers healthy fats. Strawberries are rich in antioxidants, and the flax seed oil dressing contributes omega-3 fatty acids. Moderation is key with bacon and pretzels, but overall, this salad is a balanced addition to your meal repertoire.

Conclusion

This Strawberry Pretzel Salad is a delightful way to enjoy a medley of flavors and textures in one dish. Whether you’re serving it at a family gathering or enjoying it as a nourishing meal, it’s sure to impress with its vibrant colors and delicious taste. I hope this salad brings you as much joy and nostalgia as it does for me. Happy cooking!

Related update: Strawberry Pretzel Salad

Related update: Guinness and Brats

Related update: Warm Goat Cheese Salad

Pasta with Peas and Italian Sausage | Made by Meaghan Moineau

Pasta with Peas and Italian Sausage

Intro

There’s something incredibly comforting about a hearty pasta dish, especially one that brings back memories of family gatherings around a bustling kitchen. For me, Pasta with Peas and Italian Sausage is not just a recipe; it’s a treasured memory of Sunday dinners at my grandmother’s house, where the aroma of sizzling sausages and simmering tomatoes would fill the air, coaxing everyone to the table. This simple yet flavorful dish has always been a favorite, and I’m thrilled to share it with you. Whether you’re cooking for a large family dinner or a cozy night in, this pasta dish is sure to bring warmth and joy to your table.

Why You’ll Love It

This Pasta with Peas and Italian Sausage recipe is more than just a meal—it’s a celebration of flavors and textures. You’ll love how the sweetness of the peas perfectly complements the savory Italian sausage, while the farfalle pasta catches every bit of the rich tomato sauce. It’s a dish that comes together effortlessly, making it perfect for busy weeknights or leisurely weekends. With its vibrant colors and mouth-watering aroma, this pasta is sure to become a staple in your home.

Ingredients

  • 1 tablespoon olive oil
  • 4 Italian sweet sausages, casings removed
  • 1 cup frozen peas
  • 1 can (14 oz) canned tomatoes, chopped
  • 1/2 cup Pomi strained tomato sauce
  • 12 oz farfalle pasta
  • 2 tablespoons butter
  • Salt and pepper to taste

Instructions

  1. Begin by cooking the farfalle pasta according to the package directions until al dente. Drain and set aside.
  2. In a very large skillet, heat the olive oil over medium heat. Add the sausage meat and sauté until it is slightly browned all over.
  3. Add the frozen peas, canned tomatoes, and Pomi strained tomato sauce to the skillet. Stir well to combine.
  4. Season the mixture with salt and pepper to taste. Lower the heat to medium and let it cook for another 10 to 15 minutes, allowing the flavors to meld together.
  5. Once the sauce is ready, add the cooked pasta to the skillet along with the butter. Toss everything together until the pasta is well coated in the sauce.
  6. Serve hot, garnished with freshly grated parmesan cheese if desired.

Tips

For the best results, use high-quality Italian sausages, as they bring a rich flavor to the dish. If you prefer a spicier kick, you can use hot Italian sausages instead of sweet ones. Also, don’t be afraid to adjust the amount of peas to suit your taste; their sweetness balances the savory elements beautifully. Lastly, remember to reserve a bit of pasta water before draining, just in case you need to loosen the sauce a little when tossing it with the pasta.

Variations & Substitutions

This recipe is quite versatile, allowing for plenty of creative variations. If you’re looking for a vegetarian option, simply omit the sausage and add more peas or other vegetables like bell peppers or zucchini. You can also substitute the farfalle pasta with any other pasta shape you have on hand, such as penne or rigatoni. For a creamier sauce, consider adding a splash of heavy cream or a dollop of ricotta cheese just before serving.

Storage

Leftovers can be stored in an airtight container in the refrigerator for up to 3 days. To reheat, simply warm the pasta in a skillet over medium heat, adding a splash of water or broth to loosen the sauce if needed. This dish is also freezer-friendly; just be sure to let it cool completely before transferring it to a freezer-safe container. It can be frozen for up to 2 months. Thaw overnight in the refrigerator before reheating.

FAQ

Can I use fresh peas instead of frozen?

Absolutely! Fresh peas can be a delightful addition. Simply blanch them in boiling water for a few minutes before adding them to the sauce. This will ensure they remain tender and vibrant.

What can I use instead of Pomi strained tomato sauce?

If you don’t have Pomi strained tomato sauce, you can use any high-quality tomato puree or passata. The key is to ensure it’s a smooth, rich tomato sauce to complement the chunky canned tomatoes.

Is this dish spicy?

This recipe is not inherently spicy, as it uses sweet Italian sausage. However, you can adjust the spice level by using hot Italian sausage or adding a pinch of red pepper flakes to the sauce for an extra kick.

Nutrition

This hearty pasta dish is packed with protein from the sausages and peas, providing a satisfying and balanced meal. The tomatoes add a dose of vitamin C, while the pasta offers plenty of energy-boosting carbohydrates. As always, moderation is key, especially if you’re watching your calorie intake.

Conclusion

Pasta with Peas and Italian Sausage is a dish that embodies comfort and nostalgia, bringing together simple ingredients to create something truly special. Whether you’re reconnecting with family traditions or starting new ones, this recipe is sure to become a beloved favorite. I hope it brings as much joy and warmth to your home as it has to mine. Happy cooking!

Related update: Pasta with Peas and Italian Sausage

Colcannon | Made by Meaghan Moineau

Colcannon: A Delicious Irish Classic

Intro

There’s a special place in my heart for colcannon, a traditional Irish dish that brings back fond memories of family gatherings at my grandmother’s house. I remember sitting at her rustic wooden table, watching as she expertly combined simple ingredients to create a meal that was both hearty and comforting. The creamy potatoes, the vibrant green of the cabbage, and the subtle hint of green onions all melded together to create a dish that was beloved by everyone at the table. As the comforting aroma filled the kitchen, it was clear that colcannon was more than just food; it was a tradition, a connection to our roots, and a testament to the warmth of home-cooked meals.

Why You’ll Love It

Colcannon is not just a dish; it’s an experience. This Irish classic is perfect for cozy dinners and festive occasions alike. You’ll love it for its simplicity, its rich and creamy texture, and its ability to bring people together around the table. Plus, it’s a wonderful way to introduce more greens into your meal in a deliciously sneaky way. Whether you’re Irish or just a fan of hearty comfort food, colcannon is sure to become a favorite in your household.

Ingredients

  • 2 rashers bacon (optional)
  • Butter
  • Cabbage
  • Stems green onions
  • Milk
  • Parsley
  • Pepper
  • Potatoes
  • Salt

Instructions

  1. Cut into the top of the cabbage and hollow it out, leaving 3-4 outside leaves intact, reserving the hollowed-out portion.
  2. Plunge the hollowed-out head into a large amount of boiling water; simmer for 5 minutes or until tender-crisp. It must hold its shape.
  3. Cool quickly in cold water; invert and drain.
  4. Chop reserved cabbage pieces, measure 1 1/2 cups.
  5. Stir fry in butter along with green onions until tender. Set aside.
  6. Boil and mash potatoes, adding milk and seasonings.
  7. Stir in the sautéed mixture and parsley.

Tips

For the creamiest colcannon, make sure to use starchy potatoes like Russets or Yukon Golds. Don’t rush the mashing process—take your time to achieve that perfect, smooth texture. If you want an extra layer of flavor, consider frying the bacon until crispy and crumbling it over the top just before serving.

Variations & Substitutions

If you’re looking to add a twist to traditional colcannon, consider these variations:

  • Dairy-Free: Substitute the butter and milk with plant-based alternatives like olive oil and almond milk.
  • Veggie Boost: Add a handful of chopped kale or spinach for added nutrition and a pop of color.
  • Herb Twist: Incorporate fresh herbs like thyme or chives for an aromatic touch.

Storage

Colcannon stores well in the refrigerator for up to three days. Simply place it in an airtight container to keep it fresh. To reheat, you can use the stove or microwave, adding a splash of milk to restore its creamy consistency. Unfortunately, freezing is not recommended as it can change the texture of the potatoes.

FAQ

Can I make colcannon in advance?

Absolutely! Colcannon can be made a day ahead and stored in the refrigerator. Simply reheat it gently and add a bit of extra milk or butter to freshen it up before serving.

What can I serve with colcannon?

Colcannon pairs beautifully with roasted meats like lamb or beef. It’s also a great side dish for corned beef, especially during St. Patrick’s Day celebrations.

Nutrition

This dish is rich in vitamins and minerals thanks to the cabbage and potatoes. It’s also a good source of dietary fiber and can be made more nutritious by adding extra greens. For those watching their fat intake, using reduced-fat milk and a smaller amount of butter can help lighten the dish.

Conclusion

Colcannon is more than just a recipe; it’s a comforting, nostalgic dish that brings a touch of Irish tradition to your table. Whether you’re enjoying it as a side dish or the star of the meal, colcannon is sure to delight with its creamy texture and savory flavors. So gather your loved ones, share a story or two, and enjoy this delightful dish that’s steeped in history and warmth.

Related update: Colcannon

Ditalini with peas | Made by Meaghan Moineau

Ditalini with Peas: A Cozy Italian Classic

Intro

Growing up, Sundays at my grandmother’s house were a time of laughter, family, and, most importantly, the comforting aroma of her hearty Italian cooking. Among the delightful array of dishes she would prepare, Ditalini with Peas was my absolute favorite. This simple yet flavorful pasta dish, dotted with sweet peas and enriched with creamy ricotta, brings back fond memories of sitting at her rustic kitchen table, eagerly awaiting my bowl of goodness. Today, I am thrilled to share this cherished recipe with you, hoping it brings warmth and joy to your family meals just as it has to mine.

Why You’ll Love It

This Ditalini with Peas recipe is a beautiful blend of flavors and textures that makes it irresistible. You’ll love it because:

  • Simple Ingredients: You don’t need a long list of fancy ingredients to create something delicious.
  • Quick and Easy: Perfect for a weeknight dinner, this dish comes together in under 30 minutes.
  • Family-Friendly: Its mild flavors and creamy texture make it a hit with both kids and adults.
  • Customizable: Easily adaptable to suit dietary preferences or ingredient availability.

Ingredients

  • Coarse sea salt
  • Ditalini pasta
  • Freshly ground black pepper
  • Ham, diced
  • 2 tablespoons olive oil
  • 1 medium onion, finely chopped
  • Pancetta, diced
  • Parmesan or Grana Padano cheese, grated
  • Ricotta cheese
  • 1 teaspoon turmeric in 2 ladles of water
  • 1 cup peas (fresh or frozen)

Instructions

  1. In a large sauté pan, place the chopped onion in cold olive oil. Soften the onion without letting it color by adding a teaspoon of water occasionally. Cook until the onion becomes wilted and opaque, about 10 minutes.
  2. Add the peas to the pan and pour in enough water to just cover them. Season with coarse sea salt and freshly ground black pepper. Cook until the peas are tender, approximately 5 to 15 minutes for fresh peas, depending on their freshness and size, or 10 minutes for frozen peas.
  3. Just before the peas are fully cooked, add the diced pancetta and ham. Stir everything together and then turn off the heat.
  4. Stir in the turmeric water and incorporate the ricotta cheese by sieving it through a colander. Allow the ricotta to melt into the cooking liquids, creating a golden sauce. Keep the mixture warm until the pasta is ready.
  5. Meanwhile, cook the ditalini pasta according to the manufacturer’s instructions. Drain the pasta, reserving some of the cooking water.
  6. Immediately toss the cooked pasta in the sauté pan, ensuring it is thoroughly coated with the sauce. If the sauce seems dry, add a bit of the reserved pasta cooking water to loosen it.
  7. Serve immediately, topped with grated Parmesan or Grana Padano cheese.

Tips

  • Use fresh peas: If possible, try to use fresh peas for the best texture and flavor. However, frozen peas work well too.
  • Adjust seasoning: Taste the sauce before serving and adjust the salt and pepper to your preference.
  • Don’t overcook the pasta: Ditalini should be cooked al dente to avoid a mushy texture when mixed with the sauce.

Variations & Substitutions

This Ditalini with Peas recipe is versatile! Here are some variations and substitutions you might enjoy:

  • Vegetarian Option: Omit the pancetta and ham for a meat-free version. Add sliced mushrooms or sun-dried tomatoes for extra flavor.
  • Spicy Twist: Add a pinch of red pepper flakes or a dash of hot sauce for a subtle kick.
  • Cheese Lovers: For an extra cheesy version, mix in some mozzarella or fontina cheese before serving.
  • Gluten-Free: Use your favorite gluten-free pasta instead of traditional ditalini.

Storage

Leftover Ditalini with Peas can be stored in an airtight container in the refrigerator for up to three days. To reheat, add a splash of water or broth to loosen the sauce before microwaving or warming on the stove. For best results, avoid freezing as the texture of the pasta and peas may change.

FAQ

Can I make this dish in advance?

Yes, you can prepare the sauce in advance and store it in the refrigerator for up to two days. When ready to serve, cook the pasta and toss it with the reheated sauce.

What can I use instead of ditalini pasta?

Any small pasta shape, such as macaroni or orzo, can be used as a substitute for ditalini in this recipe. Choose a pasta type that will hold the sauce well.

How can I make this dish more flavorful?

For added depth of flavor, try using chicken or vegetable broth instead of water when cooking the peas. You can also add a splash of white wine to the onion and olive oil mixture for a more robust taste.

Nutrition

This dish is a comforting blend of carbohydrates, protein, and fats. With its moderate portion of cheese and meats, it’s a satisfying meal that can be part of a balanced diet. To lighten it up, consider using low-fat ricotta and reducing the amount of cheese.

Conclusion

Ditalini with Peas is a heartwarming dish that brings people together around the table, much like it did in my grandmother’s kitchen. Its simplicity and rich flavors make it a timeless classic perfect for any occasion. I hope you enjoy making and sharing this recipe with your loved ones, creating your own cherished memories along the way. Buon appetito!

Related update: Ditalini with peas

Related update: Neoguri (Spicy Seafood Ramen)

Related update: Colcannon

Kunna (A Delicious Chinioti Dish, Punjab, Pakistan) | Made by Meaghan Moineau

Kunna: A Delicious Chinioti Dish from Punjab, Pakistan

Intro

There’s something magical about the aroma of traditional dishes wafting through the house, especially during family gatherings. I vividly remember visiting my grandmother’s place in Chiniot as a child. The entire family would come together, sharing stories and laughter, while the comforting scent of Kunna cooking in an earthenware pot would fill the air. This dish, rich in flavor and history, has always been a staple at our family dinners, bringing with it a sense of warmth and togetherness. Today, I’m thrilled to share this beloved recipe with you, hoping it brings the same joy to your table as it has to ours over the years.

Why You’ll Love It

Kunna is not just a dish; it’s an experience. The slow-cooked mutton, infused with aromatic spices, creates a flavor profile that is both rich and satisfying. It’s perfect for those who appreciate traditional cooking methods and the depth of flavor they bring. This dish is hearty, comforting, and sure to impress your guests, making it ideal for special occasions or a cozy family meal.

Ingredients

  • 1 garlic pod
  • 1 ginger pod
  • Oil
  • 2 onions
  • Spices:
    • 1 teaspoon paprika powder
    • 1 teaspoon garam masala
    • Caraway seeds
  • 1 teaspoon wheat flour
  • 1 kg mutton
  • 1/4 cup water

Instructions

  1. In a large earthenware pot (Handi Matti ki) or any metallic pot, add the mutton, garlic, and ginger. Cook for 1-3 minutes to let the flavors infuse.
  2. Add 1/4 cup of water, onions, and the spices except for the wheat flour, caraway seeds, and garam masala. Cook on low heat until the meat is tender.
  3. Once the meat is tender, add oil and stir-fry to enhance the flavors.
  4. Mix the wheat flour in 1/4 cup of water and add it to the pot. Cook on low flame for an additional 10-15 minutes to thicken the sauce.
  5. Finally, sprinkle the caraway seeds and garam masala over the dish and let it simmer for 5-10 minutes.
  6. Your delicious Kunna is ready! Serve it with Naan, Roti (Pakistani Bread), or fried rice for a complete meal.

Tips

For the best results, use fresh mutton and ensure it is of high quality. Cooking in an earthenware pot can enhance the flavor, but if unavailable, a heavy-bottomed metallic pot works just fine. Always cook on low heat to ensure the meat becomes tender and absorbs the spices fully.

Variations & Substitutions

If you prefer a milder flavor, adjust the amount of paprika powder. For those who enjoy a bit of heat, consider adding a pinch of red chili flakes. You can substitute mutton with beef or chicken, but the cooking time may vary. For a vegetarian version, replace the meat with hearty vegetables like eggplants or potatoes.

Storage

Kunna can be stored in an airtight container in the refrigerator for up to 3 days. Reheat it on the stove over low heat, adding a splash of water if needed to maintain the desired consistency.

FAQ

Can I use a slow cooker for this recipe?

Yes, a slow cooker can be used to make Kunna. Follow the same instructions, but instead of cooking on the stove, transfer everything to a slow cooker and cook on low for 6-8 hours or until the meat is tender.

What can I serve with Kunna?

Kunna pairs wonderfully with traditional Pakistani breads like Naan or Roti. It can also be served with steamed or fried rice for a more filling meal.

Is there a vegetarian version of Kunna?

While Kunna is traditionally made with mutton, you can create a vegetarian version by using hearty vegetables such as eggplants or potatoes. The spices and cooking method remain the same.

Nutrition

The nutritional content of Kunna will vary based on the specific ingredients and portion sizes used. Generally, mutton is a good source of protein and iron, while the spices contribute antioxidants and other health benefits. Be mindful of portion sizes if you’re watching your calorie intake.

Conclusion

Kunna is more than just a meal; it’s a culinary tradition that has been passed down through generations. Its rich flavors and comforting aroma make it a favorite in many households. Whether you’re making it for a special occasion or simply to enjoy a taste of Punjab, this dish is sure to delight your taste buds and warm your heart. I hope this recipe brings as much joy to your family as it has to mine. Happy cooking!

Related update: Kunna (A Delicious Chinioti Dish, Punjab, Pakistan)

Related update: Authentic Bolognese Sauce

Lemon and Strawberry Loaf | Made by Meaghan Moineau

Lemon and Strawberry Loaf

Intro

There’s something truly magical about the aroma of freshly baked goods wafting through the house. It takes me back to my childhood, spending weekends at my grandmother’s house. I would watch her bake, my tiny hands eagerly helping sprinkle flour on the countertop. One of my favorite recipes from those days is this delightful Lemon and Strawberry Loaf. Not only is it a beautiful marriage of tangy and sweet, but it also brings back warm memories of those precious moments spent baking alongside my grandmother.

Why You’ll Love It

This Lemon and Strawberry Loaf is a delightful treat for any occasion. The tartness of the lemon perfectly complements the sweetness of the strawberries, creating a balanced flavor profile that is both refreshing and comforting. The addition of dessicated coconut adds a subtle nuttiness and texture that elevates the loaf to a new level. Whether you’re enjoying a slice with your morning coffee or serving it as a dessert at a dinner party, this loaf is sure to impress.

Ingredients

  • 125g butter, softened
  • 200g sugar
  • 2 eggs
  • 250g self-raising flour
  • 50g dessicated coconut
  • 150ml natural yoghurt
  • 1 lemon, juice and rind
  • 150g fresh strawberries, chopped

Instructions

  1. Preheat the oven to 180°C (350°F).
  2. Line a 23cm x 12cm loaf tin with baking paper.
  3. In a mixing bowl, beat the butter and sugar until pale and creamy.
  4. Add the eggs, one at a time, beating well after each addition.
  5. Mix in the lemon rind and juice.
  6. Using a rubber spatula, stir in the flour, dessicated coconut, yoghurt, and strawberries until just combined.
  7. Pour the mixture into the prepared loaf tin and smooth the top with the spatula.
  8. Bake for 50-60 minutes or until a skewer inserted in the center comes out clean.
  9. Allow the loaf to cool in the tin for 10 minutes, then turn out onto a wire rack to cool completely.

Tips

To ensure your loaf is moist and fluffy, make sure all your ingredients are at room temperature before you begin. This helps them blend together more smoothly. Additionally, be careful not to overmix the batter, as this can result in a dense loaf. When folding in the strawberries, do so gently to avoid crushing them and turning the batter pink.

Variations & Substitutions

If you’re feeling adventurous, there are several ways you can tweak this recipe to suit your taste. You could substitute the strawberries with raspberries or blueberries for a different berry flavor. For a dairy-free version, replace the butter with a dairy-free spread and the yoghurt with a coconut-based alternative. You can also add a handful of chopped nuts, like almonds or walnuts, for some extra crunch.

Storage

This Lemon and Strawberry Loaf is best enjoyed fresh, but it can be stored for later enjoyment as well. Keep the loaf in an airtight container at room temperature for up to three days. If you’d like to store it for longer, wrap it tightly in plastic wrap and store it in the refrigerator for up to a week. For even longer storage, you can freeze the loaf for up to three months. Simply slice it before freezing so you can defrost individual pieces as needed.

FAQ

Can I use frozen strawberries instead of fresh?

Yes, you can use frozen strawberries if fresh ones are not available. Just be sure to thaw them completely and drain any excess liquid before adding them to the batter to prevent it from becoming too runny.

What can I use if I don’t have self-raising flour?

If you don’t have self-raising flour, you can make your own by combining 2 cups of all-purpose flour with 3 teaspoons of baking powder and 1/2 teaspoon of salt. This will give you the same effect as self-raising flour.

Can I make this loaf gluten-free?

Absolutely! You can substitute the self-raising flour with a gluten-free flour blend. Just make sure it includes a binding agent like xanthan gum to help maintain the structure of the loaf.

Nutrition

This loaf is not only delicious but also contains some nutritional benefits. The strawberries provide a good source of vitamin C and antioxidants, while the lemon juice offers an additional boost of vitamin C. The inclusion of natural yoghurt adds a dose of protein and calcium.

Conclusion

Baking this Lemon and Strawberry Loaf brings a piece of nostalgia into the modern kitchen. It’s a simple recipe that delivers a burst of flavor and warmth with every bite. Whether you’re baking it for a special occasion, as a sweet treat for your family, or simply to enjoy a moment of peace with a slice of homemade goodness, this loaf is sure to become a beloved addition to your recipe collection. Happy baking!

Related update: Lemon and Strawberry Loaf

Baked Chicken Thighs with Satay Sauce and Tomato Salad | Made by Meaghan Moineau

Baked Chicken Thighs with Satay Sauce and Tomato Salad

Intro

There’s something incredibly comforting about the aroma of spices wafting through the kitchen, taking me back to my childhood when family gatherings were centered around food. My grandmother had a knack for transforming simple ingredients into a feast, and her love for cooking was infectious. It was during one of those warm summer afternoons, with the sun streaming through the kitchen window, that I first tasted the magic of satay sauce. Today’s recipe for Baked Chicken Thighs with Satay Sauce and Tomato Salad is a tribute to those cherished moments, combining the rich flavors of the East with a fresh, vibrant salad that sings of summer.

Why You’ll Love It

This recipe is both a feast for the senses and a breeze to prepare. You’ll love the way the creamy satay sauce clings to the juicy chicken thighs, each bite offering a perfect balance of savory and spicy. The accompanying tomato salad provides a crisp, refreshing contrast, making this dish a perfect harmony of flavors and textures. Whether you’re cooking for family, hosting a dinner party, or simply treating yourself, this recipe will undoubtedly become a favorite.

Ingredients

  • 4-6 chicken thighs
  • Salt and pepper to taste
  • Cayenne pepper to taste
  • 2 tablespoons light soy sauce
  • 1 tablespoon apple cider vinegar
  • 2 tablespoons peanut butter
  • 1 teaspoon sesame oil
  • 4 tablespoons satay sauce
  • 1/4 cup chopped walnuts
  • 1 tablespoon grated ginger
  • 2 cloves garlic, minced
  • 1/4 cup water
  • 1 tablespoon smooth peanut butter
  • 1 tablespoon honey
  • 2 cups diced tomatoes
  • 1/4 cup celery leaves, chopped
  • 1 tablespoon mirin
  • 2 tablespoons olive oil

Instructions

  1. In a large bowl, combine the soy sauce, apple cider vinegar, peanut butter, sesame oil, satay sauce, chopped walnuts, grated ginger, minced garlic, water, smooth peanut butter, and honey. Mix until smooth.
  2. Add the chicken thighs to the bowl, ensuring they are evenly coated with the marinade. Season with salt, pepper, and a pinch of cayenne pepper to taste.
  3. Cover the bowl and let the chicken marinate for at least 15 minutes. For best results, refrigerate and marinate overnight.
  4. Preheat your oven to 180°C (356°F).
  5. Lay the chicken thighs on a baking rack placed over a baking pan. Cover the pan with foil to keep the moisture in.
  6. Bake in the preheated oven for 45 minutes to one hour, or until the chicken is fully cooked and the juices run clear.
  7. While the chicken is baking, prepare the tomato salad by combining the diced tomatoes, celery leaves, mirin, and olive oil in a bowl. Toss gently to combine.
  8. Once the chicken is done, serve warm with the tomato salad on the side. Enjoy!

Tips

To enhance the flavors, consider toasting the walnuts lightly before adding them to the marinade. This will bring out their natural oils and add an extra depth to the sauce. Additionally, if you prefer a spicier kick, increase the amount of cayenne pepper or add a dash of chili flakes to the marinade.

Variations & Substitutions

If you prefer, you can substitute chicken thighs with chicken breasts, though they may require a slightly shorter cooking time to prevent drying out. For a nut-free version, replace peanut butter with sunflower seed butter and omit the walnuts. The tomato salad can also be varied by adding cucumbers or avocados for extra creaminess.

Storage

Leftover chicken thighs can be stored in an airtight container in the refrigerator for up to 3 days. Reheat in the oven at 160°C (320°F) until warmed through. The tomato salad is best consumed fresh but can be stored separately in the fridge for up to 1 day.

FAQ

Can I make this recipe in advance?

Absolutely! You can marinate the chicken up to a day in advance, which will only deepen the flavors. Prepare the tomato salad just before serving to ensure it remains fresh and crisp.

Is this recipe gluten-free?

To make this recipe gluten-free, ensure you use gluten-free soy sauce. All other ingredients are naturally gluten-free.

Can I use store-bought satay sauce?

Yes, store-bought satay sauce works perfectly in this recipe. However, if you have the time and ingredients, making your own can add a personal touch and allow you to adjust the flavors to your liking.

Nutrition

This dish provides a balanced meal with protein from the chicken and healthy fats from peanut butter and walnuts. The tomato salad offers a good dose of vitamins and antioxidants, making this not only a delicious but also a nutritious option for lunch or dinner.

Conclusion

Baked Chicken Thighs with Satay Sauce and Tomato Salad is more than just a meal; it’s a celebration of flavors that tells a story of tradition and innovation. It’s a dish that invites you to share in the joy of cooking and savor the warmth of home-cooked goodness. I hope this recipe brings as much joy to your table as it does to mine. Happy cooking!

Related update: Baked Chicken Thighs with Satay Sauce and Tomato Salad

Related update: Three-Cup Chicken

Flemish Style Asparagus Side Dish | Made by Meaghan Moineau

Flemish Style Asparagus Side Dish

Intro

There’s something magical about the way a simple dish can transport you back to a moment in time, like a well-loved book opening to your favorite chapter. For me, that moment is a sun-dappled afternoon at my grandmother’s table. She was a woman of few words but abundant warmth, and her Flemish Style Asparagus was a dish that spoke volumes. The tender asparagus, draped in a velvety sauce of butter, lemon, and eggs, was always the centerpiece of our springtime meals. As I learned to make it myself, I realized that this dish was more than just a recipe; it was a bridge to my heritage, a celebration of simple, fresh ingredients that come alive on the plate.

Why You’ll Love It

This Flemish Style Asparagus Side Dish is a tribute to the beauty of simplicity. It’s a testament to how a handful of fresh ingredients can create a symphony of flavors that delight the palate. You’ll love how quick and easy it is to prepare, making it perfect for both elegant dinner parties and casual family meals. The combination of buttery richness, a hint of lemony brightness, and the earthiness of asparagus will have you coming back for more.

Ingredients

  • Green and white fresh asparagus
  • Butter
  • 3 hardboiled eggs
  • Italian flat parsley
  • Juice from 1/2 lemon
  • Salt and pepper to taste

Instructions

  1. Peel the asparagus at its ends, avoiding the heads.
  2. Place the asparagus in a large saucepan and fill with boiling water to cover the veggies completely. Add a pinch of salt.
  3. Cook the asparagus until tender, about 3 to 4 minutes.
  4. Chop some flat parsley into fine bits and set aside.
  5. Boil 3 eggs until hard, then peel them.
  6. Use a fork to mash the eggs until they resemble fine crumbs. Set aside.
  7. Melt butter in a saucepan and add the juice from 1/2 a lemon. Whisk the mixture constantly and let it simmer gently for a couple of minutes.
  8. Stir in the mashed eggs and chopped parsley, combining well.
  9. Plate the dish by laying a few stalks of cooked asparagus on a plate and drizzling the sauce over the stalk ends.
  10. Season with salt and pepper. Serve warm.

Tips

For the best results, choose asparagus spears that are firm and vibrant in color. Avoid overcooking them to maintain their delightful crunch. The sauce can be made ahead of time and gently reheated before serving. This dish pairs wonderfully with roasted meats or fish.

Variations & Substitutions

If you prefer a richer sauce, consider adding a splash of cream to the butter-lemon mixture. For a tangier kick, experiment with adding a little Dijon mustard. You can also substitute dill or chives for the parsley if you want to try a different herb.

Storage

Store any leftovers in an airtight container in the refrigerator for up to two days. To reheat, gently warm the asparagus and sauce on the stove over low heat to avoid separating the butter.

FAQ

Can I use only green or only white asparagus?

Absolutely! While a mix of both adds a delightful visual contrast and varied flavor, using one type will work just as well. Just ensure they are fresh for the best taste.

Can I prepare this dish in advance?

Yes, you can prepare the sauce ahead of time and store it in the refrigerator. Reheat it gently on the stove while cooking the asparagus just before serving.

What can I serve with this dish?

This asparagus dish is versatile and pairs well with roasted chicken, grilled salmon, or even a hearty steak. It also complements a variety of vegetarian main courses.

Nutrition

This dish is not only delicious but also nutritious. Asparagus is packed with vitamins A, C, E, and K, and is a great source of fiber. The eggs provide protein, while the parsley adds a boost of antioxidants.

Conclusion

Flemish Style Asparagus is more than just a side dish; it’s a celebration of simplicity and flavor. Whether you’re sharing it with family or serving it at a special gathering, it’s sure to be a hit. Just like a cherished memory, this recipe will pull you back to the comfort of home, one delicious bite at a time.

Related update: Flemish Style Asparagus Side Dish

Chapchae (Korean Stir-Fried Noodles) | Made by Meaghan Moineau

Chapchae (Korean Stir-Fried Noodles)

Intro

Chapchae, or Korean stir-fried noodles, has always been a beloved dish in our family. I remember as a child, watching my grandmother expertly toss the noodles with colorful vegetables in her large wok, the aroma of sesame oil and soy sauce filling the kitchen. It was a dish we often enjoyed during family gatherings and special occasions, a symbol of celebration and togetherness. The combination of sweet potato vermicelli noodles, fresh vegetables, and savory flavors makes it a comforting and satisfying meal. Whether you’re new to Korean cuisine or a seasoned enthusiast, Chapchae is sure to become a favorite in your household as well.

Why You’ll Love It

This Chapchae recipe is not only delicious but also incredibly versatile. It’s a perfect balance of sweet and savory, with a delightful mix of textures from the chewy noodles and crisp-tender vegetables. You’ll love how easy it is to customize with your favorite vegetables or protein, making it adaptable to your taste preferences and dietary needs. Plus, it’s a fantastic make-ahead dish that tastes even better the next day as the flavors meld together.

Ingredients

  • 200g sweet potato vermicelli noodles
  • 1 sweet onion, thinly sliced
  • 2 cloves garlic, minced
  • 2 cups baby spinach
  • 1 carrot, julienned
  • 2 scallions, sliced
  • 1 cup mushrooms, sliced
  • 1 zucchini, julienned
  • 2 tablespoons olive oil
  • 2 tablespoons sesame oil, divided
  • 3 tablespoons soy sauce
  • 1 tablespoon sugar
  • Salt, to taste

Instructions

  1. Cook the sweet potato vermicelli noodles according to the package directions. Drain and set aside.
  2. In a large pan or wok over medium heat, heat the olive oil and 1 tablespoon of sesame oil.
  3. Add the onion slices and minced garlic, sautéing for about 1 minute until fragrant.
  4. Add the rest of the vegetables: spinach, carrots, scallions, mushrooms, and zucchini. Cook for 4-5 minutes, until the vegetables are half-cooked and still a bit crispy.
  5. Turn the heat to low and add the cooked noodles, soy sauce, sugar, and the remaining sesame oil to the pan.
  6. Mix everything to combine and cook for another 2 minutes, allowing the flavors to meld.
  7. Season with salt or more soy sauce if needed. If you prefer a slightly sweeter taste, add a touch more sugar.
  8. If using sesame seeds, sprinkle them on top just before serving.

Tips

To ensure your Chapchae is a success, here are a few tips:

  • Use high-quality sesame oil and soy sauce for the best flavor.
  • Don’t overcook the vegetables; they should remain slightly crisp for the best texture.
  • If you’re adding protein, such as beef or chicken, cook it separately before adding it to the noodles.
  • For an authentic touch, garnish with sesame seeds and a sprinkle of sliced red chili for a bit of heat.

Variations & Substitutions

Chapchae is highly adaptable, so feel free to make it your own:

  • Vegetables: Use any vegetables you have on hand, such as bell peppers, broccoli, or bok choy.
  • Protein: Add beef, chicken, or tofu for extra protein. Simply cook it separately before mixing it with the noodles.
  • Sauce: For a gluten-free version, use tamari instead of soy sauce. You can also add a splash of rice vinegar for a tangy twist.

Storage

Chapchae can be stored in an airtight container in the refrigerator for up to 3 days. To reheat, simply warm it in a pan over medium heat, adding a splash of water or soy sauce if needed to prevent sticking. It’s an excellent option for meal prep, as the flavors continue to develop over time.

FAQ

Can I make Chapchae ahead of time?

Absolutely! Chapchae is a fantastic make-ahead dish. Prepare it up to a day in advance and store it in the refrigerator. Reheat gently before serving, and enjoy the enhanced flavors.

What can I serve with Chapchae?

Chapchae can be a standalone dish, but it also pairs well with other Korean dishes like kimchi, Korean BBQ, or a simple side salad. It’s versatile enough to complement a variety of meals.

Nutrition

Chapchae is a nutritious dish rich in fiber from the vegetables and sweet potato noodles. It’s naturally gluten-free when using gluten-free soy sauce and can be easily adapted to be vegan or vegetarian. The sesame and olive oils provide healthy fats, making it a well-rounded meal.

Conclusion

Chapchae is a delightful dish that brings a taste of Korean cuisine to your table. With its colorful array of vegetables and the unique texture of sweet potato noodles, it’s sure to impress family and friends alike. Whether you’re making it for a special occasion or a simple weeknight dinner, Chapchae is a versatile and delicious option. Give this recipe a try, and let it become a cherished part of your culinary repertoire, just as it has in mine.

Related update: Chapchae (Korean Stir-Fried Noodles)

Related update: A Post Thanksgiving “sopa De Tortilla”

Related update: Flemish Style Asparagus Side Dish

Tzadziki | Made by Meaghan Moineau

Tzatziki: A Creamy, Refreshing Mediterranean Delight

Intro

There’s something truly magical about family gatherings. For me, those memories often revolve around the kitchen table, surrounded by laughter, stories, and an array of delicious dishes. One staple that always graced our table was Tzatziki, a creamy and refreshing dip that has been a beloved part of my family’s culinary tradition for generations. Every time I make it, I’m transported back to those warm summer afternoons in my grandmother’s garden, where the scent of fresh herbs mingled with the sun-drenched air. Tzatziki was the star of those meals, cooling our palates and bringing us together in a shared love for simple, flavorful food.

Why You’ll Love It

Tzatziki is more than just a dip; it’s a versatile condiment that can elevate any meal. Whether you’re using it as a spread on sandwiches, a sauce for grilled meats, or simply as a dip for fresh vegetables, its creamy texture and refreshing taste make it a crowd favorite. It’s easy to make, requires only a few ingredients, and can be prepared in advance, making it perfect for entertaining. Plus, it’s a healthier alternative to many creamy dips, thanks to its yogurt base, which is rich in probiotics.

Ingredients

  • 2 large cucumbers
  • 1 teaspoon sea salt
  • 1 cup Greek yogurt
  • 1/2 cup sour cream
  • 2 tablespoons olive oil
  • 1 tablespoon vinegar
  • 2 cloves garlic, minced
  • 1/4 teaspoon white pepper
  • 1 tablespoon fresh dill, chopped (or 1 teaspoon dried dill)

Instructions

  1. Peel and grate the cucumbers. Lightly salt them, mix, and set aside for 5 minutes to help release the water.
  2. To remove as much water as possible from the grated cucumber, squeeze it in small quantities with your hands. This step is crucial to avoid a watery dip.
  3. In a medium bowl, mix together the yogurt, sour cream, olive oil, vinegar, garlic, and white pepper until smooth and well combined.
  4. Add the squeezed cucumbers and dill to the yogurt mixture. Mix thoroughly to combine all ingredients.
  5. Taste and adjust the seasoning as needed, adding more salt or white pepper to your preference.
  6. Chill the Tzatziki in the refrigerator for at least two hours before serving. This allows the flavors to meld beautifully.

Tips

For the best results, use full-fat Greek yogurt, which lends a rich creaminess to the dip. If you’re short on time, you can prepare the Tzatziki a day ahead; in fact, it often tastes even better the next day as the flavors develop further. When grating the cucumbers, use the large holes of a box grater to achieve the perfect texture.

Variations & Substitutions

If you’re looking to switch things up, consider adding a bit of lemon zest for a citrusy twist. You can also substitute the fresh dill with mint or parsley for a different flavor profile. For a vegan option, replace the yogurt and sour cream with coconut yogurt or a similar plant-based alternative. Experimenting with different herbs and spices can lead to delightful new versions of this classic dip.

Storage

Store any leftover Tzatziki in an airtight container in the refrigerator for up to 3 days. Stir well before serving, as some separation may occur. While Tzatziki is best enjoyed fresh, it can be stored in the freezer for up to a month. However, freezing may alter the texture, so it’s ideal to enjoy it fresh or refrigerated.

FAQ

Can I use a different type of yogurt?

While Greek yogurt is traditional and provides the creamy texture Tzatziki is known for, you can use regular yogurt if necessary. However, be sure to strain it through a cheesecloth to remove excess liquid and achieve a thicker consistency.

What can I serve with Tzatziki?

Tzatziki pairs wonderfully with a variety of dishes. Serve it with grilled meats like lamb or chicken, use it as a dip for fresh vegetables or pita bread, or spread it on sandwiches and wraps for an added burst of flavor.

Nutrition

Tzatziki is a nutritious addition to your meals, offering a good source of protein and probiotics from the yogurt. It’s also low in calories, making it a guilt-free option for those watching their intake. The healthy fats from olive oil and the freshness of cucumbers and herbs contribute to a well-rounded, wholesome dish.

Conclusion

Tzatziki is more than just a recipe; it’s a connection to tradition, family, and the vibrant flavors of the Mediterranean. Whether you’re recreating cherished memories or starting new traditions, this creamy dip is sure to become a staple in your culinary repertoire. Its simplicity and adaptability make it a delight to prepare and share. So gather your ingredients, invite some friends over, and enjoy the refreshing taste of homemade Tzatziki!

Related update: Tzadziki

Related update: Summer Rolls

Yorkshire Pudding | Made by Meaghan Moineau

Yorkshire Pudding: A Classic British Side Dish

Intro

There’s something magical about the aroma of Yorkshire pudding wafting through the house on a Sunday afternoon. This classic British side dish has been a staple in my family for generations, a recipe passed down from my grandmother who would make it every time we gathered around for our traditional Sunday roast. I still remember sitting in her cozy kitchen, eagerly watching her expertly whisk the batter, her movements so fluid and practiced. Now, I’m excited to share this beloved recipe with you, hoping it will become as cherished in your home as it is in ours.

Why You’ll Love It

Yorkshire pudding is the quintessential comfort food, a perfect companion to roast beef and gravy. Its golden-brown exterior and soft, airy interior make it a delightful addition to any meal. Not only is it delicious, but it’s also incredibly simple to make with just a few pantry staples. Whether you’re a seasoned cook or a beginner, you’ll find this recipe both accessible and rewarding. The best part? Watching your puddings rise to perfection in the oven, a sight that’s as satisfying as the taste.

Ingredients

  • 3 large eggs
  • 1 cup all-purpose flour
  • 1 cup milk
  • Pan drippings from roast beef (preferably)
  • 1/2 teaspoon salt

Instructions

  1. Preheat your oven to 400-450°F (200-230°C). The exact temperature can vary depending on your oven, so you may need to adjust slightly after making these a few times.
  2. Sift the flour and salt together, ensuring there are no lumps.
  3. In a separate bowl, beat the eggs and milk together until well combined.
  4. Slowly combine the wet ingredients with the dry ingredients, whisking until you have a smooth batter.
  5. Pour the beef drippings into a Yorkshire pudding tray or a muffin/cupcake tray, and place it in the oven to heat the oil until it’s sizzling hot.
  6. Carefully remove the tray from the oven and spoon a couple of tablespoons of the batter into each section of the pan.
  7. Return the tray to the oven and bake for about 20 minutes, or until the puddings are puffed and golden brown. Do not open the oven during baking, as this will cause your puddings to deflate.

Tips

For the best Yorkshire puddings, always ensure your ingredients are at room temperature before you start. This helps the batter to rise better. Additionally, using beef drippings adds a rich flavor, but if you’re in a pinch, vegetable oil is a suitable substitute. Just be sure that whatever fat you use is piping hot before adding the batter.

Variations & Substitutions

While traditional Yorkshire pudding is made with beef drippings, you can experiment with different fats like duck fat or even butter for varying flavors. For a vegetarian version, use a high-smoking point oil such as sunflower or canola. You can also add herbs like rosemary or thyme to the batter for an aromatic twist.

Storage

If you have leftovers, Yorkshire puddings can be stored in an airtight container in the fridge for up to two days. To reheat, simply pop them in a preheated oven at 350°F (175°C) for about 5-10 minutes until warmed through. Avoid using a microwave as it can make them soggy.

FAQ

Why aren’t my Yorkshire puddings rising?

There are a few reasons why Yorkshire puddings might not rise. Ensure your oven is properly preheated and that your batter is at room temperature. Also, make sure the oil in your pan is very hot before adding the batter. Opening the oven during cooking can also cause them to deflate.

Can I make the batter ahead of time?

Yes, you can prepare the batter a few hours in advance. Just cover it and leave it at room temperature. Giving the batter a bit of rest can actually help improve the texture of the puddings.

What should I serve with Yorkshire pudding?

Yorkshire pudding is traditionally served with roast beef and gravy, but it also pairs well with other roasted meats or even a rich vegetable stew. Some enjoy them with sweet toppings like jam for a unique twist!

Nutrition

Yorkshire pudding is relatively low in calories per serving, with about 150-200 calories per pudding depending on the size and ingredients used. It is a good source of protein from the eggs but should be enjoyed in moderation due to the fat content from the drippings.

Conclusion

Yorkshire pudding is not just a side dish; it’s a piece of culinary heritage that evokes warmth and nostalgia. By following this recipe, you’ll not only create a delicious addition to your roast dinners but also carry on a tradition that has delighted families for generations. I hope this recipe brings as much joy to your table as it does to ours. Happy cooking!

Related update: Yorkshire Pudding

How to Make Easy Cheesy Garlic Bread | Made by Meaghan Moineau

How to Make Easy Cheesy Garlic Bread

Intro

If there’s one dish that can transport me back to my childhood kitchen, it’s cheesy garlic bread. I vividly remember the aroma wafting through the house as my mom prepared this delicious treat for family dinners. We’d gather around the table, eagerly waiting for the hot, bubbly bread to make its way out of the oven. This easy cheesy garlic bread recipe has been a staple in our family, and I’m excited to share it with you. It’s simple, comforting, and perfect for any occasion.

Why You’ll Love It

This cheesy garlic bread is the perfect blend of crispy, cheesy, and garlicky goodness. Whether you’re serving it as an appetizer or a side dish, it’s bound to be a hit. Here’s why you’ll fall head over heels for this recipe:

  • Quick and Easy: With just a few ingredients and minimal prep time, you can have this savory treat ready in about 20 minutes.
  • Customizable: You can easily tweak the recipe to suit your taste preferences or dietary needs.
  • Family-Friendly: It’s a hit with kids and adults alike, making it a great option for family dinners or gatherings.
  • Flavorful: The combination of garlic, cheese, and fresh parsley creates an irresistible flavor profile.

Ingredients

  • 1 loaf of French white bread (Vienna)
  • 1/4 cup butter
  • 1/4 cup extra virgin olive oil
  • 3 cloves garlic, minced
  • 2 tablespoons fresh parsley, chopped
  • 1 cup mixed mozzarella and cheddar cheese, shredded
  • 1/4 cup Parmigiano Reggiano, grated

Instructions

  1. Preheat your oven to 350°F (175°C).
  2. Cut the loaf of bread into two halves lengthwise.
  3. In a small pan over medium heat, melt the butter and combine it with the olive oil, minced garlic, and chopped parsley. Stir frequently until the garlic is fragrant, about 2-3 minutes. Be careful not to burn the garlic.
  4. Brush the butter-garlic mixture over the cut sides of the bread halves, ensuring an even coating.
  5. In a bowl, mix together the mozzarella, cheddar, and Parmigiano Reggiano cheeses until well combined.
  6. Evenly distribute the cheese mixture over the garlic-buttered bread halves, covering them completely.
  7. Place the bread on a baking sheet and bake in the preheated oven for 10 minutes or until the cheese is bubbly and golden brown.
  8. Remove from the oven and allow to cool slightly before slicing and serving. Enjoy!

Tips

Here are some helpful tips to ensure your cheesy garlic bread turns out perfectly every time:

  • Use Fresh Ingredients: Fresh garlic and parsley will provide the best flavor. Avoid using pre-minced garlic if possible.
  • Watch the Garlic: Garlic can quickly go from fragrant to burnt, so keep a close eye on it while melting the butter.
  • Serve Warm: This bread is best enjoyed fresh out of the oven when the cheese is still gooey and the bread is crispy.

Variations & Substitutions

Feel free to get creative with this recipe! Here are a few variations and substitutions you might consider:

  • Herbs: Add a sprinkle of Italian seasoning or dried oregano for extra flavor.
  • Spicy Kick: For those who love a little heat, add a pinch of red pepper flakes to the butter mixture.
  • Vegan Option: Substitute the cheeses with your favorite vegan cheese blend and use vegan butter.
  • Different Bread: Try using ciabatta or sourdough for a different texture and flavor profile.

Storage

If you have leftovers (which might be unlikely!), you can store them in an airtight container in the refrigerator for up to 3 days. To reheat, place the bread in a preheated oven at 350°F (175°C) for 5-7 minutes, or until warmed through and the cheese is melty again.

FAQ

Can I make this bread ahead of time?

Yes, you can prepare the bread up to the point of baking and store it covered in the refrigerator for up to 24 hours. When you’re ready to serve, simply bake as directed, adding a couple of minutes to the baking time if needed.

Can I freeze cheesy garlic bread?

While it’s best enjoyed fresh, you can freeze the prepared bread before baking. Wrap it tightly in plastic wrap and aluminum foil, then freeze for up to 2 months. Bake from frozen, adding additional time as necessary until the cheese is bubbly and golden.

Nutrition

While I don’t have exact nutritional information for this recipe, it’s important to note that cheesy garlic bread is a treat best enjoyed in moderation. If you’re looking to reduce calories or fat, consider using less cheese or opting for a whole-grain bread option.

Conclusion

This easy cheesy garlic bread is a comforting and delicious addition to any meal. Whether you’re serving it as a side dish for pasta night or as a snack for game day, it’s sure to be a crowd-pleaser. I hope this recipe brings as much joy to your table as it has to mine. Enjoy the cheesy, garlicky goodness, and don’t be surprised if it becomes a regular request from family and friends!

Related update: How to Make Easy Cheesy Garlic Bread

Related update: Yorkshire Pudding

Basic Hummus | Made by Meaghan Moineau

Basic Hummus: A Timeless Classic

Intro

Welcome to my warm and inviting kitchen, where today we’re diving into the luscious world of hummus. This basic hummus recipe is not just a dish; it’s a heartfelt connection to my childhood. I remember sitting in my grandmother’s cozy kitchen, a swirl of fragrant spices in the air, as she would blend her magic hummus. The ritual was always the same: a squeeze of lemon here, a dash of cumin there, and always, always a drizzle of the finest olive oil to finish. Those cherished memories inspire this recipe, and I’m thrilled to share it with you.

Why You’ll Love It

This hummus is the epitome of simplicity and flavor. It’s creamy, smooth, and rich with the earthy goodness of chickpeas and tahini. You’ll love how versatile it is—perfect as a spread, a dip, or even a side dish. It’s not just a healthy snack; it’s a culinary canvas for your creativity. Plus, it takes less than 10 minutes to whip up, making it perfect for last-minute gatherings or a quick snack.

Ingredients

  • 1 can of chickpeas
  • 3 tablespoons olive oil
  • Juice of 1 lemon
  • 2 cloves garlic
  • 1/4 cup tahini
  • 2-4 tablespoons water
  • 1 teaspoon cumin
  • Salt to taste

Instructions

  1. Puree the tahini in the food processor for about a minute until it becomes a smooth paste.
  2. Add the olive oil, garlic, lemon juice, cumin, and salt. Pulse until the ingredients are well incorporated.
  3. Add the chickpeas in two batches. Wait for the first batch to become completely smooth before adding the next.
  4. For a smoother hummus, add more lemon juice or water to reach your desired consistency.
  5. Pour the hummus into a bowl. Garnish with extra chickpeas, a sprinkle of paprika, and a drizzle of extra virgin olive oil.
  6. Serve with warm whole wheat pita bread.

Tips

For the creamiest hummus, consider peeling the chickpeas. It’s a bit of extra work, but the velvety texture is worth it. Also, make sure to use fresh lemon juice and good quality tahini for the best flavor. If you like a little heat, add a dash of cayenne pepper or hot paprika.

Variations & Substitutions

Feel free to experiment with flavors! Try adding roasted red peppers for a smoky twist, or a handful of fresh herbs like parsley or cilantro for an herby kick. If tahini isn’t available, you can substitute with a mild nut butter, though the flavor will change slightly. For a lower-fat version, reduce the olive oil and add more water or non-dairy yogurt.

Storage

Store your hummus in an airtight container in the refrigerator for up to a week. If it thickens over time, simply stir in a little water or olive oil to revive its creamy texture. You can also freeze hummus for up to three months; just be sure to thaw it fully in the fridge and give it a good stir before serving.

FAQ

Can I use dried chickpeas instead of canned?

Absolutely! If you prefer cooking from scratch, soak dried chickpeas overnight and then cook until tender. They can then be used in place of canned chickpeas. This can enhance the flavor and texture of your hummus.

Why is my hummus not smooth?

If your hummus isn’t as smooth as you’d like, it might be that the chickpeas weren’t cooked enough. Cooking them longer can help, or try peeling the chickpeas before blending. Also, make sure your food processor is strong enough to handle the job.

What can I serve with hummus?

Hummus pairs beautifully with fresh vegetables, pita chips, crackers, or even as a spread on sandwiches and wraps. It also makes a great accompaniment to grilled meats or falafel.

Nutrition

This hummus is rich in protein and healthy fats, making it a heart-healthy choice. Chickpeas provide fiber and essential nutrients, while tahini and olive oil offer a dose of beneficial fats. Enjoy in moderation as part of a balanced diet.

Conclusion

There you have it—a simple and delicious hummus recipe that’s bound to become a staple in your home. Whether you’re hosting a gathering, preparing a snack, or simply indulging in a moment of nostalgia, this hummus will bring warmth and flavor to your table. I hope it becomes a cherished part of your culinary repertoire, just as it has been in mine. Happy blending!

Related update: Basic Hummus

Related update: How to Make Easy Cheesy Garlic Bread

Related update: Tzadziki

Quinoa Tabouli with Lemon Garlic Grilled Shrimp | Made by Meaghan Moineau

Quinoa Tabouli with Lemon Garlic Grilled Shrimp

Intro

There’s something truly magical about a dish that not only tastes delicious but also evokes cherished memories. For me, Quinoa Tabouli with Lemon Garlic Grilled Shrimp is a dish that brings back the warm, sun-soaked afternoons spent at my grandmother’s garden. As kids, my cousins and I would run around, our hands sticky from picking ripe tomatoes and fresh herbs. The aroma of lemon and garlic wafting from the outdoor grill would signal that it was time to gather around the table. Today, I am thrilled to share this delightful recipe with you, hoping it brings as much joy to your table as it has to mine.

Why You’ll Love It

This Quinoa Tabouli with Lemon Garlic Grilled Shrimp is a vibrant, fresh, and nourishing dish that works perfectly as a light lunch or a satisfying dinner. It’s packed with colorful vegetables, fragrant herbs, and succulent shrimp, making every bite an explosion of flavor. Not only is it delicious, but it’s also a healthy option that’s gluten-free and full of protein. Whether you’re preparing it for a family meal or a gathering with friends, this dish is sure to impress with its visual appeal and mouth-watering taste.

Ingredients

  • 1 cup quinoa
  • 2 cups water
  • 1/2 teaspoon sea salt
  • 2 celery stalks, diced
  • 1 each of yellow, red, and orange peppers, diced
  • 4 green onions, sliced
  • 1/2 cup sun-dried olives, chopped
  • 1 vine-ripened tomato, diced
  • 1 cup frozen corn, thawed
  • 1 bunch fresh parsley, finely chopped
  • 1/4 cup mint leaves, finely chopped
  • 3 cloves garlic, minced
  • 1/4 cup lemon juice
  • 1/2 teaspoon sea salt (for dressing)
  • Grilled shrimp, seasoned to taste

Instructions

  1. Add 1/2 teaspoon of sea salt to the water and bring it to a boil.
  2. Toast the quinoa in a dry pan for a couple of minutes, moving it around so it doesn’t burn. Once you hear it pop, count to 5 and remove it immediately.
  3. Add the quinoa to the boiling water and cook for 12 minutes on a soft boil, or until all the water is absorbed.
  4. While the quinoa is cooking, combine the minced garlic with the lemon juice and allow it to sit.
  5. Remove the quinoa from the heat and add the lemon juice and garlic mixture. Mix well and let it absorb and cool.
  6. Chop all the vegetables into similar-sized pieces, about 1/4 inch dice.
  7. Finely chop the parsley and mint.
  8. Once the quinoa has cooled, combine it with the chopped vegetables, herbs, and sun-dried olives. Mix everything together well.
  9. Serve the quinoa tabouli topped with the grilled shrimp.

Tips

Toasting the quinoa before boiling enhances its nutty flavor, so don’t skip this step! Make sure to chop the vegetables into similar-sized pieces for a uniform texture. Allowing the garlic to marinate in lemon juice softens its raw edge, blending seamlessly into the dish.

Variations & Substitutions

If you prefer a vegetarian version, simply omit the shrimp or replace it with grilled halloumi or tofu for a similar protein boost. For an extra burst of flavor, try adding a sprinkle of toasted pine nuts or a handful of pomegranate seeds. If you don’t have sun-dried olives, regular black olives will also work well in this recipe.

Storage

Store any leftovers in an airtight container in the refrigerator for up to three days. The flavors will continue to meld, making the dish even more delicious the next day. If you’re planning to store it longer than a day, consider keeping the shrimp separate to maintain its optimal texture when reheated.

FAQ

Can I make this dish ahead of time?

Absolutely! In fact, making it a few hours ahead allows the flavors to develop even more. Just keep the shrimp separate until you’re ready to serve.

What can I serve with Quinoa Tabouli?

This dish is quite versatile and pairs well with a variety of sides. Try serving it alongside a fresh green salad, some warm pita bread, or a dollop of hummus for a complete meal.

Is this recipe gluten-free?

Yes, quinoa is naturally gluten-free, making this dish a great option for those with gluten sensitivities or allergies.

Nutrition

This recipe is not only delicious but also nutritious. It’s high in protein from both the quinoa and shrimp, packed with fiber from the vegetables, and rich in vitamins and minerals. It’s a healthy choice for anyone looking to enjoy a balanced, satisfying meal.

Conclusion

Quinoa Tabouli with Lemon Garlic Grilled Shrimp is a dish that brings together vibrant flavors and wholesome ingredients to create a meal that’s both nourishing and delightful. Whether you’re enjoying it on a cozy weeknight or sharing it at a festive gathering, it’s sure to be a hit. I hope this recipe becomes a cherished part of your culinary repertoire, bringing a bit of sunshine and warmth to your dining table.

Related update: Quinoa Tabouli with Lemon Garlic Grilled Shrimp

Related update: Mushroom Crepes with Vegetarian Sauce

Pasta with Peas and Italian Sausage | Made by Meaghan Moineau

Pasta with Peas and Italian Sausage

A delicious plate of pasta with peas and Italian sausage

Intro

There’s something truly comforting about a warm bowl of pasta, especially when it carries the flavors of childhood memories. I remember visiting my grandmother’s house every Sunday. The air would be filled with the aroma of her cooking — the scent of rich tomatoes simmering, sweet Italian sausage sizzling, and the gentle warmth of olive oil. This recipe for Pasta with Peas and Italian Sausage brings me back to those simple, joyful days around her dining table. It’s a dish that holds a special place in my heart, and I’m thrilled to share it with you.

Why You’ll Love It

This dish is a perfect blend of savory and sweet, with the sausages adding depth and the peas bringing a hint of sweetness. It’s easy to prepare, making it ideal for a quick weeknight dinner. Plus, the combination of wholesome ingredients creates a balanced meal that’s both satisfying and delicious. Whether you’re cooking for family or friends, this pasta is sure to be a hit.

Ingredients

  • 1 tablespoon butter
  • 1 cup canned tomatoes
  • 12 ounces farfalle pasta
  • 1 pound Italian sweet sausage, casings removed
  • 2 tablespoons olive oil
  • 1 cup frozen peas
  • Salt and pepper to taste
  • 1 cup Pomi strained tomato sauce

Instructions

  1. Cook the pasta according to the package directions. Drain and set aside.
  2. In a very large skillet over medium heat, add the olive oil and sausage. Sauté until the sausage is slightly browned all over.
  3. Add the frozen peas and canned tomatoes to the skillet. Season with salt and pepper to taste.
  4. Lower the heat to medium and let it cook for another 10 to 15 minutes, allowing the flavors to meld together.
  5. Return the drained pasta to the pan. Add the butter and Pomi strained tomato sauce.
  6. Mix everything well to ensure the pasta is coated with the sauce and sausage mixture.
  7. Serve hot and enjoy your nostalgic feast!

Tips

To ensure your pasta is cooked to perfection, aim for an al dente texture — firm to the bite. This adds a lovely contrast to the softness of the peas and the sausage. Also, be sure to taste the sauce as it cooks and adjust the seasoning as needed. A pinch of red pepper flakes can add a delightful kick if you prefer a bit of heat.

Variations & Substitutions

If you’re looking to mix things up, consider swapping the sausage for ground turkey or chicken for a lighter version. You can also use fresh peas instead of frozen for a fresher taste. If you prefer a vegetarian option, omit the sausage and add more vegetables like bell peppers or mushrooms for added texture and flavor.

Storage

Leftovers can be stored in an airtight container in the refrigerator for up to 3 days. To reheat, simply warm on the stove over medium heat, adding a splash of water if necessary to loosen the sauce. This dish is also freezer-friendly. Store in a freezer-safe container for up to 2 months. Thaw in the refrigerator before reheating.

FAQ

Can I make this dish gluten-free?

Absolutely! Simply substitute the farfalle pasta with your favorite gluten-free pasta. Ensure that the sausage is also gluten-free, as some brands may include gluten-containing fillers.

What can I use instead of Pomi tomato sauce?

If you can’t find Pomi, any high-quality strained tomato sauce will work. Alternatively, you can blend canned tomatoes until smooth for a homemade version.

Can I add cheese to this pasta?

Yes, you can! A sprinkle of grated Parmesan cheese on top adds a rich, nutty flavor that complements the dish beautifully. Feel free to add it right before serving.

Nutrition

This pasta dish is a well-rounded meal, providing carbohydrates, protein, and vital nutrients. The peas add fiber and vitamins, while the sausage offers protein and iron. Keep portion sizes in mind to maintain a balanced diet.

Conclusion

Pasta with Peas and Italian Sausage is not just a dish; it’s a journey back to simpler times, filled with laughter, love, and hearty meals. Whether you’re recreating family memories or making new ones, this recipe is sure to bring warmth and joy to your table. I hope you enjoy making and sharing this meal as much as I do. Happy cooking!

Related update: Pasta with Peas and Italian Sausage

Related update: Venison Stew

Fettuccine With Bacon Mushroom and Peas | Made by Meaghan Moineau

Fettuccine With Bacon, Mushroom, and Peas

Intro

There’s something magical about a steaming plate of pasta that transcends the ordinary. It has this incredible ability to transport us back in time, to moments filled with laughter, love, and the comforting aroma of a home-cooked meal. I remember the first time I tasted this delightful combination of fettuccine with bacon, mushroom, and peas. It was a chilly evening, and I was at my grandmother’s house. She had a knack for creating dishes that were simple yet bursting with flavor. This dish quickly became a family favorite, and every bite feels like a warm hug from her. Today, I’m thrilled to share this recipe with you, hoping it brings the same warmth and joy to your table.

Why You’ll Love It

This Fettuccine with Bacon, Mushroom, and Peas is a delightful blend of textures and flavors. It’s creamy, savory, and oh-so-satisfying! The smoky bacon, earthy mushrooms, and vibrant peas all come together in a luscious cream sauce that clings to every strand of fettuccine. Perfect for a weeknight dinner or a special occasion, this dish is quick to prepare and utterly comforting. Plus, it’s a versatile recipe that invites customization to suit your taste preferences.

Ingredients

  • Bacon
  • Cheese
  • Canned condensed cream of mushroom
  • Dried basil
  • Fettuccine
  • Black ground pepper
  • Canned mushroom
  • Dried oregano powder
  • Frozen green peas

Instructions

  1. Bring a large pot of water to boil over high heat and add a generous pinch of salt. Add the fettuccine and cook for about 9 minutes or until al dente.
  2. While the pasta is cooking, heat a pan over medium-high heat and brown the bacon. Once crispy, remove the bacon and drain it on paper towels. Set aside.
  3. Pour the excess oil out of the pan, leaving just a touch for flavor. Sauté the canned mushrooms for about a minute.
  4. Add the canned condensed cream of mushroom and a can of water to the pan. Stir well to combine.
  5. Season with ground black pepper, dried oregano, and/or basil, if desired. Bring the sauce to a gentle boil.
  6. Add the frozen green peas and a modest amount of grated cheese. Taste the sauce before adding more cheese, as the cream of mushroom can be quite salty.
  7. Once the pasta is cooked, drain it and add it to the sauce. Mix well to ensure each strand is coated.
  8. Crumble the cooked bacon and add it to the pasta. Give everything a good mix, then serve immediately. Enjoy!

Tips

For the best results, use high-quality bacon and freshly grated cheese. This enhances the flavor of the dish significantly. If you find the sauce too thick, add a splash of pasta water to reach your desired consistency. Be cautious with the salt as the bacon and cream of mushroom already contribute to the dish’s saltiness.

Variations & Substitutions

You can easily adapt this recipe to suit your dietary needs or preferences. For a vegetarian version, omit the bacon and add extra mushrooms or some sautéed spinach. If you’re not a fan of peas, substitute them with chopped asparagus or broccoli. You can also experiment with different types of cheese, such as Parmesan or Asiago, for a unique flavor profile.

Storage

This pasta dish is best enjoyed fresh, but leftovers can be stored in an airtight container in the refrigerator for up to 3 days. To reheat, gently warm it on the stovetop over low heat, adding a splash of milk or cream to bring back the creaminess. Avoid microwaving, as it may dry out the pasta.

FAQ

Can I use fresh mushrooms instead of canned?

Absolutely! Fresh mushrooms will add a wonderful texture and flavor. Simply slice them and sauté them in the pan before adding the cream of mushroom soup.

What type of cheese works best in this recipe?

A sharp cheddar or Parmesan cheese complements the flavors beautifully. However, feel free to use your favorite cheese or a blend to suit your taste.

Is it possible to make this dish gluten-free?

Yes, you can use gluten-free fettuccine to make this dish gluten-free. Ensure that any canned ingredients and seasonings are also certified gluten-free.

Nutrition

While it’s important to enjoy indulgent meals in moderation, this recipe offers a balance of protein from the bacon, fiber from the peas, and satisfying carbs from the pasta. Remember to consider portion control, especially if you’re watching your caloric intake.

Conclusion

Fettuccine with Bacon, Mushroom, and Peas is more than just a meal; it’s an experience. It’s a dish that brings people together, creates cherished memories, and satisfies the soul. Whether you’re cooking for loved ones or simply treating yourself, this recipe promises warmth and comfort in every bite. I hope this dish becomes a beloved part of your culinary repertoire, just as it has in my family. Happy cooking!

Related update: Fettuccine With Bacon Mushroom and Peas

Related update: Smoky Chicken Tacos

Quinoa Tabbouleh Salad | Made by Meaghan Moineau

Quinoa Tabbouleh Salad

Intro

There’s something magical about the combination of fresh ingredients that come together in a tabbouleh salad. I remember my grandmother making a similar dish during summer picnics, where the scent of fresh mint and parsley would fill the air. Her version used the traditional bulgur, but I’ve found that quinoa adds a delightful twist while boosting the nutritional value. This Quinoa Tabbouleh Salad is a modern take on a beloved classic, perfect for those looking to enjoy a refreshing, healthy meal.

Why You’ll Love It

This Quinoa Tabbouleh Salad is a vibrant, nutrient-packed dish that’s perfect for any occasion. Here’s why you’ll fall in love with it:

  • Refreshing and Light: The fresh vegetables and herbs make this salad a refreshing choice for any meal.
  • High in Protein: Quinoa is a complete protein, making this salad an excellent option for vegetarians and vegans.
  • Quick and Easy: With simple ingredients and minimal prep time, this salad is easy to whip up even on the busiest of days.
  • Versatile: Enjoy it as a side dish, a light lunch, or a main course by adding your favorite protein.

Ingredients

  • 1 cup quinoa
  • 2 cups water
  • 4 green onions, sliced
  • 1 cup diced tomato
  • 1 cup diced cucumber
  • 1/2 cup fresh mint, chopped
  • 1/2 cup fresh parsley, chopped
  • 1/4 cup olive oil
  • 1/4 cup lemon juice
  • 1 tsp garlic powder
  • 1/2 tsp black freshly cracked pepper

Instructions

  1. Bring water to a boil in a medium saucepan.
  2. Add quinoa and stir. Cover and reduce heat to medium-low.
  3. Allow quinoa to simmer until all water is absorbed, about 20 minutes. Stir occasionally, ensuring it doesn’t burn.
  4. Once cooked, allow quinoa to cool completely.
  5. Transfer cooled quinoa to a large bowl with an airtight lid.
  6. Add green onions, diced tomato, diced cucumber, fresh mint, fresh parsley, olive oil, lemon juice, garlic powder, and freshly cracked pepper.
  7. Gently stir until all ingredients are very well-mixed.
  8. Cover and refrigerate for at least an hour to allow flavors to meld.
  9. Stir again before serving.

Tips

  • For extra flavor, try toasting the quinoa lightly before cooking. This will bring out a nutty flavor that complements the salad beautifully.
  • Ensure the quinoa is completely cool before adding the other ingredients to prevent wilting the fresh herbs and vegetables.
  • Use a sharp knife to chop the vegetables to maintain their texture and freshness.

Variations & Substitutions

This Quinoa Tabbouleh Salad can easily be adapted to suit your preferences:

  • Grains: Substitute quinoa with bulgur for a traditional touch or try couscous for a different texture.
  • Herbs: Add fresh dill or cilantro for an extra burst of flavor.
  • Protein: Add grilled chicken, chickpeas, or feta cheese to make it a more substantial meal.
  • Vegetables: Include chopped bell peppers or radishes for added crunch and color.

Storage

This salad is best enjoyed fresh but can be stored in the refrigerator for two to three days. Make sure to keep it in an airtight container to maintain its crispness and flavor. Stir well before serving leftovers to redistribute the dressing.

FAQ

Can I make this salad ahead of time?

Yes, you can prepare the salad a day in advance. In fact, allowing the flavors to meld in the fridge can enhance the taste. Just be sure to give it a good stir before serving.

Is Quinoa Tabbouleh Salad gluten-free?

Absolutely! This recipe uses quinoa, which is naturally gluten-free, making it a perfect choice for those with gluten sensitivities.

What can I serve with Quinoa Tabbouleh Salad?

This salad pairs well with grilled meats, fish, or even as part of a mezze platter alongside hummus, pita bread, and olives.

Nutrition

Quinoa Tabbouleh Salad is not only delicious but also packed with nutrients. Here’s a quick overview of its nutritional benefits:

  • High in Protein: Quinoa is a complete protein, providing all nine essential amino acids.
  • Rich in Fiber: The combination of quinoa and fresh veggies offers a good amount of dietary fiber.
  • Loaded with Vitamins and Minerals: Fresh herbs and vegetables provide vitamins A, C, K, and minerals like potassium and magnesium.
  • Healthy Fats: Olive oil offers heart-healthy monounsaturated fats.

Conclusion

Quinoa Tabbouleh Salad is more than just a dish; it’s a celebration of fresh flavors and wholesome ingredients. Whether you’re looking for a side dish to complement your meal or a light, nutritious option for lunch, this salad is sure to delight. Remember the days of picnics with loved ones and make new memories with this healthy twist on a classic. Enjoy every bite and share the love with those around you!

Related update: Quinoa Tabbouleh Salad

Related update: Crab Cakes Eggs Benedict

Related update: Strawberry Pretzel Salad