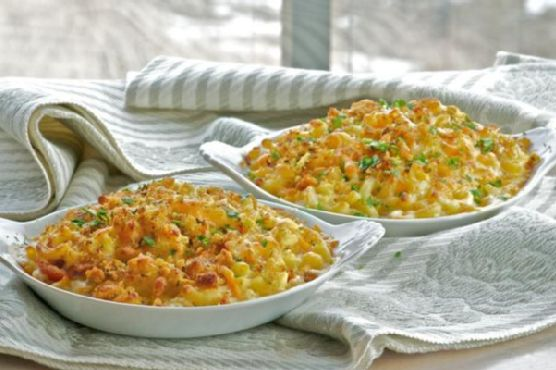
Macaroni and Cheese Gratin
Intro
There’s something magical about the comforting embrace of macaroni and cheese. It’s a dish that transcends age, a warm hug on a plate for both the young and the old. I remember spending countless afternoons in my grandmother’s kitchen, the air filled with the tantalizing aroma of bubbling cheese and freshly baked bread crumbs. She always let me sprinkle the breadcrumbs on top, a task I took to with glee. This Macaroni and Cheese Gratin recipe has been passed down through generations in my family, and today, I’m thrilled to share it with you.
Why You’ll Love It
This Macaroni and Cheese Gratin is the epitome of comfort food, with a crispy, herbed breadcrumb topping that contrasts beautifully with the creamy, cheesy pasta beneath. It’s perfect for family gatherings, potlucks, or a cozy night in. The blend of cheddar and gruyere provides a rich, tangy flavor, while a hint of nutmeg and pepper sauce adds warmth and depth. You’ll love how the top gets golden and crunchy, making every bite a delightful experience.
Ingredients
- 2 cups herbed bread crumbs
- 4 tablespoons butter, divided
- 2 cups grated cheddar cheese
- 1 pound elbow macaroni
- 1/4 cup all-purpose flour
- 1 cup grated gruyere cheese
- 4 cups milk
- 1/4 teaspoon freshly grated nutmeg
- 1/2 cup grated parmesan cheese
- 2 tablespoons chopped fresh parsley
- 1 teaspoon pepper sauce
- Salt, to taste
Instructions
- Bring a large pot of water to a boil. Add a generous pinch of salt, then add the elbow macaroni. Cook until just shy of al dente, since the macaroni will continue to cook in the oven. Drain and set aside.
- In another pot, melt two tablespoons of butter over medium heat. Add the flour and stir with a whisk or wooden spoon for a couple of minutes to cook the raw flavor out of the flour.
- Gradually whisk in the milk, 1/2 cup at a time, allowing the mixture to thicken before adding more. Once all the milk is incorporated, reduce the heat to low and continue to cook, stirring constantly, until the sauce thickens.
- Stir in the grated cheddar, gruyere, and parmesan cheeses until melted and smooth. Add the nutmeg, pepper sauce, and salt to taste. Remove from heat and set aside.
- Return the drained macaroni to its pot and pour the cheese sauce over it. Stir gently with a wooden spoon to combine.
- Spoon the macaroni mixture into individual gratin dishes or a large buttered baking dish. Feel free to add a few tomato slices here and there, pressing them gently into the surface.
- To make the topping, melt the remaining two tablespoons of butter and mix it with the herbed bread crumbs until well combined.
- Sprinkle the breadcrumb mixture evenly over the macaroni and cheese. Do not smooth out the top; leave a few peaks for extra crispiness.
- Bake in a preheated oven at 375°F (190°C) for 20-25 minutes, or until the top is golden brown and the cheese is bubbly.
- Garnish with chopped fresh parsley before serving.
Tips
For best results, use high-quality cheeses for a richer flavor. Feel free to make the cheese sauce ahead of time and store it in the refrigerator. When ready to bake, simply reheat the sauce gently and combine with the pasta.
Variations & Substitutions
Feel free to experiment with different types of cheese. A combination of sharp cheddar and smoked gouda can add a delightful twist. For a gluten-free version, use gluten-free pasta and flour. You can also add cooked bacon or diced ham to the macaroni for a meatier version.
Storage
Store any leftovers in an airtight container in the refrigerator for up to 3 days. To reheat, place in a preheated oven at 350°F (175°C) until warmed through. You can also freeze the gratin before baking; just ensure it’s well-covered. When ready to enjoy, bake directly from frozen, adding an extra 10-15 minutes to the cooking time.
FAQ
Can I make this dish ahead of time?
Yes, you can assemble the gratin up to a day in advance and refrigerate. Just add the breadcrumb topping right before baking.
What can I use instead of gruyere cheese?
If you can’t find gruyere, you can substitute it with Swiss cheese or even a mild provolone for a similar texture and flavor.
Nutrition
While I don’t have exact nutritional information for this dish, keep in mind that it’s a rich and indulgent treat. Moderation is key, and pairing it with a light salad can help balance out the meal.
Conclusion
This Macaroni and Cheese Gratin is more than just a meal; it’s a celebration of cheesy, comforting goodness that brings people together. Whether you’re sharing it with loved ones or savoring it solo, know that each bite is a testament to the timeless joy of home-cooked comfort food. Enjoy!
Related update: Macaroni and Cheese Gratin