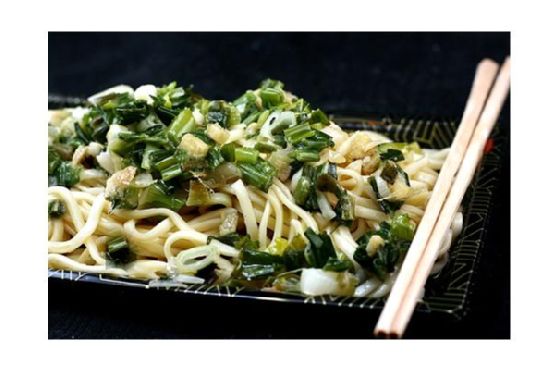
Not Momofuku Ginger Scallion Noodles | Made by Meaghan Moineau
**Title: A Taste of Nostalgia: Not Momofuku Ginger Scallion Noodles**
**Description:** Dive into the comforting embrace of Not Momofuku Ginger Scallion Noodles, a delightful dish packed with vibrant flavors and warm memories. This recipe is your gateway to a symphony of taste and nostalgia, blending simple ingredients into a soul-soothing experience. Perfect for a cozy dinner, this dish will transport you back to cherished family gatherings, making it a must-try for any home cook.
---
**Blog Post:**
There's something magical about a recipe that evokes cherished memories with every bite. For me, Not Momofuku Ginger Scallion Noodles is more than just a dish; it's a bridge to my past, a flavorful reminder of family gatherings filled with laughter, love, and of course, delightful aromas wafting from the kitchen.
**Ingredients:**
- Soba noodles
- 1/4 cup grapeseed oil
- 2 cups green onions, finely chopped
- 2 tablespoons ginger, minced
- 4 cloves garlic, minced
- 2 shallots, thinly sliced
- 2 tablespoons fish sauce
- 1 tablespoon sesame seed oil
- 1 tablespoon rice wine vinegar
- 2 tablespoons wheat-free tamari sauce
- 1 tablespoon honey
- 1 red chile pepper, crushed
- Himalayan salt, to taste
**Instructions:**
1. Heat the grapeseed oil in a saucepan over high heat until shimmering and hot, but not smoking. This is where the magic begins.
2. Carefully add the green onions, ginger, garlic, and shallots to the pan. Watch as the ingredients sizzle and the aroma fills your kitchen, instantly transforming the space into a fragrant haven. The onions will wilt and turn a vibrant green almost immediately.
3. Remove the pan from the heat and stir the mixture with a wooden spoon. Feel the warmth of the moment as you add the fish sauce, sesame seed oil, rice wine vinegar, tamari sauce, honey, crushed red chile pepper, and Himalayan salt. Allow the sauce to sit for 15 minutes, letting the flavors meld together.
4. Toss with your favorite noodles. While I used fresh Chinese egg noodles for a traditional touch, soba noodles offer a splendid alternative, absorbing the sauce beautifully.
**A Nostalgic Connection:**
This dish always takes me back to my grandmother's kitchen. As a child, I spent countless weekends there, perched on a stool, watching her deftly chop green onions and ginger while regaling me with stories of her own childhood. She had a way of making the simplest ingredients sing, turning every meal into an event. The aroma of sizzling onions and ginger would fill the house, drawing everyone to the kitchen like moths to a flame. Every bite of her noodles was a testament to her love; a warm, comforting embrace on a plate.
**Difficulty Rating: 3/10**
Classified as a **Main Dish**, Not Momofuku Ginger Scallion Noodles is surprisingly straightforward to prepare, making it an ideal choice for both novice cooks and seasoned chefs alike. Its simplicity is its strength, allowing each ingredient to shine while wrapping you in a blanket of nostalgia and flavor.
---
There's an undeniable comfort in recreating a recipe that has stood the test of time in your family. Not Momofuku Ginger Scallion Noodles is more than just a meal; it's a journey back to those precious moments spent with loved ones. Whether you're cooking for a crowd or just for yourself, this dish is sure to bring a smile to your face and warmth to your heart. So, gather your ingredients, ignite your stove, and let the magic of nostalgia fill your kitchen once more.