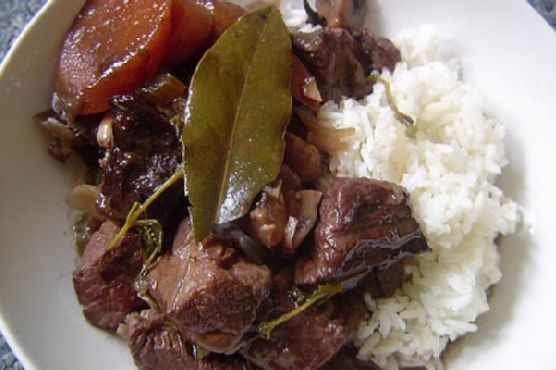
Chicken Adobo & Coconut Ginger Rice
Intro
There’s something truly magical about the smell of chicken adobo simmering on a lazy Sunday afternoon. It’s a dish that’s been passed down through generations, each family adding their own unique twist. For me, the aroma of soy sauce mixed with the tang of vinegar and the warmth of garlic brings back fond memories of my grandmother’s kitchen. I remember sitting on a stool, eagerly watching her every move, as she expertly crafted this savory masterpiece. She’d always serve it with a side of coconut ginger rice, a fragrant companion that perfectly complemented the adobo. This recipe is a tribute to those cherished moments, and I hope it brings as much joy to your table as it has to mine.
Why You’ll Love It
This Chicken Adobo & Coconut Ginger Rice recipe is a delightful blend of savory, sweet, and tangy flavors that will make your taste buds dance. The tender chicken, infused with the rich marinade, paired with the creamy coconut and spicy ginger rice, makes for a comforting and satisfying meal. Whether you’re new to Filipino cuisine or a seasoned fan, this dish is easy to prepare and perfect for any occasion.
Ingredients
- 1/2 cup low sodium soy sauce
- 1/2 cup apple cider vinegar
- 4 cloves garlic, smashed
- 1 teaspoon whole peppercorns
- 2 tablespoons brown sugar
- 2 bay leaves
- 2 pounds bone-in chicken thighs
- 1 tablespoon grapeseed oil
- 1 cup chicken broth
- 1 tablespoon cornstarch
- 1/4 cup water (for cornstarch mixture)
- 3 cups water (for rice)
- 1 1/2 cups rice (jasmine or long grain)
- 1/2 cup sweetened shredded coconut
- 1 tablespoon fresh ginger, grated
- 2 scallions, thinly sliced
- 2 tablespoons fresh parsley, chopped
- 1 teaspoon kosher salt
Instructions
- In a large bowl or flat dish, combine the soy sauce, vinegar, garlic, peppercorns, brown sugar, and bay leaves. Add the chicken thighs, ensuring they are fully submerged in the marinade. Cover and marinate in the refrigerator for at least 1 hour, preferably overnight.
- When ready to cook, heat the grapeseed oil in a large pan over medium-high heat. Remove the chicken from the marinade, reserving the liquid, and brown the chicken thighs on both sides, about 2-3 minutes per side. Remove the chicken and set aside.
- Pour the reserved marinade and chicken broth into the pan. Bring to a boil over medium heat.
- Once boiling, return the chicken to the pan, cover, and reduce the heat to a simmer. Cook for about 10 minutes.
- In a small bowl, whisk together 1/4 cup water and the cornstarch until smooth. Add this slurry to the pan, stirring to combine. Turn the chicken pieces over, cover again, and cook until the chicken is cooked through and the sauce has thickened, about 6-9 minutes.
- Meanwhile, in a medium saucepan, bring 3 cups of water to a boil. Add a pinch of salt. Once boiling, add the rice and cook according to package instructions.
- When the rice is cooked, fluff with a fork and toss with the scallions, parsley, ginger, and shredded coconut.
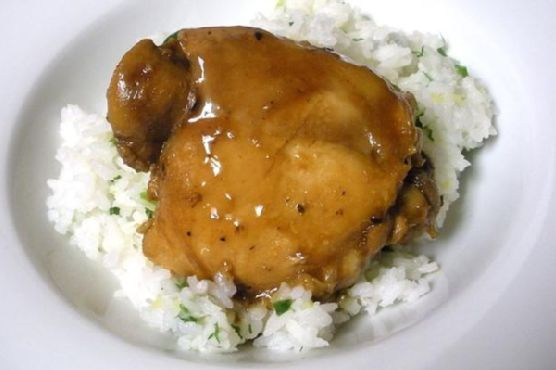
- To serve, place a generous scoop of coconut ginger rice on a plate, top with chicken adobo, and drizzle with the sauce from the pan.
Tips
- For deeper flavors, marinate the chicken overnight.
- Use fresh ginger and garlic for the best taste.
- Adjust the sweetness and tanginess by altering the amounts of brown sugar and vinegar to suit your palate.
Variations & Substitutions
If you’re looking to change things up, consider these variations:
- Protein: Swap chicken thighs for chicken breasts or pork shoulder for a different texture.
- Vinegar: Try using rice vinegar or white vinegar if apple cider vinegar is unavailable.
- Rice: Brown rice or quinoa can be used as a healthier alternative to white rice.
Storage
Store any leftover Chicken Adobo & Coconut Ginger Rice in an airtight container in the refrigerator for up to 3 days. To reheat, simply microwave on medium heat until warmed through. The flavors meld beautifully over time, making for a delicious next-day meal.
FAQ
Can I freeze Chicken Adobo?
Yes, you can freeze Chicken Adobo. Allow it to cool completely, then store in an airtight container or freezer bag for up to 3 months. Thaw in the refrigerator overnight before reheating.
What can I serve with Chicken Adobo?
Chicken Adobo pairs wonderfully with steamed vegetables, a fresh green salad, or roasted potatoes. The coconut ginger rice is a traditional accompaniment, but feel free to explore other options.
Nutrition
This dish is a balanced meal with protein from the chicken, carbohydrates from the rice, and healthy fats from the coconut. It’s a great choice for a family meal, providing essential nutrients while being incredibly delicious.
Conclusion
Chicken Adobo & Coconut Ginger Rice is more than just a meal; it’s a culinary journey that brings comfort and nostalgia with each bite. Whether you’re sharing it with family or indulging in a quiet dinner for one, this dish promises satisfaction and smiles. So go ahead, gather your ingredients, and create your own memories with this timeless recipe. Enjoy!
Related update: Chicken Adobo & Coconut Ginger Rice